【datawhale组队学习】n8n - TASK04 n8n高阶:社区节点开发(第五章)
教程地址:https://github.com/datawhalechina/handy-n8n
社区节点
n8n 本身已经内置了很多三方应用集成的节点,例如 GitHub、Slack、Jira 等,这些节点都是 n8n 官方维护的节点,代码位于官方仓库中https://github.com/n8n-io/n8n/tree/master/packages/nodes-base/nodes。
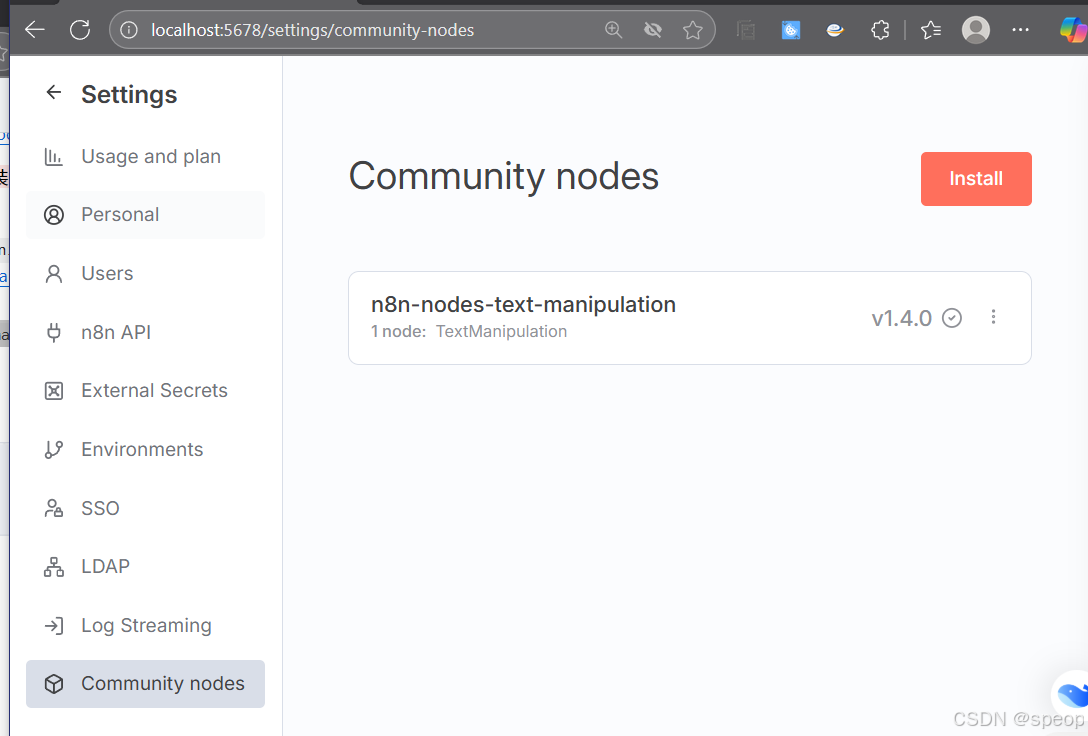
社区节点是 n8n 社区贡献的节点,由社区成员开发并维护,发布在 npm 上。安装社区节点步骤如下:
- 打开 n8n,点击左侧的 Settings,然后点击 Community nodes。
- 在 Community nodes 页面中,搜索你需要的节点,点击 Install a community node 按钮。
- n8n 弹出对话框,通过链接可以打开 npm 的搜索https://www.npmjs.com/search?q=keywords%3An8n-community-node-package。
- 找到想要安装的节点,复制其 npm 包名,这里我们使用 n8n-nodes-text-manipulation 作为测试。
- 回到 n8n 填入包名,勾选同意风险,点击 Install 按钮。
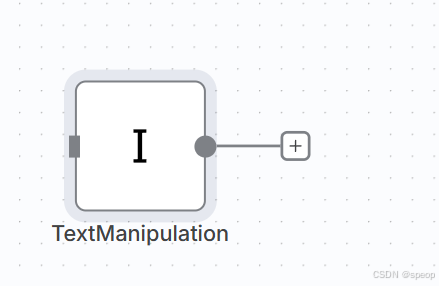
安装完成后,回到工作流编辑页面,添加节点时可以搜索到刚刚安装的社区节点
自定义节点开发
如果官方或者社区节点都没有你需要的节点,或者对于企业内部的服务需要与 n8n 集成,你可以自己开发一个节点。
n8n 官方提供了详细的文档和工具帮助开发者开发节点。以下我们以高德地图的天气服务为例,开发一个 天气服务节点。
申请高德地图API Key
首先我们需要申请一个高德地图的 API Key。
- 注册成为高德地图的开发者 https://console.amap.com/dev/id/phone,完成个人认证
- 通过开发者控制台https://console.amap.com/dev/key/app添加应用与 key,服务平台 可以选择 Web 服务
使用开发集成环境打开项目。如下是项目的目录结构:
├── CODE_OF_CONDUCT.md
├── credentials
│   ├── ExampleCredentialsApi.credentials.ts
│   └── HttpBinApi.credentials.ts
├── gulpfile.js
├── index.js
├── LICENSE.md
├── nodes
│   ├── ExampleNode
│   │   └── ExampleNode.node.ts
│   └── HttpBin
│       ├── HttpBin.node.json
│       ├── HttpBin.node.ts
│       ├── httpbin.svg
│       └── HttpVerbDescription.ts
├── package.json
├── package-lock.json
├── README.md
└── tsconfig.json
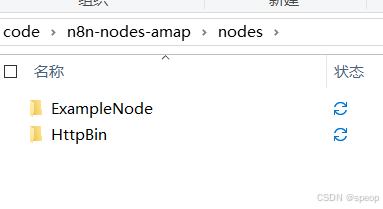
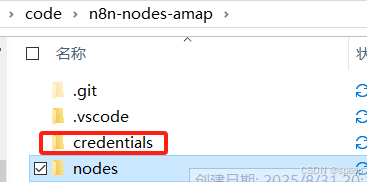
默认的模板提供了两个示例节点,分别为ExampleNode 和 HttpBin,位于 nodes 目录下。 其对应的鉴权代码位于 credentials 目录下。
n8n 官方提供两种节点开发方式,一种为 declarative-style,即申明式模式,另一种为 programmatic-style,即程序模式。一般针对 REST 风格的 API 可以使用申明式模式,而对于复杂 逻辑的 API 可以使用程序模式。官方推荐在绝大数场景都可以使用申明式模式。
申明式模式使用 JSON 对节点进行描述。
构建节点类
3. 在 nodes 目录下创建一个新的目录,命名为 AMap,用于存放高德地图的节点。
4. 在 AMap 目录下创建一个 AMap.node.js 文件,用于描述节点信息,主体结构如下
export class AMap implements INodeType {
	description: INodeTypeDescription = {
		// Basic node details will go here
		properties: [
		// Resources and operations will go here
		]
	};
}
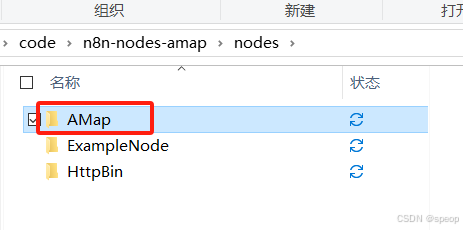
5. AMap即为 n8n 节点类,其属性description 为节点的描述信息,其类型为 INodeTypeDescription,包含通用的标准参数,以及declarative-style特有的参数。 如下是部分我们为 AMap 节点定义的参数,包括 name、icon、group、description、 inputs、outputs等,以及用于 REST 请求的默认配置requestDefaults。
	displayName: 'AMap高德地图',
	name: 'aMap',
	icon: 'file:amap.svg',
	group: ['input'],
	version: 1,
	subtitle: '={{$parameter["operation"]}}',
	description: 'Get information from AMap',
	inputs: [NodeConnectionType.Main],
	outputs: [NodeConnectionType.Main],
	defaults: {
		name: 'AMap高德地图',
	},
	requestDefaults: {
		baseURL: 'https://restapi.amap.com/v3',
		qs: {
			output: 'JSON',
		},
	},
properties 为节点支持的选项,为INodeProperties[]数组类型。沿用 RESTful 的理念,可以 定义资源resource以及针对资源的操作operation。这里我们定义一个资源为weather, 以及针对weather资源的两个操作getWeather和getForecast。
properties: [
	{
		displayName: 'Resource',
		name: 'resource',
		type: 'options',
		default: 'weather',
		noDataExpression: true,
		options: [
			{
				name: '天气',
				value: 'weather',
			},
		],
	},
	{
		displayName: 'Operation',
		name: 'operation',
		type: 'options',
		default: 'getWeather',
		noDataExpression: true,
		options: [
			{
				name: '获取实况天气',
				value: 'getWeather',
				action: '获取实况天气',
			},
			{
				name: '获取预报天气',
				value: 'getForecast',
				action: '获取预报天气',
			},
		],
	},
]
增加资源支持的参数配置,我们定义city参数,可以让用户指定城市编码。
{
	displayName: '城市编码',
	name: 'city',
	type: 'string',
	default: '110000',
	required: true,
	displayOptions: {
		show: {
			resource: ['weather'],
		},
	},
},
定义操作operation请求逻辑,需要在之前定义的操作operation配置中增加routing 属性,用于指定操作对应的请求逻辑。如下是获取实况天气的请求逻辑,包括请求 URL 以及参数
routing: {
	request: {
		method: 'GET',
		url: '/weather/weatherInfo',
		qs: {
			city: '={{$parameter["city"]}}',
			extensions: 'all',
		},
	},
},
export class AMap implements INodeType {
	description: INodeTypeDescription = {
	displayName: 'AMap高德地图',
	name: 'aMap',
	icon: 'file:amap.svg',
	group: ['input'],
	version: 1,
	subtitle: '={{$parameter["operation"]}}',
	description: 'Get information from AMap',
	inputs: [NodeConnectionType.Main],
	outputs: [NodeConnectionType.Main],
	defaults: {
		name: 'AMap高德地图',
	},
	requestDefaults: {
		baseURL: 'https://restapi.amap.com/v3',
		qs: {
			output: 'JSON',
		},
	},
		// Basic node details will go here
		properties: [
	{
		displayName: 'Resource',
		name: 'resource',
		type: 'options',
		default: 'weather',
		noDataExpression: true,
		options: [
			{
				name: '天气',
				value: 'weather',
			},
		],
	},
	{
		displayName: 'Operation',
		name: 'operation',
		type: 'options',
		default: 'getWeather',
		noDataExpression: true,
		options: [
			{
				name: '获取实况天气',
				value: 'getWeather',
				action: '获取实况天气',
			},
			{
				name: '获取预报天气',
				value: 'getForecast',
				action: '获取预报天气',
			},
		],
		routing: {
			request: {
				method: 'GET',
				url: '/weather/weatherInfo',
				qs: {
					city: '={{$parameter["city"]}}',
					extensions: 'all',
		},
	},
},
	},{
	displayName: '城市编码',
	name: 'city',
	type: 'string',
	default: '110000',
	required: true,
	displayOptions: {
		show: {
			resource: ['weather'],
		},
	},
},
]
	};
}
构建鉴权类
鉴权类在credentials目录下,其实现ICredentialType接口。AMap 接口使用key作为请求参数 进行鉴权,因此我们定义一个AMapApi类,用于配置key以及定义其在 REST 请求中的参数模式。
以下是AMapApi类的实现,
export class AMapApi implements ICredentialType {
	name = 'amapApi';
	displayName = 'AMap API';
	documentationUrl = 'https://lbs.amap.com/api/webservice/create-project-and-key';
	properties: INodeProperties[] = [
		{
			displayName: 'API Key',
			name: 'apiKey',
			type: 'string',
			typeOptions: {
				password: true,
			},
			default: '',
		},
	];
	authenticate: IAuthenticateGeneric = {
		type: 'generic',
		properties: {
			qs: {
				key: '={{$credentials.apiKey}}',
			},
		},
	};
}
其中authenticate属性定义了鉴权参数key通过qs模式添加到请求参数中。n8n 还支持auth、 header、body等多种鉴权模式。
最后回到AMap.node.json文件中,增加鉴权配置,
credentials: [
	{
		name: 'amapApi',
		required: true,
	},
],
其中amapApi对应AMapApi类中的name属性。
补充节点描述
最后我们需要补充节点描述信息,在AMap目录下创建AMap.node.json文件,内容如下,
{
	"node": "n8n-nodes-base.AMap",
	"nodeVersion": "1.0",
	"codexVersion": "1.0",
	"categories": ["Miscellaneous"],
	"resources": {
		"credentialDocumentation": [
			{
				"url": "https://lbs.amap.com/api/webservice/create-project-and-key"
			}
		],
		"primaryDocumentation": [
			{
				"url": "https://lbs.amap.com/api/webservice/summary"
			}
		]
	}
}
需要的文件
AMap.node.ts
import { INodeType, INodeTypeDescription, NodeConnectionType } from 'n8n-workflow';

export class AMap implements INodeType {
	description: INodeTypeDescription = {
		displayName: 'AMap高德地图',
		name: 'aMap',
		icon: 'file:amap.svg',
		group: ['input'],
		version: 1,
		subtitle: '={{$parameter["operation"]}}',
		description: 'Get information from AMap',
		inputs: [NodeConnectionType.Main],
		outputs: [NodeConnectionType.Main],
		defaults: {
			name: 'AMap高德地图',
		},
		properties: [
			{
				displayName: 'Resource',
				name: 'resource',
				type: 'options',
				default: 'weather',
				noDataExpression: true,
				options: [
					{
						name: '天气',
						value: 'weather',
					},
				],
			},
			{
				displayName: 'Operation',
				name: 'operation',
				type: 'options',
				default: 'getWeather',
				noDataExpression: true,
				options: [
					{
						name: '获取实况天气',
						value: 'getWeather',
						action: '获取实况天气',
						routing: {
							request: {
								method: 'GET',
								url: '/weather/weatherInfo',
								qs: {
									city: '={{$parameter["city"]}}',
									extensions: 'base',
								},
							},
						},
					},
					{
						name: '获取预报天气',
						value: 'getForecast',
						action: '获取预报天气',
						routing: {
							request: {
								method: 'GET',
								url: '/weather/weatherInfo',
								qs: {
									city: '={{$parameter["city"]}}',
									extensions: 'all',
								},
							},
						},
					},
				],
			},
			{
				displayName: '城市编码',
				name: 'city',
				type: 'string',
				default: '110000',
				required: true,
				displayOptions: {
					show: {
						resource: ['weather'],
					},
				},
			},
		],
		credentials: [
			{
				name: 'amapApi',
				required: true,
			},
		],
		requestDefaults: {
			baseURL: 'https://restapi.amap.com/v3',
			qs: {
				output: 'JSON',
			},
		},
	};
}
AMap.node.json
{
	"node": "n8n-nodes-base.AMap",
	"nodeVersion": "1.0",
	"codexVersion": "1.0",
	"categories": ["Miscellaneous"],
	"resources": {
		"credentialDocumentation": [
			{
				"url": "https://lbs.amap.com/api/webservice/create-project-and-key"
			}
		],
		"primaryDocumentation": [
			{
				"url": "https://lbs.amap.com/api/webservice/summary"
			}
		]
	}
}
安装 n8n,npm install n8n -g
进入项目目录,编译自定义节点,npm run build
使用link命令将编译后的自定义节点链接到全局,npm link
在 n8n 的数据目录下,创建custom目录(数据目录一般为~/.n8n),进入custom目录,执行npm init
在custom目录下,执行npm link n8n-nodes-amap
启动 n8n 服务,n8n start
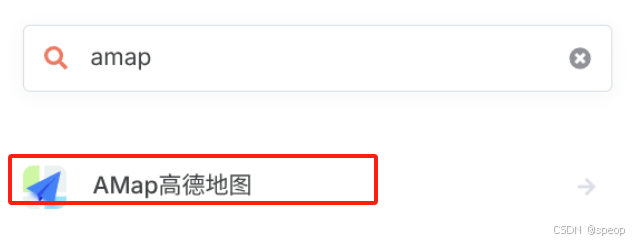
我们可以打开 n8n 的 web 界面,添加我们的自定义节点,在添加节点面板,搜索amap,可以看到我们的 自定义节点已经在 n8n 中自动加载

北京人形旗下天工造物具身智能开源社区,聚焦具身天工与慧思开物两大平台
更多推荐
 9
9 0
0- 0


 已为社区贡献2条内容

所有评论(0)