软件测试学习笔记丨接口自动化测试 用例设计
一,自动化框架介绍
1.1 接口测试工具类型
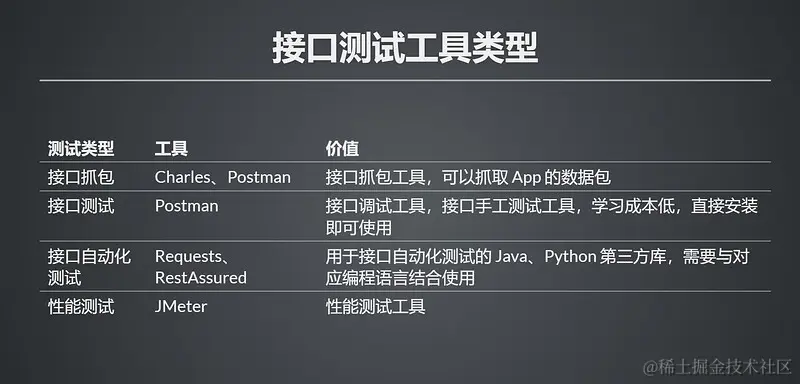
1.2 REST-assured介绍
- 是由 Java 实现的 REST API 测试框架。
- 支持发起 POST, GET, PUT, DELETE 等请求。
- 可以用来验证和校对响应信息。
1.3 REST-assured优势
- 支持多种数据格式:支持
xml/json的结构化解析。 - 内置断言库:支持
xpath/jsonpath/gpath解析方式。 - 可与多种测试框架集成:支持与 JUnit、TestNG 等测试框架集成。
1.4 REST-assured 环境依赖
html
复制代码
<!-- rest-assured 相关依赖 --> <properties> <rest-assured.version>5.3.0</rest-assured.version> </properties> <dependency> <groupId>io.rest-assured</groupId> <artifactId>rest-assured</artifactId> <version>${rest-assured.version}</version> </dependency>
1.5 附录:完整依赖配置参考
html
复制代码
<!-- 其他使用到的依赖配置 --> <!-- 版本配置--> <properties> <maven.compiler.encoding>UTF-8</maven.compiler.encoding> <java.version>11</java.version> <junit.jupiter.version>5.9.2</junit.jupiter.version> <maven.compiler.version>3.11.0</maven.compiler.version> <maven-surefire-plugin.version>3.0.0</maven-surefire-plugin.version> <rest-assured.version>5.3.0</rest-assured.version> <json-path.version>2.8.0</json-path.version> <!-- allure报告 --> <allure.version>2.21.0</allure.version> <aspectj.version>1.9.19</aspectj.version> <allure.maven.version>2.12.0</allure.maven.version> <allure.cmd.download.url> https://repo.maven.apache.org/maven2/io/qameta/allure/allure-commandline </allure.cmd.download.url> </properties> <dependencyManagement> <!-- junit5 版本管理, 找到对应依赖关系的 pom 文件,为了解决依赖冲突问题--> <dependencies> <dependency> <groupId>org.junit</groupId> <artifactId>junit-bom</artifactId> <version>${junit.jupiter.version}</version> <type>pom</type> <scope>import</scope> </dependency> </dependencies> </dependencyManagement> <dependencies> <!-- junit 相关依赖下载--> <!-- junit5 --> <dependency> <groupId>org.junit.jupiter</groupId> <artifactId>junit-jupiter</artifactId> <scope>test</scope> </dependency> <!-- junit5-suite --> <dependency> <groupId>org.junit.platform</groupId> <artifactId>junit-platform-suite</artifactId> <scope>test</scope> </dependency> <!-- 用做兼容老版本 --> <dependency> <groupId>org.junit.vintage</groupId> <artifactId>junit-vintage-engine</artifactId> <scope>test</scope> </dependency> <!-- rest-assured --> <dependency> <groupId>io.rest-assured</groupId> <artifactId>rest-assured</artifactId> <version>${rest-assured.version}</version> <scope>compile</scope> </dependency> <!-- json path 解析json文件 --> <dependency> <groupId>com.jayway.jsonpath</groupId> <artifactId>json-path</artifactId> <version>${json-path.version}</version> </dependency> <!-- allure报告--> <dependency> <groupId>io.qameta.allure</groupId> <artifactId>allure-junit5</artifactId> <version>${allure.version}</version> </dependency> <!-- https://mvnrepository.com/artifact/org.aspectj/aspectjweaver --> <dependency> <groupId>org.aspectj</groupId> <artifactId>aspectjweaver</artifactId> <version>${aspectj.version}</version> </dependency> </dependencies> <build> <plugins> <!-- maven 命令行执行插件--> <plugin> <groupId>org.apache.maven.plugins</groupId> <artifactId>maven-surefire-plugin</artifactId> <version>${maven-surefire-plugin.version}</version> <configuration> <argLine> -javaagent:"${settings.localRepository}/org/aspectj/aspectjweaver/${aspectj.version}/aspectjweaver-${aspectj.version}.jar" </argLine> </configuration> <!-- 防止maven与junit5使用依赖冲突的问题--> <dependencies> <dependency> <groupId>org.junit.jupiter</groupId> <artifactId>junit-jupiter-engine</artifactId> <version>${junit.jupiter.version}</version> </dependency> <dependency> <groupId>org.junit.vintage</groupId> <artifactId>junit-vintage-engine</artifactId> <version>${junit.jupiter.version}</version> </dependency> </dependencies> </plugin> <!-- maven 编译使用插件--> <plugin> <groupId>org.apache.maven.plugins</groupId> <artifactId>maven-compiler-plugin</artifactId> <version>${maven.compiler.version}</version> <configuration> <parameters>true</parameters> <source>${java.version}</source> <target>${java.version}</target> <encoding>${maven.compiler.encoding}</encoding> </configuration> </plugin> <plugin> <groupId>io.qameta.allure</groupId> <artifactId>allure-maven</artifactId> <version>${allure.maven.version}</version> <configuration> <reportVersion>${allure.version}</reportVersion> <allureDownloadUrl>${allure.cmd.download.url}/${allure.version}/allure-commandline-${allure.version}.zip</allureDownloadUrl> </configuration> </plugin> </plugins> </build>
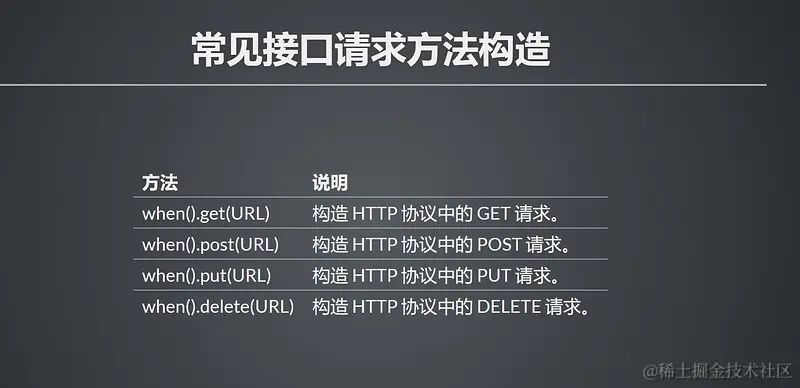
二,接口请求方法构造
三,接口请求参数
3.1 携带请求参数的方式
-
方式一:直接拼接在 URL 中:
-
?username=Hogwarts&id=666
-
-
方式二:通过
given()的queryParam()传递:queryParam():单个URL参数。queryParams():多个URL参数。
java
复制代码
package request; import org.junit.jupiter.api.Test; import java.util.HashMap; import static io.restassured.RestAssured.*; public class TestParams { //方式一:通过url拼接 @Test void getUrlParam(){ when() .get("https://httpbin.ceshiren.com/get?name=ad&scholl=hogwarts") .then() .log().all(); } //方式二:通过given()的queryParam()传递 @Test void getQueryParam(){ given() .queryParam("name","ad") .queryParam("school", "hogwarts") .when() .get("https://httpbin.ceshiren.com/get") .then() .log().all(); } //传递多个url参数的情况 @Test void getQueryParams(){ HashMap<String,Object> query = new HashMap<>(); query.put("name","ad"); query.put("school", "lites"); given() .log().all() .queryParams(query) .when() .get("https://httpbin.ceshiren.com/get") .then() .log().all(); } }
3.2 接口测试框架基本使用
java
复制代码
given() // given 设置测试预设 .header("Hello", "Hogwarts") .when() // when 所要执行的请求动作 .get("https://httpbin.ceshiren.com/get") .then() // then 解析结果、断言 .log().all(); // 打印全部响应信息(响应头、响应体、状态等等)
3.2.1 准备数据 given():
-
打印请求全部日志:
log().all() -
URL请求参数:
queryParam(),queryParams() -
设置 Content-Type:
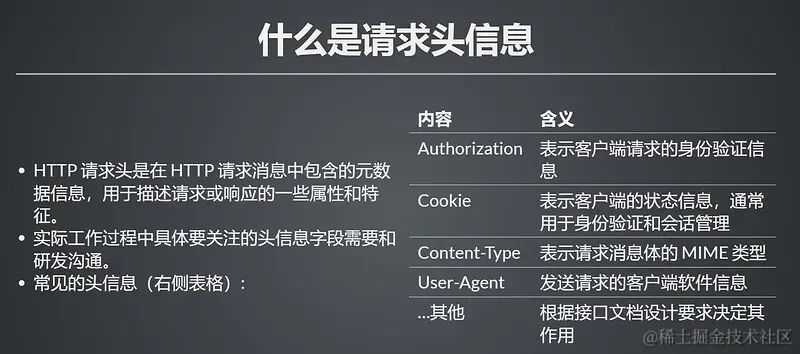
contentType() -
添加 header:
headers() -
添加cookie:
cookie()- 常用的请求头信息参数:
-
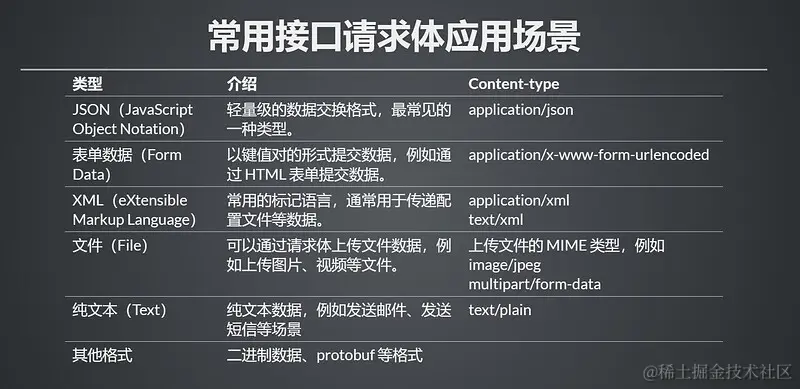
请求体:
body()- 常用接口请求体数据类型
-
json类型介绍
-
是 JavaScript Object Notation 的缩写。
-
是一种轻量级的数据交换格式。
-
是理想的接口数据交换语言。
-
Content-Type 为 application/json。
-
-
json类型接口请求体构造
- 通过
given().body(jsonData)添加请求体信息:-
JSON 对象 。
-
直接复制 String 。
-
- 通过
-
代码示例:
java
复制代码
package request; import net.minidev.json.JSONObject; import org.junit.jupiter.api.Test; import static io.restassured.RestAssured.given; public class TestJson { @Test void postJson(){ //请求体信息为json对象 JSONObject jsonData = new JSONObject(); jsonData.put("username","hogwarts"); jsonData.put("password","test12345"); given() .body(jsonData).log().all() .when() .post("https://litemall.hogwarts.ceshiren.com/admin/auth/login") .then() .log().all(); } @Test void StringPostJson(){ //直接复制String String jsonData = "{"username":"hogwarts","password":"test12345","code":""}"; given() .body(jsonData).log().all() .when() .post("https://litemall.hogwarts.ceshiren.com/admin/auth/login") .then() .log().all(); } }
- 其他:…
3.2.2 发送请求 when():
- get请求:
get()。 - post请求:
post()。 - put请求:
put()。 - delete请求:
delete()。
3.2.3 验证返回结果then() - 断言:
- 打印全部日志:
log().all() - 验证响应状态码:
statusCode() - 验证响应体 :
-
直接断言
then().body()-
结合 hamcrest 使用。
-
body("想要提取的信息", 预期结果操作)。 -
使用 gpath 语法提取。
-
-
提取后断言
then().extract().path()
-
- 其他:…
代码示例:
java
复制代码
package request; import org.junit.jupiter.api.Test; import java.util.ArrayList; import static io.restassured.RestAssured.given; import static org.hamcrest.Matchers.equalTo; import static org.hamcrest.Matchers.hasItem; public class TestAssertionBody { //直接断言 @Test void jsonBody(){ String jsonData = "{"username":"hogwarts","password":"test12345","code":[1,2,3]}"; given() .body(jsonData) .when() .post("https://httpbin.hogwarts.ceshiren.com/post") .then() .log().all() // 结合hamcrest响应体断言 .body("origin", equalTo("58.252.5.71, 182.92.156.22")) .body("headers.Host", equalTo("httpbin.hogwarts.ceshiren.com")) //判断元素是否包含 .body("json.code", hasItem(1)); } //提取后断言:需要断言的参数要提供给其他接口调用时,需要用提取后断言 @Test void extractJson(){ String jsonData = "{"username":"hogwarts","password":"test12345","code":[1,2,3]}"; // 响应嵌套提取。 ArrayList data = given() .body(jsonData) .when() .post("https://httpbin.hogwarts.ceshiren.com/post") .then() .log().all() //extract(): 提取方法,返回值为Response //path(): 从返回值中提取想要的信息(使用 gpath 语法) .extract().path("json.code"); System.out.println("code = " + data); // 提取数组中的元素 Integer arrData =given() .body(jsonData) .when() .post("https://httpbin.hogwarts.ceshiren.com/post") .then() .extract().path("json.code[0]"); System.out.println("code第一位元素 = " + arrData); } }
总结
如果你对此文有任何疑问,如果你也需要接口项目实战,如果你对软件测试、接口测试、自动化测试、面试经验交流感兴趣欢迎加入我们,加入方式在文章的最后面
自动化测试相关教程推荐:
2023最新自动化测试自学教程新手小白26天入门最详细教程,目前已有300多人通过学习这套教程入职大厂!!_哔哩哔哩_bilibili
2023最新合集Python自动化测试开发框架【全栈/实战/教程】合集精华,学完年薪40W+_哔哩哔哩_bilibili
测试开发相关教程推荐
2023全网最牛,字节测试开发大佬现场教学,从零开始教你成为年薪百万的测试开发工程师_哔哩哔哩_bilibili
postman/jmeter/fiddler测试工具类教程推荐
讲的最详细JMeter接口测试/接口自动化测试项目实战合集教程,学jmeter接口测试一套教程就够了!!_哔哩哔哩_bilibili
2023自学fiddler抓包,请一定要看完【如何1天学会fiddler抓包】的全网最详细视频教程!!_哔哩哔哩_bilibili
2023全网封神,B站讲的最详细的Postman接口测试实战教学,小白都能学会_哔哩哔哩_bilibili
总结:
光学理论是没用的,要学会跟着一起敲,要动手实操,才能将自己的所学运用到实际当中去,这时候可以搞点实战案例来学习。
如果对你有帮助的话,点个赞收个藏,给作者一个鼓励。也方便你下次能够快速查找。
如有不懂还要咨询下方小卡片,博主也希望和志同道合的测试人员一起学习进步
在适当的年龄,选择适当的岗位,尽量去发挥好自己的优势。
我的自动化测试开发之路,一路走来都离不每个阶段的计划,因为自己喜欢规划和总结,
测试开发视频教程、学习笔记领取传送门!!


北京人形旗下天工造物具身智能开源社区,聚焦具身天工与慧思开物两大平台
更多推荐
 3
3 0
0- 0


 已为社区贡献12条内容

所有评论(0)