webrtcP2P音视频通话(一)
文章目录
关联:
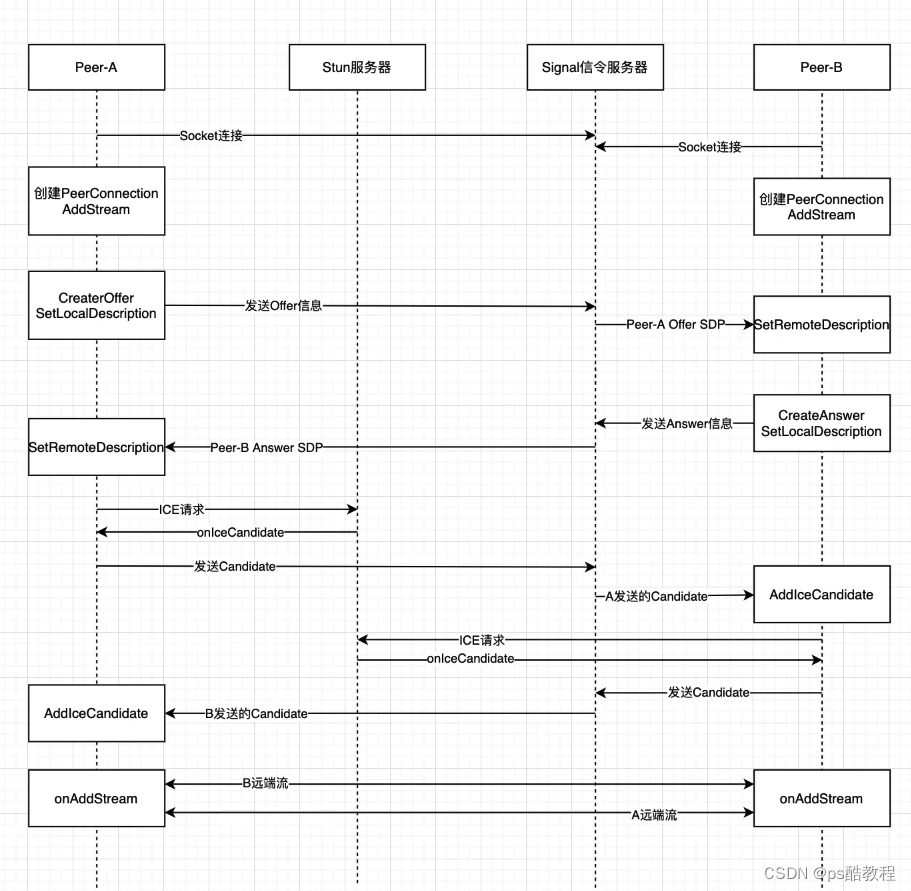
webrtcP2P通话流程
在这里,stun服务器包括stun服务和turn转发服务。信令服服务还包括im等功能
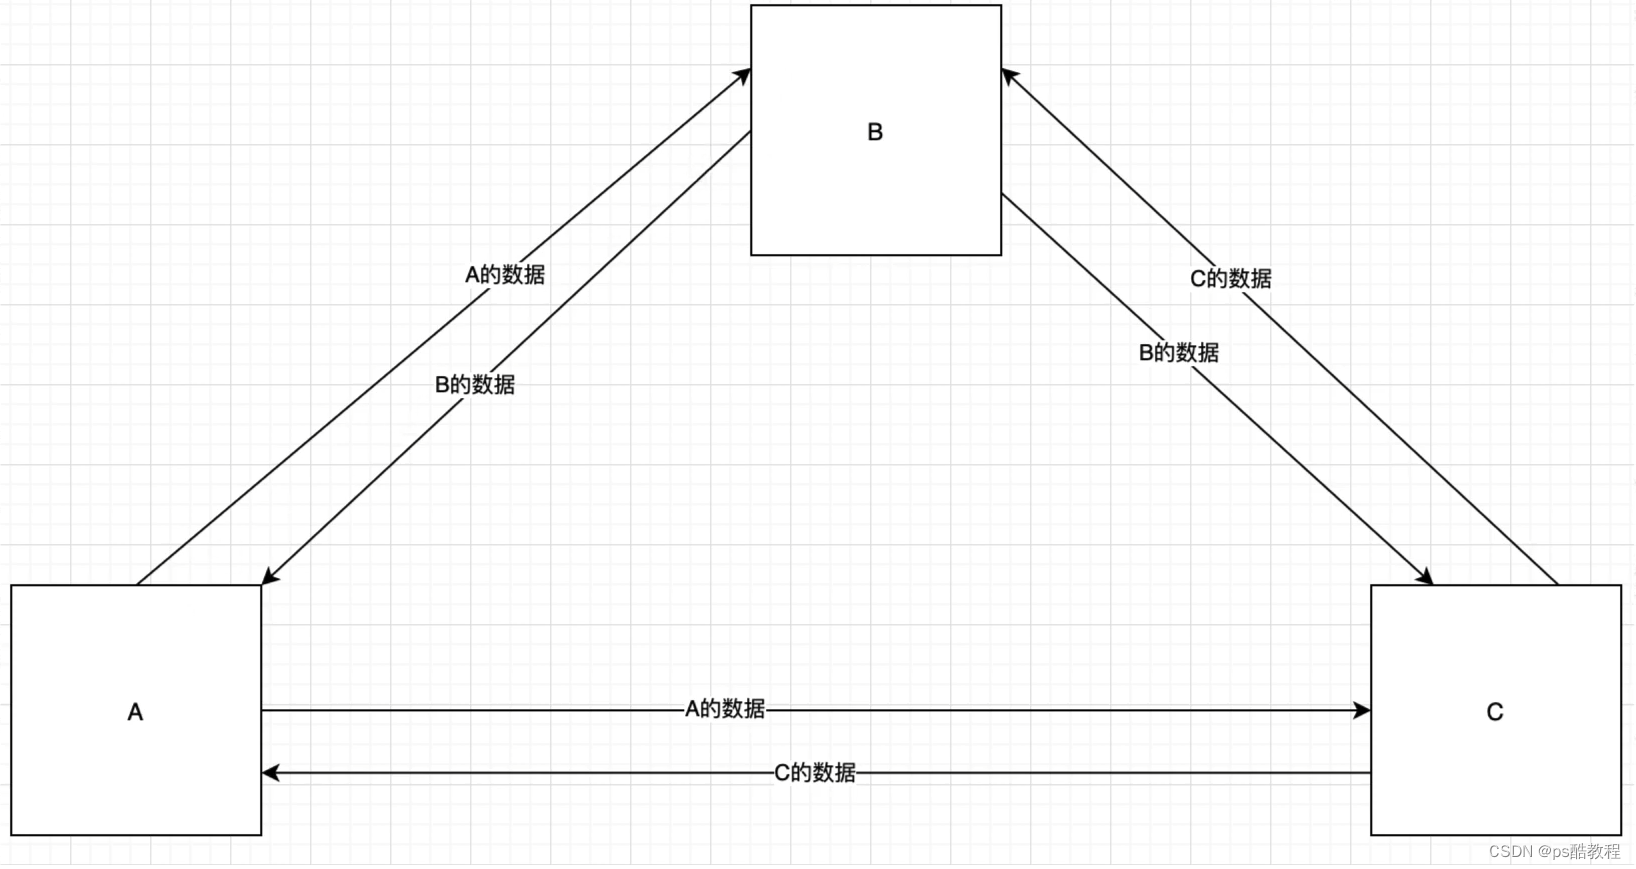
webrtc多对多 mesh方案
适合人数较少的场景
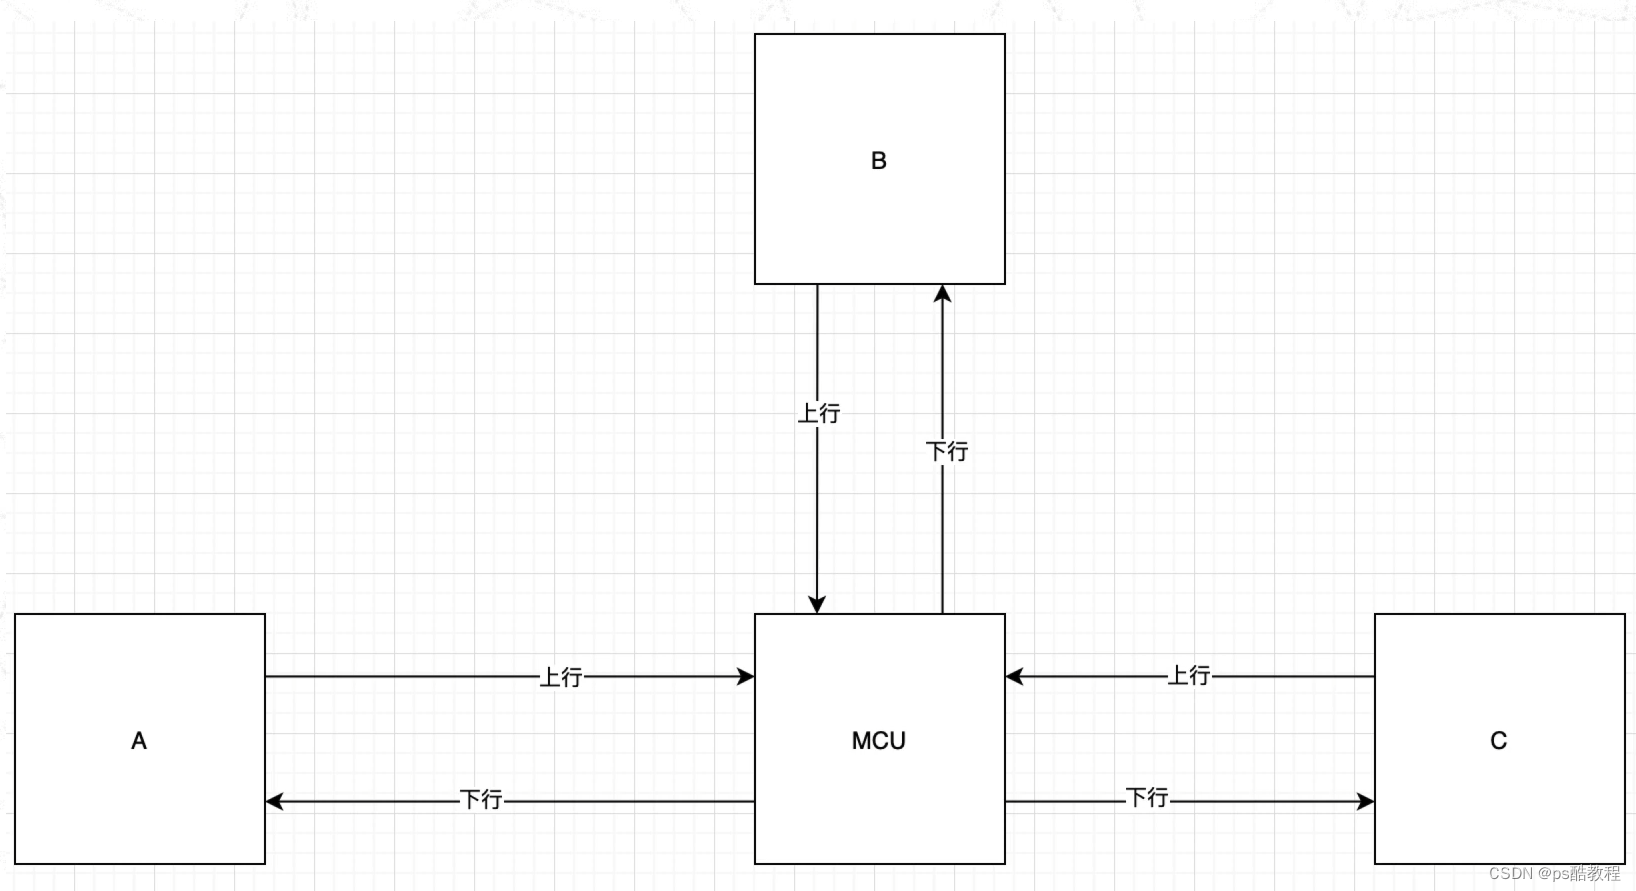
webrtc多对多 mcu方案
(multipoint control point)将上行的视频/音频合成,然后分发。对客户端来说压力不大,但对服务器消耗较大,但节省带宽。适合开会人多会议场景。
webrtc多对多 sfu方案
(selective forwarding unit)对服务器压力小,不需要太高配置,但对带宽要求较高,流量消耗大。
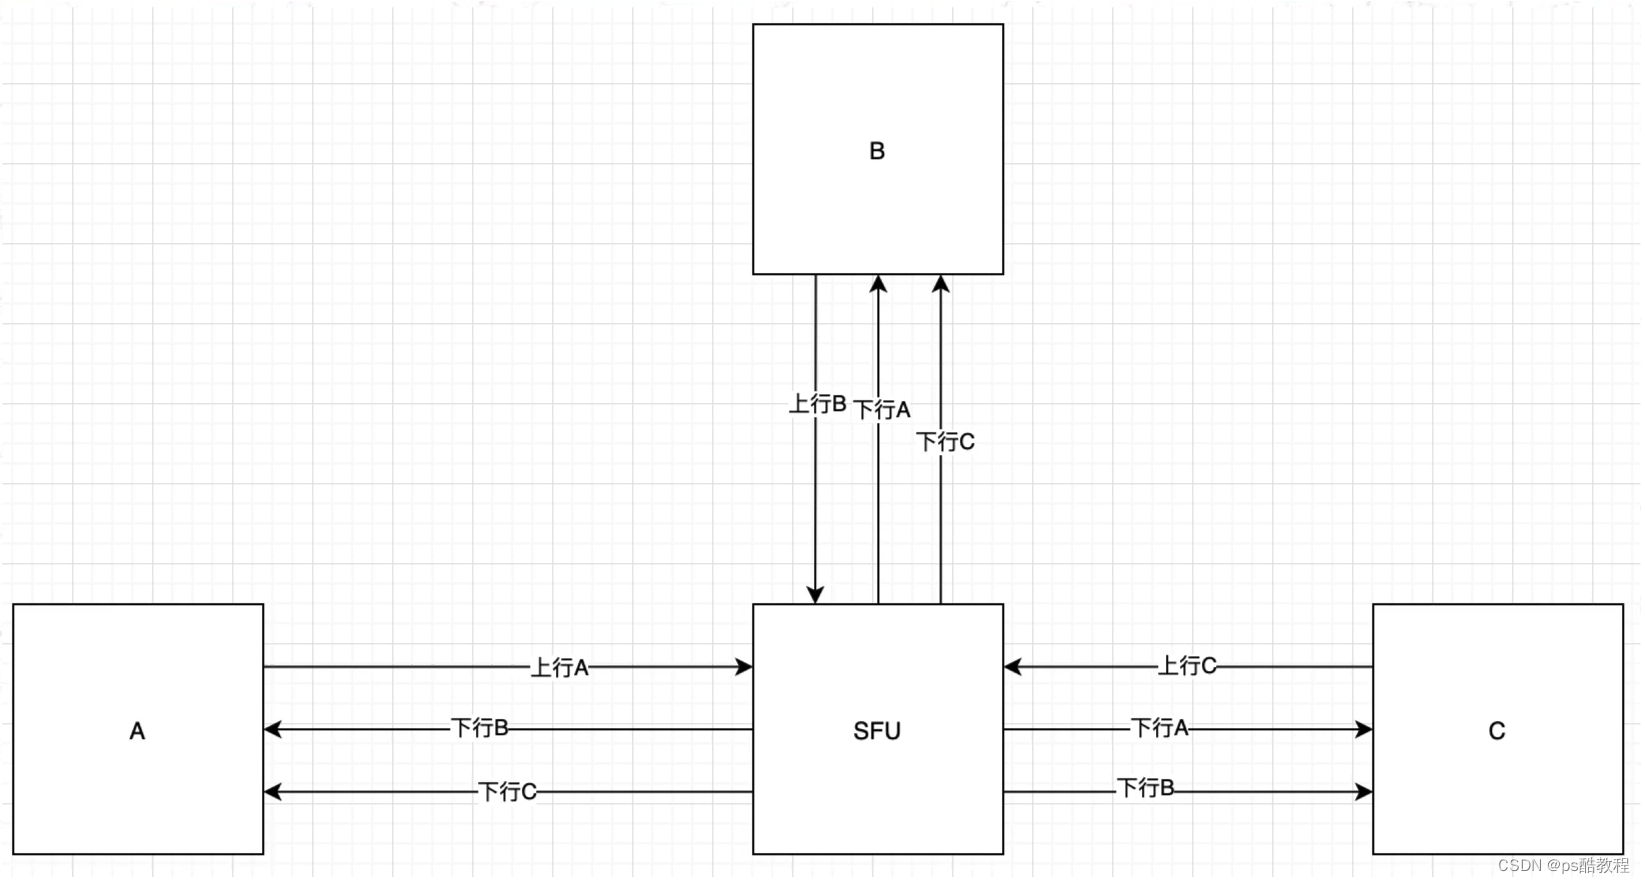
在sfu中,它们的通信过程如下
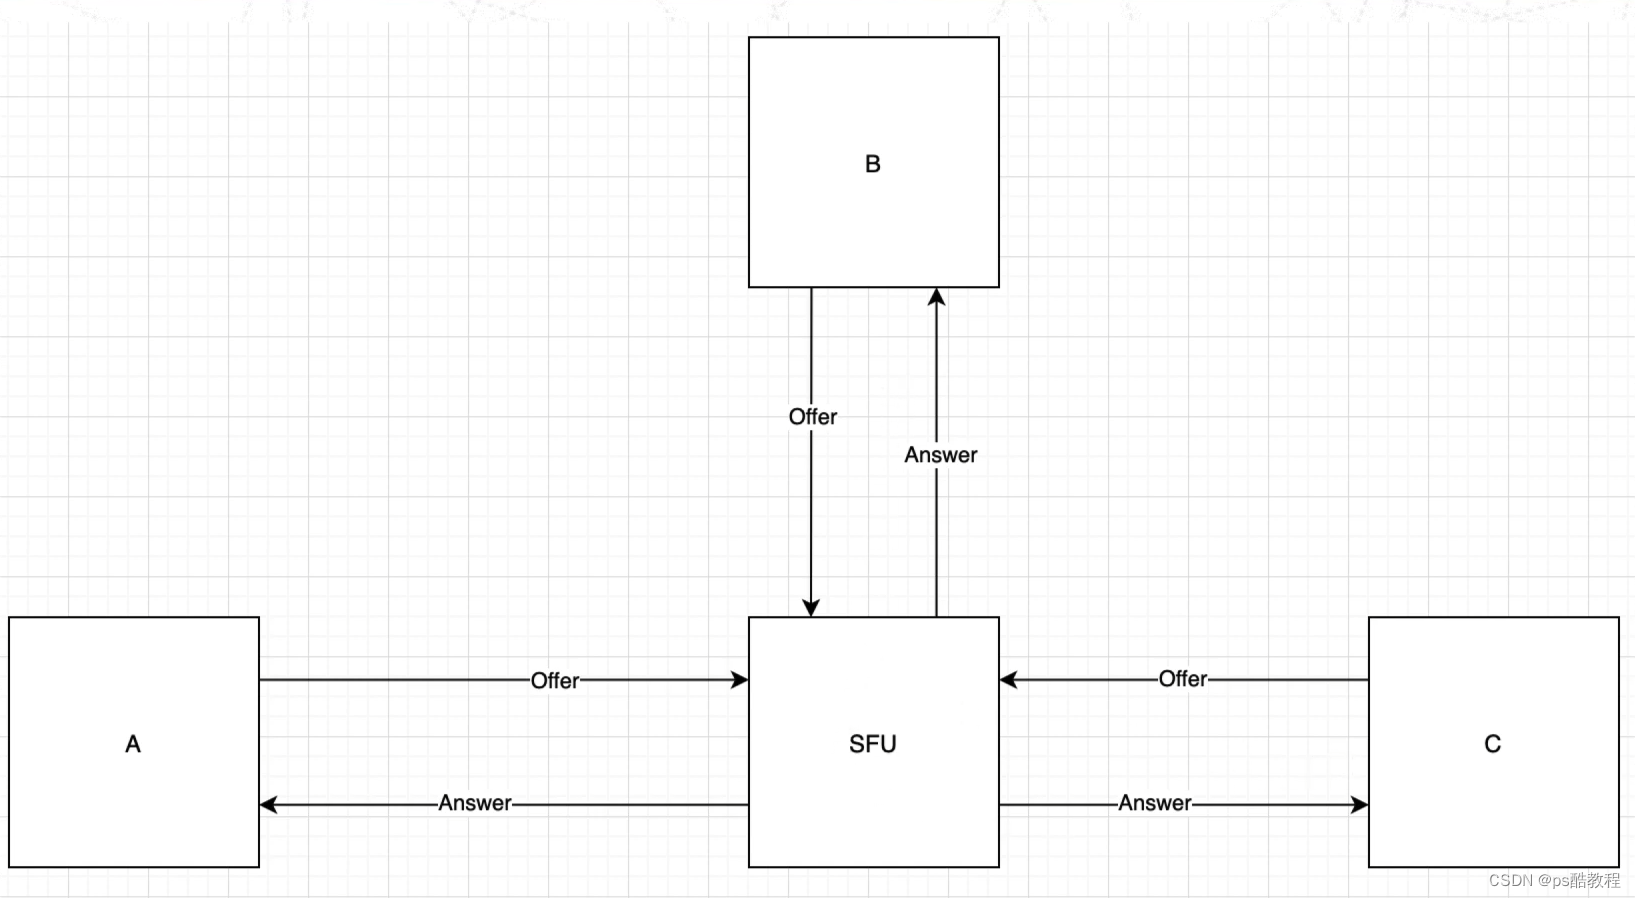
再单独看下客户端与sfu的通信过程,并且在sfu内部的流媒体转发过程
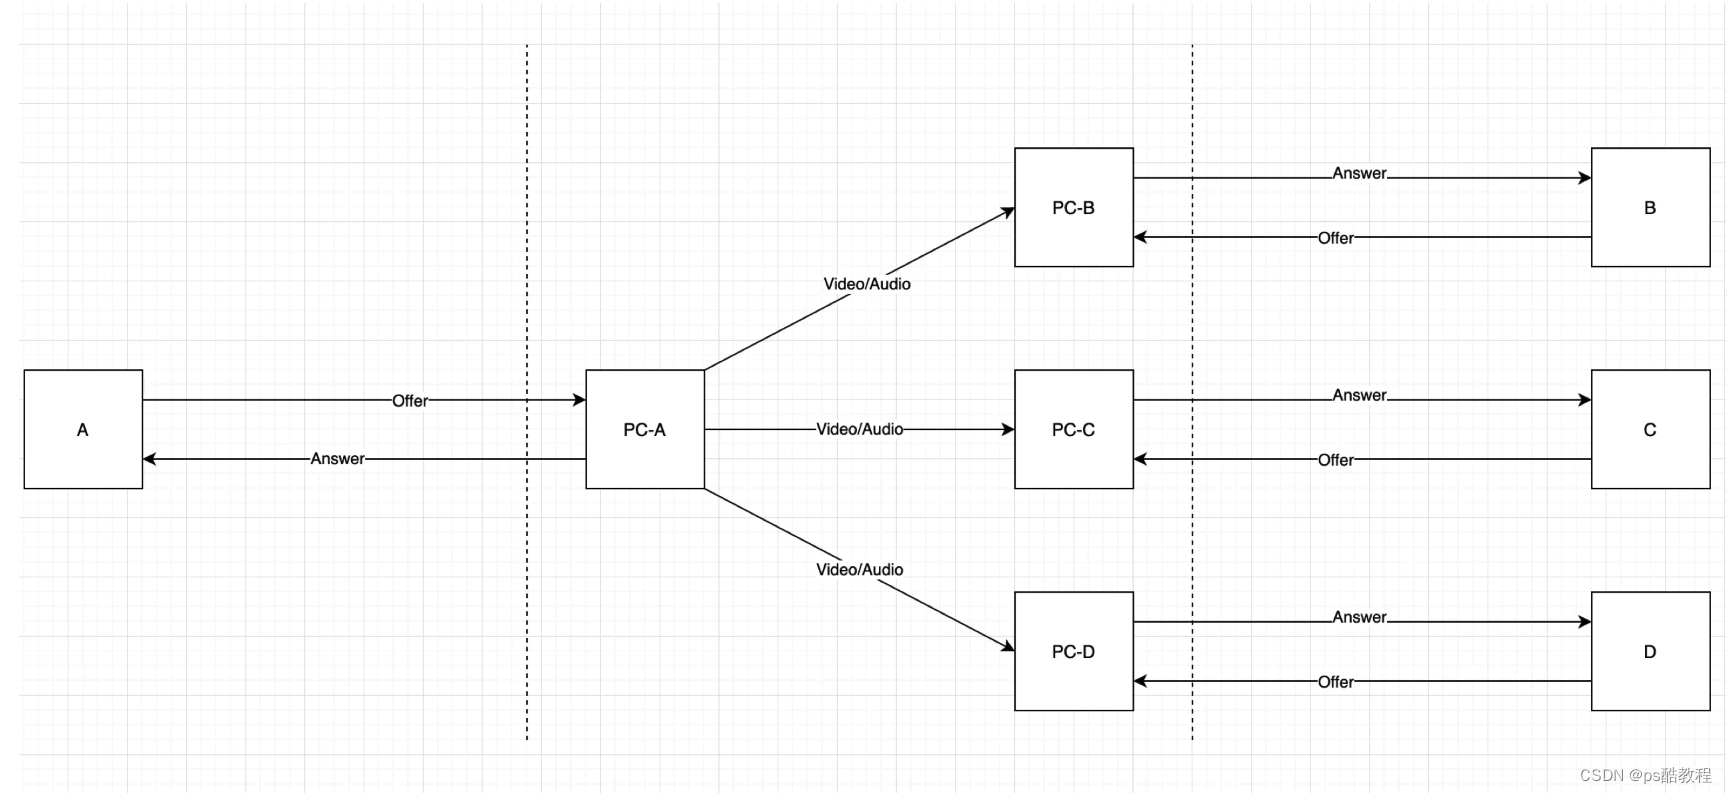
webrtc案例测试
samples代码 https://github.com/webrtc/samples?tab=readme-ov-file
要注意的一点是,如果不是本机地址,那就需要https,否则获取媒体的方法会调用不了
里面有不少示例,需要花时间看看
<!DOCTYPE html>
<!--
 *  Copyright (c) 2015 The WebRTC project authors. All Rights Reserved.
 *
 *  Use of this source code is governed by a BSD-style license
 *  that can be found in the LICENSE file in the root of the source
 *  tree.
-->
<html>
<head>

    <meta charset="utf-8">
    <meta name="description" content="WebRTC Javascript code samples">
    <meta name="viewport" content="width=device-width, user-scalable=yes, initial-scale=1, maximum-scale=1">
    <meta itemprop="description" content="Client-side WebRTC code samples">
    <meta itemprop="image" content="src/images/webrtc-icon-192x192.png">
    <meta itemprop="name" content="WebRTC code samples">
    <meta name="mobile-web-app-capable" content="yes">
    <meta id="theme-color" name="theme-color" content="#ffffff">

    <base target="_blank">

    <title>WebRTC samples</title>

    <link rel="icon" sizes="192x192" href="src/images/webrtc-icon-192x192.png">
    <link href="https://fonts.googleapis.com/css?family=Roboto:300,400,500,700" rel="stylesheet" type="text/css">
    <link rel="stylesheet" href="src/css/main.css"/>

    <style>
        h2 {
            font-size: 1.5em;
            font-weight: 500;
        }

        h3 {
            border-top: none;
        }

        section {
            border-bottom: 1px solid #eee;
            margin: 0 0 1.5em 0;
            padding: 0 0 1.5em 0;
        }

        section:last-child {
            border-bottom: none;
            margin: 0;
            padding: 0;
        }
    </style>
</head>

<body>
<div id="container">

    <h1>WebRTC samples</h1>

    <section>

        <p>
            This is a collection of small samples demonstrating various parts of the <a
                href="https://developer.mozilla.org/en-US/docs/Web/API/WebRTC_API">WebRTC APIs</a>. The code for all
            samples are available in the <a href="https://github.com/webrtc/samples">GitHub repository</a>.
        </p>

        <p>Most of the samples use <a href="https://github.com/webrtc/adapter">adapter.js</a>, a shim to insulate apps
            from spec changes and prefix differences.</p>

        <p><a href="https://webrtc.org/getting-started/testing" title="Command-line flags for WebRTC testing">https://webrtc.org/getting-started/testing</a>
            lists command line flags useful for development and testing with Chrome.</p>

        <p>Patches and issues welcome! See <a href="https://github.com/webrtc/samples/blob/gh-pages/CONTRIBUTING.md">CONTRIBUTING.md</a>
            for instructions.</p>

        <p class="warning"><strong>Warning:</strong> It is highly recommended to use headphones when testing these
            samples, as it will otherwise risk loud audio feedback on your system.</p>
    </section>

    <section>

        <h2 id="getusermedia"><a href="https://developer.mozilla.org/en-US/docs/Web/API/MediaDevices/getUserMedia">getUserMedia():</a>
        </h2>
        <p class="description">Access media devices</p>
        <ul>
            <li><a href="src/content/getusermedia/gum/">Basic getUserMedia demo</a></li>

            <li><a href="src/content/getusermedia/canvas/">Use getUserMedia with canvas</a></li>

            <li><a href="src/content/getusermedia/filter/">Use getUserMedia with canvas and CSS filters</a></li>

            <li><a href="src/content/getusermedia/resolution/">Choose camera resolution</a></li>

            <li><a href="src/content/getusermedia/audio/">Audio-only getUserMedia() output to local audio element</a>
            </li>

            <li><a href="src/content/getusermedia/volume/">Audio-only getUserMedia() displaying volume</a></li>

            <li><a href="src/content/getusermedia/record/">Record stream</a></li>

            <li><a href="src/content/getusermedia/getdisplaymedia/">Screensharing with getDisplayMedia</a></li>

            <li><a href="src/content/getusermedia/pan-tilt-zoom/">Control camera pan, tilt, and zoom</a></li>

            <li><a href="src/content/getusermedia/exposure/">Control exposure</a></li>
        </ul>
        <h2 id="devices">Devices:</h2>
        <p class="description">Query media devices</p>
        <ul>
            <li><a href="src/content/devices/input-output/">Choose camera, microphone and speaker</a></li>

            <li><a href="src/content/devices/multi/">Choose media source and audio output</a></li>
        </ul>

        <h2 id="capture">Stream capture:</h2>
        <p class="description">Stream from canvas or video elements</p>
        <ul>

            <li><a href="src/content/capture/video-video/">Stream from a video element to a video element</a></li>

            <li><a href="src/content/capture/video-pc/">Stream from a video element to a peer connection</a></li>

            <li><a href="src/content/capture/canvas-video/">Stream from a canvas element to a video element</a></li>

            <li><a href="src/content/capture/canvas-pc/">Stream from a canvas element to a peer connection</a></li>

            <li><a href="src/content/capture/canvas-record/">Record a stream from a canvas element</a></li>

            <li><a href="src/content/capture/video-contenthint/">Guiding video encoding with content hints</a></li>
        </ul>

        <h2 id="peerconnection"><a href="https://developer.mozilla.org/en-US/docs/Web/API/RTCPeerConnection">RTCPeerConnection:</a>
        </h2>
        <p class="description">Controlling peer connectivity</p>
        <ul>
            <li><a href="src/content/peerconnection/pc1/">Basic peer connection demo in a single tab</a></li>

            <li><a href="src/content/peerconnection/channel/">Basic peer connection demo between two tabs</a></li>

            <li><a href="src/content/peerconnection/perfect-negotiation/">Peer connection using Perfect Negotiation</a></li>

            <li><a href="src/content/peerconnection/audio/">Audio-only peer connection demo</a></li>

            <li><a href="src/content/peerconnection/bandwidth/">Change bandwidth on the fly</a></li>

            <li><a href="src/content/peerconnection/change-codecs/">Change codecs before the call</a></li>

            <li><a href="src/content/peerconnection/upgrade/">Upgrade a call and turn video on</a></li>

            <li><a href="src/content/peerconnection/multiple/">Multiple peer connections at once</a></li>

            <li><a href="src/content/peerconnection/multiple-relay/">Forward the output of one PC into another</a></li>

            <li><a href="src/content/peerconnection/munge-sdp/">Munge SDP parameters</a></li>

            <li><a href="src/content/peerconnection/pr-answer/">Use pranswer when setting up a peer connection</a></li>

            <li><a href="src/content/peerconnection/constraints/">Constraints and stats</a></li>

            <li><a href="src/content/peerconnection/old-new-stats/">More constraints and stats</a></li>

            <li><a href="src/content/peerconnection/per-frame-callback/">RTCPeerConnection and requestVideoFrameCallback()</a></li>

            <li><a href="src/content/peerconnection/create-offer/">Display createOffer output for various scenarios</a>
            </li>

            <li><a href="src/content/peerconnection/dtmf/">Use RTCDTMFSender</a></li>

            <li><a href="src/content/peerconnection/states/">Display peer connection states</a></li>

            <li><a href="src/content/peerconnection/trickle-ice/">ICE candidate gathering from STUN/TURN servers</a>
            </li>

            <li><a href="src/content/peerconnection/restart-ice/">Do an ICE restart</a></li>

            <li><a href="src/content/peerconnection/webaudio-input/">Web Audio output as input to peer connection</a>
            </li>

            <li><a href="src/content/peerconnection/webaudio-output/">Peer connection as input to Web Audio</a></li>
            <li><a href="src/content/peerconnection/negotiate-timing/">Measure how long renegotiation takes</a></li>
            <li><a href="src/content/extensions/svc/">Choose scalablilityMode before call - Scalable Video Coding (SVC) Extension </a></li>
        </ul>
        <h2 id="datachannel"><a
                href="https://developer.mozilla.org/en-US/docs/Web/API/RTCDataChannel">RTCDataChannel:</a></h2>
        <p class="description">Send arbitrary data over peer connections</p>
        <ul>
            <li><a href="src/content/datachannel/basic/">Transmit text</a></li>

            <li><a href="src/content/datachannel/filetransfer/">Transfer a file</a></li>

            <li><a href="src/content/datachannel/datatransfer/">Transfer data</a></li>

            <li><a href="src/content/datachannel/channel/">Basic datachannel demo between two tabs</a></li>

            <li><a href="src/content/datachannel/messaging/">Messaging</a></li>
        </ul>

        <h2 id="videoChat">Video chat:</h2>
        <p class="description">Full featured WebRTC application</p>
        <ul>

            <li><a href="https://github.com/webrtc/apprtc/">AppRTC video chat client</a> that you can run out of a Docker image</li>

        </ul>

        <h2 id="capture">Insertable Streams:</h2>
        <p class="description">API for processing media</p>
        <ul>
            <li><a href="src/content/insertable-streams/endtoend-encryption">End to end encryption using WebRTC Insertable Streams</a></li> (Experimental)
            <li><a href="src/content/insertable-streams/video-analyzer">Video analyzer using WebRTC Insertable Streams</a></li> (Experimental)
            <li><a href="src/content/insertable-streams/video-processing">Video processing using MediaStream Insertable Streams</a></li> (Experimental)
            <li><a href="src/content/insertable-streams/audio-processing">Audio processing using MediaStream Insertable Streams</a></li> (Experimental)
            <li><a href="src/content/insertable-streams/video-crop">Video cropping using MediaStream Insertable Streams in a Worker</a></li> (Experimental)
            <li><a href="src/content/insertable-streams/webgpu">Integrations with WebGPU for custom video rendering:</a></li> (Experimental)
        </ul>

    </section>

</div>

<script src="src/js/lib/ga.js"></script>

</body>
</html>
getUserMedia
getUserMedia基础示例-打开摄像头
<template>
    <video ref="videoRef" autoplay playsinline></video>
    <button @click="openCamera">打开摄像头</button>
    <button @click="closeCamera">关闭摄像头</button>
</template>

<script lang="ts" setup name="gum">

import { ref } from 'vue';

const videoRef = ref()

let stream = null

// 打开摄像头
const openCamera = async function () {

    stream = await navigator.mediaDevices.getUserMedia({
        audio: false,
        video: true
    });

    const videoTracks = stream.getVideoTracks();
    console.log(`Using video device: ${videoTracks[0].label}`);

    videoRef.value.srcObject = stream

}

// 关闭摄像头
const closeCamera = function() {
    const videoTracks = stream.getVideoTracks();
    stream.getTracks().forEach(function(track) {
        track.stop();
    });
}

</script>
getUserMedia + canvas - 截图
<template>
    <video ref="videoRef" autoplay playsinline></video>
    <button @click="shootScreen">截图</button>
    <button @click="closeCamera">关闭摄像头</button>

    <canvas ref="canvasRef"></canvas>
</template>

<script lang="ts" setup name="gum">

import { ref, onMounted } from 'vue';

const videoRef = ref()
const canvasRef = ref()
let stream = null


onMounted(() => {

    canvasRef.value.width = 480;
    canvasRef.value.height = 360;


    // 打开摄像头
    const openCamera = async function () {

        stream = await navigator.mediaDevices.getUserMedia({
            audio: false,
            video: true
        });

        const videoTracks = stream.getVideoTracks();
        console.log(`Using video device: ${videoTracks[0].label}`);

        videoRef.value.srcObject = stream

    }
    openCamera()

})

// 截图
const shootScreen = function () {
    canvasRef.value.width = videoRef.value.videoWidth;
    canvasRef.value.height = videoRef.value.videoHeight;
    canvasRef.value.getContext('2d').drawImage(videoRef.value, 0, 0, canvasRef.value.width, canvasRef.value.height);
}

// 关闭摄像头
const closeCamera = function() {
    const videoTracks = stream.getVideoTracks();
    stream.getTracks().forEach(function(track) {
        track.stop();
    });
}
</script>
getDisplayMedia
打开共享屏幕
<template>
    <video ref="myVideoRef" autoPlay playsinline  width="50%"></video>
    <button @click="openCarmera">打开共享屏幕</button>
</template>

<script lang="ts" setup name="App">

    import {ref} from 'vue'

    const myVideoRef = ref()

    // 打开共享屏幕的代码
    const openScreen = async ()=>{
        const constraints = {video: true}
        try{
            const stream = await navigator.mediaDevices.getDisplayMedia(constraints);
            const videoTracks = stream.getTracks();
            console.log('使用的设备是: ' + videoTracks[0].label)
            myVideoRef.value.srcObject = stream
        }catch(error) {

        }
    }

</script>
黑马webrtc视频笔记
代码在:https://gitee.com/zzhua195/webrtc-heima
背景
随着互联网技术的飞速发展,实时音视频通话已经成为在线教育、远程办公、社交媒体等领域的核心且常用的功能。WebRTC(Web Real-Time Communication)作为一项开放的实时通信标准,为开发者提供了快速构建实时音视频通话系统的能力。在本课程中,我们将从0到1使用 WebRTC 构建一个基于 P2P 架构的音视频通话的应用案例。
应用场景
- 点对点视频聊天:如 微信视频 等实时视频通话应用。
- 多人视频会议:企业级多人视频会议系统,如飞书、钉钉、腾讯会议等。
- 在线教育:如腾讯课堂、网易云课堂等。
- 直播:游戏直播、课程直播等。
P2P通信原理
P2P 通信即点对点通信。
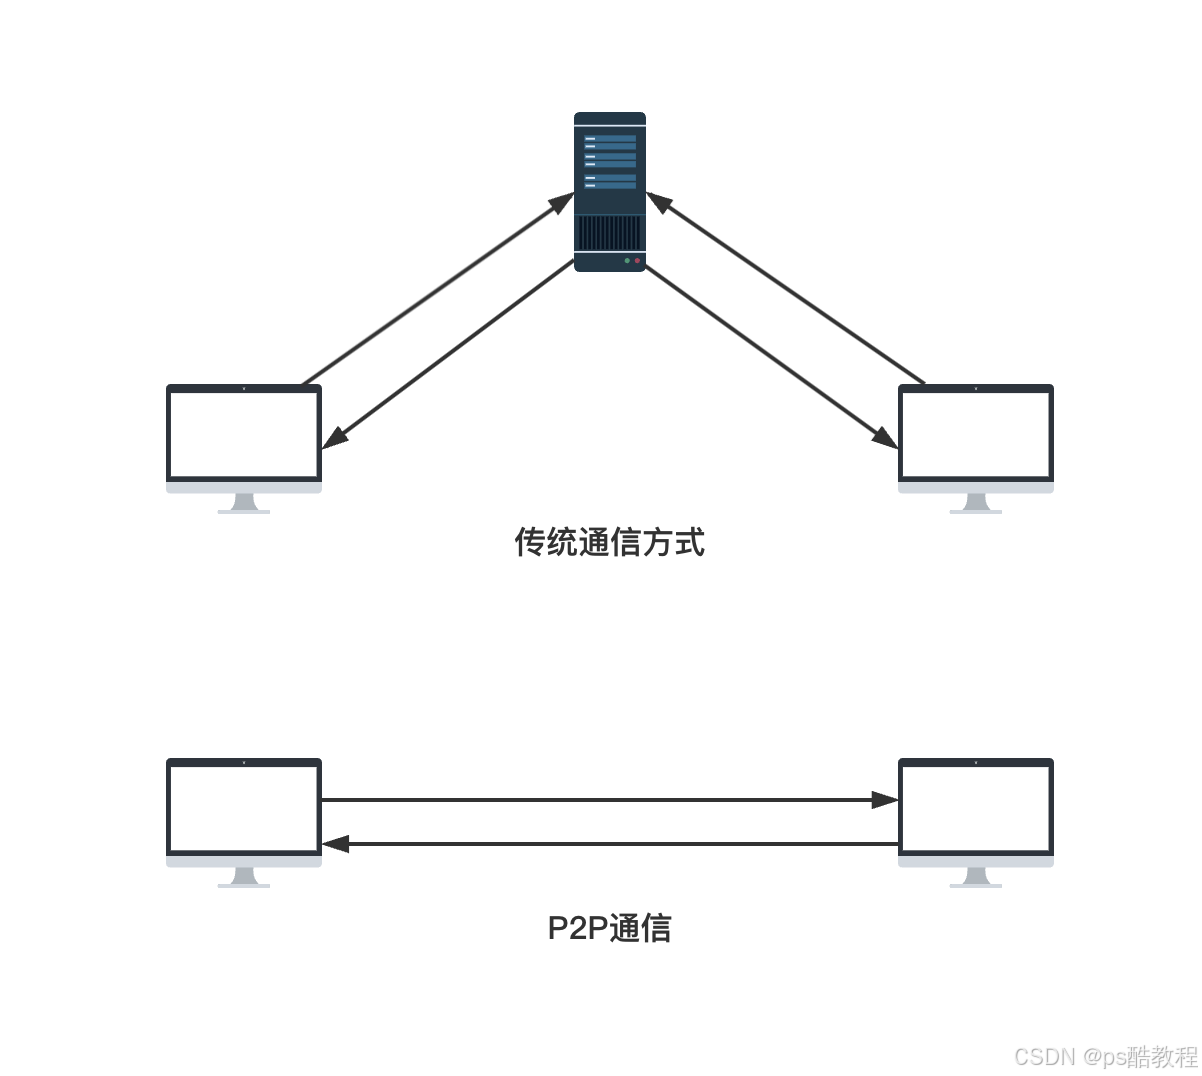
要实现两个客户端的实时音视频通信,并且这两个客户端可能处于不同网络环境,使用不同的设备,都需要解决哪些问题?
主要是下面这 3 个问题:
-
如何发现对方?
-
不同的音视频编解码能力如何沟通?
-
如何联系上对方?
下面我们将逐个讨论这 3 个问题。
如何发现对方?
在 P2P 通信的过程中,双方需要交换一些元数据比如媒体信息、网络数据等等信息,我们通常称这一过程叫做“信令(signaling)”。
对应的服务器即“信令服务器 (signaling server)”,通常也有人将之称为“房间服务器”,因为它不仅可以交换彼此的媒体信息和网络信息,同样也可以管理房间信息。
比如:
1)通知彼此 who 加入了房间;2)who 离开了房间 3)告诉第三方房间人数是否已满是否可以加入房间。
为了避免出现冗余,并最大限度地提高与已有技术的兼容性,WebRTC 标准并没有规定信令方法和协议。在本课程中会使用websocket来搭建一个信令服务器
不同的音视频编解码能力如何沟通?
不同浏览器对于音视频的编解码能力是不同的。
比如: 以日常生活中的例子来讲,小李会讲汉语和英语,而小王会讲汉语和法语。为了保证双方都可以正确的理解对方的意思,最简单的办法即取他们都会的语言,也就是汉语来沟通。
在 WebRTC 中:有一个专门的协议,称为 Session Description Protocol(SDP),可以用于描述上述这类信息。
因此:参与音视频通讯的双方想要了解对方支持的媒体格式,必须要交换 SDP 信息。而交换 SDP 的过程,通常称之为媒体协商。
如何联系上对方?
其实就是网络协商的过程,即参与音视频实时通信的双方要了解彼此的网络情况,这样才有可能找到一条相互通讯的链路。
理想的网络情况是每个客户端都有自己的私有公网 IP 地址,这样的话就可以直接进行点对点连接。实际上呢,出于网络安全和其他原因的考虑,大多数客户端之间都是在某个局域网内,需要网络地址转换(NAT)。
在 WebRTC 中我们使用 ICE 机制建立网络连接。ICE 协议通过一系列的技术(如 STUN、TURN 服务器)帮助通信双方发现和协商可用的公共网络地址,从而实现 NAT 穿越。
ICE 的工作原理如下:
- 首先,通信双方收集本地网络地址(包括私有地址和公共地址)以及通过 STUN 和 TURN 服务器获取的候选地址。
- 接下来,双方通过信令服务器交换这些候选地址。
- 通信双方使用这些候选地址进行连接测试,确定最佳的可用地址。
- 一旦找到可用的地址,通信双方就可以开始实时音视频通话。
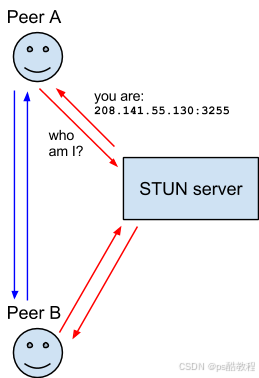
在 WebRTC 中网络信息通常用candidate来描述
针对上面三个问题的总结:就是通过 WebRTC 提供的 API 获取各端的媒体信息 SDP 以及 网络信息 candidate ,并通过信令服务器交换,进而建立了两端的连接通道完成实时视频语音通话。
常用的API
音视频采集getUserMedia
// 获取本地音视频流
const getLocalStream = async () => {
  const stream = await navigator.mediaDevices.getUserMedia({ // 获取音视频流
    audio: true,
    video: true
  })

  localVideo.value!.srcObject = stream
  localVideo.value!.play()

  return stream
}
核心对象 RTCPeerConnection
RTCPeerConnection 作为创建点对点连接的 API,是我们实现音视频实时通信的关键。
const peer = new RTCPeerConnection({
  // iceServers: [
  //   { url: "stun:stun.l.google.com:19302" }, // 谷歌的公共服务
  //   {
  //     urls: "turn:***",
  //     credential: "***",
  //     username: "***",
  //   },
  // ],
});
主要会用到以下几个方法:
媒体协商方法:
- createOffer
- createAnswer
- setLocalDesccription
- setRemoteDesccription
重要事件:
-
onicecandidate
-
onaddstream
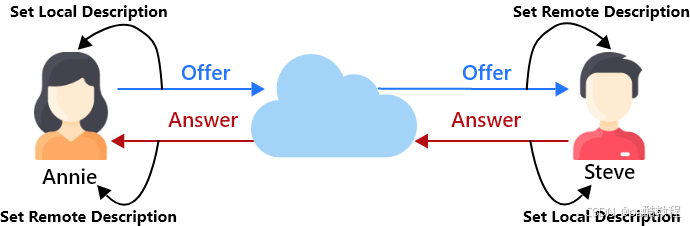
整个媒体协商过程可以简化为三个步骤对应上述四个媒体协商方法:
-
呼叫端创建 Offer(createOffer)并将 offer 消息(内容是呼叫端的 SDP 信息)通过信令服务器传送给接收端,同时调用 setLocalDesccription 将含有本地 SDP 信息的 Offer 保存起来
-
接收端收到对端的 Offer 信息后调用 setRemoteDesccription 方法将含有对端 SDP 信息的 Offer 保存起来,并创建 Answer(createAnswer)并将 Answer 消息(内容是接收端的 SDP 信息)通过信令服务器传送给呼叫端
-
呼叫端收到对端的 Answer 信息后调用 setRemoteDesccription 方法将含有对端 SDP 信息的 Answer 保存起来
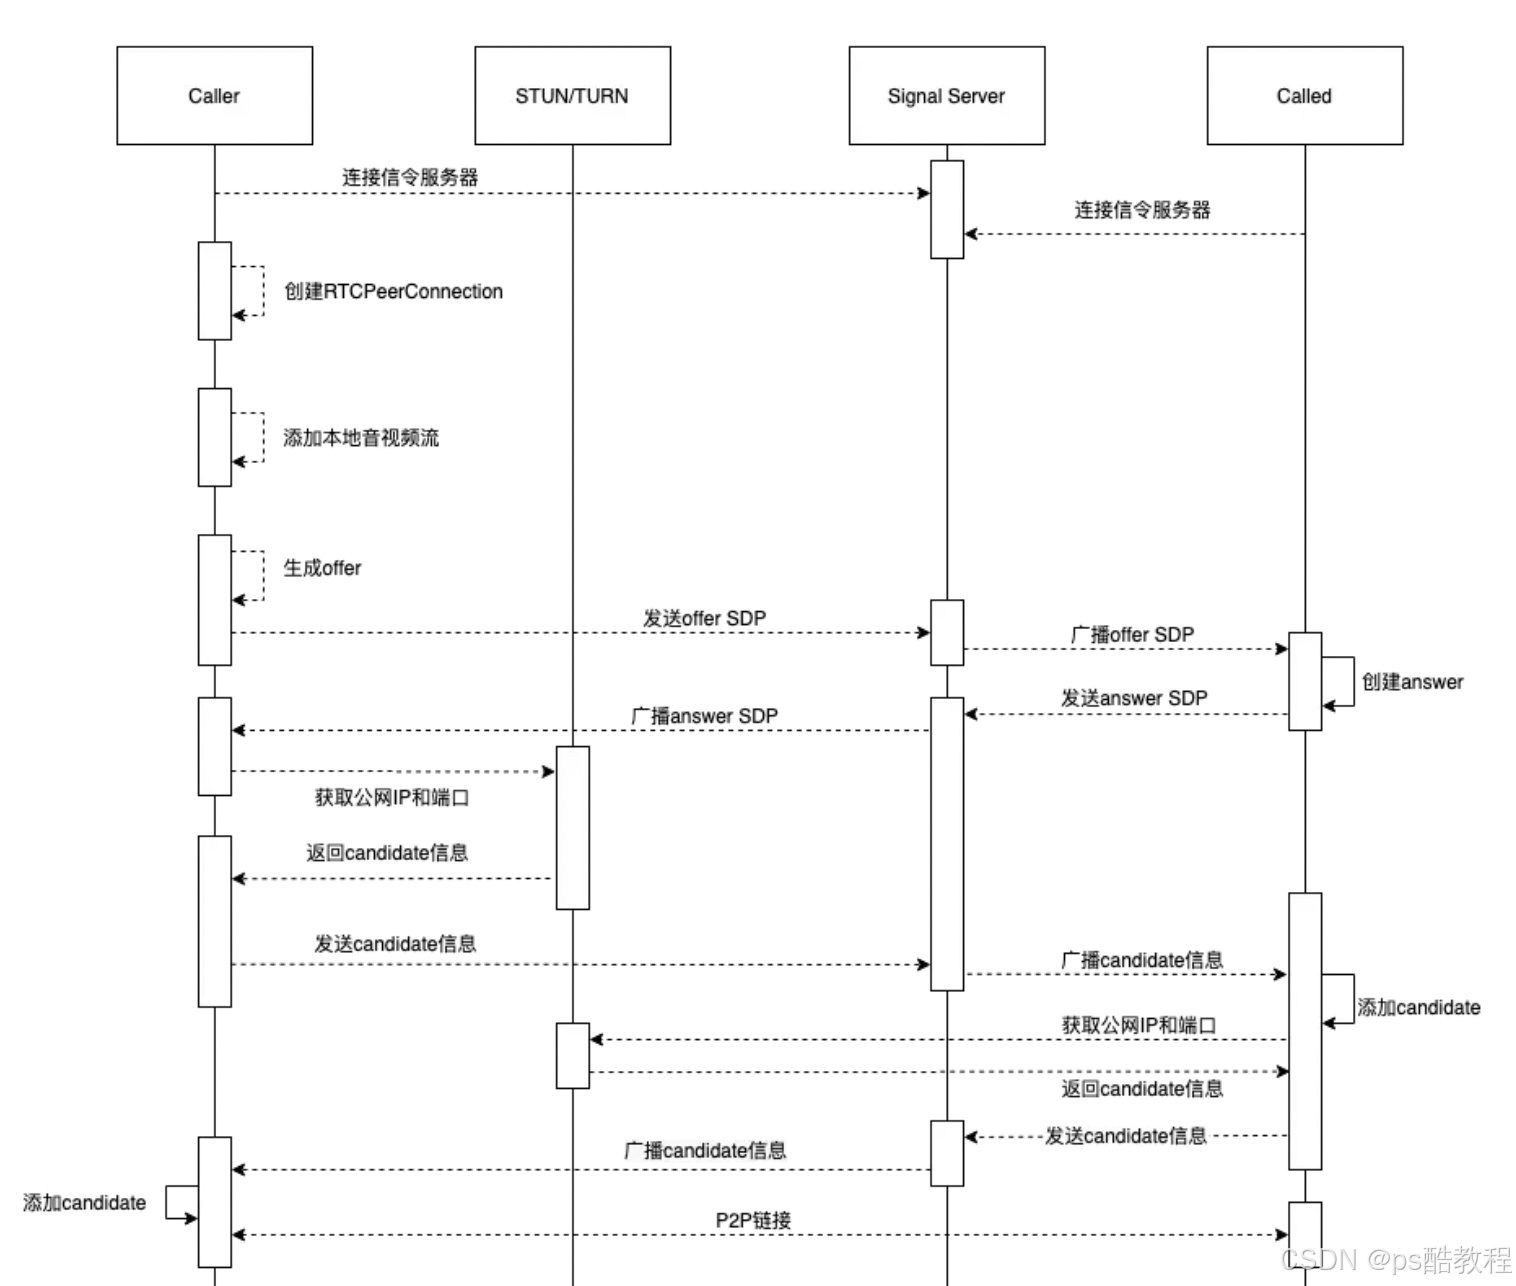
经过上述三个步骤,则完成了 P2P 通信过程中的媒体协商部分,实际上在呼叫端以及接收端调用setLocalDesccription 同时也开始了收集各端自己的网络信息(candidate),然后各端通过监听事件 onicecandidate 收集到各自的 candidate 并通过信令服务器传送给对端,进而打通 P2P 通信的网络通道,并通过监听 onaddstream 事件拿到对方的视频流进而完成了整个视频通话过程。
实践
项目搭建
前端项目
- 项目使用
vue3+ts,运行如下命令:
npm create vite@latest webrtc-client -- --template vue-ts
- 并且引入
tailwindcss:
npm install -D tailwindcss postcss autoprefixer
npx tailwindcss init -p
- 在生成的
tailwind.config.js配置文件中添加所有模板文件的路径。
/** @type {import('tailwindcss').Config} */
module.exports = {
  content: [
    "./index.html",
    "./src/**/*.{vue,js,ts,jsx,tsx}",
  ],
  theme: {
    extend: {},
  },
  plugins: [],
}
- 修改
style.css中的内容如下:
@tailwind base;
@tailwind components;
@tailwind utilities;
- 自定义修改
App.vue中的内容如下:
<script lang="ts" setup>
import { ref } from 'vue'

const called = ref<boolean>(false) // 是否是接收方
const caller = ref<boolean>(false) // 是否是发起方
const calling = ref<boolean>(false) // 呼叫中
const communicating = ref<boolean>(false) // 视频通话中
const localVideo = ref<HTMLVideoElement>() // video标签实例,播放本人的视频
const remoteVideo = ref<HTMLVideoElement>() // video标签实例,播放对方的视频

// 发起方发起视频请求
const callRemote = () => {
  console.log('发起视频');
}

// 接收方同意视频请求
const acceptCall = () => {
  console.log('同意视频邀请');
}

// 挂断视频
const hangUp = () => {
  console.log('挂断视频');
}
</script>

<template>
  <div class="flex items-center flex-col text-center p-12 h-screen">
    <div class="relative h-full mb-4">
      <video
        ref="localVideo"
        class="w-96 h-full bg-gray-200 mb-4 object-cover"
      ></video>
      <video
        ref="remoteVideo"
        class="w-32 h-48 absolute bottom-0 right-0 object-cover"
      ></video>
      <div v-if="caller && calling" class="absolute top-2/3 left-36 flex flex-col items-center">
        <p class="mb-4 text-white">等待对方接听...</p>
        <img @click="hangUp" src="/refuse.svg" class="w-16 cursor-pointer" alt="">
      </div>
      <div v-if="called && calling" class="absolute top-2/3 left-32 flex flex-col items-center">
        <p class="mb-4 text-white">收到视频邀请...</p>
        <div class="flex">
          <img @click="hangUp" src="/refuse.svg" class="w-16 cursor-pointer mr-4" alt="">
          <img @click="acceptCall" src="/accept.svg" class="w-16 cursor-pointer" alt="">
        </div>
      </div>
    </div>
    <div class="flex gap-2 mb-4">
      <button
        class="rounded-md bg-indigo-600 px-4 py-2 text-sm font-semibold text-white"
        @click="callRemote"
      >发起视频</button>
      <button
        class="rounded-md bg-red-600 px-4 py-2 text-sm font-semibold text-white"
        @click="hangUp"
      >挂断视频</button>
    </div>
  </div>
</template>
执行完上面的步骤就可以运行npm run dev来在本地启动项目了
后端项目
创建一个webrtc-server的文件夹,执行npm init ,一路回车即可,然后运行如下命令安装socket.io和nodemon:
npm install socket.io nodemon
创建index.js的文件,并添加如下内容:
const socket = require('socket.io');
const http = require('http');

const server = http.createServer()

const io = socket(server, {
  cors: {
    origin: '*' // 配置跨域
  }
});

io.on('connection', sock => {
  console.log('连接成功...')
  // 向客户端发送连接成功的消息
  sock.emit('connectionSuccess');
})

server.listen(3000, () => {
  console.log('服务器启动成功');
});
在package.json中添加start命令,使用nodemon启动项目:
"scripts": {
  "test": "echo \"Error: no test specified\" && exit 1",
  "start": "nodemon index.js"
},
执行完后运行npm run start即在3000端口可启动node服务了
前端连接信令服务器
前端需要安装socket.io-client, 并连接信令服务器:
<script setup lang="ts">
  // App.vue
  import { ref, onMounted, onUnmounted } from 'vue'
	import { io, Socket } from "socket.io-client";

  // ...
  const socket = ref<Socket>() // Socket实例

  onMounted(() => {
    const sock = io('localhost:3000'); // 对应服务的端口

    // 连接成功
    sock.on('connectionSuccess', () => {
      console.log('连接成功')
    });

    socket.value = sock;
  })

  // ...
</script>
发起视频请求
角色:用户A–发起方,用户B–接收方
房间:类比聊天窗口
连接成功时加入房间:
// 前端代码
const roomId = '001'

sock.on('connectionSuccess', () => {
  console.log('连接服务器成功...');
  sock.emit('joinRoom', roomId) // 前端发送加入房间事件
})

// 服务端代码
sock.on('joinRoom', (roomId) => {
  sock.join(roomId) // 加入房间
})
用户A发起视频请求并通知用户B:
- 用户A发起视频请求,并且通过信令服务器通知用户B
// 发起方发起视频请求
const callRemote = async () => {
  console.log('发起视频');
  caller.value = true;
  calling.value = true;
  await getLocalStream()
	// 向信令服务器发送发起请求的事件
  socket.value?.emit('callRemote', roomId)
}
- 用户B同意视频请求,并且通过信令服务器通知用户A
// 接收方同意视频请求
const acceptCall = () => {
  console.log('同意视频邀请');
  socket.value?.emit('acceptCall', roomId)
}
开始交换 SDP 信息和 candidate 信息:
- 用户A创建创建RTCPeerConnection,添加本地音视频流,生成offer,并且通过信令服务器将offer发送给用户B
// 创建RTCPeerConnection
peer.value = new RTCPeerConnection()
// 添加本地音视频流
peer.value.addStream(localStream.value)
// 生成offer
const offer = await peer.value.createOffer({
  offerToReceiveAudio: 1,
  offerToReceiveVideo: 1
})
console.log('offer', offer);
// 设置本地描述的offer
await peer.value.setLocalDescription(offer);
// 通过信令服务器将offer发送给用户B
socket.value?.emit('sendOffer', { offer, roomId })
- 用户B收到用户A的offer
sock.on('sendOffer', (offer) => {
  if (called.value) { // 判断接收方
    console.log('收到offer', offer);
  }
})
- 用户B需要创建自己的RTCPeerConnection,添加本地音视频流,设置远端描述信息,生成answer,并且通过信令服务器发送给用户A
// 创建自己的RTCPeerConnection
peer.value = new RTCPeerConnection()
// 添加本地音视频流
const stream = await getLocalStream()
peer.value.addStream(stream)
// 设置远端描述信息
await peer.value.setRemoteDescription(offer);
const answer = await peer.value.createAnswer()
console.log(answer);
await peer.value.setLocalDescription(answer);
// 发送answer给信令服务器
socket.value?.emit('sendAnswer', { answer, roomId })
- 用户A收到用户B的answer
sock.on('sendAnswer', (answer) => {
  if (caller.value) { // 判断是否是发送方
    // 设置远端answer信息
    peer.value.setRemoteDescription(answer);
  }
})
- 用户A获取candidate信息并且通过信令服务器发送candidate给用户B
// 通过监听onicecandidate事件获取candidate信息
peer.value.onicecandidate = (event: any) => {
  if (event.candidate) {
    console.log('用户A获取candidate信息', event.candidate);
    // 通过信令服务器发送candidate信息给用户B
    socket.value?.emit('sendCandidate', {
      roomId,
      candidate: event.candidate
    })
  }
}
- 用户B添加用户A的candidate信息
// 添加candidate信息
sock.on('sendCandidate', async (candidate) => {
  await peer.value.addIceCandidate(candidate);
})
- 用户B获取candidate信息并且通过信令服务器发送candidate给用户A(如上)
peer.value.onicecandidate = (event: any) => {
  if (event.candidate) {
    console.log('用户B获取candidate信息', event.candidate);
    // 通过信令服务器发送candidate信息给用户A
    socket.value?.emit('sendCandidate', {
      roomId,
      candidate: event.candidate
    })
  }
}
- 用户A添加用户B的candidate信息(如上)
// 添加candidate信息
sock.on('sendCandidate', async (candidate) => {
  await peer.value.addIceCandidate(candidate);
})
- 接下来用户A和用户B就可以进行P2P通信流
// 监听onaddstream来获取对方的音视频流
peer.value.onaddstream = (event: any) => {
  calling.value = false;
  communicating.value = true;
  remoteVideo.value!.srcObject = event.stream
  remoteVideo.value!.play()
}
挂断视频
// 挂断视频
const hangUp = () => {
  console.log('挂断视频');
  socket.value?.emit('hangUp', roomId)
}

// 状态复原
const reset = () => {
  called.value = false
  caller.value = false
  calling.value = false
  communicating.value = false
  peer.value = null
  localVideo.value!.srcObject = null
  remoteVideo.value!.srcObject = null
  localStream.value = undefined
}
拓展:peerjs
文档:https://peerjs.com/docs/#start
服务端实现
// 使用peer搭建信令服务器
const { PeerServer } = require('peer');
const peerServer = PeerServer({ port: 3001, path: '/myPeerServer' });
前端实现
<script setup lang="ts">
import { ref, onMounted } from 'vue'
import { Peer } from "peerjs";

const url = ref<string>()
const localVideo = ref<HTMLVideoElement>()
const remoteVideo = ref<HTMLVideoElement>()
const peerId = ref<string>()
const remoteId = ref<string>()
const peer = ref<any>()
const caller = ref<boolean>(false)
const called = ref<boolean>(false)
const callObj = ref<any>(false)

onMounted(() => {
  //
  peer.value = new Peer({ // 连接信令服务器
    host: 'localhost',
    port: 3001,
    path: '/myPeerServer'
  });
  peer.value.on('open', (id: string) => {
    peerId.value = id
  })

  // 接收视频请求
  peer.value.on('call', async (call: any) => {
    called.value = true
    callObj.value = call
  });
})

// 获取本地音视频流
async function getLocalStream(constraints: MediaStreamConstraints) {
  // 获取媒体流
  const stream = await navigator.mediaDevices.getUserMedia(constraints)
  // 将媒体流设置到 video 标签上播放
  localVideo.value!.srcObject = stream;
  localVideo.value!.play();
  return stream
}

const acceptCalled = async () => {
  // 接收视频
  const stream = await getLocalStream({ video: true, audio: true })
  callObj.value.answer(stream);
  callObj.value.on('stream', (remoteStream: any) => {
    called.value = false
    // 将远程媒体流添加到 video 元素中
    remoteVideo.value!.srcObject = remoteStream;
    remoteVideo.value!.play();
  });
}

// 开启视频
const callRemote = async () => {
  if (!remoteId.value) {
    alert('请输入对方ID')
    return
  }
  const stream = await getLocalStream({ video: true, audio: true })

  // 将本地媒体流发送给远程 Peer
  const call = peer.value.call(remoteId.value, stream);
  caller.value = true
  call.on('stream', (remoteStream: any) => {
    caller.value = false
    // 将远程媒体流添加到 video 元素中
    remoteVideo.value!.srcObject = remoteStream;
    remoteVideo.value!.play();
  });
}
</script>
WebRtc最简单的示例
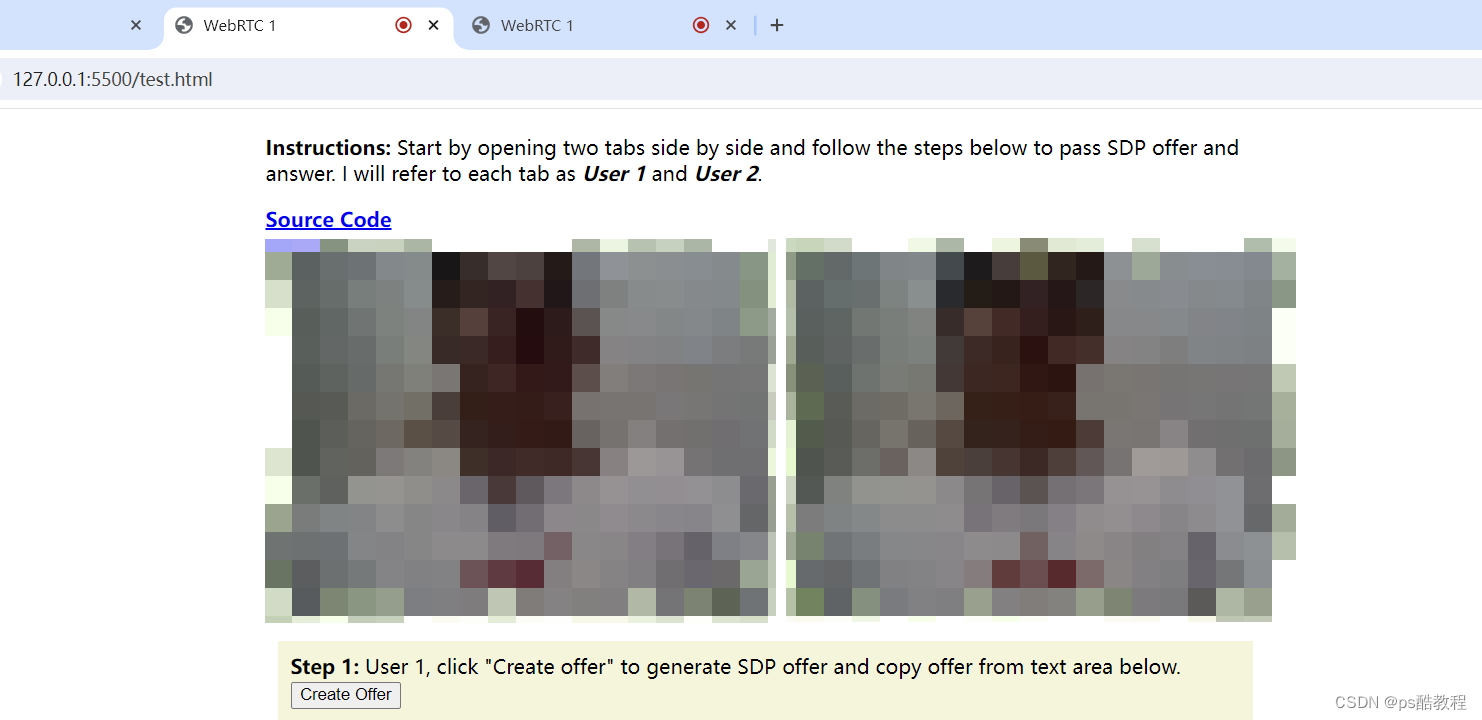
先点击createOffer得到offer,在另外1个tab页粘贴offer并点击createAnswer,得到answer后,将answer粘贴到第1个tab的answer处,即可
<!DOCTYPE html>
<html>

<head>
    <meta charset='utf-8'>
    <meta http-equiv='X-UA-Compatible' content='IE=edge'>
    <title>WebRTC 1</title>
    <meta name='viewport' content='width=device-width, initial-scale=1'>
    <link rel='stylesheet' type='text/css' media='screen' href='main.css'>
</head>

<body>

    <div id="intro-container">
        <h2>WebRTC, Passing SDP with no signaling.</h2>

        <p><b>Instructions: </b>Start by opening two tabs side by side and follow the steps below to pass SDP offer and
            answer. I will refer to each tab as <i><b>User 1</b></i> and <i><b>User 2</b></i>.</p>
        <a href="https://github.com/divanov11/WebRTC-Simple-SDP-Handshake-Demo/" target="_blank"><b>Source Code</b></a>
    </div>


    <div id="videos">
        <video class="video-player" id="user-1" autoplay playsinline style="width:600px;height:300px"></video>
        <video class="video-player" id="user-2" autoplay playsinline style="width:600px;height:300px"></video>
    </div>

    <div class="step">
        <p><strong>Step 1:</strong> User 1, click "Create offer" to generate SDP offer and copy offer from text area
            below.</p>
        <button id="create-offer">Create Offer</button>
    </div>

    <label>SDP OFFER:</label>
    <textarea id="offer-sdp" placeholder='User 2, paste SDP offer here...'></textarea>

    <div class="step">
        <p><strong>Step 2:</strong> User 2, paste SDP offer generated by user 1 into text area above, then click "Create
            Answer" to generate SDP answer and copy the answer from the text area below.</p>
        <button id="create-answer">Create answer</button>
    </div>


    <label>SDP Answer:</label>
    <textarea id="answer-sdp" placeholder="User 1, paste SDP answer here..."></textarea>

    <div class="step">
        <p><strong>Step 3:</strong> User 1, paste SDP offer generated by user 2 into text area above and then click "Add
            Answer"</p>
        <button id="add-answer">Add answer</button>
    </div>

</body>
<script>

    /*
      整体交互步骤:
          1. 创建RCTPeerConnection
          2. 获取本地音视频流: navigator.mediaDevices.getUserMedia({ video: true, audio: false })
          3. 将 本地音视频流 绑定给 video元素的 srcObject属性
          3. 向 peerConnection 注册本地音视频流: peerConnection.addTrack(track, localStream);
          4. 给 peerConnection 绑定ontrack监听函数, 以便当调用 peerConnection.setRmoteDescription(..)时, 将对方的音视频流注册到remoteStream中
          5. 发起方 给peerConnection 绑定onicecandidate监听函数, 以便当调用 peerConnection.setLocalDescription(offer)时, 获取到offer信息,
             发起方 调用peerConnection创建offer, 并调用peerConnection.setLocalDescription(offer)
          6. 接收方 给peerConenction 绑定onicecandidate监听函数, 以便当调用 peerConnection.setLocalDescription(answer)时, 获取到answer信息,
             接收方 调用peerConenction.setRemoteDescription(offer)
             接收方 调用peerConnection.createAnswer()创建answer, 并调用peerConnection.setLocalDescription(answer)
          7. 发起方 调用peerConnection.setRemoteDescription(answer)

          所以关键的就几点:
              MediaStream包括多个MediaStreamTrack;
              发起方拿到的的MediaStream直接给到video元素的srcObject属性就可以播放;
              peerConnection的onicecandidate监听函数在peerConnection.setLocalDescription(..)时触发, 在里面获取到sdp信息发送给对方;
              peerConnection的ontrack监听函数在peerConnection.setRmoteDescription(..)时触发, 在里面将得到的视频流添加到remoteStream中;

          关键的步骤:
              发起方创建offer并设置为localDescription,
              接收方将发起方的offer设置为remoteDescription并创建answer设置为localDescription,
              发起方将answer设置为localDescription;

    */

    // 创建1个PeerConnection对象
    let peerConnection = new RTCPeerConnection()

    let localStream;
    let remoteStream;

    let init = async () => {
        localStream = await navigator.mediaDevices.getUserMedia({ video: true, audio: false })

        // 获取到的是1个MediaStream对象:
        // {id: '85a5c284-56bd-4791-a252-2175cd51a815', active: true, onaddtrack: null, onremovetrack: null, onactive: null, oninactive: null,…}
        console.log(localStream);

        // 获取到的是2个MediaStreamTrack对象(如果上面开启了视频和音频, 那么这里会获取到2个对象):
        // {kind: 'audio', id: 'ca131608-ef15-4106-a97b-c3e498a53ead', label: 'Default - 麦克风阵列 (Realtek(R) Audio)', enabled: true, muted: false, …}
        // {kind: 'video', id: '770bec3c-45a4-4105-ab05-6f2233b2b0a9', label: 'Integrated Camera (04f2:b6d9)', enabled: true, muted: false, …}
        console.log('localStream.getTracks()... =>', localStream.getTracks());

        // 创建的是1个MediaStreamTrack对象:
        // {id: '666310ee-23a0-4254-a619-e19db0581aa8', active: false, onaddtrack: null, onremovetrack: null, onactive: null, …}
        remoteStream = new MediaStream()
        console.log(remoteStream);

        document.getElementById('user-1').srcObject = localStream
        document.getElementById('user-2').srcObject = remoteStream

        // 将 localStream的 track 添加到 peerConnection 中
        localStream.getTracks().forEach((track) => {
            peerConnection.addTrack(track, localStream);
        });
        console.log(peerConnection);

        // 监听peerConnection的ontrack
        // 触发时机: 当调用 peerConnection.setRemoteDescription(offer) 时会触发这个函数
        // 触发时机: 当调用 peerConnection.setRemoteDescription(answer) 时会触发这个函数
        peerConnection.ontrack = (event) => {
            // RTCTrackEvent {isTrusted: true, receiver: RTCRtpReceiver, track: MediaStreamTrack, streams: Array(1), transceiver: RTCRtpTransceiver, …}
            console.log('peerConnection.ontrack触发...1', event);
            // [MediaStream]
            // MediaStream {id: '4b35aca3-4feb-4487-8484-d64369e06202', active: true, onaddtrack: null, onremovetrack: null, onactive: null, …}
            // [MediaStreamTrack] 如果发起方开启了视频和音频, 那么这里会获取到2个对象
            console.log('peerConnection.ontrack触发...2', event.streams, event.streams[0],event.streams[0].getTracks());
            event.streams[0].getTracks().forEach((track) => {
                remoteStream.addTrack(track);
            });
        };
    }

    // 创建offer
    let createOffer = async () => {

        // 如果这个方法被触发说明调用了peerConnection的setLocalDescription方法, 所以下面直接去拿peerConnection.localDescription
        peerConnection.onicecandidate = async (event) => {

            // RTCPeerConnectionIceEvent {isTrusted: true, candidate: RTCIceCandidate, type: 'icecandidate', target: RTCPeerConnection, currentTarget: RTCPeerConnection, …}
            console.log('peerConnection.onicecandidate触发...1', event);

            if (event.candidate) {
                // RTCIceCandidate {candidate: 'candidate:776395818 1 udp 2122260223 192.168.134.5…847 typ host generation 0 ufrag VO3s network-id 1', sdpMid: '0', sdpMLineIndex: 0, foundation: '776395818', component: 'rtp', …}
                console.log('peerConnection.onicecandidate触发...2', event.candidate);
                document.getElementById('offer-sdp').value = JSON.stringify(peerConnection.localDescription)
                // RTCSessionDescription {type: 'offer', sdp: 'v=0\r\no=- 3455385802246710328 2 IN IP4 127.0.0.1\r\ns…34caaaa0bf cec44d77-0a4a-4392-93ee-69c894151aec\r\n'}
                // 这里的peerConnection.localDescription与下面创建的offer有些些不一样
                console.log('peerConnection.localDescription...',peerConnection.localDescription);
            }
        };

        // 使用peerConnection创建offer对象:
        // RTCSessionDescription {type: 'offer', sdp: 'v=0\r\no=- 9182618772315292434 2 IN IP4 127.0.0.1\r\ns…a0e3d52014 0b481359-d40e-4ddc-8899-fdc86ff1c6f3\r\n'}
        const offer = await peerConnection.createOffer();
        console.log('offer', offer);
        console.log(JSON.stringify(offer));

        // 将offer设置到本地sdp
        // (此时会触发peerConnection.onicecandidate执行,一共执行了5次,最后1次的event.candidate为null)
        await peerConnection.setLocalDescription(offer);
        document.getElementById('offer-sdp').value = JSON.stringify(peerConnection.localDescription)

    }

    let createAnswer = async () => {

        // 模拟获取到发起方的sdp信息
        let offer = JSON.parse(document.getElementById('offer-sdp').value)

        peerConnection.onicecandidate = async (event) => {

            console.log('【peerConnection.onicecandidate触发...1】', event);

            if (event.candidate) {
                console.log('【peerConnection.onicecandidate触发...2】', event.candidate);
                document.getElementById('answer-sdp').value = JSON.stringify(peerConnection.localDescription)
                console.log('【peerConnection.localDescription...】',peerConnection.localDescription);
            }
        };

        // 设置发起方的sdp信息
        // 会触发peerConnection.ontrack 绑定的函数 执行
        await peerConnection.setRemoteDescription(offer);

        // 使用peerConnection创建offer对象
        let answer = await peerConnection.createAnswer();

        // 将answer设置到本地sdp
        // (此时会触发peerConnection.onicecandidate执行,一共执行了3次,最后1次的event.candidate为null)
        await peerConnection.setLocalDescription(answer);
        document.getElementById('answer-sdp').value = JSON.stringify(peerConnection.localDescription)

    }

    let addAnswer = async () => {
        console.log('Add answer triggerd')
        // 拿到answer
        let answer = JSON.parse(document.getElementById('answer-sdp').value)
        console.log('answer: ', answer)
        console.log('peerConnection.currentRemoteDescription: ',peerConnection.currentRemoteDescription);
        if (!peerConnection.currentRemoteDescription) {
            // 设置接收方的sdp信息
            // 会触发peerConnection.ontrack 绑定的函数 执行
            peerConnection.setRemoteDescription(answer);
            // 此时, 双方可以视频通话了
        }
    }

    init()

    document.getElementById('create-offer').addEventListener('click', createOffer)
    document.getElementById('create-answer').addEventListener('click', createAnswer)
    document.getElementById('add-answer').addEventListener('click', addAnswer)
</script>

</html>
WebRtc最简单示例2
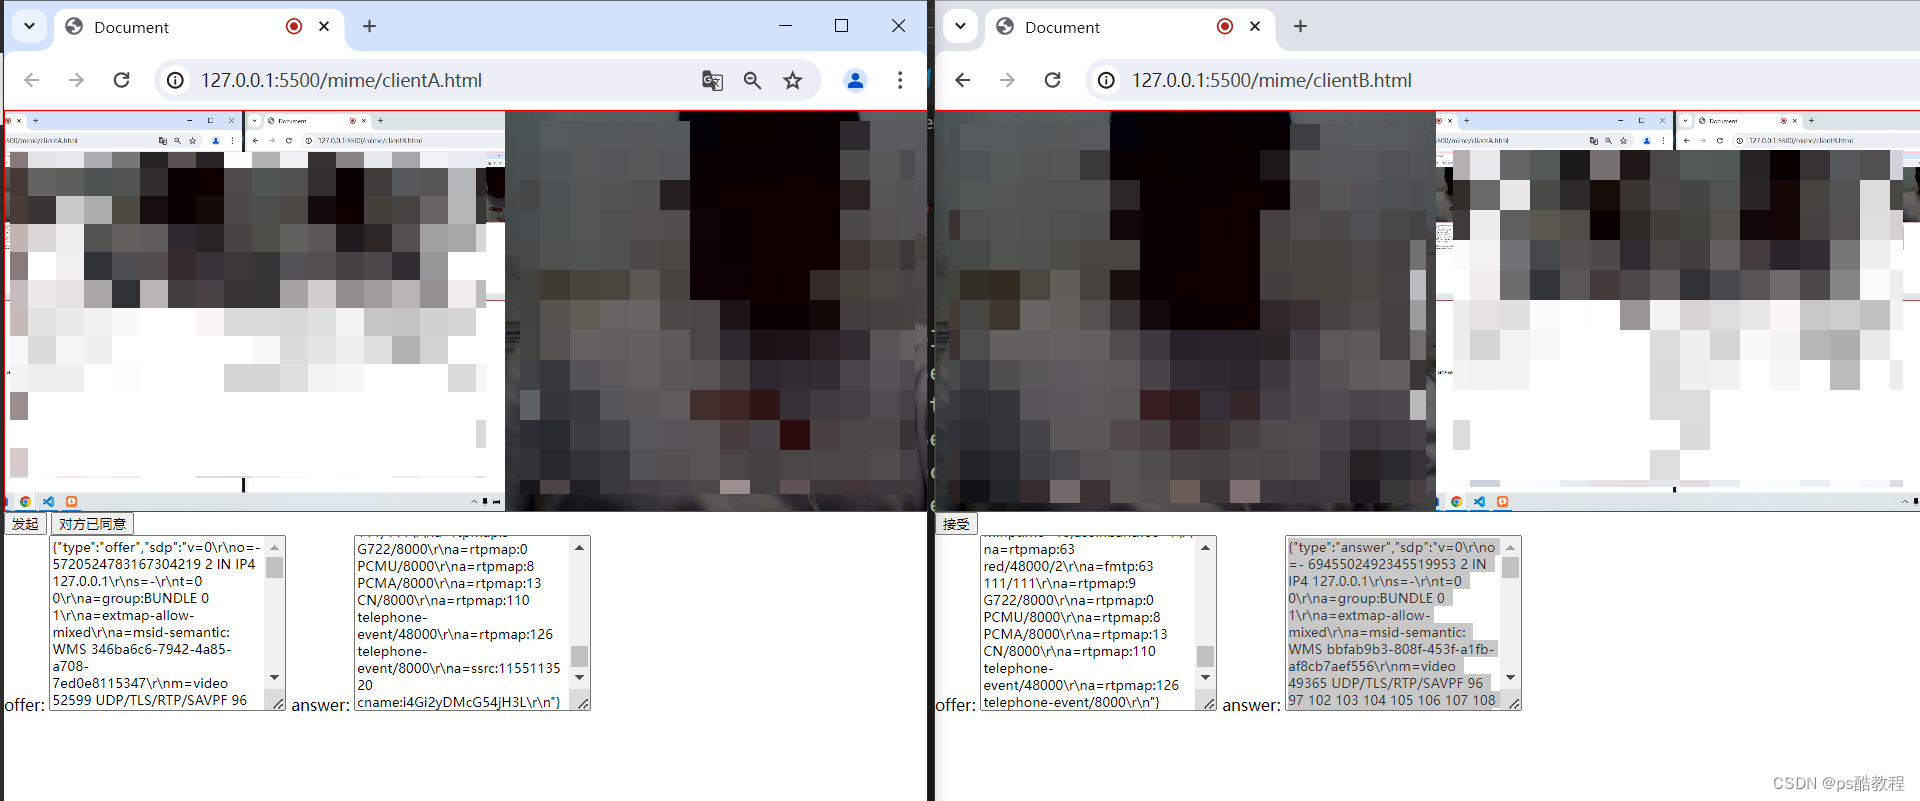
clientA.html
<!DOCTYPE html>
<html lang="en">
<head>
    <meta charset="UTF-8">
    <meta name="viewport" content="width=device-width, initial-scale=1.0">
    <title>Document</title>
</head>
<body>

    <div class="video-wrapper">
        <video id="localVideo"></video>
        <video id="remoteVideo"></video>
    </div>

    <div class="btn-wrapper">
        <button id="sendBtn">发起</button>
        <button id="acceptedBtn">对方已同意</button>
    </div>

    offer:
    <textarea id="offerTxt" cols="30" rows="10"></textarea>

    answer:
    <textarea id="answerTxt" cols="30" rows="10"></textarea>

</body>
<script>
    let localVideo = document.querySelector('#localVideo')
    let remoteVideo = document.querySelector('#remoteVideo')
    let sendBtn = document.querySelector('#sendBtn')
    let acceptedBtn = document.querySelector('#acceptedBtn')
    let offerTxt = document.querySelector('#offerTxt')
    let answerTxt = document.querySelector('#answerTxt')

    window.localVideo = localVideo
    window.remoteVideo = remoteVideo
    window.sendBtn = sendBtn
    window.acceptedBtn = acceptedBtn

    sendBtn.addEventListener('click', async () => {

        // 创建RTCPeerConnection对象
        const peer = new RTCPeerConnection()

        // 开启本地视频
        const localStream = await activateLocalVideo()
        console.log(localStream);

        // 添加本地音视频流
        peer.addStream(localStream)

        acceptedBtn.addEventListener('click', async function(){
            console.log('acceptedBtn', peer);
            // (会触发onaddstream事件)
            peer.setRemoteDescription(JSON.parse(answerTxt.value))
        })

        // 监听icecandidate事件
        // (当调用peer.setLocalDescription(offer)时,会触发这里绑定的函数)
        peer.onicecandidate = (evt) => {
            console.log('onicecandidate事件触发...', evt);
            if(evt.candidate) {
                // 必须在这里面设置
                offerTxt.value = JSON.stringify(peer.localDescription)
            }
        }

        // 监听onaddstream事件
        // (当调用peer.setRemoteDescription(JSON.parse(answerTxt.value))时,会触发这里绑定的函数)
        peer.onaddstream = (evt) => {
            console.log('onaddstream事件触发...', evt);
            remoteVideo.srcObject = evt.stream
            remoteVideo.play()
        }

        // 生成offer
        const offer = await peer.createOffer({
            offerToReceiveAudio:true,
            offerToReceiveVideo:true
        })

        // 设置本地描述的offer
        // (会触发 peer.onicecandidate 绑定的函数, 一共触发了 9次,最后1次的 evt.candidate 是 null)
        await peer.setLocalDescription(offer)

    })

    // 激活本地视频
    async function activateLocalVideo() {
        const stream = await navigator.mediaDevices.getDisplayMedia({
            audio: true,
            video: true
        })

        localVideo.srcObject = stream
        localVideo.play()
        return stream
    }


</script>
<style>
    html,body {
        height: 100%;
    }
    body {
        margin: 0;
    }
    .video-wrapper {
        width: 500px;
        height: 200px;
        border: 1px solid red;
        display: flex;
    }
    .video-wrapper video {
        width: 50%;
        object-fit: cover;
    }
</style>
</html>
clientB.html
<!DOCTYPE html>
<html lang="en">
<head>
    <meta charset="UTF-8">
    <meta name="viewport" content="width=device-width, initial-scale=1.0">
    <title>Document</title>
</head>
<body>

    <div class="video-wrapper">
        <video id="localVideo"></video>
        <video id="remoteVideo"></video>
    </div>

    <div class="btn-wrapper">
        <button id="acceptBtn">接受</button>
    </div>

    offer:
    <textarea id="offerTxt" cols="30" rows="10"></textarea>

    answer:
    <textarea id="answerTxt" cols="30" rows="10"></textarea>

</body>
<script>
    let localVideo = document.querySelector('#localVideo')
    let remoteVideo = document.querySelector('#remoteVideo')
    let acceptBtn = document.querySelector('#acceptBtn')
    let offerTxt = document.querySelector('#offerTxt')
    let answerTxt = document.querySelector('#answerTxt')

    acceptBtn.addEventListener('click', async () => {

        const peer = new RTCPeerConnection()

        const localStream = await activateLocalVideo()

        // 添加本地音视频流
        peer.addStream(localStream)

        // 监听icecandidate事件
        // (当调用peer.setLocalDescription(answer)时,会触发这里绑定的函数)
        peer.onicecandidate = (evt) => {
            console.log('onicecandidate事件触发...');
            if(evt.candidate) {
                console.log('获取candidate信息', JSON.stringify(evt.candidate));
                // 必须在这里面设置
                answerTxt.value = JSON.stringify(peer.localDescription)
            }
        }

        // 监听onaddstream事件
        // (当调用peer.setRemoteDescription(JSON.parse(offerTxt.value))时,会触发这里绑定的函数)
        peer.onaddstream = (evt) => {
            console.log('onaddstream事件触发...', evt);
            remoteVideo.srcObject = evt.stream
            remoteVideo.play()
        }

        // 接收远端的offer
        // (会触发onaddstream事件)
        await peer.setRemoteDescription(JSON.parse(offerTxt.value))

        // 创建answer
        const answer =await peer.createAnswer()
        console.log(answer);

        // 设置本地描述信息
        // (会触发onicecandidate事件)
        peer.setLocalDescription(answer)

    })

    // 激活本地视频
    async function activateLocalVideo() {
        const stream = await navigator.mediaDevices.getUserMedia({
            audio: true,
            video: true
        })

        localVideo.srcObject = stream
        localVideo.play()
        return stream
    }


</script>
<style>
    html,body {
        height: 100%;
    }
    body {
        margin: 0;
    }
    .video-wrapper {
        width: 500px;
        height: 200px;
        border: 1px solid red;
        display: flex;
    }
    .video-wrapper video {
        width: 50%;
        object-fit: cover;
    }
</style>
</html>

北京人形旗下天工造物具身智能开源社区,聚焦具身天工与慧思开物两大平台
更多推荐
 5
5 0
0- 0


 已为社区贡献9条内容

所有评论(0)