Linux安装haproxy
·
一、安装Haproxy
1、卸载Haproxy
# 卸载
yum remove haproxy

# 查找残留haproxy配置
find / -name "haproxy"

# 删除残留配置
rm -rf /var/lib/haproxy
rm -rf /etc/haproxy
2、安装Haproxy
yum install haproxy


haproxy -v
HA-Proxy version 1.5.18 2016/05/10
Copyright 2000-2016 Willy Tarreau <willy@haproxy.org>


systemctl start haproxy
● haproxy.service - HAProxy Load Balancer
   Loaded: loaded (/usr/lib/systemd/system/haproxy.service; disabled; vendor preset: disabled)
   Active: active (running) since Wed 2022-10-19 17:53:35 CST; 5s ago
 Main PID: 29537 (haproxy-systemd)
    Tasks: 3
   Memory: 2.6M
   CGroup: /system.slice/haproxy.service
           ├─29537 /usr/sbin/haproxy-systemd-wrapper -f /etc/haproxy/haproxy.cfg -p /run/haproxy.pid
           ├─29538 /usr/sbin/haproxy -f /etc/haproxy/haproxy.cfg -p /run/haproxy.pid -Ds
           └─29539 /usr/sbin/haproxy -f /etc/haproxy/haproxy.cfg -p /run/haproxy.pid -Ds

Oct 19 17:53:35 aswtechlabpoc92 systemd[1]: Started HAProxy Load Balancer.
Oct 19 17:53:35 aswtechlabpoc92 haproxy-systemd-wrapper[29537]: haproxy-systemd-wrapper: executing /usr/sbin/haproxy -f /etc/haproxy/haproxy.cfg...id -Ds
Hint: Some lines were ellipsized, use -l to show in full.


ps -ef | grep haproxy | grep -v grep
root     29537     1  0 17:53 ?        00:00:00 /usr/sbin/haproxy-systemd-wrapper -f /etc/haproxy/haproxy.cfg -p /run/haproxy.pid
haproxy  29538 29537  0 17:53 ?        00:00:00 /usr/sbin/haproxy -f /etc/haproxy/haproxy.cfg -p /run/haproxy.pid -Ds
haproxy  29539 29538  0 17:53 ?        00:00:00 /usr/sbin/haproxy -f /etc/haproxy/haproxy.cfg -p /run/haproxy.pid -Ds
二、开启Haproxy后端管理界面
[root@aswtechlabpoc92 haproxy]# cat haproxy.cfg
#---------------------------------------------------------------------
# Example configuration for a possible web application.  See the
# full configuration options online.
#
#   http://haproxy.1wt.eu/download/1.4/doc/configuration.txt
#
#---------------------------------------------------------------------

#---------------------------------------------------------------------
# Global settings
#---------------------------------------------------------------------
global
    # to have these messages end up in /var/log/haproxy.log you will
    # need to:
    #
    # 1) configure syslog to accept network log events.  This is done
    #    by adding the '-r' option to the SYSLOGD_OPTIONS in
    #    /etc/sysconfig/syslog
    #
    # 2) configure local2 events to go to the /var/log/haproxy.log
    #   file. A line like the following can be added to
    #   /etc/sysconfig/syslog
    #
    #    local2.*                       /var/log/haproxy.log
    #
    log         127.0.0.1 local2

    chroot      /var/lib/haproxy
    pidfile     /var/run/haproxy.pid
    maxconn     4000
    user        haproxy
    group       haproxy
    daemon

    # turn on stats unix socket
    stats socket /var/lib/haproxy/stats

#---------------------------------------------------------------------
# common defaults that all the 'listen' and 'backend' sections will
# use if not designated in their block
#---------------------------------------------------------------------
defaults
    mode                    http
    log                     global
    option                  httplog
    option                  dontlognull
    option http-server-close
    option forwardfor       except 127.0.0.0/8
    option                  redispatch
    retries                 3
    timeout http-request    10s
    timeout queue           1m
    timeout connect         10s
    timeout client          1m
    timeout server          1m
    timeout http-keep-alive 10s
    timeout check           10s
    maxconn                 3000

#---------------------------------------------------------------------
# main frontend which proxys to the backends
#---------------------------------------------------------------------
frontend  main *:5000
    acl url_static       path_beg       -i /static /images /javascript /stylesheets
    acl url_static       path_end       -i .jpg .gif .png .css .js

    use_backend static          if url_static
    default_backend             app

#---------------------------------------------------------------------
# static backend for serving up images, stylesheets and such
#---------------------------------------------------------------------
backend static
    balance     roundrobin
    server      static 127.0.0.1:4331 check

#---------------------------------------------------------------------
# round robin balancing between the various backends
#---------------------------------------------------------------------
backend app
    balance     roundrobin
    server  app1 127.0.0.1:5001 check
    server  app2 127.0.0.1:5002 check
    server  app3 127.0.0.1:5003 check
    server  app4 127.0.0.1:5004 check


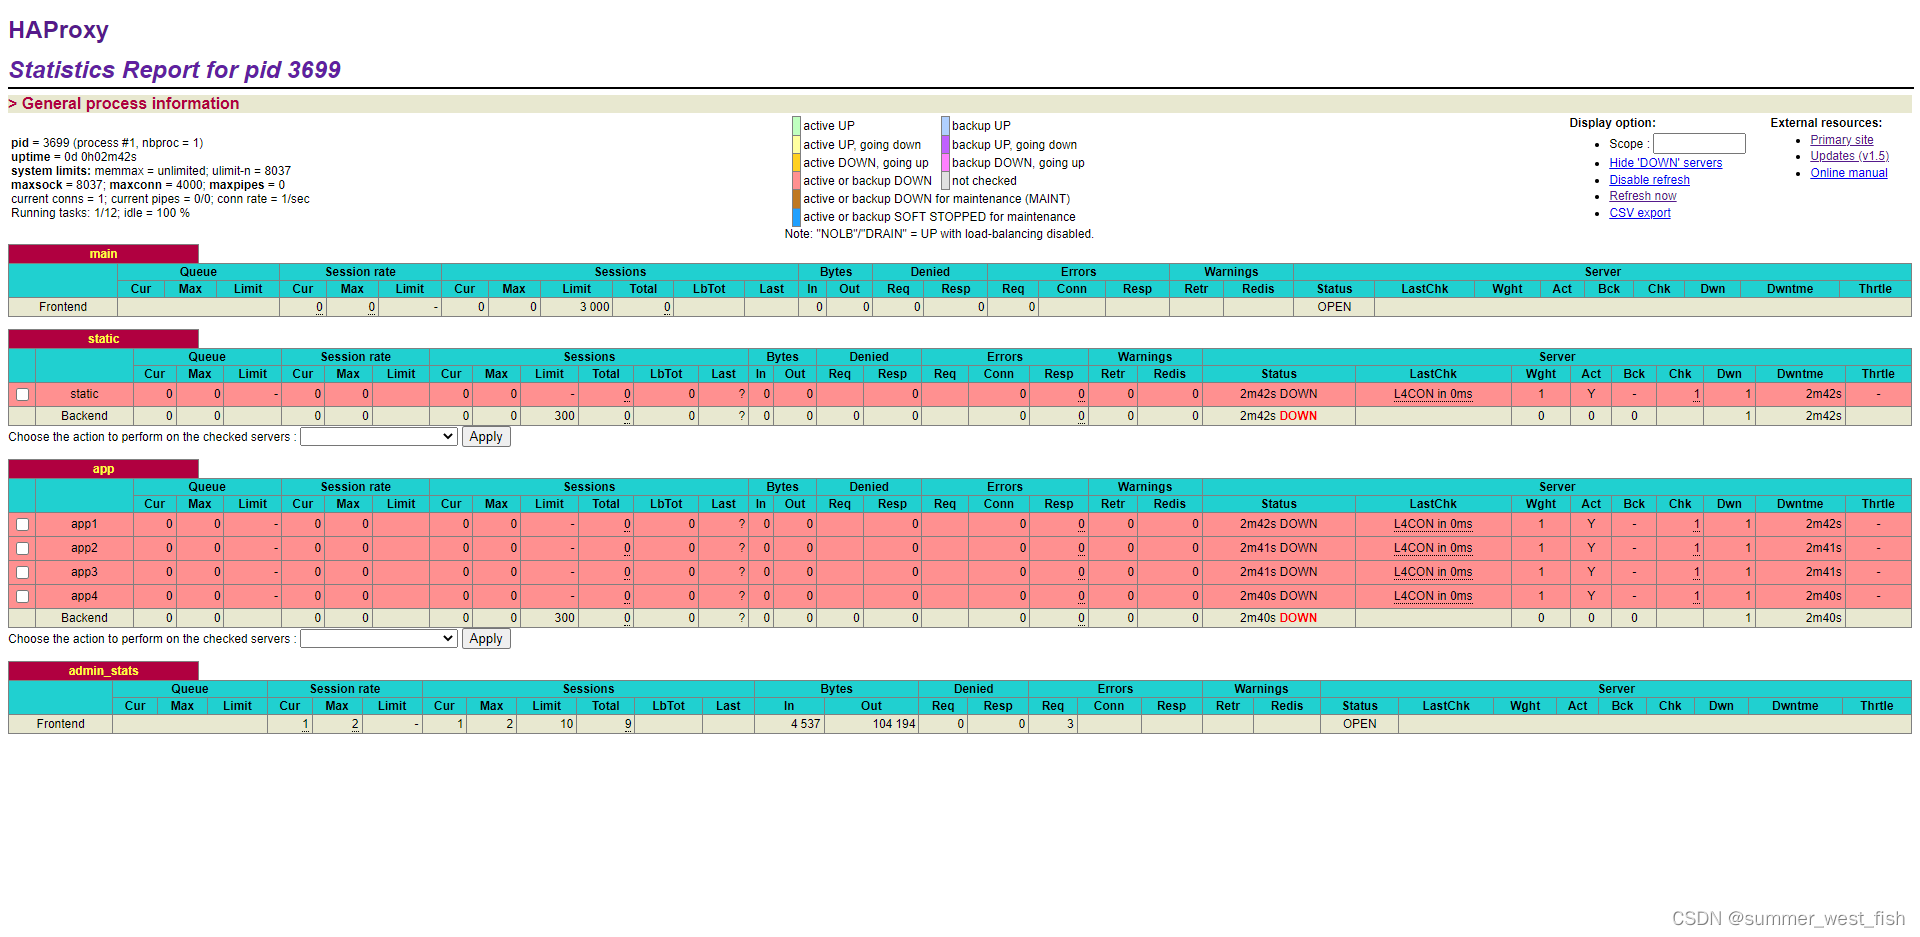
# 追加-后台管理的配置
frontend admin_stats
  #后台管理端口7777
  bind :7777
     mode http
     stats enable
     option httplog
     maxconn 10
     stats refresh 30s
     #地址ip:端口/admin
     stats uri /admin
     #用户名:admin 密码:123456
     stats auth admin:123456
     stats hide-version
stats admin if TRUE访问:http://10.95.35.92:7777/admin
三、配置代理
1、MySQL代理
listen cc_mysql_18066
    maxconn                 8000
    mode tcp
    bind 0.0.0.0:18066
    server s1 10.95.35.187:3306  check port 3306 rise 3 fall 5
2、配置DBLE代理
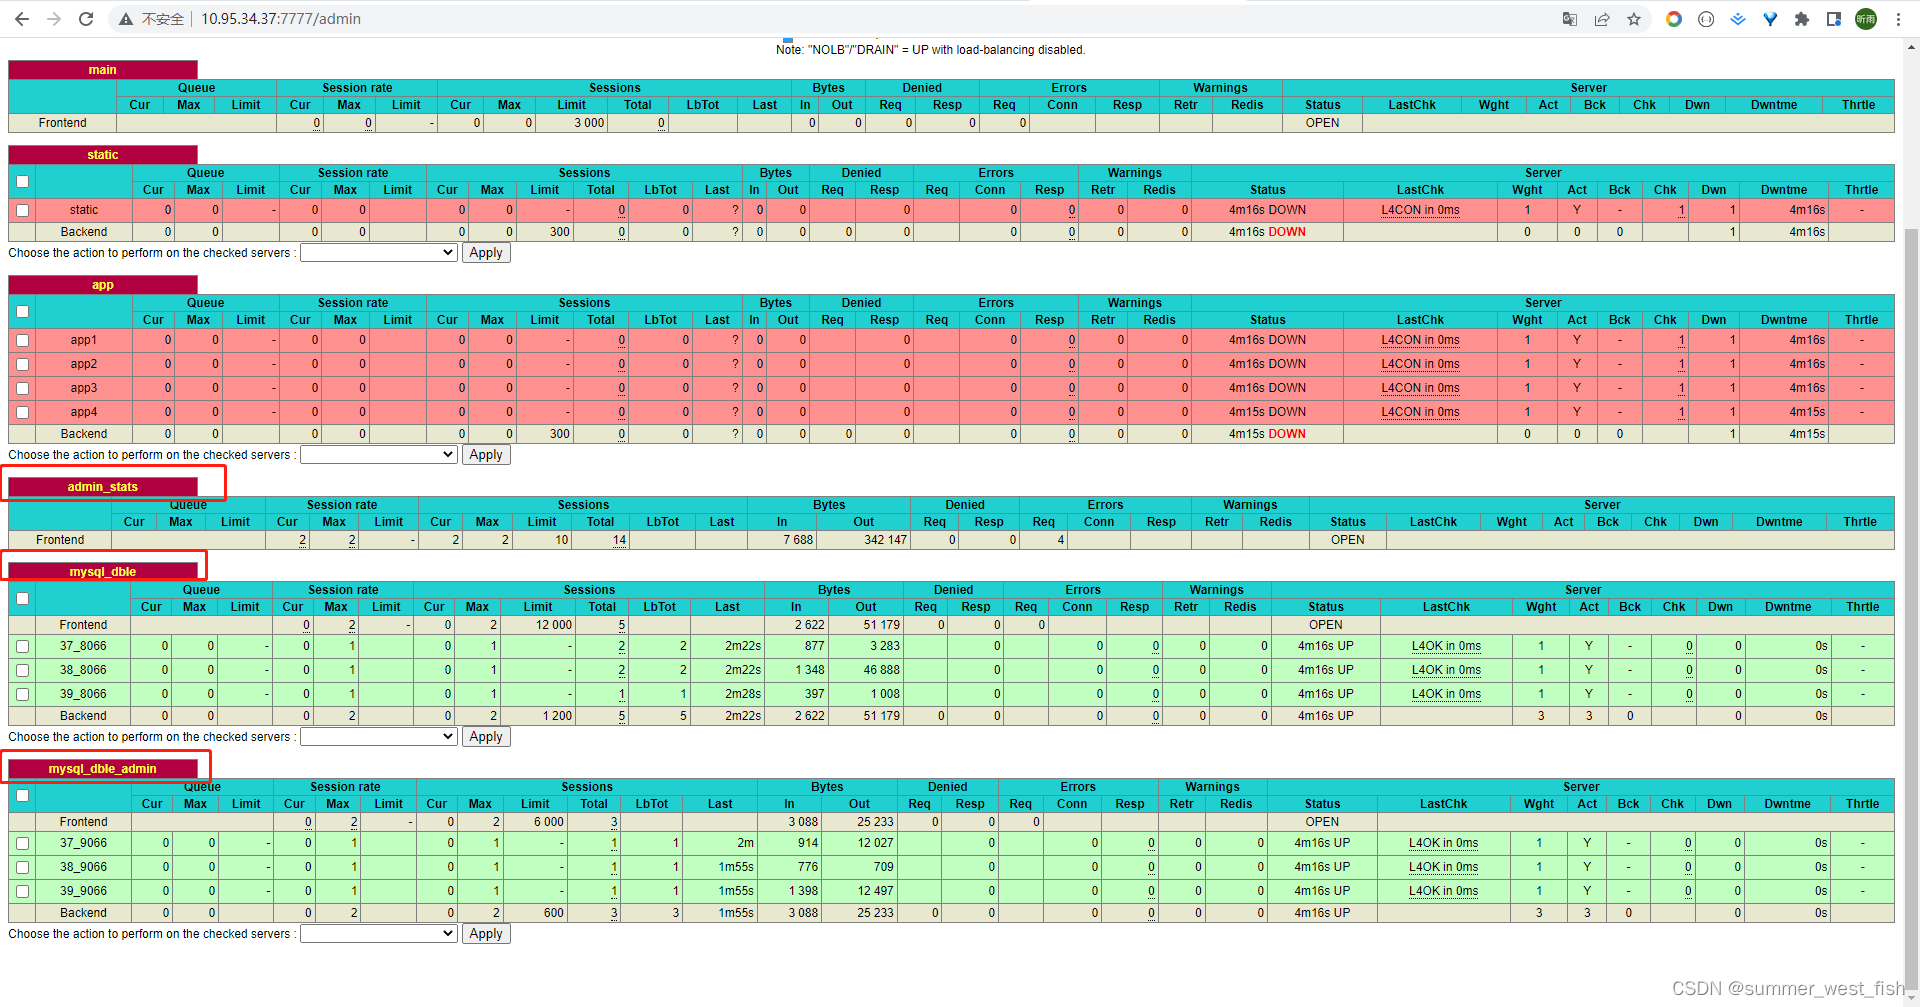
listen mysql_dble
    balance static-rr
    maxconn                 12000
    bind 0.0.0.0:18066
    mode tcp
    server 37_8066 10.95.34.37:8066  check port 8066 rise 3 fall 5
    server 38_8066 10.95.34.38:8066  check port 8066 rise 3 fall 5
    server 39_8066 10.95.34.39:8066  check port 8066 rise 3 fall 5

listen mysql_dble_admin
    balance static-rr
    maxconn                 6000
    bind 0.0.0.0:19066
    mode tcp
    server 37_9066 10.95.34.37:9066  check port 9066 rise 3 fall 5
    server 38_9066 10.95.34.38:9066  check port 9066 rise 3 fall 5
    server 39_9066 10.95.34.39:9066  check port 9066 rise 3 fall 5
3、观测

北京人形旗下天工造物具身智能开源社区,聚焦具身天工与慧思开物两大平台
更多推荐
 0
0 0
0- 0


 已为社区贡献10条内容

所有评论(0)