毕业设计仿真平台搭建【Gazebo+PX4+MID360+D435i】大全(二)运行fastlio
毕业设计仿真平台搭建【Gazebo+PX4+MID360+D435i】大全(二)运行fastlio
一、Mid360实物运行
前文说到,安装了livox_ros_driver2之后其实实物就可以运行了。
那么实物应该怎么运行呢?
sudo chmod 777 /dev/ttyACM0 & sleep 1;
roslaunch livox_ros_driver2 msg_MID360.launch & sleep 3
如上,第一步是赋予雷达相应的串口权限,然后运行livox_ros_driver2包中的msg_MID360.launch 文件。这个文件是做什么的?理解这个可以帮助我们更好的理解仿真是怎么运行起来的。
1.msg_MID360.launch 文件解读
<launch>

	<!--user configure parameters for ros start-->
	<arg name="lvx_file_path" default="livox_test.lvx"/>
	<arg name="bd_list" default="100000000000000"/>
	<arg name="xfer_format" default="1"/>
	<arg name="multi_topic" default="0"/>
	<arg name="data_src" default="0"/>
	<arg name="publish_freq" default="10.0"/>
	<arg name="output_type" default="0"/>
	<arg name="rviz_enable" default="false"/>
	<arg name="rosbag_enable" default="false"/>
	<arg name="cmdline_arg" default="$(arg bd_list)"/>
	<arg name="msg_frame_id" default="livox_frame"/>
	<arg name="lidar_bag" default="true"/>
	<arg name="imu_bag" default="true"/>
	<!--user configure parameters for ros end-->

	<param name="xfer_format" value="$(arg xfer_format)"/>
	<param name="multi_topic" value="$(arg multi_topic)"/>
	<param name="data_src" value="$(arg data_src)"/>
	<param name="publish_freq" type="double" value="$(arg publish_freq)"/>
	<param name="output_data_type" value="$(arg output_type)"/>
	<param name="cmdline_str" type="string" value="$(arg bd_list)"/>
	<param name="cmdline_file_path" type="string" value="$(arg lvx_file_path)"/>
	<param name="user_config_path" type="string" value="$(find livox_ros_driver2)/config/MID360_config.json"/>
	<param name="frame_id" type="string" value="$(arg msg_frame_id)"/>
	<param name="enable_lidar_bag" type="bool" value="$(arg lidar_bag)"/>
	<param name="enable_imu_bag" type="bool" value="$(arg imu_bag)"/>

	<node name="livox_lidar_publisher2" pkg="livox_ros_driver2"
	      type="livox_ros_driver2_node" required="true"
	      output="screen" args="$(arg cmdline_arg)"/>

	<group if="$(arg rosbag_enable)">
    	<node pkg="rosbag" type="record" name="record" output="screen"
          		args="-a"/>
    </group>

</launch>
启动文件中的参数主要分为三类:点云数据配置、设备连接配置以及数据记录与其他设置。其核心逻辑是通过设置这些参数,来启动 livox_ros_driver2_node节点,从而控制雷达的工作方式。
1.1点云数据配置
这些参数决定了点云消息的格式和发布频率,直接影响后续的数据处理。
参数
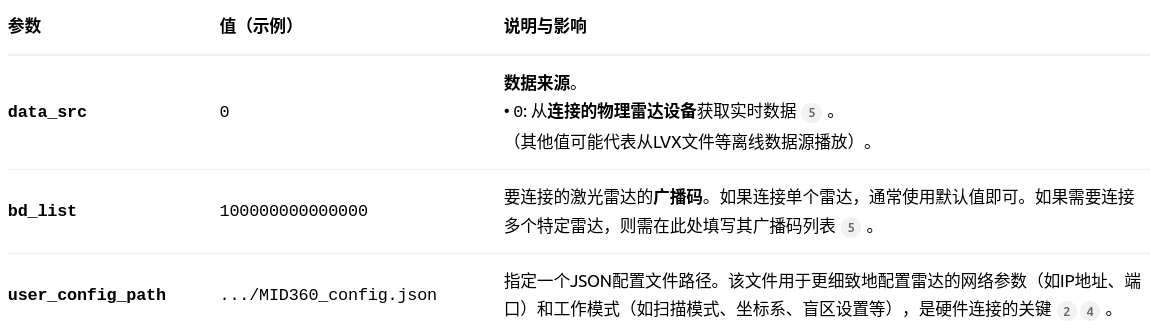
1.2设备连接与数据源
这些参数用于配置与雷达硬件的连接和数据来源。
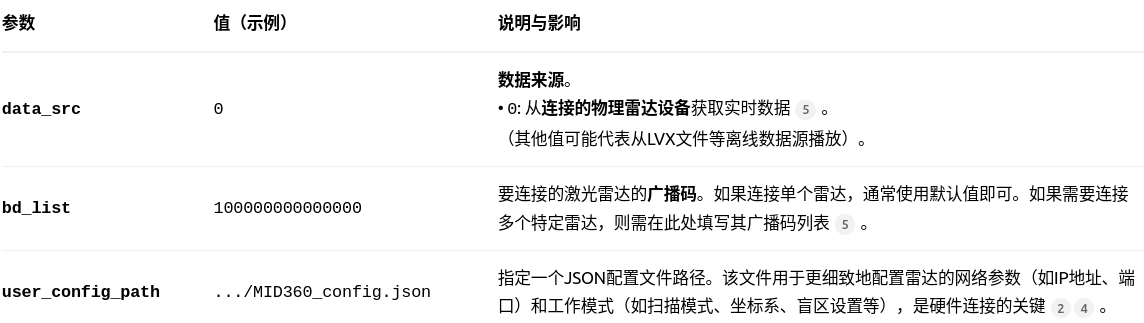
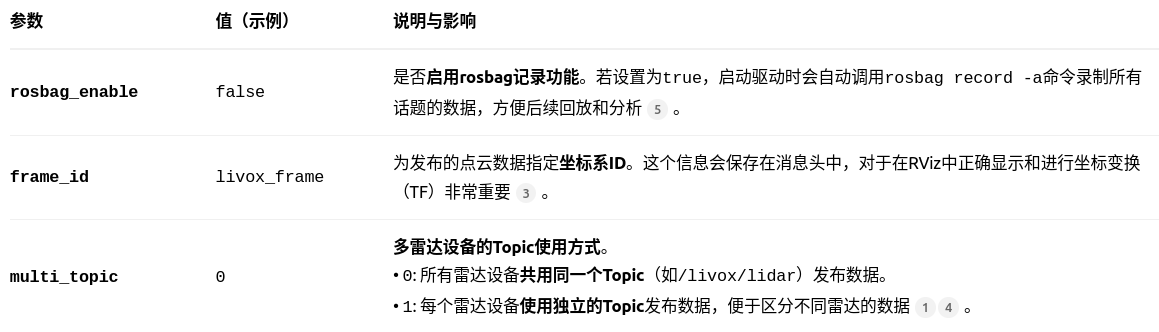
1.3数据记录与其他设置
SLAM算法开发:如果你的目的是进行SLAM(同步定位与建图),特别是使用像FAST-LIO这样的算法,务必设置 xfer_format=1。因为自定义消息格式(CustomMsg)中包含的每个点的高精度时间戳是进行运动畸变校正的关键。
常规显示与处理:如果只是想在RVIZ中可视化点云,或使用ROS生态中标准的点云处理工具(如PCL),那么使用默认的 xfer_format=0(PointCloud2格式)会更加方便,兼容性更好。
数据录制:在初次调试或需要保存数据用于后续分析时,可以临时将 rosbag_enable设为 true。但注意长时间录制会占用大量磁盘空间。
运行了上面的节点之后就可以运行fastlio节点了,关于fastlio如何部署请看本篇博文,在此不再赘述:
Livox-mid360+PX4+XTDrone+Faster-lio仿真
配置好之后运行如下节点就可以运行fastlio。
roslaunch faster_lio mapping_avia.launch & sleep 3;
那么这个节点做了什么呢?
2.faster_lio mapping_avia.launch文件解读
<launch>
<!-- Launch file for Livox AVIA LiDAR -->

	<arg name="rviz" default="true" />

	<rosparam command="load" file="$(find faster_lio)/config/avia.yaml" />

	<param name="feature_extract_enable" type="bool" value="0"/>
	<param name="point_filter_num_" type="int" value="3"/>
	<param name="max_iteration" type="int" value="3" />
	<param name="filter_size_surf" type="double" value="0.5" />
	<param name="filter_size_map" type="double" value="0.5" />
	<param name="cube_side_length" type="double" value="1000" />
	<param name="runtime_pos_log_enable" type="bool" value="1" />
    <node pkg="faster_lio" type="run_mapping_online" name="laserMapping" output="screen" />

	<!-- <group if="$(arg rviz)">
	<node launch-prefix="nice" pkg="rviz" type="rviz" name="rviz" args="-d $(find faster_lio)/rviz_cfg/loam_livox.rviz" />
	</group> -->

</launch>
这个文件做了三件事:
2.1从config文件中读取了相关参数
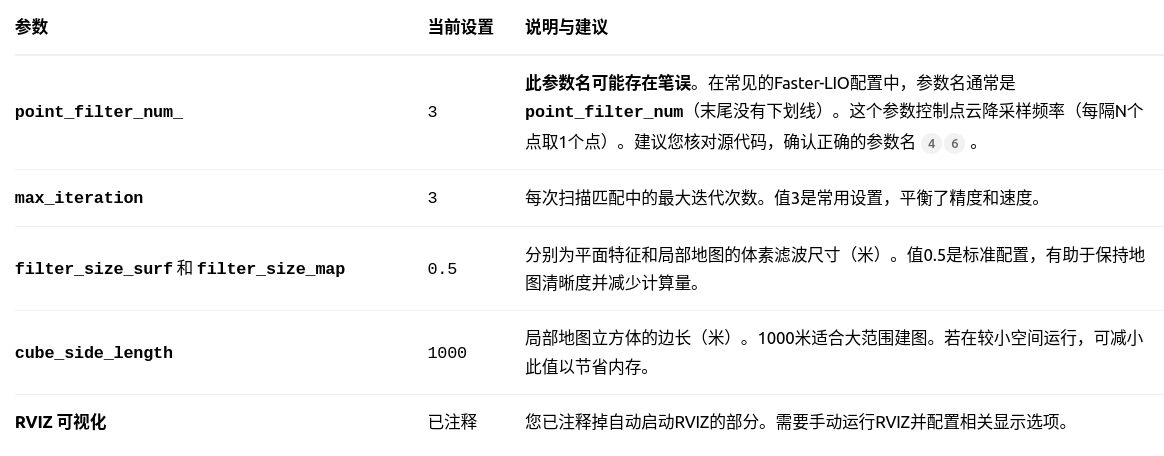
2.2配置了如下参数
2.3运行了laserMapping节点
那么config文件中读取的参数是干什么的?这个与laserMapping节点需要什么息息相关:
要让它成功运行,主要需要准备两样东西:正确的配置文件和传感器数据话题。
为了让这个节点正常工作,您需要通过ROS参数服务器或YAML配置文件提供一系列参数。核心的配置信息如下:
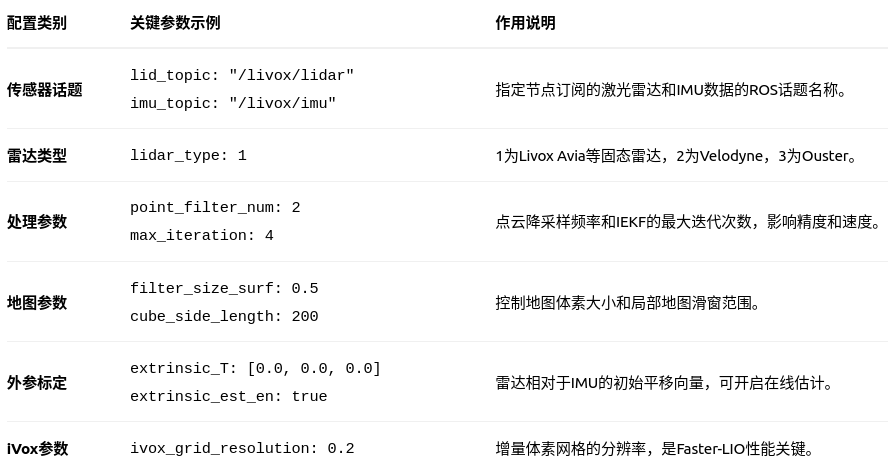
2.3.1需要订阅的ROS话题
根据代码中的 SubAndPubToROS函数,该节点需要订阅以下ROS话题:
激光雷达点云话题 (sensor_msgs::PointCloud2或 livox_ros_driver::CustomMsg)
话题名:由参数 common/lid_topic指定,默认为 “/livox/lidar”。
数据格式:代码会根据 lidar_type自动选择订阅的消息类型。对于Livox雷达(lidar_type=1),它期望的是 livox_ros_driver/CustomMsg格式的点云
。对于Velodyne等标准雷达,则使用标准的 sensor_msgs/PointCloud2格式。
IMU话题 (sensor_msgs::Imu)
话题名:由参数 common/imu_topic指定,默认为 “/livox/imu”。
数据要求:IMU数据需要包含有效的角速度(angular_velocity)和线性加速度(linear_acceleration),并且其协方差矩阵(orientation_covariance, angular_velocity_covariance, linear_acceleration_covariance)需要正确设置。
2.3.2运行前的重要检查清单
在启动您的launch文件之前,请务必确认以下几点:
传感器驱动已运行:确保 livox_ros_driver2或其他雷达驱动已经启动,并且正在发布正确的点云话题和数据格式(特别是Livox雷达需要使用CustomMsg格式,即在驱动launch文件中设置xfer_format: 1)。
话题匹配:使用 rostopic list和 rostopic echo /your_topic_name命令确认实际发布的传感器话题名称与您在YAML配置文件中的设置完全一致。这是最常见的问题之一。
时间同步:检查激光雷达数据和IMU数据的时间戳是否同步。如果不同步,可以考虑开启配置文件中的 time_sync_en选项(但优先推荐进行硬件时间同步或使用驱动层的时间戳对齐)。
二、Mid360仿真运行
仿真中和
sudo chmod 777 /dev/ttyACM0 & sleep 1;
roslaunch livox_ros_driver2 msg_MID360.launch & sleep 3
这一步对应的是什么呢?
就是打开我们的px4仿真环境加载出来带着mid360的无人机,这一步就完成了,即:
roslaunch px4 mavros_posix_sitl.launch
mid360就启动了,imu信息以及点云数据就都出来了。但是话题名称和实物不太一样,标定数据也不太一样,所以我们需要重新写一个config文件让fastlio来读取。
mid360.yaml文件:
common:
    lid_topic:  "/scan"
    imu_topic:  "/mavros/imu/data"
    time_sync_en: false
    time_offset_lidar_to_imu: 0.0 # Time offset between lidar and IMU calibrated by other algorithms, e.g. LI-Init (can be found in README).
                                  # This param will take effect no matter what time_sync_en is. So if the time offset is not known exactly, please set as 0.0

preprocess:
    lidar_type: 1                # 1 for Livox serials LiDAR, 2 for Velodyne LiDAR, 3 for ouster LiDAR,
    scan_line: 4
    blind: 0.5

mapping:
    acc_cov: 0.1
    gyr_cov: 0.1
    b_acc_cov: 0.0001
    b_gyr_cov: 0.0001
    fov_degree:    360
    det_range:     100.0
    extrinsic_est_en:  false      # true: enable the online estimation of IMU-LiDAR extrinsic
    extrinsic_T: [ -0.011, -0.02329, 0.04412 ]
    extrinsic_R: [ 1, 0, 0,
                   0, 1, 0,
                   0, 0, 1]

publish:
    path_en:  false
    scan_publish_en:  true       # false: close all the point cloud output
    dense_publish_en: true       # false: low down the points number in a global-frame point clouds scan.
    scan_bodyframe_pub_en: true  # true: output the point cloud scans in IMU-body-frame

pcd_save:
    pcd_save_en: true
    interval: -1                 # how many LiDAR frames saved in each pcd file;
                                 # -1 : all frames will be saved in ONE pcd file, may lead to memory crash when having too much frames.
在fastlio的launch文件夹中再添加一个launch文件:
mapping_mid360.launch:
<launch>
<!-- Launch file for Livox MID360 LiDAR -->

	<arg name="rviz" default="true" />

	<rosparam command="load" file="$(find faster_lio)/config/mid360.yaml" />

	<param name="feature_extract_enable" type="bool" value="0"/>
	<param name="point_filter_num_" type="int" value="3"/>
	<param name="max_iteration" type="int" value="3" />
	<param name="filter_size_surf" type="double" value="0.5" />
	<param name="filter_size_map" type="double" value="0.5" />
	<param name="cube_side_length" type="double" value="1000" />
	<param name="runtime_pos_log_enable" type="bool" value="1" />
    <node pkg="faster_lio" type="run_mapping_online" name="laserMapping" output="screen" />

	<group if="$(arg rviz)">
	<node launch-prefix="nice" pkg="rviz" type="rviz" name="rviz" args="-d $(find faster_lio)/rviz_cfg/loam_livox.rviz" />
	</group>

</launch>
其实和原来的差不多,区别就在于读取的config文件不同了,以及把rviz打开了。
所以仿真运行的总体步骤:
roslaunch px4 mavros_posix_sitl.launch

roslaunch faster_lio mapping_mid360.launch
运行效果如下:
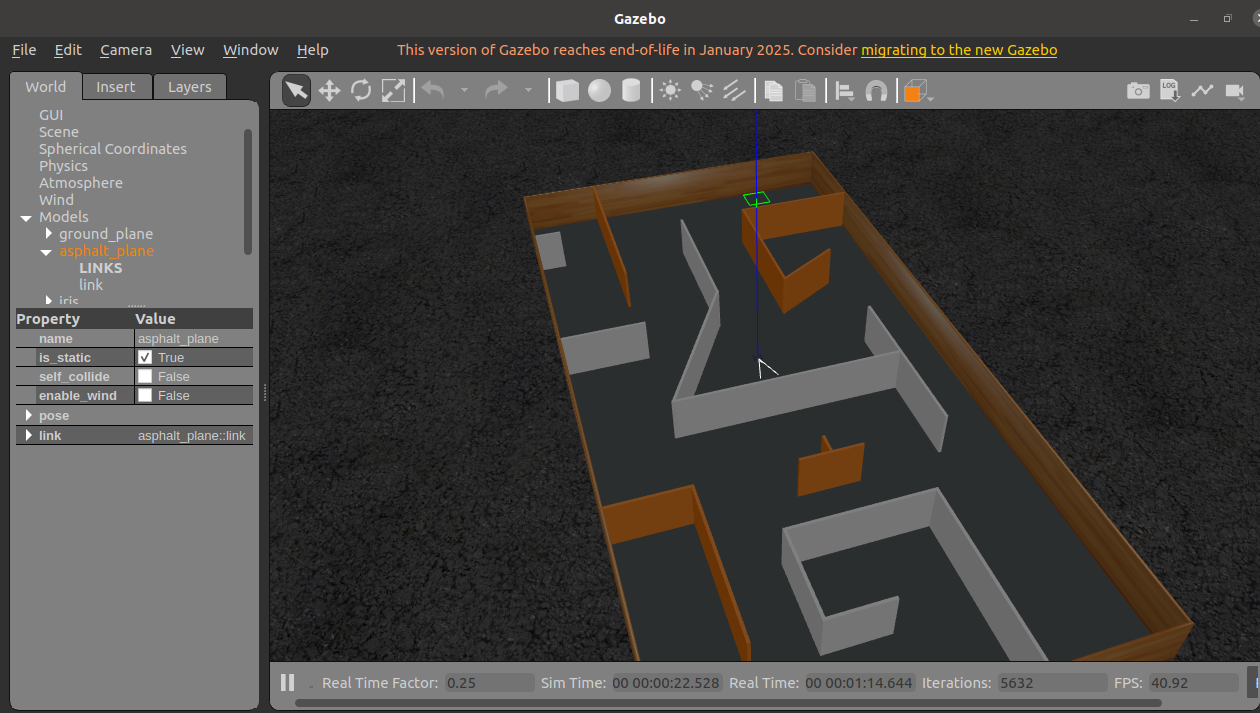
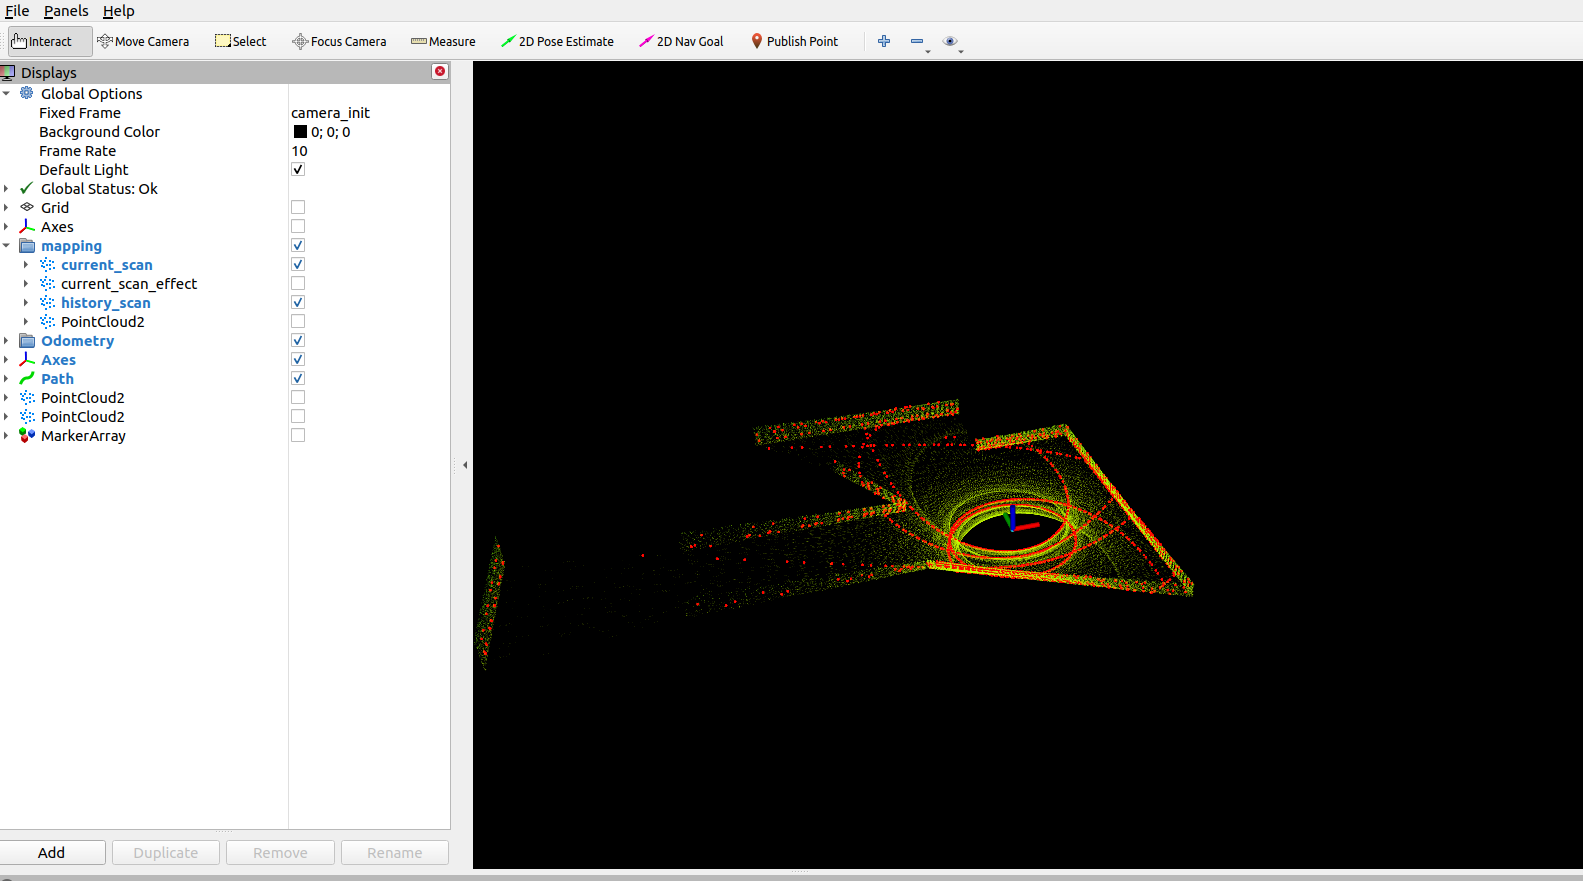
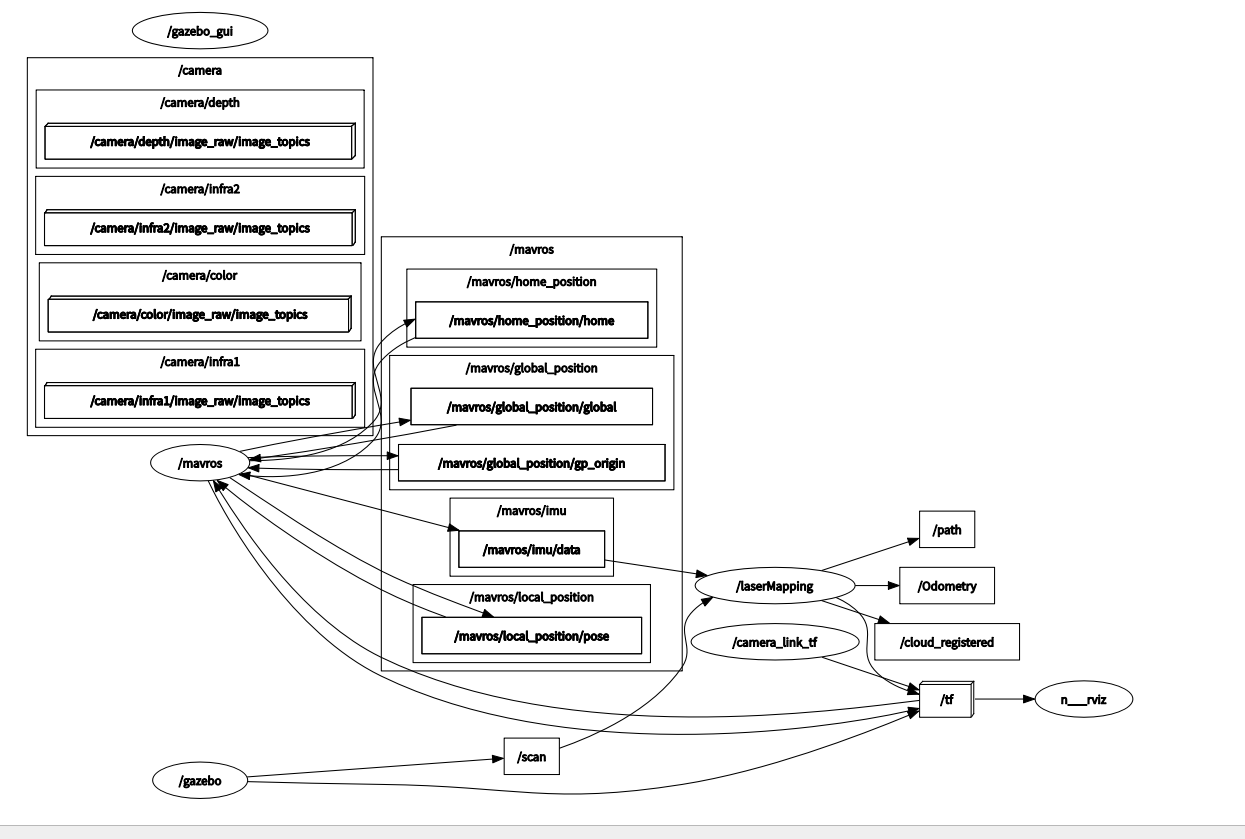 可以看到lasermapping是拿到imu和scan两个话题之后生成了后面的三个对我们有用的信息。

北京人形旗下天工造物具身智能开源社区,聚焦具身天工与慧思开物两大平台
更多推荐
 16
16 0
0- 0


 已为社区贡献2条内容

所有评论(0)