carla+ros+autoware
一、ubuntu 20.04+python3.7安装教程
1、下载carla_ros_bridge并配置环境
mkdir -p ~/carla-ros-bridge/catkin_ws/src
cd ~/carla-ros-bridge
git clone --recurse-submodules https://github.com/carla-simulator/ros-bridge.git catkin_ws/src/ros-bridge
source /opt/ros/noetic/setup.bash
cd catkin_ws
2、安装ros依赖项目
rosdep update
rosdep install --from-paths src --ignore-src -r
3、激活anaconda环境
conda activate carla37
4、安装conda依赖项目
conda install -c conda-forge empy
5、安装python依赖项目
pip install pyyaml
pip install opencv-python
pip install catkin_pkg
pip install rospkg -i https://pypi.tuna.tsinghua.edu.cn/simple
pip install pygame=1.9.6  #(0.9.10的carla版本建议装pygame的1.9.6版本)
6、编译ros包
catkin build
二、ubuntu 18.04+python2.7安装教程
1、下载carla_ros_bridge并配置环境(指定0.9.10版本)
mkdir -p ~/carla-ros-bridge/catkin_ws/src
cd ~/carla-ros-bridge
#要下载 ros-bridge 的 0.9.10 版本,你需要在克隆时指定标签(tag)。可以使用以下命令:
git clone --recurse-submodules -b 0.9.10.1 https://github.com/carla-simulator/ros-bridge.git catkin_ws/src/ros-bridge
source /opt/ros/melodic/setup.bash
cd catkin_ws
2、不用安装ros依赖项,直接创建conda环境并安装依赖项
conda create -n carla27 python=2.7
conda install -c conda-forge empy
pip install catkin_pkg
#(确保当前的conda环境是py2.7的环境,# 验证当前环境是否正确(应显示Python 2.7)
#python --version # 预期输出:Python 2.7.x
#which python # 预期输出:/anaconda3/envs/carla27/bin/python
#which pip # 预期输出:/anaconda3/envs/carla27/bin/pip
3、编译ros空间
catkin_make
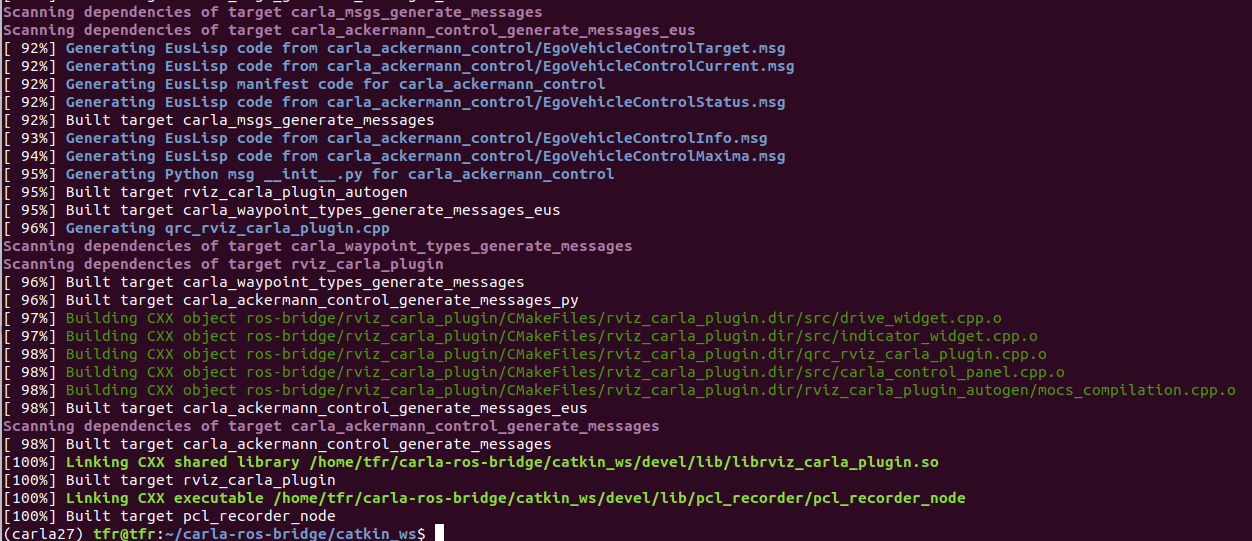
4、安装依赖项
pip install pyyaml
pip install rospkg
pip install numpy
pip install pygame==1.9.6
pip install opencv-python==4.2.0.32 -i https://pypi.tuna.tsinghua.edu.cn/simple
pip install pyyaml
pip install rospkg
pip install numpy
pip install pygame==1.9.6
pip install opencv-python==4.2.0.32 -i https://pypi.tuna.tsinghua.edu.cn/simple
5、运行carla_ros_bridge
source devel/setup.bash
roslaunch carla_ros_bridge carla_ros_bridge_with_example_ego_vehicle.launch
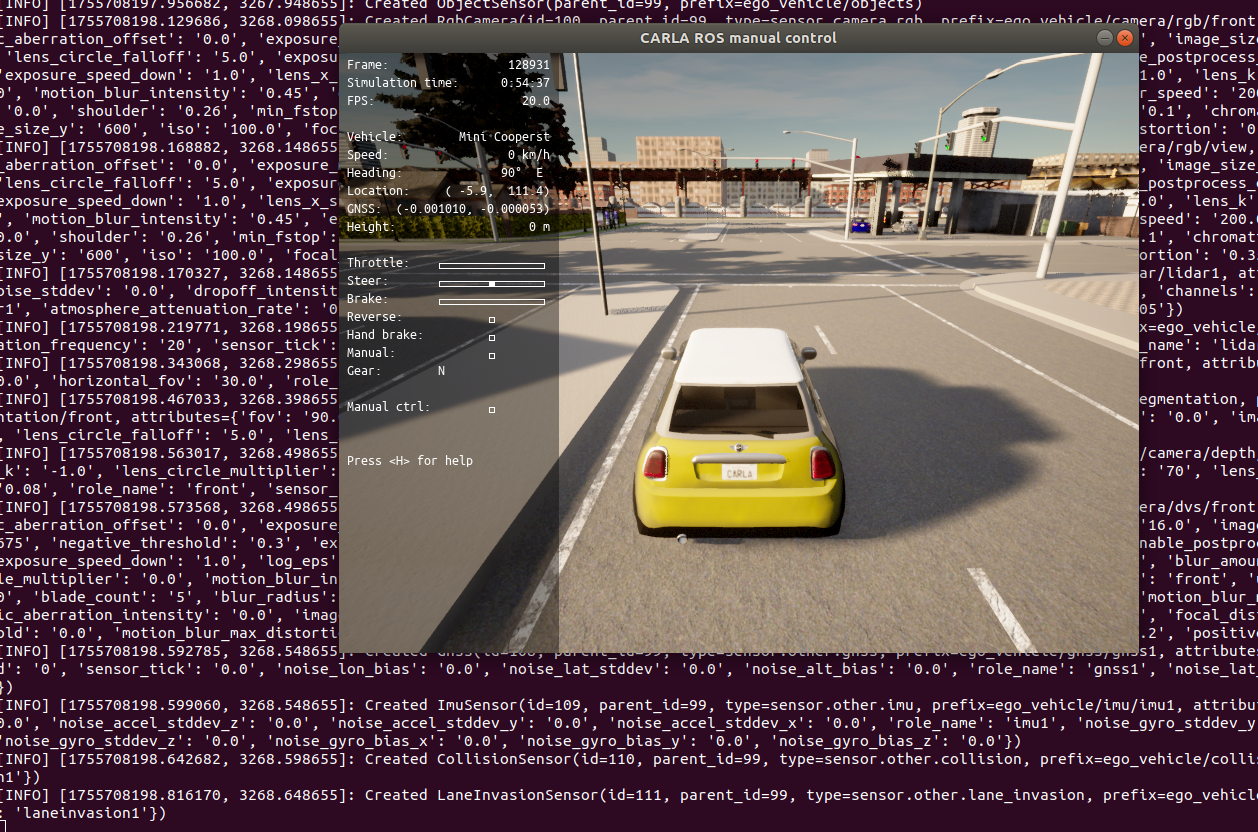
一些bug解决,比如catkin_make:Command ‘catkin_make‘ not found
 source /opt/ros/melodic/setup.bash
 echo "source /opt/ros/melodic/setup.bash" >> ~/.bashrc
 source ~/.bashrc
比如当Python 解释器仍然在加载 Python 3.7 版本的 CARLA 库时,可以清除 Python 缓存
rm -rf __pycache__/
#比如在终端临时设置 PYTHONPATH
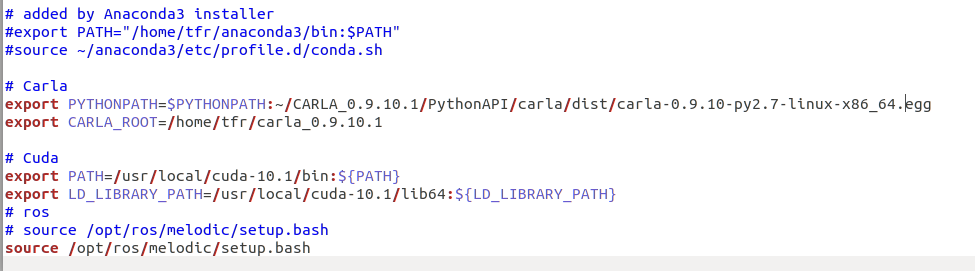
export PYTHONPATH=~/CARLA_0.9.10.1/PythonAPI/carla/dist/carla-0.9.10-py2.7-linux-x86_64.egg
python
import carla
常用命令
sudo gedit ~/.bashrc
source ~/.bashrc
# anaconda源
sudo gedit ~/.condarc
编辑源配置文件
sudo gedit  /etc/apt/sources.list
pkg-config --modversion python/ eigen3/eigen3 #查看环境版本
rm -rf install/ build/ log/ #清除之前编译的旧文件
bashrc环境
三、ros安装教程
1、添加清华源及密钥
sudo sh -c '. /etc/lsb-release && echo "deb http://mirrors.tuna.tsinghua.edu.cn/ros/ubuntu/ $DISTRIB_CODENAME main" > /etc/apt/sources.list.d/ros-latest.list'
sudo apt-key adv --keyserver 'hkp://keyserver.ubuntu.com:80' --recv-key C1CF6E31E6BADE8868B172B4F42ED6FBAB17C654
2、确保软件更新为最新版本
sudo apt-get update
3、下载ros
sudo apt-get install ros-melodic-desktop-full
4、初始化操作
sudo rosdep init
rosdep update  #rosdep update更新操作
5、环境配置
echo "source /opt/ros/melodic/setup.bash" >> ~/.bashrc
source ~/.bashrc
6、小海龟
roscore
rosrun turtlesim turtlesim_node #弹出一个小海龟
rosrun turtlesim turtle_teleop_key  #控制小海龟
四、实战项目的一个bug
1、问题:catkin_ws编译的问题
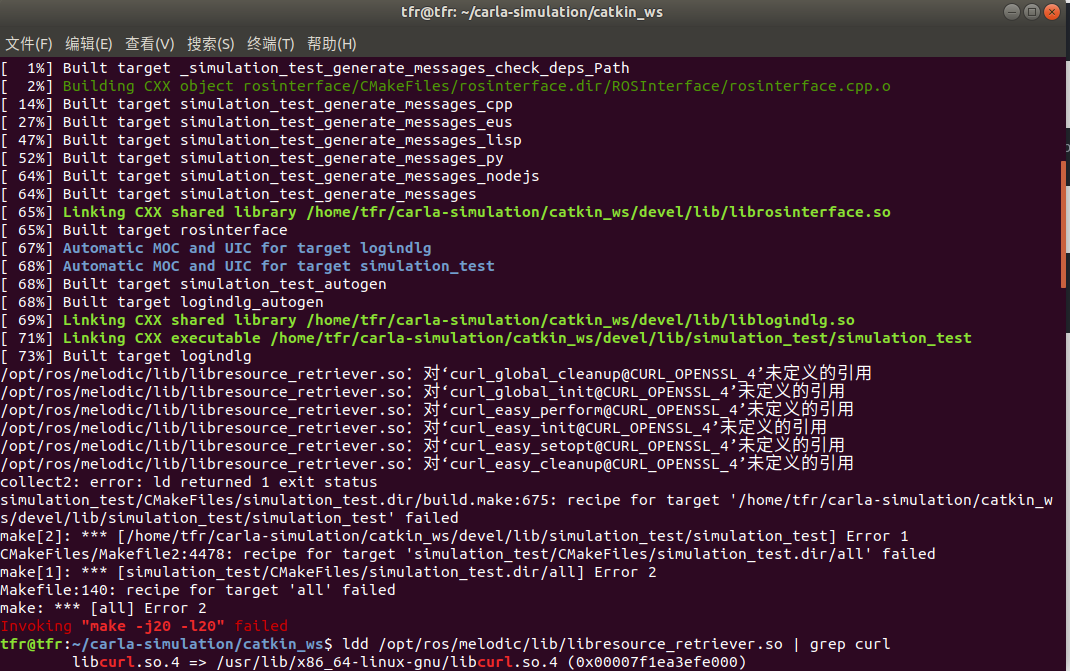
1:解决:在 simulation_test CMakeLists 中手动链接 curl
target_link_libraries(simulation_test
${catkin_LIBRARIES}
curl
)
五、autoware环境安装bug
5.1、autoware环境安装
参考教程1:Ubuntu18.04安装autoware 1.14(GPU版) 完整教程(包含环境搭建)
参考教程2:ubuntu 18.04 安装 Autoware1.13安装
参考教程3:【Ubuntu18.04】Autoware安装
1、autoware仓库下载
2、下载autoware的src源码
cd autoware-1.14.0
# 创建工作区
mkdir -p src
# 将Autoware.AI下载到工作区
vcs import src < autoware.ai.repos
3、编译autoware的ros包
colcon build --cmake-args -DCMAKE_BUILD_TYPE=Release
如果报错,则挨个编译指定的ROS包
colcon build --packages-select integrated-viewer --cmake-args -DCMAKE_BUILD_TYPE=Release #编译指定的ROS包,编译integrated_viewer包
方法1:指定 --packages-up-to 或 --packages-select
colcon build --packages-select integrated-viewer --cmake-args -DCMAKE_BUILD_TYPE=Release #编译指定的ROS包,编译integrated_viewer包
方法2:指定 src/autoware 目录
colcon build --base-paths src/autoware
方法3:组合使用示例,如果需要只编译 src/autoware 下的包,并且以 Release 模式编译,可以同时使用两个参数:
colcon build --base-paths src/autoware --cmake-args -DCMAKE_BUILD_TYPE=Release
colcon build --packages-select integrated-viewer --cmake-args -DCMAKE_BUILD_TYPE=Release #编译指定的ROS包,编译integrated_viewer包
4、运行autoware的ros包
source install/setup.bash
roslaunch runtime_manager runtime_manager.launch
5、运行autoware的ros包
将Demo测试数据放在.autoware下,然后加载对应的包即可运行
5.2、bug
export OpenCV_DIR=/usr/local/share/OpenCV
catkin_package(DEPENDS OpenCV)
target_link_libraries(get_Image ${catkin_LIBRARIES} ${OpenCV_LIBS} )
colcon build --packages-select integrated-viewer --cmake-args -DCMAKE_BUILD_TYPE=Release #编译指定的ROS包,编译integrated_viewer包
colcon build --cmake-args -DCMAKE_BUILD_TYPE=Release #编译所有ROS包
# 1. 先指定 OpenCV 路径
set(OpenCV_DIR "/usr/local/share/OpenCV")
# 2. 关键补充:执行 find_package 读取 OpenCV 配置(之前缺失这一步)
find_package(OpenCV REQUIRED)
#3、修改CMakeLists.txt
catkin_package(DEPENDS OpenCV)
target_link_libraries(get_Image ${catkin_LIBRARIES} ${OpenCV_LIBS} )
- 核心修改说明:
find_package(OpenCV REQUIRED) 的作用:
执行这一行后,CMake 会去 set(OpenCV_DIR) 指定的 /usr/local/share/OpenCV 路径下,读取 OpenCVConfig.cmake 文件,自动定义 OpenCV_INCLUDE_DIRS(头文件路径)和 OpenCV_LIBS(库文件列表)这两个关键变量。
没有这一步,后续的 include_directories(${OpenCV_INCLUDE_DIRS}) 和 target_link_libraries(…, ${OpenCV_LIBS}) 中的变量都是空的,相当于没加 OpenCV 依赖。
autoware编译几乎都是opencv环境的问题,一个是没有用到3.4.16,一个是src中的代码很多都是2.X的,不是3.X的
3、核心问题总结:
opencv库与autoware的src源码环境不匹配
一方面是修改CMakeLists.txt,主要是要指定系统所安装的opencv 3.4.16环境,另一方面是要将对应cpp文件老版本opencv函数改成对应新版本的opencv函数。
4、ROS包当用rosdep install命令安装报错时,不要纠结对应错误,直接去编译(colcon build / catkin_make等)对应ROS包,然后挨个解决包的问题。
六、vscode+ros运行
1、c_cpp_properties.json
{
  "configurations": [
    {
      "browse": {
        "databaseFilename": "${default}",
        "limitSymbolsToIncludedHeaders": false
      },
      "includePath": [
        "/opt/ros/melodic/include/**",
        "/usr/include/**"
      ],
      "name": "ROS",
      "intelliSenseMode": "gcc-x64",
      "compilerPath": "/usr/bin/gcc",
      "cStandard": "gnu11",
      "cppStandard": "c++14"
    }
  ],
  "version": 4
}
2、settings.json
{
    "python.autoComplete.extraPaths": [
        "/opt/ros/melodic/lib/python2.7/dist-packages",
        "/home/tfr/CARLA_0.9.10.1/PythonAPI/carla/dist/carla-0.9.10-py2.7-linux-x86_64.egg"
    ],
    "python.analysis.extraPaths": [
        "/opt/ros/melodic/lib/python2.7/dist-packages",
        "/home/tfr/CARLA_0.9.10.1/PythonAPI/carla/dist/carla-0.9.10-py2.7-linux-x86_64.egg"
    ]
}
3、tasks.json (colcon build 编译)
{
    "version": "2.0.0",
    "tasks": [
        {
            "label": "colcon_build",
            "type": "shell",
            "command": "colcon build",
            "args": [

                // 可选:添加其他编译参数,例如指定包编译
                // "--packages-select", "your_package_name"
            ],
            "group": {"kind": "build", "isDefault": true},
            "presentation": {
                "reveal": "always"
            },
            "problemMatcher": "$msCompile",
            "options": {
                // 确保在工作空间根目录执行编译
                "cwd": "${workspaceFolder}"
            }
        }
    ]
}
3、tasks.json (colcon build 编译,同时指定发布调试版本的ros节点,不然调试没用)
{
    "version": "0.2.0",
    "configurations": [
        {
            "name": "(gdb) Launch",
            "type": "cppdbg",
            "request": "launch",
            // 这里要修改,找到编译生成的二进制可执行文件
            "program": "${workspaceFolder}/install/hello/lib/hello/hello",
            "args": [],
            "stopAtEntry": false,
            //"preLaunchTask": "build",
            "cwd": "${workspaceFolder}",
            "environment": [],
            "externalConsole": false,
            "MIMode": "gdb",
            "targetArchitecture": "x64",
            "avoidWindowsConsoleRedirection": true,
            "setupCommands": [
                {
                    "description": "Enable pretty-printing for gdb",
                    "text": "-enable-pretty-printing",
                    "ignoreFailures": true
                }
            ]
        }
    ]
}
4、tasks.json (catkin_make编译)catkin_make和colcon build对应的ros包的CMakeLists.txt略微有区别,要注意下
{
    "version": "2.0.0",
    "tasks": [
        {
            "label": "catkin_make", //代表提示的描述性信息
            "type": "shell",  //可以选择shell或者process,如果是shell代码是在shell里面运行一个命令,如果是process代表作为一个进程来运行
            "command": "catkin_make",//这个是我们需要运行的命令
            "args": [
				 "-DCMAKE_EXPORT_COMPILE_COMMANDS=ON"
			],//如果需要在命令后面加一些后缀,可以写在这里,比如-DCATKIN_WHITELIST_PACKAGES=“pac1;pac2”
            "group": {"kind":"build","isDefault":true},
            "presentation": {
                "reveal": "always"//可选always或者silence,代表是否输出信息
            },
            "problemMatcher": "$msCompile"
        },
    ]
}
5、launch.json调试文件配置,该对应的program就像,如何是catkin_make编译,那么包的路径就是"program": “${workspaceFolder}/devel/lib/hello/hello”,//要调试的程序(完整路径,支持相对路径)
{
    "version": "0.2.0",
    "configurations": [
        {
            "name": "(gdb) Launch",
            "type": "cppdbg",
            "request": "launch",
            // 这里要修改,找到编译生成的二进制可执行文件
            "program": "${workspaceFolder}/install/hello/lib/hello/hello",
            "args": [],
            "stopAtEntry": false,
            //"preLaunchTask": "build",
            "cwd": "${workspaceFolder}",
            "environment": [],
            "externalConsole": false,
            "MIMode": "gdb",
            "targetArchitecture": "x64",
            "avoidWindowsConsoleRedirection": true,
            "setupCommands": [
                {
                    "description": "Enable pretty-printing for gdb",
                    "text": "-enable-pretty-printing",
                    "ignoreFailures": true
                }
            ]
        }
    ]
}
6、
COLCON BUILD 常用指令
创建符号连接,每次调整 launch文件时都不必重新build,如果install的文件需要拷贝到另外的机器使用,不要使用这个参数,否则会找不到源文件。
colcon build --symlink-install
编译一个单独的包,但这个指令并不会编译该包的依赖,往往会报错。
colcon build --packages-select <name-of-pkg>
编译一个单独的包和其依赖编译
colcon build --packages-up-to <name-of-pkg>
编译时忽略指定包
colcon build --packages-ignore <name-of-pkg>
编译开启Debug模式
colcon build --cmake-args -DCMAKE_BUILD_TYPE=Debug
编译开启Release模式
colcon build --cmake-args -DCMAKE_BUILD_TYPE=Release
编译一个package 并且把log 显示在屏幕上
colcon build --packages-select rmw_coredds_shared_cpp --symlink-install --cmake-args -DCMAKE_BUILD_TYPE=Debug --event-handlers=console_direct+
设置编译优化等级
colcon build --packages-select examples_rclcpp_minimal_action_client --symlink-install --cmake-args -DCMAKE_CXX_FLAGS='-o0 -ggdb' -DCMAKE_C_FLAGS='-o0 -ggdb'
7、调试ROS的lanuch文件,launch.json
{
    "configurations": [
    {
        "name": "ROS: Launch",
        "type": "ros",
        "request": "launch",
        "target": "/home/tfr/helloworld_ws_lanuch/src/hello/launch/hello.launch"
    }
    ]
}

北京人形旗下天工造物具身智能开源社区,聚焦具身天工与慧思开物两大平台
更多推荐
 2
2 0
0- 0


 已为社区贡献3条内容

所有评论(0)