GUI自动化测试---pywinauto
一、为什么要做GUI自动化
1.GUI自动化的意义
在软件测试的过程中,有许多重复型的测试用例需要执行,例如对软件基本功能的验证。如果手动测试,耗费大量时间还容易出错。GUI自动化测试可以短时间内快速执行大量的重复测试用例,并且能够始终按照预设的逻辑和步骤执行操作,能够极大的提高效率。
2.GUI自动化的适用场景
GUI测试适用于各种需要对图形用户界面进行重复性、一致性测试的场景 ,尤其在验证软件功能的稳定性、正确性和用户体验方面发挥着重要作用。
在软件开发的各个阶段,从集成测试到验收测试,它都可以帮助测试人员快速发现潜在问题,如界面元素是否正常显示、交互是否顺畅、功能是否按预期工作等,从而确保软件质量。
GUI自动化可以模拟不同用户环境下的操作,测试其兼容性和稳定性。此外,在进行大规模测试时,它能显著提高测试效率,减少人力成本,快速提供反馈,支持持续集成和持续交付,加速软件开发周期。
总之,GUI自动化适用于需要高效、准确、重复测试GUI应用程序的更重场景,有助于提升软件质量、用户满意度和开发效率。需要注意的是,尽管GUI自动化适用于上述场景,但其成功依赖于界面元素的稳定性---若UI频繁变动或涉及复杂交互,维护成本可能会陡增。
二、为什么使用pywinauto
pywinauto是一款基于Python的跨平台GUI自动化库,专门针对Windows桌面应用程序设计,其核心能力在于通过模拟用户交互行为实现对窗口、对话框及内部空间的精准定位与操作,适用于自动化测试、批量任务处理及日常办公流程优化等场景。
该库通过两种地城技术(backend="win32"和backend="uia")适配不同框架开发的应用程序:
win32模式适用于传统的MFC、VB6等旧框架;
uia模式支持现代WinForms、WPF、QT5及浏览器等应用。
1.pywinauto的优势
①基于Python:Python语言简洁易学,适合快速开发和维护。
②跨平台支持:支持Windows7及以上版本,兼容性好。
③丰富的控件支持:支持Windows原生空间(如按钮、文本框、表格)及第三方控件(如WPF、Qt)。
④动态查找机制:自动等待控件加载完成,无需显示等待。
⑤强大的调试工具:提供pywinauto.findwindows模块,方便定位控件。
⑥社区活跃:开源项目,持续更新,文档和示例丰富。
2.pywinauto的局限性
①仅支持Windows:无法用于Mac或者Linux平台。
②对非标准控件支持有限:某些自定义控件可能需要额外处理。
下边是一些无法使用pywinauto的程序分类:
①基于Web的应用程序
原因:pywinauto是为本地Windows应用程序设计的,无法直接与基于浏览器的Web应用程序交互。Web应用程序自动化通常需要使用Selenium这样的工具。
②基于自定义渲染引擎的应用程序
原因:某些应用程序可能使用自定义渲染引擎,这些引擎不会暴露标准的WindowsUI自动化接口,如企业微信、某些使用Flutter开发的桌面应用。
三、安装pywinauto
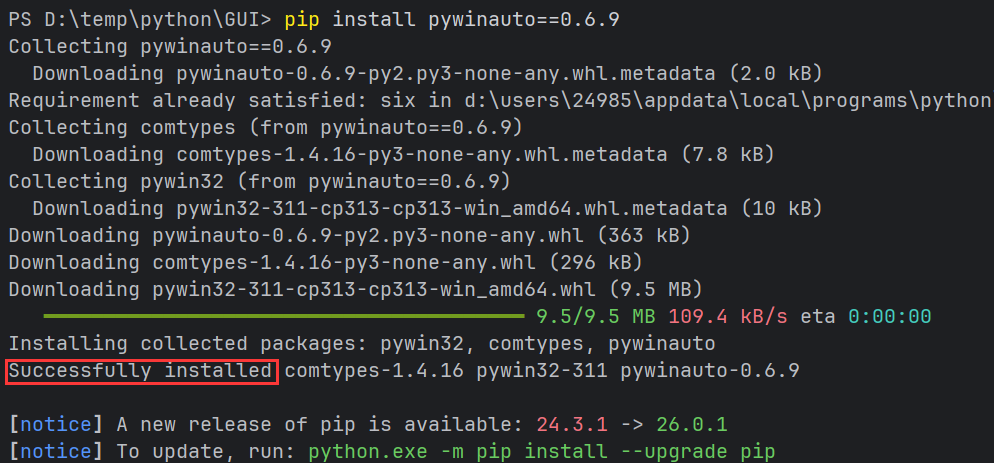
在pycharm终端输入:
pip install pywinauto==0.6.9
出现Successfully installed代表安装成功。
四、pywinauto的基本使用
from pywinauto.application import Application
1.打开程序
start(self, cmd_line...)cmd_line:启动应用程序的命令行字符串,必须包含应用程序的路径和名称,还可以包含启动参数。
start打开并连接。
①电脑自带的软件可以直接使用文件名来启动。
以记事本为例:
app = Application(backend="uia").start("notepad.exe")②使用绝对路径
Application(backend="uia").start("C:\Windows\System32\\notepad.exe")
2.连接程序
connect(self, **kwargs)process:目标的进程
handle:目标窗口的句柄
功能:可以通过进程ID或者句柄对应用程序进行连接,从而能够进行下一步操作。
如何查看进程和句柄?
①使用UISpy.exe选中目标程序或者任务管理器,手动输入。
Application(backend="uia").connect(process=25632)②使用start
start打开一个程序就会自动连接
注意:先start再使用start返回值获取进程ID再使用connect可能会报错,因为Application会创建一个新的控制对象。

3.定位窗口
app.window(title='',...)
相关参数
①title:窗口的标题(精确匹配):标题可能会变化,不方便
app = Application(backend="uia").start("notepad.exe")
app.window(title="秘钥.txt - Notepad")
②title_re:使用正则表达式来匹配标题
app = Application(backend="uia").connect(process=17544)
# win = app.window(title="无标题 - Notepad")
# win = app.window(title=".*-.*")
win = app.window(title=".*- N.*")
# win = app.window(title=".* - .*")
③best_match:模糊匹配
besst_match不可以随便写,要在win.print_control_identifiers里边查看best_match的可选列表。
win.print_control_identifiers()
一般第二行就是
win = app.window(best_match="*无标题 - NotepadDialog")
win.wait("visible")
# win.print_control_identifiers()
# //['*无标题 - Notepad', '*无标题 - NotepadDialog', 'Dialog', 'Dialog0', 'Dialog1']
④class_name:窗口类为指定值的元素(精确匹配)
app = Application(backend="uia").connect(process=17544)
win = app.window(class_name="Notepad")
win.wait("visible")
⑤class_name_re:正则表达式匹配窗口类元素
app = Application(backend="uia").connect(process=29156)
time.sleep(1)
win = app.window(class_name_re=".*Notepad.*")
win.wait("visible")
⑥best_match简化版
# win = app.Dialog
win = app["*无标题 - Notepad"]
win.wait("visible")
⑦top_window
win = app.top_window()可能不准

4.窗口操作
①close
关闭窗口
win = app.window(best_match="dialog")
win.close()
②maximize
窗口最大化
win = app.window(best_match="dialog")
win.wait("visible")
win.maximize()
③minimize
窗口最小化
win = app.window(best_match="dialog")
win.wait("visible")
win.minimize()
④restore
恢复正常大小
win = app.window(best_match="dialog")
win.wait("visible")
win.restore()
⑤get_show_state
判断窗口状态0正常1最大化2最小化
def judgeWinSize():
    if win.get_show_state() == 0:
        print("当前窗口大小为正常")
    elif win.get_show_state() == 1:
        print("当前窗口大小为最大化")
    elif win.get_show_state() == 2:
        print("当前窗口大小为最大化")
win.restore() judgeWinSize() win.maximize() judgeWinSize() win.minimize() judgeWinSize()
⑥is_dialog
判断是否为顶级窗口
print("是顶级窗口:", win.is_dialog())
⑦is_maximized
判断是否为最大化窗口
⑧is_mimimized
判断是否为最小化窗口
⑨is_normal
判断是否为正常大小窗口
win.restore()
print("是否为正常大小:", win.is_normal())
win.minimize()
print("是否为最小化:", win.is_minimized())
win.maximize()
print("是否为最大化",win.is_maximized())



5.定位控件
在使用pywinauto进行自动化操作时,程序启动后,首先需要定位到目标窗口。窗口时所有控件的容器,只有成功定位到窗口,才能进一步操作窗口内的控件。控件是窗口功能的体现,包括按钮、文本框、列表等,对控件的操作是自动化任务的核心。然而,在对控件进行操作之前,必须先完成控件的定位,定位控件时确保操作准确性的关键步骤,也是自动化流程的基础。
定位控件需要借助前面学到的print_control_identifiers()方法,打印窗口及其子控件的标识符
信息。
以记事本为例:
Dialog - '*无标题 - Notepad'    (L0, T0, R0, B0)
['*无标题 - NotepadDialog', '*无标题 - Notepad', 'Dialog', 'Dialog0', 'Dialog1']
child_window(title="*无标题 - Notepad", control_type="Window")
   |
   | Pane - ''    (L-31991, T-31890, R-29467, B-30427)
   | ['Pane', '无标题Pane', 'Pane0', 'Pane1', '无标题Pane0', '无标题Pane1']
   |    |
   |    | Document - '\r'    (L-31991, T-31890, R-29467, B-30427)
   |    | ['\r', '\rDocument', 'Document']
   |    | child_window(title="\r", control_type="Document")
   |
   | Pane - ''    (L-31931, T-31988, R-31500, B-31940)
   | ['Pane2', '无标题Pane2']
   |    |
   |    | Pane - ''    (L-31931, T-31988, R-31500, B-31940)
   |    | ['Pane3', '无标题Pane3']
   |    |    |
   |    |    | TabControl - ''    (L-31931, T-31988, R-31500, B-31940)
   |    |    | ['TabControl添加新标签页', 'TabControl', '无标题TabControl']
   |    |    | child_window(auto_id="Tabs", control_type="Tab")
   |    |    |    |
   |    |    |    | ListBox - ''    (L-31928, T-31988, R-31556, B-31940)
   |    |    |    | ['ListBox', '无标题ListBox']
   |    |    |    | child_window(auto_id="TabListView", control_type="List")
   |    |    |    |    |
   |    |    |    |    | TabItem - '无标题. 已修改。'    (L-31925, T-31988, R-31556, B-31940)
   |    |    |    |    | ['无标题. 已修改。TabItem', 'TabItem', '无标题. 已修改。']
   |    |    |    |    | child_window(title="无标题. 已修改。", control_type="TabItem")
   |    |    |    |    |    |
   |    |    |    |    |    | Static - '无标题'    (L-31906, T-31976, R-31851, B-31953)
   |    |    |    |    |    | ['无标题Static', 'Static', '无标题', 'Static0', 'Static1']
   |    |    |    |    |    | child_window(title="无标题", control_type="Text")
   |    |    |    |
   |    |    |    | Button - '添加新标签页'    (L-31551, T-31981, R-31503, B-31945)
   |    |    |    | ['添加新标签页', '添加新标签页Button', 'Button', 'Button0', 'Button1']
   |    |    |    | child_window(title="添加新标签页", auto_id="AddButton", control_type="Button")
   |
   | Pane - ''    (L-31991, T-31940, R-29467, B-31890)
   | ['Pane4', '无标题Pane4']
   |    |
   |    | Pane - ''    (L-31991, T-31940, R-29467, B-31890)
   |    | ['Pane5', '无标题Pane5']
   |    |    |
   |    |    | Menu - ''    (L-31991, T-31940, R-31739, B-31892)
   |    |    | ['无标题Menu', 'Menu', 'Menu0', 'Menu1']
   |    |    | child_window(auto_id="MenuBar", control_type="MenuBar")
   |    |    |    |
   |    |    |    | MenuItem - '文件'    (L-31985, T-31940, R-31913, B-31892)
   |    |    |    | ['MenuItem', '文件MenuItem', '文件', 'MenuItem0', 'MenuItem1']
   |    |    |    | child_window(title="文件", auto_id="File", control_type="MenuItem")
   |    |    |    |
   |    |    |    | MenuItem - '编辑'    (L-31901, T-31940, R-31829, B-31892)
   |    |    |    | ['MenuItem2', '编辑MenuItem', '编辑']
   |    |    |    | child_window(title="编辑", auto_id="Edit", control_type="MenuItem")
   |    |    |    |
   |    |    |    | MenuItem - '查看'    (L-31817, T-31940, R-31745, B-31892)
   |    |    |    | ['查看', 'MenuItem3', '查看MenuItem']
   |    |    |    | child_window(title="查看", auto_id="View", control_type="MenuItem")
   |    |    |
   |    |    | Button - '标题'    (L-30951, T-31940, R-30867, B-31892)
   |    |    | ['标题', '标题Button', 'Button2', '标题0', '标题1', '标题Button0', '标题Button1']
   |    |    | child_window(title="标题", control_type="Button")
   |    |    |
   |    |    | Button - '列表'    (L-30867, T-31940, R-30783, B-31892)
   |    |    | ['列表Button', '列表', 'Button3']
   |    |    | child_window(title="列表", control_type="Button")
   |    |    |
   |    |    | Button - '加粗(Ctrl+B)'    (L-30783, T-31940, R-30735, B-31892)
   |    |    | ['加粗(Ctrl+B)Button', '加粗(Ctrl+B)', 'Button4']
   |    |    | child_window(title="加粗(Ctrl+B)", control_type="Button")
   |    |    |
   |    |    | Button - '斜体(Ctrl+I)'    (L-30735, T-31940, R-30687, B-31892)
   |    |    | ['Button5', '斜体(Ctrl+I)', '斜体(Ctrl+I)Button']
   |    |    | child_window(title="斜体(Ctrl+I)", control_type="Button")
   |    |    |
   |    |    | Button - '链接(Ctrl+K)'    (L-30687, T-31940, R-30639, B-31892)
   |    |    | ['链接(Ctrl+K)Button', '链接(Ctrl+K)', 'Button6']
   |    |    | child_window(title="链接(Ctrl+K)", control_type="Button")
   |    |    |
   |    |    | Button - '表'    (L-30639, T-31940, R-30555, B-31892)
   |    |    | ['Button7', '表Button', '表']
   |    |    | child_window(title="表", control_type="Button")
   |    |    |
   |    |    | Button - '清除格式设置(Ctrl+空格)'    (L-30555, T-31940, R-30507, B-31892)
   |    |    | ['清除格式设置(Ctrl+空格)Button', '清除格式设置(Ctrl+空格)', 'Button8']
   |    |    | child_window(title="清除格式设置(Ctrl+空格)", control_type="Button")
   |    |    |
   |    |    | Button - '标题'    (L0, T0, R0, B0)
   |    |    | ['标题2', '标题Button2', 'Button9']
   |    |    | child_window(title="标题", control_type="Button")
   |    |    |
   |    |    | Button - '标题'    (L0, T0, R0, B0)
   |    |    | ['标题3', '标题Button3', 'Button10']
   |    |    | child_window(title="标题", control_type="Button")
   |    |    |
   |    |    | Button - '标题'    (L0, T0, R0, B0)
   |    |    | ['标题4', '标题Button4', 'Button11']
   |    |    | child_window(title="标题", control_type="Button")
   |    |    |
   |    |    | Button - '设置'    (L-29524, T-31940, R-29479, B-31892)
   |    |    | ['设置', '设置Button', 'Button12']
   |    |    | child_window(title="设置", auto_id="SettingsButton", control_type="Button")
   |    |    |
   |    |    | Dialog - ''    (L0, T0, R0, B0)
   |    |    | ['Dialog2']
   |    |    | child_window(auto_id="PrivacyTeachingTip", control_type="Window")
   |    |    |
   |    |    | Dialog - ''    (L0, T0, R0, B0)
   |    |    | ['Dialog3']
   |    |    | child_window(auto_id="CowriterTeachingTip", control_type="Window")
   |    |    |
   |    |    | Pane - ''    (L0, T0, R0, B0)
   |    |    | ['Pane6']
   |    |    | child_window(auto_id="PsDownloadDetailTeachingTip", control_type="Pane")
   |    |    |
   |    |    | Pane - '本地模型必须完成下载才可在注销后使用 AI 功能。'    (L0, T0, R0, B0)
   |    |    | ['Pane7', '本地模型必须完成下载才可在注销后使用 AI 功能。', '本地模型必须完成下载才可在注销后使用 AI 功能。Pane']
   |    |    | child_window(title="本地模型必须完成下载才可在注销后使用 AI 功能。", auto_id="PsDownloadLightTeachingTip", control_type="Pane")
   |
   | Pane - ''    (L-31991, T-30427, R-29467, B-30379)
   | ['Pane8', '  行 2,列 1Pane', '  行 2,列 1Pane0', '  行 2,列 1Pane1']
   |    |
   |    | Pane - ''    (L-31991, T-30427, R-29467, B-30379)
   |    | ['Pane9', '  行 2,列 1Pane2']
   |    |    |
   |    |    | Static - '  行 2,列 1'    (L-31967, T-30415, R-31873, B-30391)
   |    |    | ['Static2', '  行 2,列 1', '  行 2,列 1Static']
   |    |    | child_window(title="  行 2,列 1", auto_id="ContentTextBlock", control_type="Text")
   |    |    |
   |    |    | Static - '1 个字符'    (L-31833, T-30415, R-31764, B-30391)
   |    |    | ['1 个字符Static', '1 个字符', 'Static3']
   |    |    | child_window(title="1 个字符", auto_id="ContentTextBlock", control_type="Text")
   |    |    |
   |    |    | Static - '纯文本'    (L-31530, T-30427, R-31458, B-30379)
   |    |    | ['纯文本', '纯文本Static', 'Static4']
   |    |    | child_window(title="纯文本", auto_id="ContentTextBlock", control_type="Text")
   |    |    |
   |    |    | Static - ' 100%'    (L-30022, T-30415, R-29974, B-30391)
   |    |    | [' 100%', ' 100%Static', 'Static5']
   |    |    | child_window(title=" 100%", auto_id="ContentTextBlock", control_type="Text")
   |    |    |
   |    |    | Static - ' Windows (CRLF)'    (L-29920, T-30415, R-29786, B-30391)
   |    |    | [' Windows (CRLF)Static', ' Windows (CRLF)', 'Static6']
   |    |    | child_window(title=" Windows (CRLF)", auto_id="ContentTextBlock", control_type="Text")
   |    |    |
   |    |    | Static - ' UTF-8'    (L-29668, T-30415, R-29615, B-30391)
   |    |    | [' UTF-8', ' UTF-8Static', 'Static7']
   |    |    | child_window(title=" UTF-8", auto_id="ContentTextBlock", control_type="Text")
   |
   | TitleBar - ''    (L0, T0, R0, B0)
   | ['TitleBar', ' UTF-8TitleBar']
   |    |
   |    | Menu - '系统'    (L-31989, T-31989, R-31956, B-31956)
   |    | ['系统', 'Menu2', '系统Menu', '系统0', '系统1']
   |    | child_window(title="系统", auto_id="MenuBar", control_type="MenuBar")
   |    |    |
   |    |    | MenuItem - '系统'    (L-31989, T-31989, R-31956, B-31956)
   |    |    | ['MenuItem4', '系统MenuItem', '系统2']
   |    |    | child_window(title="系统", control_type="MenuItem")
   |    |
   |    | Button - '还原'    (L-31983, T-31999, R-31912, B-31969)
   |    | ['还原', 'Button13', '还原Button']
   |    | child_window(title="还原", control_type="Button")
   |    |
   |    | Button - '最大化'    (L-31912, T-31999, R-31842, B-31969)
   |    | ['最大化', 'Button14', '最大化Button']
   |    | child_window(title="最大化", control_type="Button")
   |    |
   |    | Button - '关闭'    (L-31842, T-31999, R-31771, B-31969)
   |    | ['关闭Button', '关闭', 'Button15']
   |    | child_window(title="关闭", control_type="Button")
①定位控件
使用best_match
proc = win.MenuItem
proc = win[MenuItem]
proc.wait("visible")
②定位控件的控件
通过查询上边的列表可以找到这些控件的定位方法
child_win = win.child_window(title="文件", auto_id="File", control_type="MenuItem")
child_win.print_control_identifiers()
属性名称 描述 control_type auto_id 具有此⾃动化ID的元素(⽤于UIAutomation元素不是所有都有) found_index 返回的已过滤⼦元素的索引,索引下标从0开始 可以选择部分参数进行控件的定位,也可以组合使用参数,但是要求能够定位唯一的控件。
③但是有些控件只有ControlType,而ControlType很容易重复,或者,每次定位会变化,我们可以根据孩子找父亲。
先查找子空间,再使用parent()函数找到他的父控件。
child_win = win.child_window(title="列表", control_type="Button")
file_parent = child_win.parent()
print(file_parent)
也可以根据父亲找孩子
parent = win.child_window(auto_id="MenuBar", found_index=0)
print(parent.children())




6.等待
在
pywinauto中,wait相关方法是实现自动化稳定性的核心工具,其核心目的是解决 GUI 操作中 “程序响应延迟”“元素加载慢”“操作执行有耗时” 等问题,避免代码因 “操之过急” 而执行失败。
    def wait(self, wait_for, timeout=None, retry_interval=None)
    def wait_not(self, wait_for_not, timeout=None, retry_interval=None)
参数说明:
wait_for:
exists:表示控件是一个有效的句柄,不要求在桌面上可见
visible:表示控件不隐藏,可以看到,要求在桌面上可见
enable:表示控件未被禁用,可操作
ready:表示控件可见且已启用(visible+enable)
active:表示控件处于活跃状态(定位窗口点击或者使用set_focus())
timeout:表示超时
retry_interval:表示重试时间间隔,单位为s
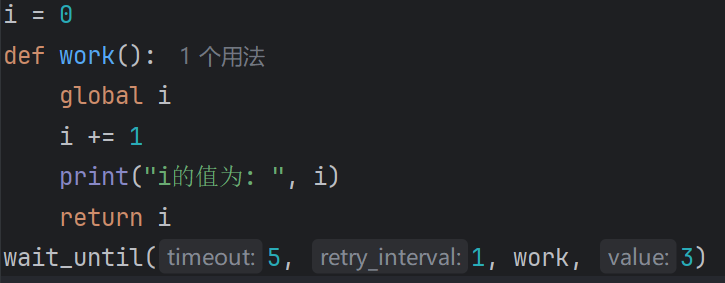
wait_until
from pywinauto.timings import wait_until
在5秒内,以1秒为间隔,执行work函数,当返回值为3时终止
def get_window():
    app = Application(backend='uia').connect(process=12688)
    win = app.window(class_name="ApplicationFrameWindow")
    return win.is_visible()
def test_wait():
    wait_until(10, 2, get_window, True)
    print("等待通过")
test_wait()
7.点击操作
click_input
app = Application(backend='uia').connect(process=12688)
win = app.window(class_name="ApplicationFrameWindow")
num1 = win.child_window(title="一", auto_id="num1Button", control_type="Button")
num2 = win.child_window(title="二", auto_id="num2Button", control_type="Button")
num3 = win.child_window(title="三", auto_id="num3Button", control_type="Button")
num4 = win.child_window(title="四", auto_id="num4Button", control_type="Button")
push = win.child_window(title="加", auto_id="plusButton", control_type="Button")
deng = win.child_window(title="等于", auto_id="equalButton", control_type="Button")

num1.click_input()
num2.click_input()
push.click_input()
num3.click_input()
deng.click_input()
自动调用12+3=
app = Application(backend="uia").connect(process=17984)
win = app.window(class_name="Notepad")
head = win["无标题Menu"]
for item in head.children():
    item.click_input()
    time.sleep(1)
    item.click_input()
    time.sleep(1)
自动点击记事本

right_click_input
点击右键
double_click_input
双击
8.获取文本
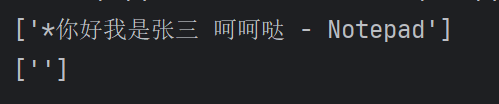
tests()
用于花去窗口或控件中的所有文本内容,返回一个列表,其中每个元素是一个字符串,表示窗口或控件中的某个文本片段。
app = Application(backend="uia").connect(process=20316)
win = app.window(class_name="Notepad")
win.wait("visible")
print(win.texts())
# 打印控件文本
proc = win.Pane6
print(proc.texts())
window_text()
用于获取窗口控件的主文本内容,通常是指窗口的标题或主要显示的文本,它返回的是一个字符串。
app = Application(backend="uia").connect(process=20316)
win = app.window(class_name="Notepad")
win.wait("visible")
print(win.texts())
print(win.window_text())

9.鼠标操作
前边我们学过点击操作(click_input,double_click_input,right_click_input),这是对控件的点击,但是控件的大小不一,到底点击的是控件的哪里呢?
click_input底层:
def click_input(
        self,
        button = "left",
        coords = (None, None),#位置信息
        button_down = True,
        button_up = True,
        double = False,
        wheel_dist = 0,
        use_log = True,
        pressed = "",
        absolute = False,
        key_down = True,
        key_up = True):
if coords[0] is None: coords[0] = int(self.rectangle().width() / 2) if coords[1] is None: coords[1] = int(self.rectangle().height() / 2)点击部位是控件框的中间位置,但是当窗口大小不同可能会导致定位不准。
在定位的控件中有一个隐藏的xy轴,以控件的左上角为原点,向右为x轴,向下为y轴。
那怎么找元素坐标呢?
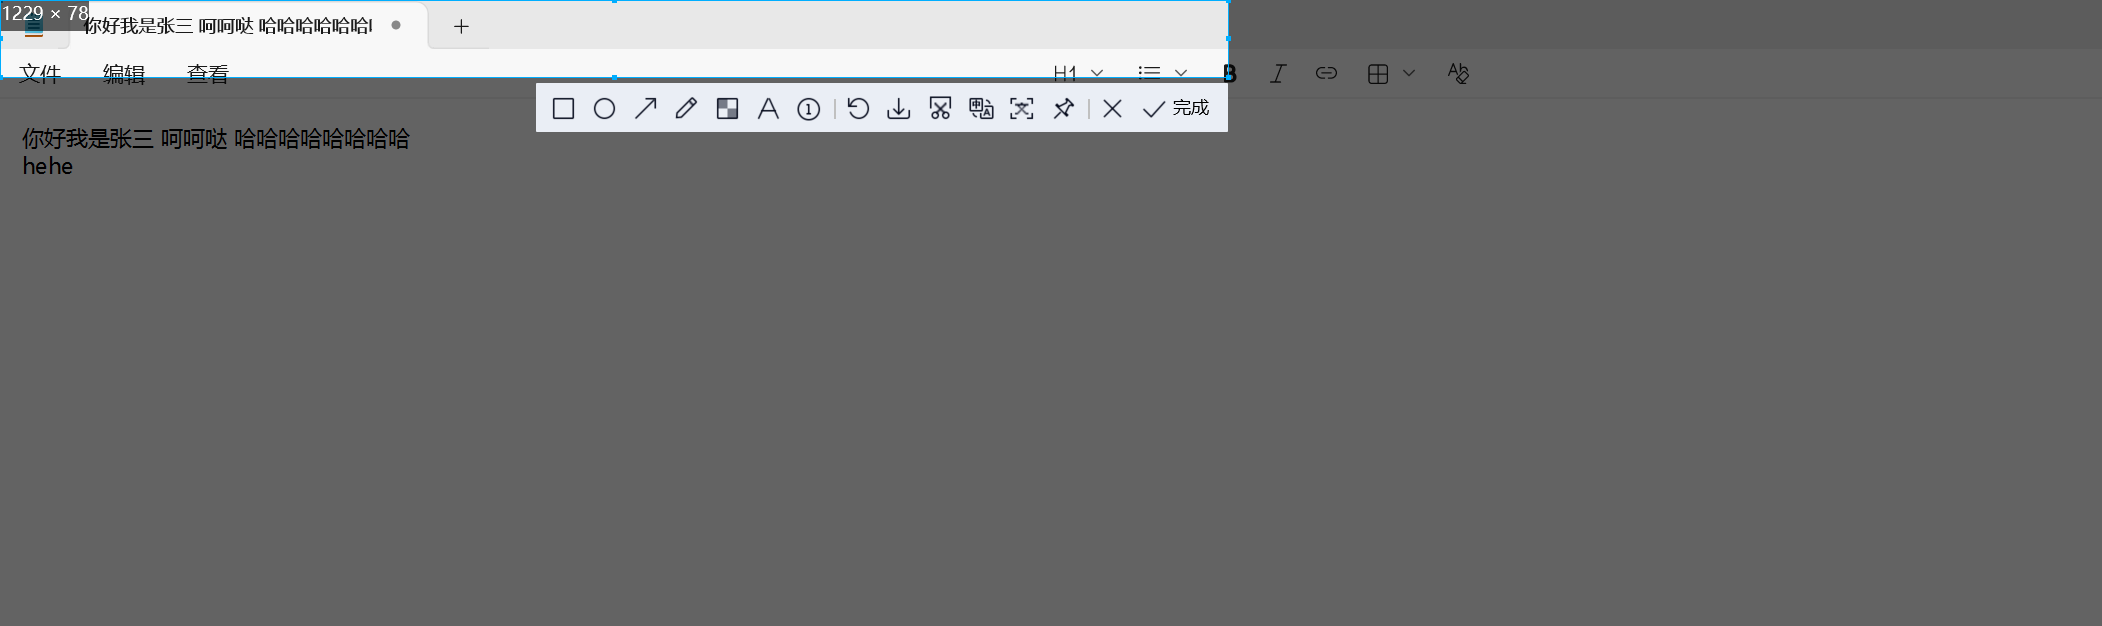
可以使用截图工具,我比较喜欢使用QQ截屏,它会显示截图框大小,只需要将框移动到左上角就可以定位任何元素了。
如图,我定位的就是记事本的加粗控件,他的坐标是(1229,79)
proc = win["你好我是张三 呵呵哒 哈哈哈哈哈哈哈哈Pane5"]
proc.click_input(coords=(1281,0))
proc.right_click_input(coords=(1277,477))
先定位控件,然后再输入空间内的坐标。
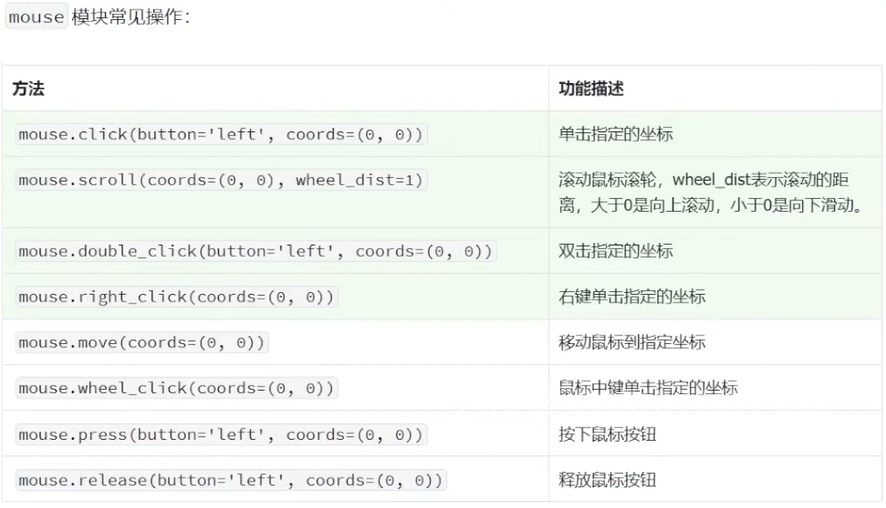
点击的三个接口,需要先定位控件,再进行坐标的输入,有些麻烦,所以在pywinauto中提供了一个mouse模块,专门用于模拟真实用户的鼠标事件,这个模块的优势在于,它完全独立于控件操作,能够更贴近真实用户的行为模式。通过mouse模块,可以直接在屏幕上指定坐标进行点击、双击、拖动等操作,无需依赖控件的层次结构。
from pywinauto import mouse
mouse.click()
源码:
def click(button='left', coords=(0, 0)):
    """Click at the specified coordinates"""
    _perform_click_input(button=button, coords=coords)

def double_click(button='left', coords=(0, 0)):
    """Double click at the specified coordinates"""
    _perform_click_input(button=button, coords=coords, double=True)


def right_click(coords=(0, 0)):
    """Right click at the specified coords"""
    _perform_click_input(button='right', coords=coords)


def move(coords=(0, 0)):
    """Move the mouse"""
    _perform_click_input(button='move',coords=coords,button_down=False,button_up=False)


def press(button='left', coords=(0, 0)):
    """Press the mouse button"""
    _perform_click_input(button=button, coords=coords, button_down=True, button_up=False)


def release(button='left', coords=(0, 0)):
    """Release the mouse button"""
    _perform_click_input(button=button, coords=coords, button_down=False, button_up=True)


def scroll(coords=(0, 0), wheel_dist=1):
    """Do mouse wheel"""
    if wheel_dist:
        _perform_click_input(button='wheel', wheel_dist=wheel_dist, coords=coords)


def wheel_click(coords=(0, 0)):
    """Middle mouse button click at the specified coords"""
    _perform_click_input(button='middle', coords=coords)
def _perform_click_input( button="left", coords=(None, None), double=False, button_down=True, button_up=True, wheel_dist=0, pressed="", key_down=True, key_up=True, ):其实点击操作调用的也是鼠标操作。
定位空间坐标函数:rectangle
print(win.rectangle())
参数解释:从左到右依次是左部、顶部、右部、底部
可以看出这是一个矩形
rect = proc.rectangle()
print(rect)
# # 计算控件的中间位置
width = rect.left + (rect.right-rect.left)/2
height = rect.top + (rect.bottom-rect.top)/2
height = math.floor(height)
width = math.floor(width)
mouse.move(coords=(width, height)
手动计算中间位置坐标有点烦,pywinauto提供了一个自动计算中间位置的函数
mid_point:获取元素中间位置坐标,返回类型为元组,元组中两个整数分别是XY轴的值
for i in proc.children():
    rect = i.rectangle()
    #计算控件的中间位置
    point = rect.mid_point()
    mouse.click(coords=(point.x, point.y))

10.键盘操作
通用操作:keyboard.send_keys("输入内容")
keyboard.send_keys()是一个通用的键盘输入方法,它可以直接将按键序列发送到当前具有焦点的窗口。然而,在实际的自动化场景中,我们通常需要针对特定的控件(如文本框、按钮等)进行精确的输入操作,二不是依赖于窗口的焦点状态。
为了满足这种需求,pywinauto对键盘输入功能进行了进一步的封装,引入了type_keys方法,type_keys是控件对象的专属方法,可以直接作用于指定的控件,确保输入内容精准无误,这种方法避免了因焦点切换导致的输入错误,特别适合在复杂的用户界面中进行自动化操作。
win.type_keys("我是自动化测试啊")def type_keys( self, keys, #要输入的字符 pause = None, #每次按键后的延迟时间 with_spaces = False, #如果为True,则会在输入的字符中保留字符 with_tabs = False, #如果为True,则会在输入的字符串中保留tab with_newlines = False,#如果为True,则会在输入的字符串中保留换行符 turn_off_numlock = True, set_foreground = True, vk_packet = True):win.type_keys("我是 自动 化测\n试啊",pause=1,with_spaces=True,with_tabs=True,with_newlines=True)
每隔一秒打印一个字符
win.type_keys("我是 自动 化测\n试啊")
空格tab换行都不打
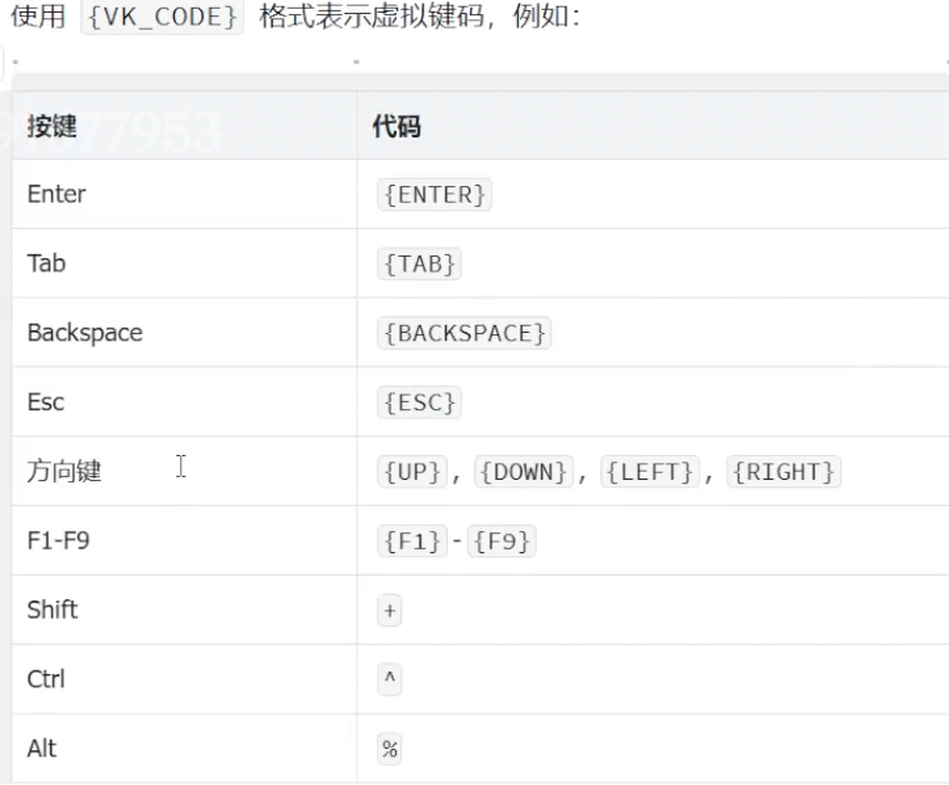
虚拟键码
全选删除
win.type_keys("^a{BACKSPACE}")#全选+删除(ctrl+a)+删除键左括号:shift+9
右括号:shift+0
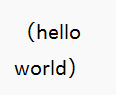
win.type_keys("+9hello{ENTER}world+0")
在使用特殊按键时,还可以指定次数如:{ENTER 2}代表回车两次
如果我们想要输入的时字符本身,而不是虚拟键码如想要输入1+2=3,计算机会自动识别为1@=3,解决这种问题的方法很简单,给特殊字符加一个{}就可以了,恢复原来的字符,1{+}2=3。
11.菜单控件操作
items:返回对话框菜单项,如果没有菜单项,返回空列表
menu = win.Menu
print(menu.items())

item_by_index(idx):查找索引指定的菜单项
len = len(menu.items())
print(len)
for i in range(0, len):
    menu.item_by_index(i).double_click_input()
如果使用单机可能会进入子菜单
item_by_path(path, exact=False):用户查找路径指定的菜单项
path:用于指定要选择的菜单路径
exact:设置为True,则要求菜单名称与路径中的名称完全匹配;如果为False,则允许模糊匹配。
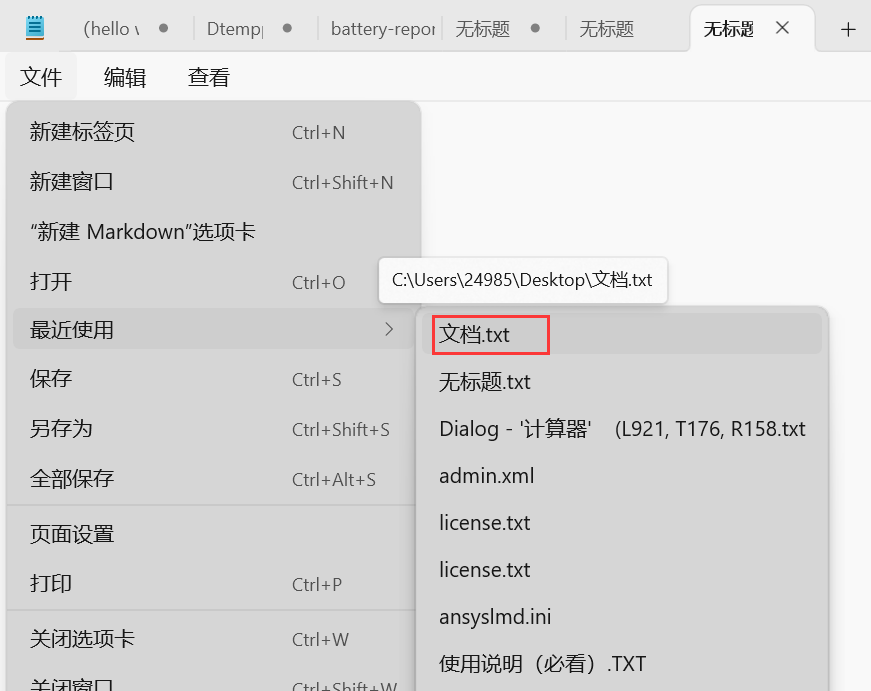
nor = menu.item_by_path(path="文件->最近使用")

point = nor.rectangle().mid_point()
mouse.move(coords=(point.x, point.y))
注意:item_by_path不支持定位三级菜单!
如果要定位三级菜单可以先定位二级菜单然后点击以下,再使用win.print_control_identifiers查询子菜单的best_match或者child_window()
提示:点击后再查询会新增当前点击的下一级菜单内容。
nor = menu.item_by_path(path="文件->最近使用")

nor.click_input()
# win.print_control_identifiers()

wendang = win.child_window(title="文档.txt", auto_id="TextBlock", control_type="Text")
wendang.click_input()
menu_select(path, exact=False):用户擦护照路径指定的菜单项
path:用于指定要选择的菜单路径
exact:设置为True,则要求菜单名称与路径中的名称完全匹配;如果为False,则允许模糊匹配。
他会自动完成打开、展开、点击
win.menu_select("文件->保存")
12.列表控件操作
get_items:获取列表视图中的所有项目
item_count:列表视图中的个数
get_item:返回列表视图中的指定项目
感谢观看

北京人形旗下天工造物具身智能开源社区,聚焦具身天工与慧思开物两大平台
更多推荐
 12
12 0
0- 0


 已为社区贡献2条内容

所有评论(0)