PyTest自动化测试框架
一、PyTest基本介绍和按照
1、pytest基本介绍
Pytest是Python的一个第三方的单元测试库,能自动识别测试模块和测试函数,提供丰富的断言(assert)语句,用于判断值是否相等、大小关系等
2、pytest中的使用约束
测试文件的文件名必须以“test_”开头或以“_test”结尾;测试类必须以“Test”开头;测试的函数名必须以“test_”开头;构造方法不可以包含“init”方法
3、pytest的安装命令
pip install pytest
4、应用案例
import pytest

def test_demo():
    assert 1 == 1


if __name__ == '__main__':
    pytest.main(['tset_pytest1.py'])
二、PyTest断言
1、创建py文件,导入pytest(注意:pytest中的使用约束)
2、函数断言示例
import pytest

def add(a, b):
    return a + b

def test_dengyu():
    assert 3 == add(1, 2)

def test_budengyu():
    assert 3 != add(1, 3)

def test_dayu():
    assert 5 > add(1, 3)

def test_baohan():
    assert 1 in [1, 2, 3]

def test_bubaohan():
    assert 1 not in [1, 2, 3]

def test_iftrue():
    assert 1 is True

def test_iffalse():
    assert bool(0) is False

if __name__ == '__main__':
    pytest.main(['test_pytest2.py'])
注意事项:pytest不会自动进行类型转换,数字1不等于True,必须使用bool()转换
三、PyTest参数化
1、参数化的含义
核心思想:代码逻辑不变,通过改变输入参数实现多组测试
2、参数化的实现
基本语法:@pytest.mark.parametrize("参数名", 参数值列表)
(1)第一种实现参数化的写法
# 参数化
import pytest
def add(a, b):
    return a + b
# 第一种实现参数化的写法
@pytest.mark.parametrize(['x', 'y'], [(1, 2), (3, 4)])
def test_add1(x, y):
    assert 3 == add(x, y)

if __name__ == '__main__':
    pytest.main(['test_pytest3.py'])
(2)第二种实现参数化的写法
# 第二种参数化的写法
xy = [(-1, 2), (3, 4), (5, 6)]
@pytest.mark.parametrize(['x', 'y'], xy)
def test_add2(x, y):
    assert 3 == add(x, y)
(3)数据库测试用例参数化
# 把存储在mysql当中的测试用例参数化出来
import pymysql
db_info = {
    'host': 'localhost',
    'user': 'root',
    'password': '<PASSWORD>',
    'database': 'test',
    'charset': 'utf8'
}
conn = pymysql.connect(**db_info)
cursor = conn.cursor()
sql = 'select * from test'
cursor.execute(sql)
result = cursor.fetchall()

@pytest.mark.parametrize(['id','case_id','title','interface_type','uri'],result)
def test_mysql_param(id, case_id, title, interface_type, uri):
    print(title)
注意:装饰器中字段顺序需与数据库表结构完全一致
四、PyTest测试用例组织管理
1、组织管理示例
# 测试用例的组织管理
import pytest

def test_01():
    print(1)
def test_02():
    print(2)
def test_03():
    print(3)
@pytest.mark.run(order=1)
def test_04():
    print(4)

class TestLogin():
    def test_09(self):
        print(9)

    def test_05(self):
        print(5)

    @pytest.mark.run(order=2)
    def test_06(self):
        print(6)

    def test_07(self):
        print(7)

    # @pytest.mark.first
    def test_08(self):
        print(8)

if __name__ == '__main__':
    pytest.main(['test_pytest4.py'])
2、组织管理注意事项
- 在pytest当中,测试方法执行的顺序,默认是从上到下
- 使用@pytest.mark.run()进行测试函数执行顺序的标记时,需要先安装pip install pytest_ordering(正数从前到后,负数从后往前)
- 在优先级方面(正数)@pytest.mark.first是最高优先级;(倒数)@pytest.mark.last的优先级低于order = -1
- 如果在标记顺序时,假设我们采用了数字的形式,那么就都用数字
五、PyTest前置和后置操作
1、模块级别和函数级别的前置和后置操作
# pytest的前置和后置操作
import pytest


def setup_module():
    print("这是前置的模块级别的函数")
def teardown_module():
    print("这是后置的模块级别的函数")

def setup_function():
    print("这是前置的函数级别运行的函数")
def teardown_function():
    print("这是后置的函数级别运行的函数")

def test_01():
    print("test_01运行了")
    assert 1 == 1
def test_02():
    print("test_02运行了")

if __name__ == '__main__':
    pytest.main(['test_pytest5.py'])
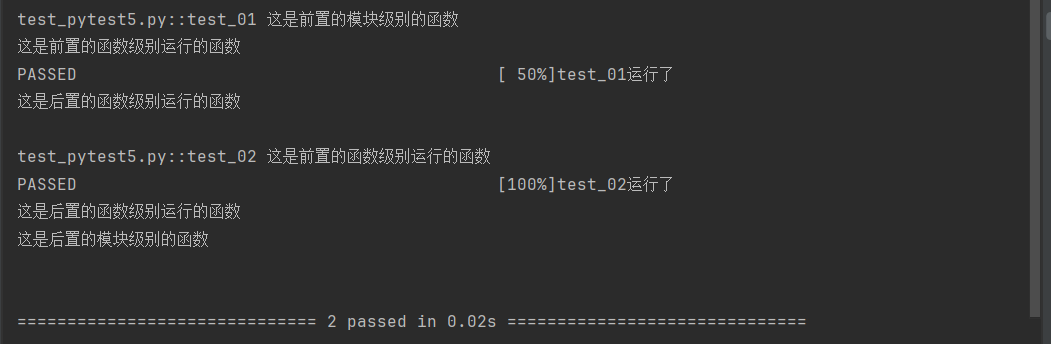
注意事项:在 Python 3.6 的版本中下边的两个前置和后置函数 setup 和 teardown,是可以运行的, 但是优先级没有 setup_function 和 teardown_function 的优先级高
def setup():
    print("前置函数级别的11111")
def teardown():
    print("后置函数级别的22222")
2、类级别和类中方法级别的前置和后置操作
class TestMyClass():
    def setup_class(self):
        print("这是前置的class级别的方法")
    def teardown_class(self):
        print("这是后置的class级别的方法")

  def setup_method(self):
        print("我是前置的类中方法级别的")
    def teardown_method(self):
        print("我是后置的类中方法级别的")

    def test_of_method1(self):
        print("<<<我是类中的测试方法1111>>>")
    def test_of_method2(self):
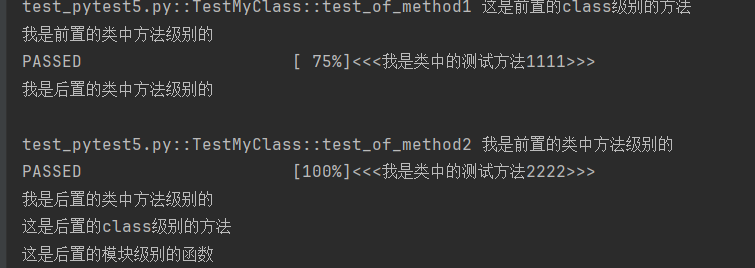
注意事项:类中的前置和后置方法必须要写method,不能写function
六、Pytest核心—fixture
1、fixture介绍
fixture是pytest最大的优势之一,可以将复杂的测试需求分解为简单、可管理的组件; Fixture 为测试提供了已定义的、可靠的和一致的上下文;Fixture 定义了构成测试准备阶段的步骤和数据
(1)基础用法示例
- 定义语法: 使用@pytest.fixture装饰器标记函数
- 返回值传递: fixture函数可以通过return将值传递给测试用例
- 参数传递: 测试用例通过将fixture名称作为参数来接收返回值
- 执行顺序: fixture会在测试用例执行前自动运行
@pytest.fixture()
def first_fixture():
    print("这是我人生中第一个fixture")
    return 1
def test_case1(first_fixture):
    print("这是我的第一个测试用例")
    r = first_fixture
    print(r)  # 输出1
(2)高级用法
- 参数化支持: fixture支持scope、params、autouse等多种配置参数
- 调试技巧: 使用-v查看详细信息,-s显示print输出
if __name__ == '__main__': pytest.main(['-vs', 'test_pytest6.py']) - 链式调用: fixture之间可以相互调用和依赖
@pytest.fixture()
def second_fixture(first_fixture):
    print("这是我人生中的第二个fixture")
    return first_fixture + 2  # 使用第一个fixture的返回值
def test_case2(second_fixture):
    print("这是我的第二个测试用例")
    print(second_fixture)  # 输出3
2、Pytest多fixture应用
@pytest.fixture()
def first_fixture():
    print("我是第一个fixture")
    return 1,2,3

@pytest.fixture()
def second_fixture():
    return "第2个值"
def test_case1(first_fixture, second_fixture):
    print("这是我的第一个测试用例")
    print(first_fixture)
    a,b,c = first_fixture
    print(a)
    print(b)
    print(c)
    r = second_fixture
3、conftest统一配置
(1)conftest核心功能
用于存放项目中多个测试文件共享的fixture配置
(2)conftest的使用
- 创建conftest.py用于专门存储要共享的fixture配置
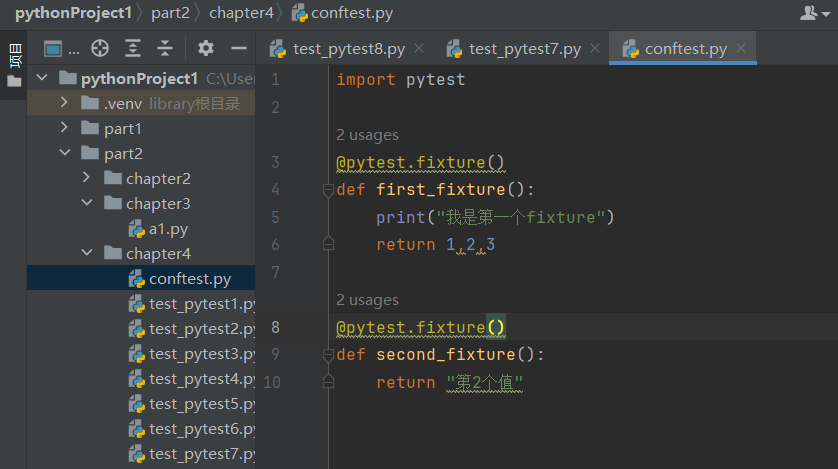
- 编写代码运行一下
import pytest


def test_case1(first_fixture, second_fixture):
    print("这是我的测试用例")
    print(first_fixture)
    print(second_fixture)


if __name__ == "__main__":
    pytest.main(['-s', 'test_pytest8.py'])
4、fixture作用域控制与自动执行
(1)基本概念
作用域概念是指fixture在哪个区域生效,与前置/后置操作类似但更精细;自动执行是需设置autouse=True才会自动运行,否则需在测试函数参数中显式调用
@pytest.fixture(scope='session', autouse=True)
def session_fixture():
    print("我是会话级别的作用域")

@pytest.fixture(scope='module', autouse=True)
def module_fixture():
    print("我是模块级别的作用域")

@pytest.fixture(scope='class', autouse=True)
def class_fixture():
    print("我是类级别的作用域")

@pytest.fixture(scope='function', autouse=True)
def function_fixture():
    print("我是函数级别的作用域")
# @pytest.fixture(scope='method', autouse=True)
# def method_fixture():
#     print("我是方法级别的作用域")

def test_case1():
    print("----我是函数的测试用例11111----")

def test_case2():
    print("----我是函数的测试用例22222----")

class TestMyCless():
    def test_of_method1(self):
        print("<<<我是类中的测试方法1111>>>")

    def test_of_method2(self):
        print("<<<我是类中的测试方法2222>>>")
(2)注意事项
- 当我们使用fixture时,把scope的值设置成class时,每一个测试类之前都会被运行 pytest在每个测试函数的外层会自动的把函数包装成一个测试类
- 在使用fixture时,scope=function时,无论时函数中,还是在方法中, 都是作用域都function在生效
- 在我们使用的Python版本中,去掉了scope=method这个作用域 在Python3.6的版本上边这种写法会生效
- 作用域层级:session>module>class>function
5、fixture实现参数化
(1)fixture实现参数化方法
- fixture通过params参数实现参数化
- 装饰器参数:params=test_data:绑定参数数据集,request:必须使用的内置fixture参数名
- 参数传递机制:通过return request.param将参数逐个传递给测试用例
- 强制命名规则:参数必须命名为request,修改为其他名称(如r)会导致报错
- request核心作用:作为pytest内置的fixture,专门用于参数传递的桥梁
- 注意事项:注释需明确说明"request是pytest内置的fixture,必须这样写才能传进来"
(2)参数化示例
-
test_data = [
    {
        "case_name": "登录成功的测试",
        "username": "admin",
        "password": "123456",
    },
    {
        "case_name": "登录失败的测试",
        "username": "aaaaa",
        "password": "111111",
    },
    {
        "case_name": "用户名为空的登录",
        "username": "",
        "password": "22222",
    }
]

@pytest.fixture(params=test_data)
def param_data(request):
    return request.param

def test_login(param_data):
    username = param_data.get("username")
    print(username)
    password = param_data.get("password")
    print(password)
    case_name = param_data.get("case_name")
    print(case_name)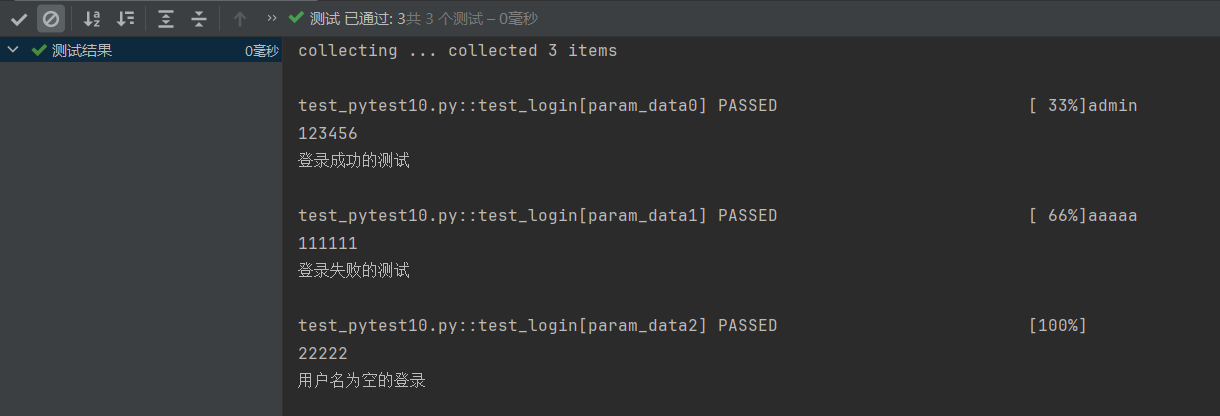
6、fixture实现测试控制
(1)应用场景
在企业自动化测试中,有时需要控制某些测试用例不执行
(2)无理由跳过
- 导入pytest模块
- 使用@pytest.mark.skip装饰器标记需要跳过的测试函数
-
@pytest.mark.skip
def test_dengyu():
    assert 3 == 3
(3)条件跳过
- 使用@pytest.mark.skipif装饰器
- 第一个参数为条件表达式
- 第二个参数reason用于说明跳过原因
-
a = 1
@pytest.mark.skipif(a>0,reason="a大于了0我跳过了")
def test_dayu():
    assert 5 != 4
7、fixture集成allure生成自动化测试报告—环境、生成
(1)allure基本环境的安装
- 获取allure:通过GitHub地址https://github.com/allure-framework/allure2/releases下载allure,后解压到项目目录中,文件夹重命名为"allure"
- 安装Java运行环境:下载jdk8
- 配置环境变量(jdk8和allure),并验证是否配置成功


(2)生成测试报告
安装python的allure的支持库 pip install allure-pytest
测试报告生成
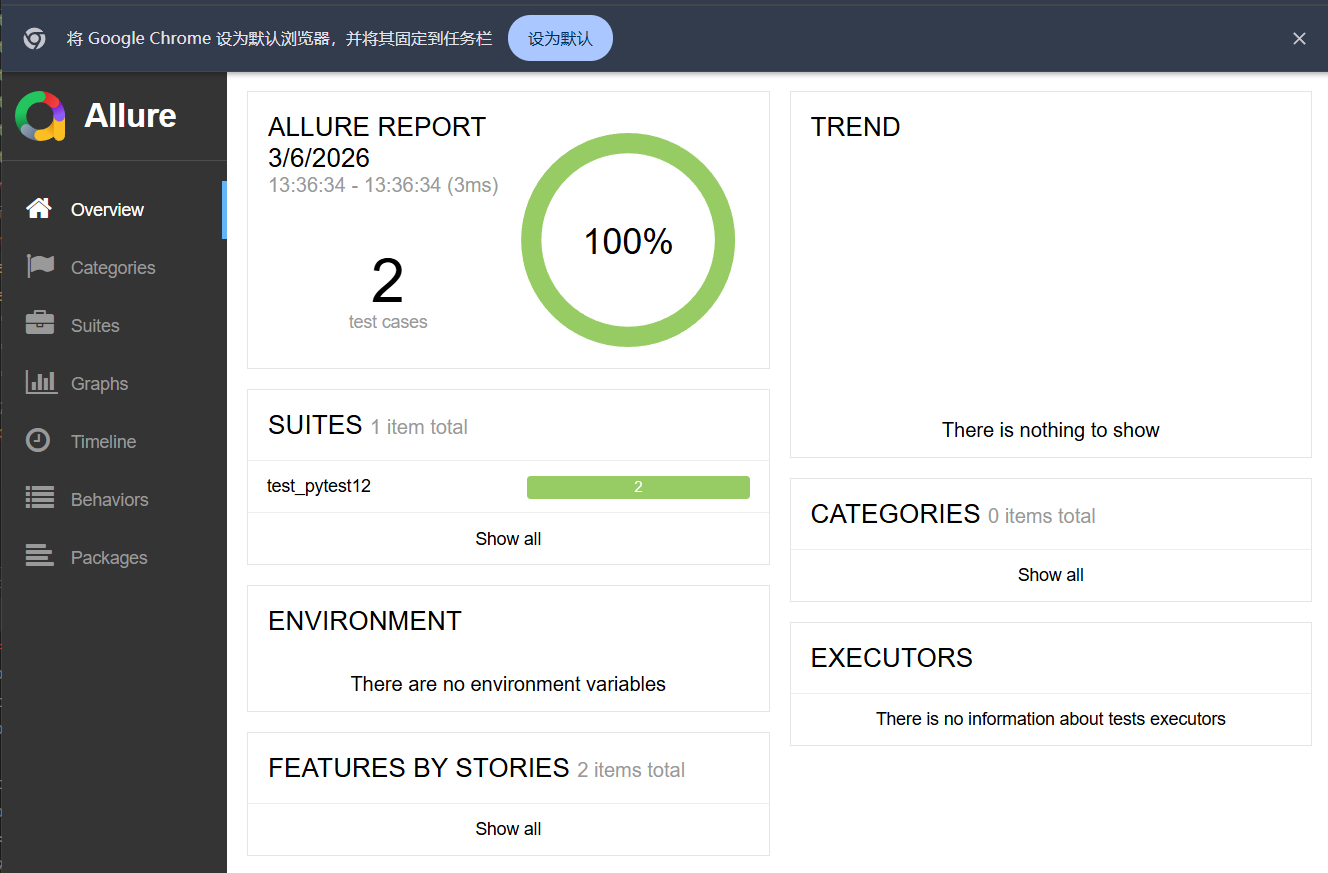
- 先创建test_pytest12.py
# test_pytest12.py 完整正确示例
import pytest
import os

# 示例被测试函数
def add(a, b):
    return a + b

# 测试用例(必须以 test_ 开头,pytest 才会识别)
def test_add_normal():
    """测试正常加法"""
    assert add(1, 2) == 3
    assert add(0, 0) == 0
    assert add(-1, 1) == 0

def test_add_negative():
    """测试负数加法"""
    assert add(-2, -3) == -5

# 生成 allure 报告的执行代码
if __name__ == '__main__':
    # 注意路径用正斜杠,避免 Unicode 转义错误
    pytest.main(['test_pytest12.py', '--alluredir', './result'])
    # 加 --clean 清空旧报告,避免冲突
    os.system("allure generate ./result -o ./report_allure --clean")
- 在包含这个测试的文件夹中运行下面的命令——成功后会显示"Report successfully generated to..."
# 1. 先跑 pytest,生成 allure 结果到 ./result
pytest test_pytest12.py --alluredir ./result

# 2. 再用 allure 生成报告
allure generate ./result -o ./report_allure --clean
- 查看测试报告:直接打开index.html文件,用浏览器查看

北京人形旗下天工造物具身智能开源社区,聚焦具身天工与慧思开物两大平台
更多推荐
 19
19 0
0- 0


 已为社区贡献2条内容

所有评论(0)