cocos creator3.8 箭头的uv 流动shader
CCEffect %{
techniques:
- passes:
- vert: sprite-vs:vert
frag: sprite-fs:frag
depthStencilState:
depthTest: false
depthWrite: false
blendState:
targets:
- blend: true
blendSrc: src_alpha
blendDst: one_minus_src_alpha
blendDstAlpha: one_minus_src_alpha
rasterizerState:
cullMode: none
properties:
mainTexture: { value: white }
tiling: { value: [1.0, 1.0] }
flowSpeed: { value: 5.0 }
repeatScale: { value: 128.0 }
}%
CCProgram sprite-vs %{
precision highp float;
#include <builtin/uniforms/cc-global>
#if USE_LOCAL
#include <builtin/uniforms/cc-local>
#endif
in vec3 a_position;
in vec2 a_texCoord;
in vec4 a_color;
uniform Properties {
vec2 tiling;
float flowSpeed;
float repeatScale;
};
out vec4 v_color;
out vec2 uv0;
out float v_repeatY;
vec4 vert() {
vec4 pos = vec4(a_position, 1);
v_repeatY = max(a_color.a * repeatScale, 0.0001);
#if USE_LOCAL
pos = cc_matWorld * pos;
#endif
pos = cc_matViewProj * pos;
uv0 = a_texCoord;
v_color = a_color;
return pos;
}
}%
CCProgram sprite-fs %{
precision highp float;
#include <builtin/uniforms/cc-global>
#include <builtin/internal/embedded-alpha>
in vec4 v_color;
in vec2 uv0;
in float v_repeatY;
uniform sampler2D mainTexture;
uniform Properties {
vec2 tiling;
float flowSpeed;
float repeatScale;
};
vec4 frag() {
float t = cc_time.x;
vec2 uv = vec2(uv0.x * tiling.x, fract(uv0.y * v_repeatY + t * flowSpeed));
vec4 texColor = texture(mainTexture, uv);
return vec4(v_color.rgb, 1.0) * texColor;
}
}%
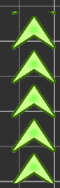
将箭头图片拖到场景中,修改图片的材质,该一下箭头图片node节点的高度 ,同时修改一下材质上 tile 的y值,直接运行,类似如图

北京人形旗下天工造物具身智能开源社区,聚焦具身天工与慧思开物两大平台
更多推荐
 5
5 0
0- 0


 已为社区贡献4条内容

所有评论(0)