树莓派Pico的SWD调试
最近弄一下rtos和lvgl,遇到一个问题就是开机后没多久系统就挂死了。此时串口也连接不上,唯一就是LED看一下状态,但是信息量确实太少了。
没办法,只有把SWD的调试环境搭起来。。。
1 硬件级调试原理
硬件级调试整体结构图:
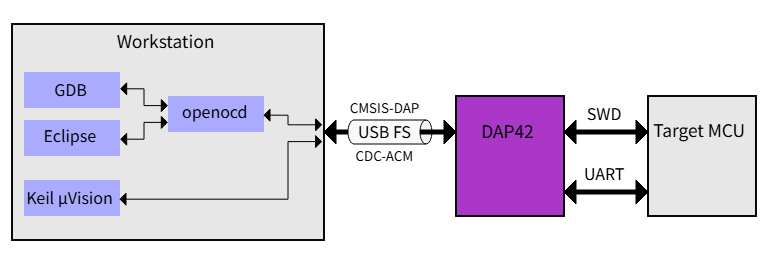
原图来自:https://devanlai.github.io/projects/dap42/
上图的DAP42,在这里换成Debug probe。这个图对整体结构描述的很好。说明了GDB,openOCD,CMSIS-DAP,SWD,UART在系统中的作用。
整体流程:
1 GDB。通过GDB RSP (Remote Serial Protocol) 协议和OpenODC通信。将要执行的指令发给OpenOCD。
2 OpenOCD。OpenOCD收到GDB的指令后,按照 CMSIS-DAP 的规范,封装一个 USB 数据包,发给调试探头。
3 DebugProbe。收到CMSIS-DAP (USB 指令)后,在 SWCLK 和 SWDIO 这两根线上产生特定频率的高低电平跳变,也就是SWD信号。
4 DAP。DAP 不需要 CPU 运行,它自己就有权访问芯片内部的 总线 (AHB/APB)。收到SWD指令后,直接独写内存或寄存器,之后原路返回结果。
路径示意图如下:

SWD(Serial Wire Debug,串行线调试) 是 ARM 公司推出的一种串行调试接口标准,其核心是通过两根串行信号线实现对芯片的调试控制、数据读写及程序调试,相比传统的 JTAG 接口更简洁、占用引脚更少,适合 Pico 这类小型微控制器。简而言之,SWD就是JTAG的青春版。
SWD 是 JTAG 舍弃了复杂的电路板级硬件测试(边界扫描)功能,并利用半双工通信技术将 5 根引脚精简为 2 根的“高性价比”方案。它在牺牲了对电路板焊点检测和多芯片物理串联能力的基础上,依然完整保留了对 CPU 内核调试、内存访问及程序烧录的所有核心能力。
SWD 调试依赖RP2040 芯片内置的 ARM Cortex-M0 + 内核的调试架构,以及专门的调试引脚和硬件模块,结构如下:
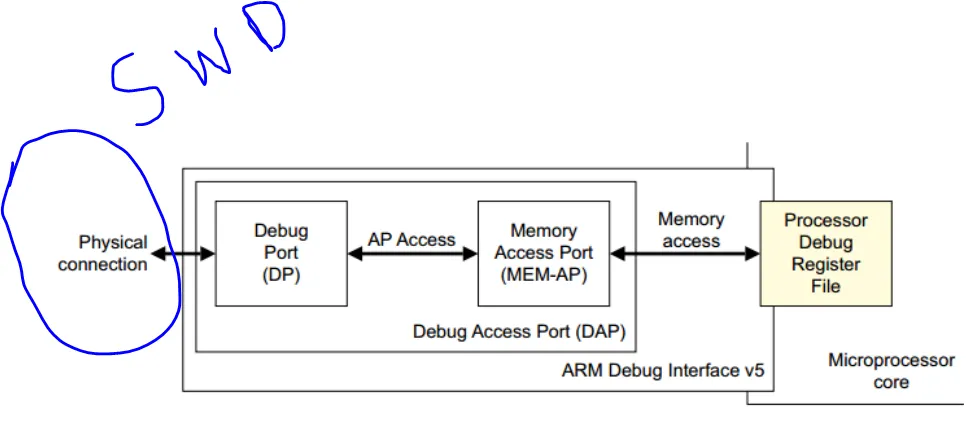
DAP(Debug Access Port,调试访问端口):RP2040 内部集成了 ARM 标准的 DAP 模块,这是 SWD 调试的核心硬件单元,负责解析外部调试器的指令、访问芯片的内部资源(如寄存器、内存、Flash)。
这部分可以参考官网:https://developer.arm.com/documentation/ddi0480/e/Debug-Access-Port
SWD 专用引脚:Pico 板载了两个关键的 SWD 引脚(可通过排针引出):
SWDCLK:串行调试时钟引脚,由调试器(如 J-Link、OpenOCD+Raspberry Pi 主机)提供时钟信号,同步数据传输;
SWDIO:双向数据引脚,用于在调试器和 Pico 之间传输命令、地址和数据(输入输出复用)。
看着SWD的协议有点类似I2C。此外,还需要 GND(接地)和可选的nRESET(复位引脚,用于复位芯片)配合。
SWD工作流程:
1 外部调试器通过 SWD 协议 发送一个请求数据包。
2 数据包到达 DP (Debug Port)。
3 DP 解析请求,如果目标是内存或外设:
4 DP 使用 SELECT 寄存器选中目标 AP (Access Port)(通常是 MEM-AP)。
5 DP 将读/写请求转发给选中的 AP。
6 AP (Access Port) 将这个请求转化为内部总线协议(如 AHB 或 APB)事务。
7 内部总线执行操作(读取内存或写入外设寄存器)。
8 结果通过 AP 和 DP 返回,最终通过 SWDIO 线返回给外部调试器。
小结:SWD的本质功能就是通过SWD接口读写MCU的内存和寄存器。
小扩展:在windows或者Linux上不用这种手段,直接用GDB就能调了。这是为什么呢?
当在 Linux上直接运行 gdb <app_name> 时,GDB 是在软件层和操作系统内核的帮助下完成调试的。最核心的机制是 ptrace (Process Trace)。GDB(作为父进程)通过 ptrace() 系统调用,将自己挂载到目标进程(您要调试的应用程序)上。同时获得对目标进程内存、寄存器和执行流的完全控制权。
同时,在现代操作系统上,每个应用程序都有自己的虚拟地址空间。GDB 和目标进程都在同一个OS内核的监督下运行。GDB 通过内核提供的 API(如 /proc 文件系统、ptrace)来直接访问和操作目标进程的内存和寄存器状态。
Windows上不是ptrace。微软提供了一套Debug API来实现这个功能。
2 环境搭建
根据树莓派的官方文档RP-008276-DS-1-getting-started-with-pico,搭建调试环境是这样的。
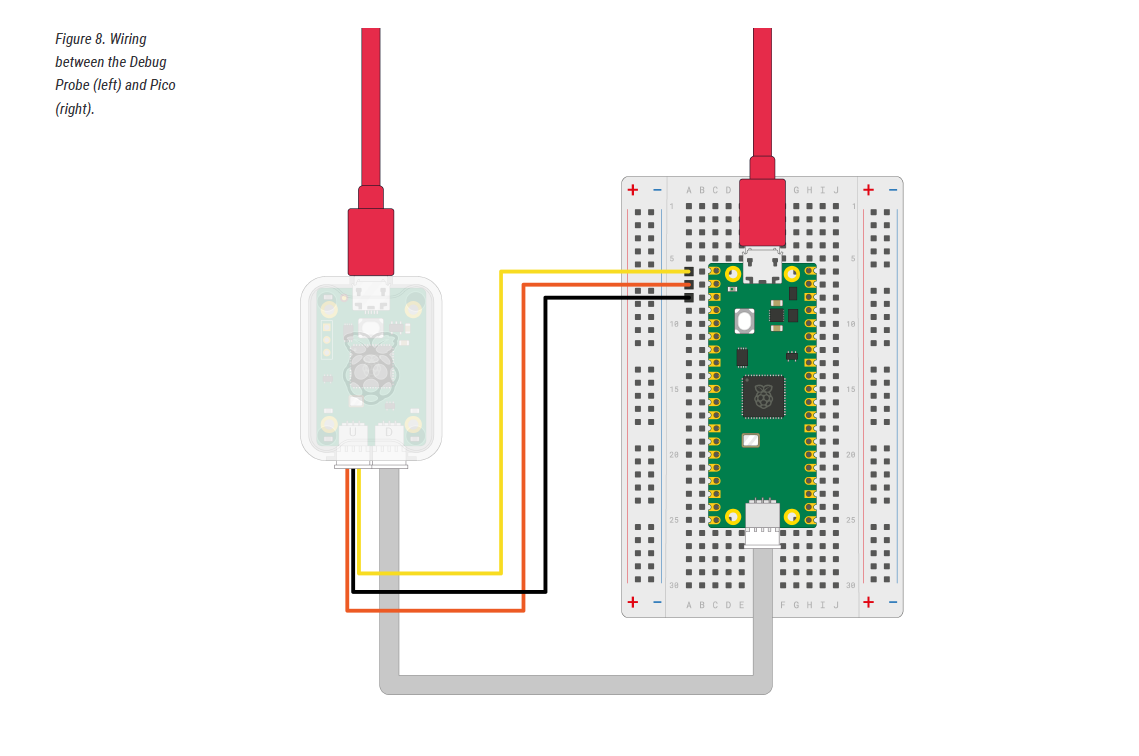
文档里面说需要两个PICO。这个是什么原因呢?其实中间的PICO就是一个协议转换。也就是上面说到DebugProbe。做的工作就是将USB/Uart转换成SWD协议。将USB接口的5V数据电平转换成SWD的3.3V并保证硬件时序。
理论上这些功能也不算难,要求的算力也不多。真的有人做一个集成方案,比如STlink,弄到10块钱也不是不行。。。(想当年一个Jtag调试器成千上万,有些公司也只有一个,甚至有员工离职不要未发工资顺走一个Jtag的。。。)
STlink也是支持CMSIS和SWD,查了一下能否用STlink替代,结论是最基本功能也许行,很多树莓派特定的指令STlink是肯定不支持的。所以复杂的功能是肯定搞不定的。
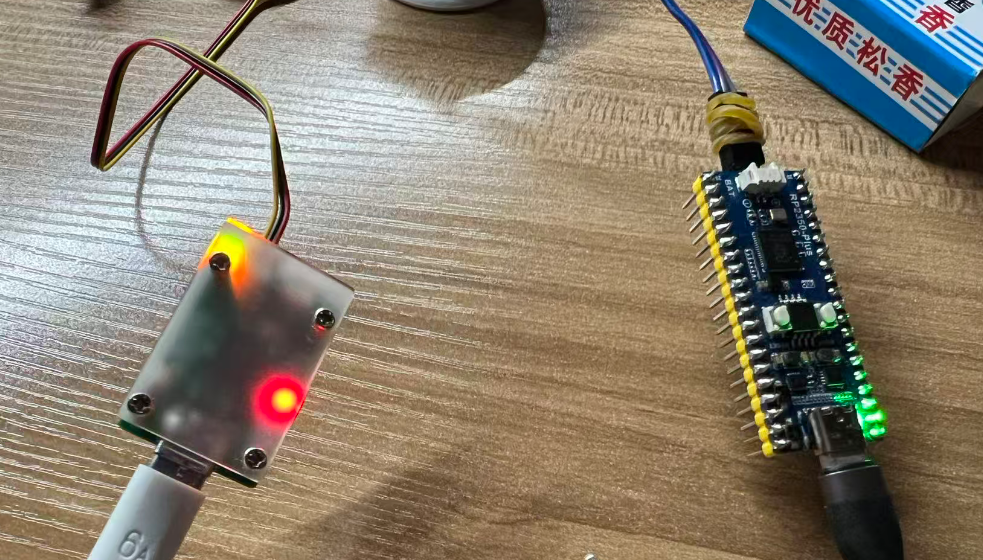
有DebugProbe两个口,一个是SWD,一个是UART。基本功能的话先连接SWD就可以了。一般的Pico板子是的SWD口是没有接出来,要自己焊接飞线,搞这个真的折腾死我了。。。
调试软件直接用的VSCode集成的PICO套件。用的Blink示例工程。
调试的时候选第一个,使用内置的OpenOCD。
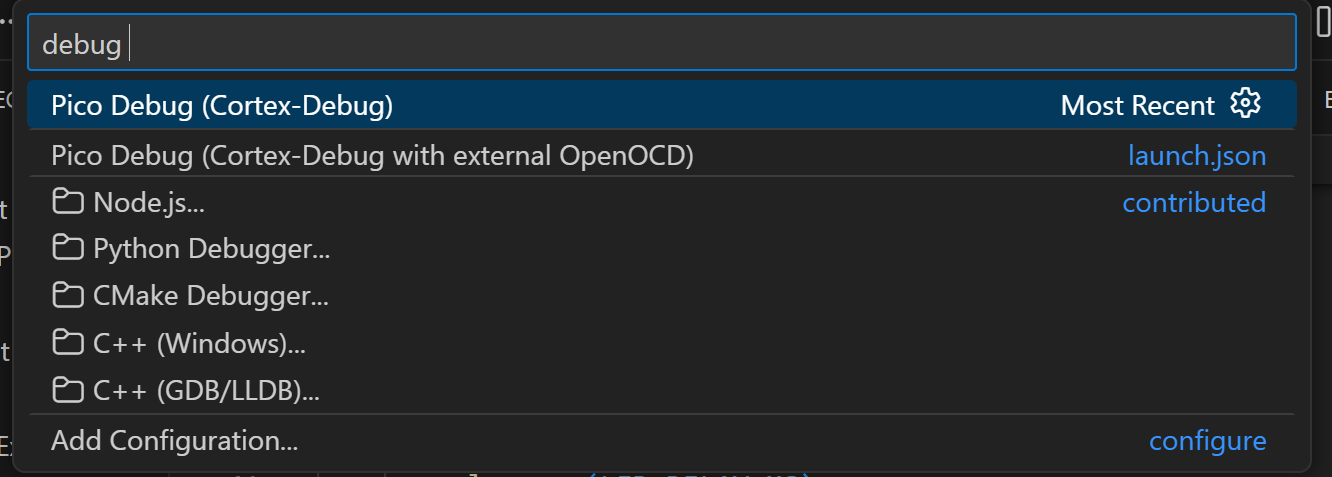
之后过程非常丝滑,一下就能调了。。
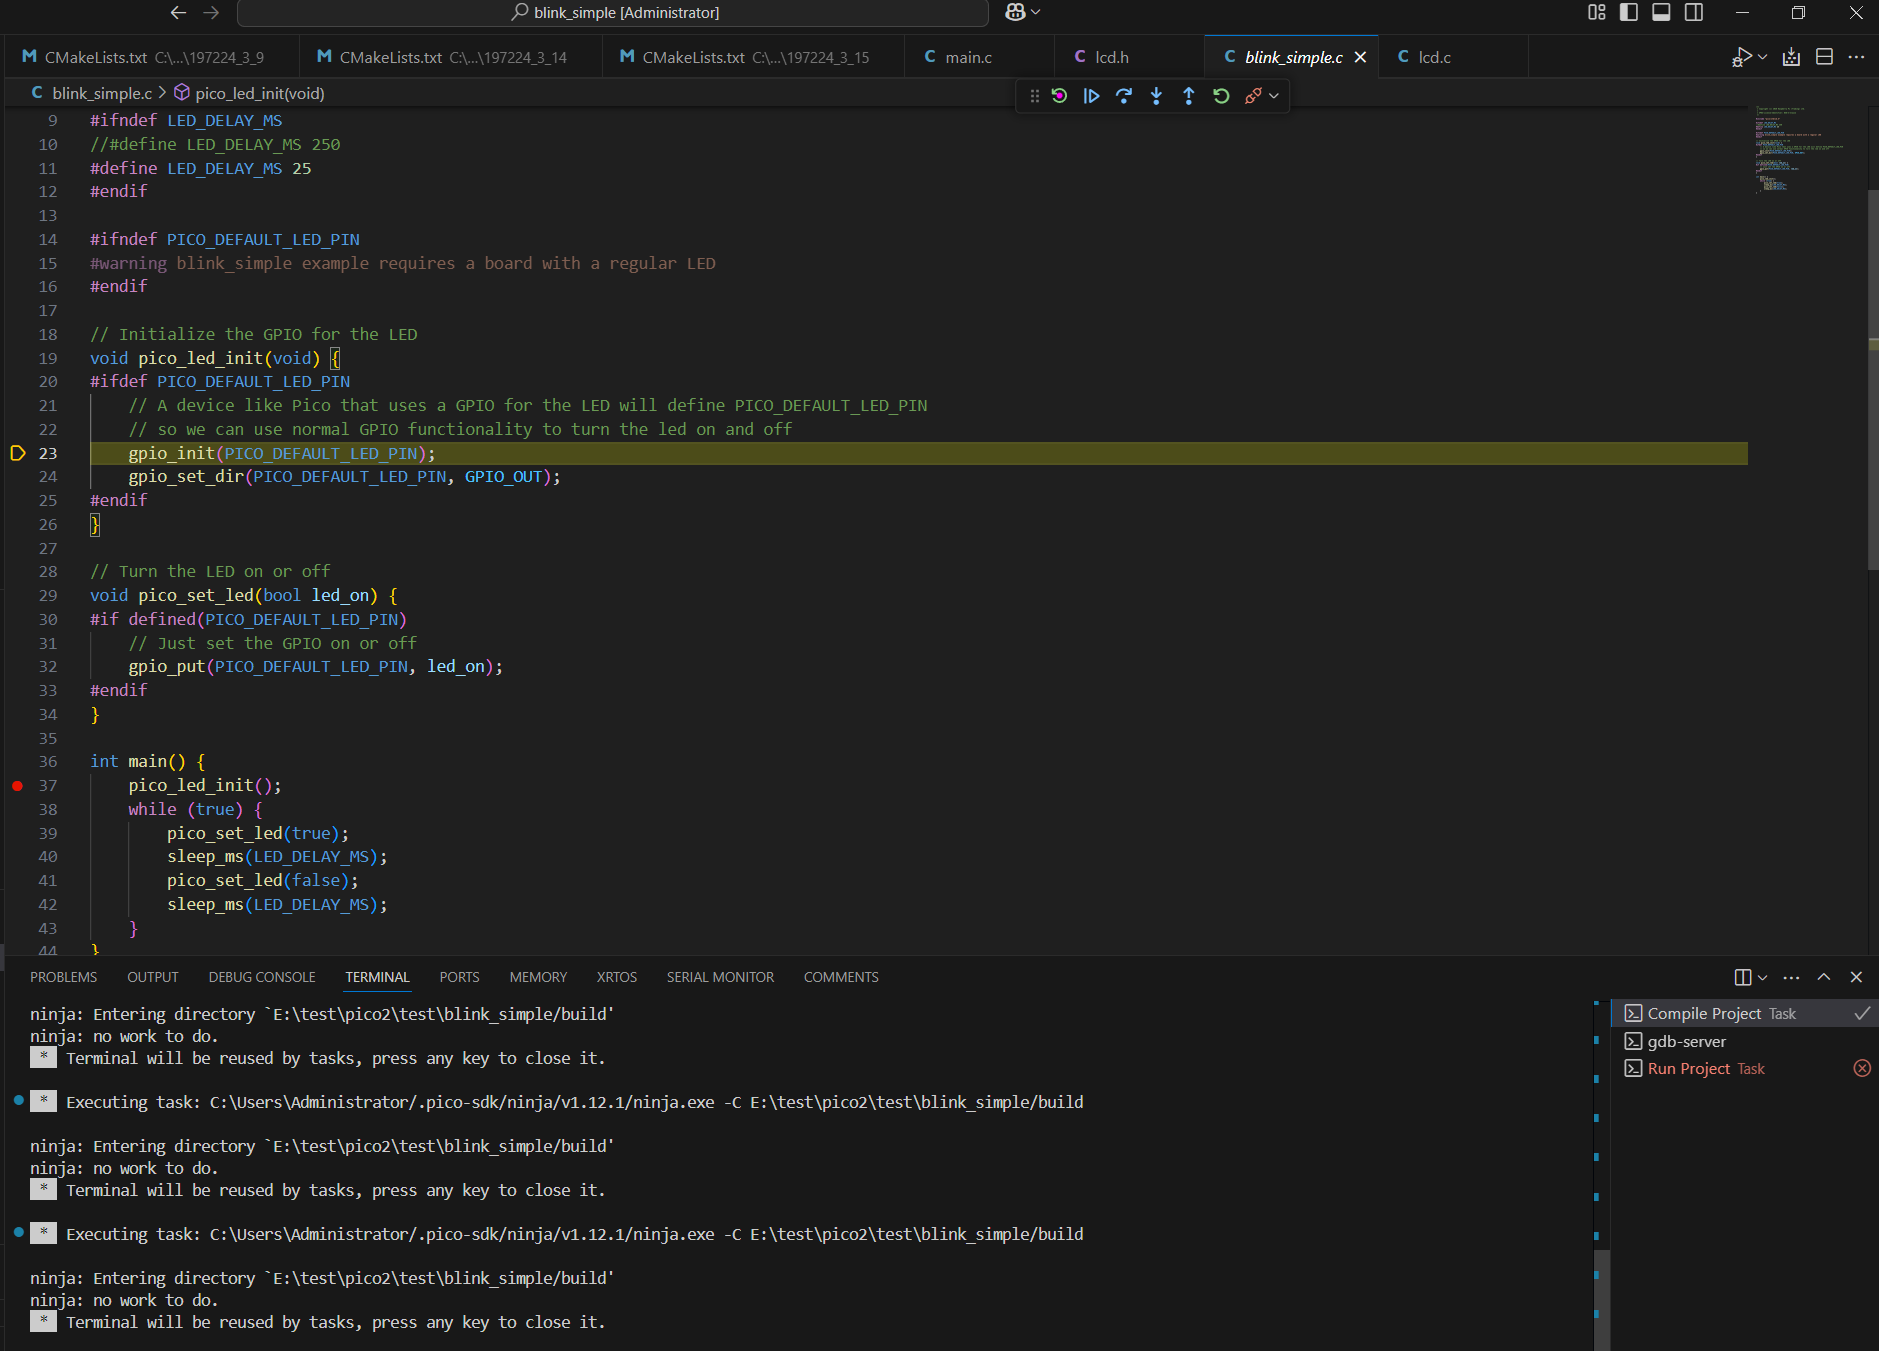
在工程的文件夹里面,可以看到插件帮忙弄的launch.json
{
    "version": "0.2.0",
    "configurations": [
        {
            "name": "Pico Debug (Cortex-Debug)",
            "cwd": "${userHome}/.pico-sdk/openocd/0.12.0+dev/scripts",
            "executable": "${command:raspberry-pi-pico.launchTargetPath}",
            "request": "launch",
            "type": "cortex-debug",
            "servertype": "openocd",
            "serverpath": "${userHome}/.pico-sdk/openocd/0.12.0+dev/openocd.exe",
            "gdbPath": "${command:raspberry-pi-pico.getGDBPath}",
            "device": "${command:raspberry-pi-pico.getChipUppercase}",
            "configFiles": [
                "interface/cmsis-dap.cfg",
                "target/${command:raspberry-pi-pico.getTarget}.cfg"
            ],
            "svdFile": "${userHome}/.pico-sdk/sdk/2.2.0/src/${command:raspberry-pi-pico.getChip}/hardware_regs/${command:raspberry-pi-pico.getChipUppercase}.svd",
            "runToEntryPoint": "main",
            // Fix for no_flash binaries, where monitor reset halt doesn't do what is expected
            // Also works fine for flash binaries
            "overrideLaunchCommands": [
                "monitor reset init",
                "load \"${command:raspberry-pi-pico.launchTargetPath}\""
            ],
            "openOCDLaunchCommands": [
                "adapter speed 5000"
            ]
        },
        {
            "name": "Pico Debug (Cortex-Debug with external OpenOCD)",
            "cwd": "${workspaceRoot}",
            "executable": "${command:raspberry-pi-pico.launchTargetPath}",
            "request": "launch",
            "type": "cortex-debug",
            "servertype": "external",
            "gdbTarget": "localhost:3333",
            "gdbPath": "${command:raspberry-pi-pico.getGDBPath}",
            "device": "${command:raspberry-pi-pico.getChipUppercase}",
            "svdFile": "${userHome}/.pico-sdk/sdk/2.2.0/src/${command:raspberry-pi-pico.getChip}/hardware_regs/${command:raspberry-pi-pico.getChipUppercase}.svd",
            "runToEntryPoint": "main",
            // Fix for no_flash binaries, where monitor reset halt doesn't do what is expected
            // Also works fine for flash binaries
            "overrideLaunchCommands": [
                "monitor reset init",
                "load \"${command:raspberry-pi-pico.launchTargetPath}\""
            ]
        },
    ]
}
实际上PICO套件集成的东西还挺多的。看了下,在C:\Users\用户名\.pico-sdk\
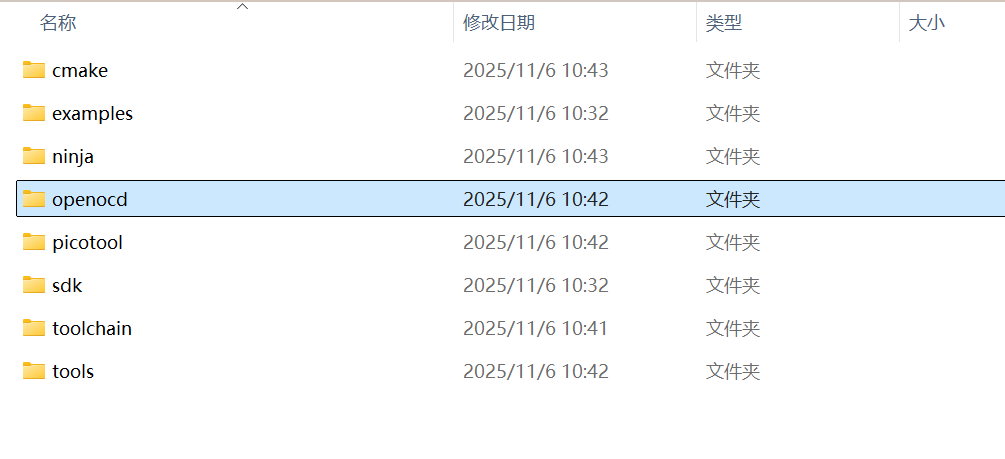
在这里悄悄把openocd安装进来了。在.pico-sdk\openocd\0.12.0+dev\scripts\target可以看到rp2350调试的配置文件。rp2350.cfg
# SPDX-License-Identifier: GPL-2.0-or-later

# RP2350 is a microcontroller with dual Cortex-M33 cores or dual Hazard3 RISC-V cores.
# https://www.raspberrypi.com/documentation/microcontrollers/silicon.html#rp2350

transport select swd

source [find bitsbytes.tcl]
source [find target/swj-dp.tcl]

if { [info exists CHIPNAME] } {
	set _CHIPNAME $CHIPNAME
} else {
	set _CHIPNAME rp2350
}

if { [info exists WORKAREASIZE] } {
	set _WORKAREASIZE $WORKAREASIZE
} else {
	set _WORKAREASIZE 0x10000
}

# Nonzero FLASHSIZE supresses QSPI flash size detection
if { [info exists FLASHSIZE] } {
	set _FLASHSIZE $FLASHSIZE
} else {
	# Detect QSPI flash size based on flash ID or SFDP
	set _FLASHSIZE 0
}

if { [info exists CPUTAPID] } {
	set _CPUTAPID $CPUTAPID
} else {
	set _CPUTAPID 0x00040927
}

# Set to '1' to start rescue mode
if { [info exists RESCUE] } {
	set _RESCUE $RESCUE
} else {
	set _RESCUE 0
}

# Set to 'cm0' or 'cm1' for Cortex-M33 single core configuration
# To keep compatibility with RP2040 aliases '0' and '1' are provided for Cortex-M33 cores
# Use 'rv0' or 'rv1' for RISC-V single core configuration
# List more for a multicore configuration
if { [info exists USE_CORE] } {
	set _USE_CORE $USE_CORE
} else {
	# defaults to both Cortex-M33 cores
	set _USE_CORE { cm0 cm1 }
}

swj_newdap $_CHIPNAME cpu -expected-id $_CPUTAPID

if { [info exists SWD_MULTIDROP] } {
	dap create $_CHIPNAME.dap -adiv6 -chain-position $_CHIPNAME.cpu -dp-id 0x0040927 -instance-id 0
} else {
	dap create $_CHIPNAME.dap -adiv6 -chain-position $_CHIPNAME.cpu
}

# Cortex-M33 core 0
if { [lsearch $_USE_CORE cm0] >= 0 || [lsearch $_USE_CORE 0] >= 0 } {
	set _TARGETNAME_CM0 $_CHIPNAME.cm0
	set _TARGETNAME_0 $_TARGETNAME_CM0
}

# RISC-V core 0
if { [lsearch $_USE_CORE rv0] >= 0 } {
	set _TARGETNAME_RV0 $_CHIPNAME.rv0
	if { ![info exists _TARGETNAME_0] } {
		set _TARGETNAME_0 $_TARGETNAME_RV0
	}
}

# Cortex-M33 core 1
if { [lsearch $_USE_CORE cm1] >= 0 || [lsearch $_USE_CORE 1] >= 0 } {
	set _TARGETNAME_CM1 $_CHIPNAME.cm1
	set _TARGETNAME_1 $_TARGETNAME_CM1
}

# RISC-V core 1
if { [lsearch $_USE_CORE rv1] >= 0 } {
	set _TARGETNAME_RV1 $_CHIPNAME.rv1
	if { ![info exists _TARGETNAME_1] } {
		set _TARGETNAME_1 $_TARGETNAME_RV1
	}
}

proc _rv_reset_init { } {
	set chip_id [format 0x%08x [read_memory 0x40000000 32 1]]

	# Version related workarounds
	switch $chip_id {
		0x00004927 { # A0
			# remove IO_QSPI isolation
			mww 0x40030014 0
			mww 0x4003001c 0
			mww 0x40030024 0
			mww 0x4003002c 0
			mww 0x40030034 0
			mww 0x4003003c 0
		}
	}

	rp2xxx rom_api_call FC
}

proc _conditional_examine { target } {
	if {![$target was_examined]} {
		$target arp_examine
	}
}

proc _conditional_examine_switch { old_target new_target } {
	if {[$new_target was_examined]} {
		rp2xxx _switch_target $old_target $new_target
	} else {
		$new_target arp_examine
	}
}

proc _cm_present { dap romtable_ptr } {
	expr { [$dap apreg 0 $romtable_ptr] & 1 }
}

proc _cm_available_examine { target dap romtable_ptr } {
	if { [_cm_present $dap $romtable_ptr] } {
		# examine after switch if not yet examined
		_conditional_examine $target
		return "available"
	} else {
		return "unavailable"
	}
}

if { [info exists _TARGETNAME_CM0] } {
	target create $_TARGETNAME_CM0 cortex_m -dap $_CHIPNAME.dap -ap-num 0x2000
	# srst does not exist; use SYSRESETREQ to perform a soft reset
	$_TARGETNAME_CM0 cortex_m reset_config sysresetreq

	# After a rescue reset the cache requires invalidate to allow SPI flash
	# reads from the XIP cached mapping area
	$_TARGETNAME_CM0 configure -event reset-init { rp2xxx rom_api_call FC }

	$_TARGETNAME_CM0 configure -event check-availability "_cm_available_examine $_TARGETNAME_CM0 $_CHIPNAME.dap 0"
}

if { [info exists _TARGETNAME_RV0] } {
	target create $_TARGETNAME_RV0 riscv -dap $_CHIPNAME.dap -ap-num 0xa000 -coreid 0
	$_TARGETNAME_RV0 riscv set_enable_virt2phys off

	$_TARGETNAME_RV0 configure -event reset-init "_rv_reset_init"

	if { [info exists _TARGETNAME_CM0] } {
		$_TARGETNAME_RV0 configure -event become-unavailable "rp2xxx _switch_target $_TARGETNAME_RV0 $_TARGETNAME_CM0"
		$_TARGETNAME_RV0 configure -event become-available "_conditional_examine_switch $_TARGETNAME_CM0 $_TARGETNAME_RV0"

		# just for setting after init when the event become-available is not fired
		$_TARGETNAME_RV0 configure -event examine-end "rp2xxx _switch_target $_TARGETNAME_CM0 $_TARGETNAME_RV0"
	} else {
		$_TARGETNAME_RV0 configure -event become-available "_conditional_examine $_TARGETNAME_RV0"
	}
}

if { [info exists _TARGETNAME_CM1] } {
	target create $_TARGETNAME_CM1 cortex_m -dap $_CHIPNAME.dap -ap-num 0x4000
	$_TARGETNAME_CM1 cortex_m reset_config sysresetreq

	$_TARGETNAME_CM1 configure -event check-availability "_cm_available_examine $_TARGETNAME_CM1 $_CHIPNAME.dap 4"
}

if { [info exists _TARGETNAME_RV1] } {
	target create $_TARGETNAME_RV1 riscv -dap $_CHIPNAME.dap -ap-num 0xa000 -coreid 1
	$_TARGETNAME_RV1 riscv set_enable_virt2phys off

	$_TARGETNAME_RV1 configure -event become-available "_conditional_examine $_TARGETNAME_RV1"
}

if { [info exists USE_SMP] } {
	set _USE_SMP $USE_SMP
} elseif { [info exists _TARGETNAME_CM0] == [info exists _TARGETNAME_CM1]
		&& [info exists _TARGETNAME_RV0] == [info exists _TARGETNAME_RV1] } {
	set _USE_SMP 1
} else {
	set _USE_SMP 0
}
if { $_USE_SMP } {
	if { [info exists _TARGETNAME_CM0] && [info exists _TARGETNAME_CM1] } {
		$_TARGETNAME_CM0 configure -rtos hwthread
		$_TARGETNAME_CM1 configure -rtos hwthread
		target smp $_TARGETNAME_CM0 $_TARGETNAME_CM1
	}
	if { [info exists _TARGETNAME_RV0] && [info exists _TARGETNAME_RV1] } {
		$_TARGETNAME_RV0 configure -rtos hwthread
		$_TARGETNAME_RV1 configure -rtos hwthread
		target smp $_TARGETNAME_RV0 $_TARGETNAME_RV1
	}
}

if { [info exists _TARGETNAME_0] } {
	set _FLASH_TARGET $_TARGETNAME_0
}
if { ![info exists _FLASH_TARGET] && [info exists _TARGETNAME_1] } {
	set _FLASH_TARGET $_TARGETNAME_1
	if { [info exists _TARGETNAME_CM1] && [info exists _TARGETNAME_RV1] } {
		echo "Info : $_CHIPNAME.flash will be handled by $_TARGETNAME_1 without switching"
	}
}
if { [info exists _FLASH_TARGET] } {
	# QSPI flash size detection during gdb connect requires to back-up RAM
	set _WKA_BACKUP [expr { $_FLASHSIZE == 0 }]
	$_FLASH_TARGET configure -work-area-phys 0x20010000 -work-area-size $_WORKAREASIZE -work-area-backup $_WKA_BACKUP
	if { [info exists _TARGETNAME_CM0] && [info exists _TARGETNAME_RV0] } {
		$_TARGETNAME_RV0 configure -work-area-phys 0x20010000 \
			 -work-area-size $_WORKAREASIZE -work-area-backup $_WKA_BACKUP
		echo "Info : $_CHIPNAME.flash will be handled by the active one of $_FLASH_TARGET and $_TARGETNAME_RV0 cores"
	}
	set _FLASHNAME $_CHIPNAME.flash
	flash bank $_FLASHNAME rp2xxx 0x10000000 $_FLASHSIZE 0 0 $_FLASH_TARGET
}

if { [info exists _TARGETNAME_1] } {
	# Alias to ensure gdb connecting to core 1 gets the correct memory map
	flash bank $_CHIPNAME.alias virtual 0x10000000 0 0 0 $_TARGETNAME_1 $_FLASHNAME
}

if { [info exists _TARGETNAME_0] } {
	# Select core 0
	targets $_TARGETNAME_0
}

# If a debug key is set in OTP, it needs to be shifted in before the cores will respond to debug requests
proc send_dbgkey { _DBGKEY } {
	global _CHIPNAME
	set __CHIPNAME $_CHIPNAME
	# Check ID register
	echo [format "Info : RP-AP IDR 0x%08x" [$__CHIPNAME.dap apreg 0x80000 0xdfc]]
	# Key should be a 32-char hex string
	if { ([string length $_DBGKEY] != 32) || ![regexp -nocase {(^[0-9A-F]+$)} $_DBGKEY] } {
		echo "Error : DBGKEY should be a string of 32 hex characters"
		return -1
	}
	# Reset key FSM (also resets the result of previous key loads)
	$__CHIPNAME.dap apreg 0x80000 4 0x4
	# Thanks to "everything is a string in tcl" we can hack around the lack of Bignum support in jimtcl
	for {set jj 0 } { $jj < 32 } { set jj [expr {$jj + 8}]} {
		scan [string range $_DBGKEY $jj [expr {$jj + 7}]] %x _DBGKEY_CHUNK
		echo [format "Info : Setting debug key chunk %d to 0x%08x" [expr {$jj / 8}] $_DBGKEY_CHUNK]
		for {set ii 0 } { $ii < 32 } { set ii [expr {$ii + 1}]} {
			# Shift bits in one at a time
			# e.g. key nibble == 'b1100
			# push is bit 1, data is bit 0
			# so write 0x2, 0x2, 0x3, 0x3
			set _KEYBIT [normalize_bitfield $_DBGKEY_CHUNK $ii $ii]
			set _KEYBIT [expr {($_KEYBIT | 0x2)}]
			$__CHIPNAME.dap apreg 0x80000 4 $_KEYBIT
		}
	}
	# TODO: read back AHB-AP CSW for DeviceEn and SDeviceEn bits (CM33)
	return 0
}

# Cold reset resets everything except DP
proc cold_reset { { __CHIPNAME "" } } {
	if { $__CHIPNAME == "" } {
		global _CHIPNAME
		set __CHIPNAME $_CHIPNAME
	}
	poll off
	# set CDBGRSTREQ (and keep set CSYSPWRUPREQ and CDBGPWRUPREQ)
	$__CHIPNAME.dap dpreg 4 0x54000000
	set dpstat [$__CHIPNAME.dap dpreg 4]
	if { [expr { $dpstat & 0xcc000000 }] != 0xcc000000 } {
		echo "Warn : dpstat_reset failed, DP STAT $dpstat"
	}
	$__CHIPNAME.dap dpreg 4 0x50000000
	dap init
	poll on
}

# Rescue reset resets everything except DP and RP_AP
# Both Cortex-M33 cores stop in bootrom
proc rescue_reset { { __CHIPNAME "" } } {
	if { $__CHIPNAME == "" } {
		global _CHIPNAME
		set __CHIPNAME $_CHIPNAME
	}
	poll off
	# set bit RESCUE_RESTART in RP_AP: CTRL register
	$__CHIPNAME.dap apreg 0x80000 0 0x80000000
	$__CHIPNAME.dap apreg 0x80000 0 0
	dap init
	poll on
	if { [lsearch [target names] $__CHIPNAME.cm0] < 0 } {
		echo "Info : restart OpenOCD with 'set USE_CORE { cm0 cm1 }' to debug after rescue"
	}
}

if { $_RESCUE } {
	init
	rescue_reset
}

proc target_present { target } {
	set dap [$target cget -dap]
	if { [$target cget -type] == "riscv" } {
		# Reading availability from DM requires to select particular core.
		# Use negated presence of Cortex-M33 core instead.
		switch [$target cget -coreid] {
			0 { return [expr { ![_cm_present $dap 0] }]}
			1 { return [expr { ![_cm_present $dap 4] }]}
			default { echo "Error: unexpected core id"; return 0 }
		}
	} else {
		switch [format 0x%x [$target cget -ap-num]] {
			0x2000 { return [_cm_present $dap 0] }
			0x4000 { return [_cm_present $dap 4] }
			default { echo "Error: unexpected AP num"; return 0 }
		}
	}
}

proc ocd_process_reset_inner { MODE } {
	set targets [target names]

	# If this target must be halted...
	switch $MODE {
		halt -
		init {
			set halt 1
		}
		run {
			set halt 0
		}
		default {
			return -code error "Invalid mode: $MODE, must be one of: halt, init, or run";
		}
	}

	# Target event handlers *might* change which TAPs are enabled
	# or disabled, so we fire all of them.  But don't issue any
	# target "arp_*" commands, which may issue JTAG transactions,
	# unless we know the underlying TAP is active.
	#
	# NOTE:  ARP == "Advanced Reset Process" ... "advanced" is
	# relative to a previous restrictive scheme

	foreach t $targets {
		# New event script.
		$t invoke-event reset-start
	}

	# Use TRST or TMS/TCK operations to reset all the tap controllers.
	# TAP reset events get reported; they might enable some taps.
	init_reset $MODE

	# Examine all targets on enabled taps.
	foreach t $targets {
		if {![using_jtag] || [jtag tapisenabled [$t cget -chain-position]]} {
			if {[target_present $t]} {
				$t invoke-event examine-start
				set err [catch "$t arp_examine"]
				if { $err } {
					$t invoke-event examine-fail
				} else {
					$t invoke-event examine-end
				}
			}
		}
	}

	# Assert SRST, and report the pre/post events.
	# Note:  no target sees SRST before "pre" or after "post".
	foreach t $targets {
		$t invoke-event reset-assert-pre
	}
	foreach t $targets {
		# C code needs to know if we expect to 'halt'
		if {![using_jtag] || [jtag tapisenabled [$t cget -chain-position]]} {
			if {[target_present $t]} {
				$t arp_reset assert $halt
			}
		}
	}
	foreach t $targets {
		$t invoke-event reset-assert-post
	}

	# Now de-assert SRST, and report the pre/post events.
	# Note:  no target sees !SRST before "pre" or after "post".
	foreach t $targets {
		$t invoke-event reset-deassert-pre
	}
	foreach t $targets {
		# Again, de-assert code needs to know if we 'halt'
		if {![using_jtag] || [jtag tapisenabled [$t cget -chain-position]]} {
			if {[target_present $t]} {
				$t arp_reset deassert $halt
			}
		}
	}
	foreach t $targets {
		$t invoke-event reset-deassert-post
	}

	# Pass 1 - Now wait for any halt (requested as part of reset
	# assert/deassert) to happen.  Ideally it takes effect without
	# first executing any instructions.
	if { $halt } {
		foreach t $targets {
			if {[using_jtag] && ![jtag tapisenabled [$t cget -chain-position]]} {
				continue
			}
			if {![target_present $t]} {
				continue
			}

			if { ![$t was_examined] } {
				# don't wait for targets where examination is deferred
				# they can not be halted anyway at this point
				if { [$t examine_deferred] } {
					continue
				}
				# try to re-examine or target state will be unknown
				$t invoke-event examine-start
				set err [catch "$t arp_examine"]
				if { $err } {
					$t invoke-event examine-fail
					return -code error [format "TARGET: %s - Not examined" $t]
				} else {
					$t invoke-event examine-end
				}
			}

			# Wait up to 1 second for target to halt. Why 1sec? Cause
			# the JTAG tap reset signal might be hooked to a slow
			# resistor/capacitor circuit - and it might take a while
			# to charge

			# Catch, but ignore any errors.
			catch { $t arp_waitstate halted 1000 }

			# Did we succeed?
			set s [$t curstate]

			if { $s != "halted" } {
				return -code error [format "TARGET: %s - Not halted" $t]
			}
		}
	}

	#Pass 2 - if needed "init"
	if { $MODE == "init" } {
		foreach t $targets {
			if {[using_jtag] && ![jtag tapisenabled [$t cget -chain-position]]} {
				continue
			}
			if {![target_present $t]} {
				continue
			}

			# don't wait for targets where examination is deferred
			# they can not be halted anyway at this point
			if { ![$t was_examined] && [$t examine_deferred] } {
				continue
			}

			set err [catch "$t arp_waitstate halted 5000"]
			# Did it halt?
			if { $err == 0 } {
				$t invoke-event reset-init
			}
		}
	}

	foreach t $targets {
		$t invoke-event reset-end
	}
}
========================12/31补========================
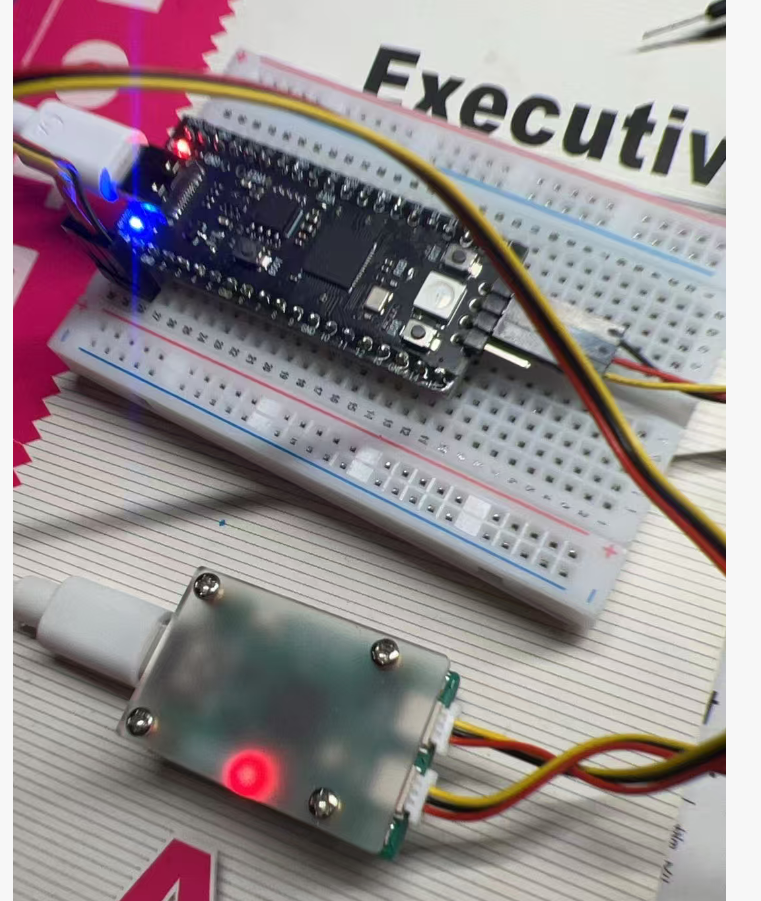
最后还是找了个PICO,弄了个完全体,把UART也接上来了。其实这个功能直接再用一个ttl转usb也一样,接线方式也一样。
3 SWD调试的功能
3.1 下载程序和重启单板
直接在面板就可以启动。
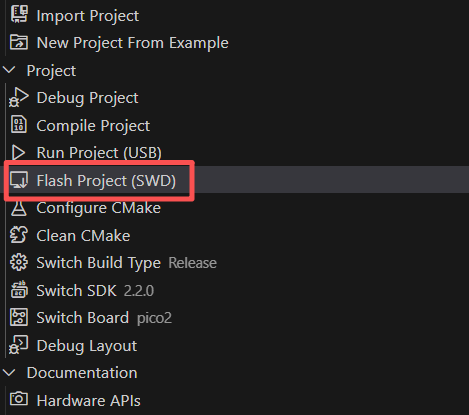
很方便,再也不用去重启按BOOTSEL。打印是这样的。
Executing task: C:\Users\Administrator/.pico-sdk/openocd/0.12.0+dev/openocd.exe -s C:\Users\Administrator/.pico-sdk/openocd/0.12.0+dev/scripts -f interface/cmsis-dap.cfg -f target/rp2350-riscv.cfg -c adapter speed 5000; program "e:/test/pico2/test/blink_simple/build/blink_simple.elf" verify reset exit

Open On-Chip Debugger 0.12.0+dev (2025-09-12-19:31)
Licensed under GNU GPL v2
For bug reports, read
        http://openocd.org/doc/doxygen/bugs.html
Info : [rp2350.rv0] Hardware thread awareness created
Info : [rp2350.rv1] Hardware thread awareness created
ocd_process_reset_inner
Info : Using CMSIS-DAPv2 interface with VID:PID=0x2e8a:0x000c, serial=E6625887D331392D
Warn : ***
Warn : *** Old Raspberry Pi Debugprobe firmware detected (1.0.1)
Warn : *** Using low-performance workaround
Warn : *** Please update to the latest release at:
Warn : *** https://github.com/raspberrypi/debugprobe/releases/latest
Warn : ***
Info : CMSIS-DAP: SWD supported
Info : CMSIS-DAP: Atomic commands supported
Info : CMSIS-DAP: Test domain timer supported
Info : CMSIS-DAP: FW Version = 2.0.0
Info : CMSIS-DAP: Interface Initialised (SWD)
Info : SWCLK/TCK = 0 SWDIO/TMS = 0 TDI = 0 TDO = 0 nTRST = 0 nRESET = 0
Info : CMSIS-DAP: Interface ready
Info : clock speed 5000 kHz
Info : SWD DPIDR 0x4c013477
Info : [rp2350.rv0] datacount=1 progbufsize=2
Info : [rp2350.rv0] Disabling abstract command reads from CSRs.
Info : [rp2350.rv0] Disabling abstract command writes to CSRs.
Info : [rp2350.rv0] Core 0 could not be made part of halt group 1.
Info : [rp2350.rv0] Examined RISC-V core
Info : [rp2350.rv0]  XLEN=32, misa=0x40901105
Info : [rp2350.rv0] Examination succeed
Info : [rp2350.rv1] datacount=1 progbufsize=2
Info : [rp2350.rv1] Disabling abstract command reads from CSRs.
Info : [rp2350.rv1] Disabling abstract command writes to CSRs.
Info : [rp2350.rv1] Core 1 could not be made part of halt group 1.
Info : [rp2350.rv1] Examined RISC-V core
Info : [rp2350.rv1]  XLEN=32, misa=0x40901105
Info : [rp2350.rv1] Examination succeed
Info : [rp2350.rv0] starting gdb server on 3333
Info : Listening on port 3333 for gdb connections
Info : RP2350 rev 2, QSPI Flash win w25q32fv/jv id = 0x1640ef size = 4096 KiB in 1024 sectors
Info : RP2xxx ROM API function FC @ 7d6a
** Programming Started **
Info : Padding image section 2 at 0x1000185c with 164 bytes (bank write end alignment)
Warn : Adding extra erase range, 0x10001900 .. 0x10001fff
** Programming Finished **
** Verify Started **
** Verified OK **
** Resetting Target **
shutdown command invoked
可以看到,核心就是openocd.exe的命令:
C:\Users\Administrator/.pico-sdk/openocd/0.12.0+dev/openocd.exe -s C:\Users\Administrator/.pico-sdk/openocd/0.12.0+dev/scripts -f interface/cmsis-dap.cfg -f target/rp2350-riscv.cfg -c adapter speed 5000; program "e:/test/pico2/test/blink_simple/build/blink_simple.elf" verify reset exit
在这里,烧写的文件的elf而不是常见的uf2。UF2格式原始开发是微软,专门用来U盘更新,由elf2uf2工具生成。
3.2 实时断点与单步执行
可以让 Pico 运行到代码的任意一行(点击红点)自动停下。随后可以“单步跳入”函数内部,或者“单步跳过”某行指令。这是排查逻辑漏洞最快的方法。
直接在面板的Debug Project启动。
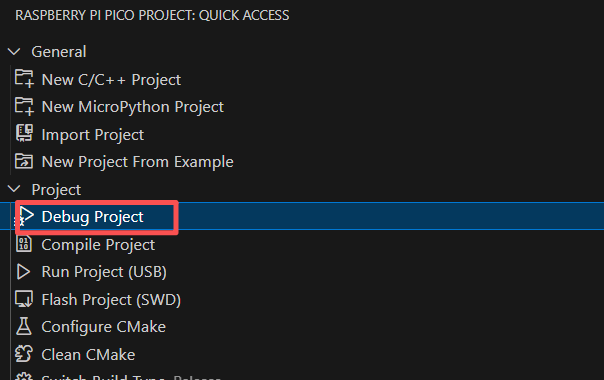
图在之前放过了,就不重新发了。
Cortex-Debug: VSCode debugger extension version 1.12.1 git(652d042). Usage info: https://github.com/Marus/cortex-debug#usage
Reading symbols from c:/users/administrator/.pico-sdk/toolchain/riscv_zcb_rpi_2_2_0_3/bin/riscv32-unknown-elf-objdump --syms -C -h -w e:/test/pico2/test/blink_simple/build/blink_simple.elf
Reading symbols from c:/users/administrator/.pico-sdk/toolchain/riscv_zcb_rpi_2_2_0_3/bin/riscv32-unknown-elf-nm --defined-only -S -l -C -p e:/test/pico2/test/blink_simple/build/blink_simple.elf
Launching GDB: "C:\\Users\\Administrator\\.pico-sdk\\toolchain\\RISCV_ZCB_RPI_2_2_0_3\\bin\\riscv32-unknown-elf-gdb" -q --interpreter=mi2
    IMPORTANT: Set "showDevDebugOutput": "raw" in "launch.json" to see verbose GDB transactions here. Very helpful to debug issues or report problems
Launching gdb-server: "C:\\Users\\Administrator/.pico-sdk/openocd/0.12.0+dev/openocd.exe" -c "gdb_port 50000" -c "tcl_port 50001" -c "telnet_port 50002" -s "C:\\Users\\Administrator/.pico-sdk/openocd/0.12.0+dev/scripts" -f "c:/Users/Administrator/.vscode/extensions/marus25.cortex-debug-1.12.1/support/openocd-helpers.tcl" -f interface/cmsis-dap.cfg -f target/rp2350-riscv.cfg -c "adapter speed 5000"
    Please check TERMINAL tab (gdb-server) for output from C:\Users\Administrator/.pico-sdk/openocd/0.12.0+dev/openocd.exe
Finished reading symbols from objdump: Time: 545 ms
Finished reading symbols from nm: Time: 412 ms
Could not find platform independent libraries <prefix>
Could not find platform dependent libraries <exec_prefix>
Python path configuration:
  PYTHONHOME = (not set)
  PYTHONPATH = (not set)
  program name = 'D:\a\_temp\msys64\ucrt64\bin\python'
  isolated = 0
  environment = 1
  user site = 1
  safe_path = 0
  import site = 1
  is in build tree = 0
  stdlib dir = 'D:\M\msys64\ucrt64\lib\python3.12'
  sys._base_executable = 'D:\\a\\_temp\\msys64\\ucrt64\\bin\\python'
  sys.base_prefix = 'D:\\M\\msys64\\ucrt64'
  sys.base_exec_prefix = 'D:\\M\\msys64\\ucrt64'
  sys.platlibdir = 'lib'
  sys.executable = 'D:\\a\\_temp\\msys64\\ucrt64\\bin\\python'
  sys.prefix = 'D:\\M\\msys64\\ucrt64'
  sys.exec_prefix = 'D:\\M\\msys64\\ucrt64'
    'D:\\M\\msys64\\ucrt64\\lib\\python3.12\\lib-dynload',
  ]
Python initialization failed: failed to get the Python codec of the filesystem encoding
Output radix now set to decimal 10, hex a, octal 12.
Input radix now set to decimal 10, hex a, octal 12.
0x10000ac0 in timer_time_reached (timer=0x400b0000, t=<optimized out>) at C:/Users/Administrator/.pico-sdk/sdk/2.2.0/src/rp2_common/hardware_timer/include/hardware/timer.h:324
324	    return (hi >= hi_target && (timer->timerawl >= (uint32_t) target || hi != hi_target));
Program stopped, probably due to a reset and/or halt issued by debugger
RP2xxx ROM API function FC @ 7d6a
Loading section .text, size 0x1418 lma 0x10000000
Loading section .rodata, size 0xe0 lma 0x10001418
Loading section .binary_info, size 0x1c lma 0x100014f8
Loading section .data, size 0x334 lma 0x10001514
Loading section .flash_end, size 0x14 lma 0x10001848
Start address 0x10000034, load size 6236
Transfer rate: 5 KB/sec, 1247 bytes/write.
Note: automatically using hardware breakpoints for read-only addresses.

Thread 1 "rp2350.rv0" hit Breakpoint 1, main () at E:/test/pico2/test/blink_simple/blink_simple.c:23
23	    gpio_init(PICO_DEFAULT_LED_PIN);
使用riscv32-unknown-elf-objdump和nm读取函数名、变量地址等信息。GDB是riscv32-unknown-elf-gdb。之后重新烧写了固件,.text(Flash的起始地址)到0x10000000,.rodata(只读数据(如字符串常量))到0x10001418,.binary_info(Pico SDK 特有的,用于存储程序的元数据(如引脚配置、版本号),方便 picotool 识别)到0x100014f8,.data(初始化的全局变量)到0x10001514,.flash_end到0x10001848。
3.3 内存与变量的实时读写
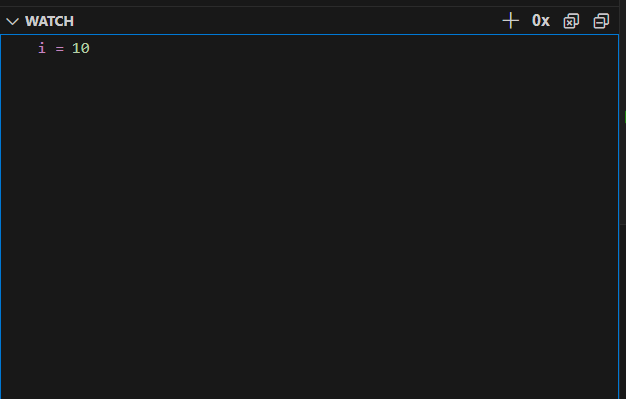
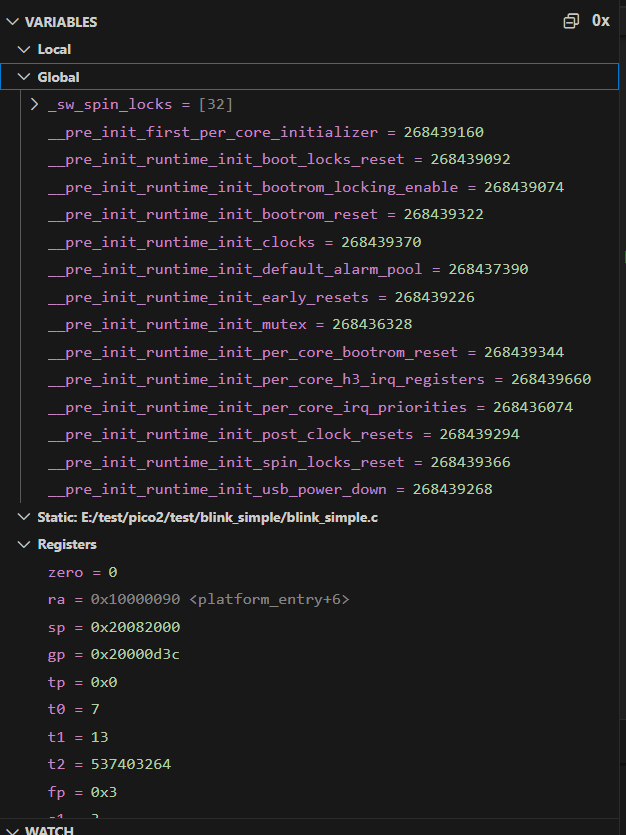
无需在代码里写 printf。在程序暂停时,可以直接在 VS Code 的“监视(Watch)”窗口查看任何变量的值。甚至可以手动修改变量值,然后继续运行,观察系统在不同参数下的反应。
可以看到各种全局变量和寄存器。不过感觉要能改寄存器也要学很多才行。
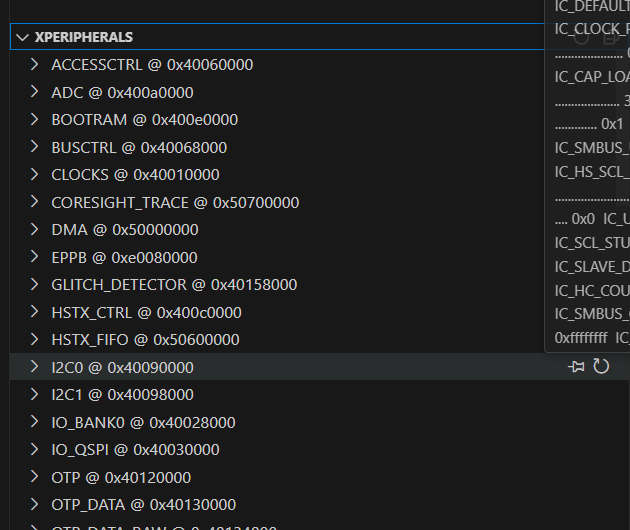
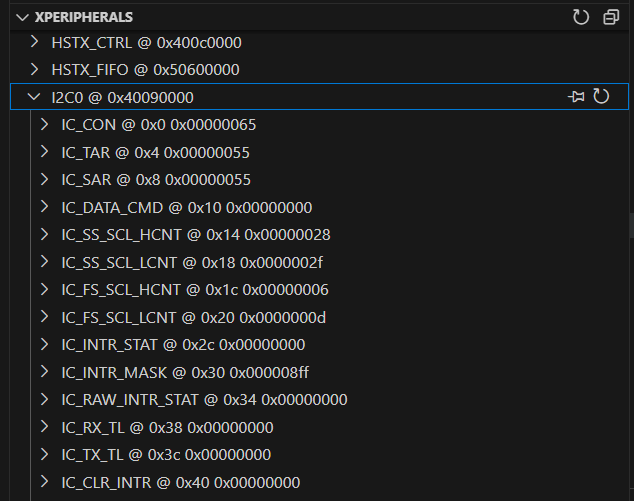
3.4 外设寄存器观察(Peripherals)
可以直接看到硬件寄存器的实时状态。比如 GPIO 指向的是输入还是输出、定时器的当前计数值、甚至是 ADC 的配置位。
3.5 调用堆栈(Call Stack)溯源
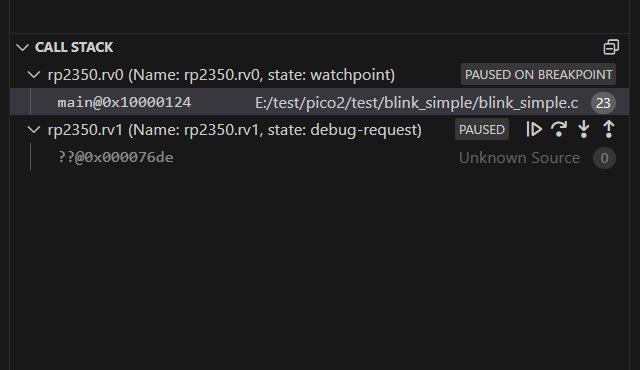
当程序崩溃或陷入死循环时,查看调用堆栈能瞬间知道:什么时候调用了哪个函数导致了当前的错误。
3.6 硬错误分析(HardFault)
如果芯片因为非法内存访问挂掉了,SWD 可以回到崩溃现场,显示出错的那条汇编指令。

北京人形旗下天工造物具身智能开源社区,聚焦具身天工与慧思开物两大平台
更多推荐
 4
4 0
0- 0


 已为社区贡献18条内容

所有评论(0)