详解flink table api基础(三)
文章目录
- 1.使用flink的原因:
- 2. Flink支持两种模式:
- 3. flink table api工作原理:
- 4. Flink table api 使用
- 5. select语句&flink table api:
- 6. 使用flink table api 创建table
- 7. 使用flink table api 写流式数据输出到表或sink
- 8. flink auto-scaling(自动伸缩)
- 9. watermarks(水印)
- 10. 聚合数据(Aggregating Data)
- 11. 使用窗口聚合数据(using windows to aggregate data)
- 12.flink 多表连接(joining flink tables)
- 13.flink table api 代码
1.使用flink的原因:
- real-time
- scalable
- reliable
- Fully-managed
2. Flink支持两种模式:
- Batch processing
package com.flink.wc;

import org.apache.flink.api.common.functions.FlatMapFunction;
import org.apache.flink.api.java.ExecutionEnvironment;
import org.apache.flink.api.java.operators.AggregateOperator;
import org.apache.flink.api.java.operators.DataSource;
import org.apache.flink.api.java.operators.FlatMapOperator;
import org.apache.flink.api.java.operators.UnsortedGrouping;
import org.apache.flink.api.java.tuple.Tuple2;
import org.apache.flink.util.Collector;

/**
 * DataSet api实现(不推荐),官方推荐直接使用DataStream api
 * 批处理:字符分割
 */
public class WordCountBatchDemo {
    public static void main(String[] args) throws Exception {
        //1.创建执行环境
        ExecutionEnvironment env=ExecutionEnvironment.getExecutionEnvironment();
        //2.读取数据:从文件中读取
        DataSource<String> lineDS = env.readTextFile("D:\\ideawork\\javaBasics\\input\\word.txt");

        //3.切分、转换(word,1)
        FlatMapOperator<String, Tuple2<String, Integer>> wordAndOne = lineDS.flatMap(new FlatMapFunction<String, Tuple2<String, Integer>>() {
            @Override
            public void flatMap(String value, Collector<Tuple2<String, Integer>> out) throws Exception {
                //3.1 按照空格进行切分单词
                String[] words = value.split(" ");
                for (String word : words) {
                    //3.2 将单词,转换二元组(word,1)
                    Tuple2<String, Integer> wordTuple2 = Tuple2.of(word, 1);
                    //3.3 使用collector向下游发送数据
                    out.collect(wordTuple2);
                }
            }
        });


        //4.按照word分组,按照tuple中第一个位置word的索引0,分组
        UnsortedGrouping<Tuple2<String, Integer>> wordAndOneGroupby = wordAndOne.groupBy(0);//传入索引为0


        //5.各分组内聚合,按照二元组中第二个元素的位置进行聚合
        AggregateOperator<Tuple2<String, Integer>> sum = wordAndOneGroupby.sum(1);

        //6.输出
        sum.print();
    }
}
- Stateful stream Processing
package com.flink.wc;

import org.apache.flink.api.common.functions.FlatMapFunction;
import org.apache.flink.api.java.functions.KeySelector;
import org.apache.flink.api.java.tuple.Tuple2;
import org.apache.flink.streaming.api.datastream.DataStreamSource;
import org.apache.flink.streaming.api.datastream.KeyedStream;
import org.apache.flink.streaming.api.datastream.SingleOutputStreamOperator;
import org.apache.flink.streaming.api.environment.StreamExecutionEnvironment;
import org.apache.flink.util.Collector;

public class WordCountStreamDemo {
    public static void main(String[] args) throws Exception {
        //1.创建执行环境
        StreamExecutionEnvironment env = StreamExecutionEnvironment.getExecutionEnvironment();

        //2.读取数据
        DataStreamSource<String> lineDS=env.readTextFile("input/word.txt");

        //3.处理数据
        SingleOutputStreamOperator<Tuple2<String, Integer>> wordAndOneDS = lineDS.flatMap(new FlatMapFunction<String, Tuple2<String, Integer>>() {
            @Override
            public void flatMap(String value, Collector<Tuple2<String, Integer>> out) throws Exception {
                //按照空格进行切分
                String[] words = value.split(" ");
                for (String word : words) {
                    //数组转成二元组(word,1)
                    Tuple2<String, Integer> wordAndOne = Tuple2.of(word, 1);
                    //通过采集器,向下游发送数据
                    out.collect(wordAndOne);
                }
            }
        });
        //3.2 分组
        KeyedStream<Tuple2<String, Integer>, String> wordAndOneKS = wordAndOneDS.keyBy(new KeySelector<Tuple2<String, Integer>, String>() {
            @Override
            public String getKey(Tuple2<String, Integer> value) throws Exception {
                return value.f0;
            }
        });

        //3.3 聚合,从tuple第二个元素位置进行聚合
        SingleOutputStreamOperator<Tuple2<String, Integer>> sumDS = wordAndOneKS.sum(1);

        //4.输出数据
       sumDS.print();
        //5.执行:触发启动逻辑
        env.execute();

    }
}
3. flink table api工作原理:
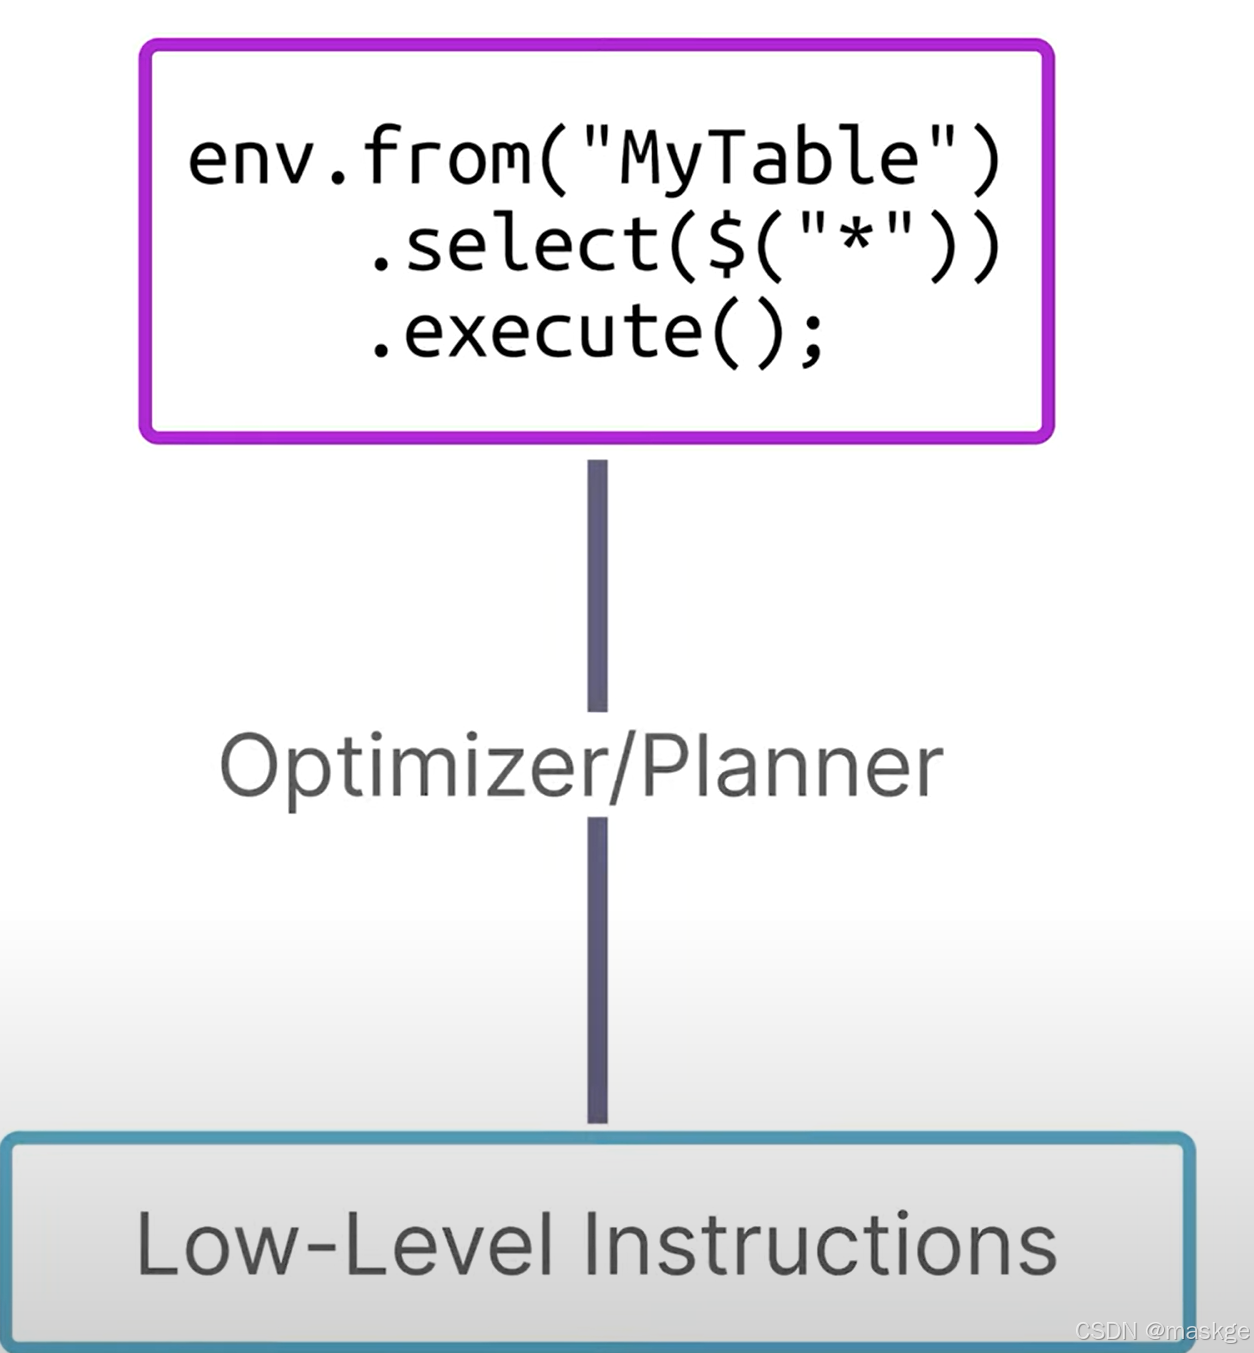
优化器、计划器决定table api如何在flink集群上执行;
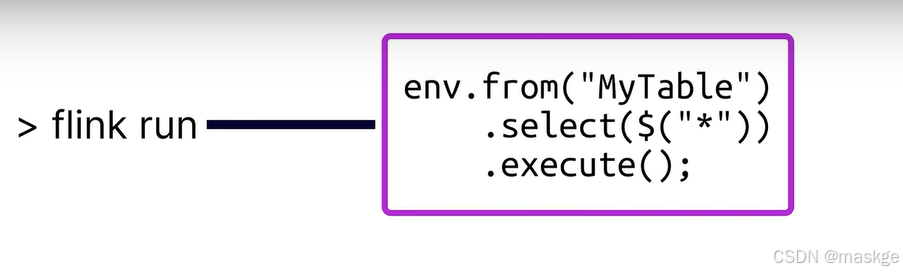
执行flink run命令运行,剩下的代码执行由flink集群执行
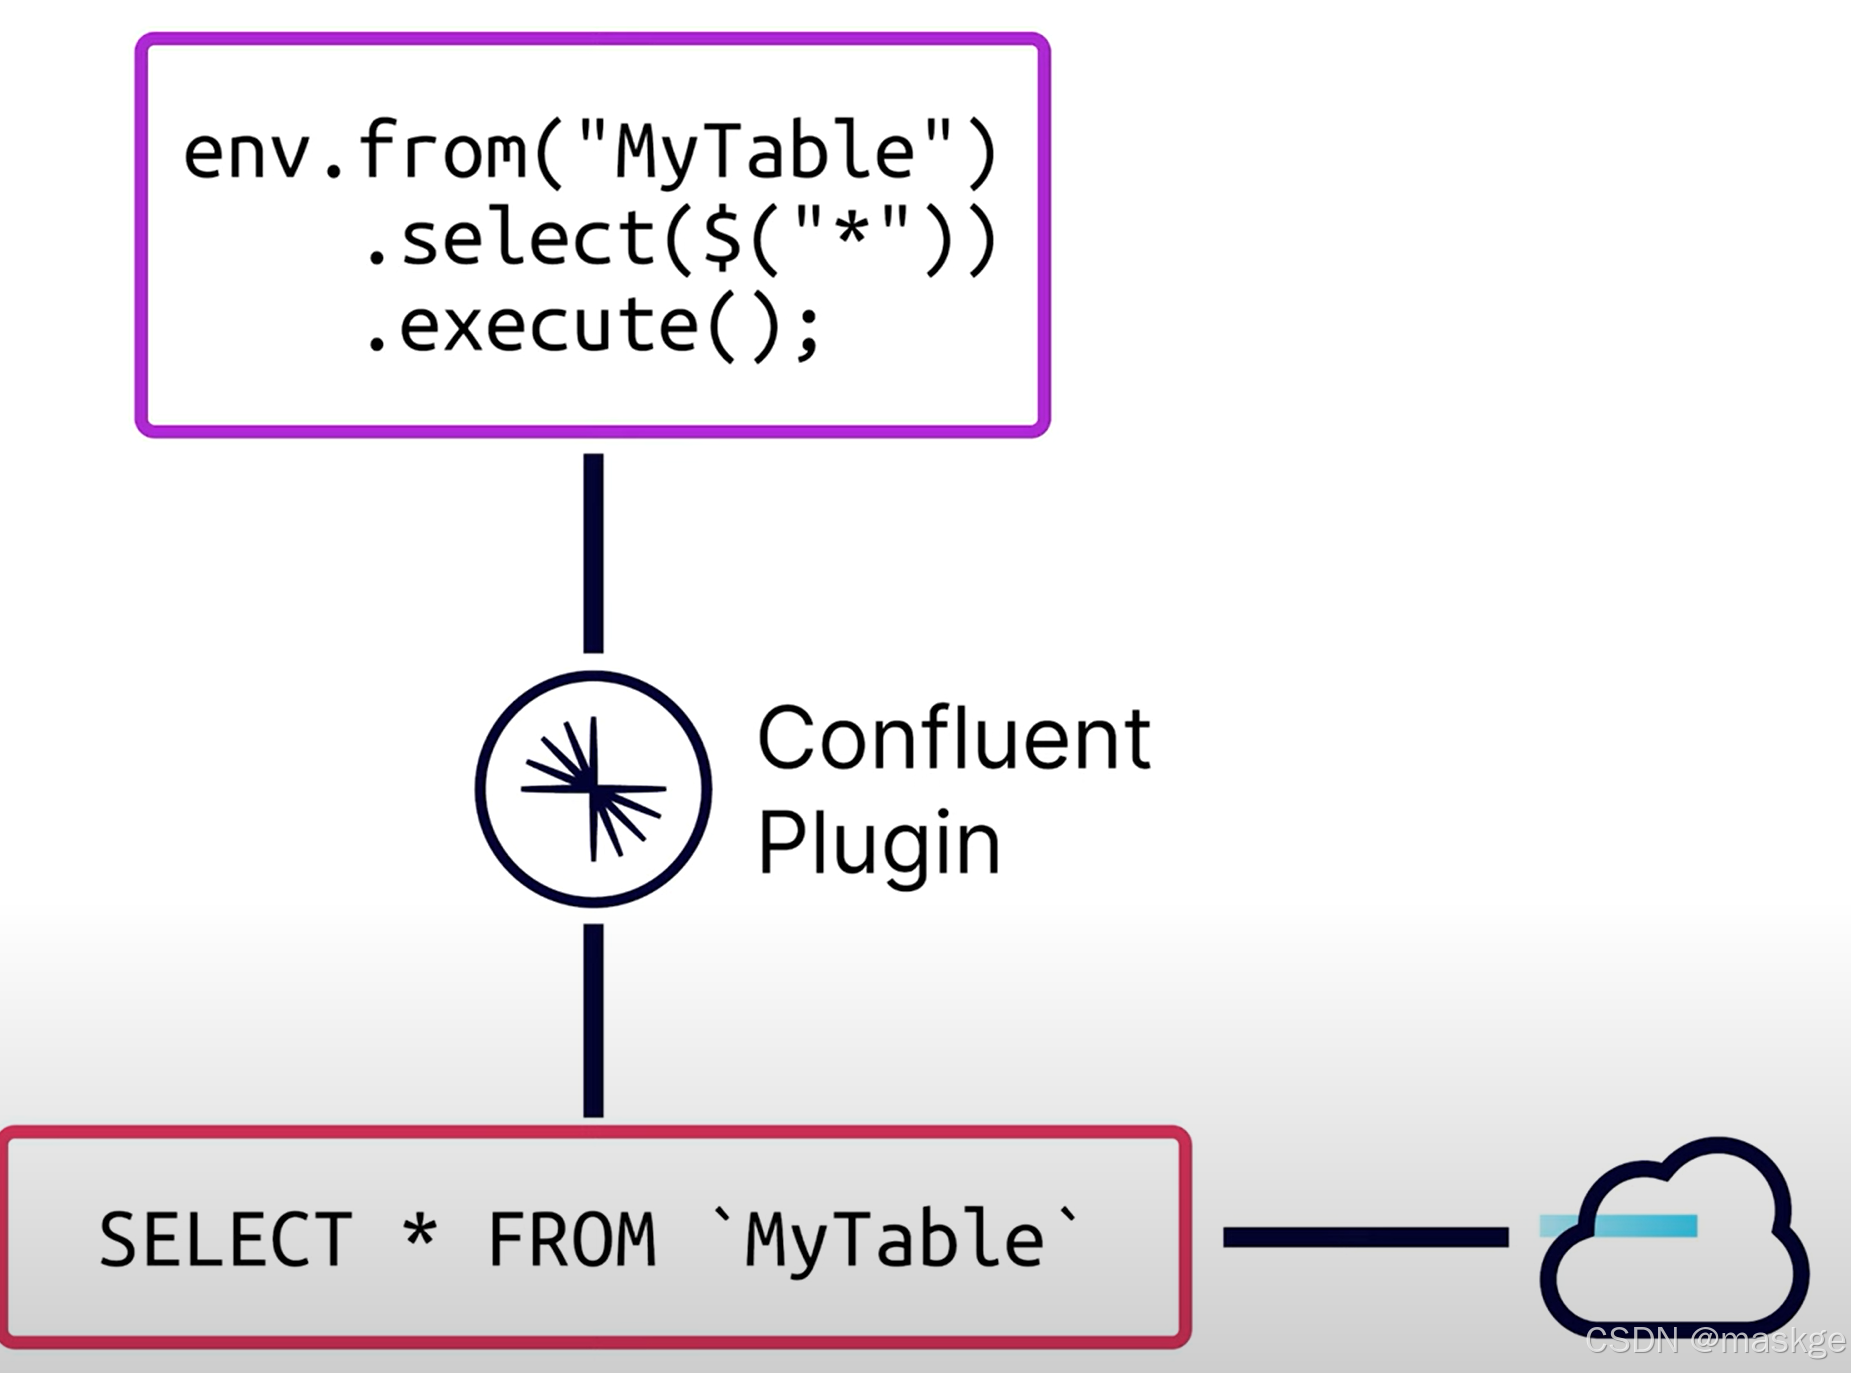 通过Confluent 插件,把flink java代码转换为SQL,然后交由云进行执行
4. Flink table api 使用
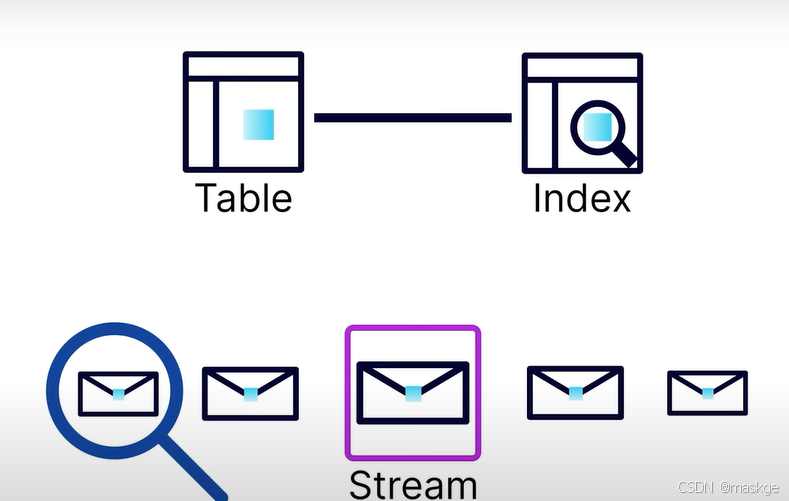
查询数据库中表数据可以通过读取索引index查询,但是查询数据流,只能从开始读取整个流
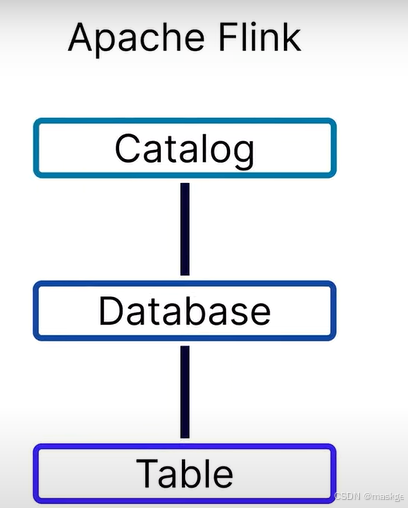
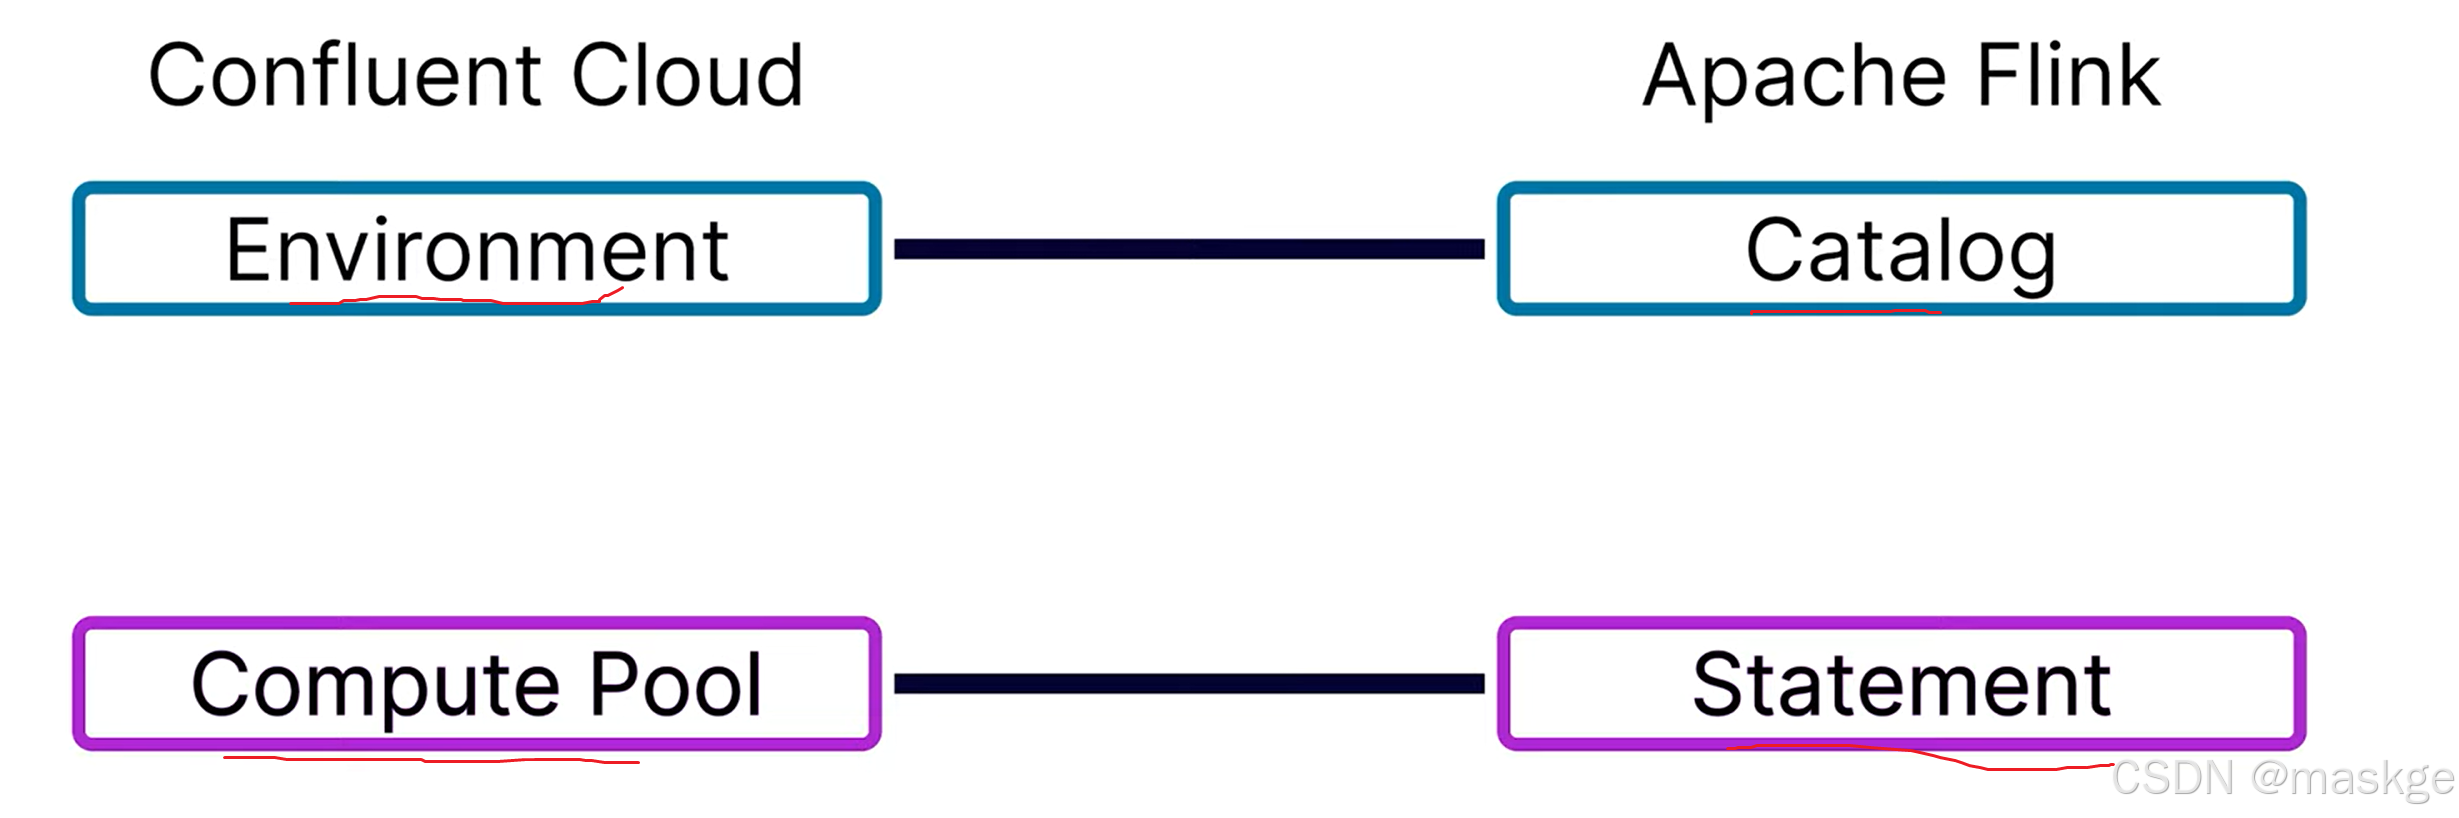
Flink table api 工作对象自定向下包含Catalog、database、table
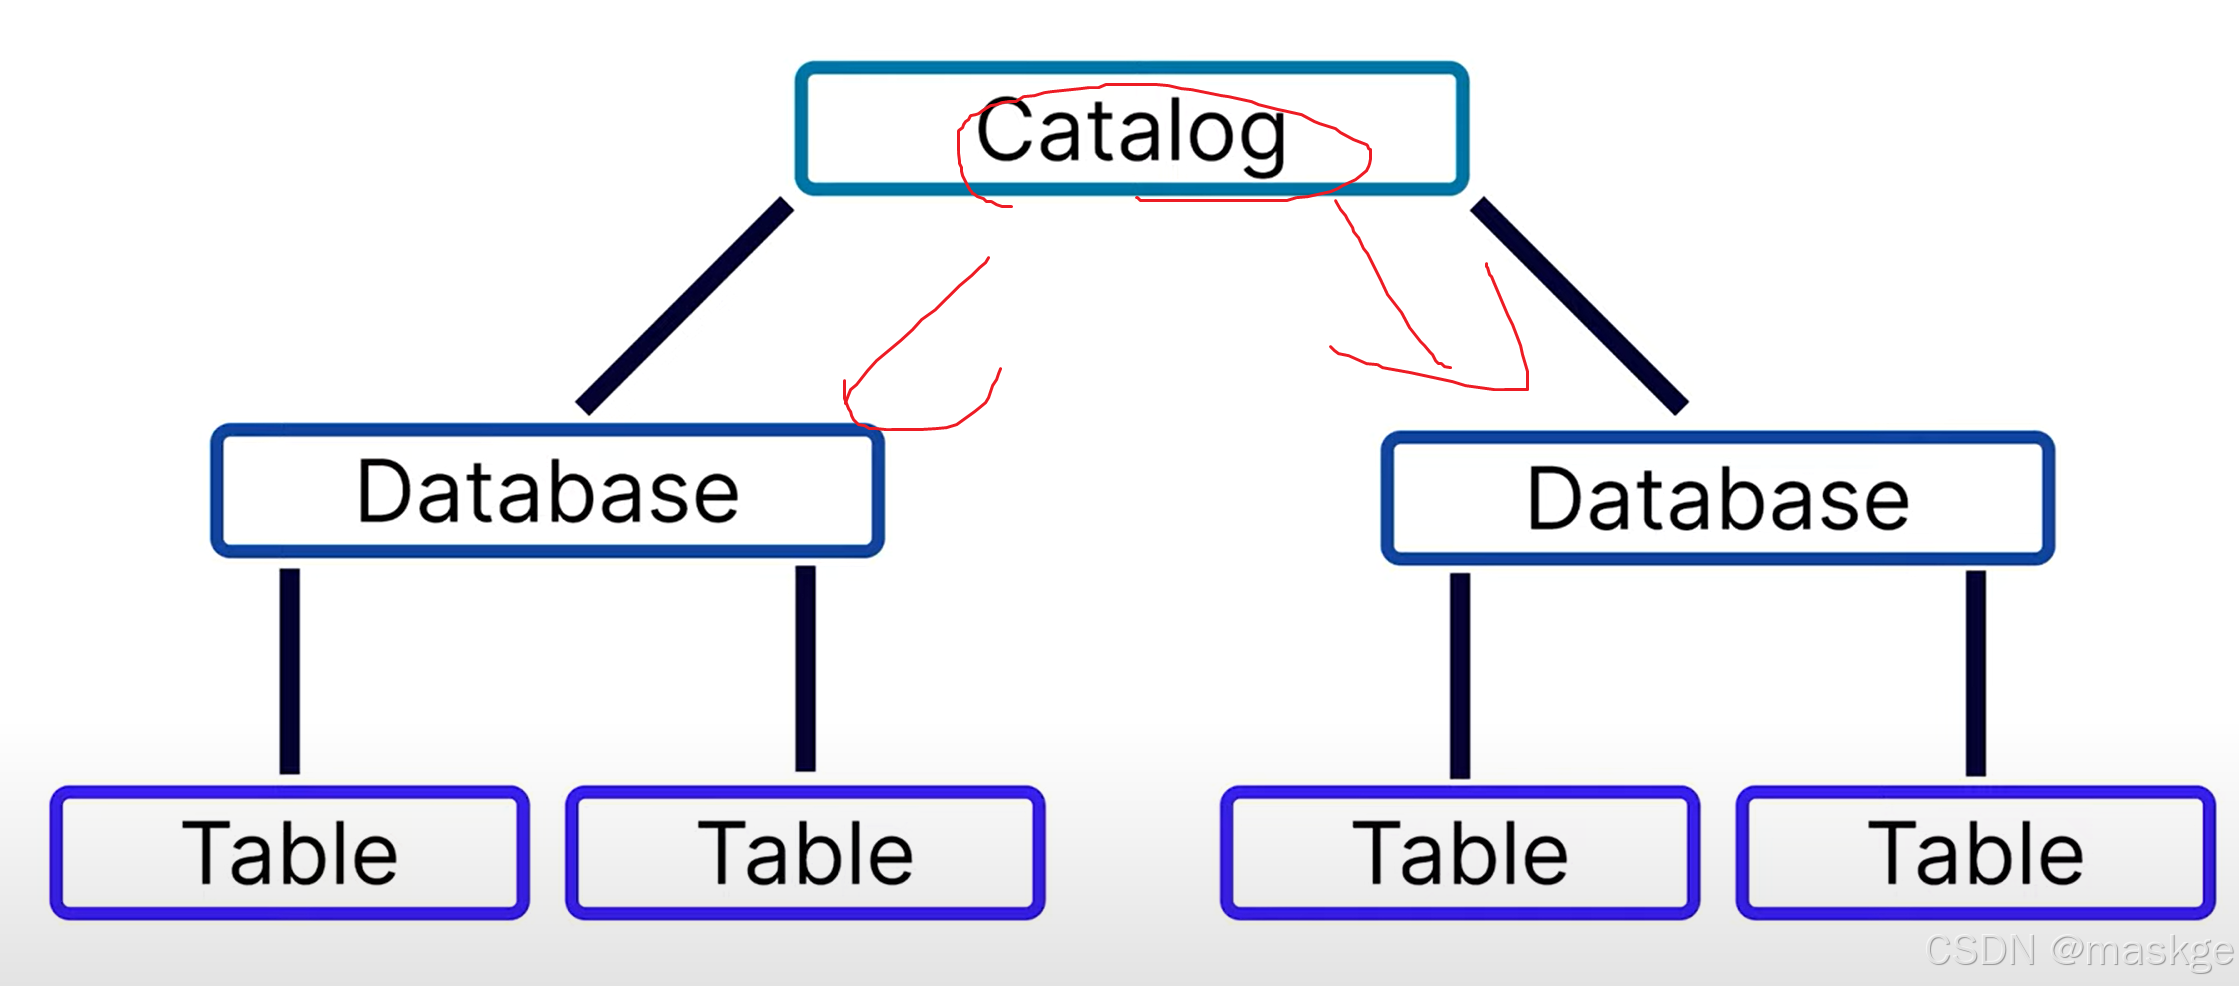
一个Catalog底下有1个或多个database,一个database底下有1个或多个table
调用方式:

例子:

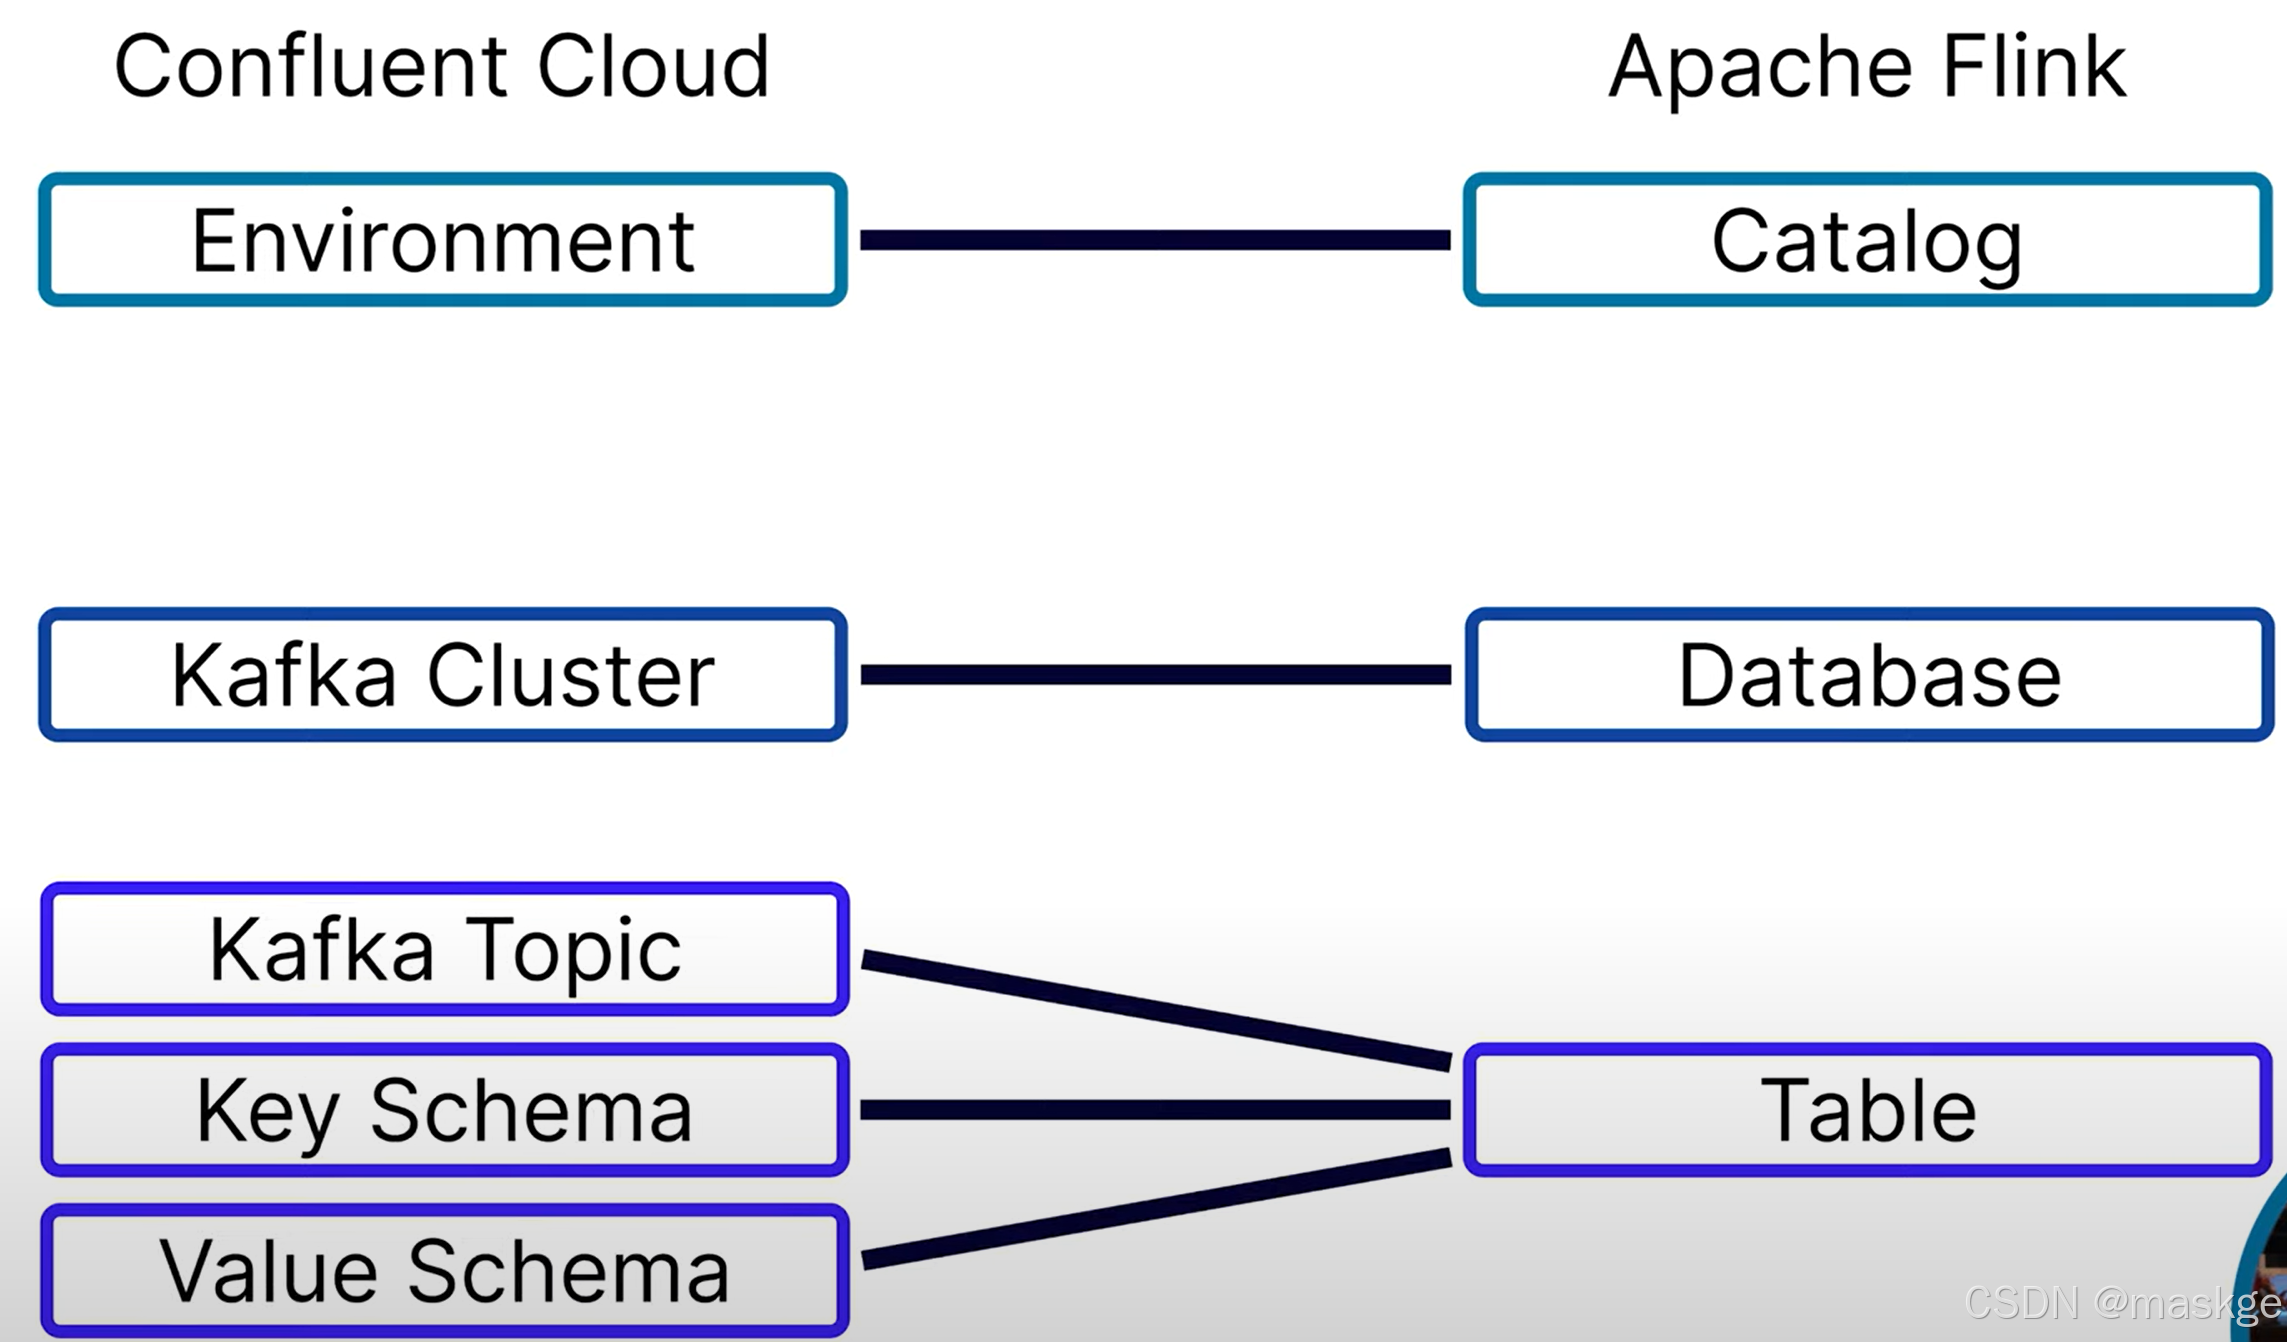
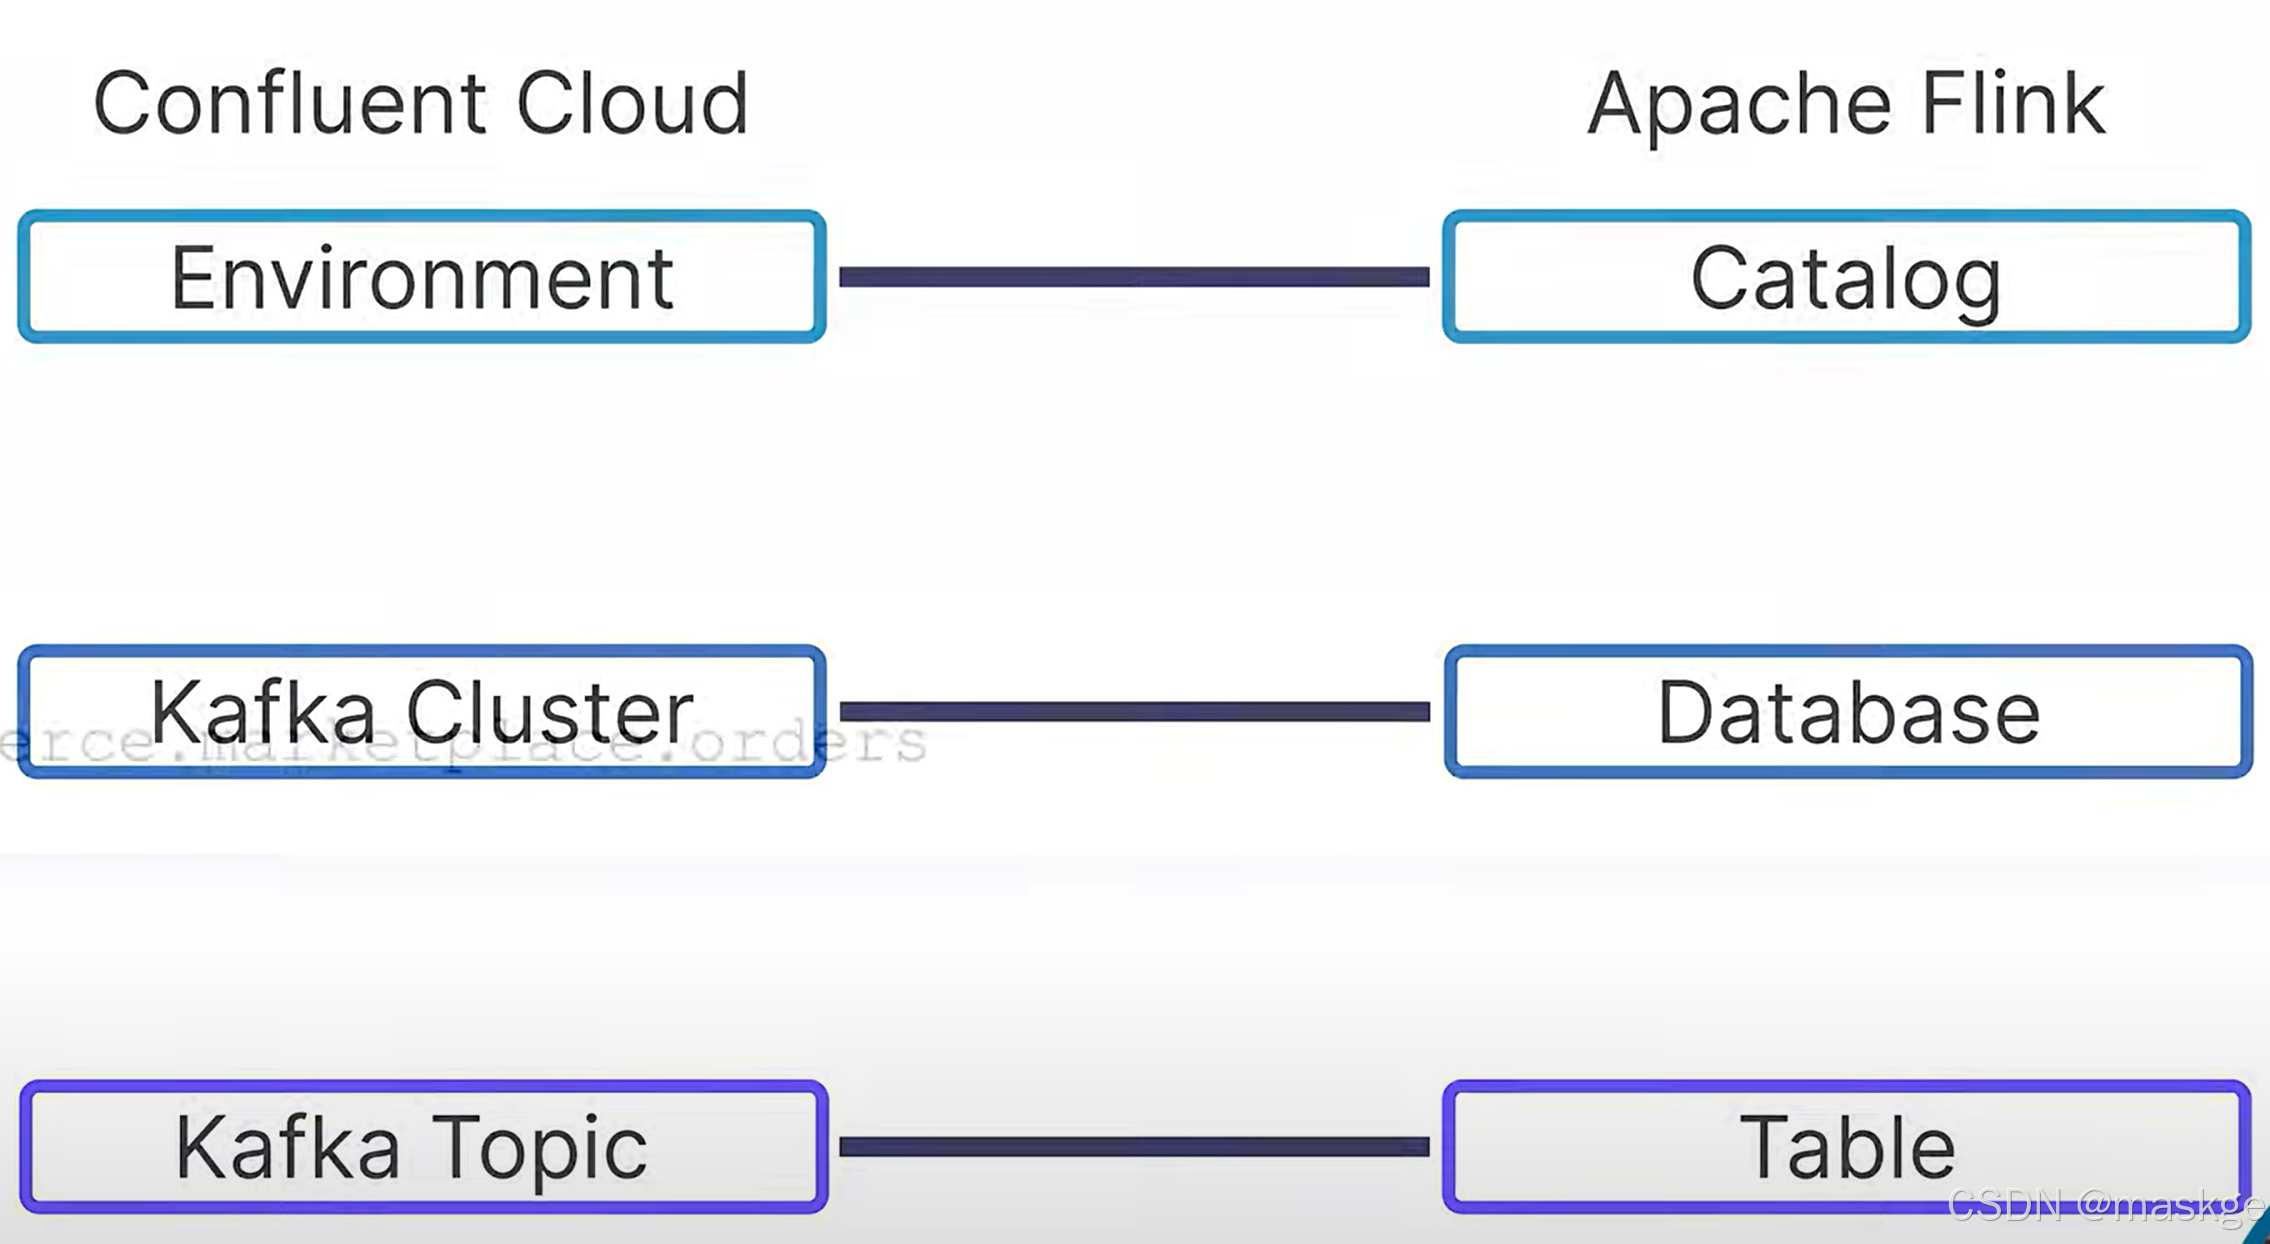 一个环境对应一个catalog,一个集群对应一个databse,一个Topic对应一个table,但是这块topic与table的关系有点不一定
语句理解:
 TableResult result=env
                .from("ecommerce.marketplace.orders")
                .select($("*"))
                .execute();
        result.print();
执行上面的java代码的效果与下面执行sql的效果等效:

5. select语句&flink table api:
  //查询结果
        TableResult result=env
                .from("ecommerce.marketplace.orders")
                .select($("*"),
                        $("vin").as("win")
                        )
                .insertInto("all_cars")
                .execute();

        CloseableIterator<Row> rows=result.collect();//迭代结果
        while (rows.hasNext()){
            Row row=rows.next();
            row.getField("vin");
        }


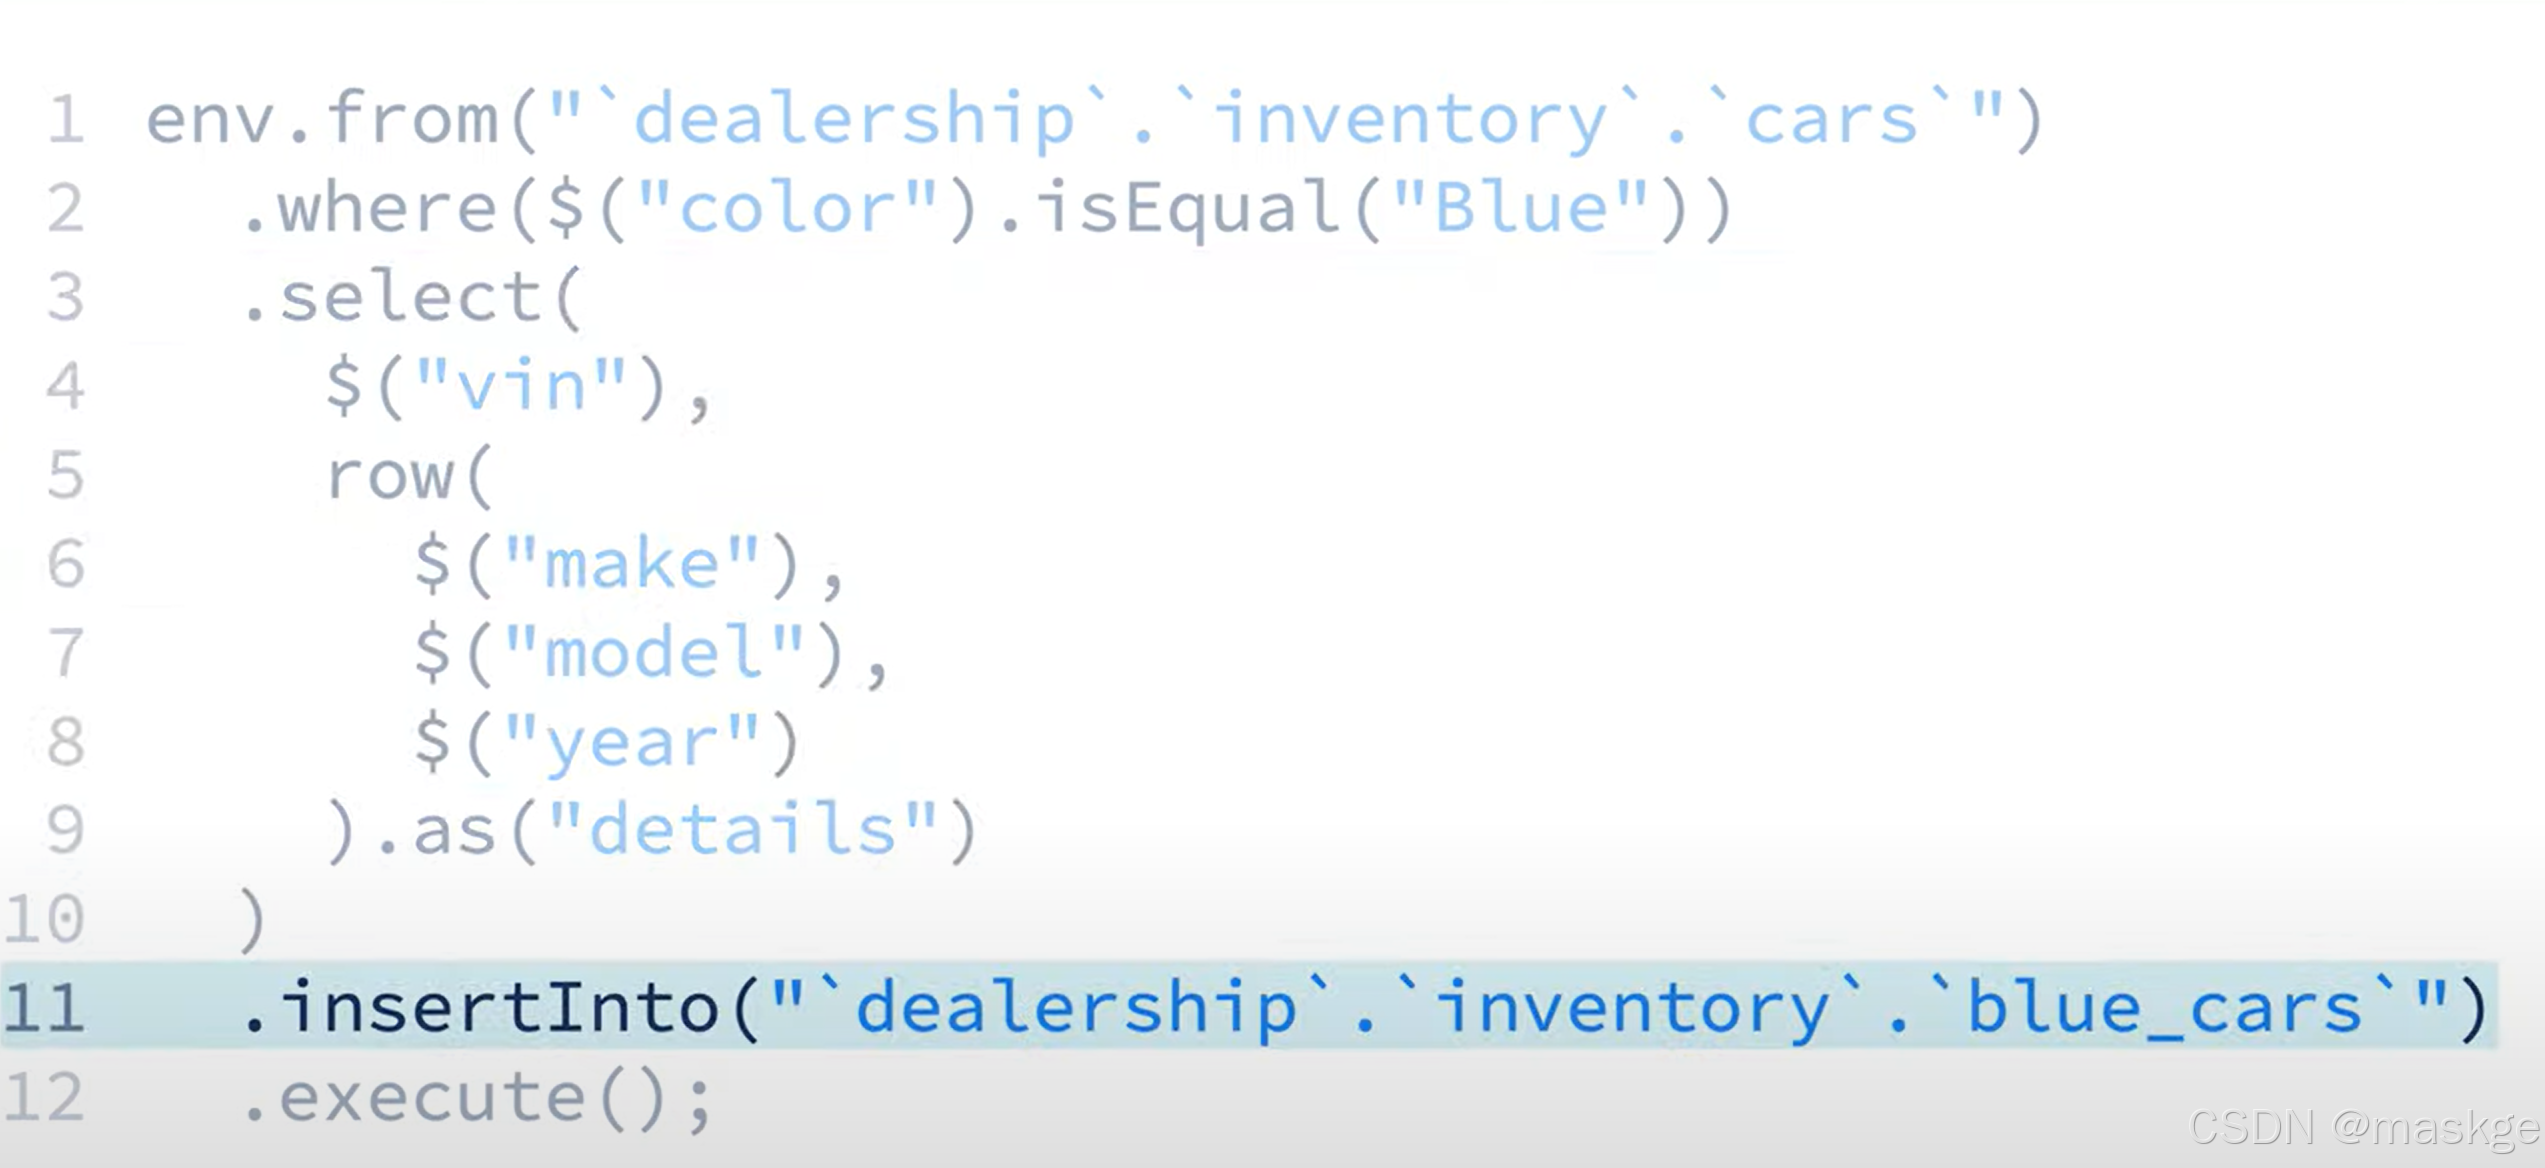
env.from("cars")
	.select($("*"))
	.where($("color").isEqual("Blue"))
	.insertInto("blue_cars");


env.from("cars")
	.select($("*"))
	.where($("year").isGreaterOrEqual(2022))
	.insertInto("cars_from_2022_or_later");


env.from("cars")
	.select($("*"))
	.where(
		and(
			$("year").isGreaterOrEqual(1900),
			$("year").isLess(2000)
		)
	)
	.insertInto("cars_from_the_1900s");


env.from("cars")
	.select($("*"))
	.where($("year").cast(DataTypes.STRING()).like("19%"))
	.insertInto("cars_from_the_1900s");
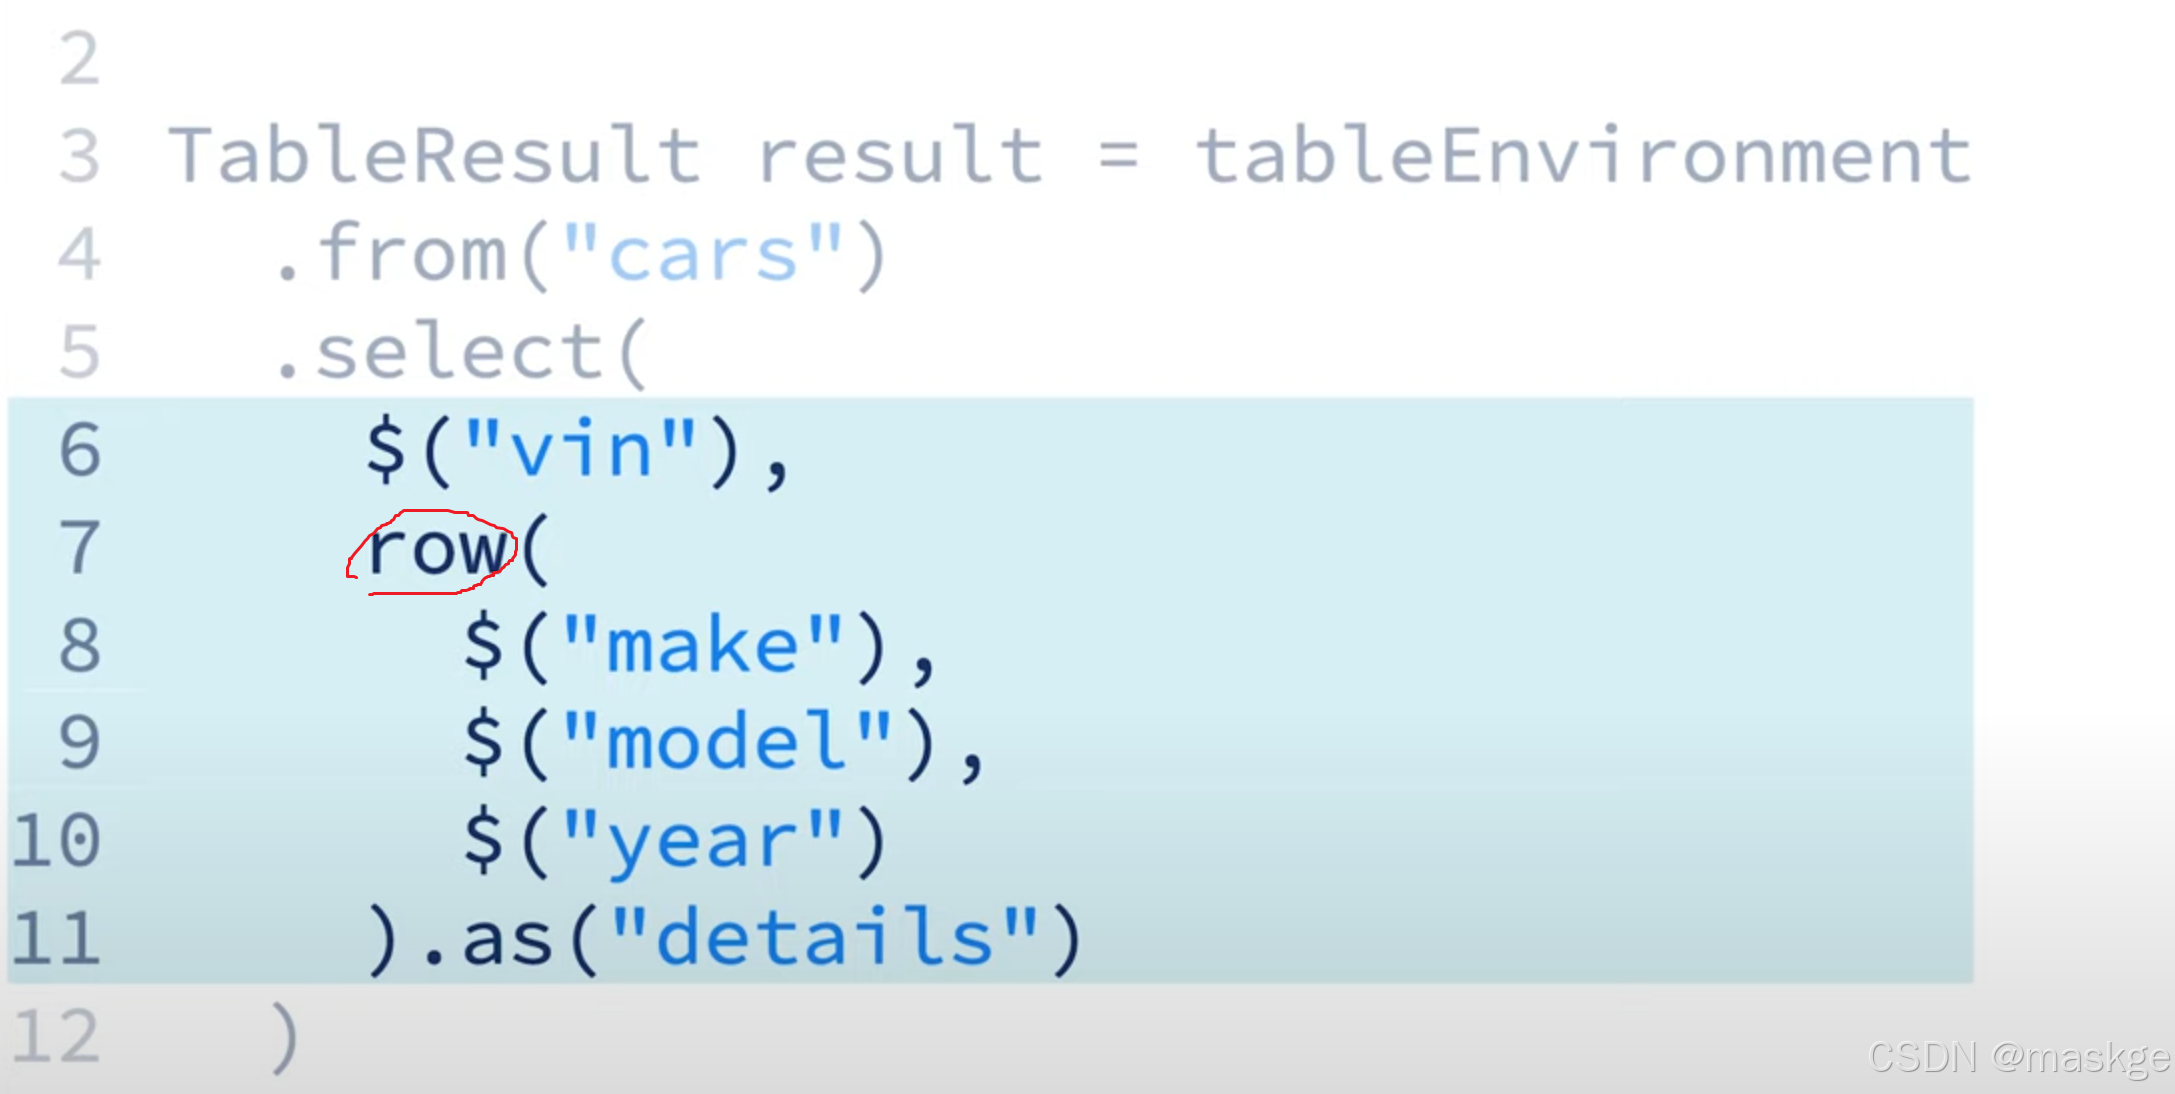
备注说明:flink中查询出来的数据一般很少打印输出,一般直接插入一张表
查看定义的表结构
SHOW CREATE TABLE examples.marketplace.orders;
查看flink是否正常启动
ps aux | grep flink
6. 使用flink table api 创建table
package com.flink.wc;

import org.apache.flink.table.api.*;

public class FlinkTableApi2 {
    public static void main(String[] args) {
        //1.创建设置
        EnvironmentSettings settings=EnvironmentSettings
                .newInstance()
                .inStreamingMode()
                .build();

        //2.创建table环境
        TableEnvironment env = TableEnvironment.create(settings);

        //创建schema
        Schema schemaTest=Schema.newBuilder()
                .column("vin", DataTypes.STRING().notNull())
                .column("make", DataTypes.STRING().notNull())
                .column("model", DataTypes.STRING().notNull())
                .column("year",DataTypes.INT().notNull())
                .column("color",DataTypes.STRING().notNull())
                .build();

        //转换上面schema成json或avro或protobuf schema
        TableDescriptor descriptor=TableDescriptor.forConnector("confluents")
                .schema(schemaTest)
                .option("key.format","proto-registry")//注册使用proto格式,当然也可以使用json-registry或avro-registry
                .option("value.format","proto-registry")
                .option("kafka.retention.time","7 days")
                .option("scan.startup.mode","latest-offset")
                .partitionedBy("make")//设置分隔的key为make
                .build();
        //创建表
        env.createTable("cars",descriptor);

    }
}
数据格式化的格式:
- proto-registry
- json-registry
- avro-registry
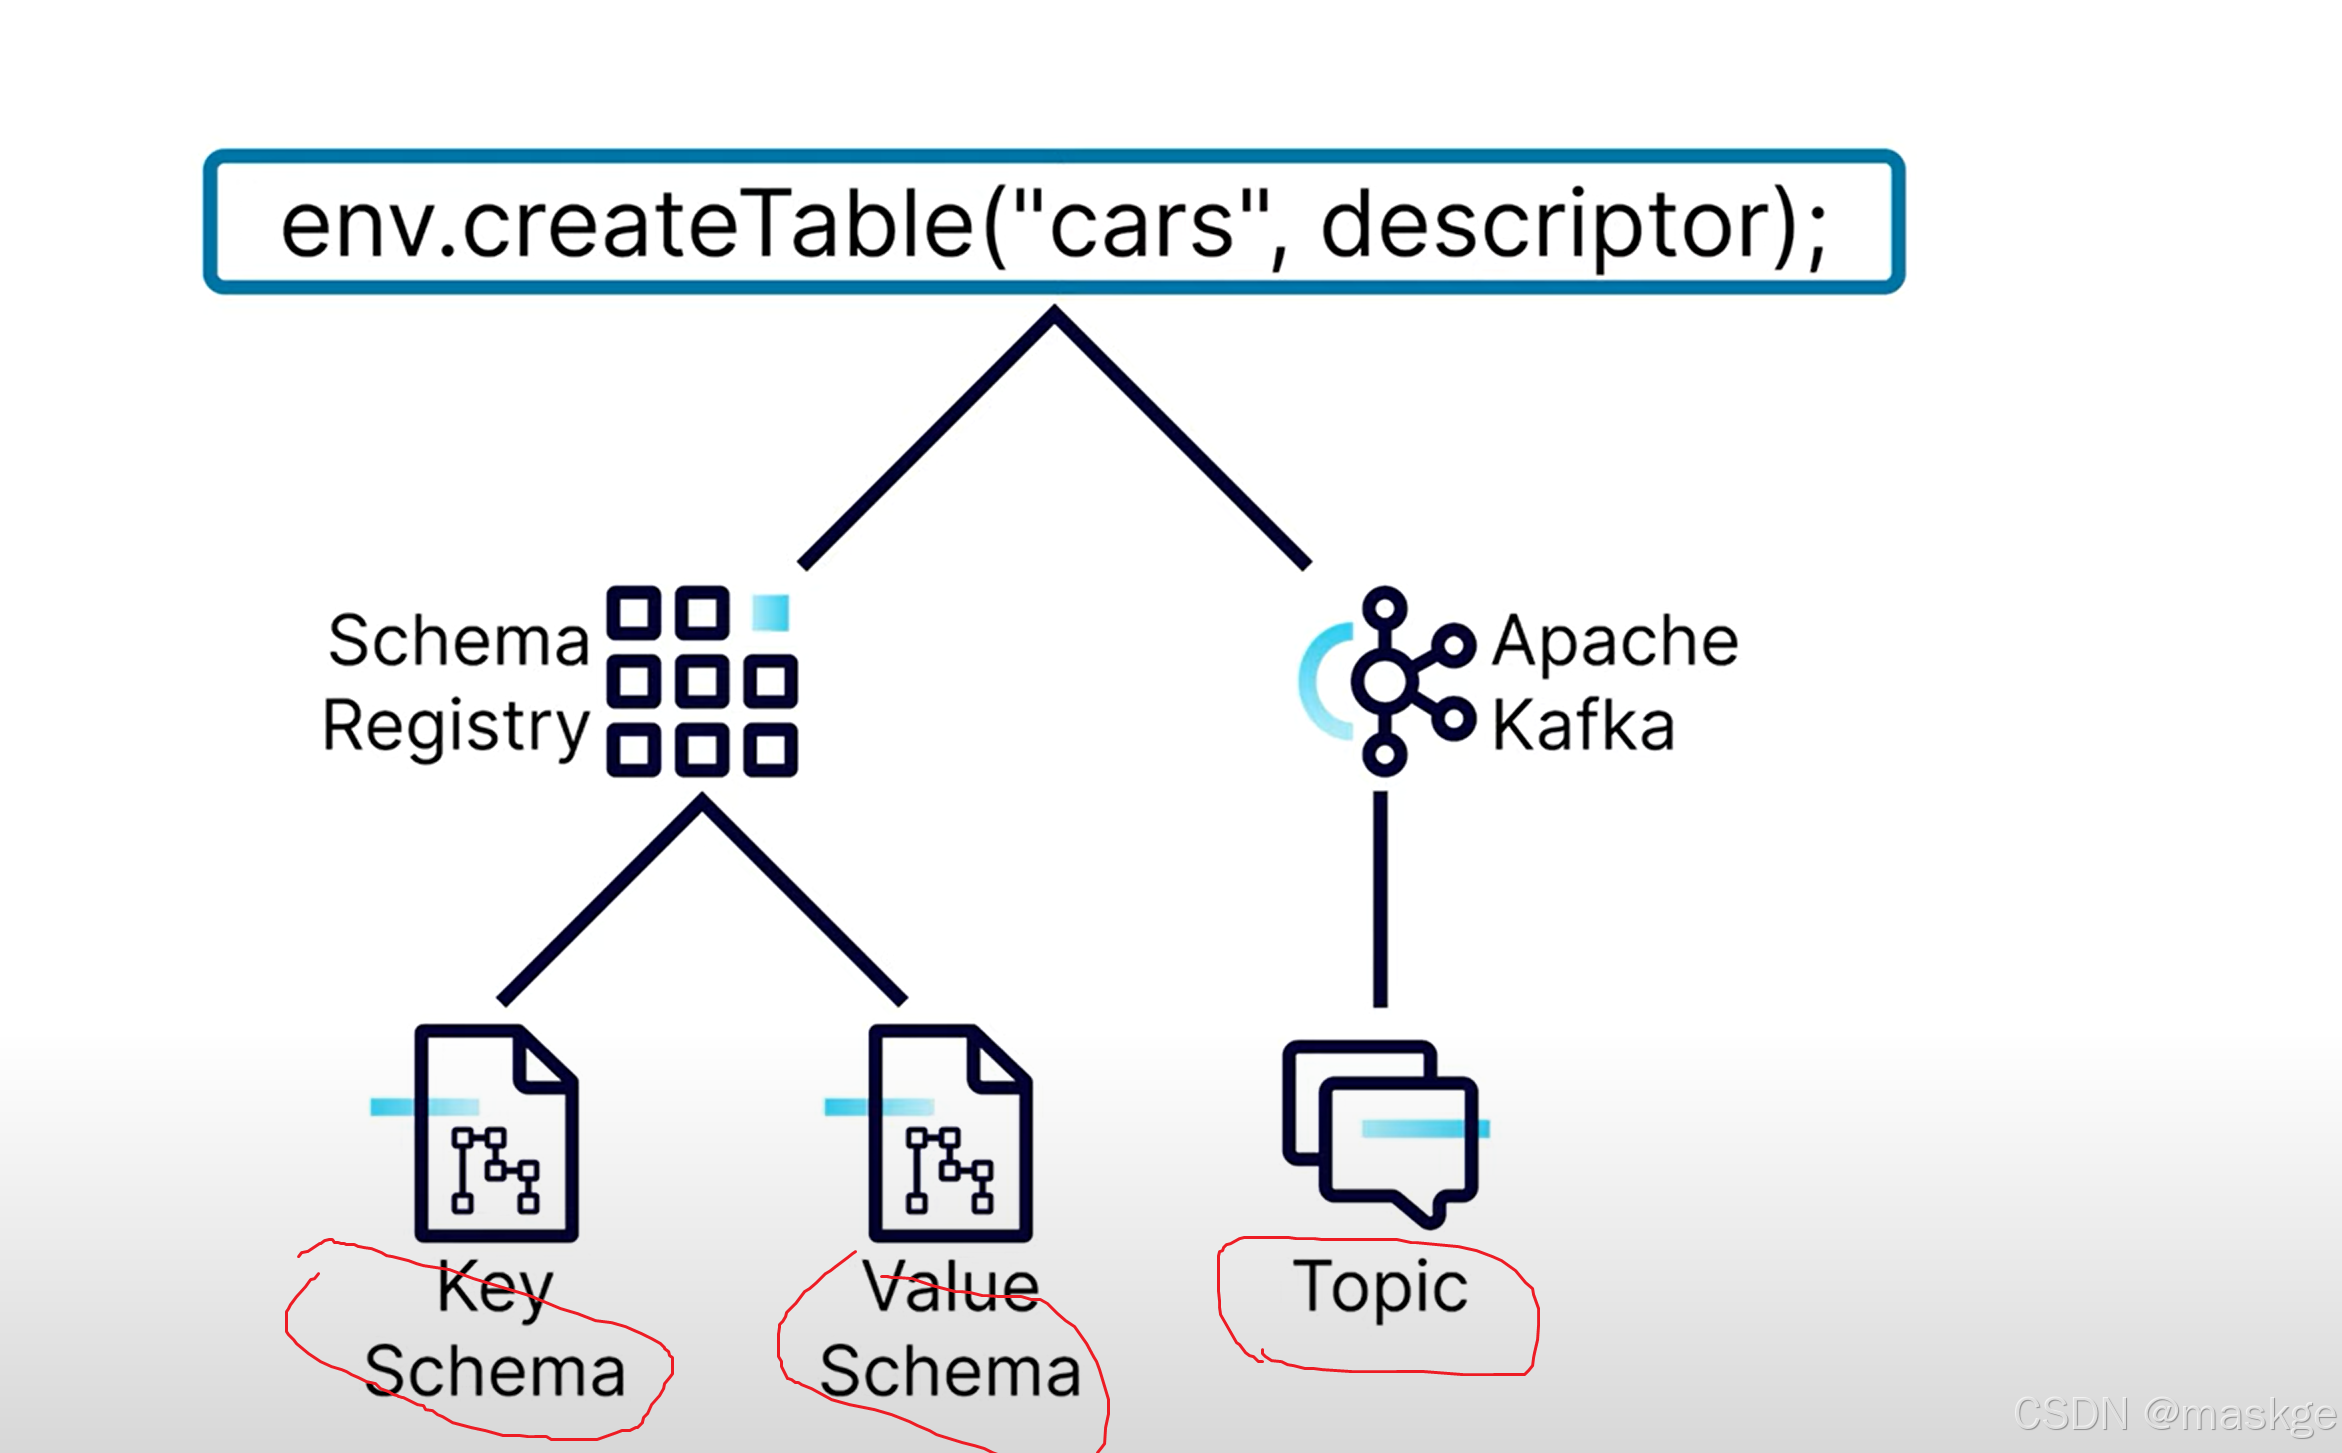
flink 创建表的原理:
- 创建表就是在创建 keyschema、value schema、topic;
- descriptor:描述如何这些资源被创建
flink table api 使用sql脚本创建表
 //创建表方法2
        env.executeSql("""
	CREATE TABLE `cars` (
		`vin` VARCHAR(2147483647) NOT NULL,
		`make` VARCHAR(2147483647) NOT NULL,
		`model` VARCHAR(2147483647) NOT NULL,
		`year` INT NOT NULL,
		`color` VARCHAR(2147483647) NOT NULL
	) DISTRIBUTED BY (`vin`) INTO 6 BUCKETS WITH (
		'connector' = 'confluent',
		'kafka.retention.time' = '7 days',
		'scan.startup.mode' = 'latest-offset',
		'key.format' = 'proto-registry',
		'value.format' = 'proto-registry'
	)""");
7. 使用flink table api 写流式数据输出到表或sink
输出到table

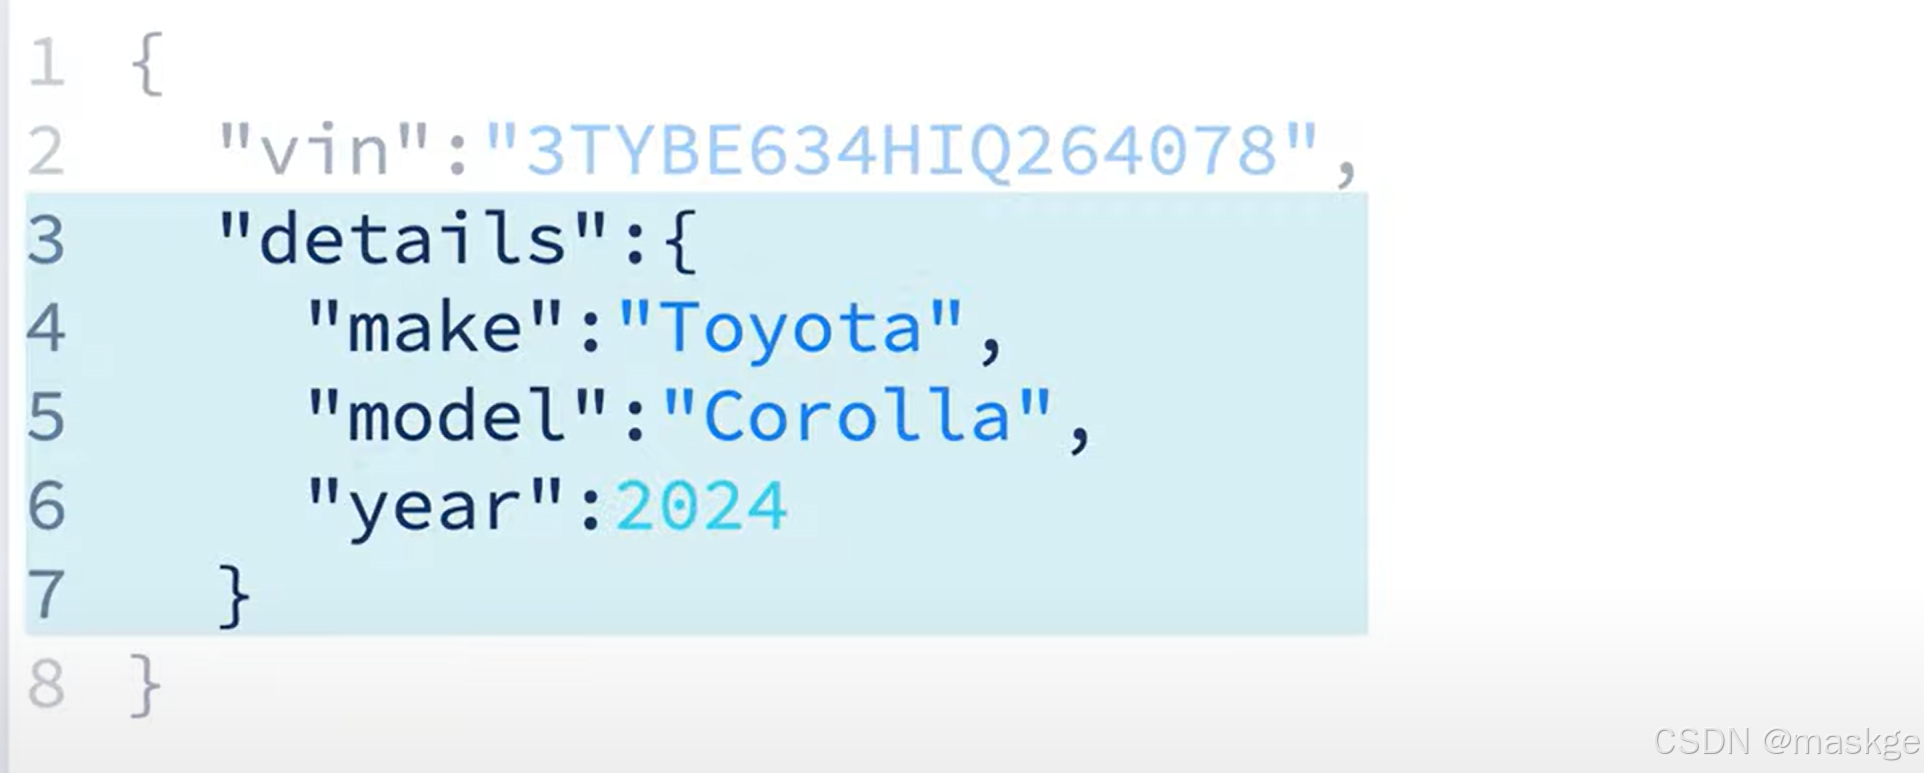
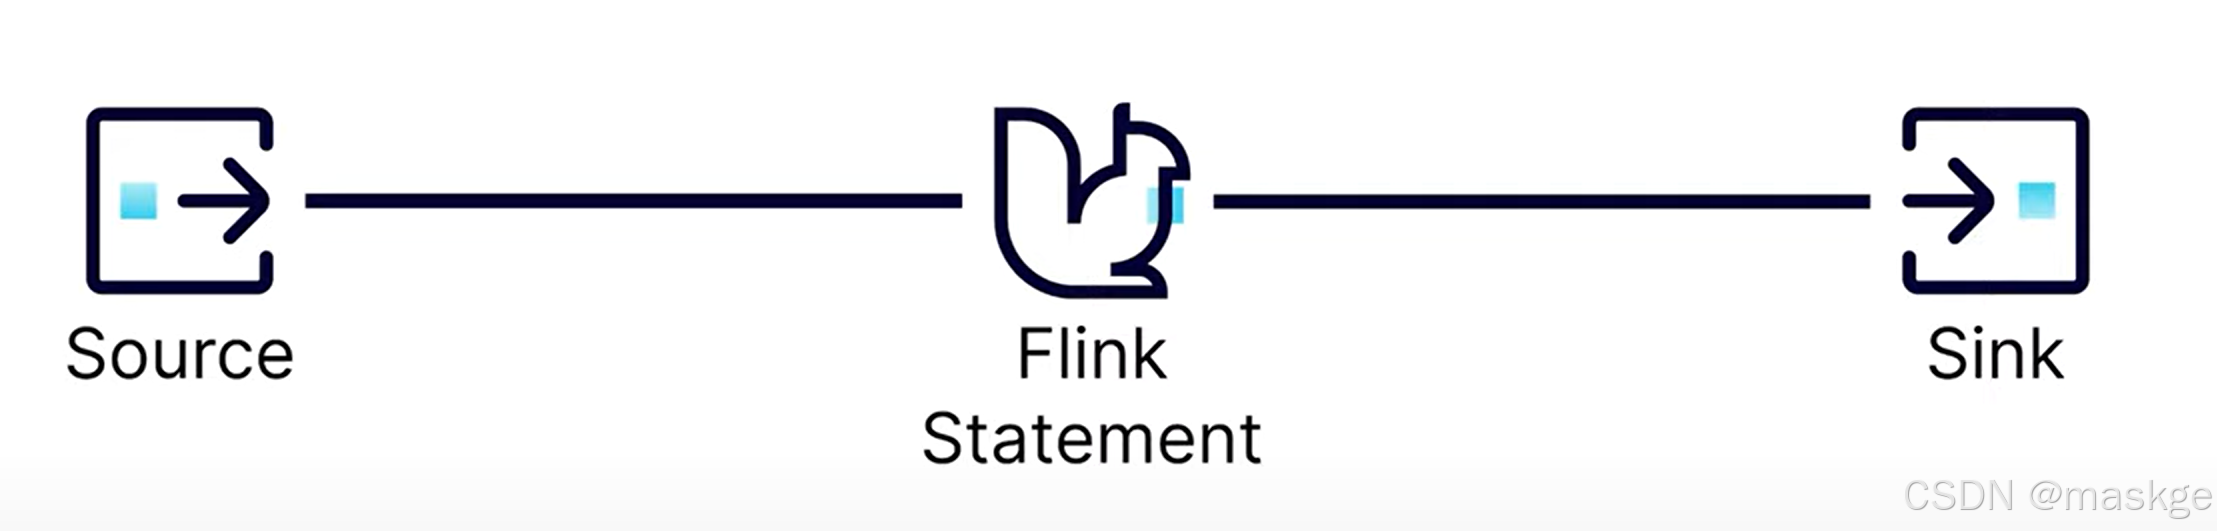
flink statement
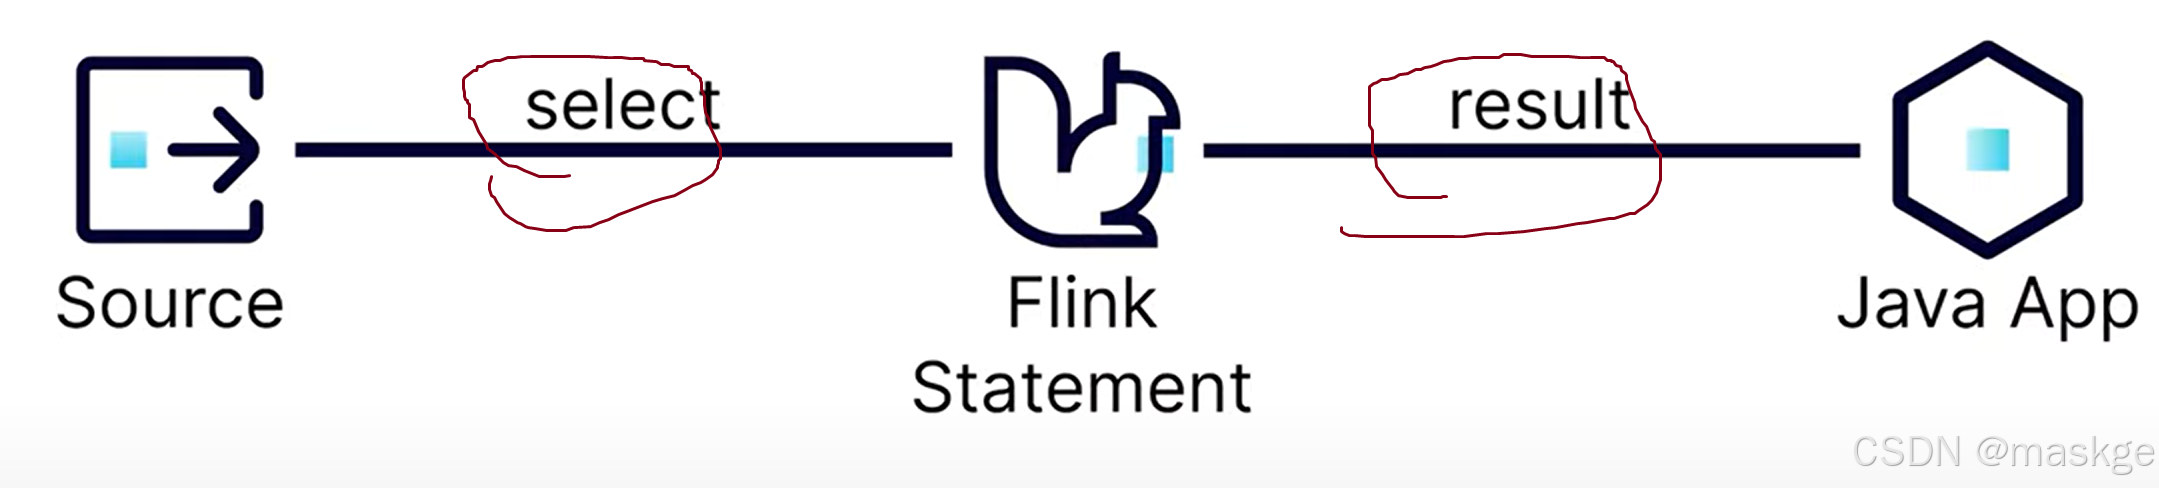 上面的sink即java APP
当javaApp,挂了出现的情况:只要kafka topic存在,可以把数据写到kafka
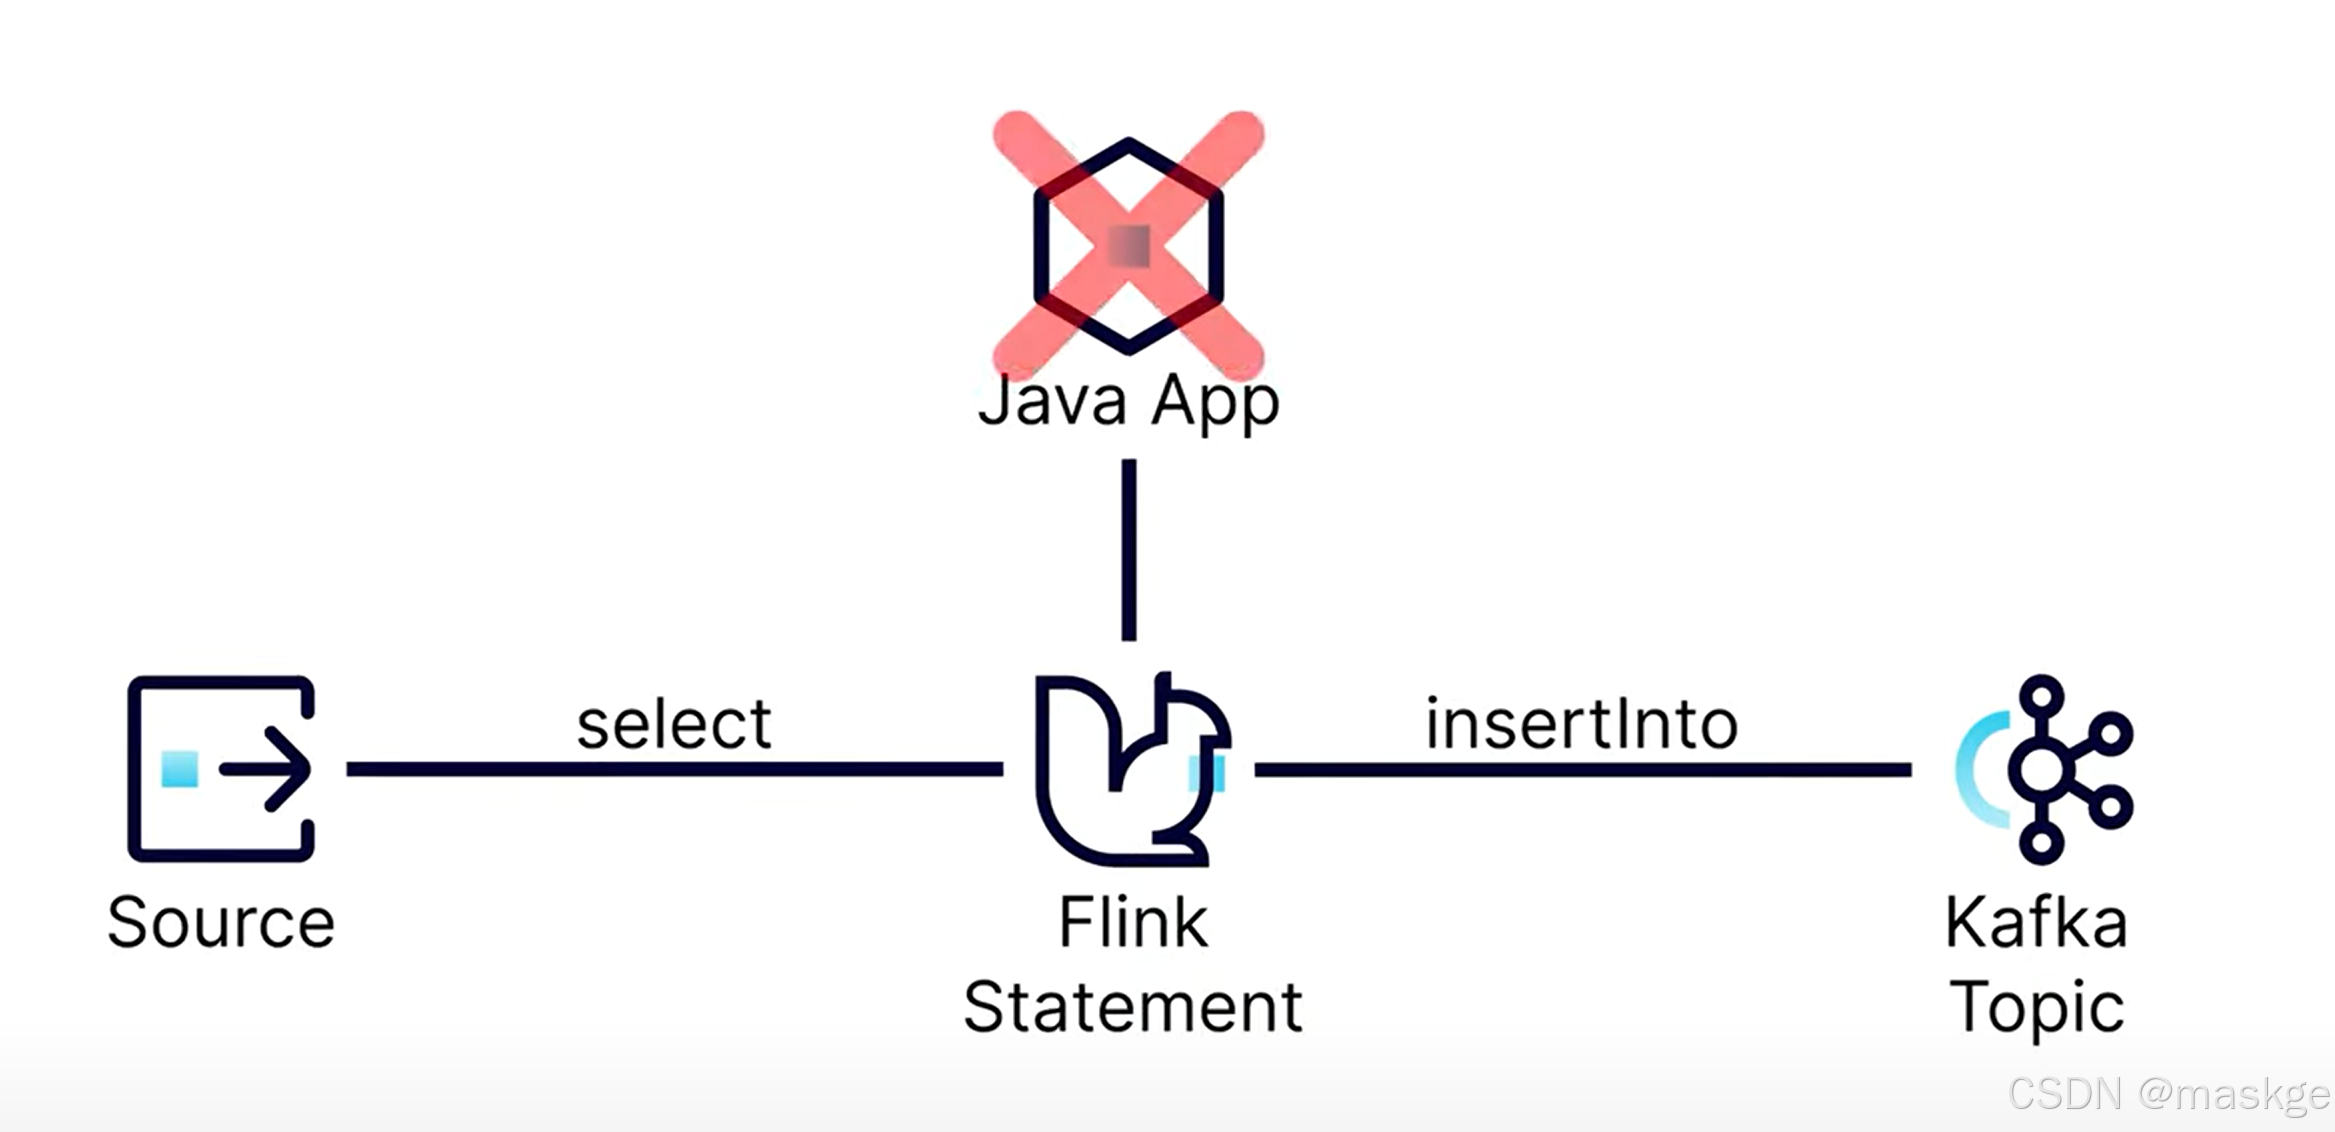
flink table api 数据流写入表(也可以是topics),并输出结果到控制台:
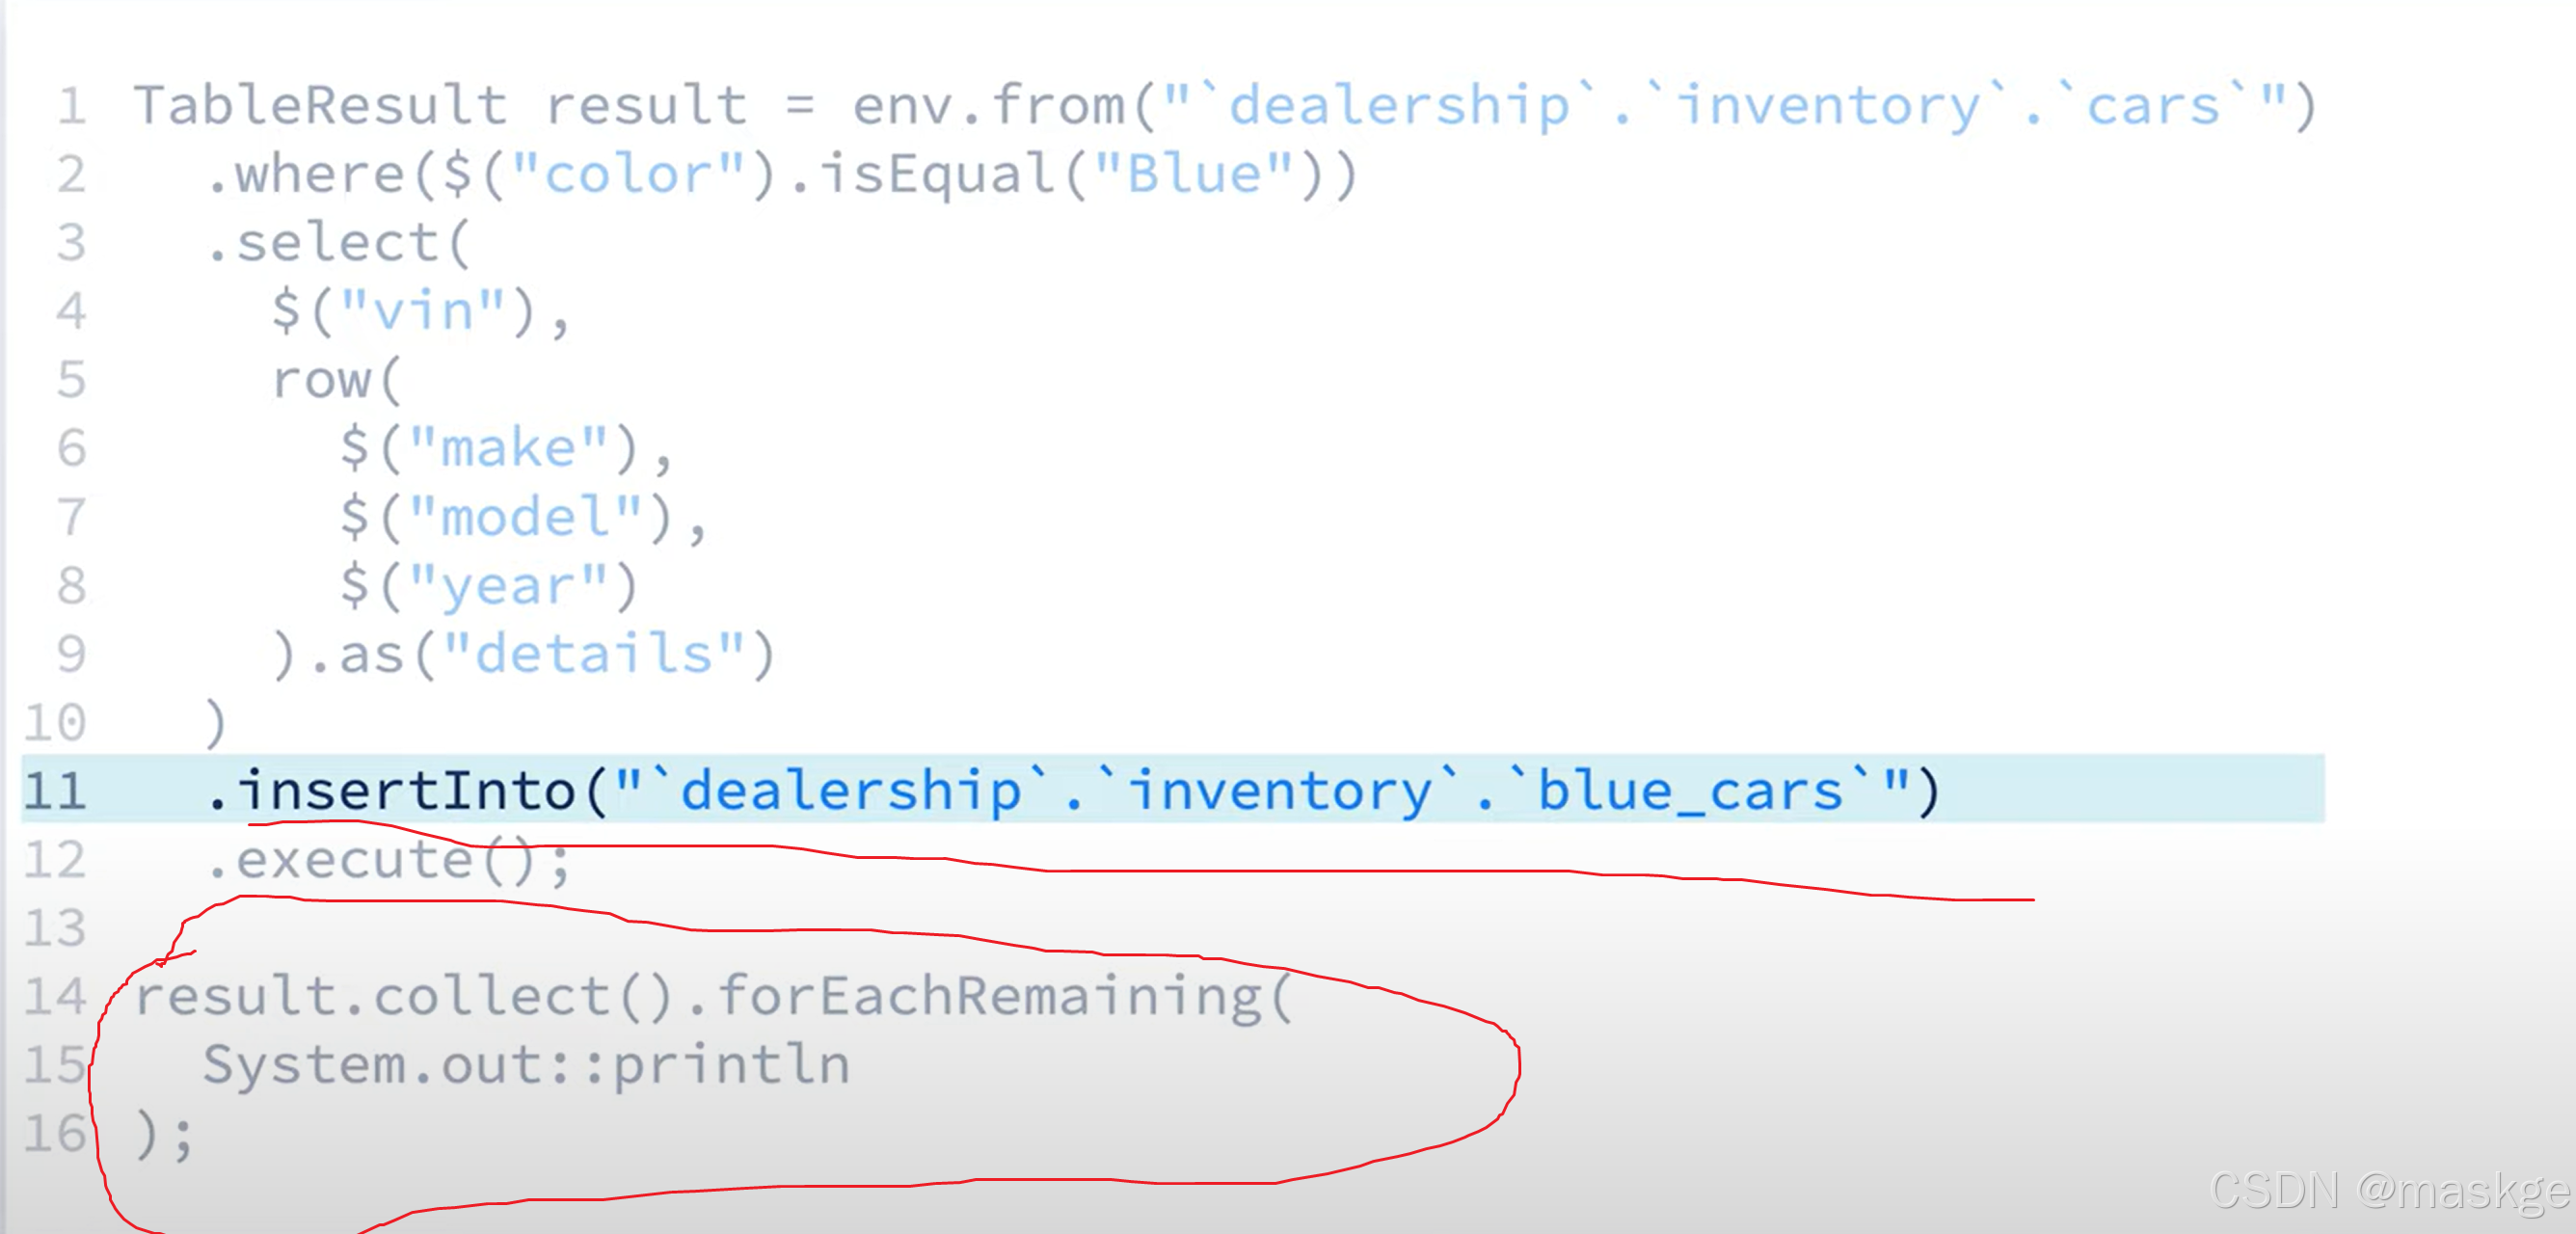
上面语句解释:
执行execute()方法,就是在创建一个无界流,这也就意味着进行insertInfo()操作的时候,就一直往表中无限插入。这个特别需要注意,不能这样做,不然会出现数据爆表
8. flink auto-scaling(自动伸缩)
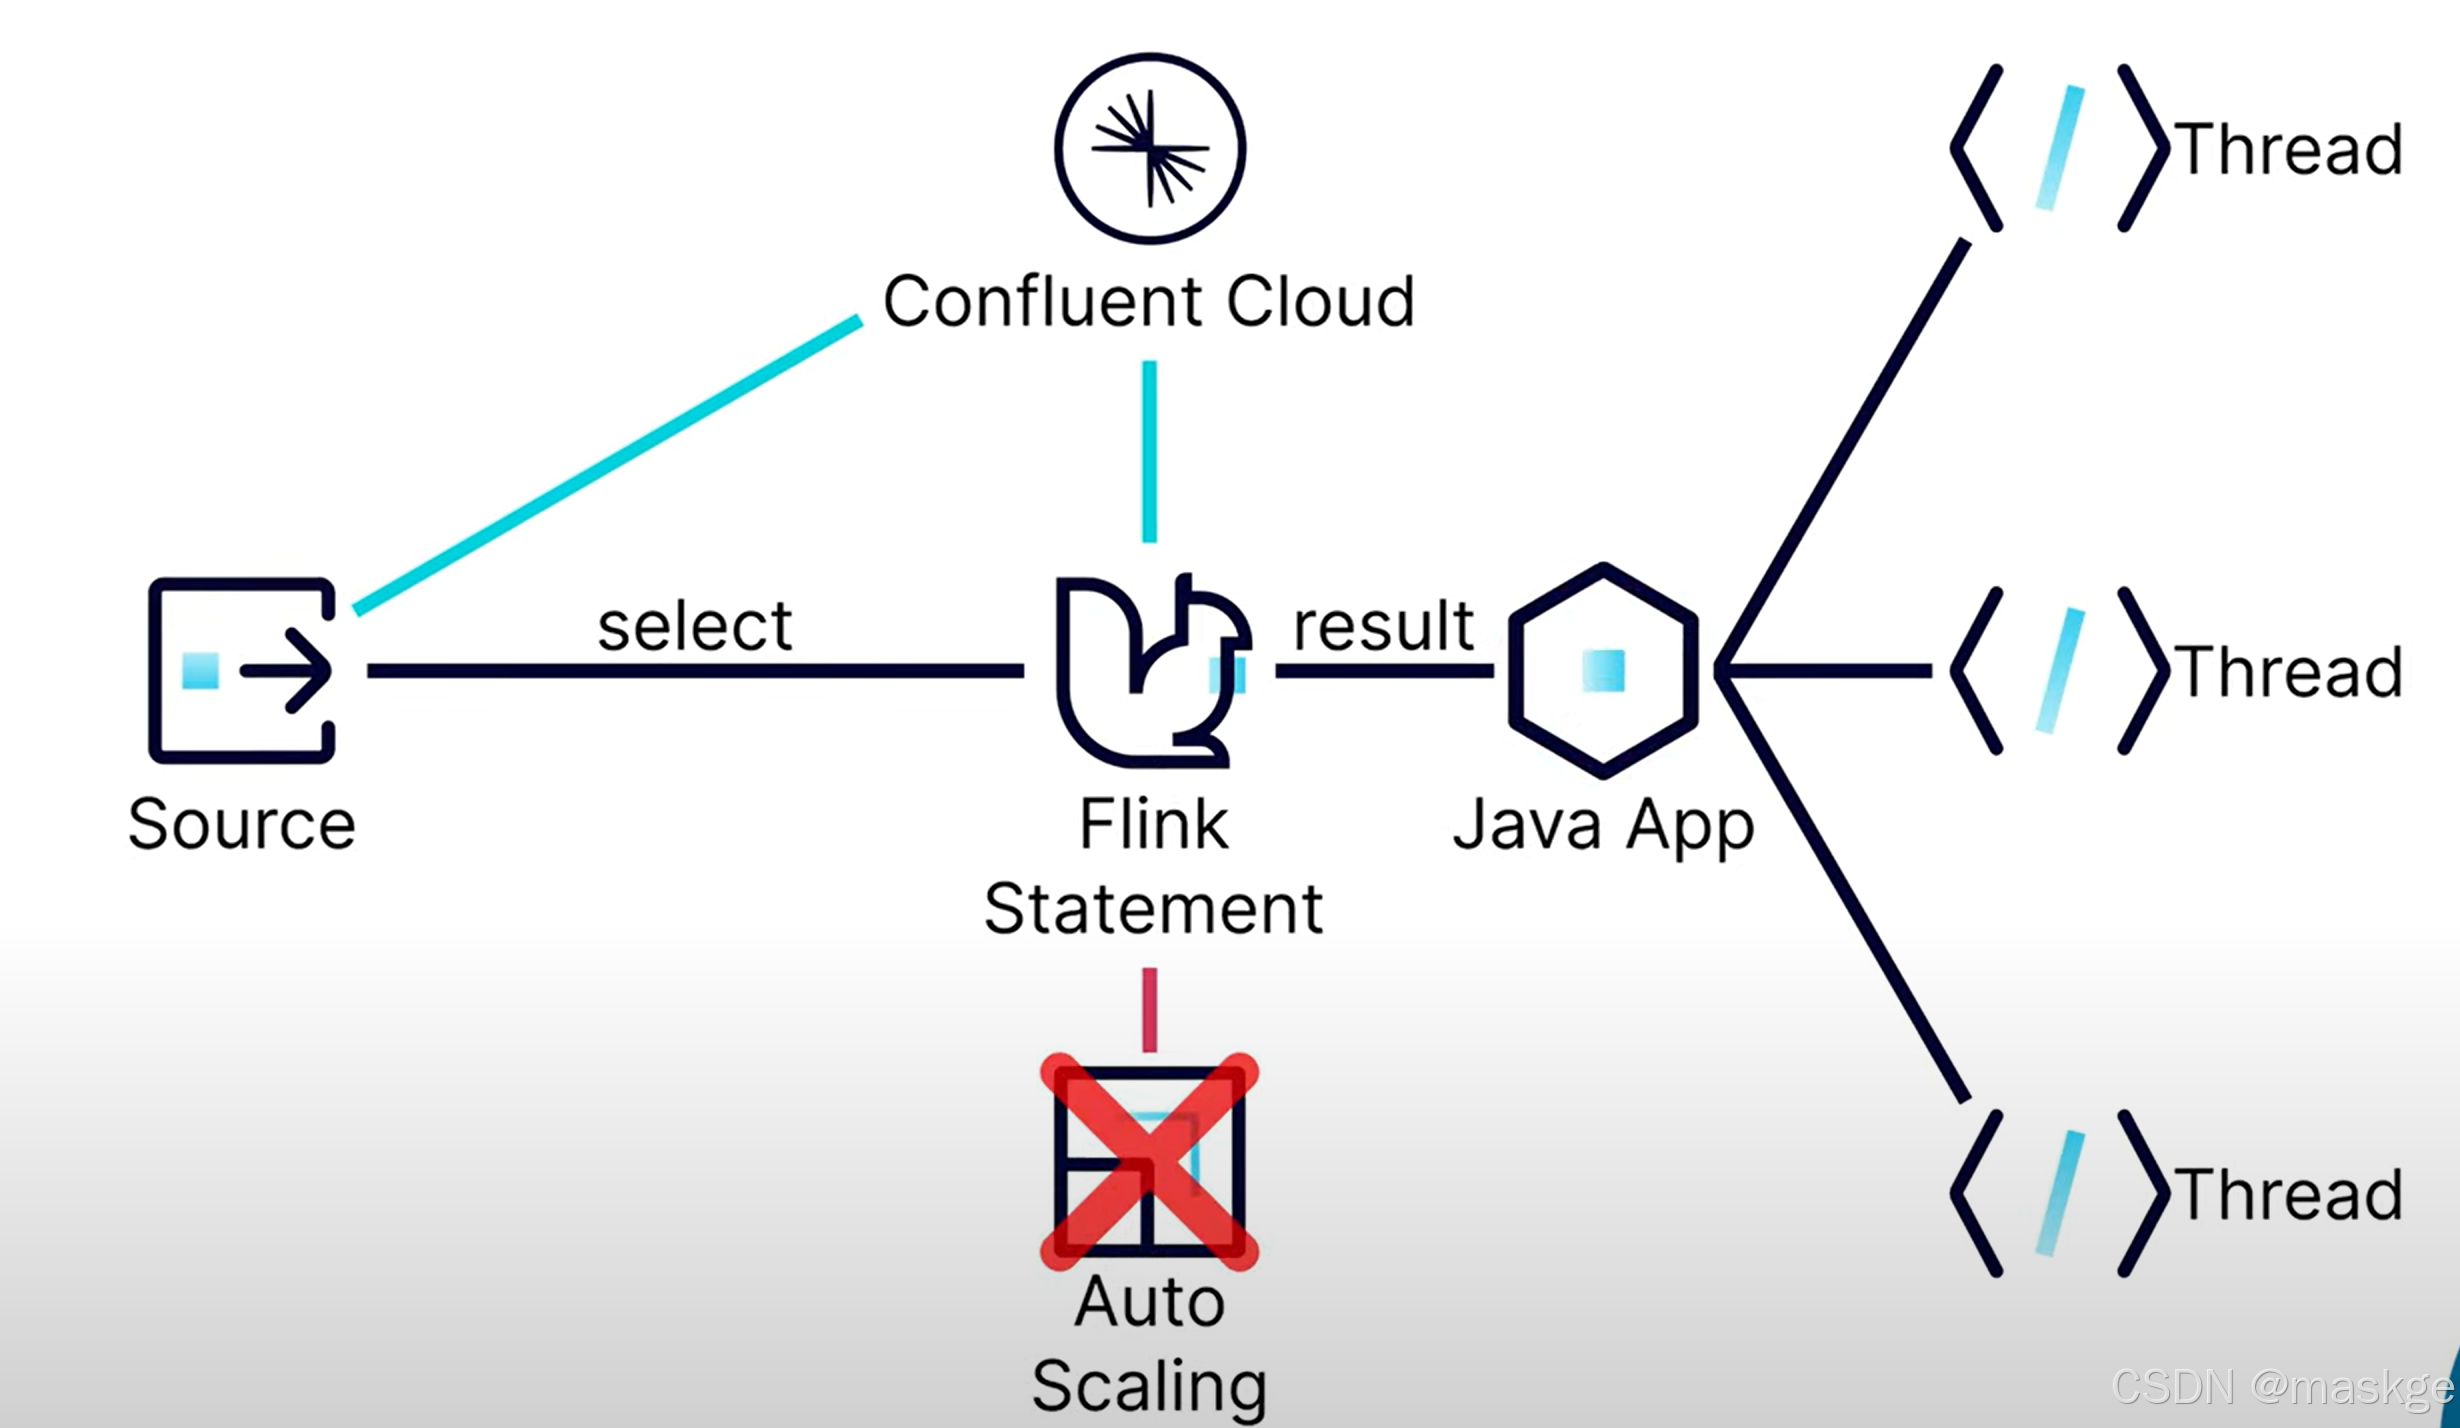 在flink java应用中,查询是一个单线程,因此不能自动伸缩;
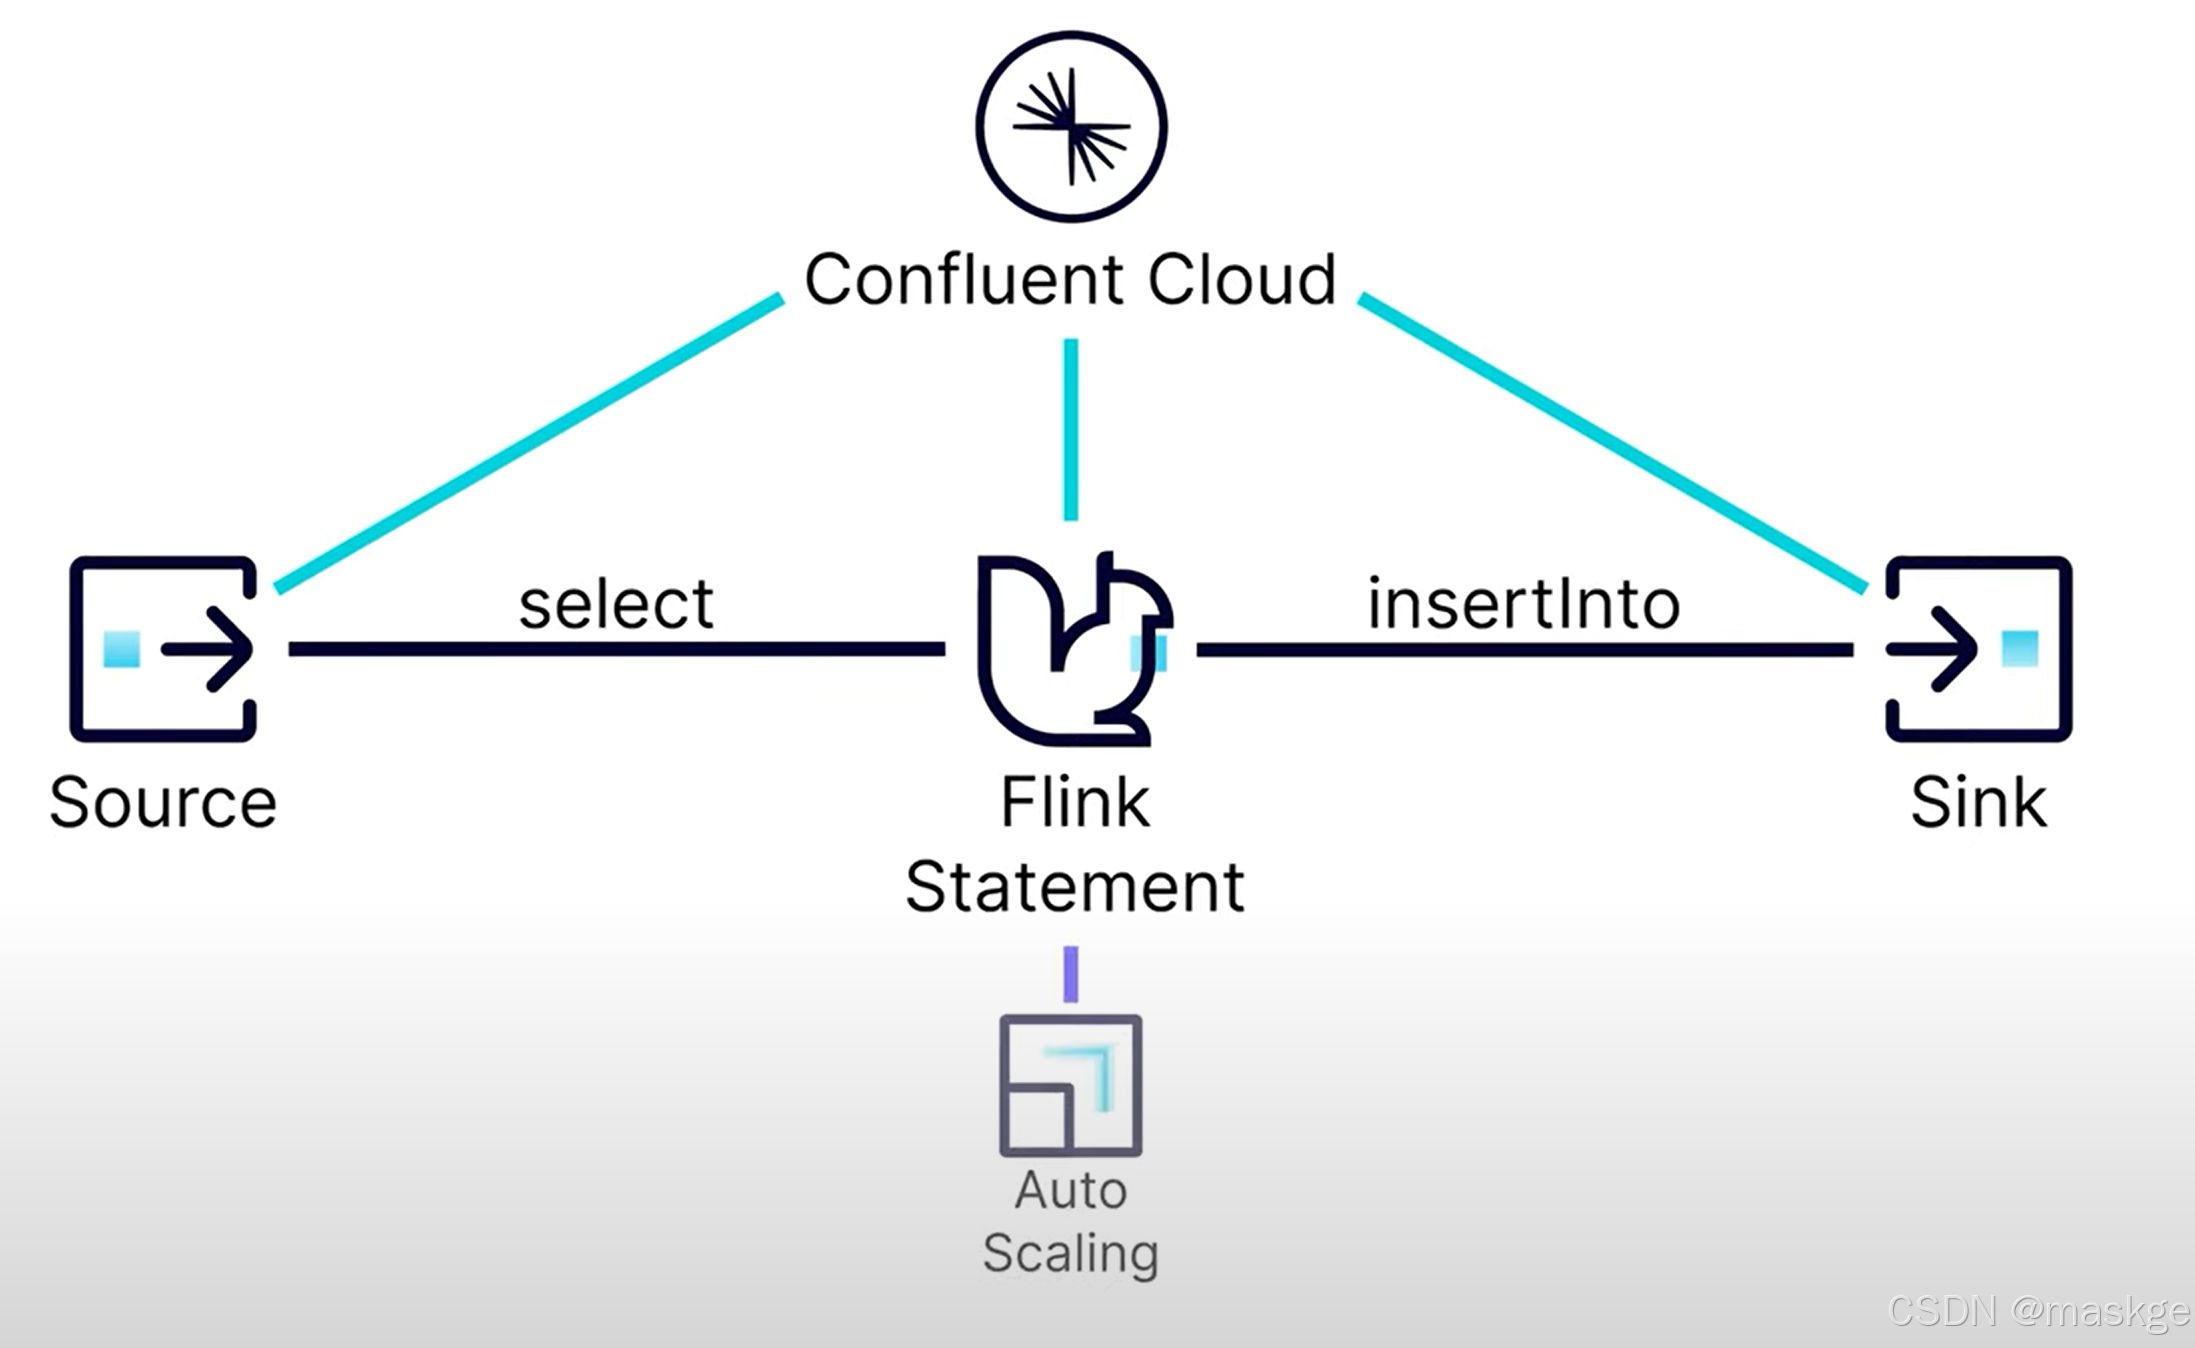
confluent cloud可以让flink自动伸缩,更加高效的利用资源
中断job:即使中断了应用,无界流依然run,依然耗费资源。可以通过程序中断job: tableresult.getJobClient().get().cancel();
 TableResult tableresult=env
                .from("ecommerce.marketplace.orders")
                .select($("*"),
                        $("vin").as("win")
                        )
                .insertInto("all_cars")
                .execute();
        tableresult.getJobClient().get().cancel();//中断job
9. watermarks(水印)
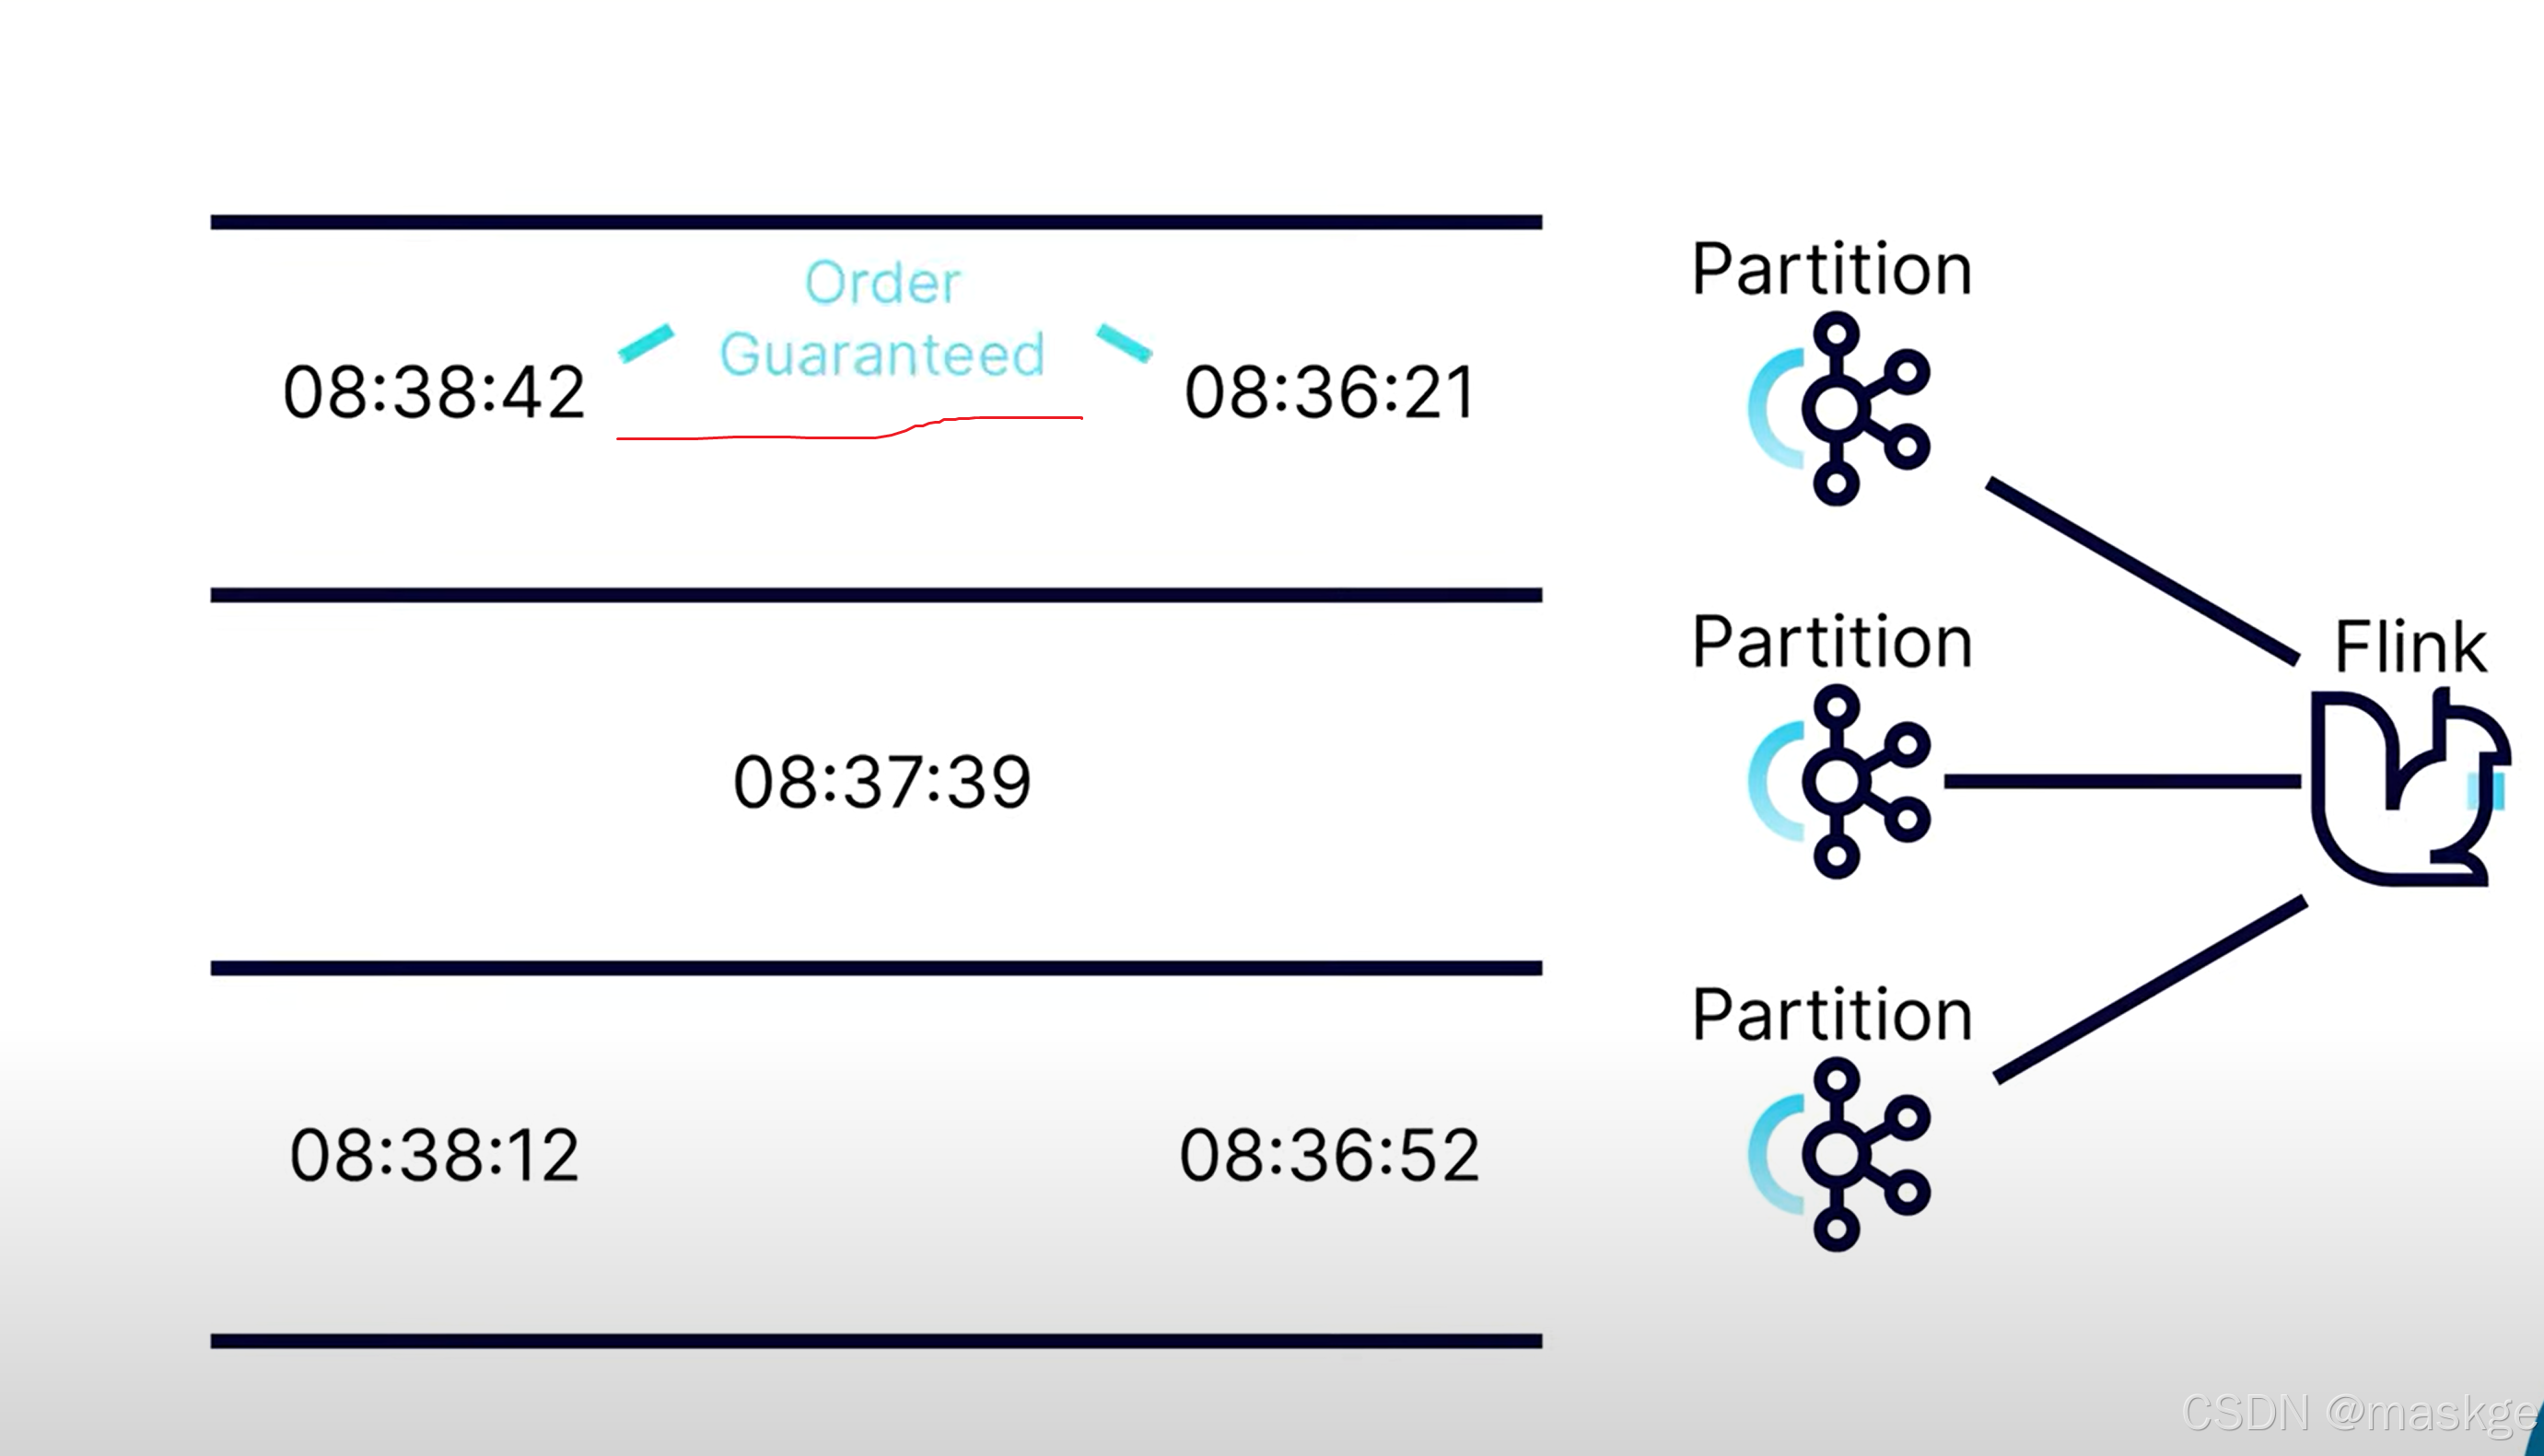
kafka可以确保分区内有序;但不确保跨多个分区有序;这也就产生了事件到达无序问题
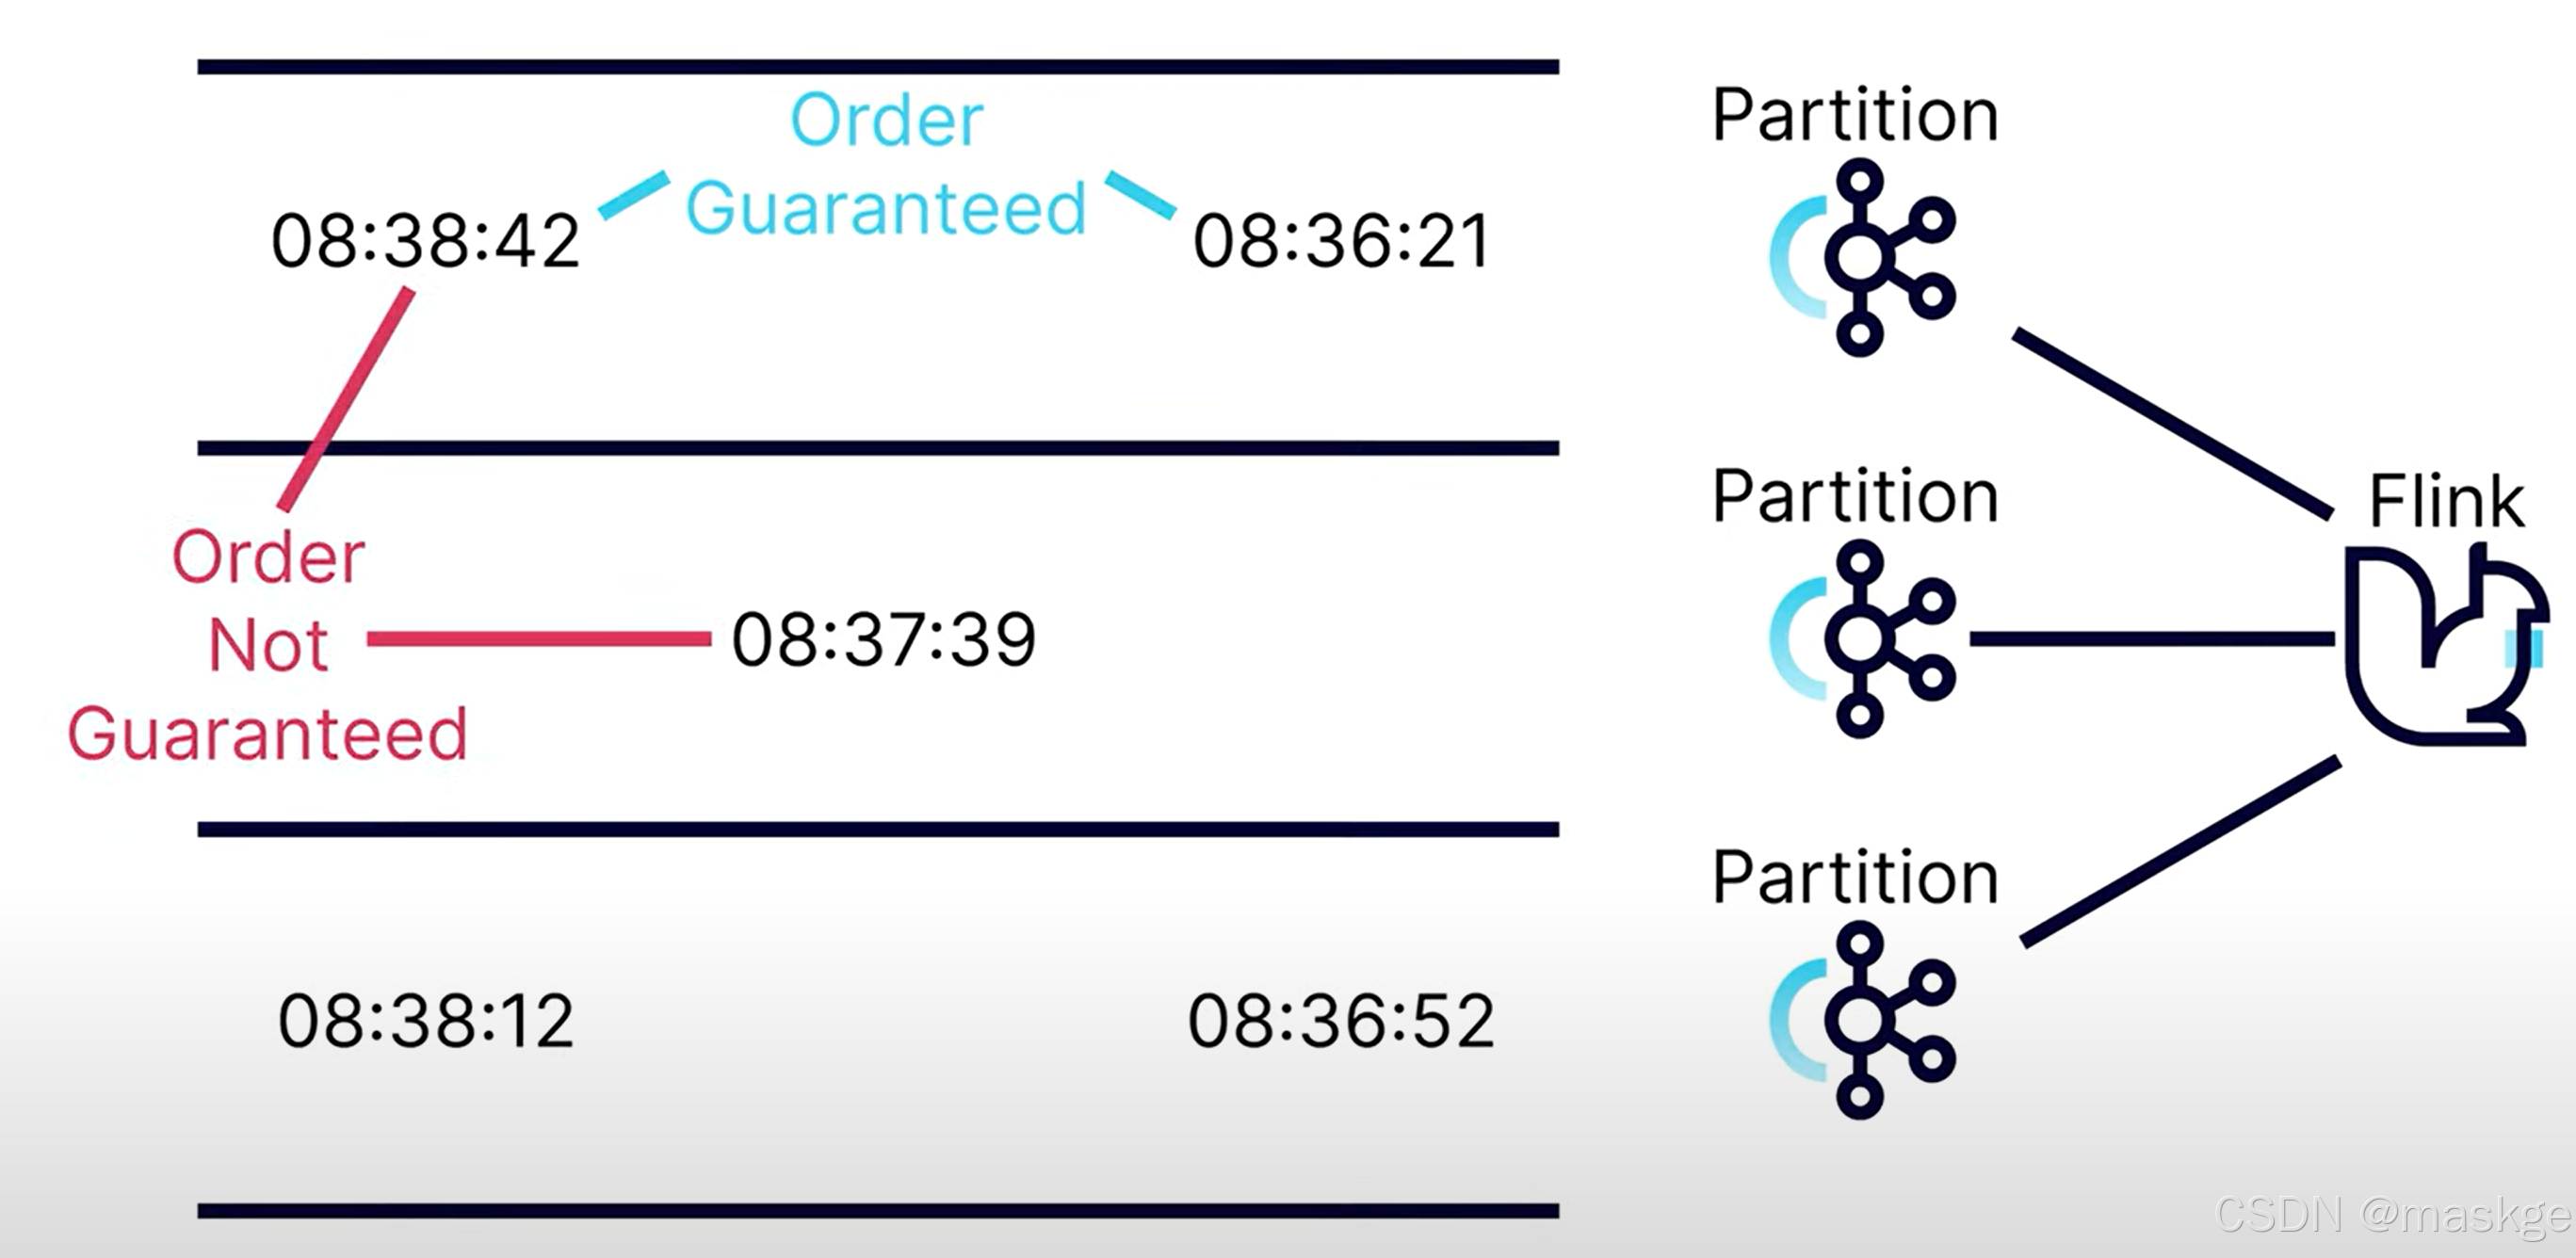
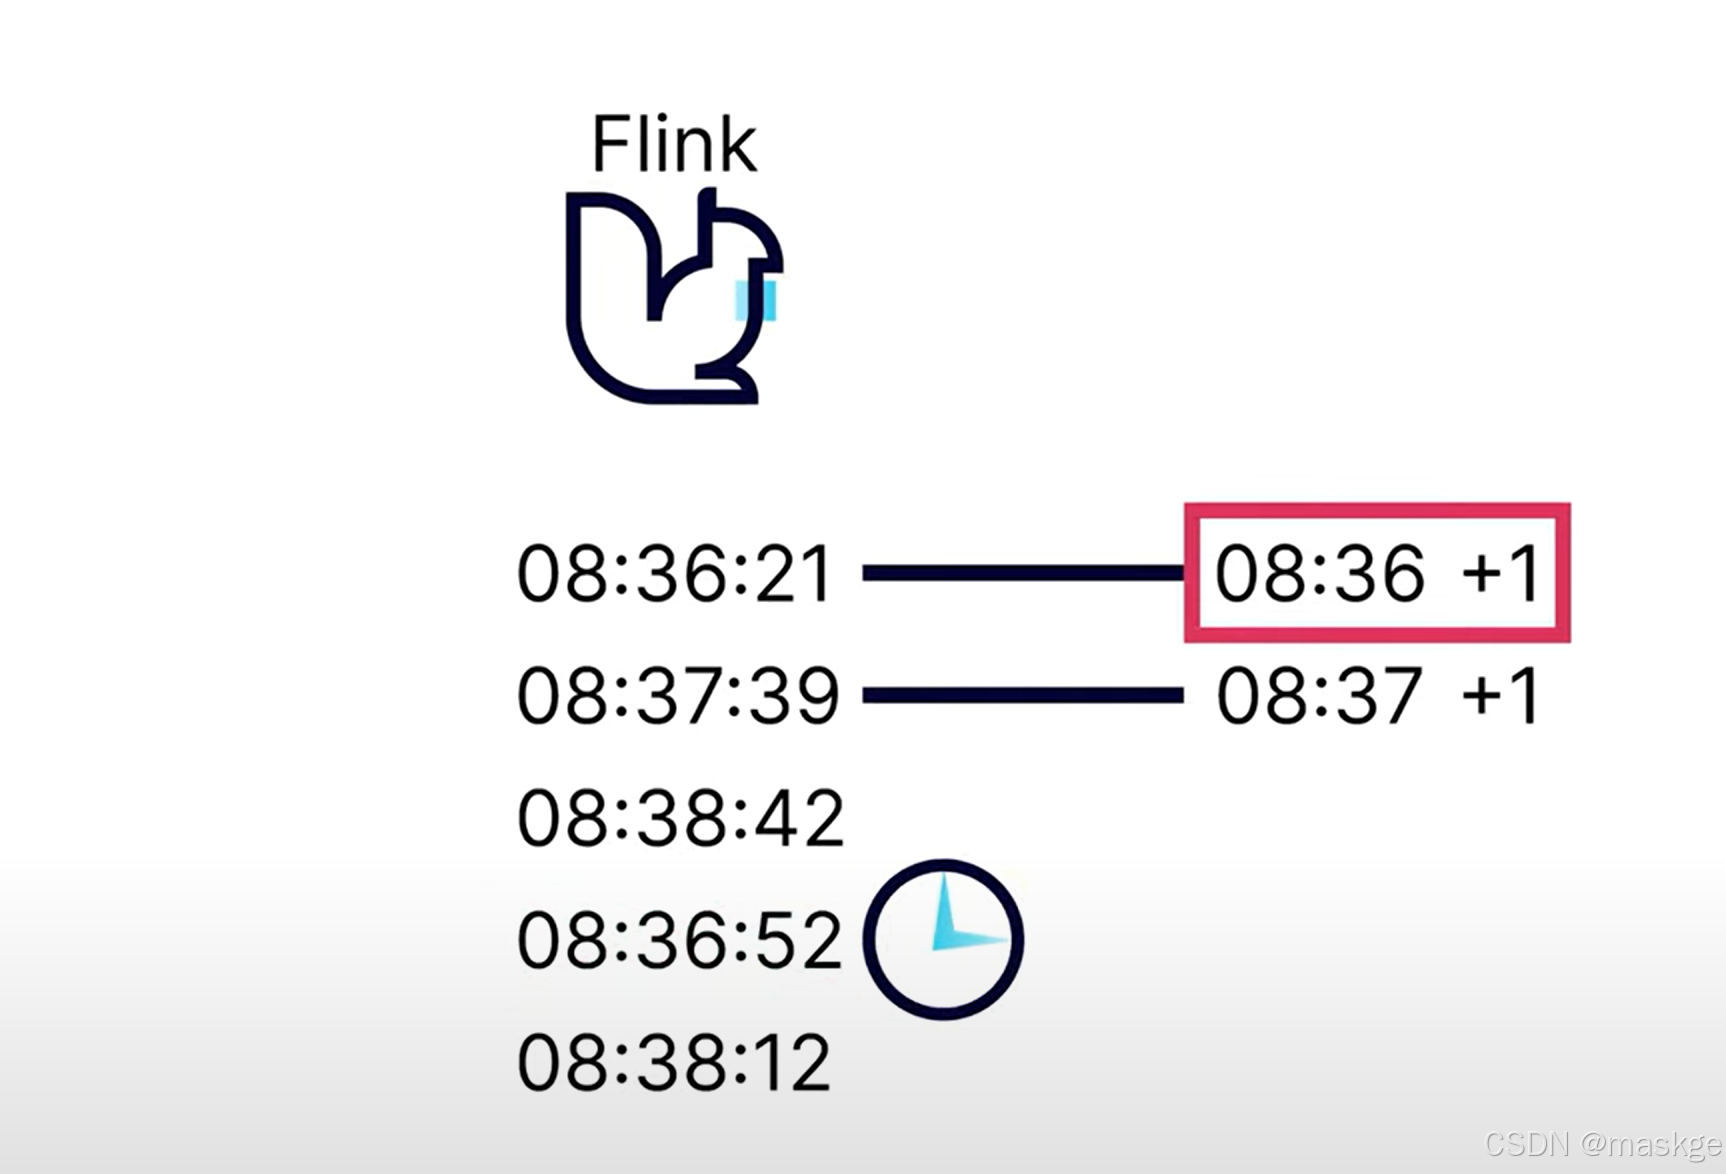
watermark的目标是提供一个最大的时间,等候无序事件
kafka ----> timeststamp
自定义watermark
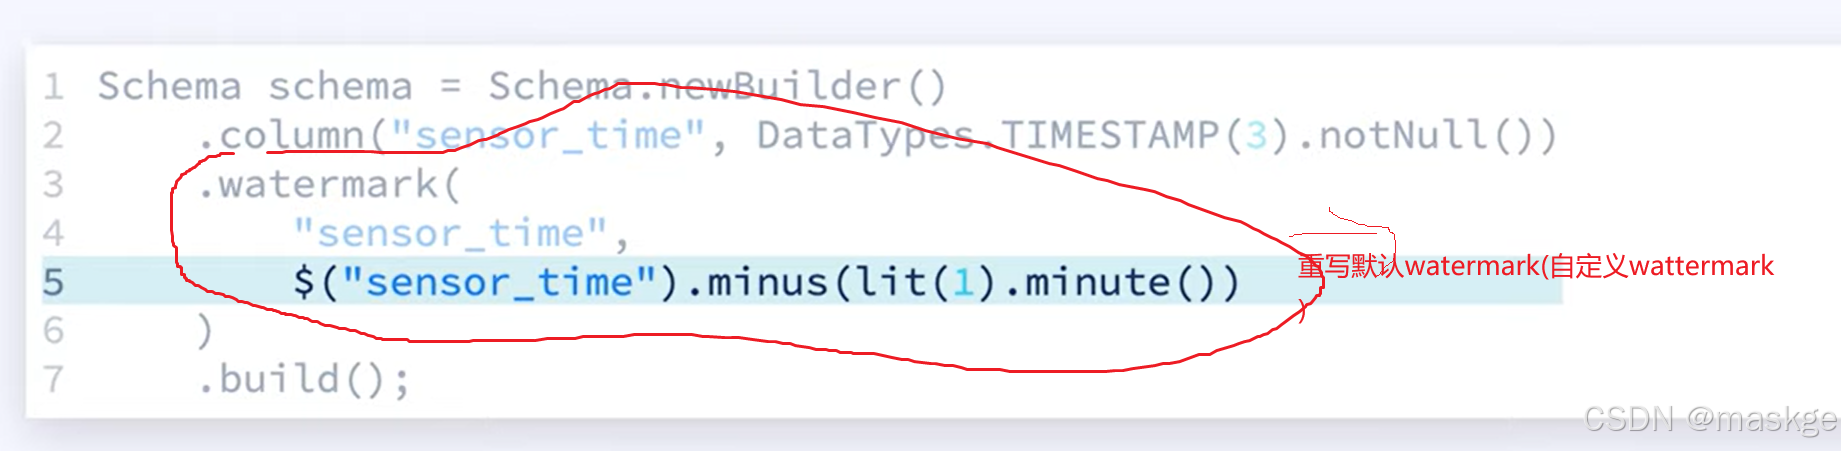
10. 聚合数据(Aggregating Data)

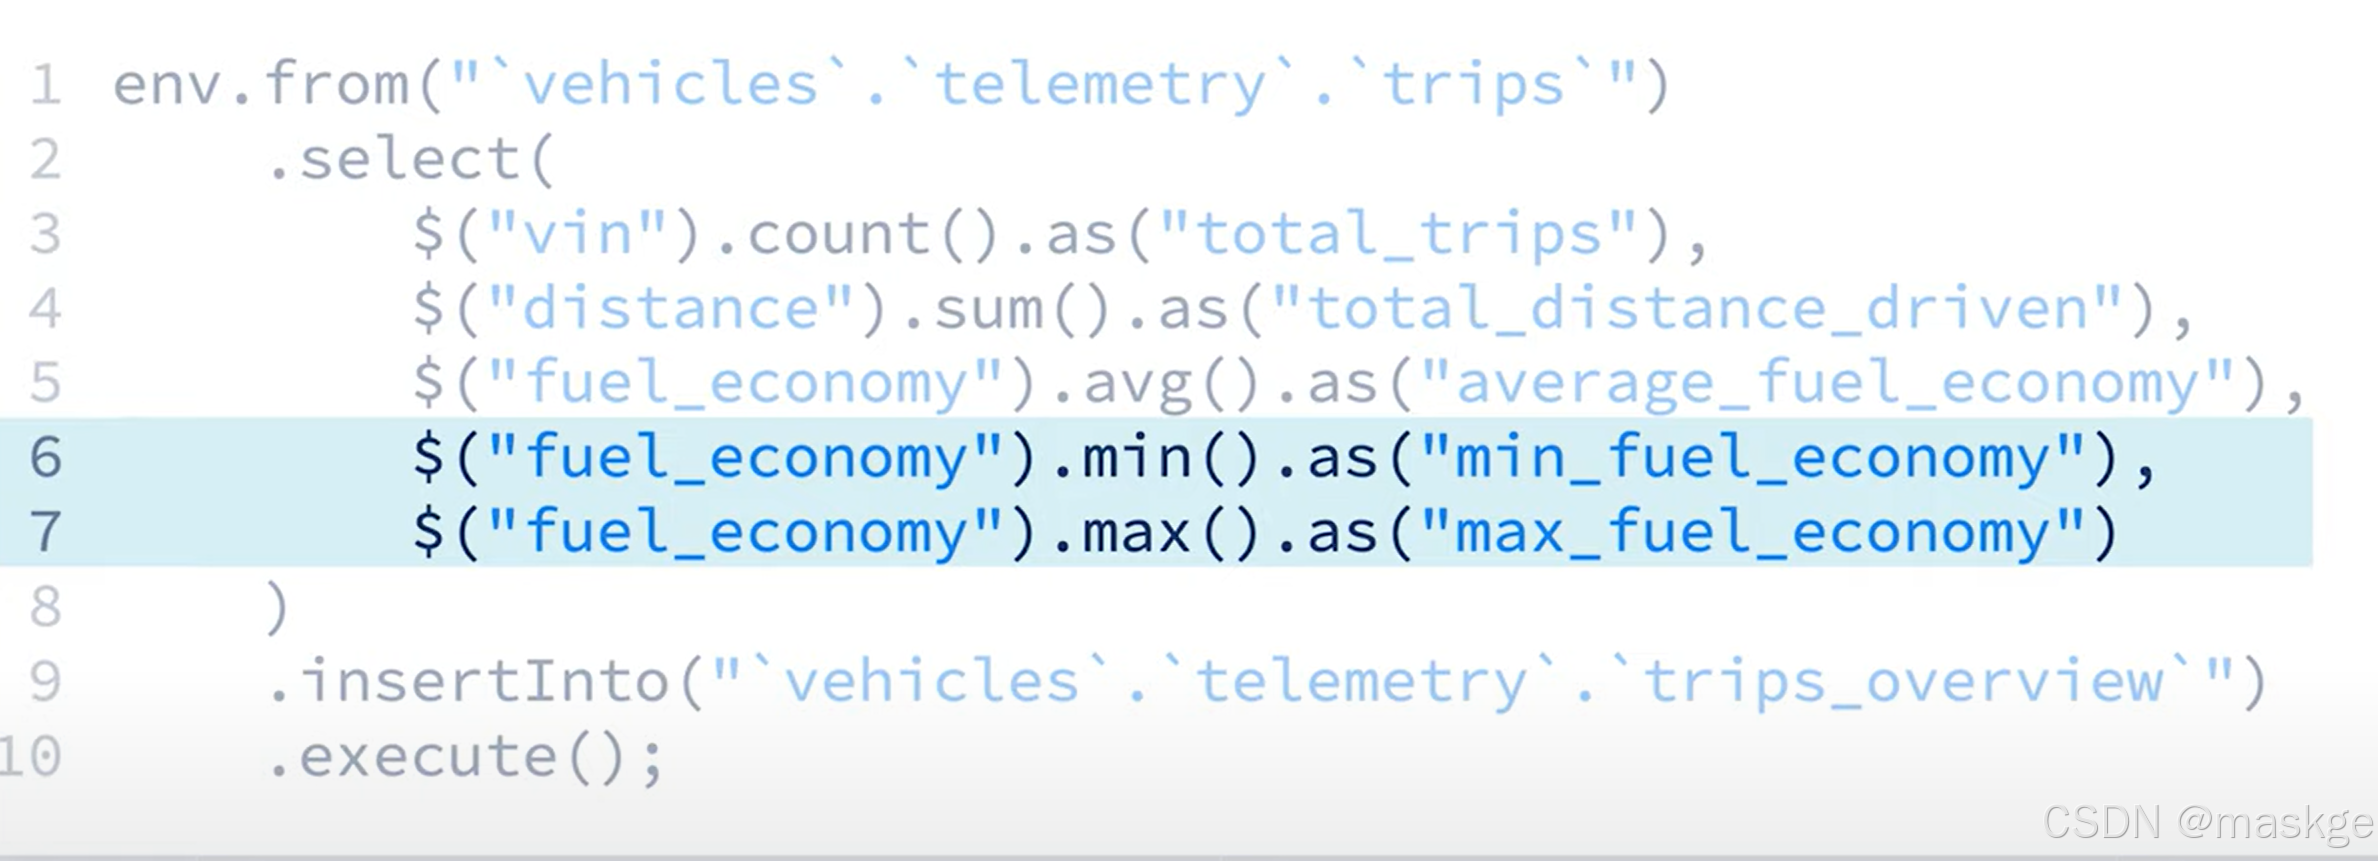
语句解释:把查询汇总的结果,最终写入topic: trips_overview中
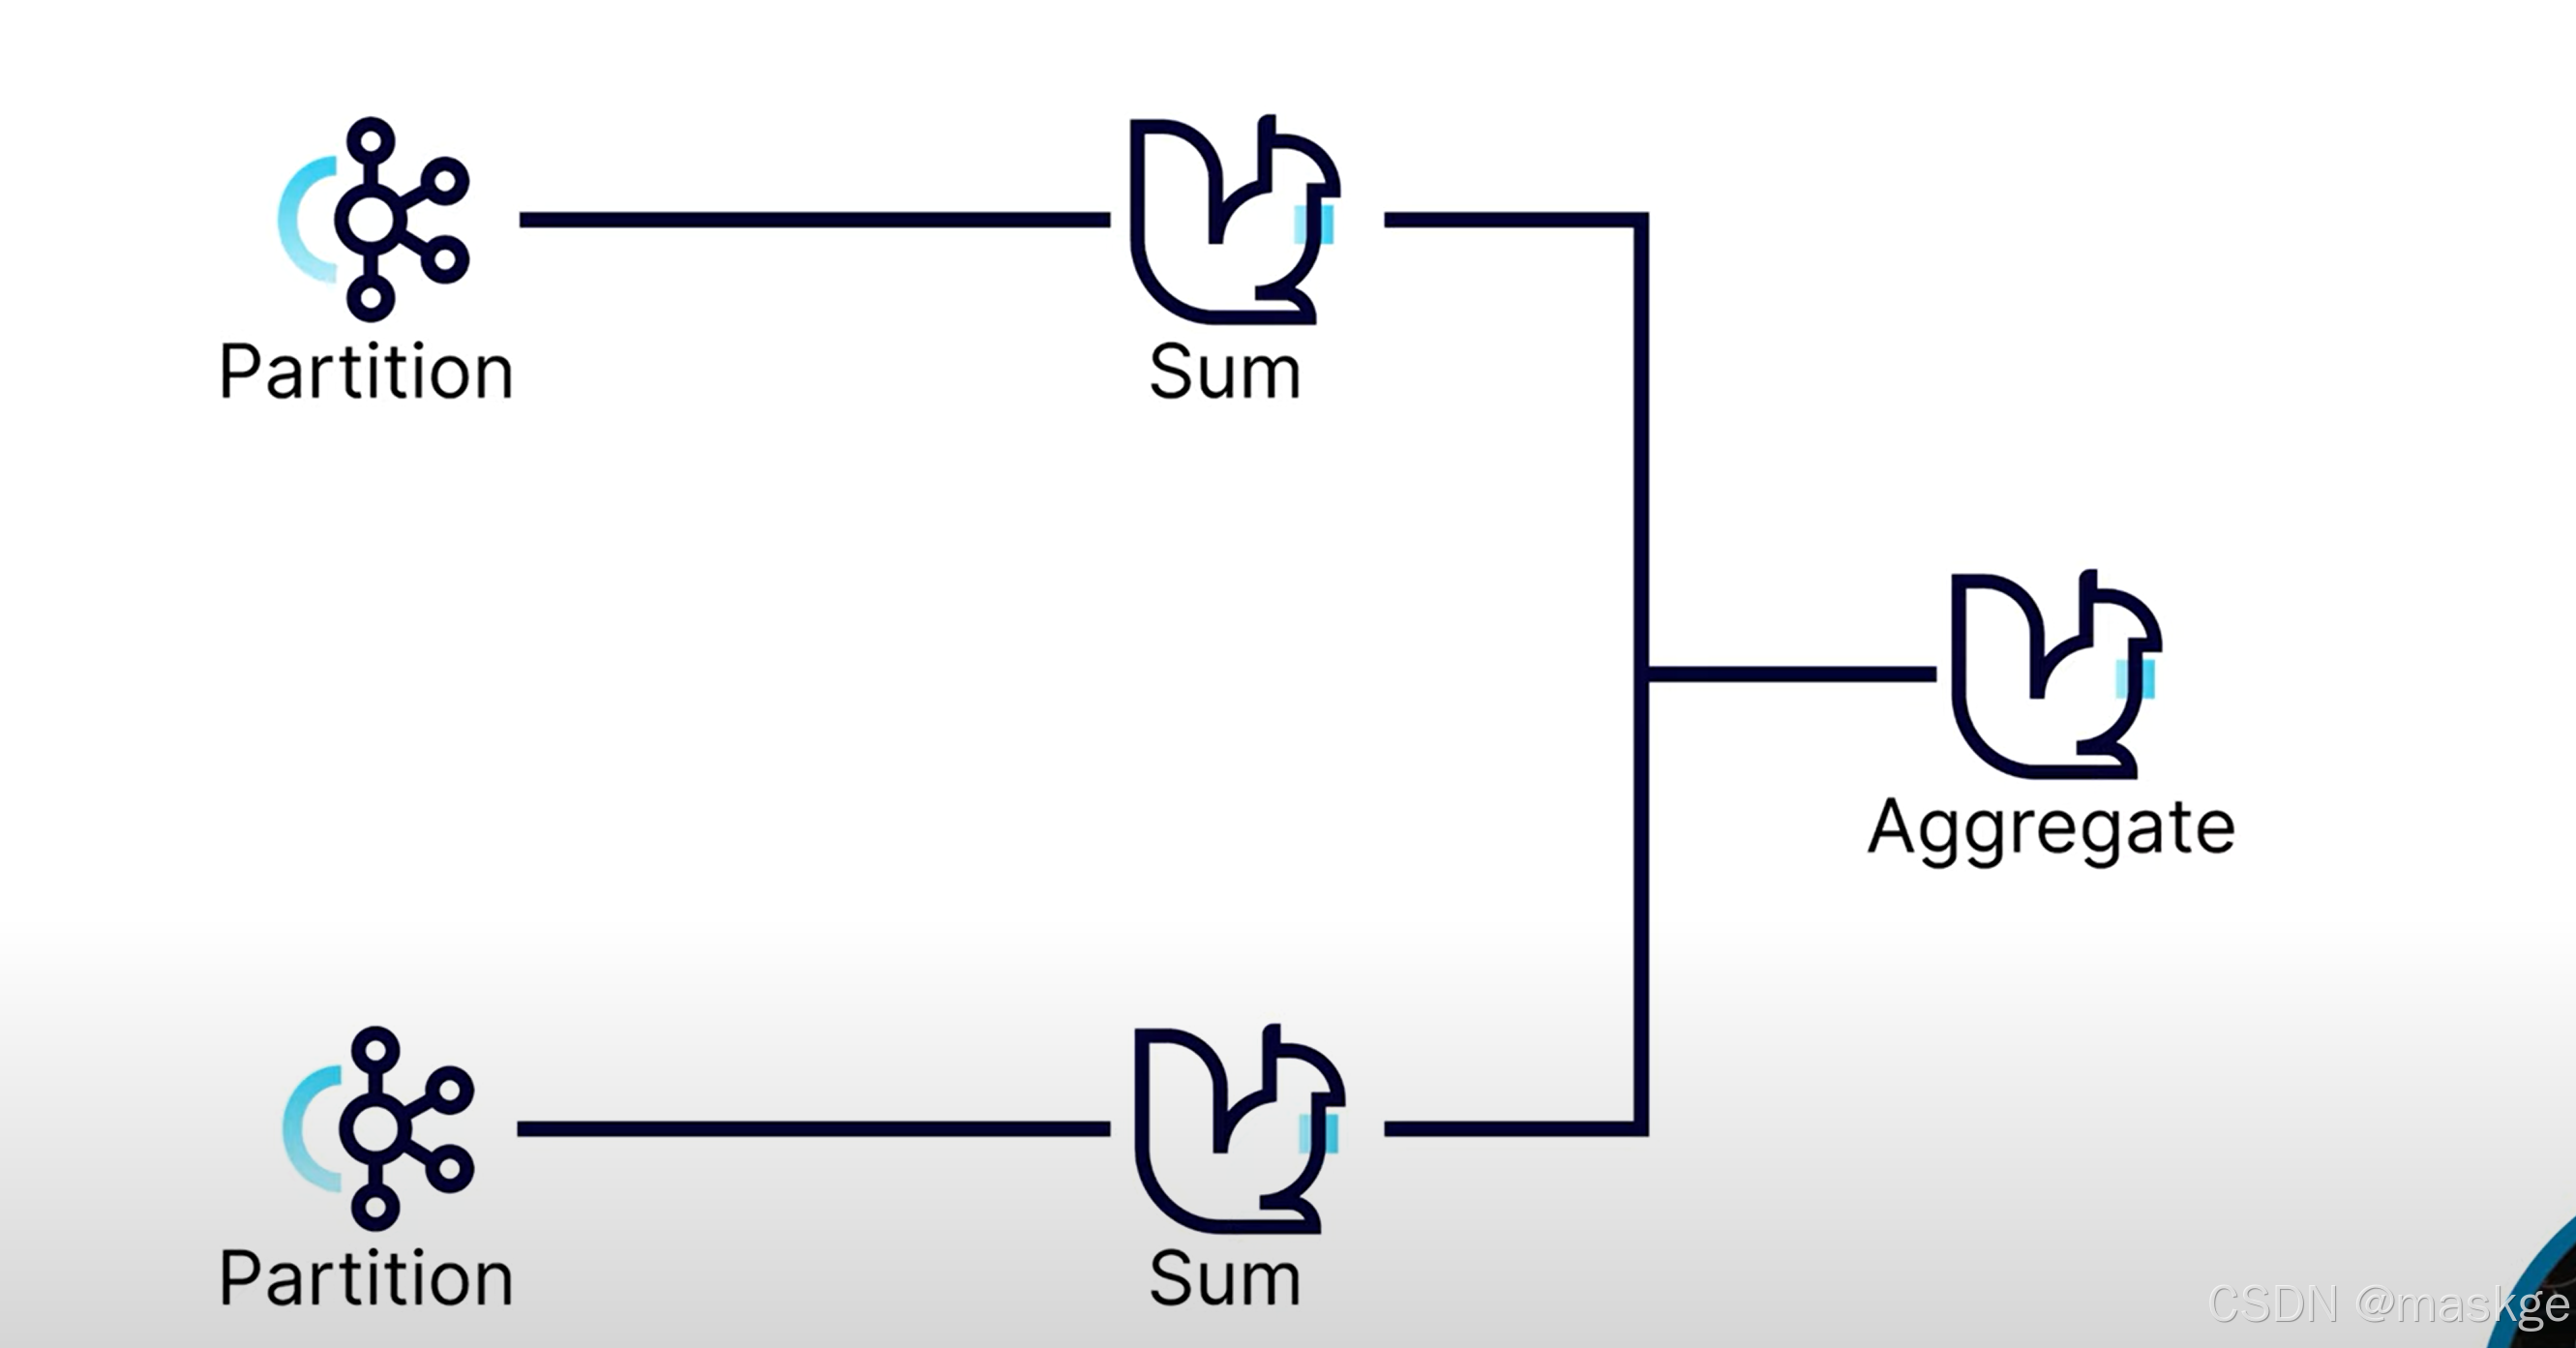
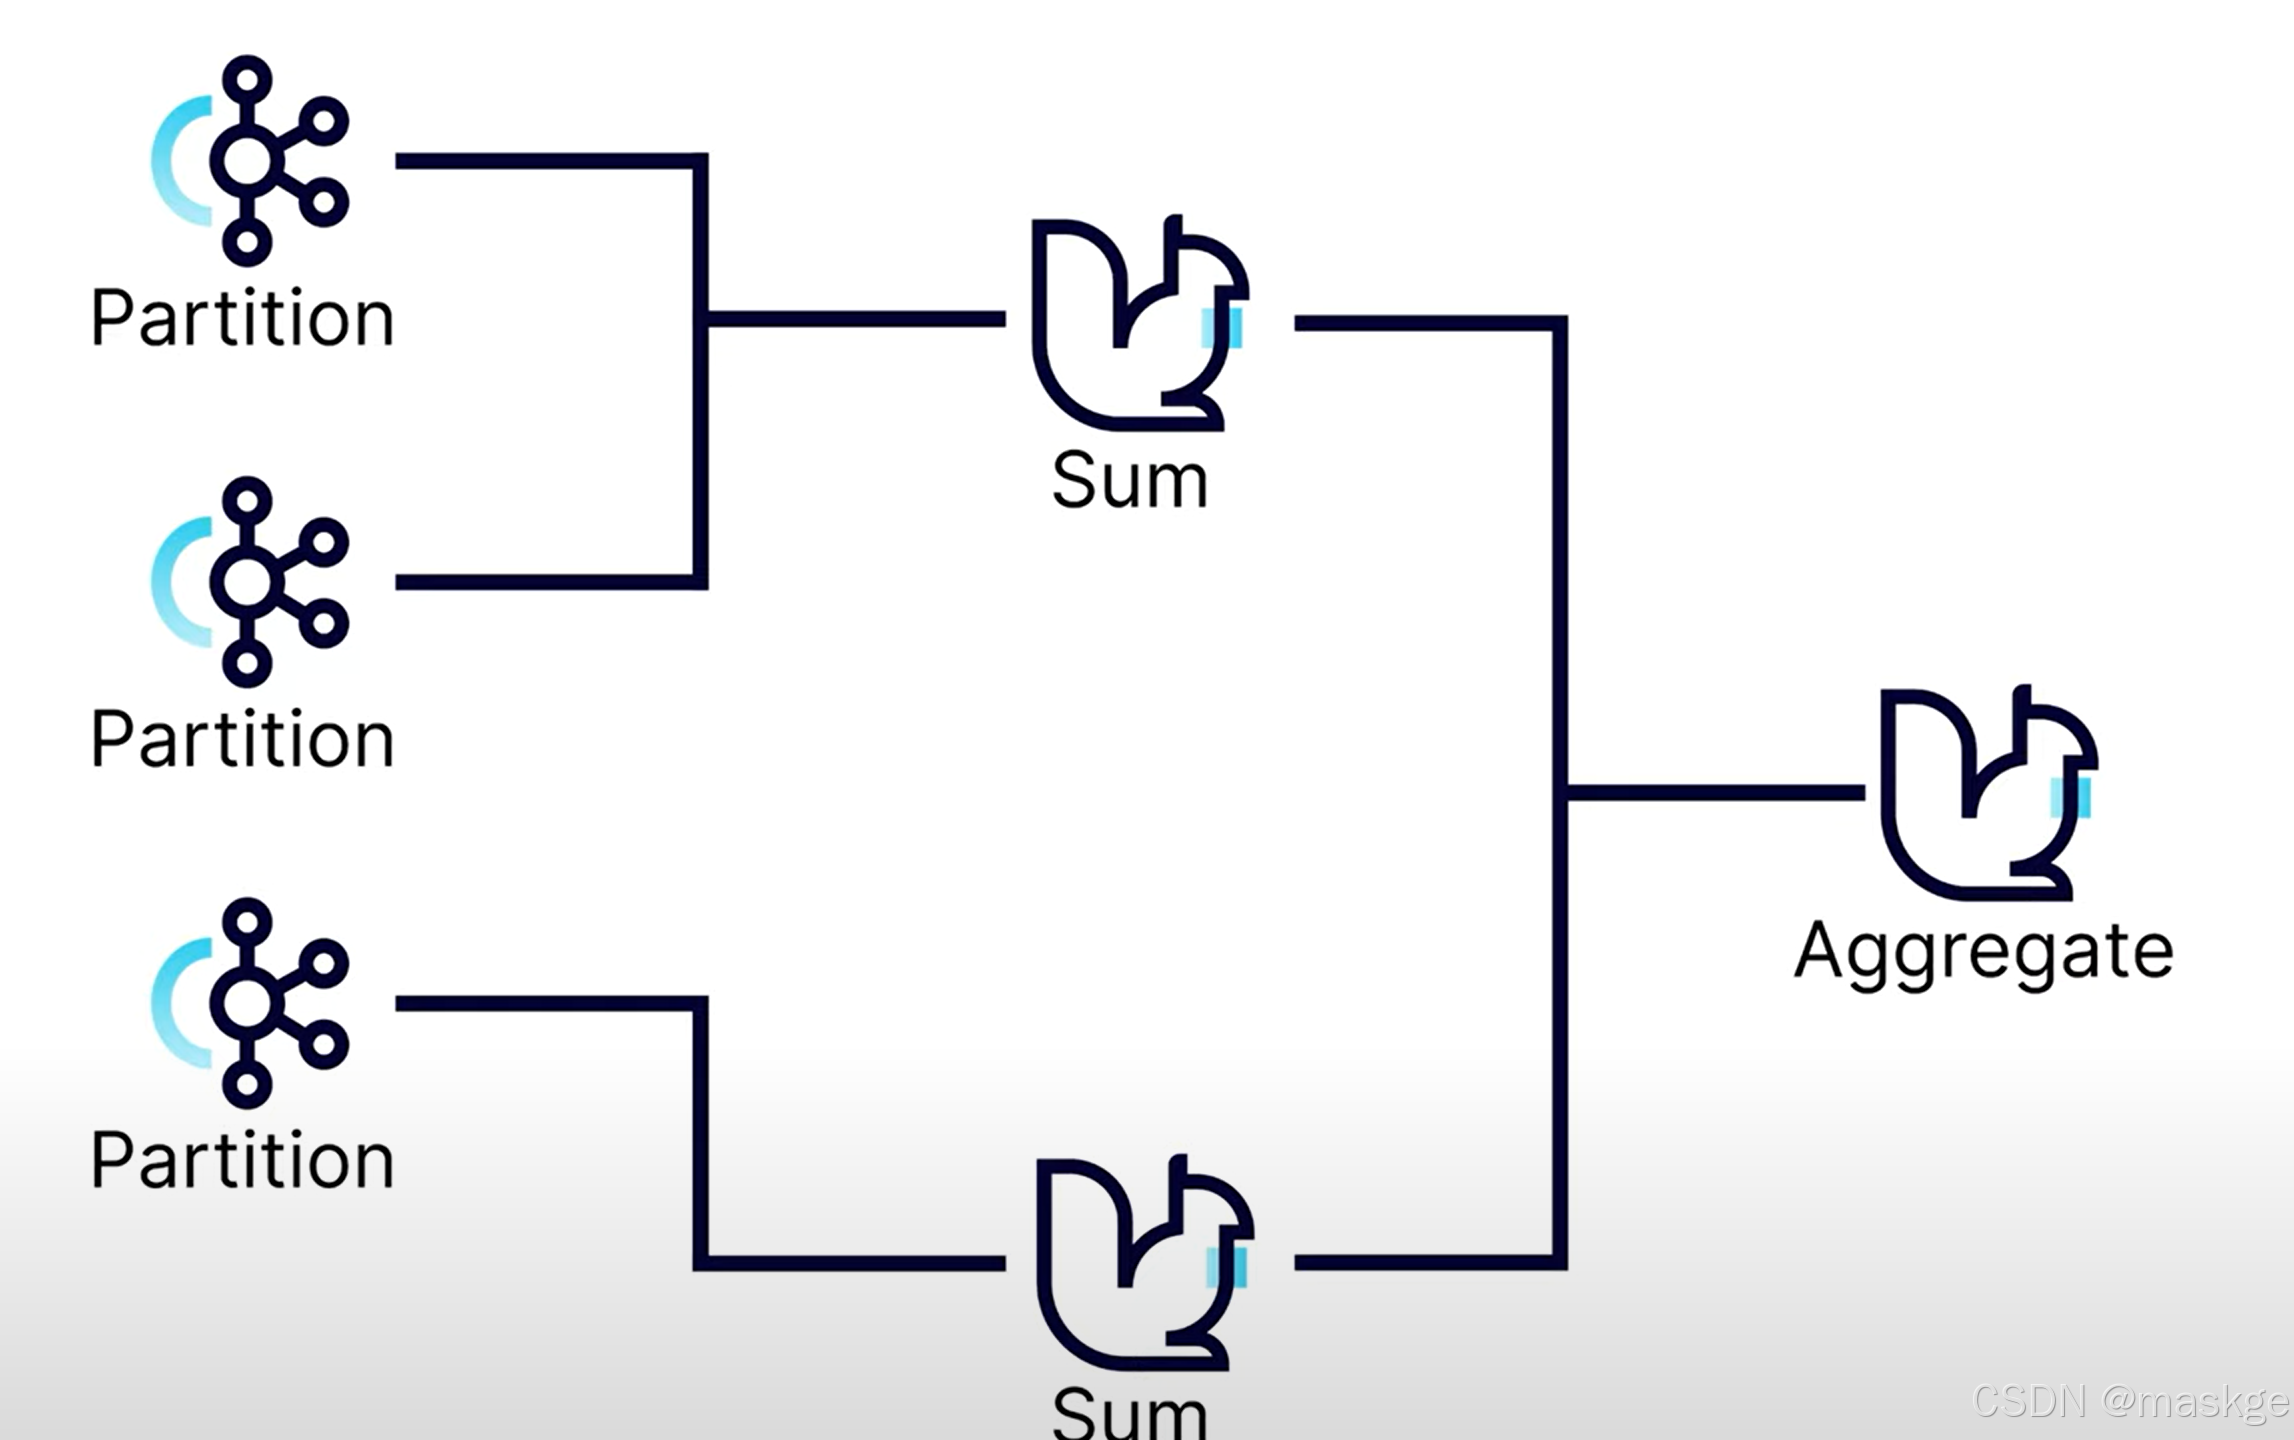
flink可以把各个分区sum的结果进行最终的聚合(Aggregate);
如果分区不够,很容易出现数据偏移,最佳实践是配置足够多的分区空间,在扩展的时候,不会出现太多偏移
groupBy 可以分隔进入的数据流成为多个数据流
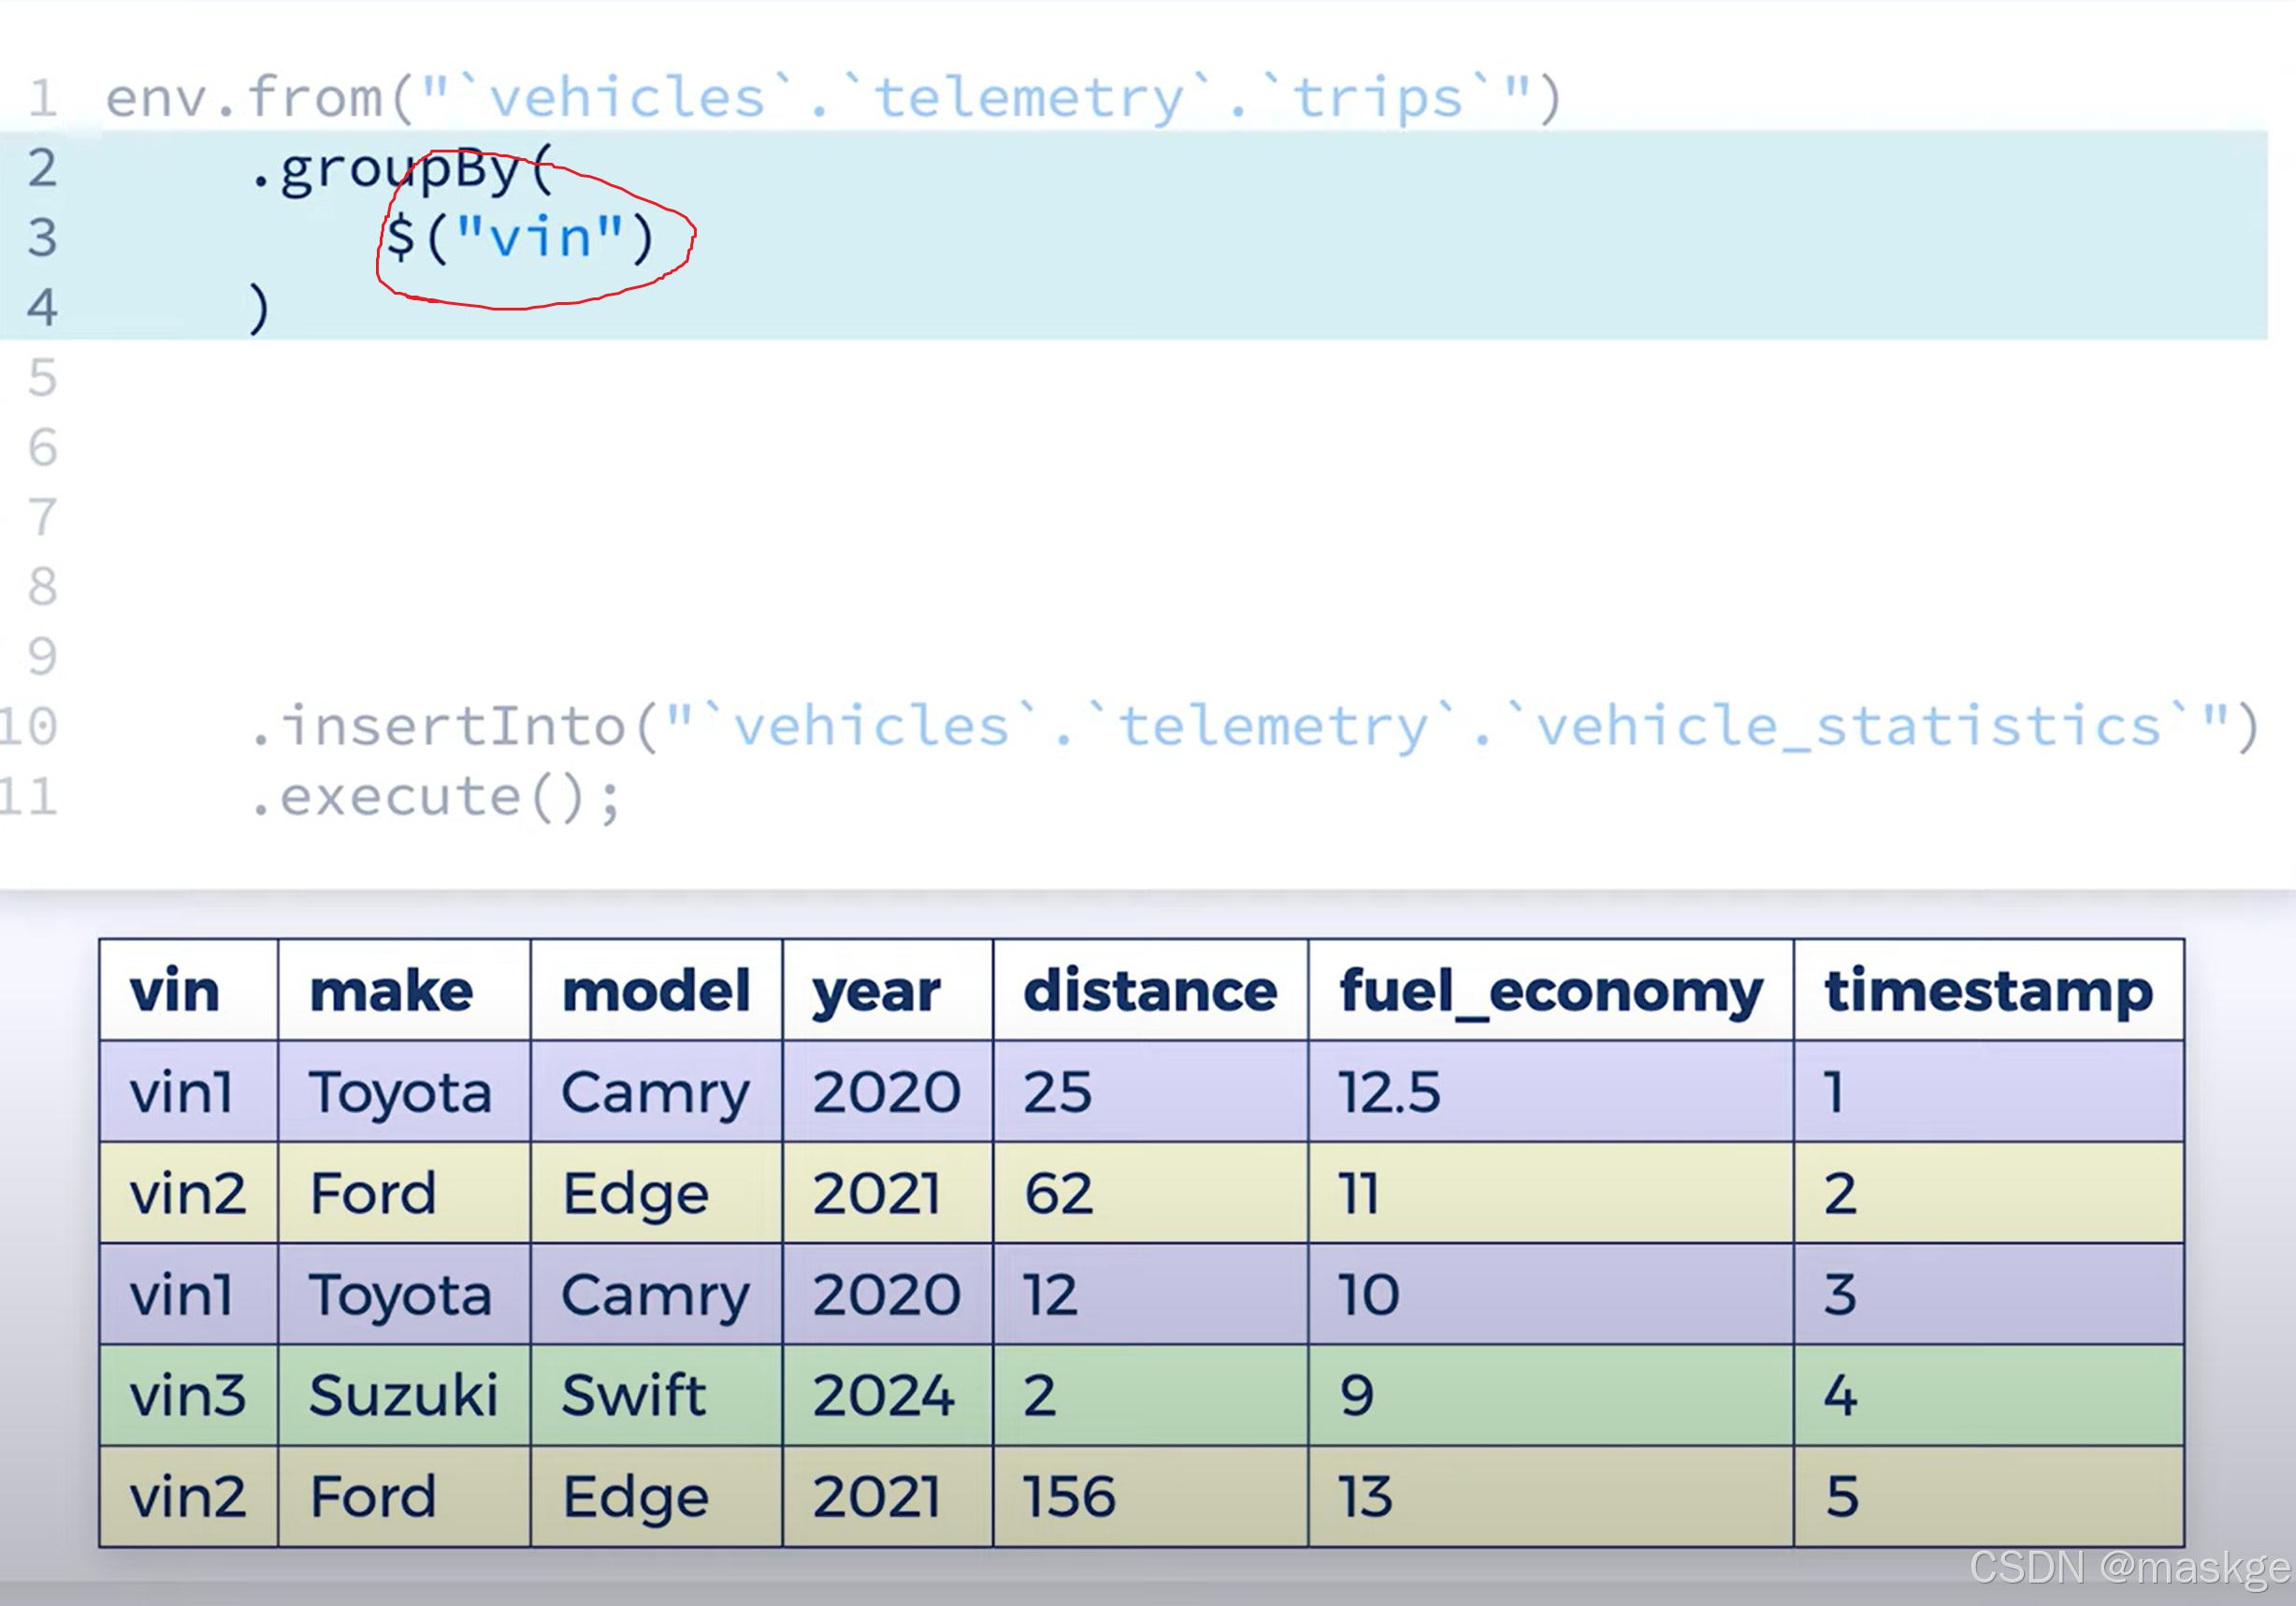
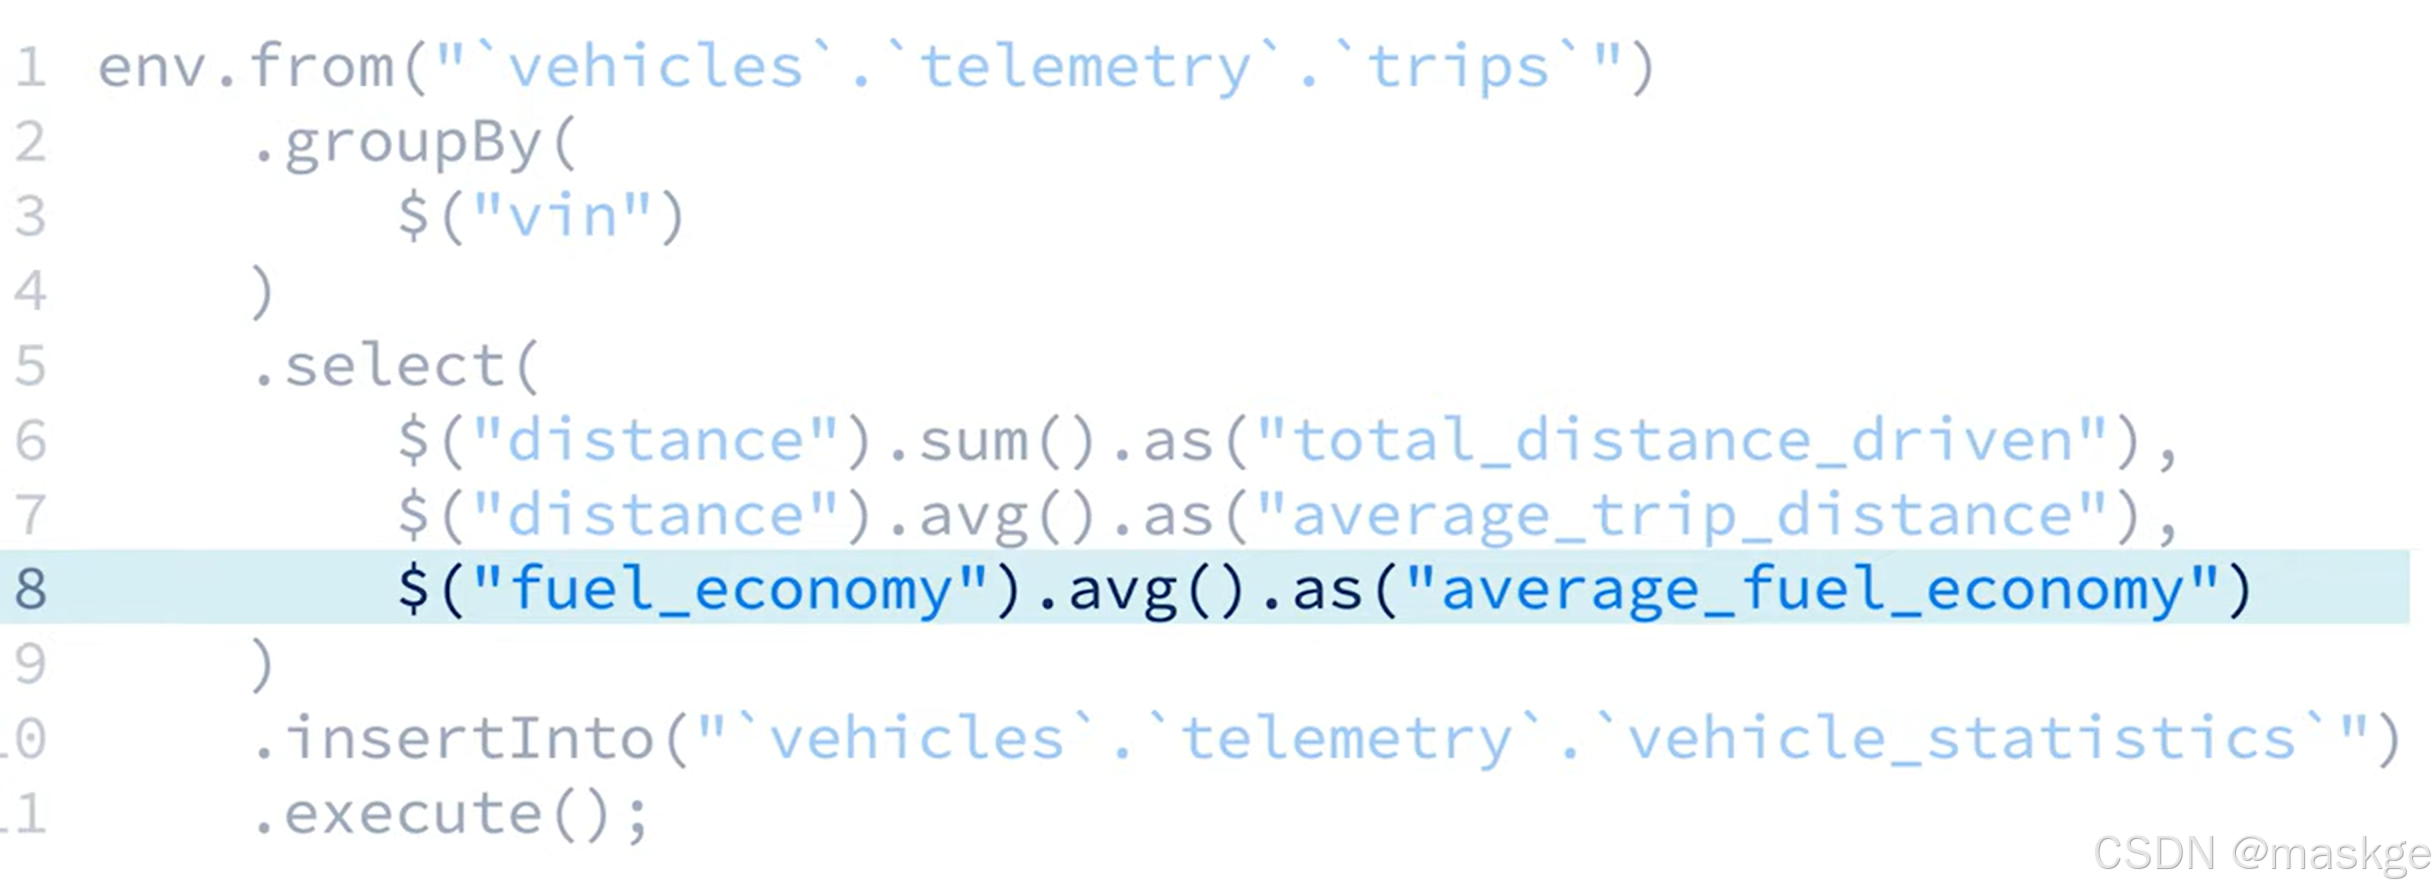
distinct():去重
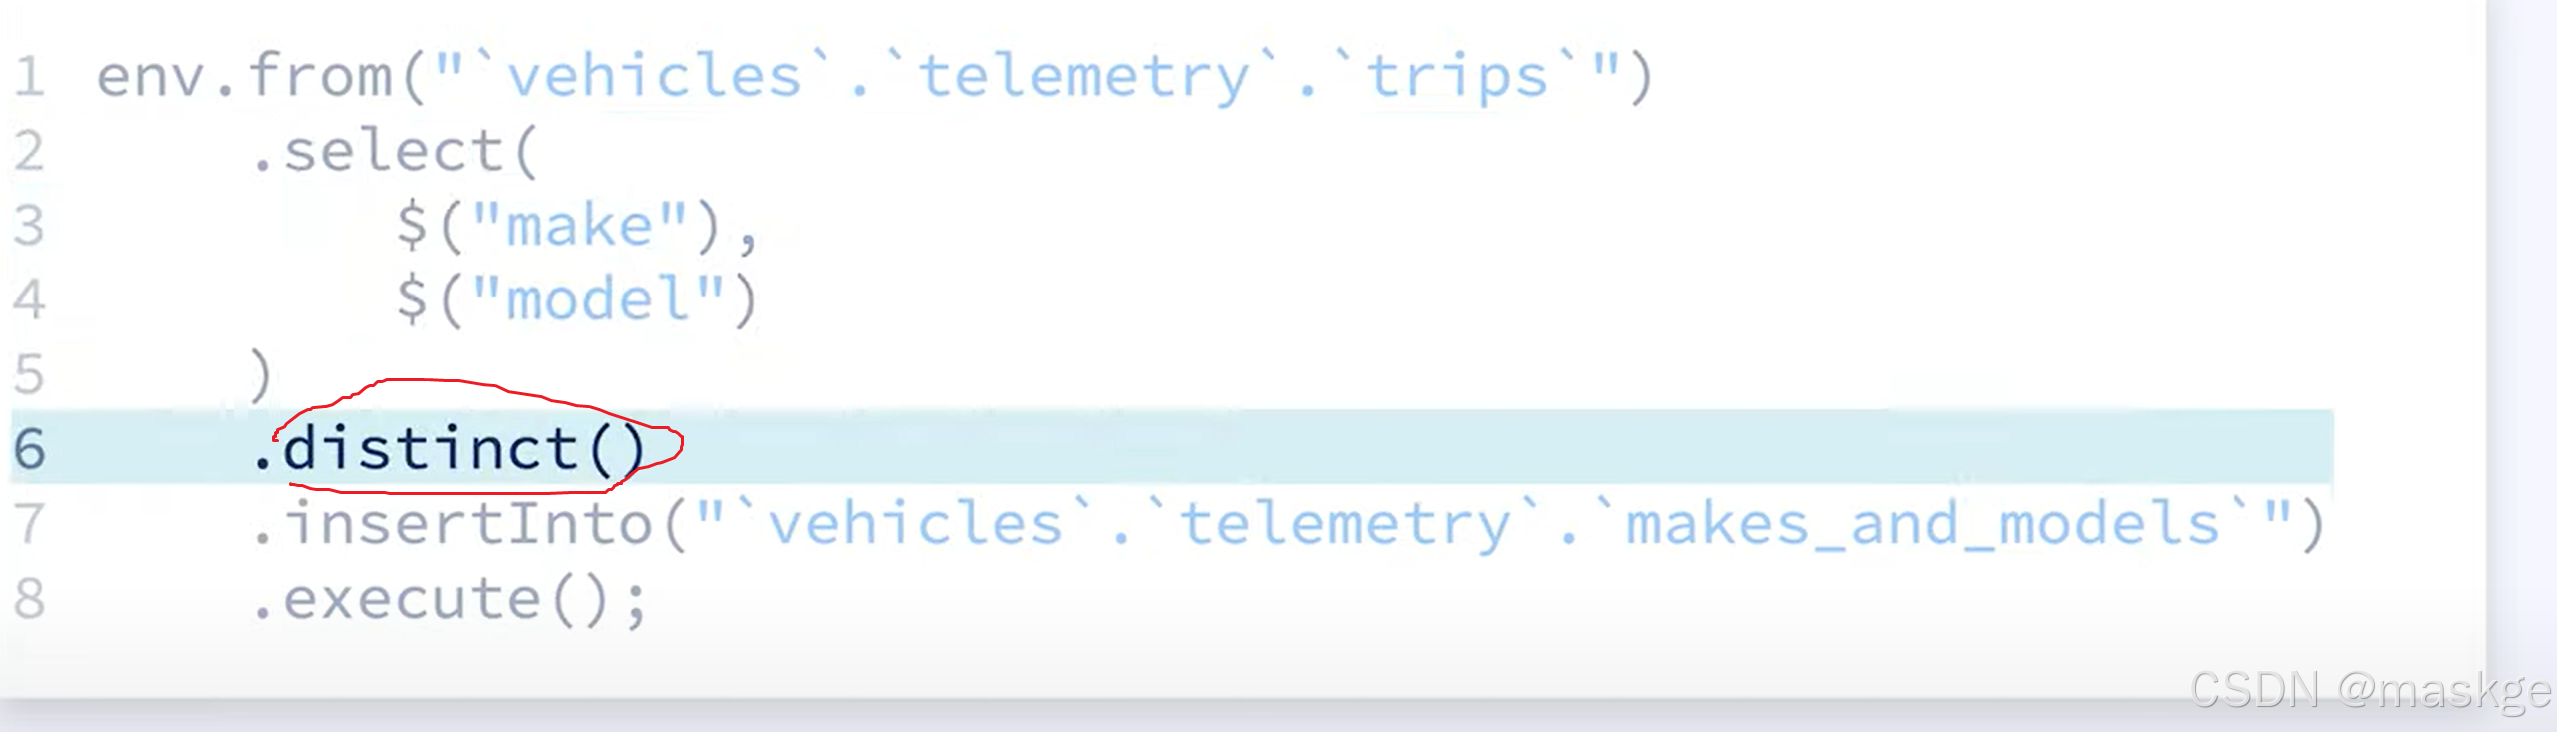
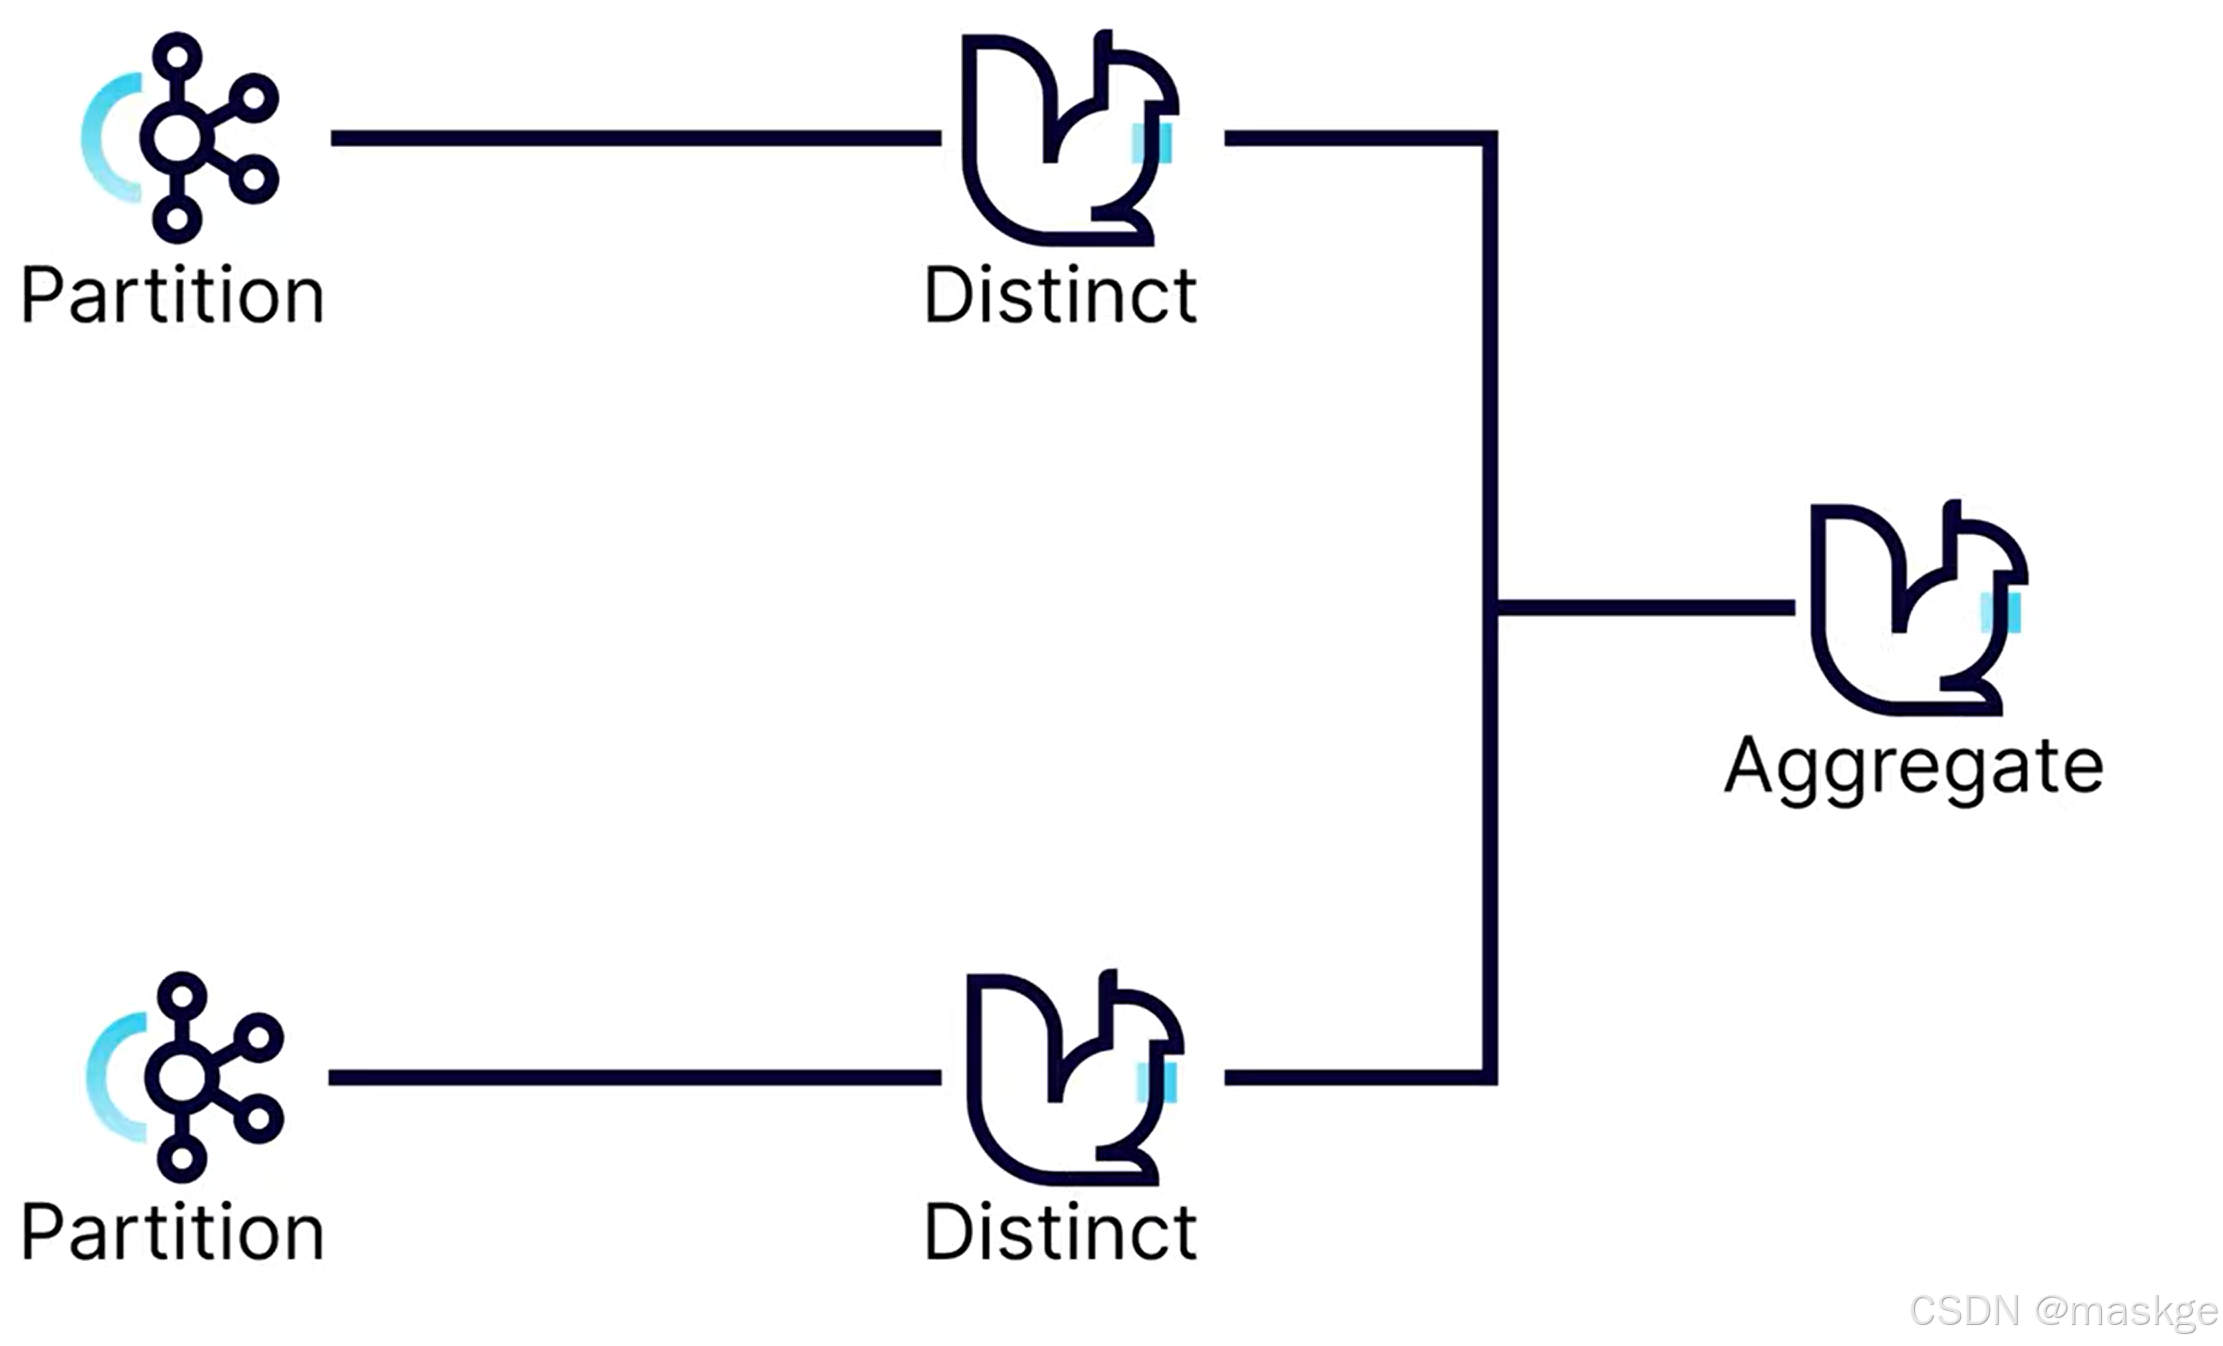
count 、 sum、average 通常是安全的并且可以完成最小的存储; distinct需要更多的存储,区间于如何配置它
11. 使用窗口聚合数据(using windows to aggregate data)
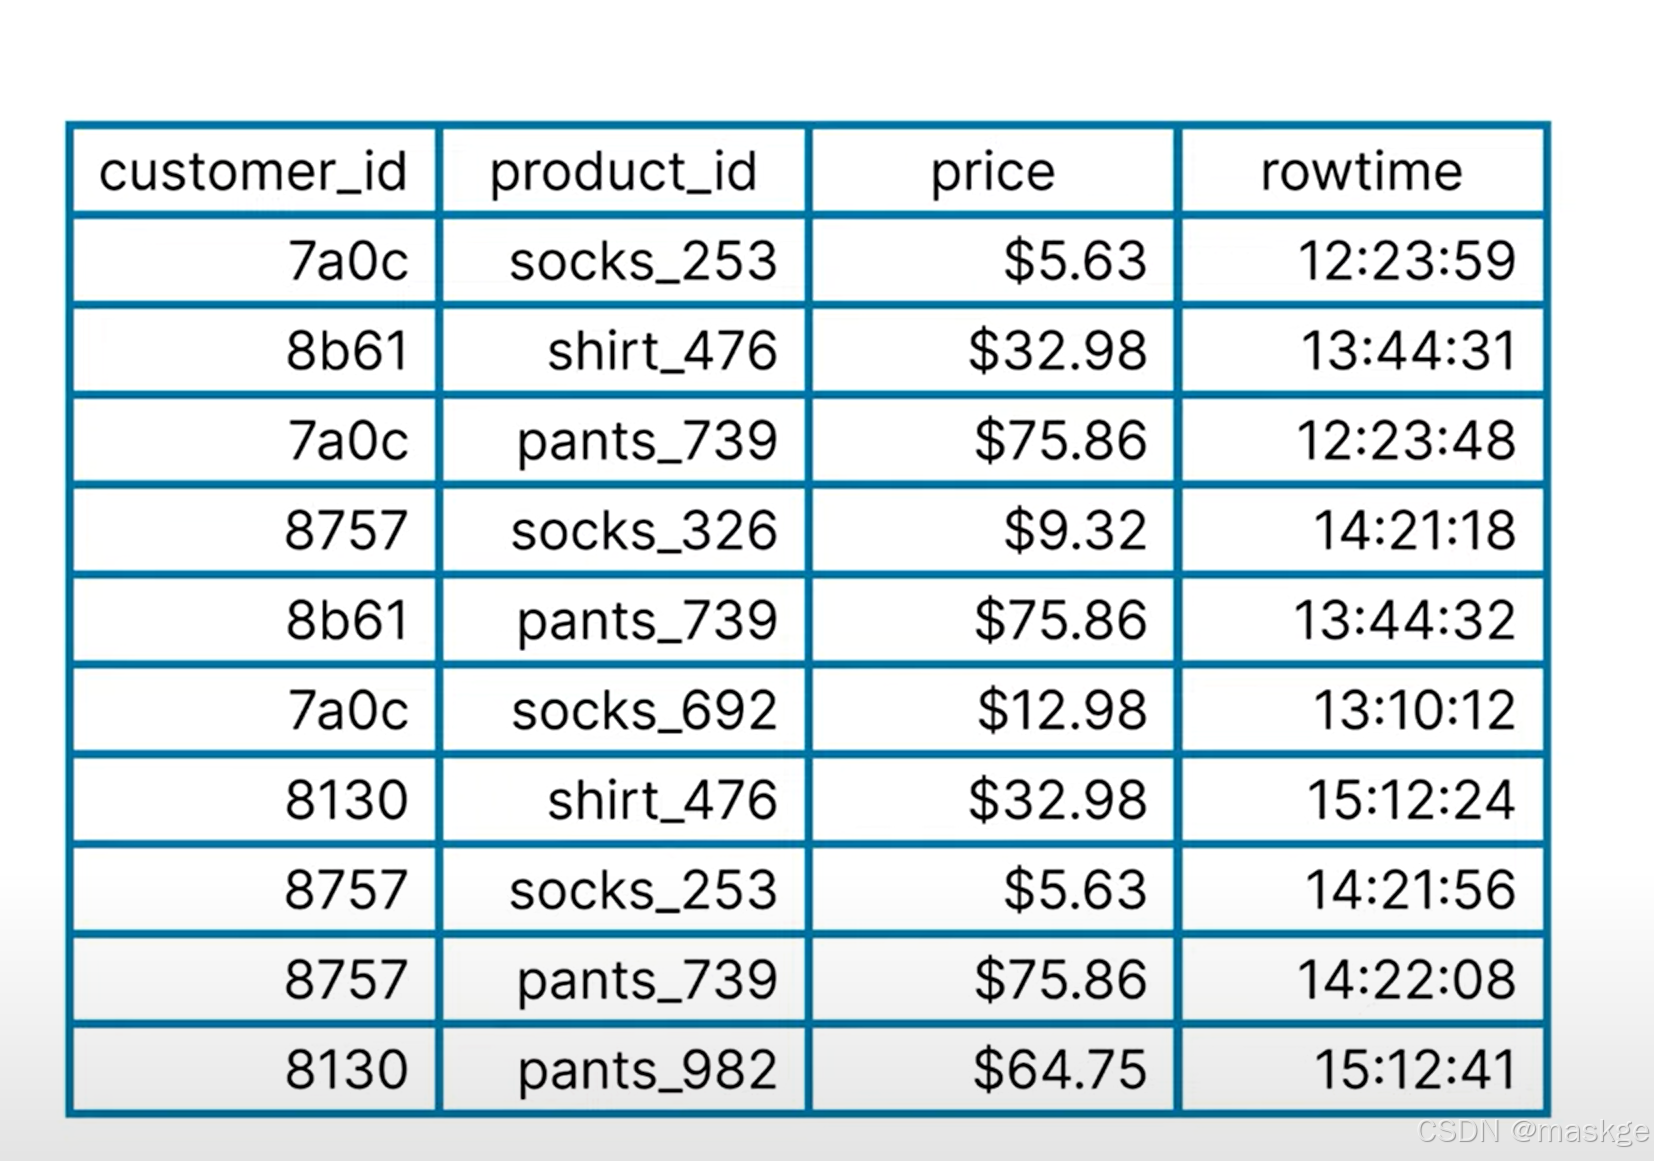
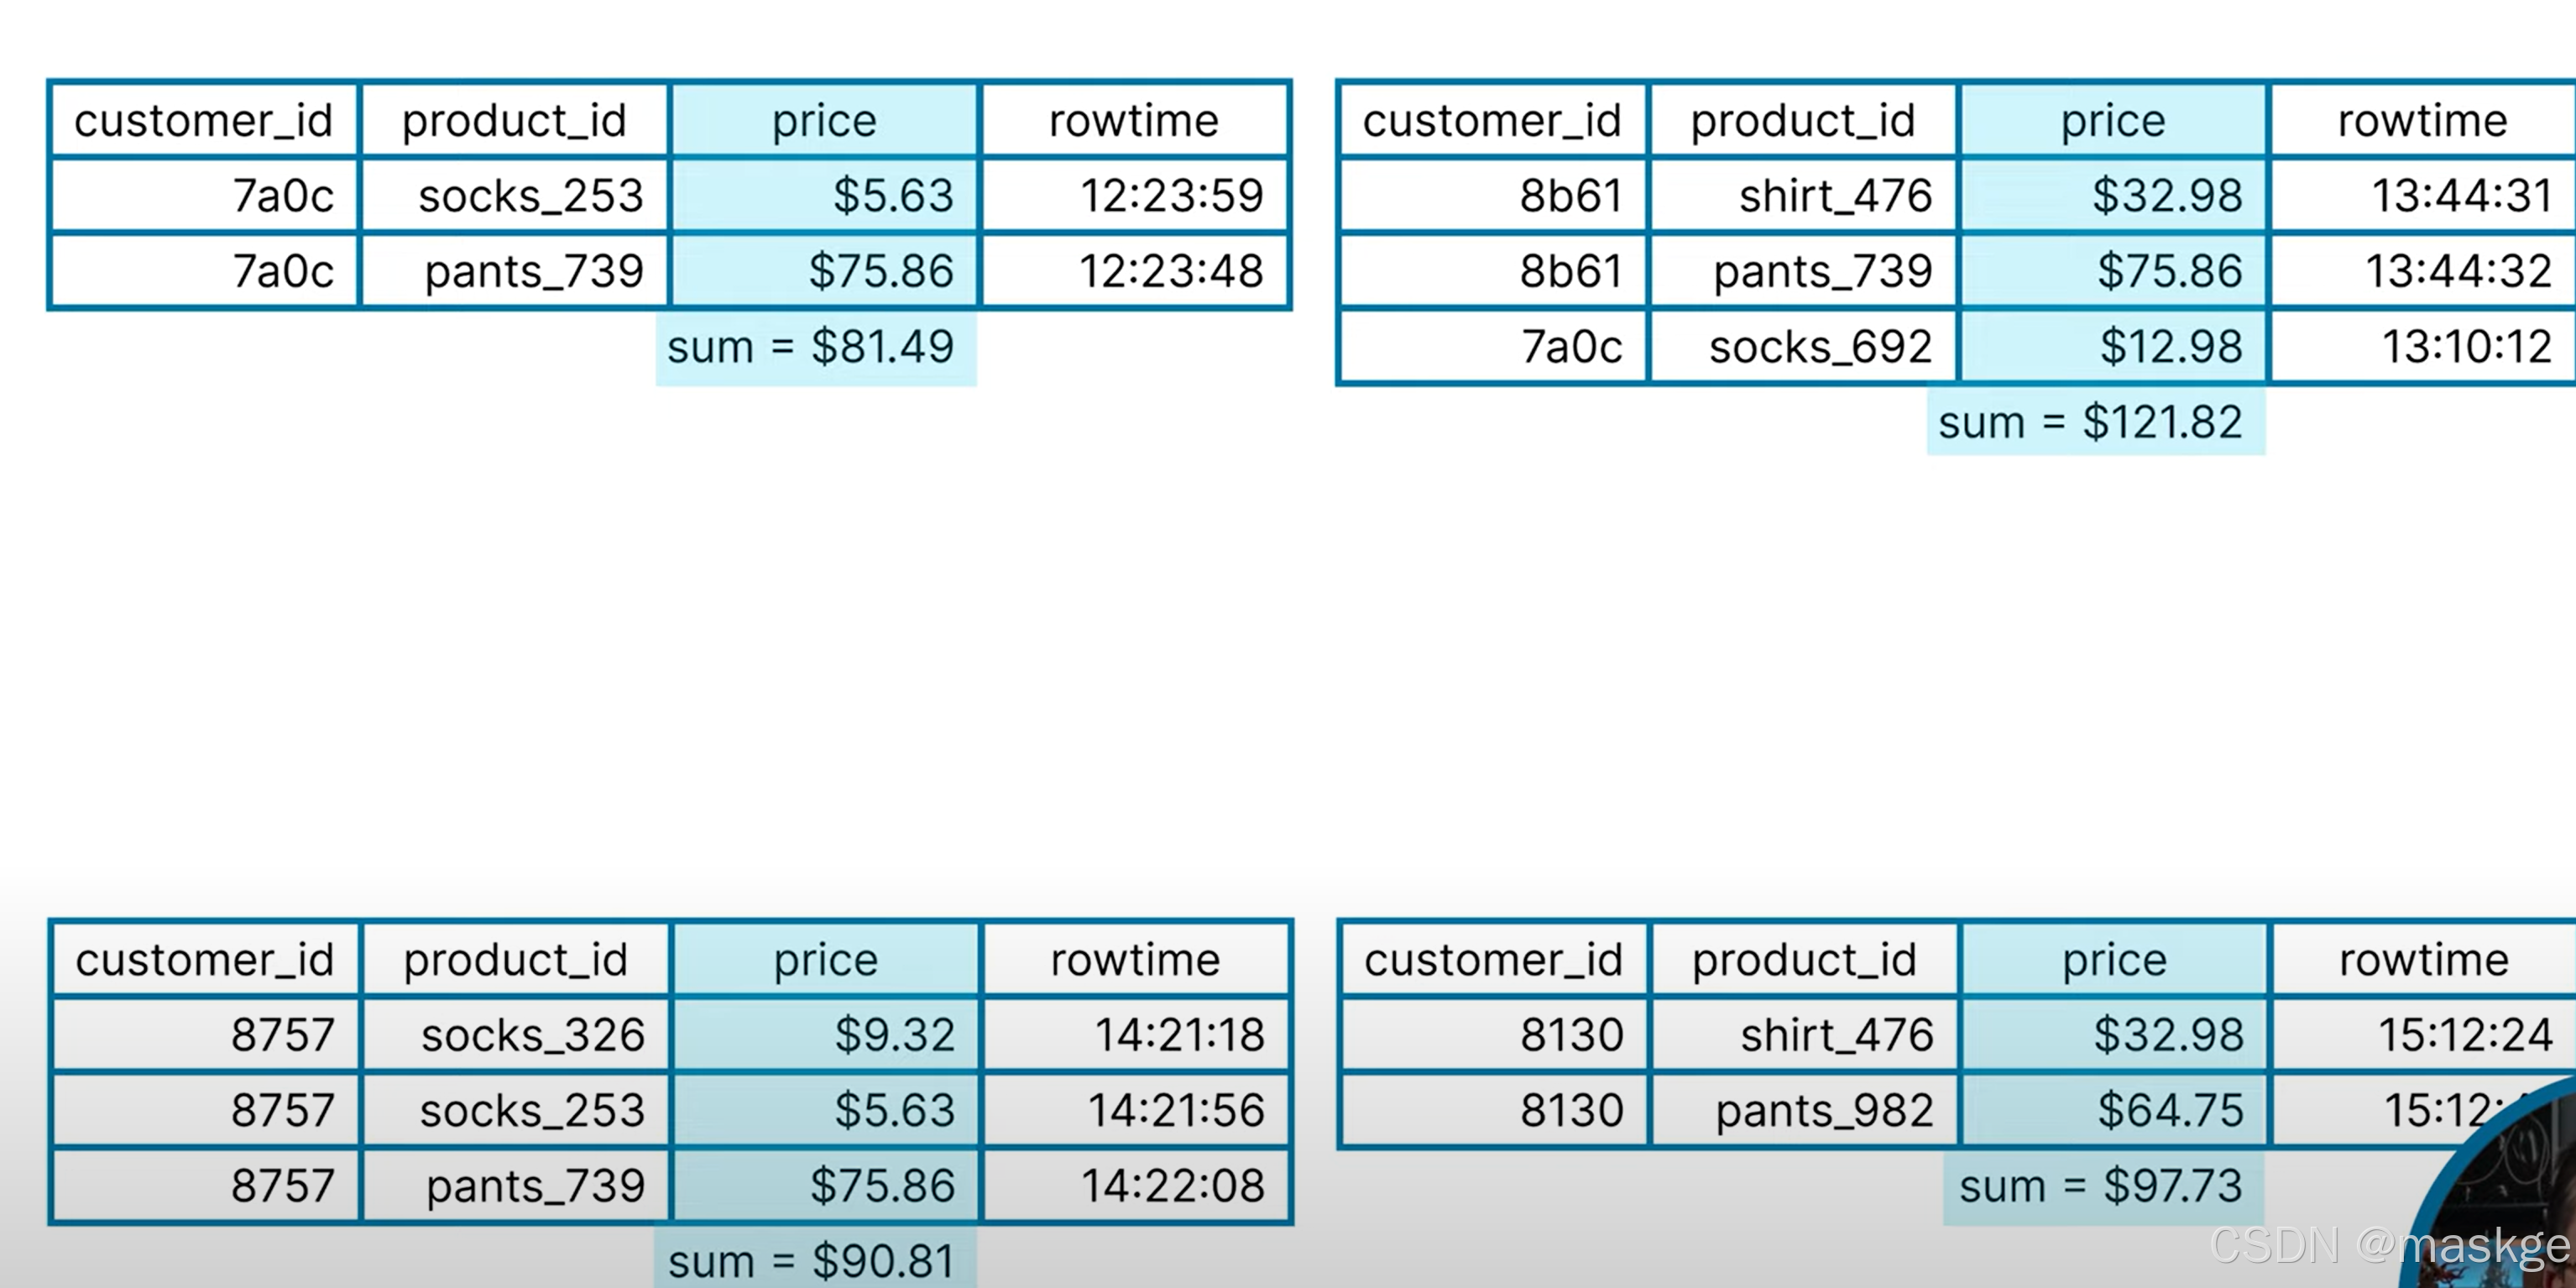
window API 允许flink对事件进行分组,基于时间窗口
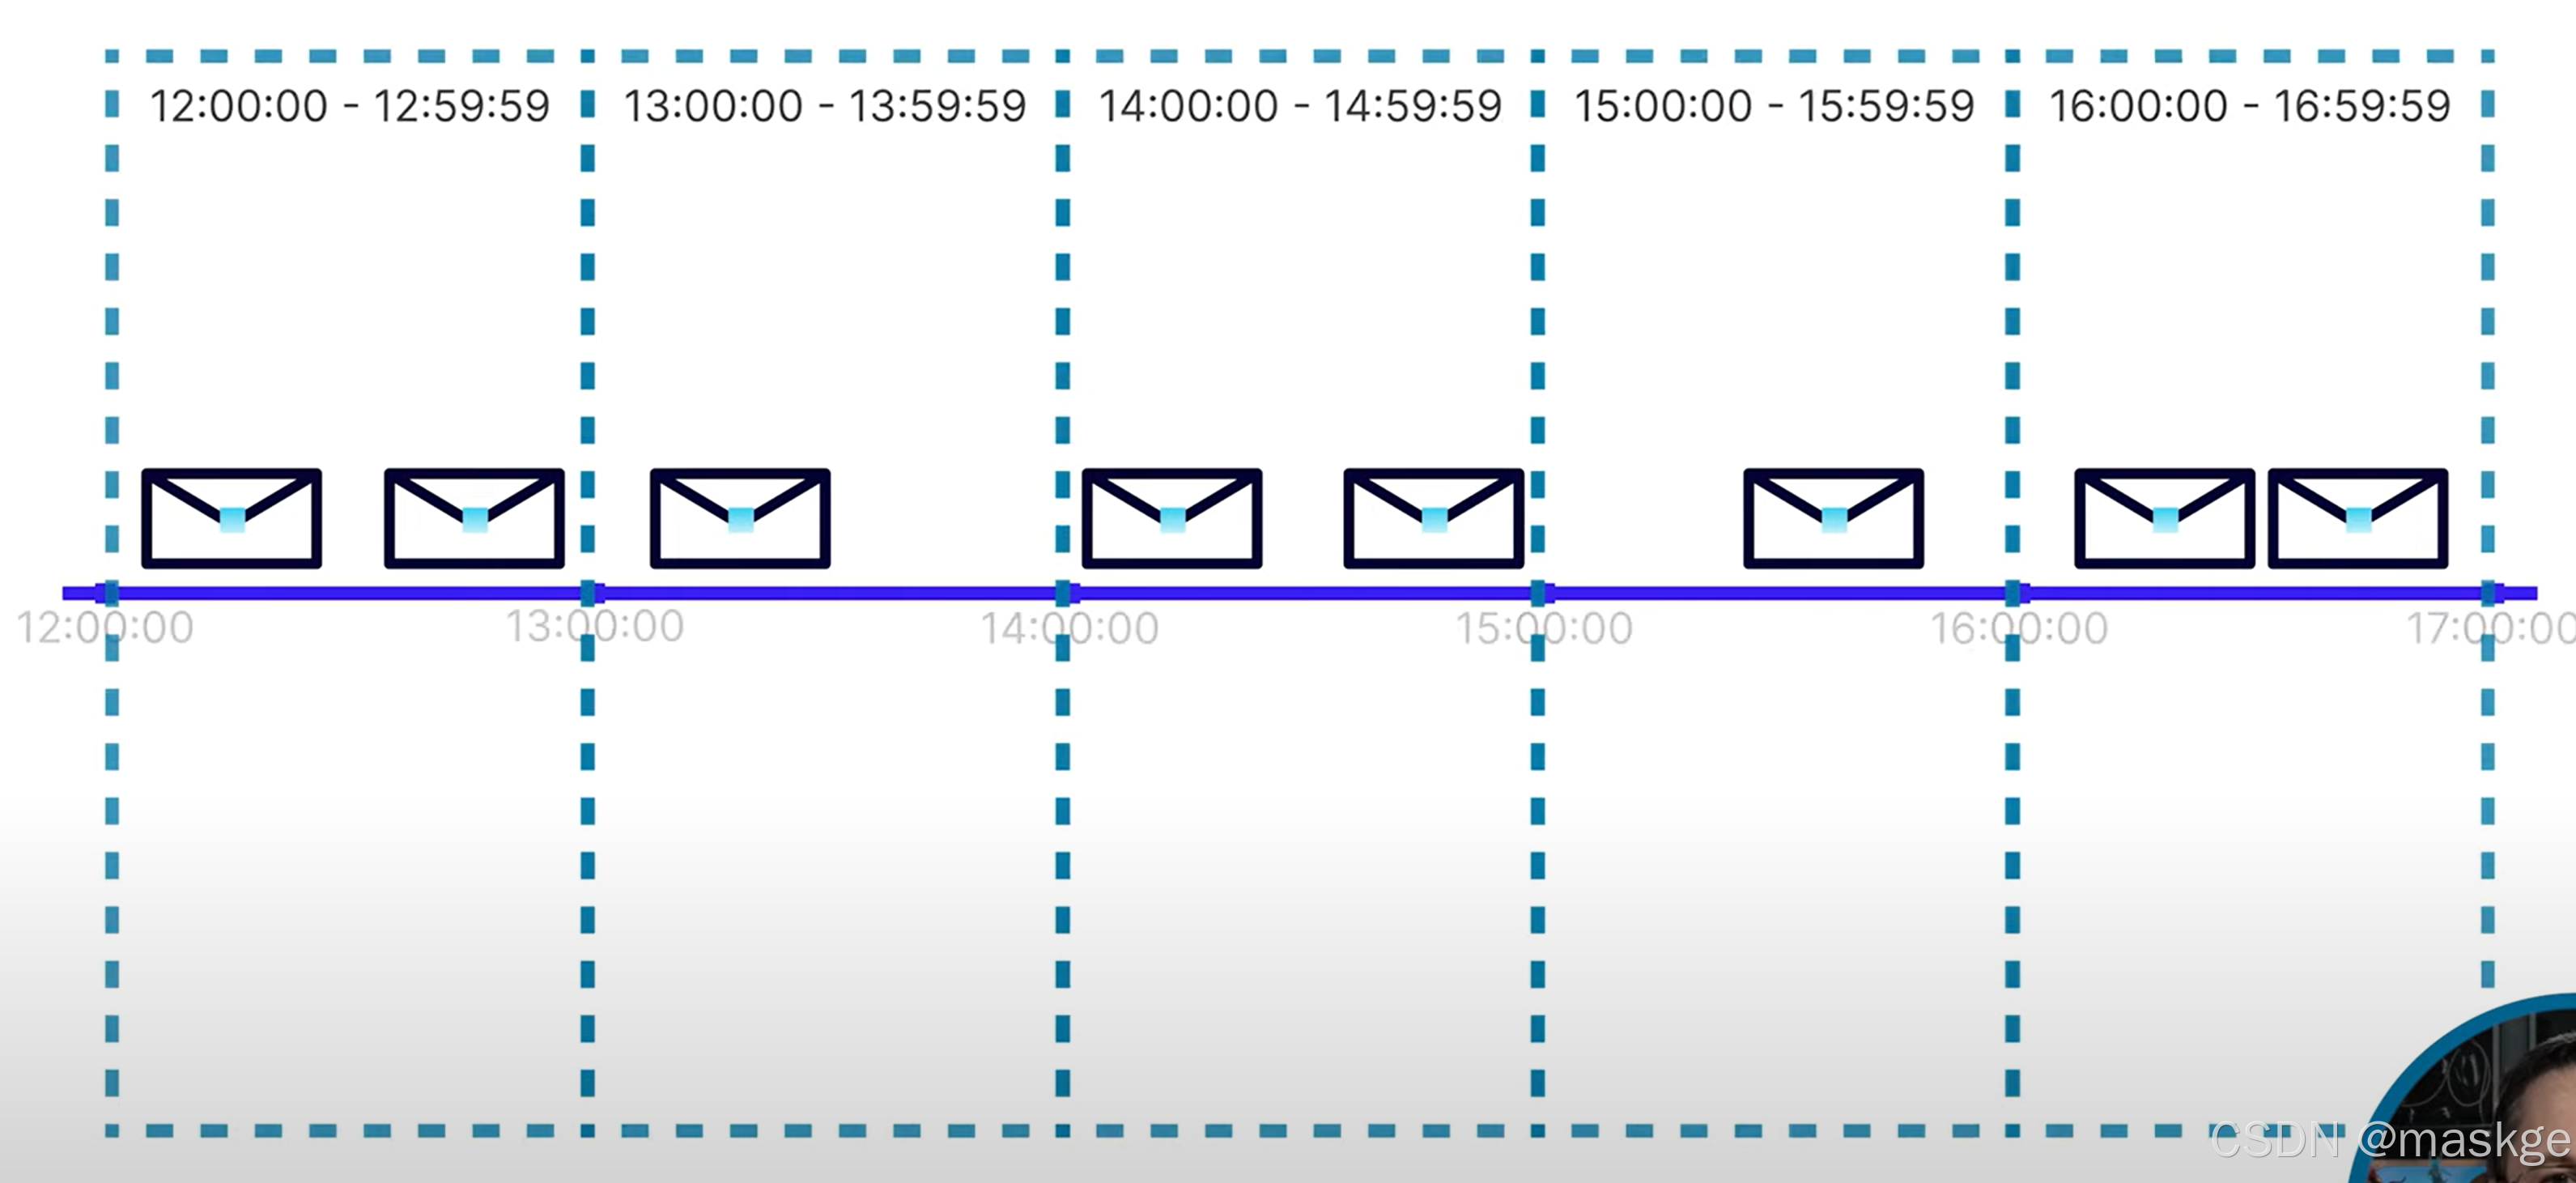
滚动窗口(tumbling windows): 窗口固定,无重叠

把上面的消息分隔成1个小时一个窗口;
滚动窗口代码如下:
package com.flink.wc;

import org.apache.flink.table.api.EnvironmentSettings;
import org.apache.flink.table.api.TableEnvironment;
import org.apache.flink.table.api.Tumble;

import static org.apache.flink.table.api.Expressions.$;
import static org.apache.flink.table.api.Expressions.lit;

public class FlinkTableApiWindowAggregate {
    public static void main(String[] args) {
        //1.创建设置
        EnvironmentSettings settings=EnvironmentSettings
                .newInstance()
                .inStreamingMode()
                .build();

        //2.创建table环境
        TableEnvironment env = TableEnvironment.create(settings);

        env.from("examples.marketpalce.orders")
                .window(
                        Tumble.over(
                                lit(1).hours()//设置一个滚动窗口持续时间为1小时
                        )
                                .on(
                                        $("$rowtime")//使用rowtime字段作为时间戳timestamp
                                ).as("window")//设置窗口名字为name
                )
                .groupBy(//对查询记录进行分组
                        $("customer_id"),
                        $("window")
                )
                .select(//查询计算窗口数据
                        $("customer_id"),
                        $("window").start().as("window_start"),
                        $("window").end().as("window_end"),
                        $("price").sum().as("total_spend")
                )
                .execute();


    }
}
fixed-size window(固定大小窗口)

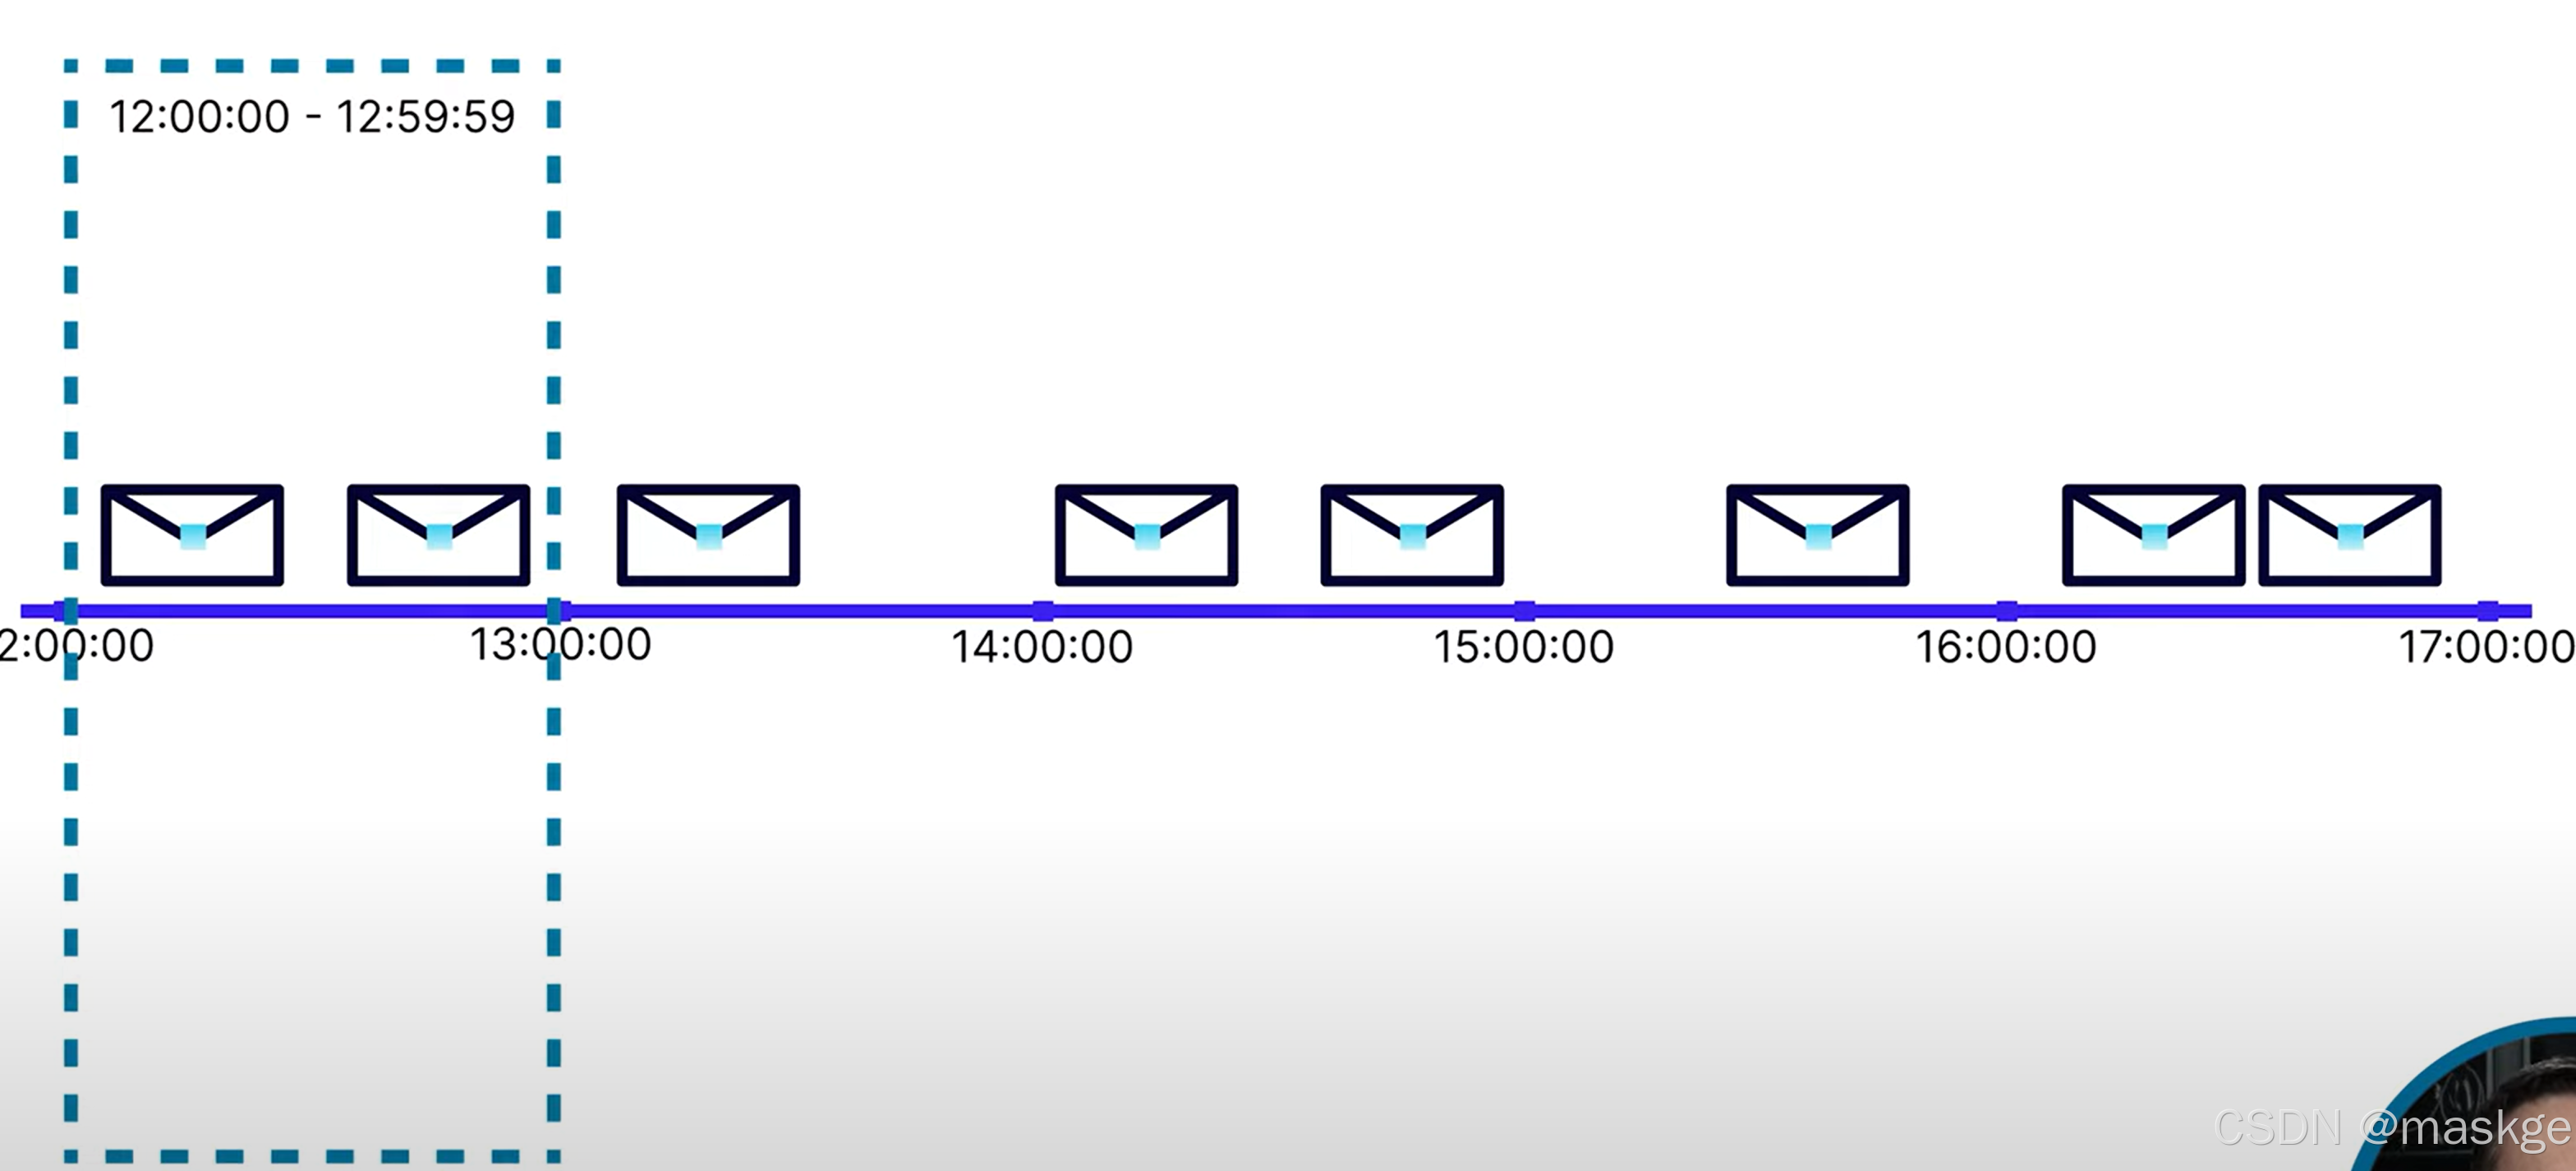
滑动窗口(sliding window):窗口与先前的窗口重叠;
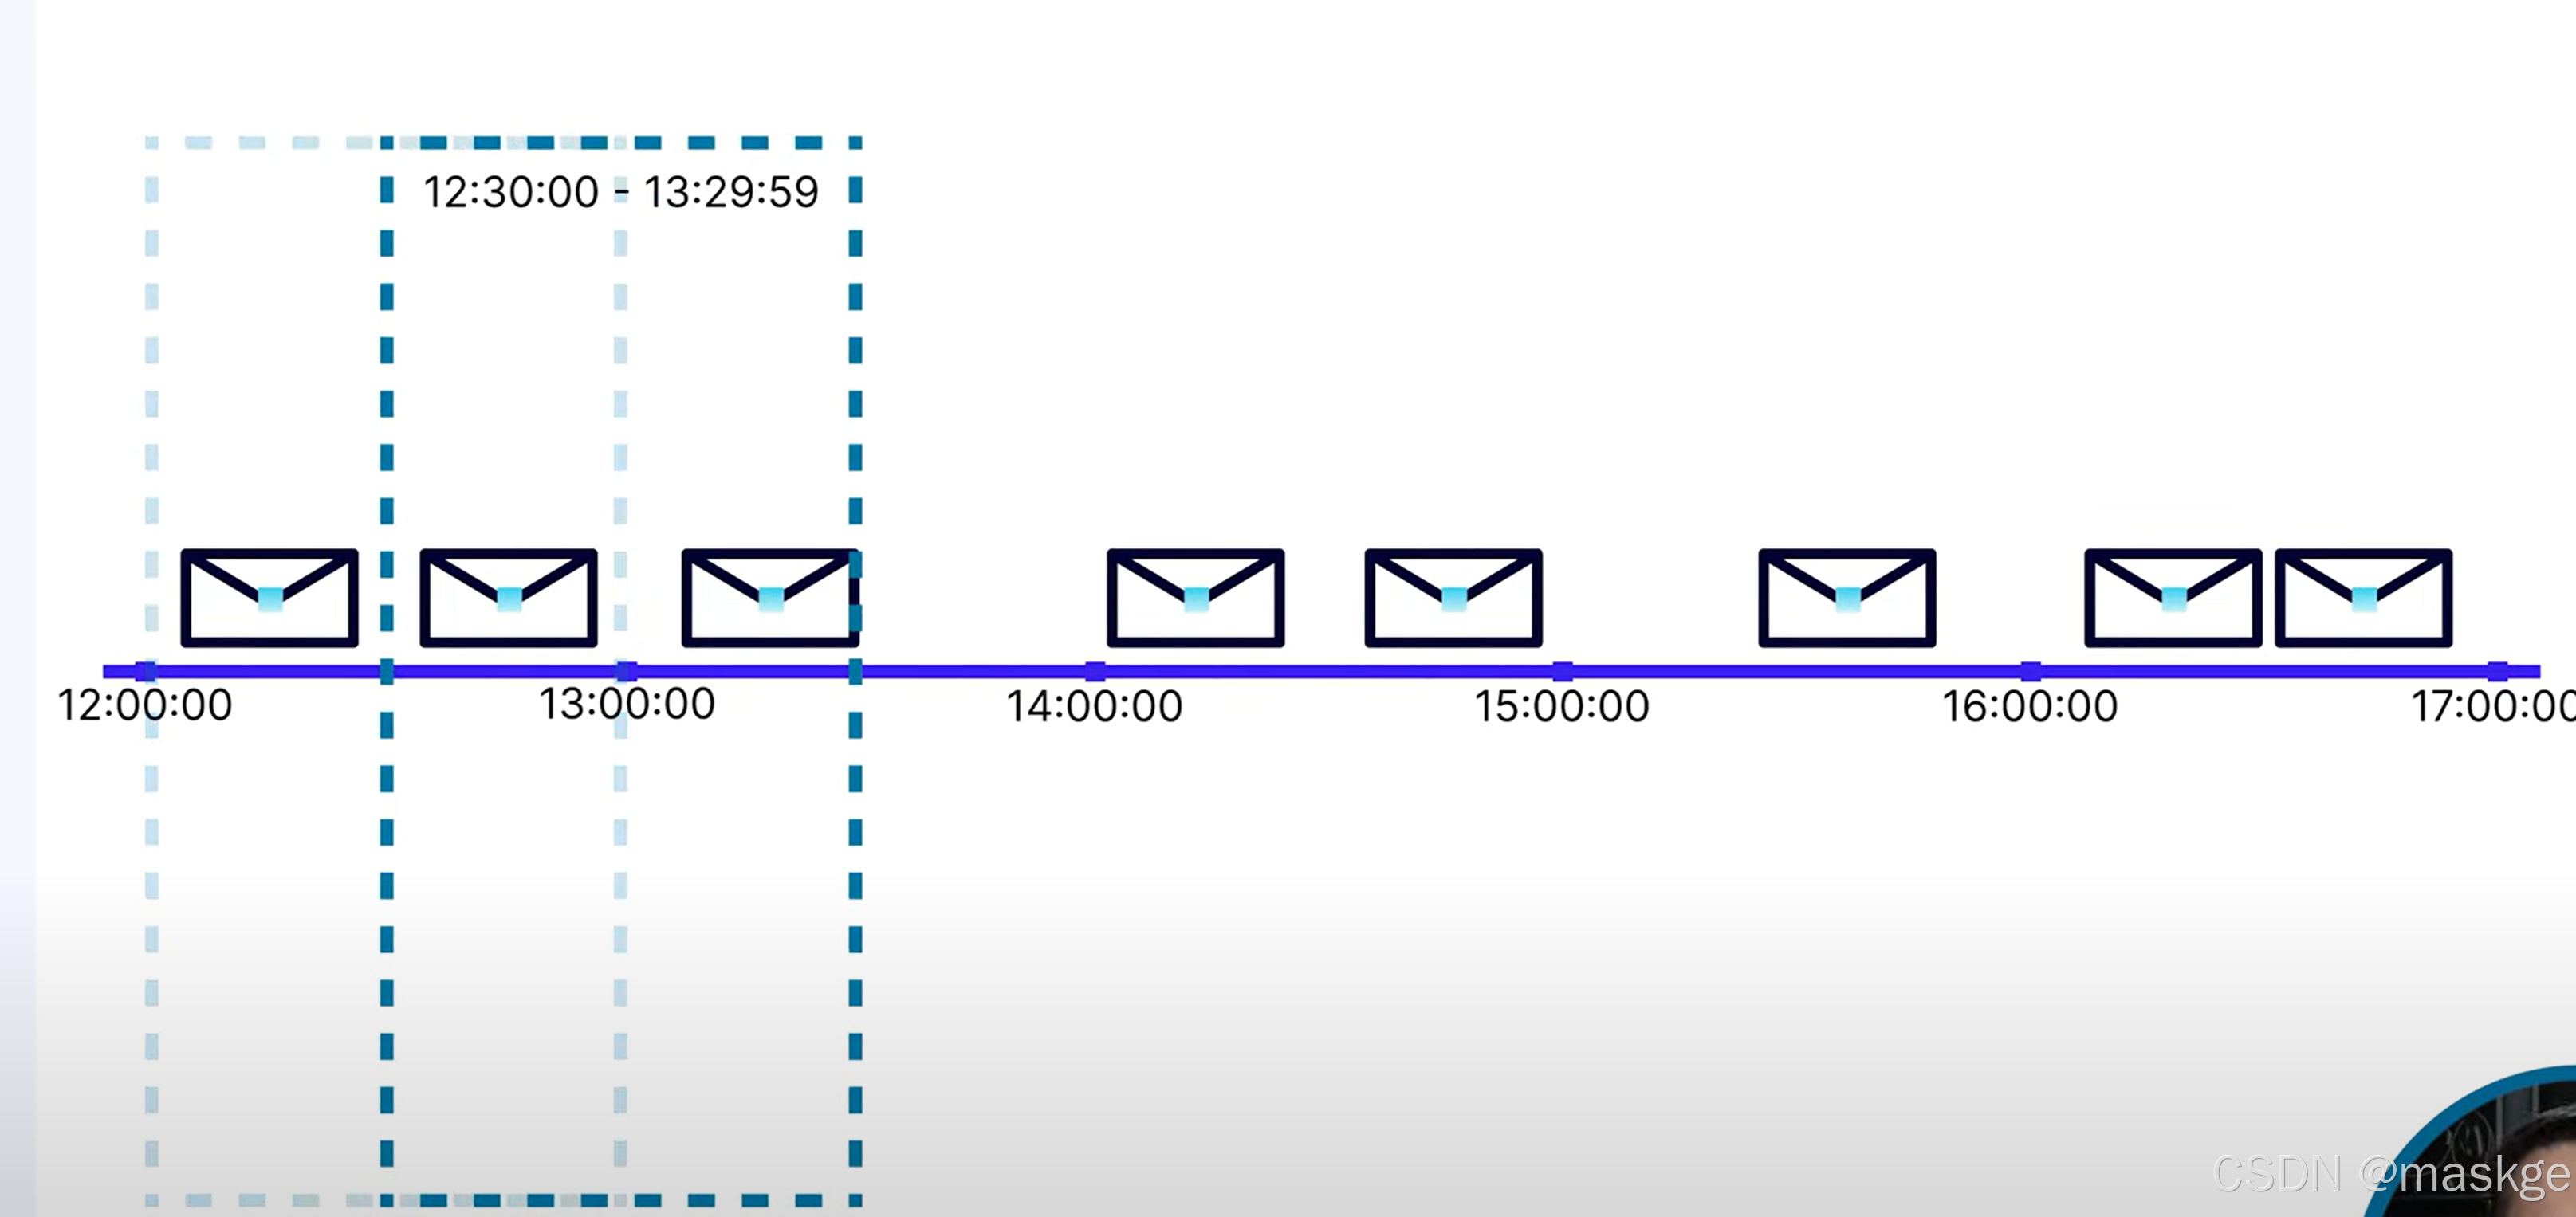
跳跃窗口(hopping window):
它是一种基于时间的窗口机制,用于将持续产生的流数据划分成多个有固定长度的时间段(窗口),并按固定的 “跳跃间隔”(hop interval)向前移动。
- 核心特点:窗口有固定的长度(window size)和固定的跳跃间隔。跳跃间隔通常小于窗口长度,因此相邻窗口之间会存在重叠部分。
例如:若窗口长度为 10 分钟,跳跃间隔为 5 分钟,那么第一个窗口覆盖 [0:00, 0:10),第二个窗口覆盖 [0:05, 0:15),以此类推,两个窗口重叠 5 分钟。 - 与其他窗口的区别:
- 滚动窗口(tumbling window):跳跃间隔等于窗口长度,无重叠;
- 滑动窗口(sliding window):逻辑上与跳跃窗口类似,有时可视为 “跳跃窗口” 的另一种表述(取决于具体语境),强调窗口随时间滑动的特性。
跳跃窗口常用于需要高频次统计一段连续时间数据的场景,例如 “每 5 分钟计算过去 10 分钟的订单总量”。
滑动窗口代码:
package com.flink.wc;

import org.apache.flink.table.api.EnvironmentSettings;
import org.apache.flink.table.api.Slide;
import org.apache.flink.table.api.TableEnvironment;

import static org.apache.flink.table.api.Expressions.$;
import static org.apache.flink.table.api.Expressions.lit;

/**
 * 滑动窗口代码
 */
public class FlinkTableApiWindowAggregate2 {
    public static void main(String[] args) {
        //1.创建设置
        EnvironmentSettings settings=EnvironmentSettings
                .newInstance()
                .inStreamingMode()
                .build();

        //2.创建table环境
        TableEnvironment env = TableEnvironment.create(settings);

        env.from("examples.marketpalce.orders")
                .window(
                        Slide.over(
                                lit(1).hours()//设置一个滑动窗口持续时间为1小时
                        ).every(
                                lit(30).minutes()//设置每30分钟计算一个结果
                                )
                                .on(
                                        $("$rowtime")//使用rowtime字段作为时间戳timestamp
                                ).as("window")//设置窗口名字为name
                )
                .groupBy(//对查询记录进行分组
                        $("customer_id"),
                        $("window")
                )
                .select(//查询计算窗口数据
                        $("customer_id"),
                        $("window").start().as("window_start"),
                        $("window").end().as("window_end"),
                        $("price").sum().as("total_spend")
                )
                .execute();


    }
}
12.flink 多表连接(joining flink tables)
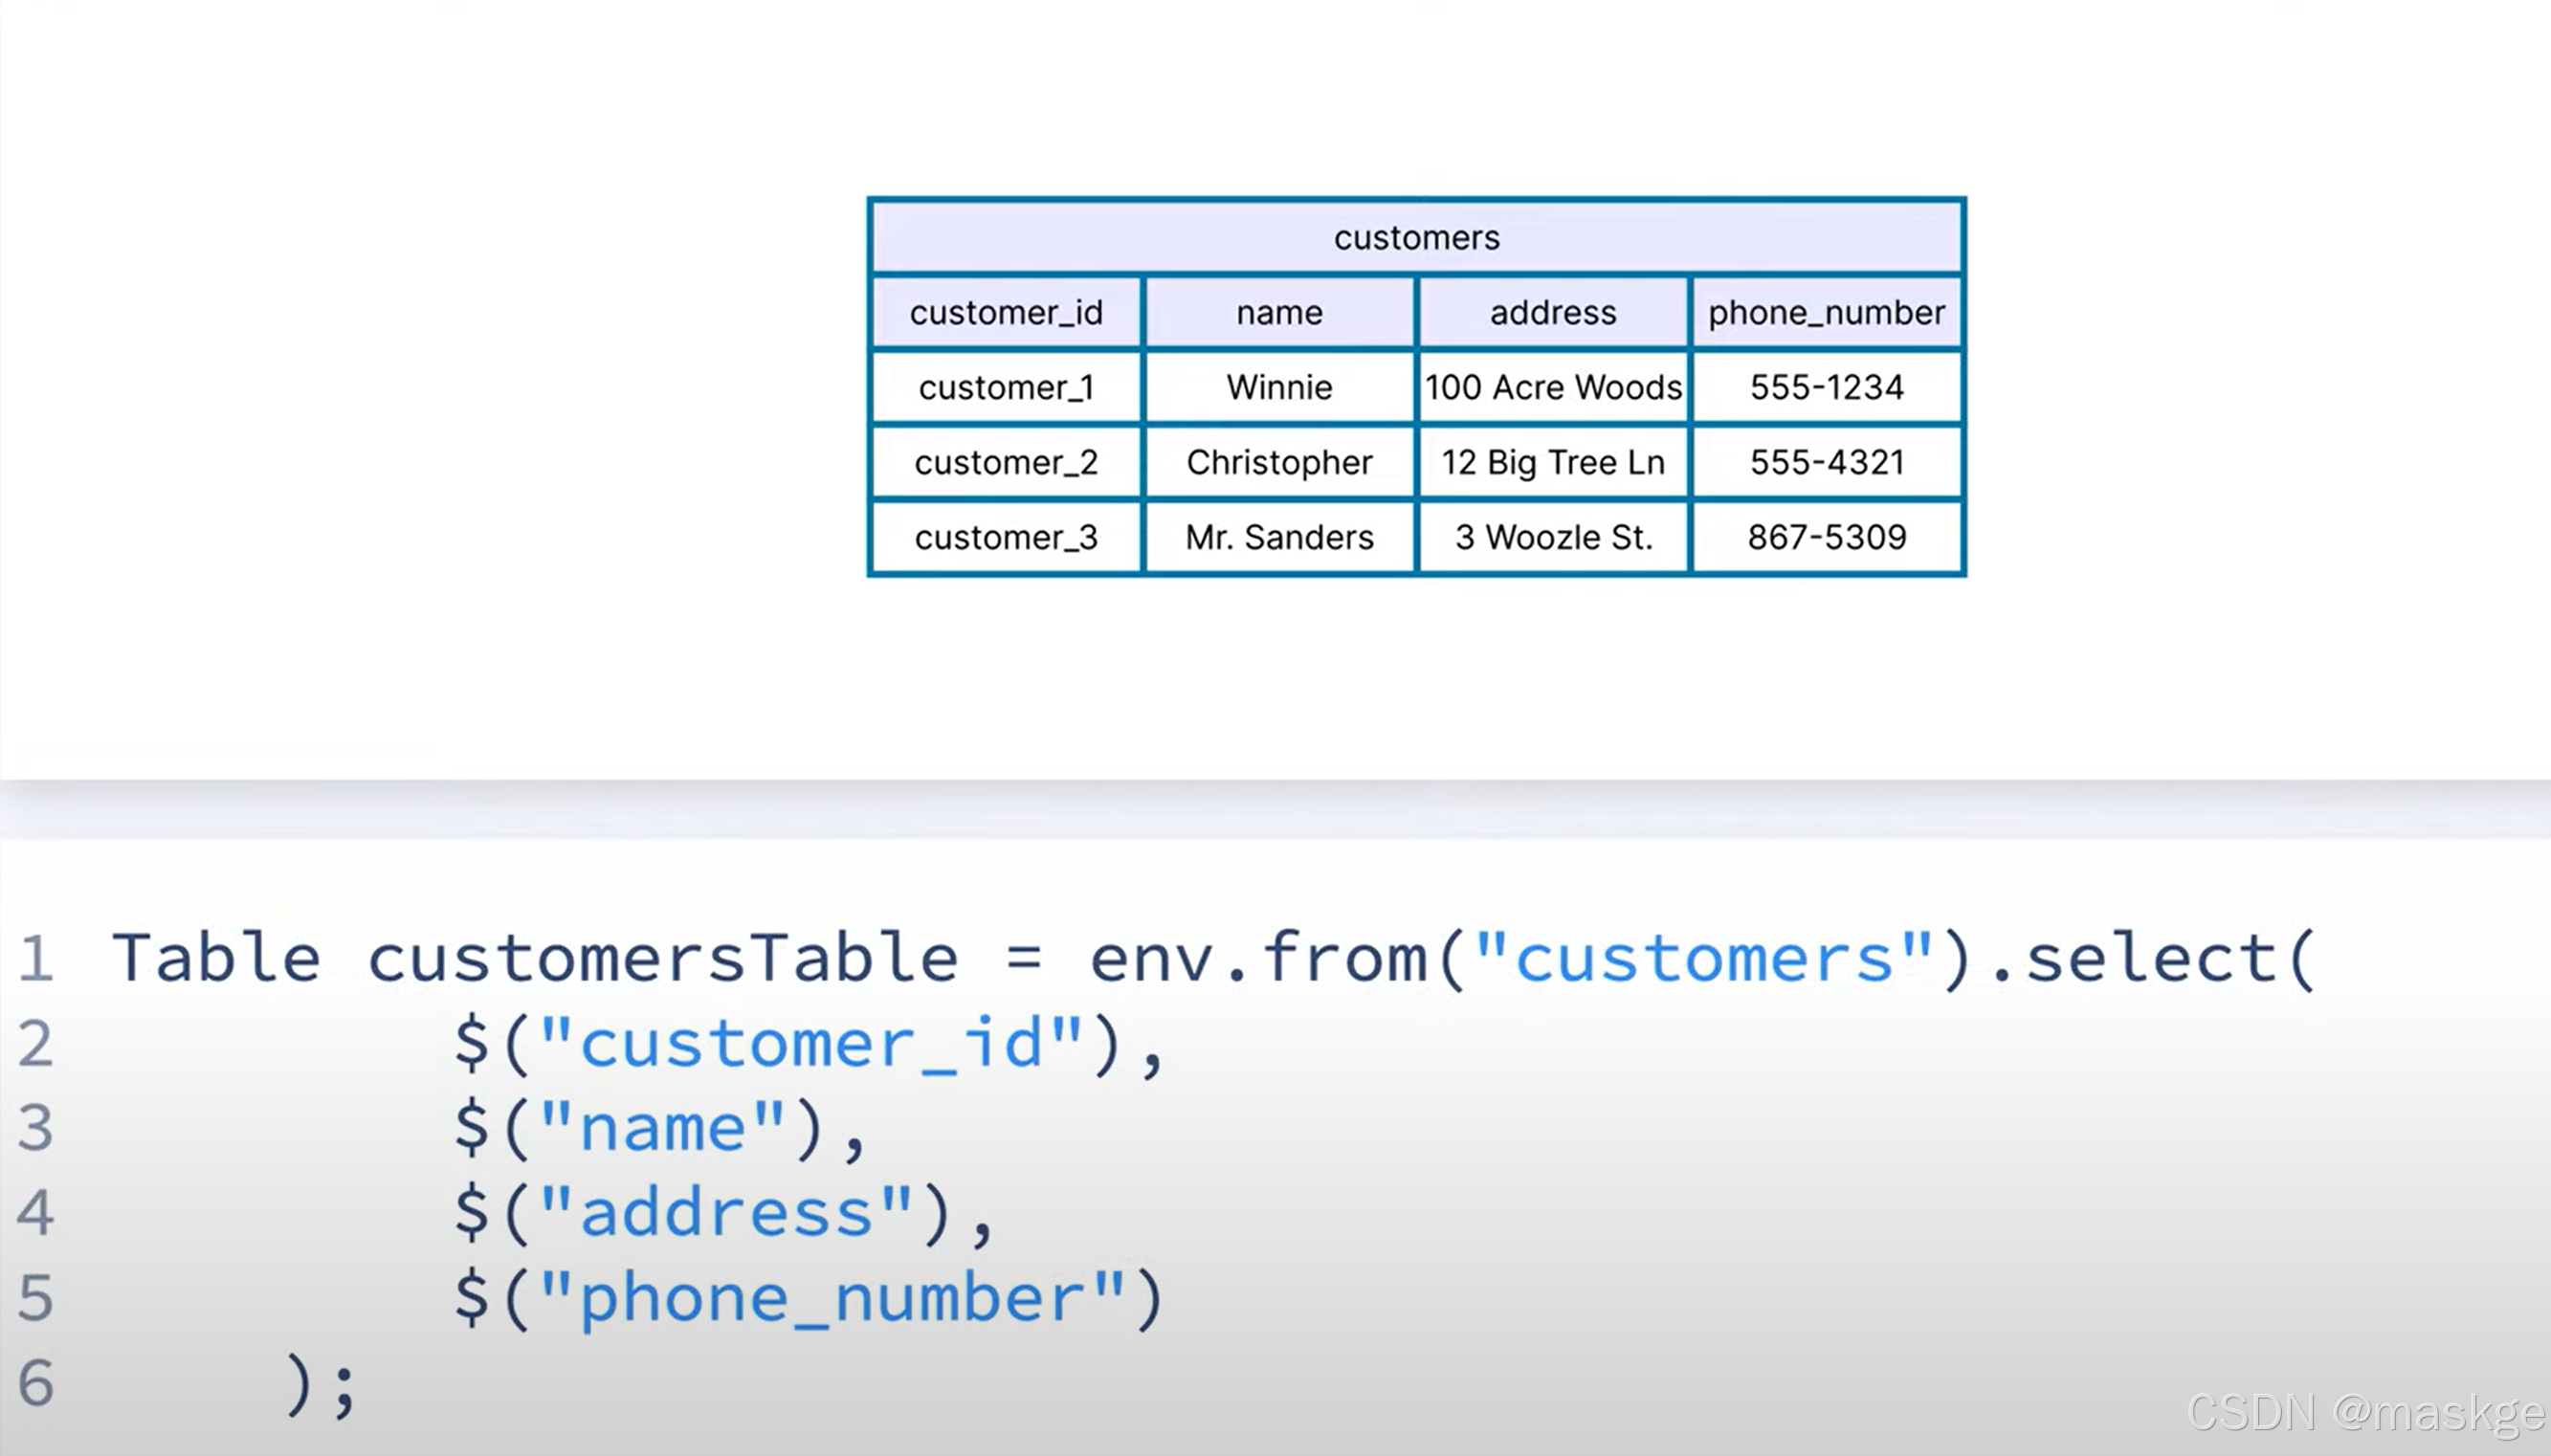
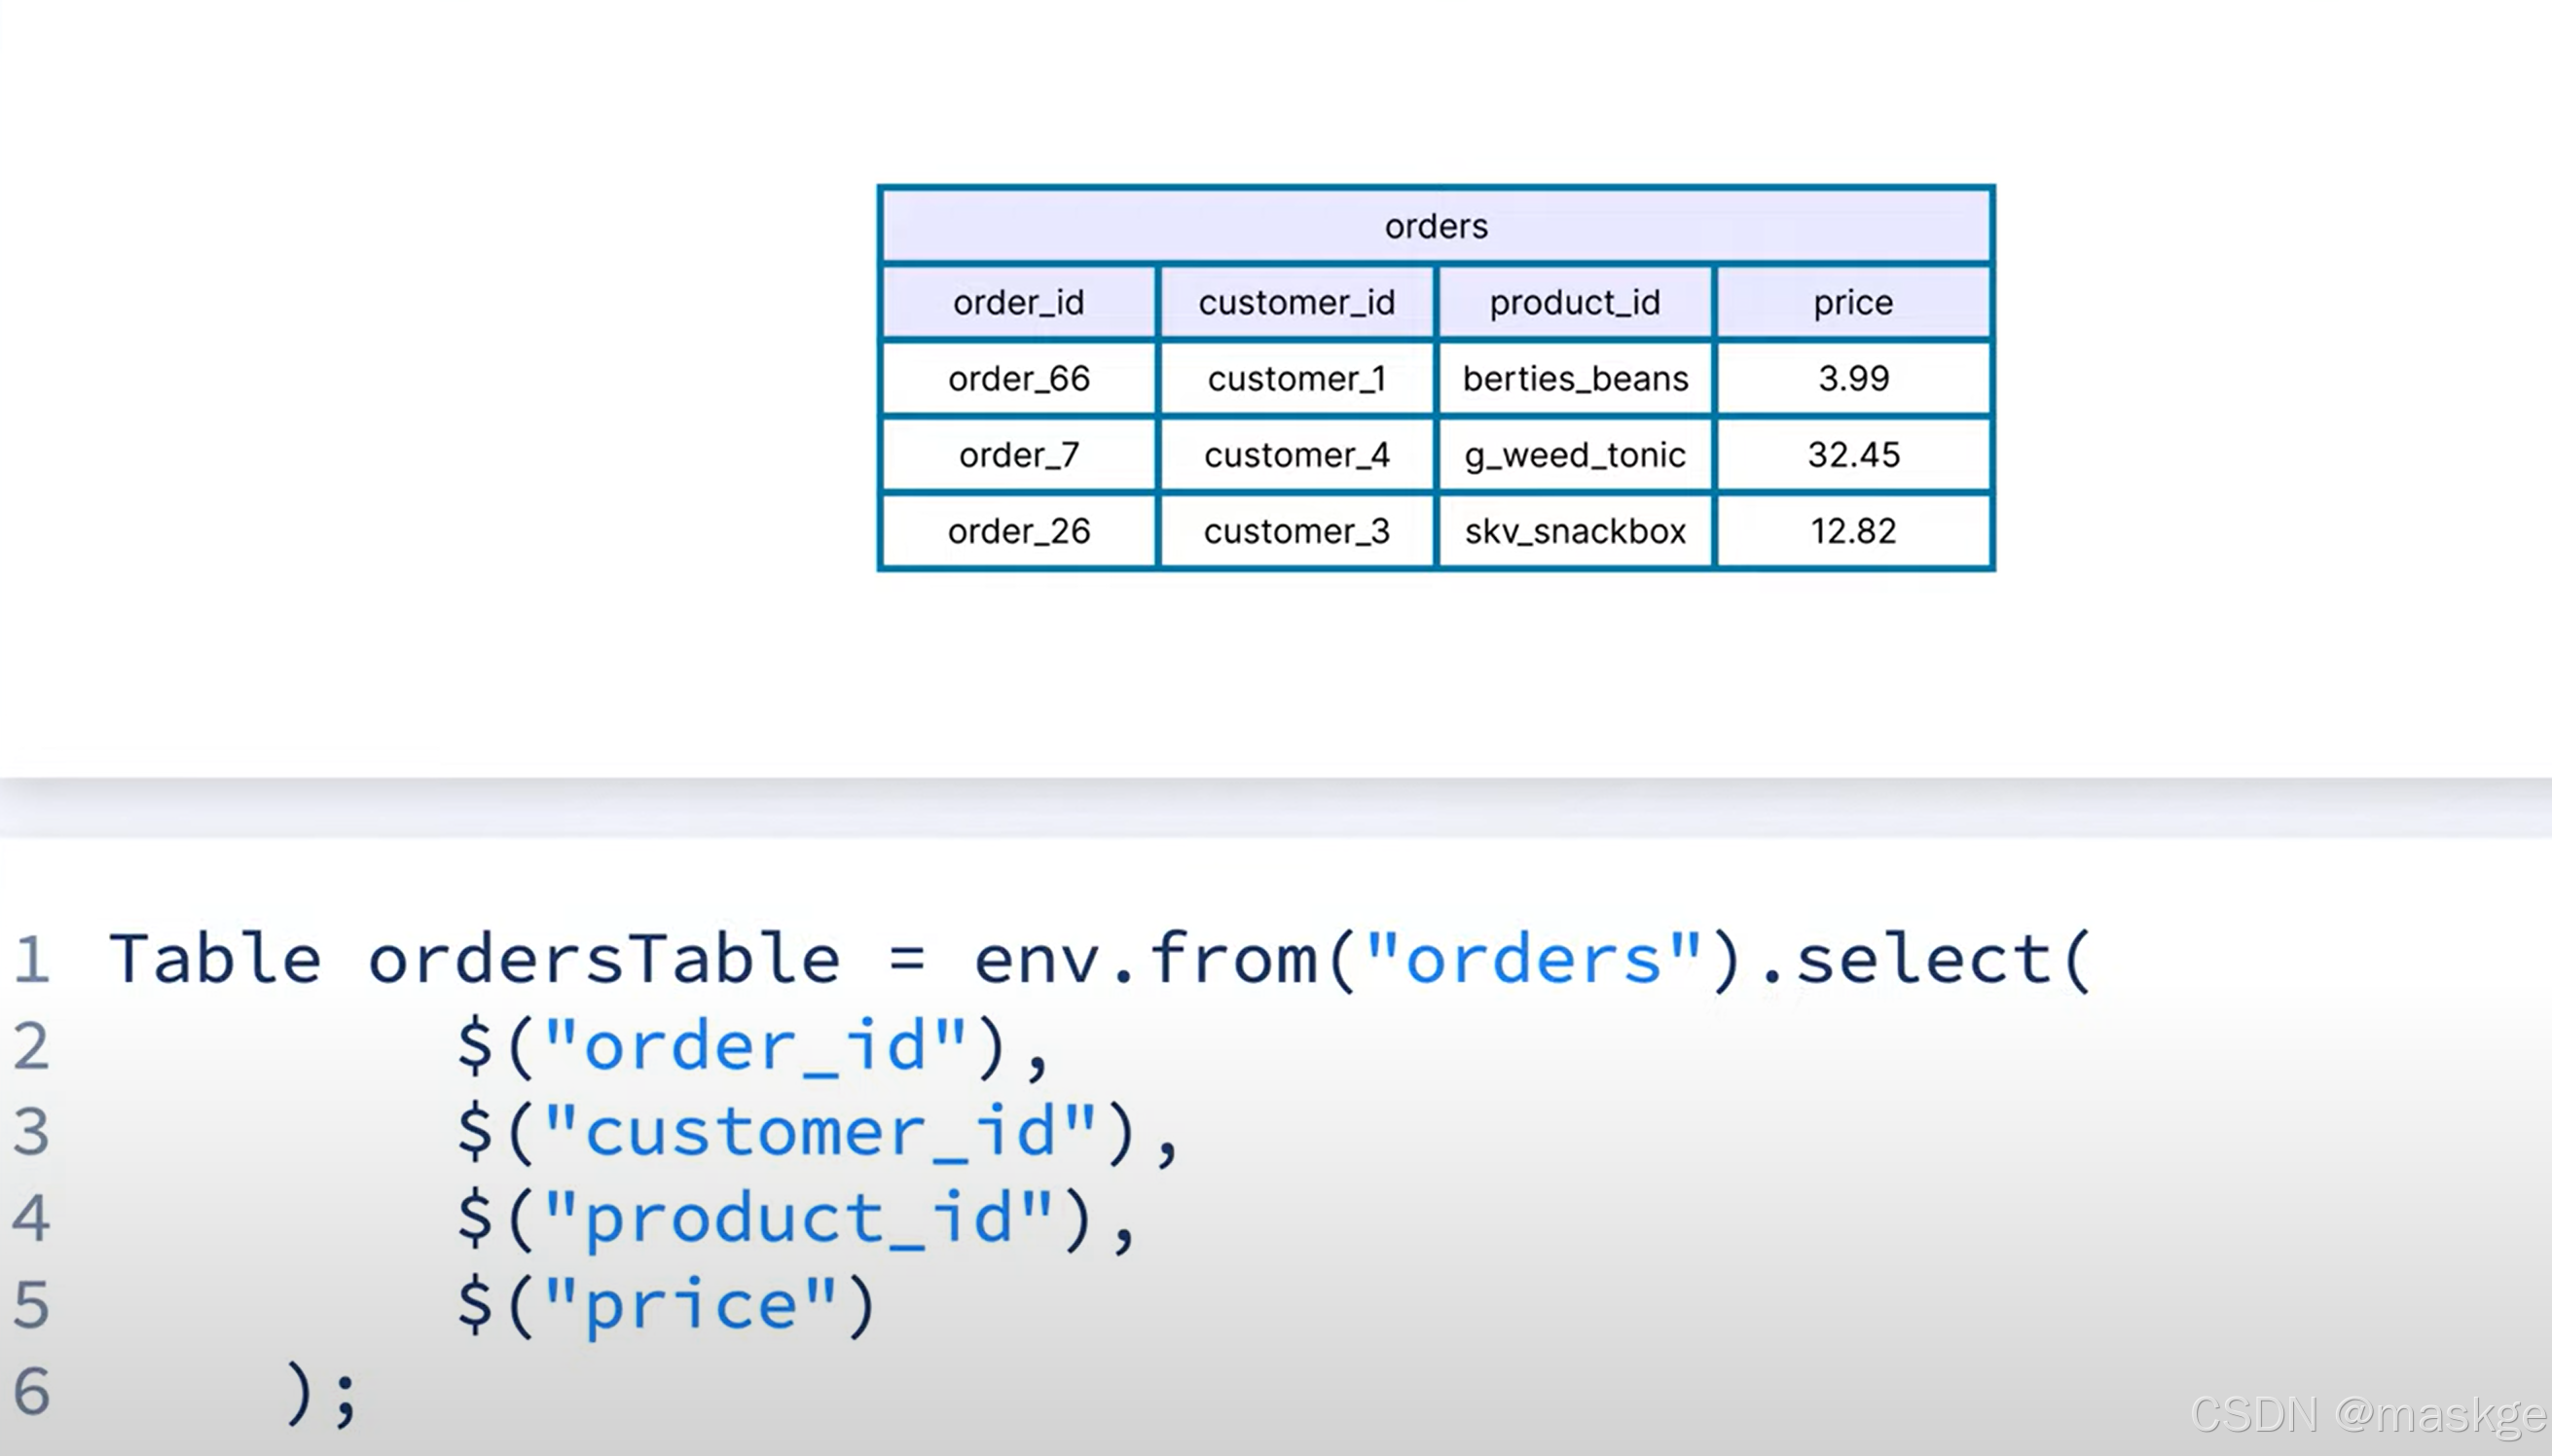
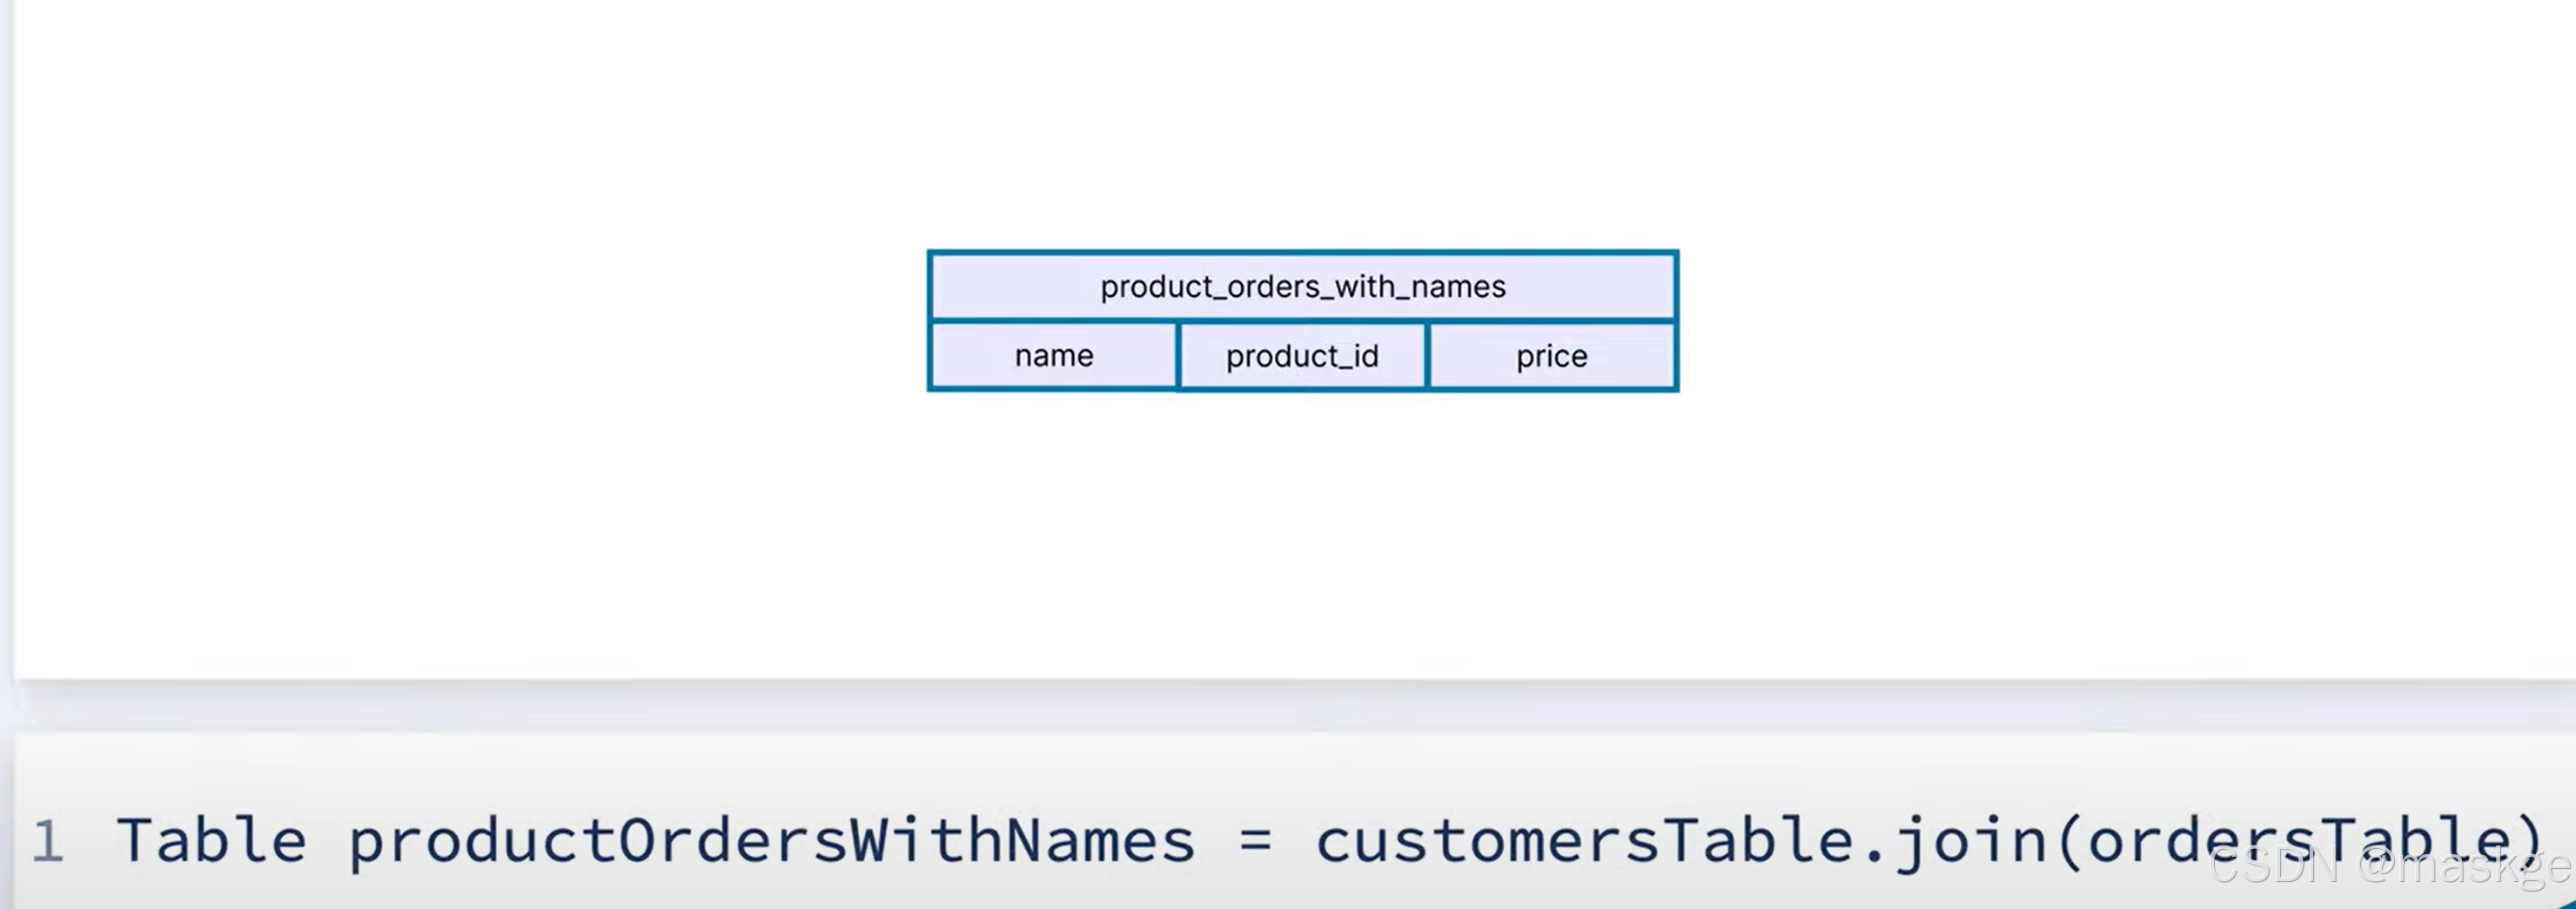
内连接(inner join)
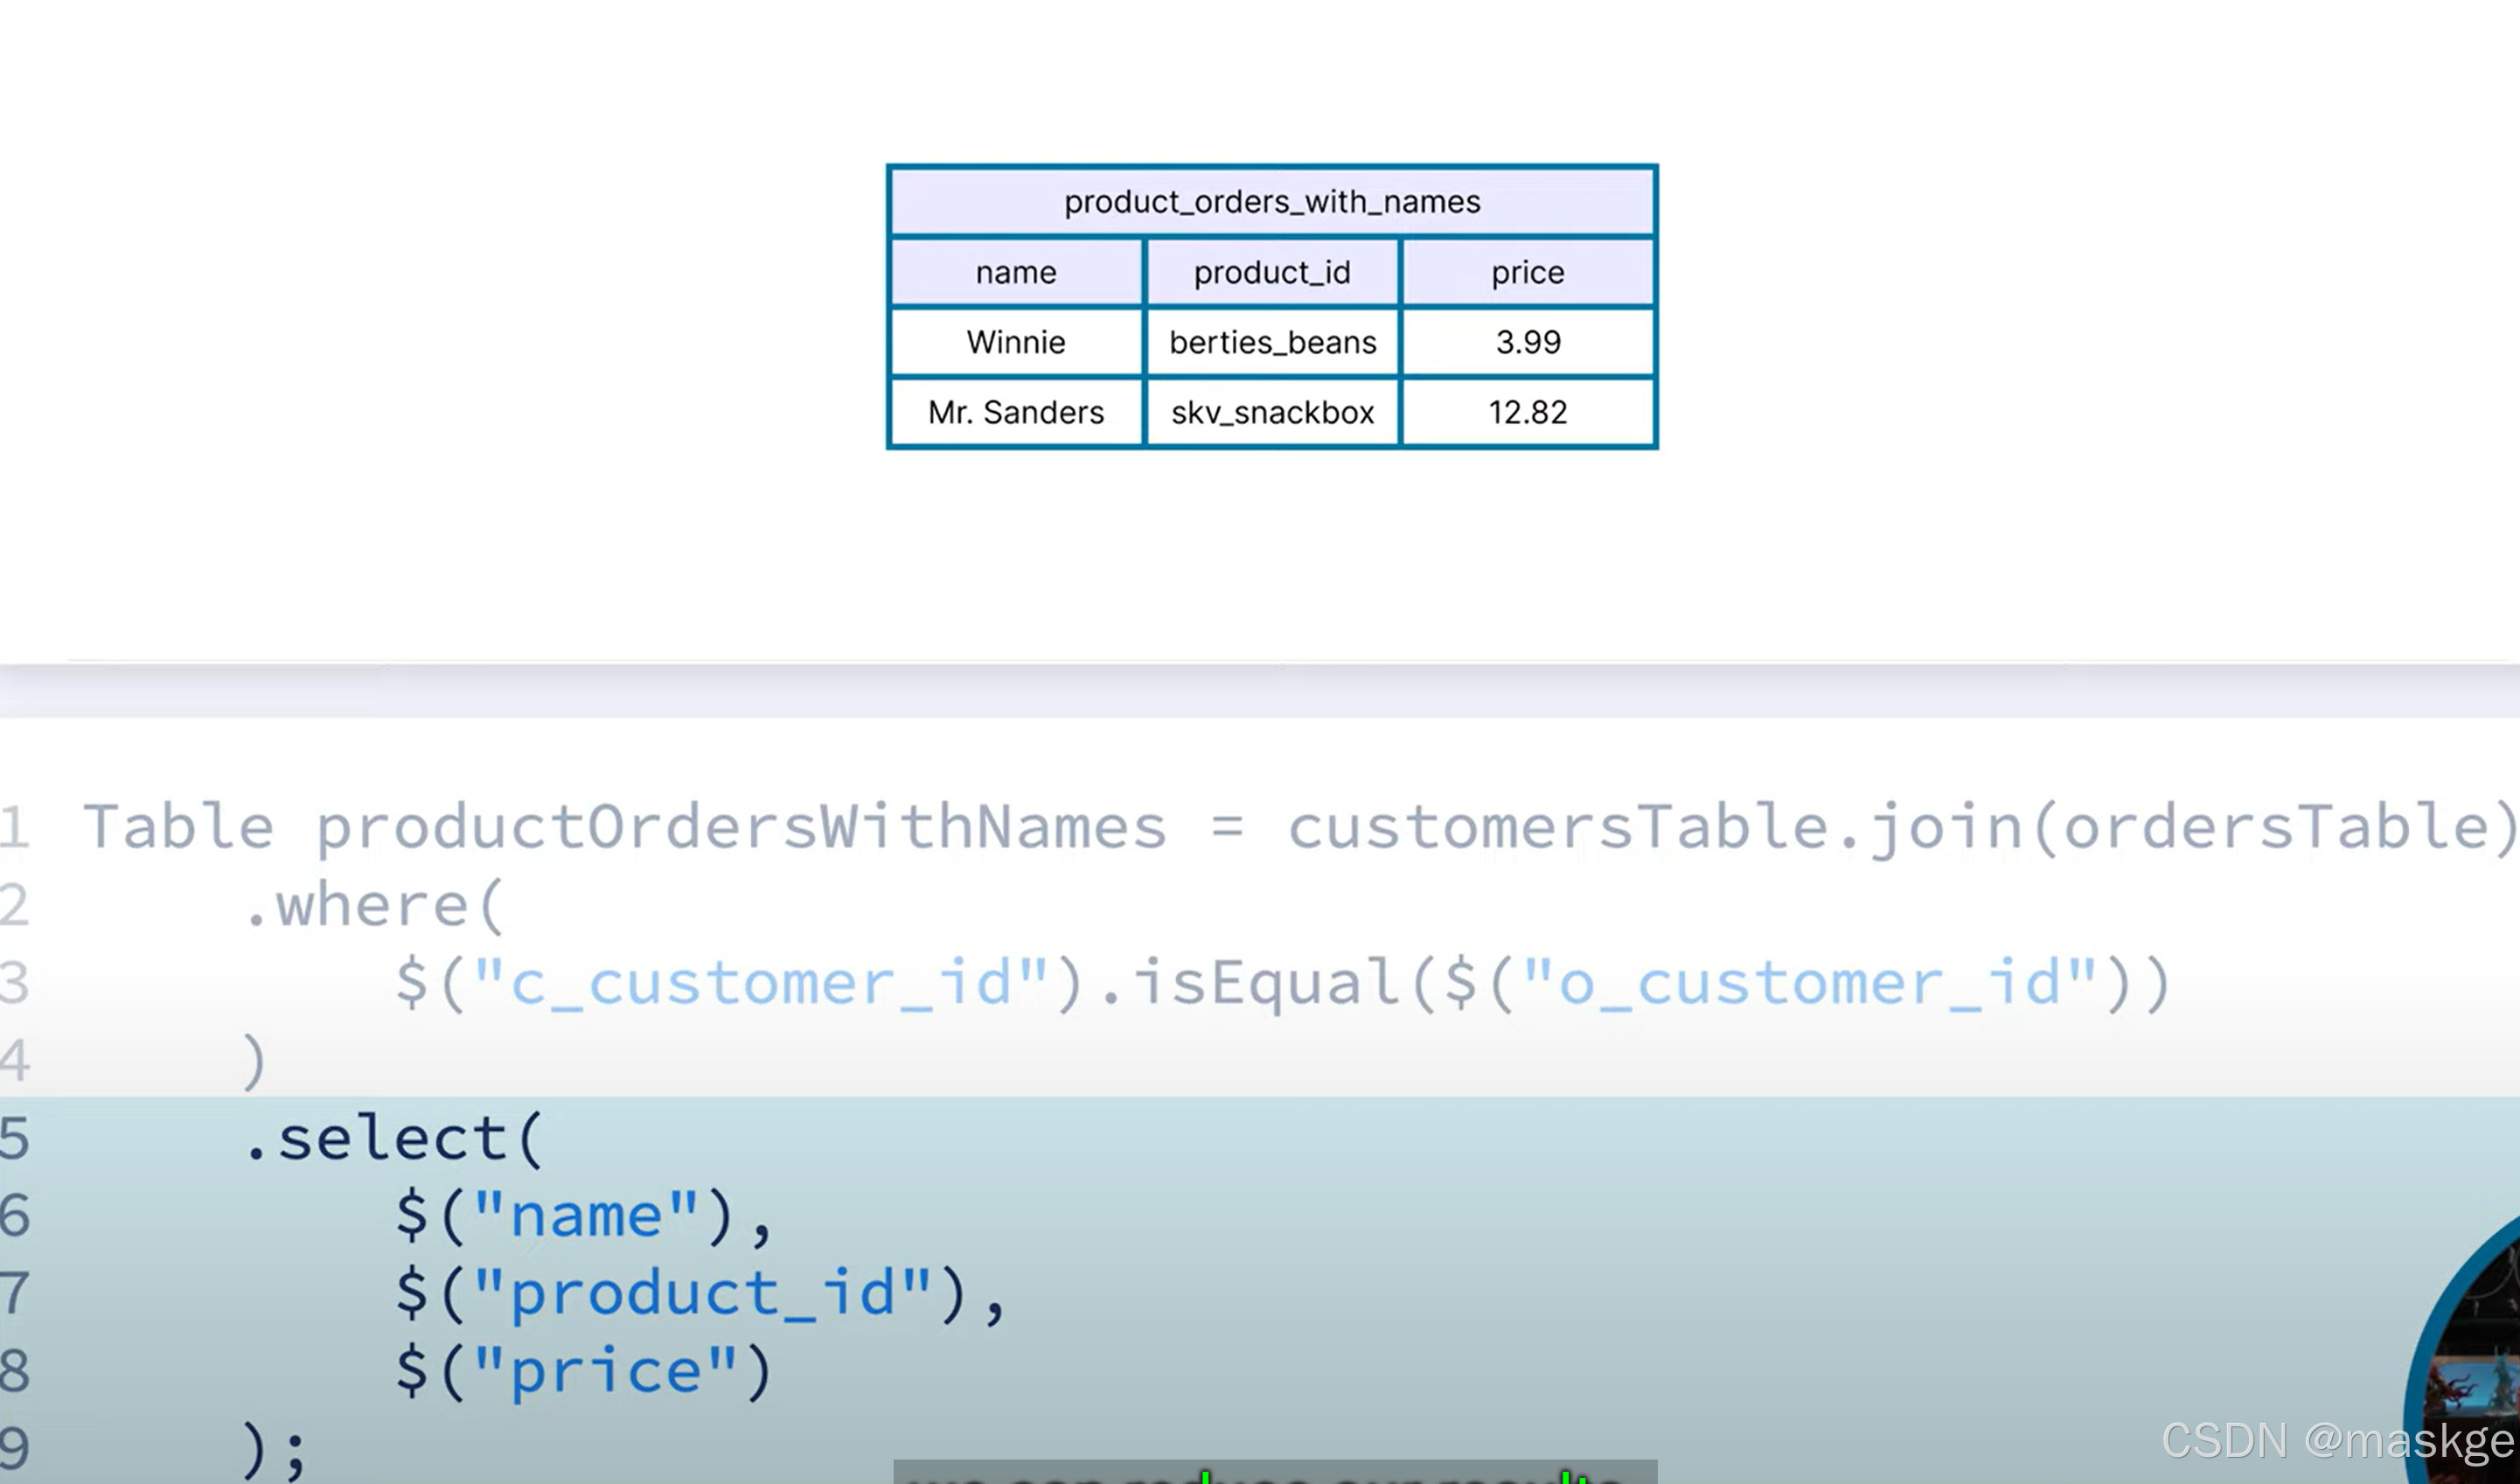
左连接&全连接
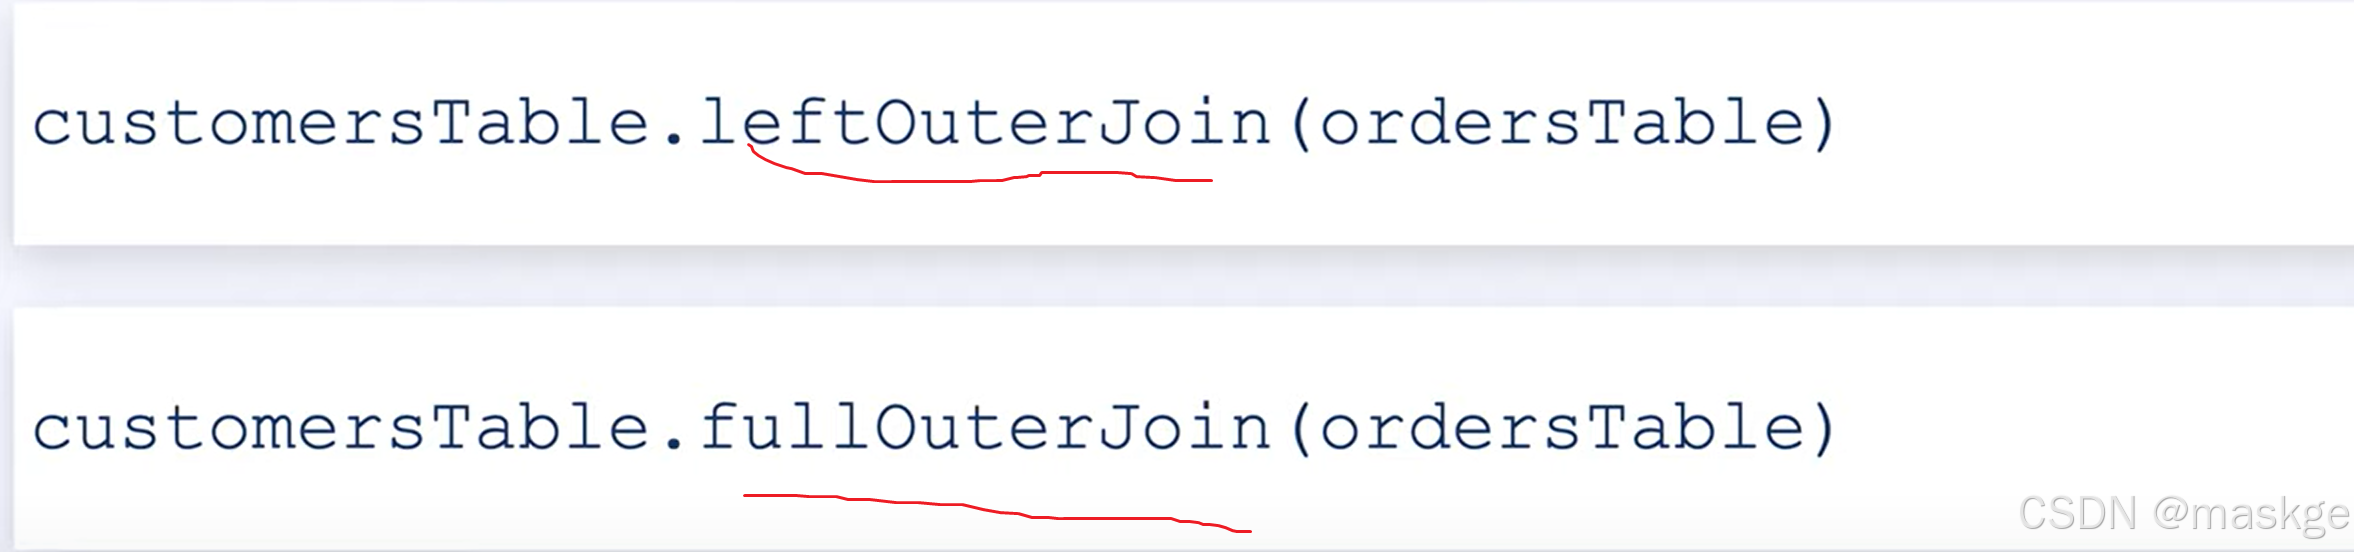

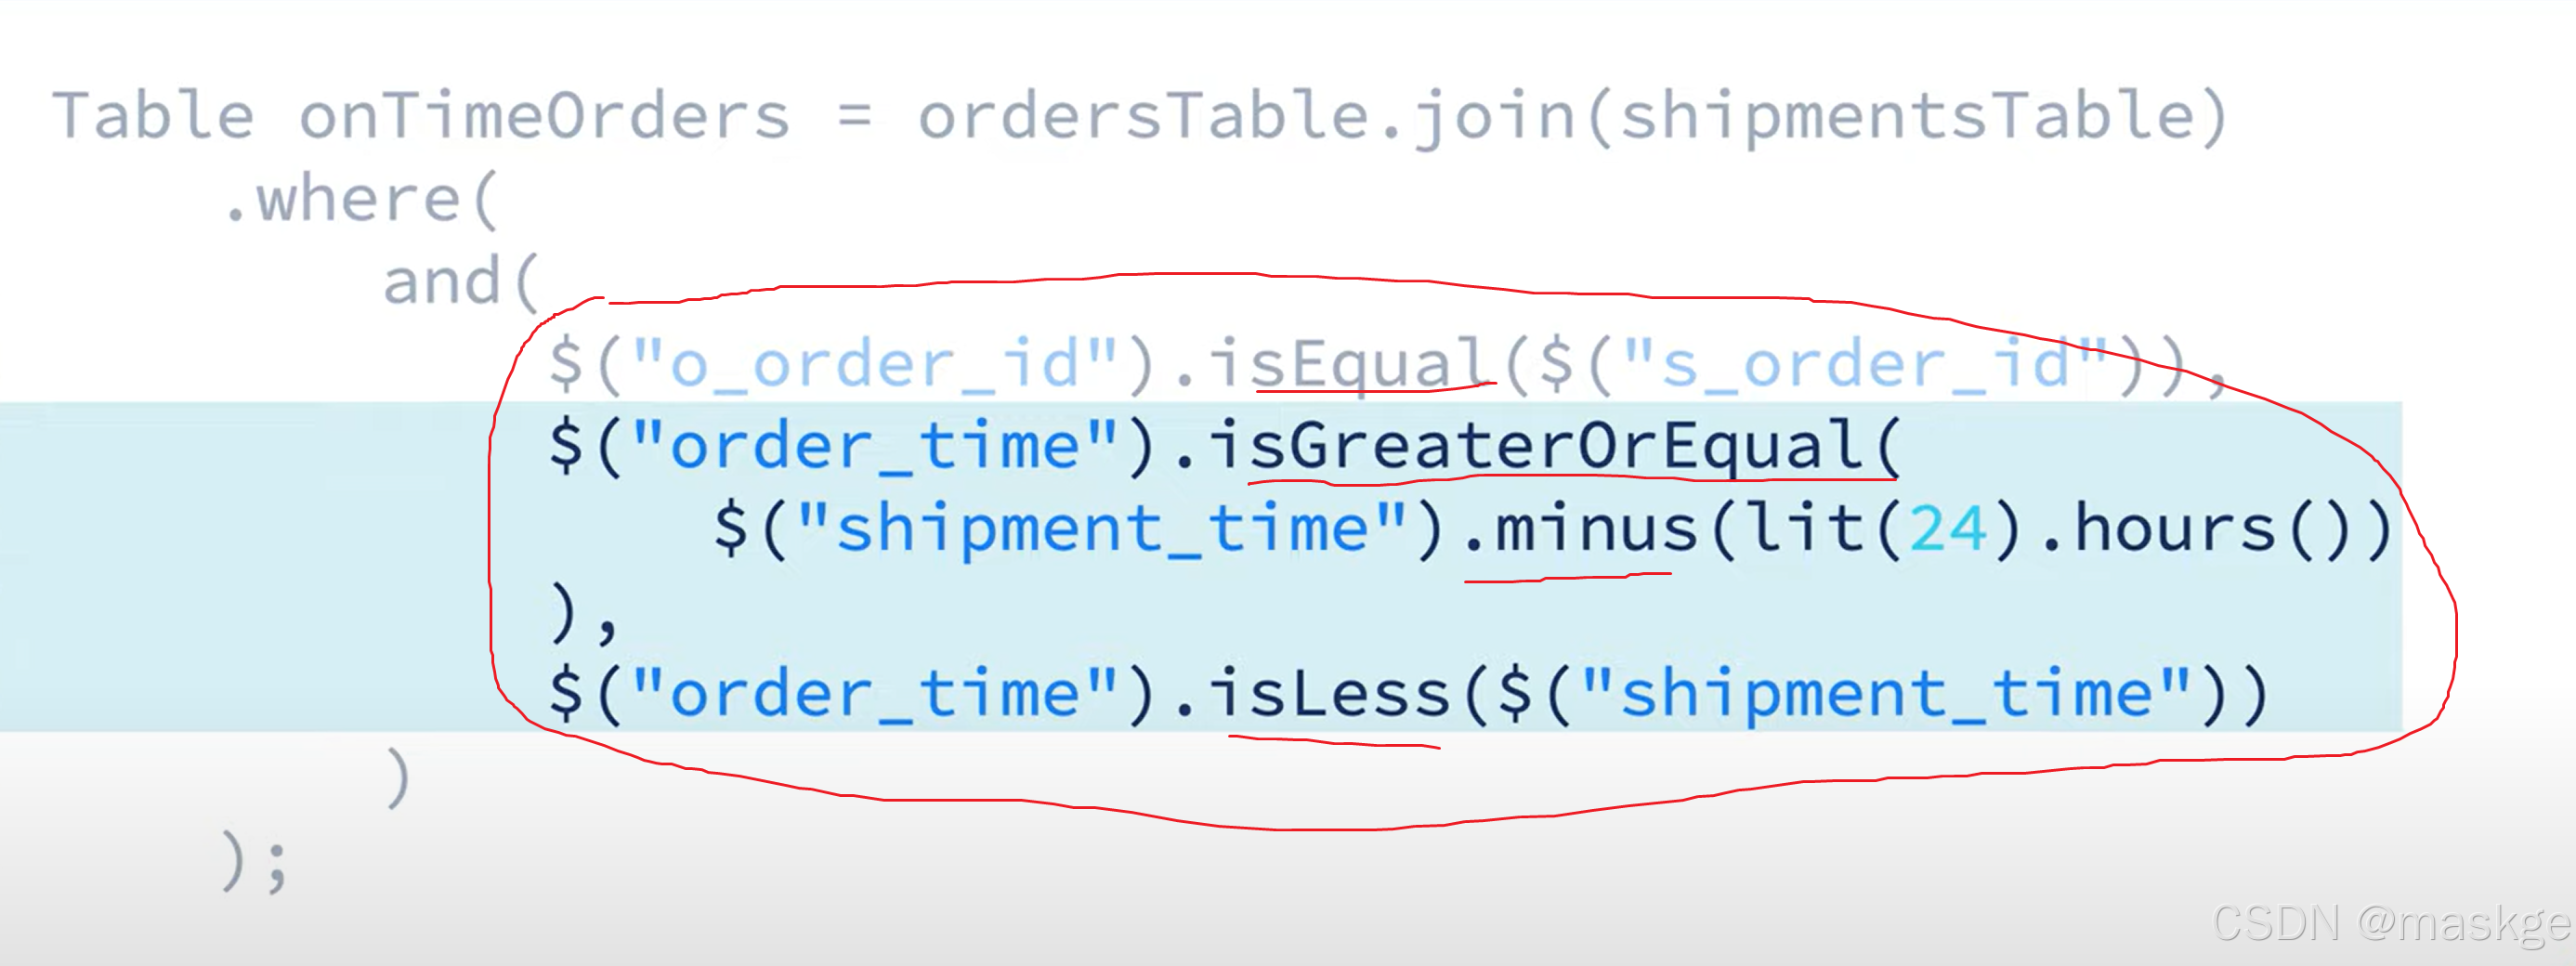
interval join(区间连接):在区间时间内的查询有效,一旦超过区间时间,就舍弃窗口外无效状态;
需要append-only 流,以避免级联更新问题
13.flink table api 代码
创建表代码:
package com.flink.wc;

import org.apache.flink.table.api.*;
import org.apache.flink.table.api.config.TableConfigOptions;
import org.apache.flink.table.types.DataType;

import java.util.List;

/**
 * A table program example that illustrates how to create a table backed by a Kafka topic.
 *
 * <p>NOTE: This example requires write access to a Kafka cluster. Fill out the given variables
 * below with target catalog/database if this is fine for you.
 */
public class CreatingTables {

    // Fill this with an environment you have write access to
    static final String TARGET_CATALOG = "";

    // Fill this with a Kafka cluster you have write access to
    static final String TARGET_DATABASE = "";

    // Fill this with names of the Kafka Topics you want to create
    static final String TARGET_TABLE1 = "MyExampleTable1";
    static final String TARGET_TABLE2 = "MyExampleTable2";

    public static void main(String[] args) {
        //1.创建设置
        EnvironmentSettings settings=EnvironmentSettings
                .newInstance()
                .inStreamingMode()
                .build();


        settings.getConfiguration()
                .set(TableConfigOptions.LOCAL_TIME_ZONE,"UTC");//table.local-time-zone
        //2.创建table环境
        TableEnvironment env = TableEnvironment.create(settings);
        env.useCatalog(TARGET_CATALOG);
        env.useDatabase(TARGET_DATABASE);

        System.out.println("Creating table... " + TARGET_TABLE1);

        // Create a table programmatically:
        // The table...
        //   - is backed by an equally named Kafka topic
        //   - stores its payload in JSON
        //   - will reference two Schema Registry subjects for Kafka message key and value
        //   - is distributed across 4 Kafka partitions based on the Kafka message key "user_id"
        env.createTable(
                TARGET_TABLE1,
                TableDescriptor.forManaged()
                        .schema(
                                Schema.newBuilder()
                                        .column("user_id", DataTypes.STRING())
                                        .column("name", DataTypes.STRING())
                                        .column("email", DataTypes.STRING())
                                        .build())
                        .partitionedBy("user_id")
                        //.distributedBy(4, "user_id")
                        .option("kafka.retention.time", "0")
                        .option("key.format", "json-registry")
                        .option("value.format", "json-registry")
                        .build());

        // Alternatively, the call above could also be executed with SQL
        env.executeSql(
                "CREATE TABLE IF NOT EXISTS `"
                        + TARGET_TABLE1
                        + "` (\n"
                        + "  `user_id` STRING,\n"
                        + "  `name` STRING,\n"
                        + "  `email` STRING\n"
                        + ")\n"
                        + "DISTRIBUTED BY HASH(`user_id`) INTO 4 BUCKETS\n"
                        + "WITH (\n"
                        + "  'kafka.retention.time' = '0 ms',\n"
                        + "  'key.format' = 'json-registry',\n"
                        + "  'value.format' = 'json-registry'\n"
                        + ")");

        System.out.println("Creating table... " + TARGET_TABLE2);

        // The schema builders can be quite useful to avoid manual schema work. You can adopt schema
        // from other tables, massage the schema, and/or add additional columns
        DataType productsRow =
                env.from("examples.marketplace.products")
                        .getResolvedSchema()
                        .toPhysicalRowDataType();
        List<String> columnNames = DataType.getFieldNames(productsRow);
        List<DataType> columnTypes = DataType.getFieldDataTypes(productsRow);

        // In this example, the table will get all names/data types from the table 'products'
        // plus an 'additionalColumn' column
        env.createTable(
                TARGET_TABLE2,
                TableDescriptor.forManaged()
                        .schema(
                                Schema.newBuilder()
                                        .fromFields(columnNames, columnTypes)
                                        .column("additionalColumn", DataTypes.STRING())
                                        .build())
                        .build());
    }
}
flink table pipeline(flink 流水线)代码:
package com.flink.wc;


import org.apache.flink.table.api.*;
import org.apache.flink.table.api.config.TableConfigOptions;

import java.util.List;
import java.util.concurrent.ExecutionException;

import static org.apache.flink.table.api.Expressions.$;
import static org.apache.flink.table.api.Expressions.concat;
import static org.apache.flink.table.api.Expressions.row;

/**
 * A table program example that demos how to pipe data into a table or multiple tables.
 *
 * <p>NOTE: This example requires write access to a Kafka cluster. Fill out the given variables
 * below with target catalog/database if this is fine for you.
 *
 * <p>ALSO NOTE: The example submits an unbounded background statement. Make sure to stop the
 * statement in the Web UI afterward to clean up resources.
 */
public class Example_05_TablePipelines {

    // Fill this with an environment you have write access to
    static final String TARGET_CATALOG = "";

    // Fill this with a Kafka cluster you have write access to
    static final String TARGET_DATABASE = "";

    // Fill this with names of the Kafka Topics you want to create
    static final String TARGET_TABLE1 = "PricePerProduct";
    static final String TARGET_TABLE2 = "PricePerCustomer";

    public static void main(String[] args) throws ExecutionException, InterruptedException {
        //1.创建设置
        EnvironmentSettings settings=EnvironmentSettings
                .newInstance()
                .inStreamingMode()
                .build();


        settings.getConfiguration()
                .set(TableConfigOptions.LOCAL_TIME_ZONE,"UTC");//table.local-time-zone
        //2.创建table环境
        TableEnvironment env = TableEnvironment.create(settings);
        env.useCatalog(TARGET_CATALOG);
        env.useDatabase(TARGET_DATABASE);

        System.out.println("Creating tables... " + List.of(TARGET_TABLE1, TARGET_TABLE2));

        // Create two helper tables that will be filled with data from examples
        env.createTable(
                TARGET_TABLE1,
                TableDescriptor.forManaged()
                        .schema(
                                Schema.newBuilder()
                                        .column("product_id", DataTypes.STRING().notNull())
                                        .column("price", DataTypes.DOUBLE().notNull())
                                        .build())
                        .build());
        env.createTable(
                TARGET_TABLE2,
               TableDescriptor.forManaged()
                        .schema(
                                Schema.newBuilder()
                                        .column("customer_id", DataTypes.INT().notNull())
                                        .column("price", DataTypes.DOUBLE().notNull())
                                        .build())

                        .build());

        System.out.println("Executing table pipeline synchronous...");

        // A TablePipeline describes a flow of data from source(s) to sink.
        // In this case, from values to a Kafka-backed target table
        TablePipeline pipeline =
                env.fromValues(row("1408", 27.71), row("1062", 94.39), row("42", 80.01))
                        .insertInto(TARGET_TABLE1);

        // One can explain or execute a pipeline
        pipeline.printExplain();

        // Execution happens async by default, use await() to attach to the execution in case all
        // sources are finite (i.e. bounded).
        // For infinite (i.e. unbounded) sources, waiting for completion would not make much sense.
        pipeline.execute().await();

        System.out.println("Executing statement set asynchronous...");

        // The API supports more than a single sink, you can also fan out to different tables while
        // reading from a table once using a StatementSet:
        StatementSet statementSet =
                env.createStatementSet()
                        .add(
                                env.from("`examples`.`marketplace`.`orders`")
                                        .select($("product_id"), $("price"))
                                        .insertInto(TARGET_TABLE1))
                        .add(
                                env.from("`examples`.`marketplace`.`orders`")
                                        .select($("customer_id"), $("price"))
                                        .insertInto(TARGET_TABLE2));

        // Executes a statement set that splits the 'orders' table into two tables,
        // a 'product_id | price' table and a 'customer_id | price' one
        statementSet.execute();

        System.out.println("Reading merged data written by background statement...");

        // For this example, we read both target tables in again and union them into one output to
        // verify that the data arrives
        Table targetTable1 =
                env.from(TARGET_TABLE1)
                        .select(concat($("product_id"), " event in ", TARGET_TABLE1));
        Table targetTable2 =
                env.from(TARGET_TABLE2)
                        .select(
                                concat(
                                        $("customer_id").cast(DataTypes.STRING()),
                                        " event in ",
                                        TARGET_TABLE2));
        targetTable1.unionAll(targetTable2).as("status").execute().print();
    }
}
flink values与datatype :
package com.flink.wc;

import org.apache.flink.table.api.DataTypes;
import org.apache.flink.table.api.EnvironmentSettings;
import org.apache.flink.table.api.Table;
import org.apache.flink.table.api.TableEnvironment;
import org.apache.flink.table.api.config.TableConfigOptions;
import org.apache.flink.table.expressions.Expression;
import org.apache.flink.types.Row;

import java.math.BigDecimal;
import java.time.Instant;
import java.time.LocalDate;
import java.time.LocalDateTime;
import java.time.LocalTime;
import java.util.Map;

import static org.apache.flink.table.api.Expressions.*;

/** A table program example to create mock data. */
public class Example_06_ValuesAndDataTypes {

    public static void main(String[] args) {
        //1.创建设置
        EnvironmentSettings settings=EnvironmentSettings
                .newInstance()
                .inStreamingMode()
                .build();


        settings.getConfiguration()
                .set(TableConfigOptions.LOCAL_TIME_ZONE,"UTC");//table.local-time-zone
        //2.创建table环境
        TableEnvironment env = TableEnvironment.create(settings);

        // Values for each data type can be created...

        // (1) with Java objects
        Row row = new Row(17);
        // BOOLEAN
        row.setField(0, true);
        // STRING / CHAR / VARCHAR
        row.setField(1, "Alice");
        // DATE
        row.setField(2, LocalDate.of(2024, 12, 23));
        // TIME
        row.setField(3, LocalTime.of(13, 45, 59));
        // TIMESTAMP
        row.setField(4, LocalDateTime.of(2024, 12, 23, 13, 45, 59));
        // TIMESTAMP_LTZ
        row.setField(5, Instant.ofEpochMilli(1734957959000L));
        // BIGINT
        row.setField(6, 42L);
        // INT
        row.setField(7, 42);
        // SMALLINT
        row.setField(8, (short) 42);
        // TINYINT
        row.setField(9, (byte) 42);
        // DOUBLE
        row.setField(10, 42.0);
        // FLOAT
        row.setField(11, 42.0f);
        // DECIMAL
        row.setField(12, new BigDecimal("123.4567"));
        // BYTES / BINARY / VARBINARY
        row.setField(13, new byte[] {1, 2, 3});
        // ARRAY
        row.setField(14, new Integer[] {1, 2, 3});
        // MAP
        row.setField(15, Map.ofEntries(Map.entry("k1", "v1"), Map.entry("k2", "v2")));
        // ROW
        row.setField(16, Row.of("Bob", true));
        Table fromObjects = env.fromValues(row);

        // (2) with Table API expressions
        Expression rowExpr =
                row(
                        // VARCHAR(200)
                        lit("Alice").cast(DataTypes.VARCHAR(200)),
                        // ARRAY
                        array(1, 2, 3),
                        // MAP
                        map("k1", "v1", "k2", "v2"),
                        // ROW
                        row("Bob", true),
                        // NULL
                        nullOf(DataTypes.INT()));
        Table fromExpressions = env.fromValues(rowExpr);

        // (3) with SQL expressions
        Table fromSql =
                env.sqlQuery(
                        "VALUES ("
                                // VARCHAR(200)
                                + "CAST('Alice' AS VARCHAR(200)), "
                                // BYTES
                                + "x'010203', "
                                // ARRAY
                                + "ARRAY[1, 2, 3], "
                                // MAP
                                + "MAP['k1', 'v1', 'k2', 'v2', 'k3', 'v3'], "
                                // ROW
                                + "('Bob', true), "
                                // NULL
                                + "CAST(NULL AS INT), "
                                // DATE
                                + "DATE '2024-12-23', "
                                // TIME
                                + "TIME '13:45:59.000', "
                                // TIMESTAMP
                                + "TIMESTAMP '2024-12-23 13:45:59.000', "
                                // TIMESTAMP_LTZ
                                + "TO_TIMESTAMP_LTZ(1734957959000, 3)"
                                + ")");

        // Verify the derived data types and values

        System.out.println("Table from objects:");
        fromObjects.printSchema();
        fromObjects.execute().print();

        System.out.println("Table from Table API expressions:");
        fromExpressions.printSchema();
        fromExpressions.execute().print();

        System.out.println("Table from SQL expressions:");
        fromSql.printSchema();
        fromSql.execute().print();
    }
}
flink confluent集成与部署代码:
package com.flink.wc;


import org.apache.flink.table.api.EnvironmentSettings;
import org.apache.flink.table.api.TableEnvironment;
import org.apache.flink.table.api.TableResult;
import org.apache.flink.table.api.config.TableConfigOptions;
import org.apache.flink.types.Row;
import org.apache.flink.util.CloseableIterator;

import java.util.*;
import java.util.stream.Collectors;
import java.util.stream.Stream;

import static org.apache.flink.table.api.Expressions.*;

/**
 * An example that illustrates how to embed a table program into a CI/CD pipeline for continuous
 * testing and rollout.
 *
 * <p>Because we cannot rely on production data in this example, the program sets up some
 * Kafka-backed tables with data during the {@code setup} phase.
 *
 * <p>Afterward, the program can operate in two modes: one for integration testing ({@code test}
 * phase) and one for deployment ({@code deploy} phase).
 *
 * <p>A CI/CD workflow could execute the following:
 *
 * <pre>
 *     export EXAMPLE_JAR=./target/flink-table-api-java-examples-1.0.jar
 *     export EXAMPLE_CLASS=io.confluent.flink.examples.table.Example_08_IntegrationAndDeployment
 *     java -jar $EXAMPLE_JAR $EXAMPLE_CLASS setup
 *     java -jar $EXAMPLE_JAR $EXAMPLE_CLASS test
 *     java -jar $EXAMPLE_JAR $EXAMPLE_CLASS deploy
 * </pre>
 *
 * <p>NOTE: This example requires write access to a Kafka cluster. Fill out the given variables
 * below with target catalog/database if this is fine for you.
 *
 * <p>ALSO NOTE: The example submits an unbounded background statement. Make sure to stop the
 * statement in the Web UI afterward to clean up resources.
 *
 * <p>The complete CI/CD workflow performs the following steps:
 *
 * <ol>
 *   <li>Create Kafka table 'ProductsMock' and 'VendorsPerBrand'.
 *   <li>Fill Kafka table 'ProductsMock' with data from marketplace examples table 'products'.
 *   <li>Test the given SQL on a subset of data in 'ProductsMock' with the help of dynamic options.
 *   <li>Deploy an unbounded version of the tested SQL that write into 'VendorsPerBrand'.
 * </ol>
 */
public class Example_08_IntegrationAndDeployment {

    // Fill this with an environment you have write access to
    static final String TARGET_CATALOG = "";

    // Fill this with a Kafka cluster you have write access to
    static final String TARGET_DATABASE = "";

    // Fill this with names of the Kafka Topics you want to create
    static final String SOURCE_TABLE = "ProductsMock";
    static final String TARGET_TABLE = "VendorsPerBrand";

    // The following SQL will be tested on a finite subset of data before
    // it gets deployed to production.
    // In production, it will run on unbounded input.
    // The '%s' parameterizes the SQL for testing.
    static final String SQL =
            "SELECT brand, COUNT(*) AS vendors FROM ProductsMock %s GROUP BY brand";

    public static void main(String[] args) throws Exception {
        if (args.length == 0) {
            throw new IllegalArgumentException(
                    "No mode specified. Possible values are 'setup', 'test', or 'deploy'.");
        }

        //1.创建设置
        EnvironmentSettings settings=EnvironmentSettings
                .newInstance()
                .inStreamingMode()
                .build();


        settings.getConfiguration()
                .set(TableConfigOptions.LOCAL_TIME_ZONE,"UTC");//table.local-time-zone
        //2.创建table环境
        TableEnvironment env = TableEnvironment.create(settings);

        env.useCatalog(TARGET_CATALOG);
        env.useDatabase(TARGET_DATABASE);

        String mode = args[0];
        switch (mode) {
            case "setup":
                setupProgram(env);
                break;
            case "test":
                testProgram(env);
                break;
            case "deploy":
                deployProgram(env);
                break;
            default:
                throw new IllegalArgumentException("Unknown mode: " + mode);
        }
    }

    // --------------------------------------------------------------------------------------------
    // Setup Phase
    // --------------------------------------------------------------------------------------------

    private static void setupProgram(TableEnvironment env) throws Exception {
        System.out.println("Running setup...");

        System.out.println("Creating table..." + SOURCE_TABLE);
        // Create a mock table that has exactly the same schema as the example `products` table.
        // The LIKE clause is very convenient for this task which is why we use SQL here.
        // Since we use little data, a bucket of 1 is important to satisfy the `scan.bounded.mode`
        // during testing.
        env.executeSql(
                String.format(
                        "CREATE TABLE IF NOT EXISTS `%s`\n"
                                + "DISTRIBUTED INTO 1 BUCKETS\n"
                                + "LIKE `examples`.`marketplace`.`products` (EXCLUDING OPTIONS)",
                        SOURCE_TABLE));

        System.out.println("Start filling table...");
        // Let Flink copy generated data into the mock table. Note that the statement is unbounded
        // and submitted as a background statement by default.
        TableResult pipelineResult =
                env.from("`examples`.`marketplace`.`products`")
                        .select($("*"))
                        .insertInto(SOURCE_TABLE)
                        .execute();

        System.out.println("Waiting for at least 200 elements in table...");
        // We start a second Flink statement for monitoring how the copying progresses
        TableResult countResult = env.from(SOURCE_TABLE).select(lit(1).count()).as("c").execute();
        // This waits for the condition to be met:
        try (CloseableIterator<Row> iterator = countResult.collect()) {
            while (iterator.hasNext()) {
                Row row = iterator.next();
                long count = row.getFieldAs("c");
                if (count >= 200L) {
                    System.out.println("200 elements reached. Stopping...");
                    break;
                }
            }
        }

        // By using a closable iterator, the foreground statement will be stopped automatically when
        // the iterator is closed. But the background statement still needs a manual stop.
        ConfluentTools.stopStatement(pipelineResult);
        //countResult.getJobClient().get().cancel()


        System.out.println("Creating table..." + TARGET_TABLE);
        // Create a table for storing the results after deployment.
        env.executeSql(
                String.format(
                        "CREATE TABLE IF NOT EXISTS `%s` \n"
                                + "(brand STRING, vendors BIGINT, PRIMARY KEY(brand) NOT ENFORCED)\n"
                                + "DISTRIBUTED INTO 1 BUCKETS",
                        TARGET_TABLE));
    }

    // --------------------------------------------------------------------------------------------
    // Test Phase
    // --------------------------------------------------------------------------------------------

    private static void testProgram(TableEnvironment env) {
        System.out.println("Running test...");

        // Dynamic options allow influencing parts of a table scan. In this case, they define a
        // range (from start offset '0' to end offset '100') how to read from Kafka. Effectively,
        // they make the table bounded. If all tables are finite, the statement can terminate.
        // This allows us to run checks on the result.
        String dynamicOptions =
                "/*+ OPTIONS(\n"
                        + "'scan.startup.mode' = 'specific-offsets',\n"
                        + "'scan.startup.specific-offsets' = 'partition: 0, offset: 0',\n"
                        + "'scan.bounded.mode' = 'specific-offsets',\n"
                        + "'scan.bounded.specific-offsets' = 'partition: 0, offset: 100'\n"
                        + ") */";

        System.out.println("Requesting test data...");
        TableResult result = env.executeSql(String.format(SQL, dynamicOptions));
       Iterator<Row> rows = result.collect();
       List<Row>  lists=new ArrayList<>();
       while (rows.hasNext()){
           Row row=rows.next();
           lists.add(row);

       }
        System.out.println(
                "Test data:\n"
                        + lists.stream().map(Row::toString).collect(Collectors.joining("\n")));


        // Use the testing framework of your choice and add checks to verify the
        // correctness of the test data
        boolean testSuccessful =
                lists.stream()
                        .map(r -> r.<String>getFieldAs("brand"))
                        .anyMatch(brand -> brand.equals("Apple"));


        if (testSuccessful) {
            System.out.println("Success. Ready for deployment.");
        } else {
            throw new IllegalStateException("Test was not successful");
        }
    }

    // --------------------------------------------------------------------------------------------
    // Deploy Phase
    // --------------------------------------------------------------------------------------------

    private static void deployProgram(TableEnvironment env) {
        System.out.println("Running deploy...");

        // It is possible to give a better statement name for deployment but make sure that the name
        // is unique across environment and region.
        String statementName = "vendors-per-brand-" + UUID.randomUUID();
        env.getConfig().set("client.statement-name", statementName);

        // Execute the SQL without dynamic options.
        // The result is unbounded and piped into the target table.
        TableResult insertIntoResult =
                env.sqlQuery(String.format(SQL, "")).insertInto(TARGET_TABLE).execute();

        // The API might add suffixes to manual statement names such as '-sql' or '-api'.
        // For the final submitted name, use the provided tools.
        String finalName = ConfluentTools.getStatementName(insertIntoResult);

        System.out.println("Statement has been deployed as: " + finalName);
    }
}

北京人形旗下天工造物具身智能开源社区,聚焦具身天工与慧思开物两大平台
更多推荐
 12
12 0
0- 0


 已为社区贡献12条内容

所有评论(0)