Mysql实战案例 | 利用Mycat实现MYSQL的读写分离
·
文章目录
免费个人运维知识库,欢迎您的订阅:literator_ray.flowus.cn
一、环境准备
-
3台服务器(server端内存那建议2G以上)
-
centos7系统
-
关闭防火墙:systemctl stop firewalld
-
关闭selinux:setenforce 0
-
时间同步
CHANGE MASTER TO
MASTER_HOST='10.0.0.31',
MASTER_USER='repluser',
MASTER_PASSWORD='111111',
MASTER_LOG_FILE='mariadb-bin.000001',
MASTER_LOG_POS=471;
二、创建主从数据库
[root@master ~]# yum -y install mariadb-server
或者
[root@centos8 ~]#yum -y install mysql-server
2.1 修改master和slave上的配置文件
# master上的my.cnf
server-id=31
log-bin

# slave上的my.cnf
server-id=32

# 启动数据库
systemctl restart mariadb
2.2 Master上创建复制用户
[root@centos7 ~]# mysql -uroot
MariaDB [(none)]> grant replication slave on *.* to repluser@'10.0.0.%' identified by '111111';
Query OK, 0 rows affected (0.01 sec)

MariaDB [(none)]> flush privileges;
Query OK, 0 rows affected (0.00 sec)

MariaDB [(none)]> show master status;
+--------------------+----------+--------------+------------------+
| File               | Position | Binlog_Do_DB | Binlog_Ignore_DB |
+--------------------+----------+--------------+------------------+
| mariadb-bin.000001 |      471 |              |                  |
+--------------------+----------+--------------+------------------+
1 row in set (0.00 sec)
2.3 Slave上执行
[root@centos7 ~]# mysql -uroot
MariaDB [(none)]> CHANGE MASTER TO
    -> MASTER_HOST='10.0.0.31',
    -> MASTER_USER='repluser',
    -> MASTER_PASSWORD='111111',
    -> MASTER_LOG_FILE='mariadb-bin.000001',
    -> MASTER_LOG_POS=471;
Query OK, 0 rows affected (0.00 sec)


MariaDB [(none)]> start slave;
Query OK, 0 rows affected (0.00 sec)


MariaDB [(none)]> show slave status\G
*************************** 1. row ***************************
               Slave_IO_State: Waiting for master to send event
                  Master_Host: 10.0.0.31
                  Master_User: repluser
                  Master_Port: 3306
                Connect_Retry: 60
              Master_Log_File: mariadb-bin.000001
          Read_Master_Log_Pos: 471
               Relay_Log_File: mariadb-relay-bin.000002
                Relay_Log_Pos: 531
        Relay_Master_Log_File: mariadb-bin.000001
             Slave_IO_Running: Yes
            Slave_SQL_Running: Yes

            ......省略......
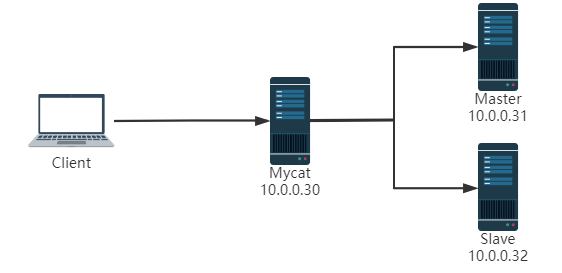
三、在Mysql代理服务器10.0.0.30上安装mycat并启动
yum -y install java mariadb
# 确认安装成功

[root@centos7 ~]# java -version
openjdk version "1.8.0_312"
OpenJDK Runtime Environment (build 1.8.0_312-b07)
OpenJDK 64-Bit Server VM (build 25.312-b07, mixed mode)

# 下载并安装mycat
[root@centos7 ~]# wget http://dl.mycat.org.cn/1.6.7.6/20211118155357/Mycat-server-1.6.7.6-release-20211118155357-linux.tar.gz
[root@centos7 ~]# tar xvf Mycat-server-1.6.7.6-release-20211118155357-linux.tar.gz -C /opt

# 配置环境变量
[root@centos7 ~]# echo 'PATH=/opt/mycat/bin:$PATH' > /etc/profile.d/mycat.sh
[root@centos7 ~]# source /etc/profile.d/mycat.sh

# 查看端口
[root@centos7 ~]# ss -nlt
State      Recv-Q Send-Q                                Local Address:Port                                               Peer Address:Port
LISTEN     0      128                                               *:22                                                            *:*
LISTEN     0      100                                       127.0.0.1:25                                                            *:*
LISTEN     0      128                                            [::]:22                                                         [::]:*
LISTEN     0      100                                           [::1]:25                                                         [::]:*
LISTEN     0      80                                             [::]:3306                                                       [::]:*

# 启动mycat(注:此启动较慢,需要等一会,如果内存太小,会导致无法启动)
[root@centos7 ~]# mycat start
Starting Mycat-server...

# 再次查看端口,可以看到8066端口,用于连接mycat的
[root@centos7 ~]# ss -nltp
[root@mycat ~]# ss -nltp
State      Recv-Q Send-Q                                Local Address:Port                                               Peer Address:Port
LISTEN     0      128                                               *:22                                                            *:*                   users:(("sshd",pid=857,fd=3))
LISTEN     0      100                                       127.0.0.1:25                                                            *:*                   users:(("master",pid=1101,fd=13))
LISTEN     0      1                                         127.0.0.1:32000                                                         *:*                   users:(("java",pid=1680,fd=4))
LISTEN     0      128                                            [::]:22                                                         [::]:*                   users:(("sshd",pid=857,fd=4))
LISTEN     0      50                                             [::]:38201                                                      [::]:*                   users:(("java",pid=1680,fd=72))
LISTEN     0      100                                           [::1]:25                                                         [::]:*                   users:(("master",pid=1101,fd=14))
LISTEN     0      50                                             [::]:1984                                                       [::]:*                   users:(("java",pid=1680,fd=71))
LISTEN     0      128                                            [::]:8066                                                       [::]:*                   users:(("java",pid=1680,fd=95))
LISTEN     0      50                                             [::]:44677                                                      [::]:*                   users:(("java",pid=1680,fd=70))
LISTEN     0      128                                            [::]:9066                                                       [::]:*                   users:(("java",pid=1680,fd=91))
LISTEN     0      80                                             [::]:3306                                                       [::]:*                   users:(("mysqld",pid=925,fd=28))


# 查看日志,确定成功
[root@centos7 ~]# cat /opt/mycat/logs/wrapper.log
...省略...
INFO   | jvm 1    | 2021/12/03 11:29:52 | MyCAT Server startup successfully. see logs in logs/mycat.log

# 用设置的密码连接mycat:
[root@centos7 ~]# mysql -uroot -p123456 -h 127.0.0.1 -P8066
mysql: [Warning] Using a password on the command line interface can be insecure.
Welcome to the MySQL monitor.  Commands end with ; or \g.
Your MySQL connection id is 5
Server version: 5.6.29-mycat-1.6.7.6-release-20211118155357 MyCat Server (OpenCloudDB)

Copyright (c) 2000, 2021, Oracle and/or its affiliates.

Oracle is a registered trademark of Oracle Corporation and/or its
affiliates. Other names may be trademarks of their respective
owners.

Type 'help;' or '\h' for help. Type '\c' to clear the current input statement.

mysql> show databases;
+----------+
| DATABASE |
+----------+
| TESTDB   |
+----------+
1 row in set (0.00 sec)
四、在mycat服务器上修改server.xml文件配置mycat的连接信息
[root@centos7 ~]# vim /opt/mycat/conf/server.xml
...省略...

#修改下面行的8066改为3306复制到到独立非注释行
<property name="serverPort">3306</property>
<property name="handlelDistributedTransactions">0</property> #将上面行放在此行前面
#或者删除注释,并修改下面行的8066改为3306
<property name="serverPort">3306</property>
<property name="managerPort">9066</property>
<property name="idleTimeout">300000</property>
<property name="authTimeout">15000</property>
<property name="bindIp">0.0.0.0</property>
<property name="dataNodeIdleCheckPeriod">300000</property> #5 * 60 * 1000L; //连
接空闲检查 删除#后面此部分
<property name="frontWriteQueueSize">4096</property> <property
name="processors">32</property> #--> 删除#后面此部分
.....

        <user name="root" defaultAccount="true">                    # 连接mycat的用户名
                <property name="password">123456</property>         # 连接mycat的密码
                <property name="schemas">TESTDB</property>          # 数据库名要与schema.xml相对应
                <property name="defaultSchema">TESTDB</property>
这里使用的是root,密码为123456逻辑数据车为 TESTDB,这些信息都可以自己随意定义,读写权限都有,没有针对表做任何特殊的权限。重点关注上面这段配置,其他默认即可
五、修改schem.xml实现读写分离策略
[root@centos7 ~]# vim /opt/mycat/conf/schema.xml

源配置
<?xml version="1.0"?>
<!DOCTYPE mycat:schema SYSTEM "schema.dtd">
<mycat:schema xmlns:mycat="http://io.mycat/">
        <schema name="TESTDB" checkSQLschema="true" sqlMaxLimit="100" randomDataNode="dn1">
                <table name="customer" primaryKey="id" dataNode="dn1,dn2" rule="sharding-by-intfile" autoIncrement="true" fetchStoreNodeByJdbc="true">
                        <childTable name="customer_addr" primaryKey="id" joinKey="customer_id" parentKey="id"> </childTable>
                </table>
        </schema>
        <dataNode name="dn1" dataHost="localhost1" database="db1" />
        <dataNode name="dn2" dataHost="localhost1" database="db2" />
        <dataNode name="dn3" dataHost="localhost1" database="db3" />
        <dataHost name="localhost1" maxCon="1000" minCon="10" balance="0"
                          writeType="0" dbType="mysql" dbDriver="jdbc" switchType="1"  slaveThreshold="100">
                <heartbeat>select user()</heartbeat>
                <writeHost host="hostM1" url="jdbc:mysql://localhost:3306" user="root"
                                   password="root">
                </writeHost>
        </dataHost>
</mycat:schema>


修改后配置
<?xml version="1.0"?>
<!DOCTYPE mycat:schema SYSTEM "schema.dtd">
<mycat:schema xmlns:mycat="http://io.mycat/">
        <schema name="TESTDB" checkSQLschema="***false***" sqlMaxLimit="100" ***dataNode***="***dn1***">
        </schema>
        <dataNode name="dn1" dataHost="localhost1" database="***hellodb***" />        # hellodb表示后端服务器实际数据库名称
        <dataHost name="localhost1" maxCon="1000" minCon="10" balance="***1***"
                          writeType="0" dbType="mysql" dbDriver="***native***" switchType="1"  slaveThreshold="100">
                <heartbeat>select user()</heartbeat>
                ***<writeHost host="host1" url="10.0.0.31:3306" user="root" password="123456">***
                ***<readHost host="host2" url="10.0.0.32:3306" user="root" password="123456"/>***
                </writeHost>
        </dataHost>
</mycat:schema>


# 以上***部分表示原配置文件中需要修改的内容
# 注释部分已删除

# 重启mycat
[root@centos7 ~]# mycat restart
上面配置中, balance改为1,表示读写分离。以上配置达到的效果就是10.0.0.18为主库,10.0.0.28为从库
注意:要保证能使用root/123456权限成功登录10.0.0.18和10.0.0.28机器上面的mysq数据库。同时也一定要授权 mycat机器能使用root/123456权限成功登录这两台机器的mysql数据库!!这很重要否则会导致登录 mycat后,对库和表操作失败!
六、在后端主服务器创建用户并对mycat授权
[root@master ~]# mysql -uroot -p123456
MariaDB [(none)]> create database hellodb;
MariaDB [(none)]> grant all on *.* to 'root'@'10.0.0.%' identified by '123456';
Query OK, 0 rows affected (0.00 sec)

MariaDB [(none)]> flush privileges;
Query OK, 0 rows affected (0.01 sec)
七、在Mycat服务器上连接测试
[root@mycat ~]# mysql -uroot -p123456 -h127.0.0.1 -P8066 -DTESTDB
mysql: [Warning] Using a password on the command line interface can be insecure.
Reading table information for completion of table and column names
You can turn off this feature to get a quicker startup with -A

Welcome to the MySQL monitor.  Commands end with ; or \g.
Your MySQL connection id is 6
Server version: 5.6.29-mycat-1.6.7.6-release-20211118155357 MyCat Server (OpenCloudDB)

Copyright (c) 2000, 2021, Oracle and/or its affiliates.

Oracle is a registered trademark of Oracle Corporation and/or its
affiliates. Other names may be trademarks of their respective
owners.

Type 'help;' or '\h' for help. Type '\c' to clear the current input statement.

mysql> show databases;
+----------+
| DATABASE |
+----------+
| TESTDB   |                    // 只能看到一个虚拟数据库
+----------+
1 row in set (0.00 sec)

mysql> use testdb;
ERROR 1049 (HY000): Unknown database 'testdb'
mysql> use TESTDB;
Database changed
mysql> create table t1(id int);
Query OK, 0 rows affected (0.01 sec)

mysql> select @@server_id;
+-------------+
| @@server_id |
+-------------+
|          32 |
+-------------+
1 row in set (0.00 sec)

mysql> select @@hostname;
+------------+
| @@hostname |
+------------+
| slave      |
+------------+
1 row in set (0.00 sec)
八、通过通用日志确认实现读写分离
在Mysql中查看通用日志
mysql> show variables like 'general_log';            # 查看日志是否开启
mysql> set global general_log=on;                    # 开启日志功能
mysql> show variables like 'general_log_file';       # 查看日志文件保存位置
mysql> set global general_log_file='/tmp/general.log';  # 设置日志文件保存位置
在主从服务器分别启用通用日志,查看读写分离
[root@centos7 ~]# vim /etc/my.cnf.d/server.cnf
[mysqld]
general_log=ON

[root@centos7 ~]# systemctl restart mariadb
[root@centos7 ~]# tail -f /var/lib/mariadb/mariadb.log
九、停止从节点,Mycat自动调度读请求至主节点
[root@slave ~]# systemctl stop mariadb

# 客户端连接
[root@mycat ~]# mysql -uroot -p123456 -h127.0.0.1 -P8066 -DTESTDB
MySQL [(none)]> select @@server_id;
+-------------+
| @@server_id |
+-------------+
| 1 |
+-------------+
1 row in set (0.00 sec)

MySQL [(none)]>

#停止主节点,MyCAT不会自动调度写请求至从节点
MySQL [TESTDB]> insert teachers values(5,'wang',30,'M');
ERROR 1184 (HY000): java.net.ConnectException: Connection refused
十、MyCAT对后端服务器的健康性检查方法select user()
#开启通用日志
[root@master ~]#mysql
mysql> set global general_log=1;

[root@slave ~]#mysql
mysql> set global general_log=1;

#查看通用日志
[root@master ~]#tail -f /var/lib/mysql/master.log
/usr/libexec/mysqld, Version: 8.0.17 (Source distribution). started with:
Tcp port: 3306 Unix socket: /var/lib/mysql/mysql.sock
Time Id Command Argument
2021-02-22T08:52:57.086198Z 17 Query select user()
2021-02-22T08:53:07.086340Z 24 Query select user()
2021-02-22T08:53:17.086095Z 16 Query select user()
2021-02-22T08:53:27.086629Z 18 Query select user()
[root@slave ~]#tail -f /var/lib/mysql/slave.log
请不要以此视为定论,这只是我的个人经验

北京人形旗下天工造物具身智能开源社区,聚焦具身天工与慧思开物两大平台
更多推荐
 13
13 0
0- 0


 已为社区贡献6条内容

所有评论(0)