windows openvino部署yolov8l模型流程记录(C++)
·
- 将yolo的pt文件转为onnx文件
	from ultralytics import YOLO
	model = YOLO("yolov8l.yaml")  # 从头开始构建新模型
	model = YOLO("best.pt")  # 加载预训练模型(推荐用于训练)
	success = model.export(format="onnx")  # 将模型导出为 ONNX 格式
-
将onnx模型转为IR模型用于openvino使用(Pt模型导出Openvino模型_pt转openvino-CSDN博客)
下载openvino工具(版本需要和vs使用的openvino版本一致)
pip install openvino-dev[pytorch] -i https://pypi.tuna.tsinghua.edu.cn/simple/找到虚拟环境下的openvino文件夹中的mo_onnx.py文件
“D:\installed software\Anaconda\envs\ocr_detect\Lib\site-packages\openvino\tools\mo\mo_onnx.py”
mo_onnx.py --input_model xxxx.onnx --output_dir xxx -
在vs中配置openvino和opencv库
本次版本 openvino(2024.6.0) opencv(4.11)
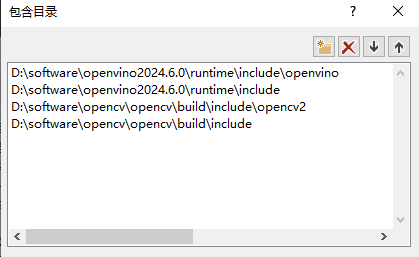
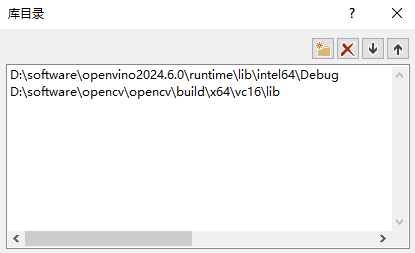
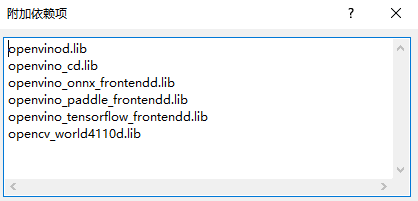
-
编写配置代码
#include <iostream>
#include <string>
#include <vector>

#include <openvino/openvino.hpp> //openvino header file
#include <opencv2/opencv.hpp>    //opencv header file

std::vector<cv::Scalar> colors = { cv::Scalar(0, 0, 255) , cv::Scalar(0, 255, 0) , cv::Scalar(255, 0, 0) ,
                                   cv::Scalar(255, 100, 50) , cv::Scalar(50, 100, 255) , cv::Scalar(255, 50, 100) };
const std::vector<std::string> class_names = {
    "B", "cell", "bla" };

using namespace cv;
using namespace dnn;

// Keep the ratio before resize
Mat letterbox(const cv::Mat& source)
{
    int col = source.cols;
    int row = source.rows;
    int _max = MAX(col, row);
    Mat result = Mat::zeros(_max, _max, CV_8UC3);
    source.copyTo(result(Rect(0, 0, col, row)));
    return result;
}

int main(int argc, char* argv[])
{
    // -------- Step 1. Initialize OpenVINO Runtime Core --------
    ov::Core core;

    // -------- Step 2. Compile the Model --------
    auto compiled_model = core.compile_model("E:\\c++_code\\old\\openvino\\cell\\mo\\best.xml", "CPU");

    // -------- Step 3. Create an Inference Request --------
    ov::InferRequest infer_request = compiled_model.create_infer_request();

    // -------- Step 4.Read a picture file and do the preprocess --------
    Mat img = cv::imread("E:\\c++_code\\old\\openvino\\cell\\0200C5022E_10_4_4_340.jpg");
    // Preprocess the image
    Mat letterbox_img = letterbox(img);
    float scale = letterbox_img.size[0] / 640.0;
    Mat blob = blobFromImage(letterbox_img, 1.0 / 255.0, Size(640, 640), Scalar(), true);

    // -------- Step 5. Feed the blob into the input node of the Model -------
    // Get input port for model with one input
    auto input_port = compiled_model.input();
    // Create tensor from external memory
    ov::Tensor input_tensor(input_port.get_element_type(), input_port.get_shape(), blob.ptr(0));
    // Set input tensor for model with one input
    infer_request.set_input_tensor(input_tensor);

    // -------- Step 6. Start inference --------
    infer_request.infer();

    // -------- Step 7. Get the inference result --------
    auto output = infer_request.get_output_tensor(0);
    auto output_shape = output.get_shape();
    std::cout << "The shape of output tensor:" << output_shape << std::endl;
    int rows = output_shape[2];        //8400
    int dimensions = output_shape[1];  //84: box[cx, cy, w, h]+80 classes scores

    // -------- Step 8. Postprocess the result --------
    float* data = output.data<float>();
    Mat output_buffer(output_shape[1], output_shape[2], CV_32F, data);
    transpose(output_buffer, output_buffer); //[8400,84]
    float score_threshold = 0.25;
    float nms_threshold = 0.5;
    std::vector<int> class_ids;
    std::vector<float> class_scores;
    std::vector<Rect> boxes;

    // Figure out the bbox, class_id and class_score
    for (int i = 0; i < output_buffer.rows; i++) {
        Mat classes_scores = output_buffer.row(i).colRange(4, 5);
        Point class_id;
        double maxClassScore;
        minMaxLoc(classes_scores, 0, &maxClassScore, 0, &class_id);

        if (maxClassScore > score_threshold) {
            class_scores.push_back(maxClassScore);
            class_ids.push_back(class_id.x);
            float cx = output_buffer.at<float>(i, 0);
            float cy = output_buffer.at<float>(i, 1);
            float w = output_buffer.at<float>(i, 2);
            float h = output_buffer.at<float>(i, 3);

            int left = int((cx - 0.5 * w) * scale);
            int top = int((cy - 0.5 * h) * scale);
            int width = int(w * scale);
            int height = int(h * scale);

            boxes.push_back(Rect(left, top, width, height));
        }
    }
    //NMS
    std::vector<int> indices;
    NMSBoxes(boxes, class_scores, score_threshold, nms_threshold, indices);

    // -------- Visualize the detection results -----------
    for (size_t i = 0; i < indices.size(); i++) {
        int index = indices[i];
        int class_id = class_ids[index];
        rectangle(img, boxes[index], colors[class_id % 6], 2, 8);
        std::string label = class_names[class_id] + ":" + std::to_string(class_scores[index]).substr(0, 4);
        Size textSize = cv::getTextSize(label, FONT_HERSHEY_SIMPLEX, 0.5, 1, 0);
        Rect textBox(boxes[index].tl().x, boxes[index].tl().y - 15, textSize.width, textSize.height + 5);
        cv::rectangle(img, textBox, colors[class_id % 6], FILLED);
        putText(img, label, Point(boxes[index].tl().x, boxes[index].tl().y - 5), FONT_HERSHEY_SIMPLEX, 0.5, Scalar(255, 255, 255));
    }

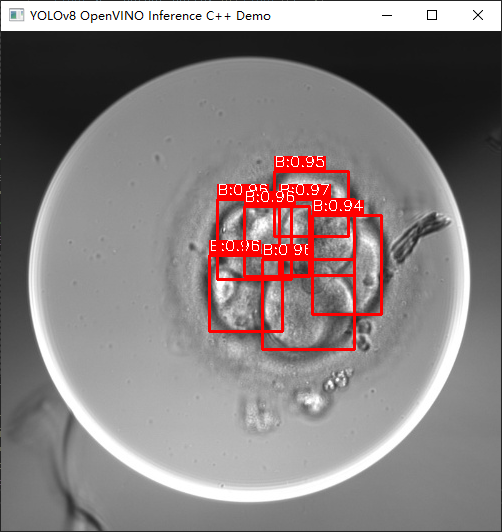
    namedWindow("YOLOv8 OpenVINO Inference C++ Demo", WINDOW_AUTOSIZE);
    imshow("YOLOv8 OpenVINO Inference C++ Demo", img);
    waitKey(0);
    destroyAllWindows();
    return 0;
}
注:代码中const std::vector<std::string> class_names = {"B", "cell", "bla" }; 需要更改为模型yaml中的类别
      Mat classes_scores = output_buffer.row(i).colRange(4, 5); 5需要改为onnx模型output的类别数
- 运行前将dll链接库放置在exe所在的文件夹中
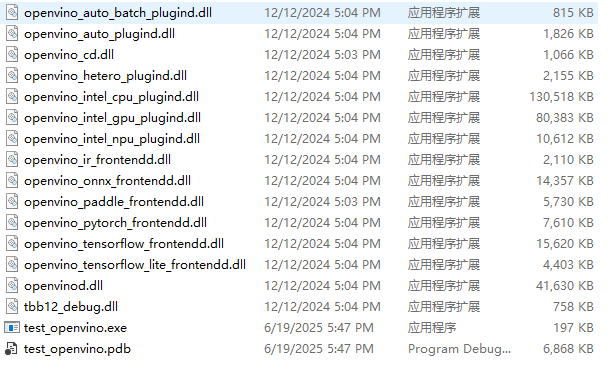
- 正常运行即可

北京人形旗下天工造物具身智能开源社区,聚焦具身天工与慧思开物两大平台
更多推荐
 34
34 0
0- 0


 已为社区贡献3条内容

所有评论(0)