Nacos 配置管理案例:nacos-spring-cloud-config-example详解
一、结构说明:基于Spring Cloud Alibaba的微服务示例
nacos-spring-cloud-config-example : 服务提供者
二、技术栈:Spring Boot+Spring Cloud+Spring Cloud Alibaba Nacos + Actuator(可选:监控)
三、使用环境
安装nacos参考:
Nacos 安装配置步骤详解_nacos:2.5.1 mysql-CSDN博客
Nacos 服务注册与发现参考:Nacos 服务注册发现案例:nacos-spring-cloud-example 详解-CSDN博客
- 安装Nacos服务(nacos-server-2.5.1)
- 确保JDK17环境(根据pom.xml中的配置)
- Maven环境 3.6.3 +
四、项目结构示例:
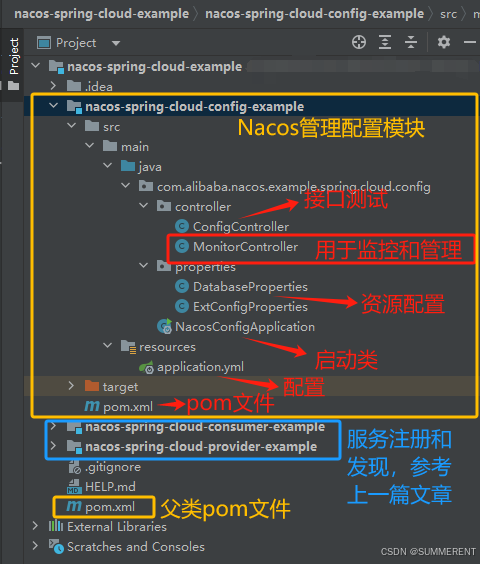
五、代码详解配置:
(1):nacos-spring-cloud-example----父pom.xml文件
<?xml version="1.0" encoding="UTF-8"?>
<project xmlns="http://maven.apache.org/POM/4.0.0"
         xmlns:xsi="http://www.w3.org/2001/XMLSchema-instance"
         xsi:schemaLocation="http://maven.apache.org/POM/4.0.0 http://maven.apache.org/xsd/maven-4.0.0.xsd">
    <modelVersion>4.0.0</modelVersion>
    <groupId>com.alibaba.nacos</groupId>
    <artifactId>nacos-spring-cloud-example</artifactId>
    <packaging>pom</packaging>
    <version>0.2.0-SNAPSHOT</version>

    <modules>
        <module>nacos-spring-cloud-provider-example</module>
        <module>nacos-spring-cloud-consumer-example</module>
    </modules>

    <properties>
        <spring-boot.version>3.0.2</spring-boot.version>
        <spring-cloud.version>2022.0.0</spring-cloud.version>
        <spring-cloud-alibaba.version>2022.0.0.0</spring-cloud-alibaba.version>

        <maven.compiler.source>17</maven.compiler.source>
        <maven.compiler.target>17</maven.compiler.target>
    </properties>
    <dependencyManagement>
        <dependencies>
            <!-- Spring Boot -->
            <dependency>
                <groupId>org.springframework.boot</groupId>
                <artifactId>spring-boot-dependencies</artifactId>
                <version>${spring-boot.version}</version>
                <type>pom</type>
                <scope>import</scope>
            </dependency>
            <!-- Spring Cloud -->
            <dependency>
                <groupId>org.springframework.cloud</groupId>
                <artifactId>spring-cloud-dependencies</artifactId>
                <version>${spring-cloud.version}</version>
                <type>pom</type>
                <scope>import</scope>
            </dependency>
            <!-- Spring Cloud Alibaba -->
            <dependency>
                <groupId>com.alibaba.cloud</groupId>
                <artifactId>spring-cloud-alibaba-dependencies</artifactId>
                <version>${spring-cloud-alibaba.version}</version>
                <type>pom</type>
                <scope>import</scope>
            </dependency>
        </dependencies>
    </dependencyManagement>
    <build>
        <plugins>
            <plugin>
                <groupId>org.springframework.boot</groupId>
                <artifactId>spring-boot-maven-plugin</artifactId>
                <executions>
                    <execution>
                        <goals>
                            <goal>repackage</goal>
                        </goals>
                    </execution>
                </executions>
            </plugin>
        </plugins>
    </build>
</project>
(2):配置管理 nacos-spring-cloud-config-example
1、添加依赖:pom.xml文件
<?xml version="1.0" encoding="UTF-8"?>
<project xmlns="http://maven.apache.org/POM/4.0.0"
         xmlns:xsi="http://www.w3.org/2001/XMLSchema-instance"
         xsi:schemaLocation="http://maven.apache.org/POM/4.0.0 http://maven.apache.org/xsd/maven-4.0.0.xsd">
    <parent>
        <artifactId>nacos-spring-cloud-example</artifactId>
        <groupId>com.alibaba.nacos</groupId>
        <version>0.2.0-SNAPSHOT</version>
    </parent>
    <modelVersion>4.0.0</modelVersion>
    <artifactId>nacos-spring-cloud-config-example</artifactId>

    <dependencies>
        <!-- Spring Boot Web 启动器 -->
        <dependency>
            <groupId>org.springframework.boot</groupId>
            <artifactId>spring-boot-starter-web</artifactId>
        </dependency>

        <!-- Nacos 配置中心依赖 -->
        <dependency>
            <groupId>com.alibaba.cloud</groupId>
            <artifactId>spring-cloud-starter-alibaba-nacos-config</artifactId>
        </dependency>

        <!-- Spring Cloud 基础依赖
            提供了 Spring Cloud 的核心功能
            包含 @RefreshScope 等注解的支持-->
        <dependency>
            <groupId>org.springframework.cloud</groupId>
            <artifactId>spring-cloud-context</artifactId>
        </dependency>

        <!-- Spring Boot 配置处理器
            用于处理 @ConfigurationProperties 注解
            提供配置属性的元数据支持-->
        <dependency>
            <groupId>org.springframework.boot</groupId>
            <artifactId>spring-boot-configuration-processor</artifactId>
            <optional>true</optional>
        </dependency>

        <!-- 添加 actuator 监控 -->
        <dependency>
            <groupId>org.springframework.boot</groupId>
            <artifactId>spring-boot-starter-actuator</artifactId>
        </dependency>

        <!-- Spring Boot 注解处理器
            提供 AOP 支持
            用于实现配置刷新等功能 -->
        <dependency>
            <groupId>org.springframework.boot</groupId>
            <artifactId>spring-boot-starter-aop</artifactId>
        </dependency>
    </dependencies>

    <build>
        <plugins>
            <plugin>
                <groupId>org.springframework.boot</groupId>
                <artifactId>spring-boot-maven-plugin</artifactId>
                <executions>
                    <execution>
                        <goals>
                            <goal>repackage</goal>
                        </goals>
                    </execution>
                </executions>
            </plugin>
            <plugin>
                <artifactId>maven-compiler-plugin</artifactId>
                <configuration>
                    <source>17</source>
                    <target>17</target>
                </configuration>
            </plugin>
        </plugins>
    </build>
</project> 2、配置application.yml中配置 Nacos server 的地址:
server:
  port: 8080

spring:
  application:
    name: nacos-config-example
  profiles:
    active: dev
  config:
    import:
      - optional:nacos:${spring.application.name}-${spring.profiles.active}.yaml  # 主配置文件   # optional 表示配置可选,找不到也不报错
      - optional:nacos:common-db.yaml  # 共享配置-数据库
      - optional:nacos:common-redis.yaml  # 共享配置-Redis
      - optional:nacos:ext-config-common.yaml  # 扩展配置-通用
      - optional:nacos:ext-config-${spring.profiles.active}.yaml  # 扩展配置-环境特定
  cloud:
    nacos:
      config:
        server-addr: localhost:8848
        namespace: public
        group: DEFAULT_GROUP
        file-extension: yaml
        refresh-enabled: true

# actuator 配置:用于监控和管理应用程序
management:
  endpoints:
    web:
      exposure:
        include: '*'  # 开启所有监控端点
  endpoint:
    health:
      show-details: always # 显示详细的健康信息
通过spring:config:import:- optional:nacos: 后面跟的是dataId是在Nacos配置中心配置将 dataId 为common-db.yaml共享配置-数据库
group: DEFAULT_GROUP的配置作为配置源
3、在 Nacos 控制台配置:访问地址http://localhost:8848/nacos 默认用户名nacos 密码nacos
需要在 Nacos 控制台创建以下配置:
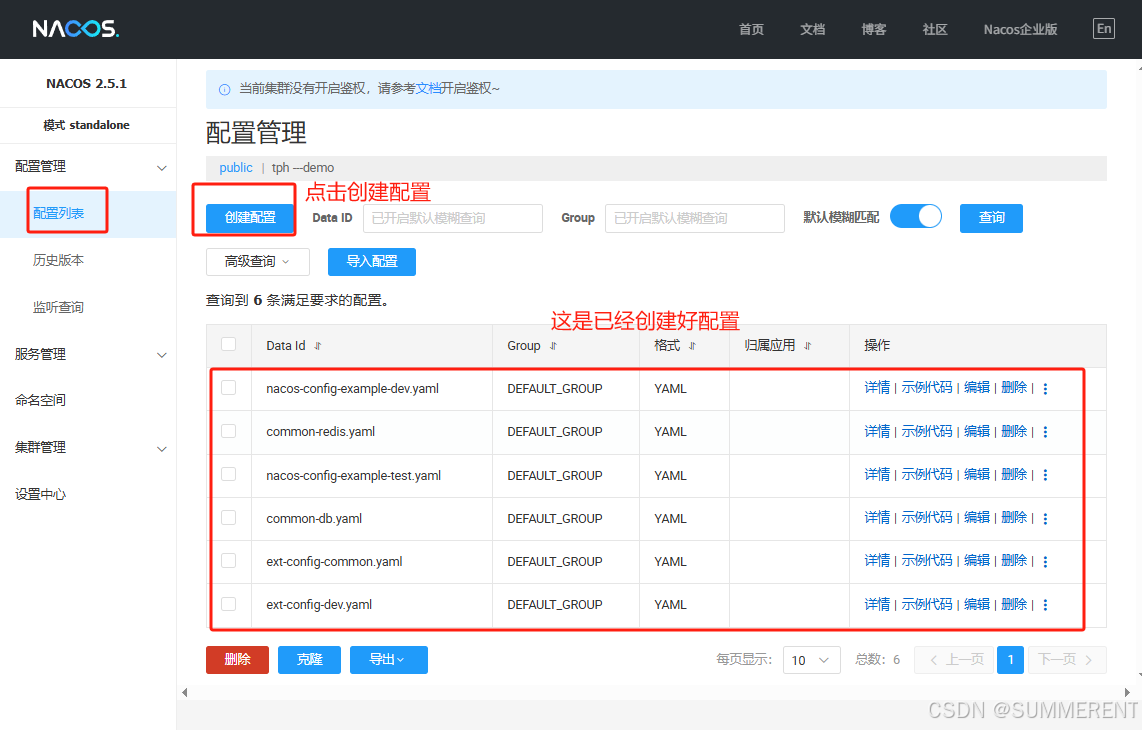
3.1. 主配置文件-dev环境: nacos-config-example-dev.yaml
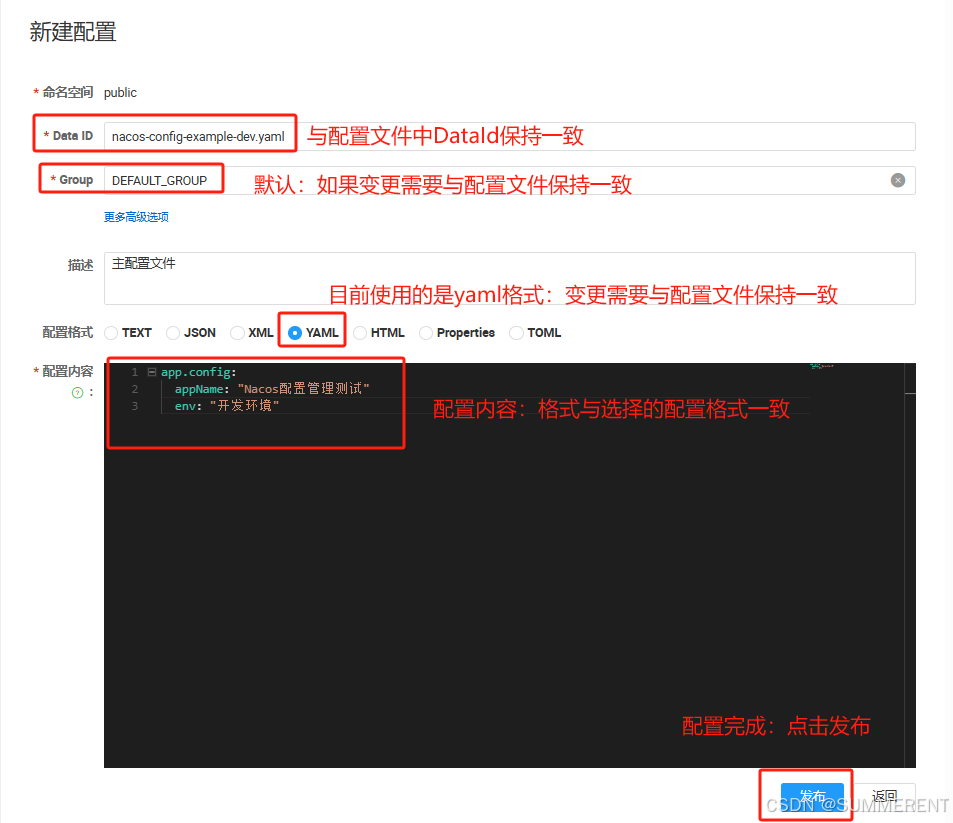
填写好配置:点击发布即可
3.2. 主配置文件-test环境: nacos-config-example-test.yaml ,参照上述图创建如下信息:
# Data ID: nacos-config-example-test.yaml
# Group: DEFAULT_GROUP
# 配置格式选择 YAML
# 配置内容⬇️
app.config:
  appName: "Nacos配置管理测试"
  env: "测试环境"
3.3. Redis配置文件-通用: common-redis.yaml
# Data ID: common-redis.yaml
# Group: DEFAULT_GROUP
# 配置格式选择 YAML
# 配置内容⬇️
common:
  title: "配置中心测试"
  version: "1.0.0"
3.4. 数据库配置文件-通用: common-db.yaml
# Data ID: common-db.yaml
# Group: DEFAULT_GROUP
# 配置格式选择 YAML
# 配置内容⬇️
database:
  url: jdbc:mysql://localhost:3306/test2222
  username: root
  password: 123456
  driverClassName: com.mysql.cj.jdbc.Driver
3.5. 扩展配置文件-通用: ext-config-common.yaml
# Data ID: ext-config-common.yaml
# Group: DEFAULT_GROUP
# 配置格式选择 YAML
# 配置内容⬇️
ext.config:
  timeout: 3000        # 通用超时时间
  maxRetry: 3          # 通用重试次数
  appName: "配置中心示例"  # 应用名称
3.6. 扩展配置文件-dev环境: ext-config-dev.yaml
# Data ID: ext-config-dev.yaml
# Group: DEFAULT_GROUP
# 配置格式选择 YAML
# 配置内容⬇️
ext.config:
  env: "开发环境"        # 环境标识
  debug: true          # 是否开启调试
  logLevel: "DEBUG"    # 日志级别
4、编写属性类
4.1.数据库属性类--DatabaseProperties
package com.alibaba.nacos.example.spring.cloud.config.properties;

import org.springframework.boot.context.properties.ConfigurationProperties;
import org.springframework.cloud.context.config.annotation.RefreshScope;
import org.springframework.stereotype.Component;

/**
 * @RefreshScope:
 * 实现配置的动态刷新
 * 当配置更新时,使用此注解的类会重新注入新的配置值
 */
@Component
@RefreshScope
@ConfigurationProperties(prefix = "database")// 对应配置文件中 database 前缀的配置
public class DatabaseProperties {
    /**
     *  数据库地址 - 来自数据库配置
     */
    private String url;
    /**
     *  数据库用户名 - 来自数据库配置
     */
    private String username;
    /**
     *  数据库密码 - 来自数据库配置
     */
    private String password;
    /**
     *  数据库驱动程序类名称 - 来自数据库配置
     */
    private String driverClassName;

    // Getters and Setters
    public String getUrl() {
        return url;
    }

    public void setUrl(String url) {
        this.url = url;
    }

    public String getUsername() {
        return username;
    }

    public void setUsername(String username) {
        this.username = username;
    }

    public String getPassword() {
        return password;
    }

    public void setPassword(String password) {
        this.password = password;
    }

    public String getDriverClassName() {
        return driverClassName;
    }

    public void setDriverClassName(String driverClassName) {
        this.driverClassName = driverClassName;
    }
}
4.2.扩展配置属性类属性类--ExtConfigProperties
package com.alibaba.nacos.example.spring.cloud.config.properties;

import org.springframework.boot.context.properties.ConfigurationProperties;
import org.springframework.cloud.context.config.annotation.RefreshScope;
import org.springframework.stereotype.Component;

/**
 * 扩展配置属性类
 * 用于映射 ext.config 前缀的配置项
 * 包含通用配置和环境特定配置的属性
 */
@Component
@RefreshScope  // 支持配置动态刷新
@ConfigurationProperties(prefix = "ext.config")  // 对应配置文件中 ext.config 前缀的配置
public class ExtConfigProperties {

    /**
     * 应用名称 - 来自通用配置
     */
    private String appName;

    /**
     * 超时时间 - 来自通用配置
     */
    private Integer timeout;

    /**
     * 最大重试次数 - 来自通用配置
     */
    private Integer maxRetry;

    /**
     * 环境标识 - 来自环境特定配置
     */
    private String env;

    /**
     * 是否开启调试 - 来自环境特定配置
     */
    private Boolean debug;

    /**
     * 日志级别 - 来自环境特定配置
     */
    private String logLevel;

    // Getters and Setters
    public String getAppName() {
        return appName;
    }

    public void setAppName(String appName) {
        this.appName = appName;
    }

    public Integer getTimeout() {
        return timeout;
    }

    public void setTimeout(Integer timeout) {
        this.timeout = timeout;
    }

    public Integer getMaxRetry() {
        return maxRetry;
    }

    public void setMaxRetry(Integer maxRetry) {
        this.maxRetry = maxRetry;
    }

    public String getEnv() {
        return env;
    }

    public void setEnv(String env) {
        this.env = env;
    }

    public Boolean getDebug() {
        return debug;
    }

    public void setDebug(Boolean debug) {
        this.debug = debug;
    }

    public String getLogLevel() {
        return logLevel;
    }

    public void setLogLevel(String logLevel) {
        this.logLevel = logLevel;
    }
}
5、配置控制器ConfigController:用于展示各种配置的获取方式和使用方法
package com.alibaba.nacos.example.spring.cloud.config.controller;

import com.alibaba.nacos.example.spring.cloud.config.properties.DatabaseProperties;
import com.alibaba.nacos.example.spring.cloud.config.properties.ExtConfigProperties;
import org.springframework.beans.factory.annotation.Autowired;
import org.springframework.beans.factory.annotation.Value;
import org.springframework.cloud.context.config.annotation.RefreshScope;
import org.springframework.web.bind.annotation.GetMapping;
import org.springframework.web.bind.annotation.RequestMapping;
import org.springframework.web.bind.annotation.RestController;

import java.util.HashMap;
import java.util.Map;

/**
 * 配置控制器
 * 用于展示各种配置的获取方式和使用方法
 * @RefreshScope:
 * 实现配置的动态刷新
 * 当配置更新时,使用此注解的类会重新注入新的配置值
 * @Value:
 * 注入配置值
 * 格式:@Value("${key:defaultValue}")
 * defaultValue 为配置不存在时的默认值,如果没有设置默认值:不存在是就是为空
 */
@RestController
@RequestMapping("/config")
@RefreshScope  // 支持配置动态刷新
public class ConfigController {

    /**
     * 使用 @Value 注解直接注入配置项
     * 来自共享配置文件 nacos-config-example-dev.yaml 或 nacos-config-example-test.yaml 动态配置
     */

    @Value("${ext.config.appName:}")
    private String appName;

    @Value("${ext.config.env:}")
    private String env;

    /**
     * 使用 @Value 注解直接注入配置项
     * 来自共享配置文件 common-redis.yaml
     */
    @Value("${common.title:}")
    private String commonTitle;

    @Value("${common.version:}")
    private String commonVersion;

    /**
     * 注入扩展配置属性类
     * 通过 @ConfigurationProperties 方式注入的配置
     */
    @Autowired
    private ExtConfigProperties extConfigProperties;

    /**
     * 注入数据库配置属性类
     */
    @Autowired
    private DatabaseProperties databaseProperties;

    /**
     * 获取所有配置信息
     * 包括:通用Redis配置、环境特定配置、数据库配置等
     */
    @GetMapping("/get")
    public Map<String, Object> getConfig() {
        Map<String, Object> config = new HashMap<>();

        // 应用配置   nacos-config-example-dev.yaml 或 nacos-config-example-test.yaml 动态配置
        Map<String, Object> applicationConfig = new HashMap<>();
        applicationConfig.put("applicationName", appName);
        applicationConfig.put("environment", env);
        config.put("application", applicationConfig);

        // 数据库配置  common-db.yaml
        Map<String, String> dbConfig = new HashMap<>();
        dbConfig.put("url", databaseProperties.getUrl());
        dbConfig.put("username", databaseProperties.getUsername());
        dbConfig.put("password", databaseProperties.getPassword());
        dbConfig.put("driverClassName", databaseProperties.getDriverClassName());
        config.put("common-db", dbConfig);

        // 通用配置  common-redis.yaml
        Map<String, Object> commonConfig = new HashMap<>();
        commonConfig.put("title", commonTitle);
        commonConfig.put("version", commonVersion);
        config.put("common-redis", commonConfig);

        // 扩展配置ext-config-common.yaml(包含通用和环境特定的配置ext-config-dev.yaml)
        Map<String, Object> extConfig = new HashMap<>();
        extConfig.put("appName", extConfigProperties.getAppName());
        extConfig.put("timeout", extConfigProperties.getTimeout());
        extConfig.put("maxRetry", extConfigProperties.getMaxRetry());
        extConfig.put("env", extConfigProperties.getEnv());
        extConfig.put("debug", extConfigProperties.getDebug());
        extConfig.put("logLevel", extConfigProperties.getLogLevel());
        config.put("extConfig", extConfig);


        return config;
    }
}
6、测试步骤:
6.1 首先启动Nacos服务
访问地址:http://localhost:8848/nacos
默认用户名/密码:nacos/nacos
配置上述的数据库,reids等配置
6.2启动应用程序服务
6.3访问接口 http://localhost:8080/config/get
返回数据成功:开始是使用的是dev环境
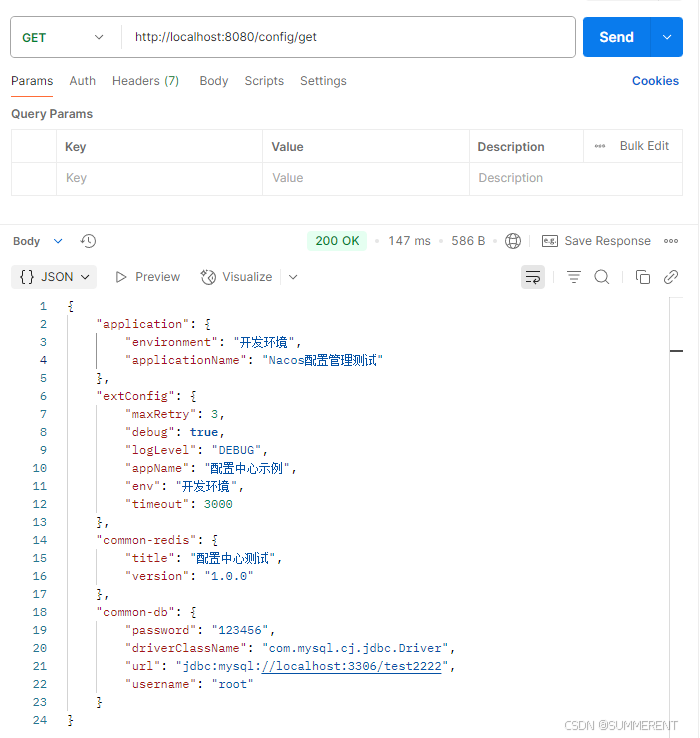
6.4 修改配置测试动态刷新
测试1:修改application.yml文件,换成test环境
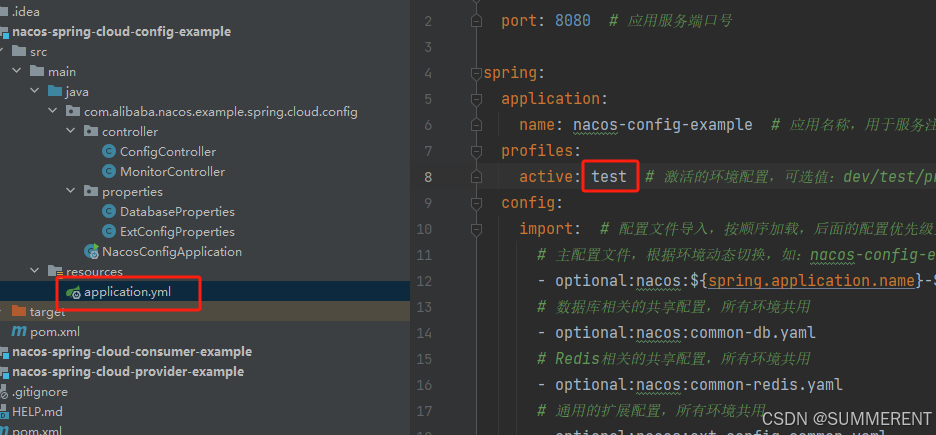
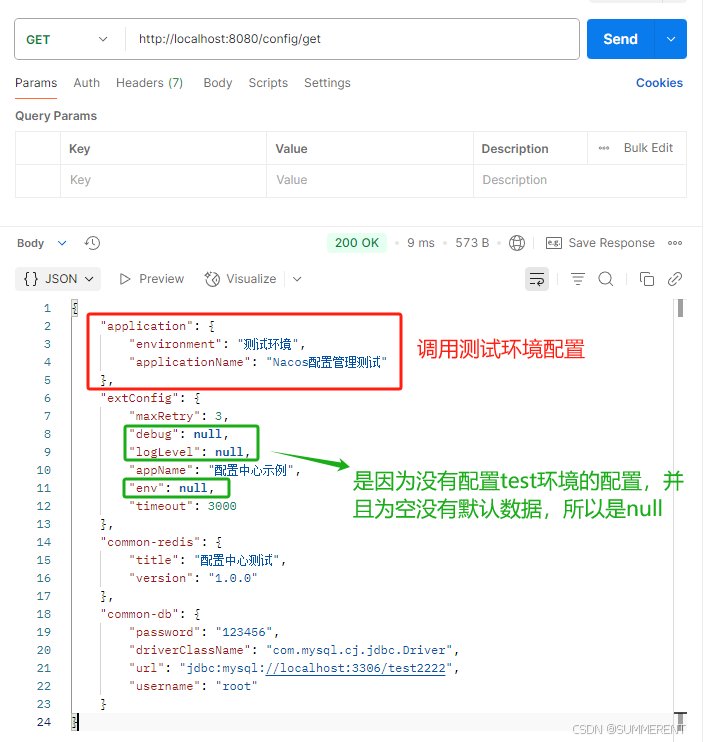
访问接口:测试结果:配置成功------调用的是nacos-config-example-test.yaml 中的配置
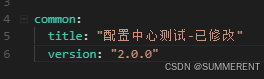
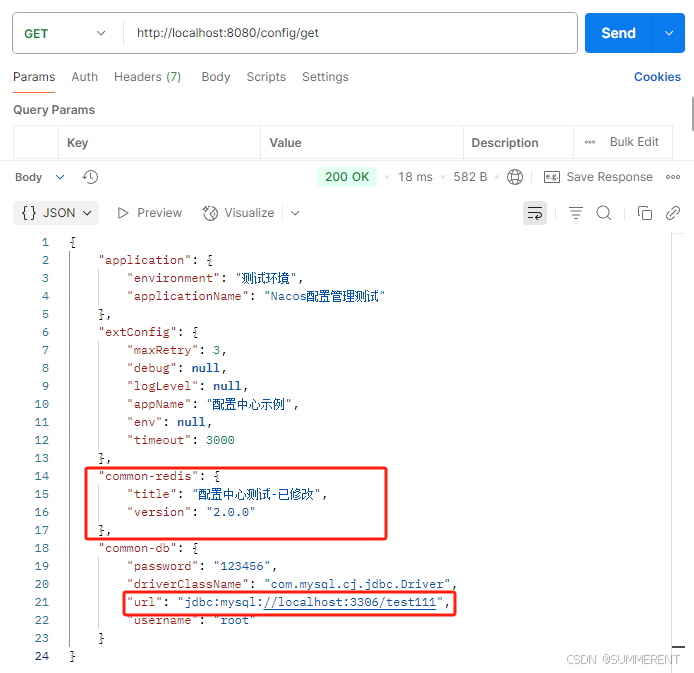
测试2:在nacos配置管理:动态修改common-redis.yaml配置文件
 点击发布:--->确认发布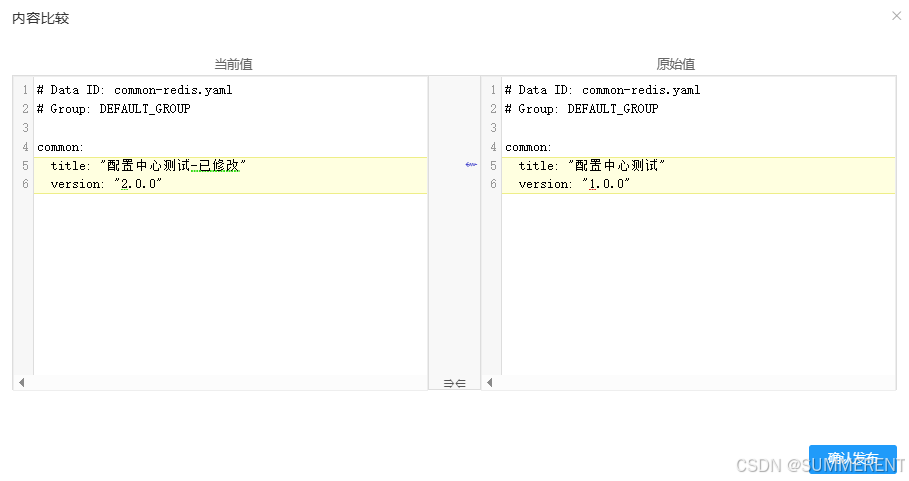
在修改一个数据库配置:common-db.yaml :修改数据库名为test111
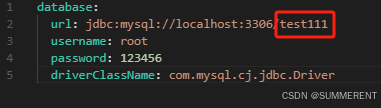 修改完成后点击发布
再次访问接口:测试结果:动态修改成功
六、监控控制:用于展示 Actuator 监控功能
Spring Boot Actuator 是一个用于监控和管理应用程序的强大功能模块
Actuator 的主要作用
1、健康检查
    检查应用程序的健康状态
    监控数据库连接、磁盘空间等
2、配置信息查看
    查看当前应用的所有配置信息
    查看配置的来源和优先级
3、度量指标监控
    JVM 内存使用
    线程使用
4、HTTP 请求统计
    运行时信息
    查看运行环境
    系统属性
    环境变量
package com.alibaba.nacos.example.spring.cloud.config.controller;
import org.springframework.beans.factory.annotation.Autowired;
import org.springframework.boot.actuate.health.HealthComponent;
import org.springframework.boot.actuate.health.HealthEndpoint;
import org.springframework.web.bind.annotation.GetMapping;
import org.springframework.web.bind.annotation.RequestMapping;
import org.springframework.web.bind.annotation.RestController;
import java.lang.management.ManagementFactory;
import java.lang.management.RuntimeMXBean;
import java.util.HashMap;
import java.util.Map;
/**
* 监控控制器
* 用于展示 Actuator 监控功能
*/
@RestController
@RequestMapping("/monitor")
public class MonitorController {
@Autowired
private HealthEndpoint healthEndpoint;
/**
* 获取应用健康状态
* 包括:
* - 应用状态
* - 磁盘空间
* - 数据库连接
* 等系统组件的状态
*/
@GetMapping("/health")
public HealthComponent health() {
return healthEndpoint.health();
}
/**
* 获取应用基本信息
* 包括:
* - 应用名称
* - 启动时间
* - JVM 信息
* - 系统信息等
*/
@GetMapping("/info")
public Map<String, Object> info() {
Map<String, Object> info = new HashMap<>();
// 运行时信息
Runtime runtime = Runtime.getRuntime();
Map<String, Object> jvm = new HashMap<>();
jvm.put("totalMemory", runtime.totalMemory());//JVM 当前总内存
jvm.put("freeMemory", runtime.freeMemory());//JVM 当前可用内存
jvm.put("maxMemory", runtime.maxMemory());//JVM 最大可申请内存
jvm.put("availableProcessors", runtime.availableProcessors());//可用CPU核心数
// 获取JVM启动参数(如 -Xmx 设置的值)
RuntimeMXBean runtimeMxBean = ManagementFactory.getRuntimeMXBean();
jvm.put("inputArguments", runtimeMxBean.getInputArguments());
info.put("jvm", jvm);
// 系统信息
Map<String, String> system = new HashMap<>();
system.put("javaVersion", System.getProperty("java.version"));//Java 版本
system.put("osName", System.getProperty("os.name"));//操作系统名称
system.put("osArch", System.getProperty("os.arch"));//操作系统架构
system.put("osVersion", System.getProperty("os.version"));//操作系统版本
info.put("system", system);
return info;
}
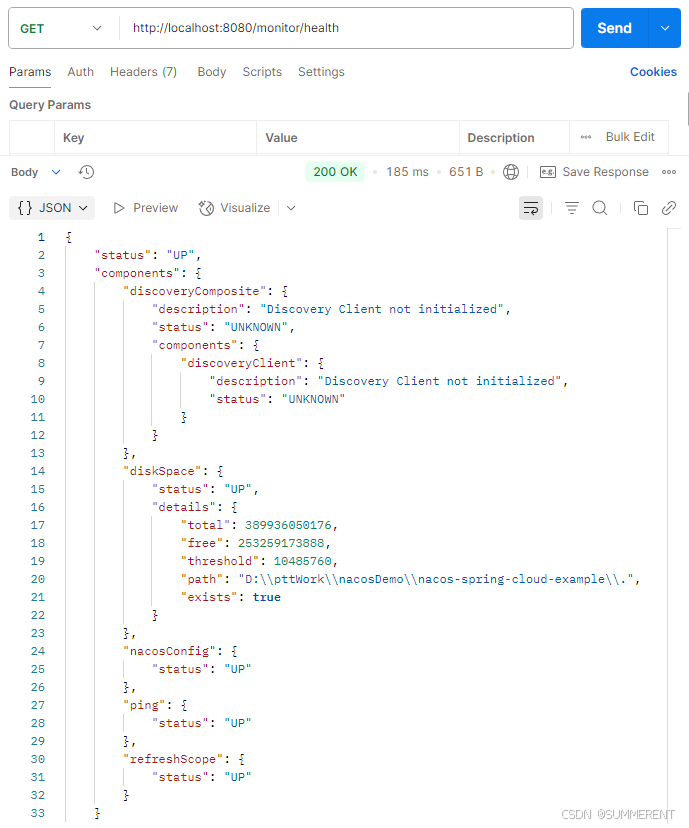
} 接口测试---获取应用健康状态 http://localhost:8080/monitor/health
接口测试---获取应用基本信息 :http://localhost:8080/monitor/info
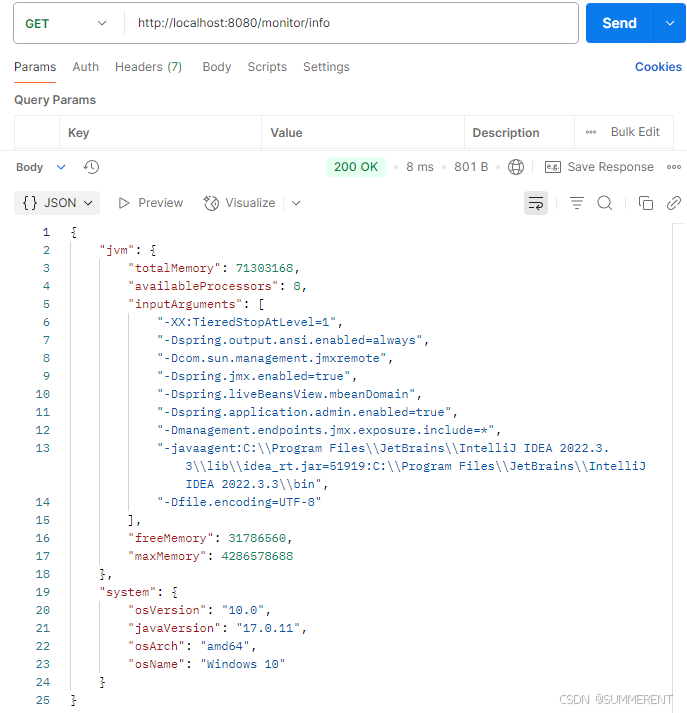
直接访问接口:查看对应的信息
# 查看应用健康状态
http://localhost:8080/actuator/health

# 查看所有配置属性
http://localhost:8080/actuator/configprops

# 查看环境信息
http://localhost:8080/actuator/env

# 查看所有可用的指标
http://localhost:8080/actuator/metrics

# 手动刷新配置
POST
http://localhost:8080/actuator/refresh

# 查看 JVM 内存指标
http://localhost:8080/actuator/metrics/jvm.memory.used

# 查看 HTTP 请求指标
http://localhost:8080/actuator/metrics/http.server.requests

北京人形旗下天工造物具身智能开源社区,聚焦具身天工与慧思开物两大平台
更多推荐
 25
25 0
0- 0


 已为社区贡献4条内容

所有评论(0)