Hive-02之分桶表、数据导入导出、静动态分区、查询、排序、hiveserver2
一、目标
- 掌握hive中数据导入、导出的方式
- 掌握hive创建分区表和使用方式
- 掌握hive的静态分区和动态分区
- 理解hive中的分桶表作用
二、要点
⭐️1、hive的分桶表
-
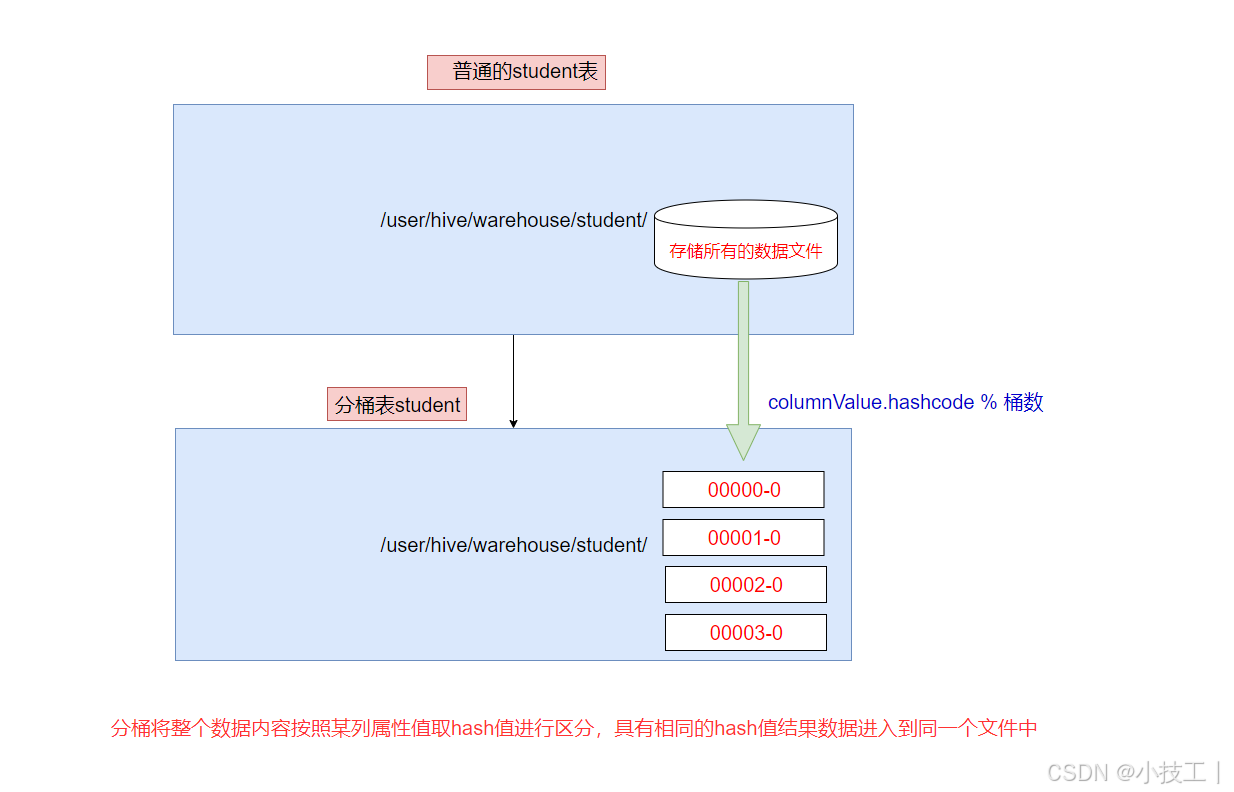
分桶是相对分区进行更细粒度的划分。
-
分桶将整个数据内容安装某列属性值取hash值进行区分,具有相同hash值的数据进入到同一个文件中
- 比如按照name属性分为3个桶,就是对name属性值的hash值对3取摸,按照取模结果对数据分桶。
- 取模结果为0的数据记录存放到一个文件
- 取模结果为1的数据记录存放到一个文件
- 取模结果为2的数据记录存放到一个文件
- 取模结果为3的数据记录存放到一个文件
- 比如按照name属性分为3个桶,就是对name属性值的hash值对3取摸,按照取模结果对数据分桶。
-
作用
- 1、取样sampling更高效。没有分区的话需要扫描整个数据集。
- 2、提升某些查询操作效率,例如map side join
-
案例演示
-
1、创建分桶表
- 在创建分桶表之前要执行的命令
- set hive.enforce.bucketing=true; 开启对分桶表的支持
- set mapreduce.job.reduces=4; 设置与桶相同的reduce个数(默认只有一个reduce)
# 进入hive客户端然后执行以下命令 use myhive; set mapreduce.job.reduces=4; set hive.enforce.bucketing=true; --分桶表 create table myhive.user_buckets_demo(id int, name string) clustered by(id) into 4 buckets row format delimited fields terminated by '\t'; --普通表 create table user_demo(id int, name string) row format delimited fields terminated by '\t'; - 在创建分桶表之前要执行的命令
-
2、准备数据文件 buckets.txt
#在linux当中执行以下命令 cd /kkb/install/hivedatas/ vim user_bucket.txt 1 laowang1 2 laowang2 3 laowang3 4 laowang4 5 laowang5 6 laowang6 7 laowang7 8 laowang8 9 laowang9 10 laowang10 -
3、加载数据到普通表 user_demo 中
load data local inpath ‘/kkb/install/hivedatas/user_bucket.txt’ overwrite into table user_demo;
#在hive客户端当中加载数据 load data local inpath '/kkb/install/hivedatas/user_bucket.txt' into table user_demo;-
4、加载数据到桶表user_buckets_demo中
insert into table user_buckets_demo select * from user_demo; -
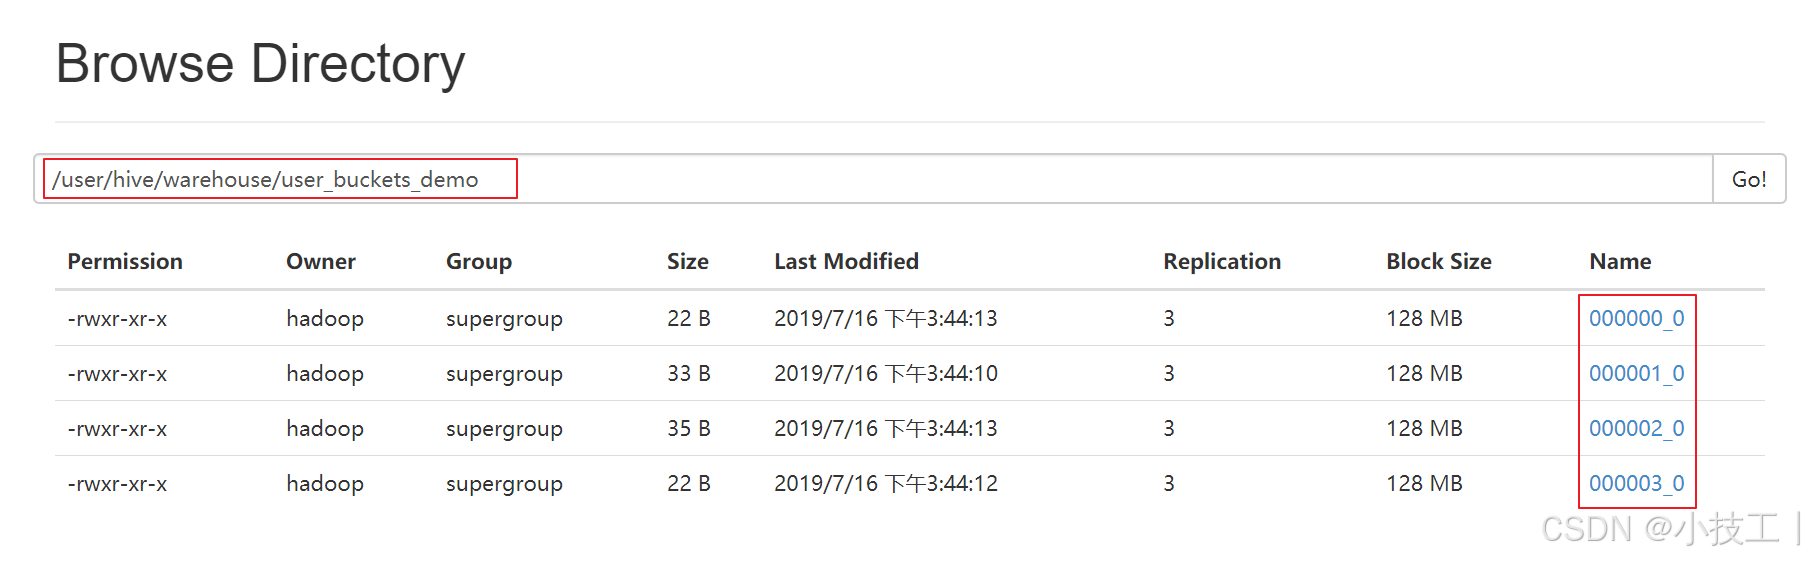
5、hdfs上查看表的数据目录
-
6、抽样查询桶表的数据
- tablesample抽样语句,语法:tablesample(bucket x out of y)
- x表示从第几个桶开始取数据
- y表示桶数的倍数,一共需要从 桶数/y 个桶中取数据
select * from user_buckets_demo tablesample(bucket 1 out of 2)

-- 需要的总桶数=4/2=2个
-- 先从第1个桶中取出数据
-- 再从第1+2=3个桶中取出数据
-
2、Hive修改表结构
修改表名称语法
alter table old_table_name rename to new_table_name;
2.1 修改表的名称
hive> alter table stu3 rename to stu4;
2.2 表的结构信息
hive> desc stu4;

hive> desc formatted stu4;
2.3 增加/修改/替换列信息
- 增加列
hive> alter table stu4 add columns(address string);
- 修改列
hive> alter table stu4 change column address address_id int;
3. Hive数据导入
1、直接向表中插入数据(强烈不推荐使用)
hive (myhive)> create table score3 like score;
hive (myhive)> insert into table score3 partition(month ='201807') values ('001','002','100');
⭐️2、通过load方式加载数据(必须掌握)
语法:
hive> load data [local] inpath 'dataPath' overwrite | into table student [partition (partcol1=val1,…)];
通过load方式加载数据
hive (myhive)> load data local inpath '/kkb/install/hivedatas/score.csv' overwrite into table score3 partition(month='201806');
⭐️3、通过查询方式加载数据(必须掌握)
通过查询方式加载数据
hive (myhive)> create table score5 like score;
hive (myhive)> insert overwrite table score5 partition(month = '201806') select s_id,c_id,s_score from score;
4、查询语句中创建表并加载数据(as select)
将查询的结果保存到一张表当中去
hive (myhive)> create table score6 as select * from score;
5、创建表时通过location指定加载数据路径
1)创建表,并指定在hdfs上的位置
hive (myhive)> create external table score7 (s_id string,c_id string,s_score int) row format delimited fields terminated by '\t' location '/myscore7';
2)上传数据到hdfs上,我们也可以直接在hive客户端下面通过dfs命令来进行操作hdfs的数据
hive (myhive)>  dfs -mkdir -p /myscore7;
hive (myhive)> dfs -put /kkb/install/hivedatas/score.csv /myscore7;
3)查询数据
hive (myhive)> select * from score7;
6、export导出与import 导入 hive表数据(内部表操作)
hive (myhive)> create table teacher2 like teacher;
hive (myhive)> export table teacher to  '/kkb/teacher';
hive (myhive)> import table teacher2 from '/kkb/teacher';
4、Hive数据导出
4.1 insert 导出
- 1、将查询的结果导出到本地
insert overwrite local directory '/kkb/install/hivedatas/stu' select * from stu;
- 2、将查询的结果格式化导出到本地
insert overwrite local directory '/kkb/install/hivedatas/stu2' row format delimited fields terminated by ',' select * from stu;
- 3、将查询的结果导出到HDFS上==(没有local)==
insert overwrite directory '/kkb/hivedatas/stu' row format delimited fields terminated by ',' select * from stu;
4.2、 Hive Shell 命令导出
-
基本语法:
- hive -e “sql语句” > file
- hive -f sql文件 > file
bin/hive -e 'select * from myhive.stu;' > /kkb/install/hivedatas/student1.txt
4.3、export导出到HDFS上
export table myhive.stu to '/kkb/install/hivedatas/stuexport';
⭐️5、hive的静态分区和动态分区
5.1 静态分区
-
表的分区字段的值需要开发人员手动给定
- 1、创建分区表
use myhive;
create table order_partition(
order_number string,
order_price  double,
order_time string
)
partitioned BY(month string)
row format delimited fields terminated by '\t';
- 2、准备数据	order.txt内容如下

cd /kkb/install/hivedatas
vim order.txt
10001	100	2019-03-02
10002	200	2019-03-02
10003	300	2019-03-02
10004	400	2019-03-03
10005	500	2019-03-03
10006	600	2019-03-03
10007	700	2019-03-04
10008	800	2019-03-04
10009	900	2019-03-04
- 3、加载数据到分区表
load data local inpath '/kkb/install/hivedatas/order.txt' overwrite into table order_partition partition(month='2019-03');
- 4、查询结果数据
select * from order_partition where month='2019-03';
结果为:

10001   100.0   2019-03-02      2019-03
10002   200.0   2019-03-02      2019-03
10003   300.0   2019-03-02      2019-03
10004   400.0   2019-03-03      2019-03
10005   500.0   2019-03-03      2019-03
10006   600.0   2019-03-03      2019-03
10007   700.0   2019-03-04      2019-03
10008   800.0   2019-03-04      2019-03
10009   900.0   2019-03-04      2019-03
⭐️5.2 动态分区
要想进行动态分区,需要设置参数
//开启动态分区功能
set hive.exec.dynamic.partition=true;
//设置hive为非严格模式
set hive.exec.dynamic.partition.mode=nonstrict;
-
按照需求实现把数据自动导入到表的不同分区中,不需要手动指定
-
需求:按照不同部门作为分区导数据到目标表
1、创建表
--创建普通表
create table t_order(
    order_number string,
    order_price  double,
    order_time   string
)row format delimited fields terminated by '\t';

--创建目标分区表
create table order_dynamic_partition(
    order_number string,
    order_price  double
)partitioned BY(order_time string)
row format delimited fields terminated by '\t';
2、准备数据 order_created.txt内容如下
cd /kkb/install/hivedatas
vim order_partition.txt

10001	100	2019-03-02
10002	200	2019-03-02
10003	300	2019-03-02
10004	400	2019-03-03
10005	500	2019-03-03
10006	600	2019-03-03
10007	700	2019-03-04
	10008	800	2019-03-04
10009	900	2019-03-04
3、向普通表t_order加载数据
load data local inpath '/kkb/install/hivedatas/order_partition.txt' overwrite into table t_order;4、动态加载数据到分区表中
要想进行动态分区,需要设置参数
//开启动态分区功能
hive> set hive.exec.dynamic.partition=true;
//设置hive为非严格模式
hive> set hive.exec.dynamic.partition.mode=nonstrict;
hive> insert into table order_dynamic_partition partition(order_time) select order_number,order_price,order_time from t_order;
5、查看分区
bin/hive> show partitions order_dynamic_partition;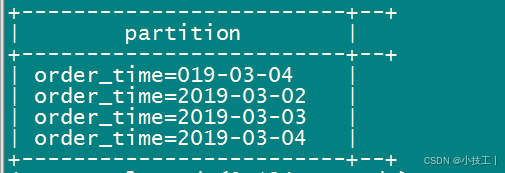
-
6、hive的基本查询语法
1. 基本查询
- 注意
- SQL 语言大小写不敏感
- SQL 可以写在一行或者多行
- 关键字不能被缩写也不能分行
- 各子句一般要分行写
- 使用缩进提高语句的可读性
1.1 全表和特定列查询
- 全表查询
select * from stu;
- 选择特定列查询
select id,name from stu;
1.2 列起别名
-
重命名一个列
- 紧跟列名,也可以在列名和别名之间加入关键字 ‘as’
-
案例实操
select id,name as stuName from stu;
1.3 常用函数
- 1.求总行数(count)
select count(*) cnt from score;
- 2、求分数的最大值(max)
select max(s_score) from score;
- 3、求分数的最小值(min)
select min(s_score) from score;
- 4、求分数的总和(sum)
select sum(s_score) from score;
- 5、求分数的平均值(avg)
select avg(s_score) from score;
1.4 limit 语句
- 典型的查询会返回多行数据。limit子句用于限制返回的行数。
select * from score limit 5;
1.5 where 语句
- 1、使用 where 子句,将不满足条件的行过滤掉
- 2、where 子句紧随from子句
- 3、案例实操
select * from score where s_score > 60;
1.6 算术运算符
| 运算符 | 描述 |
|---|---|
| A+B | A和B 相加 |
| A-B | A减去B |
| A*B | A和B 相乘 |
| A/B | A除以B |
| A%B | A对B取余 |
| A&B | A和B按位取与 |
| A|B | A和B按位取或 |
| A^B | A和B按位取异或 |
| ~A | A按位取反 |
1.7 比较运算符
| 操作符 | 支持的数据类型 | 描述 |
|---|---|---|
| A=B | 基本数据类型 | 如果A等于B则返回true,反之返回false |
| A<=>B | 基本数据类型 | 如果A和B都为NULL,则返回true,其他的和等号(=)操作符的结果一致,如果任一为NULL则结果为NULL |
| A<>B, A!=B | 基本数据类型 | A或者B为NULL则返回NULL;如果A不等于B,则返回true,反之返回false |
| A<B | 基本数据类型 | A或者B为NULL,则返回NULL;如果A小于B,则返回true,反之返回false |
| A<=B | 基本数据类型 | A或者B为NULL,则返回NULL;如果A小于等于B,则返回true,反之返回false |
| A>B | 基本数据类型 | A或者B为NULL,则返回NULL;如果A大于B,则返回true,反之返回false |
| A>=B | 基本数据类型 | A或者B为NULL,则返回NULL;如果A大于等于B,则返回true,反之返回false |
| A [NOT] BETWEEN B AND C | 基本数据类型 | 如果A,B或者C任一为NULL,则结果为NULL。如果A的值大于等于B而且小于或等于C,则结果为true,反之为false。如果使用NOT关键字则可达到相反的效果。 |
| A IS NULL | 所有数据类型 | 如果A等于NULL,则返回true,反之返回false |
| A IS NOT NULL | 所有数据类型 | 如果A不等于NULL,则返回true,反之返回false |
| IN(数值1, 数值2) | 所有数据类型 | 使用 IN运算显示列表中的值 |
| A [NOT] LIKE B | STRING 类型 | B是一个SQL下的简单正则表达式,如果A与其匹配的话,则返回true;反之返回false。B的表达式说明如下:‘x%’表示A必须以字母‘x’开头,‘%x’表示A必须以字母’x’结尾,而‘%x%’表示A包含有字母’x’,可以位于开头,结尾或者字符串中间。如果使用NOT关键字则可达到相反的效果。like不是正则,而是通配符 |
| A RLIKE B, A REGEXP B | STRING 类型 | B是一个正则表达式,如果A与其匹配,则返回true;反之返回false。匹配使用的是JDK中的正则表达式接口实现的,因为正则也依据其中的规则。例如,正则表达式必须和整个字符串A相匹配,而不是只需与其字符串匹配。 |
1.8 逻辑运算符
| 操作符 | 操作 | 描述 |
|---|---|---|
| A AND B | 逻辑并 | 如果A和B都是true则为true,否则false |
| A OR B | 逻辑或 | 如果A或B或两者都是true则为true,否则false |
| NOT A | 逻辑否 | 如果A为false则为true,否则false |
2. 分组
2.1 Group By 语句
Group By 语句通常会和聚合函数一起使用,按照一个或者多个列队结果进行分组,然后对每个组执行聚合操作。
-
案例实操:
- (1)计算每个学生的平均分数
select s_id,avg(s_score) from score group by s_id;- (2)计算每个学生最高的分数
select s_id,max(s_score) from score group by s_id;
2.2 Having语句
-
having 与 where 不同点
- where针对表中的列发挥作用,查询数据;having针对查询结果中的列发挥作用,筛选数据
- where后面不能写分组函数,而having后面可以使用分组函数
- having只用于group by分组统计语句
-
案例实操
- 求每个学生的平均分数
select s_id,avg(s_score) from score group by s_id;- 求每个学生平均分数大于60的人
select s_id,avg(s_score) as avgScore from score group by s_id having avgScore > 60;
3. join语句
3.1 等值 join
-
Hive支持通常的SQL JOIN语句,但是只支持等值连接,不支持非等值连接。
-
案例实操
- 根据学生和成绩表,查询学生姓名对应的成绩
select * from stu left join score on stu.id = score.s_id;
3.2 表的别名
-
好处
- 使用别名可以简化查询。
- 使用表名前缀可以提高执行效率。
-
案例实操
- 合并老师与课程表
#hive当中创建course表并加载数据
create table course (c_id string,c_name string,t_id string) row format delimited fields terminated by '\t';
load data local inpath '/kkb/install/hivedatas/course.csv' overwrite into table course;

select * from teacher t join course c on t.t_id = c.t_id;
3.3 内连接 inner join(join)
- 内连接:只有进行连接的两个表中都存在与连接条件相匹配的数据才会被保留下来。
- join默认是inner join
- 案例实操
select * from teacher t inner join course c on t.t_id = c.t_id;
3.4 左外连接 left outer join(left join)
-
左外连接:join操作符左边表中符合where子句的所有记录将会被返回。
-
案例实操
- 查询老师对应的课程
select * from teacher t left outer join course c on t.t_id = c.t_id;
3.5 右外连接 right outer join(right join)
-
右外连接:join操作符右边表中符合where子句的所有记录将会被返回。
-
案例实操
select * from teacher t right outer join course c on t.t_id = c.t_id;
3.6 满外连接 full outer join(full join)
-
满外连接:将会返回所有表中符合where语句条件的所有记录。如果任一表的指定字段没有符合条件的值的话,那么就使用null值替代。
-
案例实操
select * from teacher t full outer join course c on t.t_id = c.t_id;
3.7 多表连接
-
多个表使用join进行连接
-
注意:连接 n个表,至少需要n-1个连接条件。例如:连接三个表,至少需要两个连接条件。
-
案例实操
- 多表连接查询,查询老师对应的课程,以及对应的分数,对应的学生
select * from teacher t left join course c on t.t_id = c.t_id
left join score s on c.c_id = s.c_id
left join stu on s.s_id = stu.id;
4. 排序
⭐️4.1 order by 全局排序
-
order by 说明
- 全局排序,只有一个reduce
- 使用 ORDER BY 子句排序
- asc ( ascend)
- 升序 (默认)
- desc (descend)
- 降序
- asc ( ascend)
- order by 子句在select语句的结尾
-
案例实操
- 查询学生的成绩,并按照分数降序排列
select * from score s order by s_score desc ;
4.2 按照别名排序
- 按照学生分数的平均值排序
select s_id,avg(s_score) avgscore from score group by s_id order by avgscore desc;
⭐️4.4 Sort By 局部排序 每个MapReduce内部排序
-
sort by:每个reducer内部进行排序,对全局结果集来说不是排序。
1、设置reduce个数
set mapreduce.job.reduces=3;2、查看reduce的个数
set mapreduce.job.reduces;3、查询成绩按照成绩降序排列
select * from score s sort by s.s_score;4、将查询结果导入到文件中(按照成绩降序排列)
insert overwrite local directory '/kkb/install/hivedatas/sort' select * from score s sort by s.s_score;
⭐️4.5 distribute by 分区排序
-
distribute by:类似MR中partition,采集hash算法,在map端将查询的结果中hash值相同的结果分发到对应的reduce文件中。结合sort by使用。
-
注意
- Hive要求 distribute by 语句要写在 sort by 语句之前。
-
案例实操
-
先按照学生 sid 进行分区,再按照学生成绩进行排序
- 设置reduce的个数
set mapreduce.job.reduces=3;- 通过distribute by 进行数据的分区,,将不同的sid 划分到对应的reduce当中去
insert overwrite local directory '/kkb/install/hivedatas/distribute' select * from score distribute by s_id sort by s_score;
-
⭐️⭐️4.6 cluster by
-
当distribute by和sort by字段相同时,可以使用cluster by方式
-
除了distribute by 的功能外,还会对该字段进行排序,所以cluster by = distribute by + sort by
--以下两种写法等价

insert overwrite local directory '/kkb/install/hivedatas/distribute_sort' select * from score distribute  by s_score sort  by s_score;


insert overwrite local directory '/kkb/install/hivedatas/cluster' select * from score  cluster by s_score;
7、hive客户端jdbc操作
第一步:启动hiveserver2的服务端
node03执行以下命令启动hiveserver2的服务端
cd /kkb/install/hive-1.1.0-cdh5.14.2/
nohup bin/hive --service hiveserver2 2>&1 &
第二步:引入依赖
   <repositories>
        <repository>
            <id>cloudera</id>
            <url>https://repository.cloudera.com/artifactory/cloudera-repos/</url>
        </repository>
    </repositories>
    <dependencies>
        <dependency>
            <groupId>org.apache.hive</groupId>
            <artifactId>hive-exec</artifactId>
            <version>1.1.0-cdh5.14.2</version>
        </dependency>
        <dependency>
            <groupId>org.apache.hive</groupId>
            <artifactId>hive-jdbc</artifactId>
            <version>1.1.0-cdh5.14.2</version>
        </dependency>
        <dependency>
            <groupId>org.apache.hive</groupId>
            <artifactId>hive-cli</artifactId>
            <version>1.1.0-cdh5.14.2</version>
        </dependency>
        <dependency>
            <groupId>org.apache.hadoop</groupId>
            <artifactId>hadoop-common</artifactId>
            <version>2.6.0-cdh5.14.2</version>
        </dependency>
    </dependencies>
    <build>
        <plugins>
            <plugin>
                <groupId>org.apache.maven.plugins</groupId>
                <artifactId>maven-compiler-plugin</artifactId>
                <version>3.0</version>
                <configuration>
                    <source>1.8</source>
                    <target>1.8</target>
                    <encoding>UTF-8</encoding>
                    <!--    <verbal>true</verbal>-->
                </configuration>
            </plugin>
        </plugins>
    </build>
第三步:代码开发
import java.sql.*;

public class HiveJDBC {
    private static String url="jdbc:hive2://192.168.52.120:10000/myhive";
    public static void main(String[] args) throws Exception {
        Class.forName("org.apache.hive.jdbc.HiveDriver");
        //获取数据库连接
        Connection connection = DriverManager.getConnection(url, "hadoop","");
        //定义查询的sql语句
        String sql="select * from stu";
        try {
            PreparedStatement ps = connection.prepareStatement(sql);
            ResultSet rs = ps.executeQuery();
            while (rs.next()){
                //获取id字段值
                int id = rs.getInt(1);
                //获取deptid字段
                String name = rs.getString(2);
                System.out.println(id+"\t"+name);
            }
        } catch (SQLException e) {
            e.printStackTrace();
        }
    }
}
8、hive的可视化工具dbeaver介绍以及使用
1、dbeaver的基本介绍
- dbeaver是一个图形化的界面工具,专门用于与各种数据库的集成,通过dbeaver我们可以与各种数据库进行集成通过图形化界面的方式来操作我们的数据库与数据库表,类似于我们的sqlyog或者navicate
- 如果用IDEA开发,可以考虑使用Big Data Tools插件,方便管理各类分布式文件系统,以及数据存储组件。
- 参考《IDEA 中使用 Big Data Tools 连接大数据组件》
2、dbeaver的下载安装
https://github.com/dbeaver/dbeaver/releases
我们可以直接从github上面下载我们需要的对应的安装包即可
3、dbeaver的安装与使用
这里我们使用的版本是6.15这个版本,下载zip的压缩包,直接解压就可以使用,然后双击dbeaver.exe即可启动
第一步:双击dbeaver.exe然后启动dbeaver图形化界面
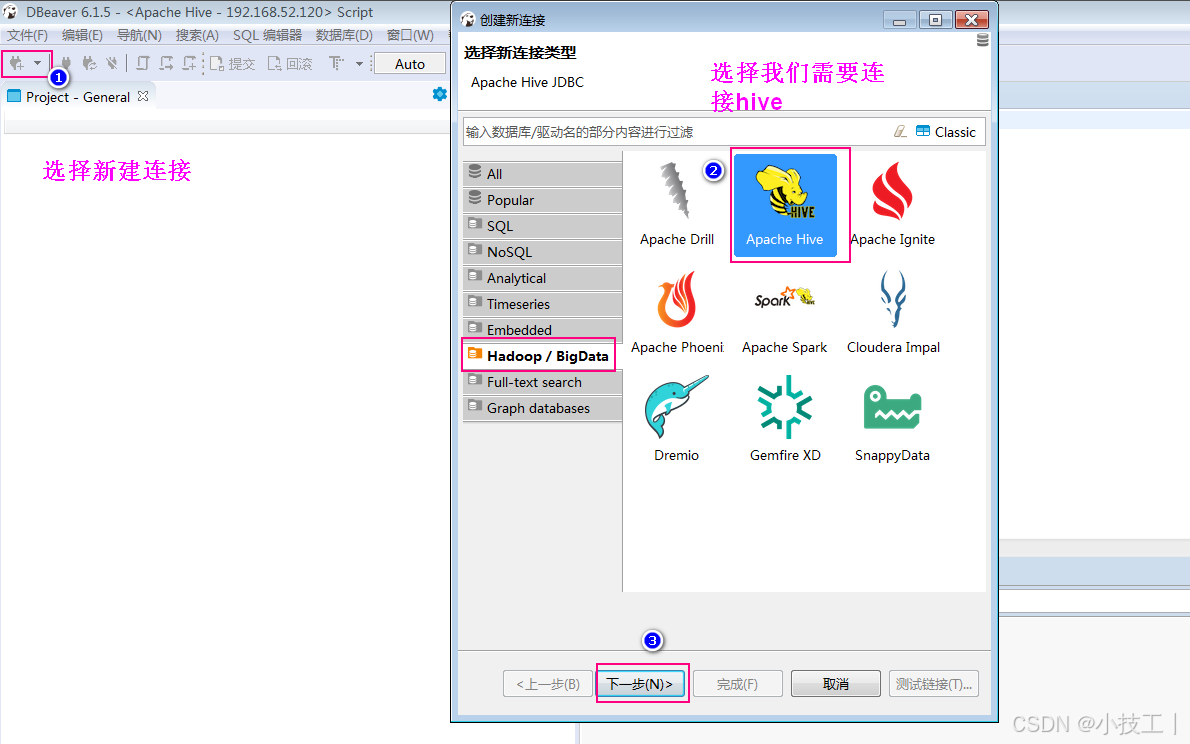
第二步:配置我们的主机名与端口号
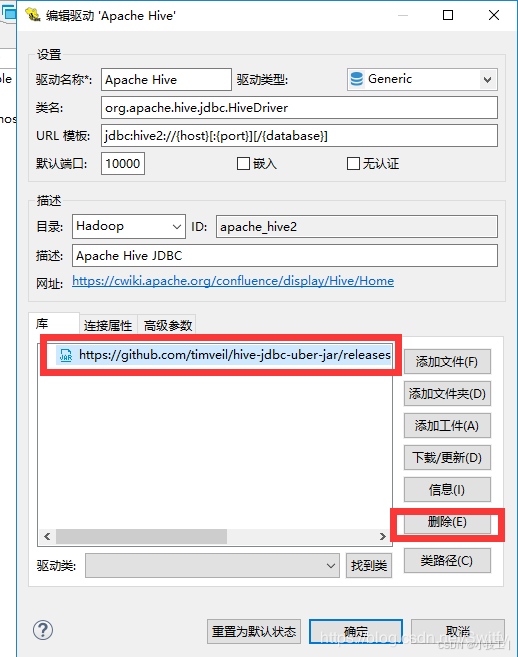
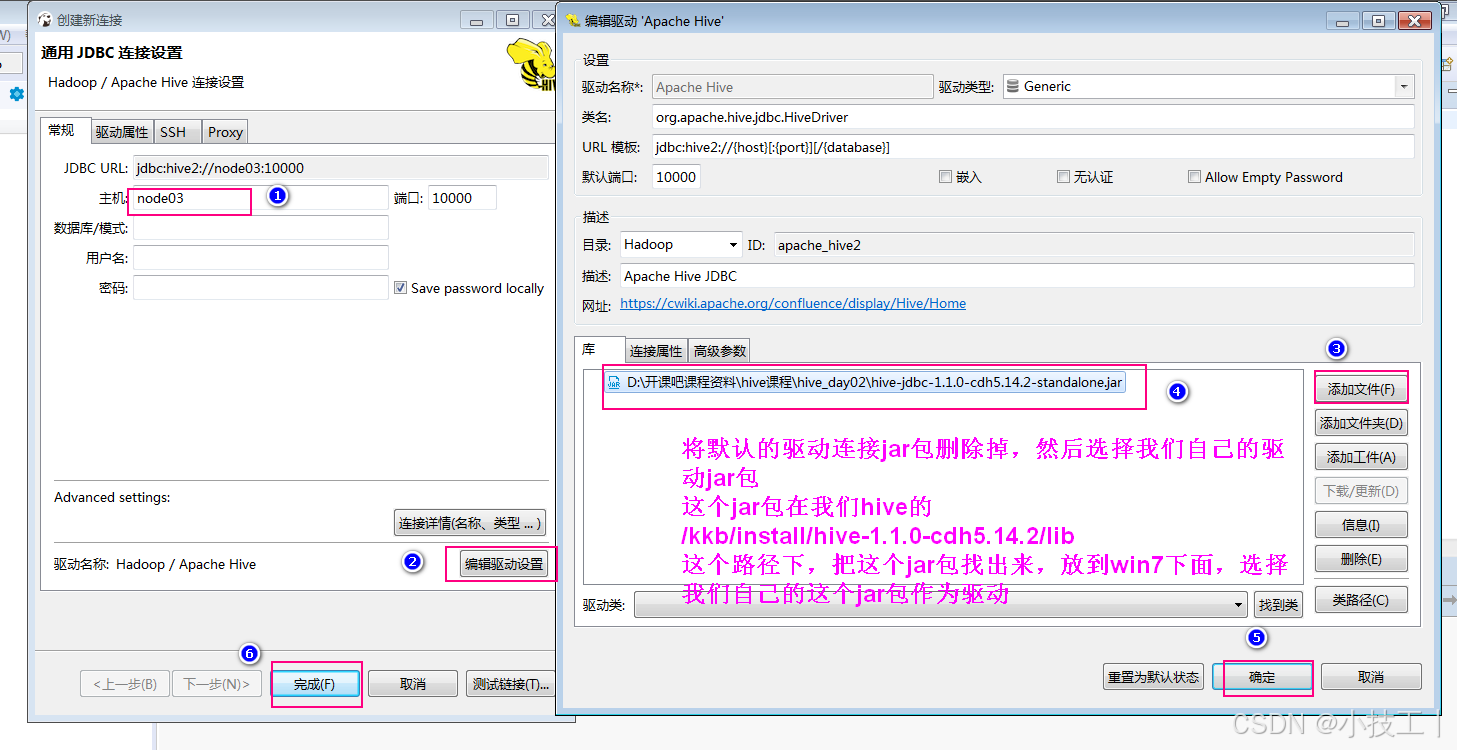
三、总结

北京人形旗下天工造物具身智能开源社区,聚焦具身天工与慧思开物两大平台
更多推荐
 15
15 0
0- 0


 已为社区贡献4条内容

所有评论(0)