Qt和微信小程序WebSocket通信
·
文章目录
前言
在开发过程中,我们经常需要在不同平台之间实现通信。本文将详细介绍如何在虚拟机中运行的Qt应用程序与主机上开发运行的微信小程序之间通过WebSocket实现实时通信。
一、虚拟机Qt端Websocket服务端
首先在.pro文件中添加WebSocket模块:
QT += core websockets在mainwindow.h中:
#ifndef MAINWINDOW_H
#define MAINWINDOW_H

#include <QMainWindow>
#include <QWebSocketServer>
#include <QWebSocket>

QT_BEGIN_NAMESPACE
namespace Ui { class MainWindow; }
QT_END_NAMESPACE

class MainWindow : public QMainWindow
{
    Q_OBJECT

public:
    MainWindow(QWidget *parent = nullptr);
    ~MainWindow();

private slots:
    void onConnectButtonClicked();
    void onSendButtonClicked();
    void onNewConnection();
    void onClientDisconnected();
    void onTextMessageReceived(const QString &message);

private:
    Ui::MainWindow *ui;
    QWebSocketServer *server;
    QList<QWebSocket *> clients;
};

#endif // MAINWINDOW_H
在mainwindow.cpp中:
#include "mainwindow.h"
#include "ui_mainwindow.h"
#include <QMessageBox>

MainWindow::MainWindow(QWidget *parent)
    : QMainWindow(parent)
    , ui(new Ui::MainWindow)
{
    ui->setupUi(this);

        // 设置全局样式
            this->setStyleSheet(R"(
                /* 全局样式 */
                QMainWindow {
                    background-color: #f0f2f5;
                    font-family: 'Segoe UI', sans-serif;
                }

                /* 按钮样式 */
                QPushButton {
                    background-color: #4a90e2;
                    color: white;
                    border: none;
                    padding: 8px 16px;
                    border-radius: 4px;
                    font-size: 14px;
                    min-width: 100px;
                }

                QPushButton:hover {
                    background-color: #357abd;
                }

                QPushButton:pressed {
                    background-color: #2a5f8a;
                }

                /* 输入框样式 */
                QLineEdit {
                    border: 1px solid #ddd;
                    border-radius: 4px;
                    padding: 8px;
                    font-size: 14px;
                    background-color: white;
                }

                QLineEdit:focus {
                    border-color: #4a90e2;
                }

                /* 消息显示区域 */
                QTextBrowser {
                    border: 1px solid #ddd;
                    border-radius: 4px;
                    padding: 10px;
                    background-color: white;
                    font-size: 14px;
                    color: #333;
                }

                /* 状态标签 */
                #statusLabel {
                    font-size: 14px;
                    color: #666;
                    padding: 8px;
                }

                /* 工具栏 */
                QWidget#centralwidget > QWidget:first-child {
                    background-color: white;
                    padding: 10px;
                    border-bottom: 1px solid #ddd;
                }
            )");

            // 设置窗口图标
            this->setWindowIcon(QIcon(":/icons/app.png"));


    // 初始化WebSocket服务器
    server = new QWebSocketServer("WebSocket Server", QWebSocketServer::NonSecureMode, this);
    if (!server->listen(QHostAddress::Any, 8080)) {
        QMessageBox::critical(this, "错误", "无法启动WebSocket服务器!");
        return;
    }

    // 连接信号槽
    connect(ui->connectButton, &QPushButton::clicked, this, &MainWindow::onConnectButtonClicked);
    connect(ui->sendButton, &QPushButton::clicked, this, &MainWindow::onSendButtonClicked);
    connect(server, &QWebSocketServer::newConnection, this, &MainWindow::onNewConnection);

    ui->statusLabel->setText("状态:服务器已启动,等待连接...");
}

MainWindow::~MainWindow()
{
    delete ui;
    server->close();
    qDeleteAll(clients);
}

void MainWindow::onConnectButtonClicked()
{
    ui->messageBrowser->append("点击了连接按钮");
}

void MainWindow::onSendButtonClicked()
{
    QString message = ui->messageEdit->text();
    if (message.isEmpty()) {
        return;
    }

    // 发送消息给所有客户端
    for (QWebSocket *client : clients) {
        client->sendTextMessage(message);
    }

    ui->messageBrowser->append("服务器发送: " + message);
    ui->messageEdit->clear();
}

void MainWindow::onNewConnection()
{
    QWebSocket *client = server->nextPendingConnection();
    connect(client, &QWebSocket::textMessageReceived, this, &MainWindow::onTextMessageReceived);
    connect(client, &QWebSocket::disconnected, this, &MainWindow::onClientDisconnected);

    clients.append(client);
    ui->statusLabel->setText("状态:客户端已连接");
    ui->messageBrowser->append("新客户端连接");
}

void MainWindow::onClientDisconnected()
{
    QWebSocket *client = qobject_cast<QWebSocket *>(sender());
    if (client) {
        clients.removeAll(client);
        client->deleteLater();
    }

    ui->statusLabel->setText("状态:客户端断开连接");
    ui->messageBrowser->append("客户端断开连接");
}

void MainWindow::onTextMessageReceived(const QString &message)
{
    QWebSocket *client = qobject_cast<QWebSocket *>(sender());
    if (client) {
        ui->messageBrowser->append("收到消息: " + message);
    }
}
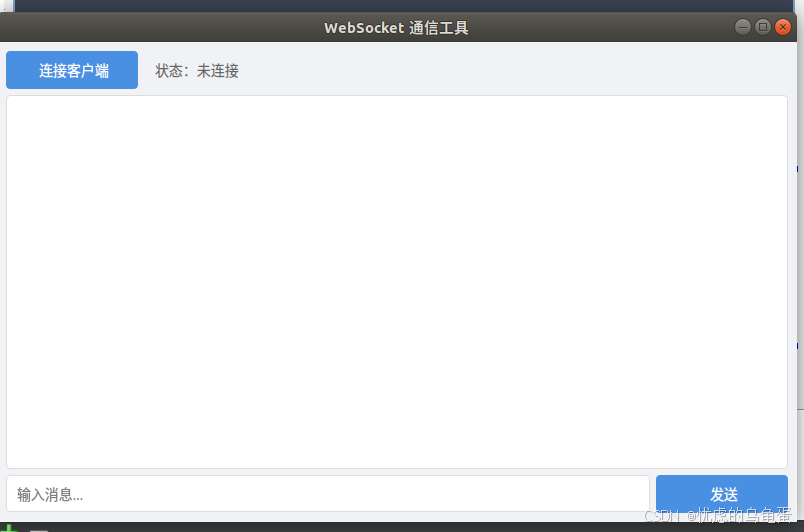
并完成界面设计:
二、微信小程序客户端
在index.js文件中,其中Websocket连接的是虚拟机的ip以及8080端口。
Page({
  data: {
    receivedMessage: '',
    socket: null
  },

  onLoad() {
    this.connectWebSocket();
  },

  connectWebSocket() {
    const socket = wx.connectSocket({
      url: 'ws://192.168.110.135:8080',
      header: {
        'content-type': 'application/json'
      }
    });

    socket.onOpen(() => {
      console.log('WebSocket连接成功');
      wx.showToast({
        title: '连接成功',
        icon: 'success'
      });
    });

    socket.onMessage((res) => {
      console.log('收到消息:', res.data);
      this.setData({
        receivedMessage: res.data
      });
    });

    socket.onClose(() => {
      console.log('WebSocket连接关闭');
      wx.showToast({
        title: '连接关闭',
        icon: 'none'
      });
    });

    socket.onError((err) => {
      console.error('WebSocket错误:', err);
      wx.showToast({
        title: '连接错误',
        icon: 'none'
      });
    });

    this.setData({ socket });
  },

  sendMessage() {
    const { socket } = this.data;
    if (socket) {
      socket.send({
        data: JSON.stringify({ message: '你好 from WeChat Mini Program' }),
        success: () => {
          console.log('消息发送成功');
          wx.showToast({
            title: '消息发送成功',
            icon: 'success'
          });
        },
        fail: (err) => {
          console.error('消息发送失败:', err);
          wx.showToast({
            title: '消息发送失败',
            icon: 'none'
          });
        }
      });
    }
  }
});
三、测试通信
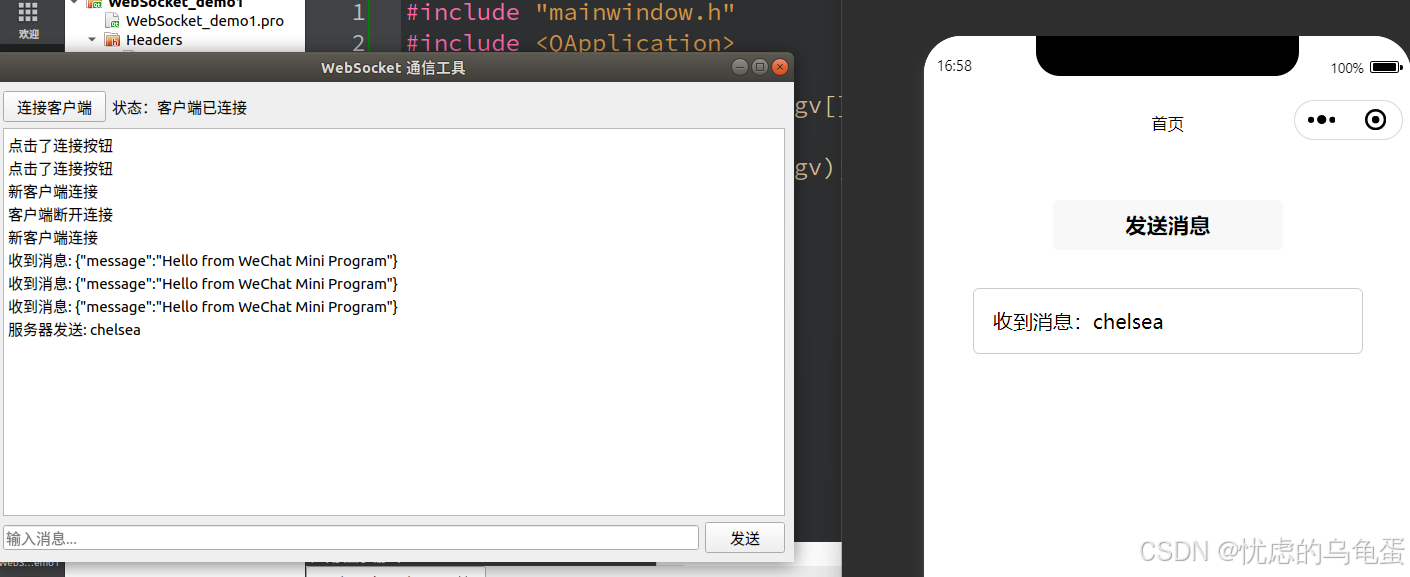
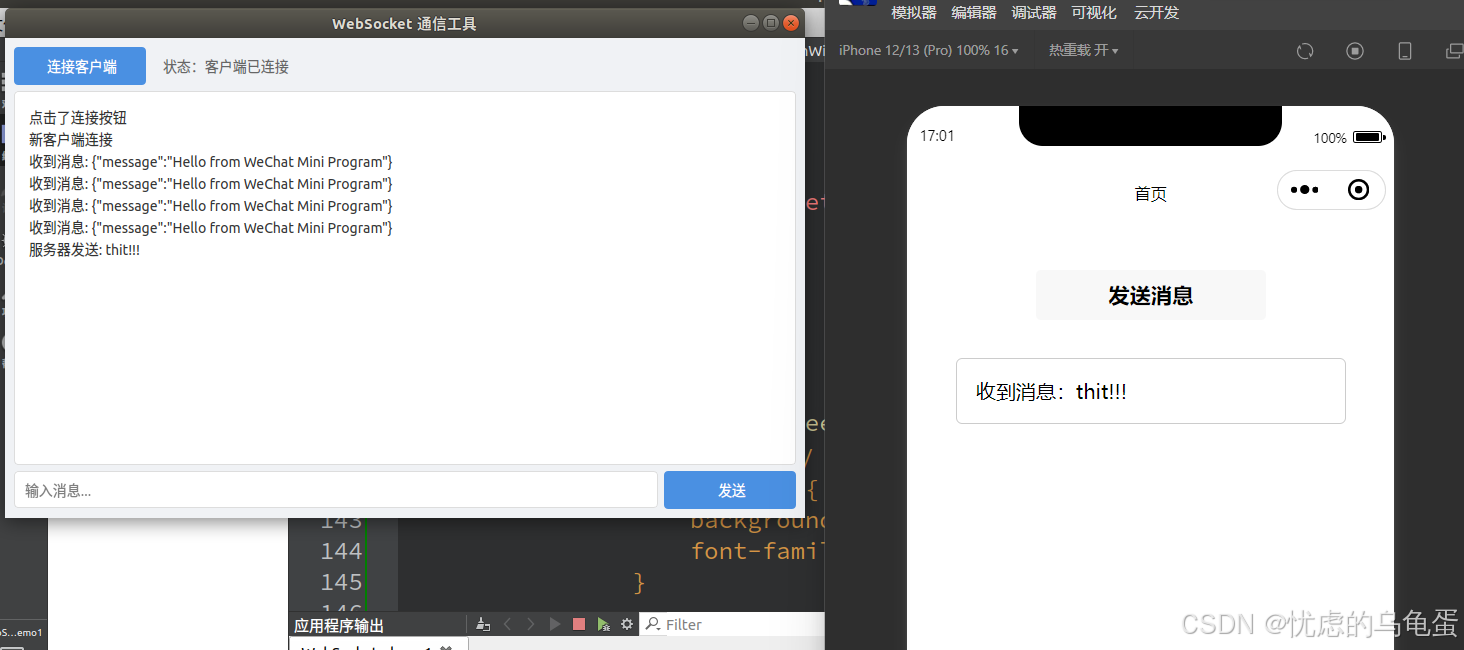
首先启动Qt WebSocket服务器,在微信开发者工具中运行小程序,观察Qt控制台和小程序控制台的输出,确认消息是否成功发送和接收。
四、问题与解决
- 检查ip地址: 确保虚拟机的ip地址正确,并且主机可以ping通虚拟机。
- 检查防火墙: 确保虚拟机的防火墙允许8080端口的入站连接。 消息未接收
- 检查代码: 确保WebSocket服务器和客户端的代码逻辑正确。
总结
通过本次实验,实现虚拟机中Qt应用程序与主机上微信小程序之间的WebSocket通信。即进行跨平台的实时通信。

北京人形旗下天工造物具身智能开源社区,聚焦具身天工与慧思开物两大平台
更多推荐
 19
19 0
0- 0


 已为社区贡献2条内容

所有评论(0)