ansible学习自用笔记
1.什么是ansible
Ansible是一个自动化统一配置管理工具,自动化主要体现在Ansible集成了丰富模块以及功能组件,可以通过一个命令完成一系列的操作,进而能减少重复性的工作和维护成本,可以提高工作效率。
| 功能 | 描述 |
|---|---|
| 配置管理 | 自动化系统、软件、服务的安装和配置,确保多主机间配置一致性。 |
| 应用部署 | 自动化应用程序的部署和版本管理,包括支持滚动更新和回滚。 |
| 任务自动化 | 在多主机上并行执行任务,如文件操作、服务重启、软件更新等。 |
| 多主机管理 | 支持跨平台管理(Linux、Windows、macOS),可根据主机组批量执行任务。 |
| 基础设施即代码 | 使用代码描述和管理基础设施配置,支持自动化创建、恢复和修改环境。 |
| 集成与扩展 | 与其他工具(如 Jenkins、Docker、Kubernetes)集成,支持模块扩展。 |
| 云管理 | 支持 AWS、Azure、Google Cloud 等云平台资源的自动化配置和管理。 |
| 安全管理 | 自动执行安全补丁管理、权限设置、密钥管理等安全相关任务。 |
2.ansible的执行流程
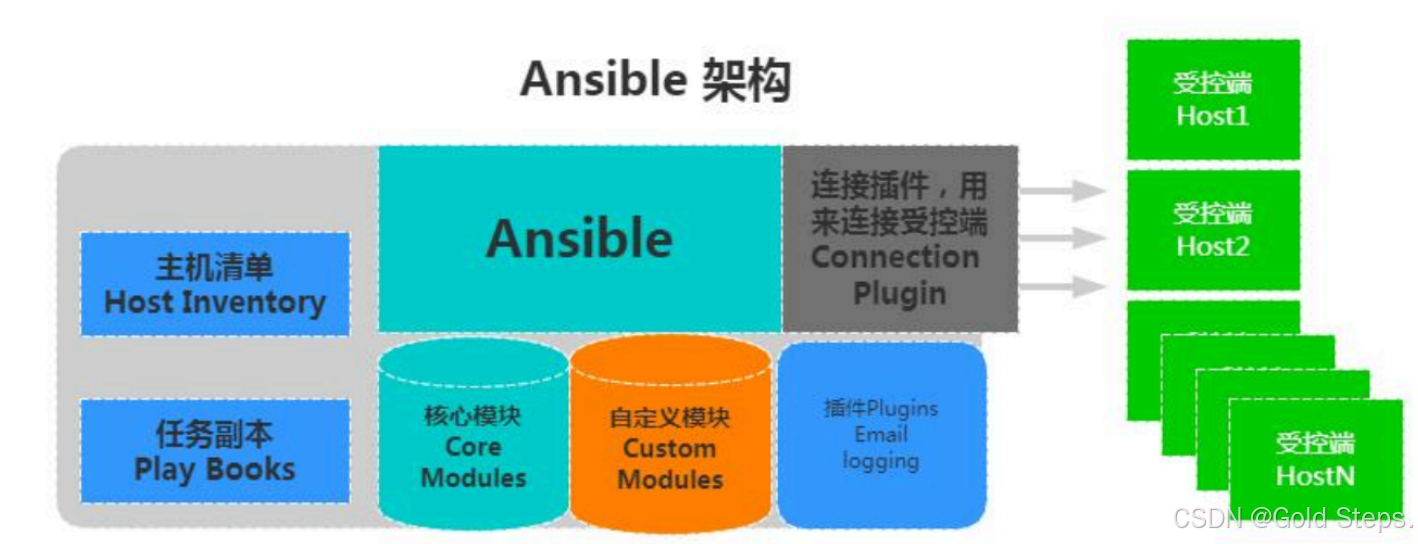 1.Ansible读取playbook剧本,剧本中会记录对哪些主机执行哪些任务。
2.首先Ansible通过主机清单找到要执行的主机,然后调用具体的模块。
3.其次Ansible会通过连接插件连接对应的主机并推送对应的任务列表。
4.最后被管理的主机会将Ansible发送过来的任务解析为本地Shell命令执行。
3.ansible主机清单定义
就是ansible的hosts文件,有多种配置的方法。
######
1.使用主机名和主机密码
[root@ansible ~]# cat /etc/ansible/hosts
[root@ansible /etc/ansible]# cat hosts
10.0.0.7 ansible_ssh_user=root ansible_ssh_port=22 ansible_ssh_pass='oldboy123.com'
[root@ansible /etc/ansible]# ansible 10.0.0.7 -m ping
10.0.0.7 | FAILED! => {
    "msg": "to use the 'ssh' connection type with passwords or pkcs11_provider, you must install the sshpass program"
}
ansible默认不支持ssh,需要我们安装一下提示的软件sshpass,我们安装一下
[root@ansible /etc/ansible]# yum install -y sshpass
再测试查看。
[root@ansible /etc/ansible]# ansible 10.0.0.7 -m ping
10.0.0.7 | SUCCESS => {
    "changed": false,
    "ping": "pong"
}
OK了
#####
2.使用别名的方式
[root@ansible /etc/ansible]# cat hosts
web01 ansible_ssh_host=10.0.0.7 ansible_ssh_user=root ansible_ssh_port=22 ansible_ssh_pass='oldboy123.com'
[root@ansible /etc/ansible]# ansible web01 -m ping
web01 | SUCCESS => {
    "changed": false,
    "ping": "pong"
}
#####
3.基于秘钥方式控制客户端
@生成密钥对
[root@ansible ~]# ssh-keygen
[root@ansible ~]# ssh-copy-id 10.0.0.7
[root@ansible ~]# ssh-copy-id 10.0.0.31
@测试免密钥
[root@ansible ~]# ssh 10.0.0.7
[root@ansible ~]# ssh 10.0.0.31
@定义主机清单
[root@ansible /etc/ansible]# cat hosts
web01 ansible_ssh_host=10.0.0.7
nfs ansible_ssh_host=10.0.0.31
[root@ansible /etc/ansible]# ansible web01 -m ping
web01 | SUCCESS => {
    "changed": false,
    "ping": "pong"
}
[root@ansible /etc/ansible]# ansible nfs -m ping
nfs | SUCCESS => {
    "changed": false,
    "ping": "pong"
}
@主机清单定义组
[root@ansible /etc/ansible]# cat hosts
web01 ansible_ssh_host=10.0.0.7
nfs ansible_ssh_host=10.0.0.31
[lnmp]
web01
nfs
[root@ansible /etc/ansible]# ansible lnmp -m ping
nfs | SUCCESS => {
    "changed": false,
    "ping": "pong"
}
web01 | SUCCESS => {
    "changed": false,
    "ping": "pong"
}
@配置子组
[root@ansible /etc/ansible]# cat hosts
web01 ansible_ssh_host=10.0.0.7
nfs ansible_ssh_host=10.0.0.31
[lnmp:childern]
web01
nfs

# 主机清单小结
/etc/ansible/hosts  # 默认的主机清单
ansible all -m ping -i hosts # -i 指定主机清单
4.ansible常见的模块
command # 执行shell命令(不支持管道等特殊字符)
shell # 执行shell命令
scripts # 执行shell脚本
yum_repository # 配置yum仓库
yum # 安装软件
copy # 变更配置文件
file # 建立目录或文件
service # 启动与停止服务
mount # 挂载设备
cron # 定时任务
get_url #下载软件
ansible执行命令都是以模块的方式执行。
ansible 主机名称 -m 指定模块的名称 -a  具体执行的命令动作
ansible nfs -m command -a 'df -h'
#####
模块1 yum模块
yum:
  name: 软件包的名称 wget
  state: 执行的动作
  	  present 安装
  	  absent  卸载

[root@ansible /etc/ansible]# ansible-doc yum
搜索:EXAMPLES:
可以看到手册
@使用yum模块安装远程安装rsync
[root@ansible /etc/ansible]# ansible backup -m yum -a 'name=rsync state=present'
[root@backup ~]# rpm -qa rsync
rsync-3.1.3-9.ky10.x86_64
@卸载rsync
[root@ansible /etc/ansible]# ansible backup -m yum -a 'name=rsync state=absent'
[root@backup ~]# rpm -qa rsync
就没了
#安装rpm包
[root@ansible ~]# ansible backup -m yum -a 'name=wget-1.20.3-3.ky10.x86_64.rpm state=present'
# 安装rsync服务
[root@ansible ~]# ansible backup -m yum -a 'name=rsync state=present'
######
模块2 copy模块
copy:
   src: 源文件(ansible服务器上的位置)  a.txt
   dest:拷贝到目标主机的哪个位置	   /opt/
   owner: 属主	www
   group: 属组    www
   mode: 权限     600
   backup: yes  给当前的文件做一个以时间命名的备份文件

@简单copy一个passwd文件到目标文件
[root@ansible /etc/ansible]# ansible backup -m copy -a 'src=/etc/passwd dest=/root/'
[root@backup ~]# ll
total 4
-rw-r--r-- 1 root root 1845 Dec 30 20:54 passwd
@修改属主属组的方式
[root@ansible /etc/ansible]# ansible backup -m copy -a 'src=/etc/services dest=/root/ owner=666 group=www'
这个修改属主属组的方式要保证目标主机存在对应的用户
[root@backup ~]# ll
total 684
-rw-r--r-- 1 root root   1845 Dec 30 20:54 passwd
-rw-r--r-- 1 www  www  692252 Dec 30 20:58 services
@修改文件权限
[root@ansible ~]# ansible backup -m copy -a 'src=cang.pwd dest=/root/ owner=666 group=www mode=0600'
[root@backup ~]# ll
total 688
-rw------- 1 www  www       2 Dec 30 21:00 cang.pwd
#将content后的字符串直接写入到目标文件中
[root@ansible ~]# ansible backup -m copy -a 'content="i love u!" dest=/root/scret.log owner=666 group=www mode=600'
[root@backup ~]# ll
total 692
-rw------- 1 www  www       9 Dec 30 21:04 scret.log
-rw-r--r-- 1 www  www  692252 Dec 30 20:58 services
[root@backup ~]# cat scret.log
i love u![root@backup ~]#
@copy支持备份,保证copy的文件与目标文件名称相同,但是源文件的内容不会被覆盖
### 会生成一个带有时间的备份文件
[root@ansible ~]# echo hello,i am ansible mechine >1.txt
[root@backup ~]# echo hello,i am source >1.txt
[root@ansible ~]# ansible backup -m copy -a 'src=1.txt dest=/root/ backup=yes'
[root@backup ~]# cat 1.txt 1.txt.10446.2024-12-30@21\:44\:17~
hello,i am ansible mechine
hello,i am source
[root@backup ~]# ll
total 696
-rw-r--r-- 1 root root     27 Dec 30 21:44 1.txt
-rw-r--r-- 1 root root     18 Dec 30 21:43 1.txt.10446.2024-12-30@21:44:17~

#####
模块4 用户模块
user:
    uid: 指定uid
    group: 指定组名称
    shell: 指定解释器 /bin/bash /sbin/nologin
    create_home: false  # 默认不写此参数就是创建家目录
    state: present  # 创建  absent删除用户
	remove: yes    # 删除用户类似 userdel -r参数
@在backup上创建oldboy用户,不创建家目录,不能登录,指定UID和GID
[root@ansible ~]# ansible backup -m user -a 'name=oldboy uid=1005 group=old shell=/sbin/nologin create_home=false'
[root@backup ~]# id oldboy
uid=1005(oldboy) gid=777(old) groups=777(old)
[root@backup ~]# ll /home/
total 0
group:
	name: old 模块的名称
	gid: 777 组的gid号
	state: present
[root@ansible ~]# ansible backup -m group -a 'name=old gid=777 state=present'

@删除用户oldboy,连家一起干掉
[root@ansible ~]# ansible backup -m user -a 'name=oldboy state=absent remove=yes'

######
模块5 file模块
file:
	path: /root/a.txt  文件的路径
	state: touch(文件) 或者 directory(目录) absent(删除文件或目录)
	owner: www 属主
	group: www 属组
	mode: 0644 权限
	recurse: yes # 递归修改属主属组
@创建普通文件
[root@ansible ~]# ansible backup -m file -a 'path=/root/cao.jpg state=touch'
[root@backup ~]# ll
total 692
-rw------- 1 www  www       2 Dec 30 21:00 cang.pwd
-rw-r--r-- 1 root root      0 Dec 30 21:24 cao.jpg
@指定属组属组和文件权限
[root@ansible ~]# ansible backup -m file -a 'path=/root/cook.sh owner=666 group=www mode=0777 state=touch'
[root@backup ~]# ll
total 692
-rw------- 1 www  www       2 Dec 30 21:00 cang.pwd
-rw-r--r-- 1 root root      0 Dec 30 21:24 cao.jpg
-rwxrwxrwx 1 www  www       0 Dec 30 21:24 cook.sh
@创建目录
[root@ansible ~]# ansible backup -m file -a 'path=/root/oldboy state=directory'
[root@backup ~]# ll
total 692
-rw------- 1 www  www       2 Dec 30 21:00 cang.pwd
-rw-r--r-- 1 root root      0 Dec 30 21:24 cao.jpg
-rwxrwxrwx 1 www  www       0 Dec 30 21:24 cook.sh
drwxr-xr-x 2 root root      6 Dec 30 21:25 oldboy
@修改目录的属主属组,默认只会修改目录的属主属组不会修改下面的文件
[root@ansible ~]# ansible backup -m file -a 'path=/root/oldboy owner=666 group=www'
[root@backup ~]# ll
total 692
drwxr-xr-x 2 www  www       6 Dec 30 21:25 oldboy
[root@backup ~]# ll oldboy/
total 0
-rw-r--r-- 1 root root 0 Dec 30 21:28 1.txt
-rw-r--r-- 1 root root 0 Dec 30 21:28 2.txt
-rw-r--r-- 1 root root 0 Dec 30 21:28 3.txt
我们要使用参数recurse
[root@ansible ~]# ansible backup -m file -a 'path=/root/oldboy state=directory owner=www group=www recurse=yes'
[root@backup ~]# ll -d oldboy/
drwxr-xr-x 2 www www 45 Dec 30 21:28 oldboy/
[root@backup ~]# ll oldboy/
total 0
-rw-r--r-- 1 www www 0 Dec 30 21:28 1.txt
-rw-r--r-- 1 www www 0 Dec 30 21:28 2.txt
-rw-r--r-- 1 www www 0 Dec 30 21:28 3.txt
@删除文件
[root@ansible ~]# ansible backup -m file -a 'path=/root/cang.pwd state=absent'
@删除目录
[root@ansible ~]# ansible backup -m file -a 'path=/root/oldboy state=absent'


##### 模块6 systemd模块
systemd:
	name=rsyncd 服务名称
	state=started|restarted|stopped|reloaded
	enabled=yes   开机自启
[root@ansible ~]# ansible backup -m systemd -a 'name=rsyncd state=started enabled=yes'

#扩展
yum_repository
mount
cron
firewalld 	关闭防火墙
selinux     关闭selinux
unarchive   解压
get_url

#####
@模块6 cron模块
# 创建一个定时任务凌晨执行
[root@ansible ~]# ansible web01 -m cron -a 'name="数据备份" minute=00 hour=00 job="tar zcf all.tar.gz /etc/service"'
# 创建定时任务时间同步
[root@ansible ~]# ansible web01 -m cron -a 'name="时间同步" minute=*/5 job="ntpdate ntp2.aliyun.com"'
### 查看定时任务列表
[root@ansible ~]# ansible web01 -m shell -a 'crontab -l'
web01 | CHANGED | rc=0 >>
#Ansible: 时间同步
*/5 * * * * ntpdate ntp2.aliyun.com
#Ansible: 数据备份
00 00 * * * tar zcf all.tar.gz /etc/service

cron模块总结
	name: 对自己任务的注释
	minute:分钟 hour小时 weekday 周....
	job:执行的命令
	state:present(创建-默认)absent(删除定时任务)

########
模块7 mount模块
##1.挂载使用present 只将挂载命令写入到fstab配置文件,但不会进行挂载系统
[root@ansible ~]# ansible web01 -m mount -a 'src=172.16.1.31:/data path=/mnt state=present fstype=nfs'
[root@ansible ~]# ansible web01 -m shell -a 'tail -2 /etc/fstab'
web01 | CHANGED | rc=0 >>
UUID=4cbd1978-6311-4b0c-b70a-de9613a46989 none                    swap    defaults        0 0
172.16.1.31:/data /mnt nfs defaults 0 0
[root@ansible ~]# ansible web01 -m shell -a 'df -h'
web01 | CHANGED | rc=0 >>
Filesystem      Size  Used Avail Use% Mounted on
devtmpfs        459M     0  459M   0% /dev
tmpfs           475M     0  475M   0% /dev/shm
tmpfs           475M  6.8M  468M   2% /run
tmpfs           475M     0  475M   0% /sys/fs/cgroup
/dev/sda3        48G  3.8G   45G   8% /
tmpfs           475M   96K  474M   1% /tmp
/dev/sda1       195M  122M   74M  63% /boot
tmpfs            95M     0   95M   0% /run/user/0
##2.使用mounted命令挂载,写入到fstab里面,并且挂载到系统
[root@ansible ~]# ansible web01 -m mount -a 'src=172.16.1.31:/data path=/mnt state=mounted fstype=nfs'
[root@ansible ~]# ansible web01 -m shell -a 'df -h'
web01 | CHANGED | rc=0 >>
Filesystem         Size  Used Avail Use% Mounted on
devtmpfs           459M     0  459M   0% /dev
tmpfs              475M     0  475M   0% /dev/shm
tmpfs              475M  6.8M  468M   2% /run
tmpfs              475M     0  475M   0% /sys/fs/cgroup
/dev/sda3           48G  3.8G   45G   8% /
tmpfs              475M   96K  474M   1% /tmp
/dev/sda1          195M  122M   74M  63% /boot
tmpfs               95M     0   95M   0% /run/user/0
172.16.1.31:/data   48G  3.8G   45G   8% /mnt
[root@ansible ~]# ansible web01 -m shell -a 'tail -2 /etc/fstab'
web01 | CHANGED | rc=0 >>
UUID=4cbd1978-6311-4b0c-b70a-de9613a46989 none                    swap    defaults        0 0
172.16.1.31:/data /mnt nfs defaults 0 0
###3.卸载使用unmounted只卸载,不会清理fstab文件里面的挂载信息
[root@ansible ~]# ansible web01 -m mount -a 'path=/mnt state=unmounted'
[root@ansible ~]# ansible web01 -m shell -a 'df -h'
web01 | CHANGED | rc=0 >>
Filesystem      Size  Used Avail Use% Mounted on
devtmpfs        459M     0  459M   0% /dev
tmpfs           475M     0  475M   0% /dev/shm
tmpfs           475M  6.8M  468M   2% /run
tmpfs           475M     0  475M   0% /sys/fs/cgroup
/dev/sda3        48G  3.8G   45G   8% /
tmpfs           475M   96K  474M   1% /tmp
/dev/sda1       195M  122M   74M  63% /boot
tmpfs            95M     0   95M   0% /run/user/0
[root@ansible ~]# ansible web01 -m shell -a 'tail -2 /etc/fstab'
web01 | CHANGED | rc=0 >>
UUID=4cbd1978-6311-4b0c-b70a-de9613a46989 none                    swap    defaults        0 0
172.16.1.31:/data /mnt nfs defaults 0 0
###4.卸载使用absent既卸载系统又清理fstab里面的文件内容
[root@ansible ~]# ansible web01 -m mount -a 'src=172.16.1.31:/data path=/mnt state=mounted fstype=nfs'

[root@ansible ~]# ansible web01 -m mount -a 'path=/mnt state=absent'

[root@ansible ~]# ansible web01 -m shell -a 'tail -2 /etc/fstab'
web01 | CHANGED | rc=0 >>
UUID=183827a6-ef9e-49a3-a8bf-ab0f78500324 /boot                   xfs     defaults        0 0
UUID=4cbd1978-6311-4b0c-b70a-de9613a46989 none                    swap    defaults        0 0
[root@ansible ~]# ansible web01 -m shell -a 'df -h'
web01 | CHANGED | rc=0 >>
Filesystem      Size  Used Avail Use% Mounted on
devtmpfs        459M     0  459M   0% /dev
tmpfs           475M     0  475M   0% /dev/shm
tmpfs           475M  6.8M  468M   2% /run
tmpfs           475M     0  475M   0% /sys/fs/cgroup
/dev/sda3        48G  3.8G   45G   8% /
tmpfs           475M   96K  474M   1% /tmp
/dev/sda1       195M  122M   74M  63% /boot
tmpfs            95M     0   95M   0% /run/user/0

@mount 小结
	state=
	只挂载不写入---->present
	只卸载不清理----->unmounted
	既挂载又写入------>mounted
	既卸载又清理------->absent
	src=... 新增的源磁盘
	path=... 自己系统要进行挂载的磁盘
	fstype=.... 文件系统类型
5.ansible变量定义
变量提供了便捷的方式来管理Ansible playbook的每一个项目中的动态值,比如 nginx-1.6.3 这个软件包的版本,在其它地方或许会反复使用,那么如果讲此值设置为变量,然后再在其他的playbook中调用,会方便许多。如此一来还方便维护,减少维护的成本。
a.变量定义方式:
1.通过命令行进行变量定义
2.在play文件中进行变量定义
3.通过Inventory主机信息文件中进行变量定义
a.变量的优先级
如果在定义变量时,变量冲突了
在上述的三个地方分别设置了:
1.命令行中:age=11
2.play文件中:age=12
3.Inventory中:age=13
那么,最终的age结果一定是11
变量的读取优先级为:
命令行 > playbook文件 > Inventory文件
6.ansible变量注册
当 absible 的模块在运行之后,其实都会返回一些 result 结果,就像是执行脚本,我们有的时候需要脚本给我们一些return 返回值,我们才知道,上一步是否可以执行成功,但是…默认情况下, ansible 的 result 并不会显示出来,所以,我们可以把这些返回值’存储’到变量中,这样我们就能通过’调用’对应的变量名,从而获取到这些 result ,这种将模块的返回值,写入到变量中的方法被称为变量注册.
###### 直接案例,一步到胃,执行playbook的时候查看NGINX的状态。
[root@ansible ~/playbook/day50]# vim nginx_status.yml
- hosts: webs
  tasks:
    - name: Show Nginx Status
      shell: nginx -t
      register: ng_st

    - name: Import Vars
      debug:
        msg: "{{ ng_st.stderr_lines }}"
[root@ansible ~/playbook/day50]# ansible-playbook nginx_status.yml

......

TASK [Import Vars] ***********************************************************************************************************
ok: [web01] => {
    "msg": [
        "nginx: the configuration file /etc/nginx/nginx.conf syntax is ok",
        "nginx: configuration file /etc/nginx/nginx.conf test is successful"
    ]
}
ok: [web02] => {
    "msg": [
        "nginx: the configuration file /etc/nginx/nginx.conf syntax is ok",
        "nginx: configuration file /etc/nginx/nginx.conf test is successful"
    ]
}
###########
官方推荐装逼写法
[root@ansible ~/playbook/day50]# vim nginx_status.yml
- hosts: webs
  tasks:
    - name: Show Nginx Status
      shell: nginx -t
      register: ng_st

    - name: Import Vars
      debug:
        msg: "{{ ng_st['stderr_lines'] }}"
7.ansible判断语句
不管是 shell 还是各大编程语言中,流程控制,条件判断这些都是必不可少的,在我们使用 Ansible 的过程中,条件判断的使用频率极其高。
例如:
1.我们使用不同的系统的时候,可以通过判断系统来对软件包进行安装。
2.在 nfs 和 rsync 安装过程中,客户端服务器不需要推送配置文件,之前我们都是写多个play,会影响效率。
3.我们在源码安装nginx的时候,执行第二遍就无法执行了,此时我们就可以进行判断是否安装过。
when判断
流程控制
## 可以通过ansible webs -m setup 里面的内置变量
# 案例1.操作一个组,只在web01服务器上卸载wget命令
[root@ansible ~/playbook/day50]# vim when.yml
- hosts: webs
  tasks:
    - name: When Case Test
      yum:
       name: wget
       state: absent
      when: ansible_hostname == "web02"
 [root@ansible ~/playbook/day50]# ansible-playbook when.yml

********************************************************************************************************
skipping: [web01]  ### 跳过web01
changed: [web02]

PLAY RECAP *******************************************************************************************************************
web01                      : ok=1    changed=0    unreachable=0    failed=0    skipped=1    rescued=0    ignored=0
web02                      : ok=2    changed=1    unreachable=0    failed=0    skipped=0    rescued=0    ignored=0
# 案例2.只在IP地址是10.0.0.7服务器上安装wget命令
[root@ansible ~/playbook/day50]# ansible web01 -m setup -a "filter=ansible_default_ipv4"
web01 | SUCCESS => {
    "ansible_facts": {
        "ansible_default_ipv4": {
            "address": "10.0.0.7",
            "alias": "ens33",
            "broadcast": "10.0.0.255",
            "gateway": "10.0.0.2",
            "interface": "ens33",
            "macaddress": "00:0c:29:d5:b4:ed",
            "mtu": 1500,
            "netmask": "255.255.255.0",
            "network": "10.0.0.0",
            "prefix": "24",
            "type": "ether"
        }
    },
    "changed": false
}
[root@ansible ~/playbook/day50]# cat when.yml
- hosts: webs
  tasks:
    - name: When Case Test
      yum:
       name: wget
       state: present
      when: ansible_default_ipv4.address == "10.0.0.8"     ### 这个点代表子集
# 案例3 并且条件,在IP地址为10.0.0.8并且主机名为web02上面安装
[root@ansible ~/playbook/day50]# cat when.yml
- hosts: webs
  tasks:
    - name: When Case Test
      yum:
       name: wget
       state: present
      when:
        - ansible_default_ipv4.address == "10.0.0.8"
        - ansible_hostname == "web02"
# 案例4 或者条件,在IP地址为10.0.0.8或者主机名为web01上面安装
[root@ansible ~/playbook/day50]# vim when.yml
- hosts: webs
  tasks:
    - name: When Case Test
      yum:
       name: wget
       state: present
      when: (ansible_default_ipv4.address == "10.0.0.8") or (ansible_hostname == "web01")
其他判断字符---search-----match
在 Ansible 中,match 和 search 都是用于正则表达式匹配的操作符,通常用于条件判断或字符串处理。
-
1.
match -
作用:
match是用于判断一个字符串是否完全符合给定的正则表达式模式。 -
行为:
match会尝试从字符串的开头开始匹配。如果字符串完全符合正则表达式,则返回匹配结果;否则返回False。 -
使用场景:当你希望匹配一个字符串的起始部分,或者完全符合某个正则表达式时使用。
示例:
 - name: Example using match
   debug:
     msg: "Match found"
   when: "'hello world' | match('^hello')"
这段代码会在 hello world 开头匹配 hello,返回 True。
-
2.
search -
作用:
search是用于查找字符串中是否包含给定的正则表达式模式。 -
行为:
search会在整个字符串中查找是否存在符合正则表达式的部分。如果找到了匹配的部分,则返回匹配结果;否则返回None。 -
使用场景:当你希望查找字符串中的任意位置是否包含符合某个模式时使用。
示例:
 - name: Example using search
   debug:
     msg: "Search found"
   when: "'hello world' | search('world')"
这段代码会查找 hello world 中是否包含 world,返回 True。
-
区别:
-
匹配范围:
-
match只检查字符串的开头部分是否符合正则表达式。 -
search会查找整个字符串,只要字符串中任意位置符合正则表达式。
-
-
匹配结果:
-
match如果符合正则,返回匹配的结果;如果不符合,返回False。 -
search如果找到匹配的部分,返回匹配的结果;如果没有找到,返回None。
-
-
总结:
-
使用
match时,确保字符串从头到尾完全符合正则模式。 -
使用
search时,可以在整个字符串中查找某部分是否符合模式。
### search
[root@ansible ~/playbook/day50]# vim when.yml +7
- hosts: webs
  tasks:
    - name: Check Nginx Status
      shell: nginx -t
      register: ng_st

    - name: Import Nginx Status
      debug:
        msg: ng_st.stderr_lines is search "ok"

@案例2.
[root@ansible oldboy]# cat w.yml
- hosts: lnmp
  tasks:
    - name: Install wget
      yum:
        name: wget
        state: present
      when: ansible_hostname is search "web"


### match
[root@ansible ~/playbook/day50]# vim when.yml
- hosts: webs
  tasks:
    - name: Check Nginx Status
      shell: nginx -t
      register: ng_st

    - name: Import Nginx Status
      debug:
        msg: ng_st.stderr_lines is match "ok"

直接使用反馈结果是一样的
[root@ansible ~/playbook/day50]# ansible-playbook when.yml

....

TASK [Import Nginx Status] ***************************************************************************************************
ok: [web01] => {
    "msg": "ng_st.stderr_lines is match \"ok\""
}
ok: [web02] => {
    "msg": "ng_st.stderr_lines is match \"ok\""
}

PLAY RECAP *******************************************************************************************************************
web01                      : ok=3    changed=1    unreachable=0    failed=0    skipped=0    rescued=0    ignored=0
web02                      : ok=3    changed=1    unreachable=0    failed=0    skipped=0    rescued=0    ignored=0
8.ansible的handler
handler 用来执行某些条件下的任务,比如当配置文件发生变化的时候,通过notify触发handler去重启服务。在saltstack中也有类似的触发器,写法相对Ansible简单,只需要watch,配置文件即可。
[root@ansible ansible]# cat nginx.yml
- hosts: webs
  tasks:
    - name: Nginx Repo
      yum_repository:
        name: nginx
        description: Nginx YUM repo
        baseurl: http://nginx.org/packages/centos/7/$basearch/
        gpgcheck: no
        enabled: yes

    - name: Install Nginx Server
      yum:
        name: nginx
        state: present

    - name: Configure Nginx Server
      copy:
        src: nginx.conf
        dest: /etc/nginx/
      notify: Restart Nginx Server		# 监控nginx配置文件是否发生变化 如果一致不触发handlers,如果发生变化则触发handlers进行重启动作

    - name: check nginx conf
      shell: nginx -t
      ignore_errors: yes   #### 表示有错误也不停止,继续往后执行完整个playbook.
      register: ng_re

    - name: create group www
      group:
        name: www
        gid: 666

    - name: Create www user
      user:
        name: www
        uid: 666
        group: www
        shell: /sbin/nologin
        create_home: false

    - name: Start Nginx Server
      systemd:
        name: nginx
        state: started
        enabled: yes

  handlers:
    - name: Restart Nginx Server		# 必须和notify后的名称一致
      systemd:
        name: nginx
        state: restarted
      when: ng_re.stderr_lines is search "ok"
注意:
1.无论多少个task通知了相同的handlers,handlers仅会在所有tasks结束后运行一次。
2.Handlers只有在其所在的任务被执行时,才会被运行;如果一个任务中定义了notify调用Handlers,但是由于条件判断等原因,该任务未被执行,那么Handlers同样不会被执行。
3.Handlers只会在每一个play的末尾运行一次;如果想在一个playbook中间运行Handlers,则需要使用meta模块来实现。例如: -meta: flush_handlers。
4.如果一个play在运行到调用Handlers的语句之前失败了,那么这个Handlers将不会被执行。我们可以使用meta模块的–force-handlers选项来强制执行Handlers,即使Handlers所在的play中途运行失败也能执行。
5.不能使用handlers替代tasks
9.ansible的loop循环
a》安装多个软件
[root@ansible ~/playbook/day51]# vim loop_yum.yml
- hosts: web01
  tasks:
    - name: Install a fews Server
      yum:
        name: "{{ item }}"
        state: present
      loop:
          - vsftpd
          - tree
          - unzip
b》拷贝多个文件
[root@ansible ~/playbook/day51]# cat loop_copy.yml
- hosts: backup
  tasks:
    - name: Copy Configure File
      copy:
        src: "{{ item.src }}"
        dest: "{{ item.dest }}"
        owner: "{{ item.owner }}"
        group: "{{ item.group }}"
        mode: "{{ item.mode }}"
      loop:
        - {src: rsyncd.conf,dest: /root/,owner: www,group: www,mode: '0644'}
        - {src: rsync.passwd,dest: /etc/,owner: root,group: root,mode: '0600'}

[root@backup ~]# ll
total 0
-rw-r--r-- 1 www www 0 Jan  2 21:22 rsyncd.conf
[root@backup ~]# ll /etc/rsync.passwd
-rw------- 1 root root 0 Jan  2 21:22 /etc/rsync.passwd
10.ansible的tag标签
给某个任务打tag,单独让它执行
#可以给多个任务打相同的tag
@ 案例1
单个任务打标签
[root@ansible ~/playbook/day50]# vim nfs.yml
....
    - name: Create User www
      user:
        name: www
        uid: 666
        group: www
        shell: /sbin/nologin
        create_home: false
      tags: hehe             ####打个标签,只让他运行一次
[root@ansible ~/playbook/day50]# ansible-playbook nfs.yml --list-tags    ## 查看tags列表
playbook: nfs.yml

  play #1 (NfsServer): NfsServer	TAGS: []
      TASK TAGS: [hehe]
[root@ansible ~/playbook/day50]# ansible-playbook nfs.yml -t hehe  ### 运行tags
@@@ 多个任务打上相同标签就是再运行一次多个任务
[root@ansible ~/playbook/day50]# vim nfs.yml
....
      - name: Create Group www
      group:
        name: www
        gid: 666
      tags: hehe      	    ####打个标签,只让他运行一次

    - name: Create User www
      user:
        name: www
        uid: 666
        group: www
        shell: /sbin/nologin
        create_home: false
      tags: hehe             ####再打个标签,只让他运行一次


[root@ansible ~/playbook/day50]# ansible-playbook nfs.yml -t hehe
11.ansible的include
# 准备两个示例文件
[root@ansible ~/playbook/day51]# cat include_yum1.yml include_yum2.yml
- name: Install Vsftpd Server
  yum:
    name: vsftpd
    state: present
- name: Install Vsftpd Server
  yum:
    name: cowsay
    state: present
# 准备一个整合文件
[root@ansible ~/playbook/day51]# cat include.yml
- hosts: all
  tasks:
    - include_tasks: include_yum1.yml
      when: ansible_hostname == 'web01'
    - include_tasks: include_yum2.yml
      when: ansible_default_ipv4.address == '10.0.0.8'

# 执行发现没有匹配到的都会跳过
......
TASK [include_tasks] ***************************************************************************************************************
skipping: [web02]
skipping: [nfs]
skipping: [backup]
included: /root/playbook/day51/include_yum1.yml for web01

TASK [Install Vsftpd Server] *******************************************************************************************************
ok: [web01]
......
12.ansible的roles
roles 不管是Ansible还是saltstack,我在写一键部署的时候,都不可能把所有的步骤全部写入到一个’剧本’文件当中,我们肯定需要把不同的工作模块,拆分开来,解耦,那么说到解耦,我们就需要用到 roles 官方推荐,因为 roles 的目录结构层次更加清晰。
例如:我们之前推荐大家写一个 base.yml 里面写所有基础优化的项目,其实把所有东西摞进去也是很鸡肋的,不如我们把这些功能全部拆分开,谁需要使用,就调用即可。
建议:每个roles最好只使用一个tasks这样方便我们去调用,能够很好的做到解耦。(SOA)
[root@ansible ~/playbook/day51]# tree rsync/
nfs/ #项目名称
├── defaults #低优先级变量
├── files #存放文件
├── handlers #触发器文件
├── meta #依赖关系文件
├── tasks #工作任务文件
├── templates #jinja2模板文件
├── tests #测试文件
└── vars #变量文件
案例.使用roles来重构NFS 服务
[root@ansible ~/playbook/day51/roles]# ansible-galaxy init nfs
- Role nfs was created successfully
[root@ansible ~/playbook/day51/roles]# tree nfs/
nfs/
├── defaults
│   └── main.yml
├── files
├── handlers
│   └── main.yml
├── meta
│   └── main.yml
├── README.md
├── tasks
│   └── main.yml
├── templates
├── tests
│   ├── inventory
│   └── test.yml
└── vars
    └── main.yml

---------------------------
任务文件:
[root@ansible ~/playbook/day51/roles]# cat nfs/tasks/main.yml
- name: Installl NFS Server
  yum:
    name: nfs-utils
    state: present

- name: Configure NFS Server
  template:                      ### 跟Nginx不一样,他没有列表要拷贝多个文件,就不需要用到loop循环
    src: exports.j2
    dest: /etc/exports
  notify: Restart NFS Server

- name: Make NFS Dir
  file:
    path: "{{ nfs_dir }}"
    state: directory
    owner: "{{ nfs_user }}"
    group: "{{ nfs_user }}"

- name: Start NFS Server
  systemd:
    name: nfs
    state: started
    enabled: yes

--------------------------------
vars变量文件:
[root@ansible ~/playbook/day51/roles]# cat nfs/vars/main.yml
nfs_dir: /data/wp
nfs_ip: 172.16.1.0/24
nfs_user: www

---------------------------------
template模板文件:
[root@ansible ~/playbook/day51/roles]# ll nfs/templates/
total 4
-rw-r--r-- 1 root root 71 Jan  3 10:16 exports.j2
[root@ansible ~/playbook/day51/roles]# cat nfs/templates/exports.j2
{{ nfs_dir }} {{ nfs_ip }}(rw,sync,all_squash,anonuid=666,anongid=666)

-----------------------------------
handlers文件
[root@ansible ~/playbook/day51/roles]# cat nfs/handlers/main.yml
- name: Restart NFS Server
  systemd:
    name: nfs
    state: restarted

------------------------------------
role模板site文件
[root@ansible ~/playbook/day51/roles]# cat site.yml
- hosts: loopdays
  roles:
    - role: nfs
      when: ansible_hostname == 'nfs'

运行测试
[root@ansible ~/playbook/day51/roles]# ansible-playbook --syntax-check site.yml
[root@ansible ~/playbook/day51/roles]# ansible-playbook site.yml

客户端直接挂载
[root@web02 ~]# mount -t nfs 172.16.1.31:/data/wp /mnt/
[root@web02 ~]# touch /mnt/1.txt
[root@web02 ~]# ll /mnt/
total 0
-rw-r--r-- 1 www www 0 Jan  3 10:20 1.txt

北京人形旗下天工造物具身智能开源社区,聚焦具身天工与慧思开物两大平台
更多推荐
 5
5 0
0- 0


 已为社区贡献3条内容

所有评论(0)