Yolov5-7转openvino 并推理(windows10)
·
一、安装onnx
1. pip install onnx
2.转成onnx模型
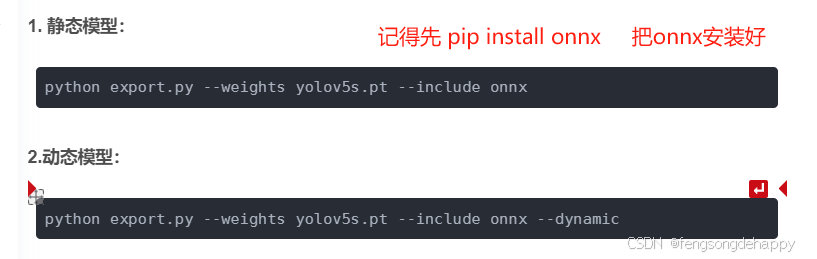
这里谈谈静态与动态的区别:
2.1没有 --dynamic(静态):
导出的 ONNX 模型的输入形状是静态的,通常是基于训练时的输入尺寸(默认 640x640, batch size = 1)。这意味着输入图片必须符合该尺寸。
优点:静态输入模型在推理时可能会有更好的优化,推理速度更快。
2.2 有 --dynamic(动态):
导出的 ONNX 模型支持动态输入尺寸。输入图片可以是任意尺寸,不局限于训练时的尺寸(即我w, h, batch 都是可变的)。
优点:灵活性更高,适用于不同分辨率的图片。
缺点:推理速度可能稍微降低,因为引擎需要处理不同的输入尺寸,无法进行特定尺寸的优化。
3.用:python export.py --weights yolov5s.pt --include onnx --dynamic 得到yolov5s.onnx
二、安装openvino
官网:Install Intel® Distribution of OpenVINO™ Toolkit from PyPI Repository — OpenVINO™ documentation
1.进入官网选择pip 安装
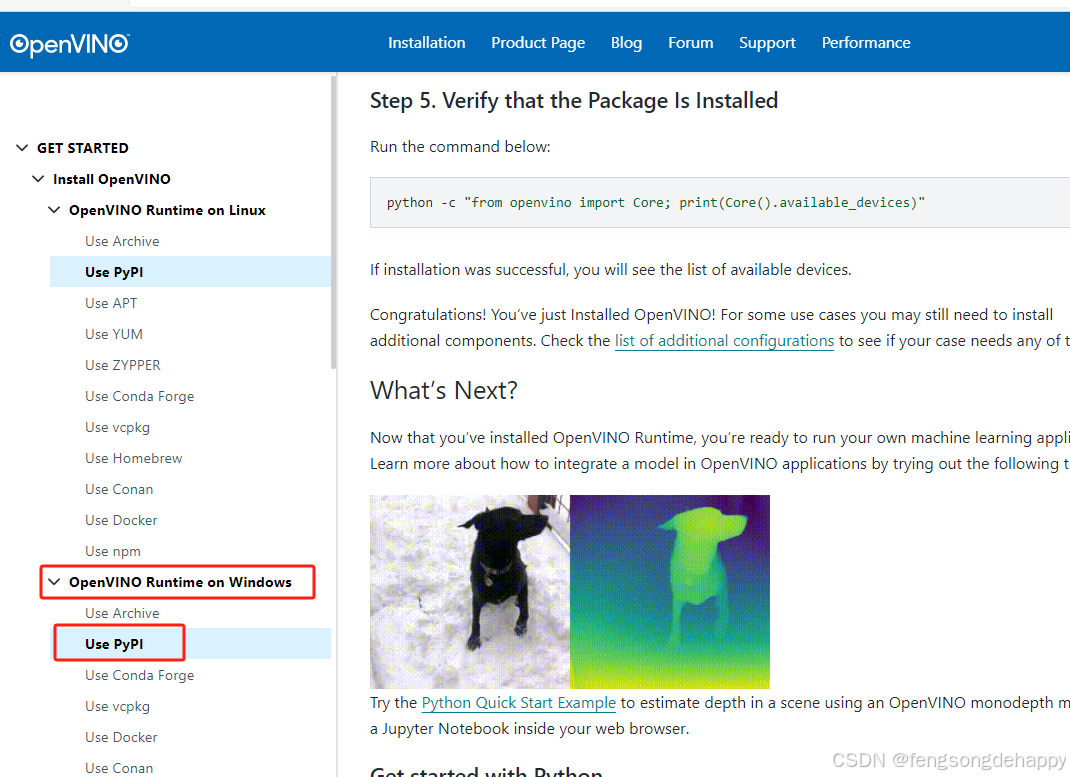
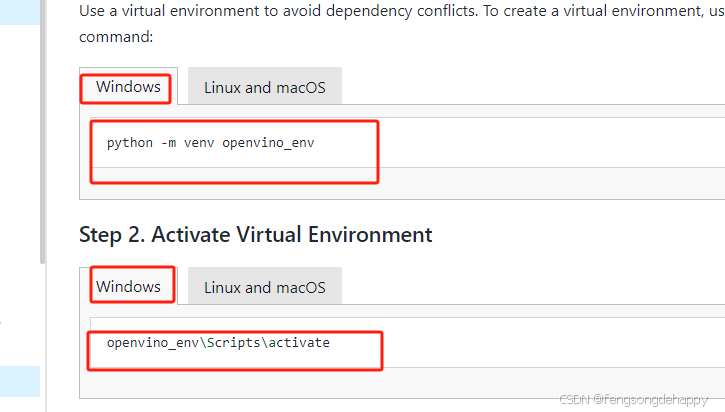
2.创建虚拟环境!!
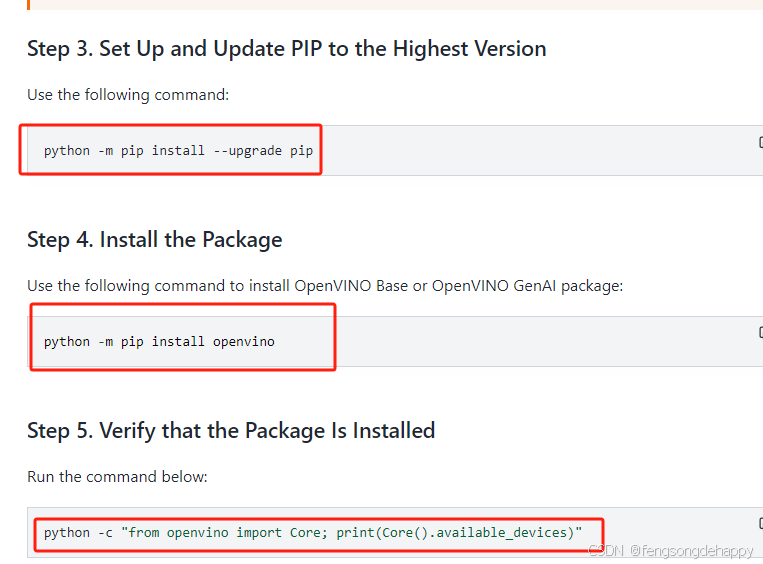
3. 安装并验证(python -m pip install --upgrade pip, 这里升级不升级都可以)

三、onnx转openvino
1.转换模型:
from openvino.runtime import Core
from openvino.runtime import serialize

# 创建一个 OpenVINO 的核心对象 ie,这是与推理引擎的主要交互接口。
ie = Core()
# 要转换的onnx模型
onnx_model_path = r"yolov5s.onnx"
# 使用ie对象读取onnx模型
model_onnx = ie.read_model(model=onnx_model_path)

# compiled_model_onnx = ie.compile_model(model=model_onnx, device_name="CPU")     #

# xml_path:指定转换完的openvino 输出的 XML 文件路径。     bin_path:指定转换完的openvino 输出的bin文件路径。    version:设置模型版本为 UNSPECIFIED。
serialize(model=model_onnx, xml_path="openvino_model/exported_onnx_model.xml", bin_path="openvino_model/exported_onnx_model.bin",
          version="UNSPECIFIED")
2.模型处理函数 (创建process.py文件把下面代码写入)
# -*- coding: utf-8 -*-


import cv2
import numpy as np
import os

def load_image(image_path):
    image = cv2.imdecode(np.fromfile(image_path, dtype=np.uint8), cv2.IMREAD_COLOR)
    return image

def pad(image, new_shape=[160, 160], color=(255, 255, 255)):
    shape = image.shape[:2]
    ratio = min(new_shape[0] / shape[0], new_shape[1] / shape[1])
    resize_shape = int(round(shape[1] * ratio)), int(round(shape[0] * ratio))
    image = cv2.resize(image, resize_shape, interpolation=cv2.INTER_LINEAR)
    dw, dh = new_shape[1] - resize_shape[0], new_shape[0] - resize_shape[1]
    top, bottom = int(round(dh / 2 - 0.1)), int(round(dh / 2 + 0.1))
    left, right = int(round(dw / 2 - 0.1)), int(round(dw / 2 + 0.1))
    image = cv2.copyMakeBorder(image, top, bottom, left, right, cv2.BORDER_CONSTANT, value=color)  # add border
    return image


#   缩放图片至指定尺寸(640x640),短边自动pad 到640
def letterbox(im, new_shape=(640, 640), color=(114, 114, 114)):
    # Resize and pad image while meeting stride-multiple constraints
    shape = im.shape[:2]  # current shape [height, width]
    if isinstance(new_shape, int):
        new_shape = (new_shape, new_shape)

    # Scale ratio (new / old)
    r = min(new_shape[0] / shape[0], new_shape[1] / shape[1])

    # Compute padding
    ratio = r  # width, height ratios
    new_unpad = int(round(shape[1] * r)), int(round(shape[0] * r))

    dw, dh = new_shape[1] - new_unpad[0], new_shape[0] - new_unpad[1]  # wh padding


    dw /= 2  # divide padding into 2 sides
    dh /= 2

    if shape[::-1] != new_unpad:  # resize
        im = cv2.resize(im, new_unpad, interpolation=cv2.INTER_LINEAR)
    top, bottom = int(round(dh - 0.1)), int(round(dh + 0.1))
    left, right = int(round(dw - 0.1)), int(round(dw + 0.1))
    im = cv2.copyMakeBorder(im, top, bottom, left, right, cv2.BORDER_CONSTANT, value=color)  # add border
    return im, ratio, (dw, dh)


def xywh2xyxy(boxes):
    boxes = np.array([boxes[:,0] - boxes[:,2] // 2, boxes[:,1] - boxes[:,3] // 2, boxes[:,0] + boxes[:,2] // 2, boxes[:,1] + boxes[:,3] // 2]).transpose((1,0))
    return boxes

# 还原pad坐标到ori图片坐标
def pad2ori(boxes,ratio,dw,dh):

    boxes = xywh2xyxy(boxes)  # 左上角点和右下角的点
    ret_x1, ret_x2 = (boxes[:,0] - dw) / ratio, (boxes[:,2] - dw) / ratio
    ret_y1, ret_y2 = (boxes[:,1] - dh) / ratio, (boxes[:,3] - dh) / ratio
    boxes = np.array([ret_x1, ret_y1, ret_x2, ret_y2]).transpose((1,0))
    return boxes


# 原始图片坐标转换yolo格式
def ori2yolo(classes,boxes,ori_image):
    datas = []
    h,w, c = ori_image.shape
    for item in zip(classes,boxes):
        cls = item[0]
        x1,y1,x2,y2 = item[1]

        w_,h_ = x2-x1,y2-y1
        x_center,y_center = x1+w_/2,y1+h_/2
        x_center,y_center,w_,h_ = x_center/w,y_center/h,w_/w,h_/h
        datas.append([cls, x_center,y_center,w_,h_])
    return datas
3. openvino 推理“
# -*- coding: utf-8 -*-


import argparse
import cv2.dnn
import numpy as np
import openvino as ov
import os
import process
import sys
import time
from shapely.geometry import Polygon

class Detector(object):
    def __init__(self, xml_path, bin_path):
        super().__init__()
        self.xml_path = xml_path
        self.bin_path = bin_path
        self.compile_model = self.init(self.xml_path, bin_path)

    def init(self, xml_path, bin_path):
        core = ov.Core()
        model = core.read_model(model=xml_path, weights=bin_path)
        # 将读取的模型编译为可在 CPU 上高效运行的格式 (使用后模型只能在cpu运行)
        compile_model = core.compile_model(model=model, device_name="CPU")
        return compile_model

    def preprocess(self, image):
        # ori_image = process.load_image(image_path)
        ori_image = image
        pad_image, ratio, (dw, dh) = process.letterbox(ori_image, new_shape=[640, 640], color=[114, 114, 114])
        # cv2.imshow("pad", pad_image)
        # cv2.waitKey(0)
        rgb_image = pad_image[:, :, ::-1]   # bgr 2 rgb
        image_data = np.expand_dims(np.transpose(rgb_image / 255.0, (2, 0, 1)), axis=0)  # 归一化, hwc 2 chw  , 添加批次维度
        return image_data, ori_image, ratio, dw, dh

    def inference(self, image_data):
        # 模型输出
        output = self.compile_model(image_data)[self.compile_model.output(0)]
        return output

    def postprocess(self, output, conf_thresh, iou_thresh, ratio, dw, dh):
        # v8与v5的后处理不一致 不能直接使用 修改一下
        # output = np.transpose(output[0], (1, 0))
        output = output[0]                  # 模型输出(没有加iou 与  conf的框-------有很多框)
        # 筛选置信度
        # locations = np.where(np.max(output[:, 4:], axis=1) > conf_thresh)
        locations = np.where(output[:, 4] > conf_thresh)
        confs = output[:, 4][locations]
        classes = np.argmax(output[:, 5:], axis=1)[locations]
        boxes = output[:, :4][locations]
        ids = cv2.dnn.NMSBoxes(boxes, confs, conf_thresh, iou_thresh)

        confs = confs[ids]
        classes = classes[ids]
        boxes = boxes[ids]
        boxes = process.pad2ori(boxes, ratio, dw, dh)
        return confs, classes, boxes


def parse_arguments(argv):
    parser = argparse.ArgumentParser()
    parser.add_argument("--video_path", type=str, default=r"1.mp4")
    parser.add_argument("--xml_path", type=str,
                        default=r"openvino_model/exported_onnx_model.xml")
    parser.add_argument("--bin_path", type=str,
                        default=r"openvino_model/exported_onnx_model.bin")


    parser.add_argument("--conf_thresh", type=float,
                        default=0.5)
    parser.add_argument("--iou_thresh", type=float,
                        default=0.45)
    return parser.parse_args(argv)


def main(args):
    video_path = args.video_path

    xml_path = args.xml_path
    bin_path = args.bin_path


    conf_thresh = args.conf_thresh
    iou_thresh = args.iou_thresh

    # 以下最好以配置文件形式进行呈现

    cls = ["garbage", "person", "hand"]

    colors = {
        "garbage": (255, 0, 255),
        "person": (0, 255, 255),
        "hand": (255, 255, 0),
    }

    # 封装成函数

    detector = Detector(xml_path, bin_path)

    capture = cv2.VideoCapture(video_path)

    flag_in = 0
    flag_in_dict = {}
    flag_out = 0
    flag_out_dict = {}
    continuous_no_person = 0


    w = int(capture.get(3))  # 获取视频的width
    h = int(capture.get(4))  # 获取视频的height
    fourcc = cv2.VideoWriter_fourcc(*'MJPG')
    video_name = 1
    out = cv2.VideoWriter(f'video_{video_name}.avi', fourcc, 20.0, (w, h))

    num = 1
    while True:
        ret, frame = capture.read()
        if not ret or frame is None:
            break

        image_data, ori_image, ratio, dw, dh = detector.preprocess(frame)
        output = detector.inference(image_data)
        # 返回一张图片上所有的置信度,类别, 框坐标
        confs, classes, boxes = detector.postprocess(output, conf_thresh, iou_thresh, ratio, dw, dh)

        classes = list(classes)
        print(classes)


        # # 判断起始未检测到人
        # if cls.index("person") not in classes:  # 如果类别1不在classes里。(既如果一张图的侦测结果里没有1=person)
        #     continuous_no_person += 1
        #     continue

        # id = classes.index(cls.index("person"))
        cv2.imshow("88", frame)
        cv2.waitKey(1)


    capture.release()
    cv2.destroyAllWindows()

if __name__ == '__main__':
    main(parse_arguments(sys.argv[1:]))

北京人形旗下天工造物具身智能开源社区,聚焦具身天工与慧思开物两大平台
更多推荐
 4
4 0
0- 0


 已为社区贡献2条内容

所有评论(0)