极狐GitLab自动化测试指南之接口测试【实践篇】
本文作者:武让
GitLab 是一个全球知名的一体化 DevOps 平台,很多人都通过私有化部署 GitLab 来进行源代码托管。极狐GitLab :https://gitlab.cn/install?channel=content&utm_source=csdn 是 GitLab 在中国的发行版,专门为中国程序员服务。可以一键式部署极狐GitLab。
更多关于极狐GitLab :https://gitlab.cn 或者 DevOps 的最佳实践,可以关注文末的极狐GitLab 公众号。
学习极狐GitLab 的相关资料:
- 极狐GitLab 官网:https://gitlab.cn
- 极狐GitLab 官网文档:https://docs.gitlab.cn
- 极狐GitLab 论坛:https://forum.gitlab.cn/
- 极狐GitLab 安装配置:https://gitlab.cn/install
- 极狐GitLab 资源中心:https://resources.gitlab.cn
搜索【极狐GitLab】公众号,后台输入加群,备注gitlab,即可加入官方微信技术交流群。
相关阅读
极狐GitLab 公众号后台回复新手指南,免费领取极狐GitLab 新手指南一份,从零到一快速上手极狐GitLab。
2 实践篇
2.1 极狐GitLab集成Apifox
2.1.1 创建文档项目
假设我们要开发一个唱片管理系统,需要实现以下功能:
- 发布唱片信息(ID、唱片名、艺术家、价格)
- 获取唱片列表(ID、唱片名、艺术家、价格)
- 获取指定ID的唱片
基于上述需求,先使用Apifox建立接口文档。Apifox官方提供了详细的介绍和操作文档,详见:快速上手 | Apifox 使用文档。目前Apifox有SaaS版和私有化部署版,其中SaaS版免费使用,而是私有化部署需要付费使用。Apifox的客户端又分为桌面版和Web版,以桌面版为例:
-
创建一个名为album的项目。
-
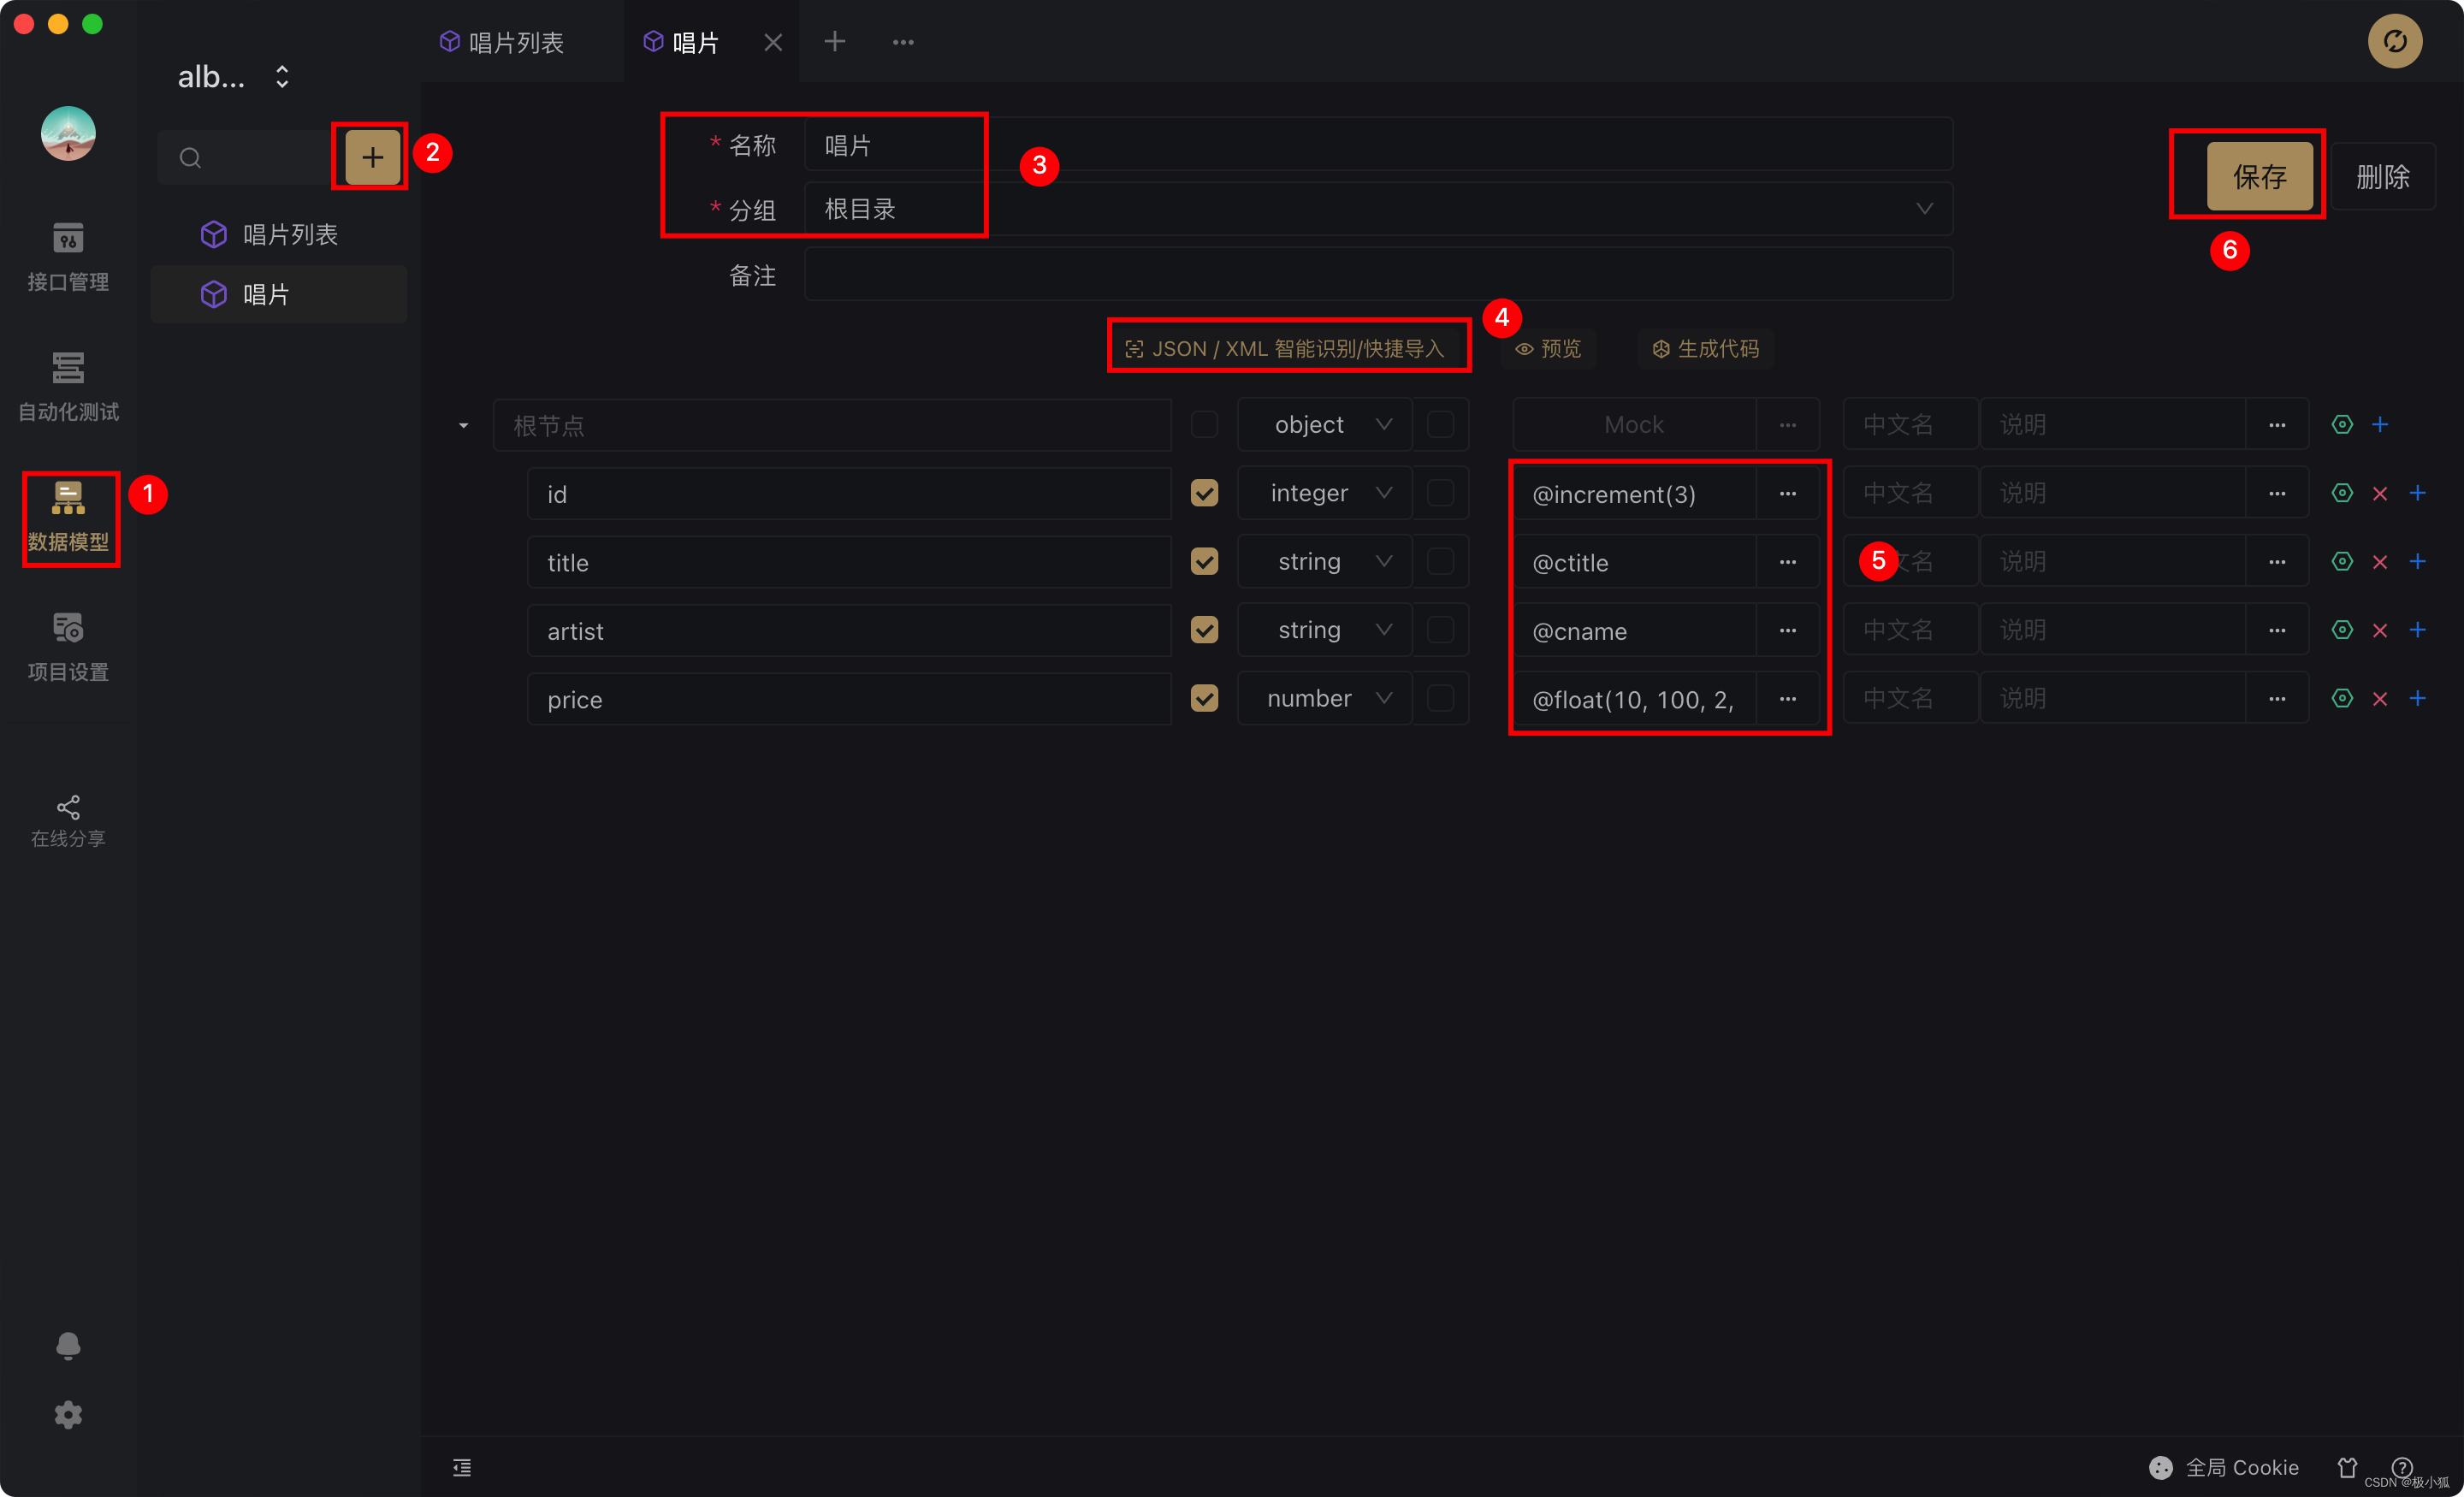
创建数据模型。如下图,使用了Apifox自带的“从JSON/XML智能识别”功能和“智能Mock”功能。详见:
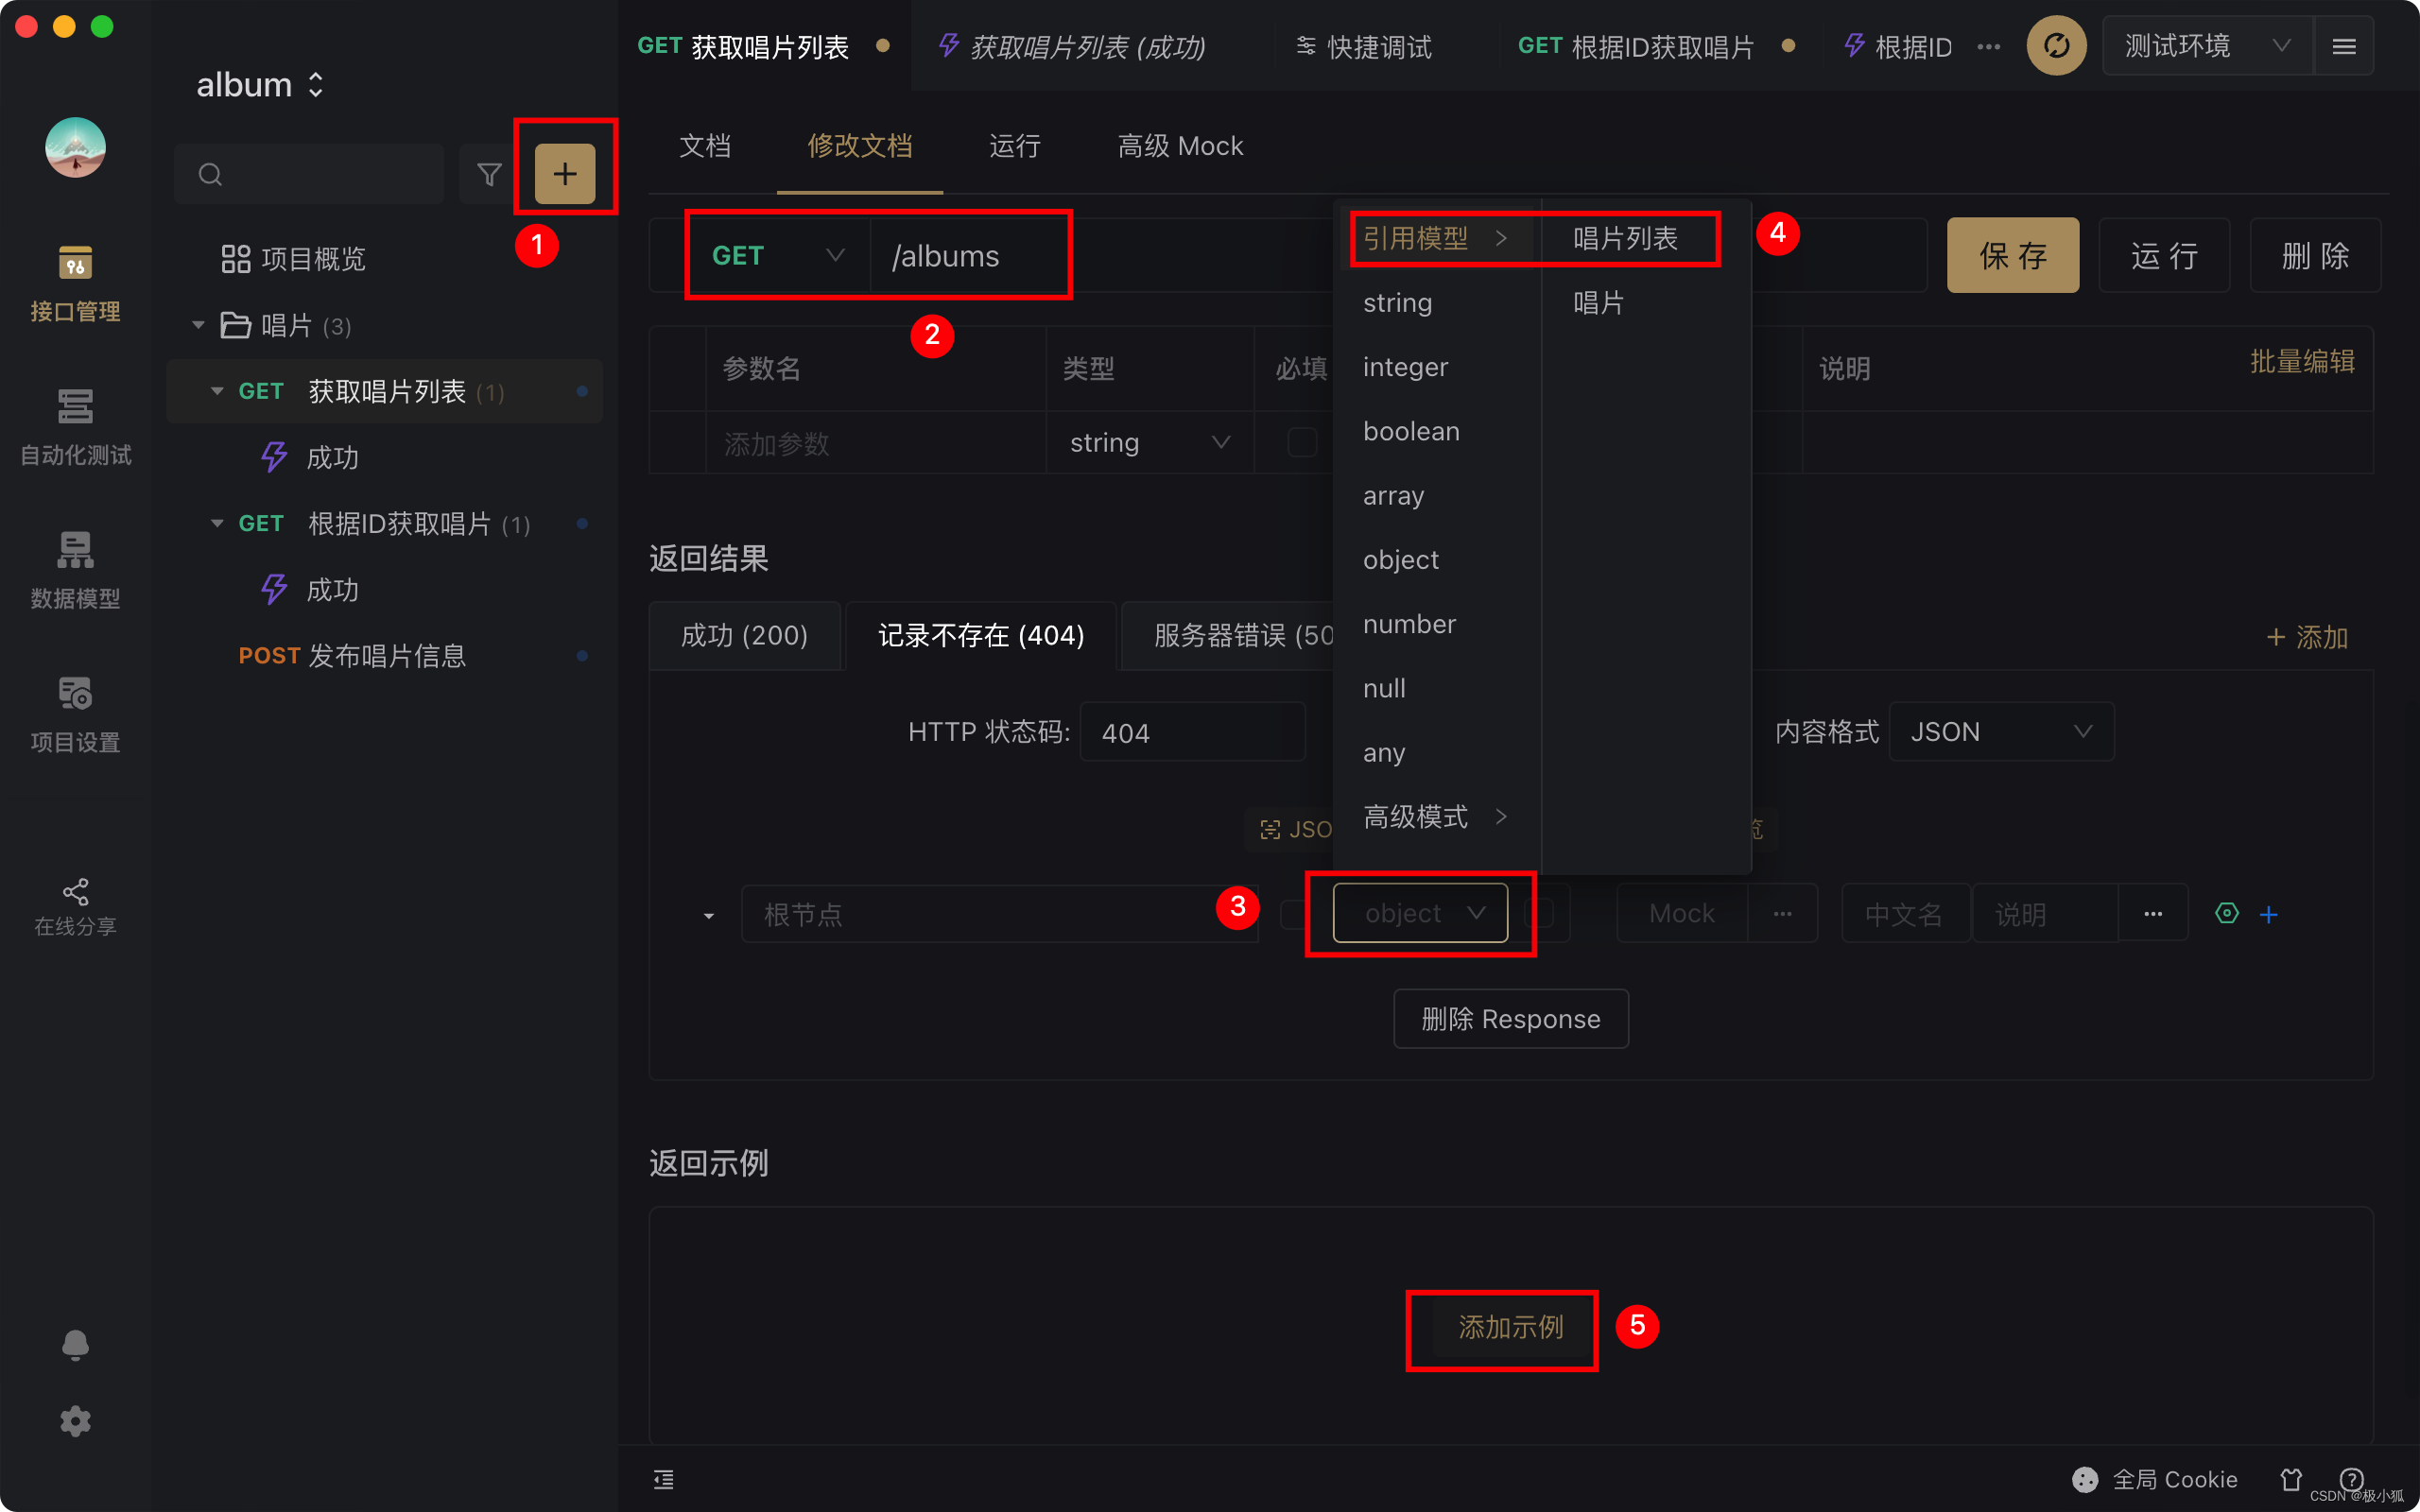
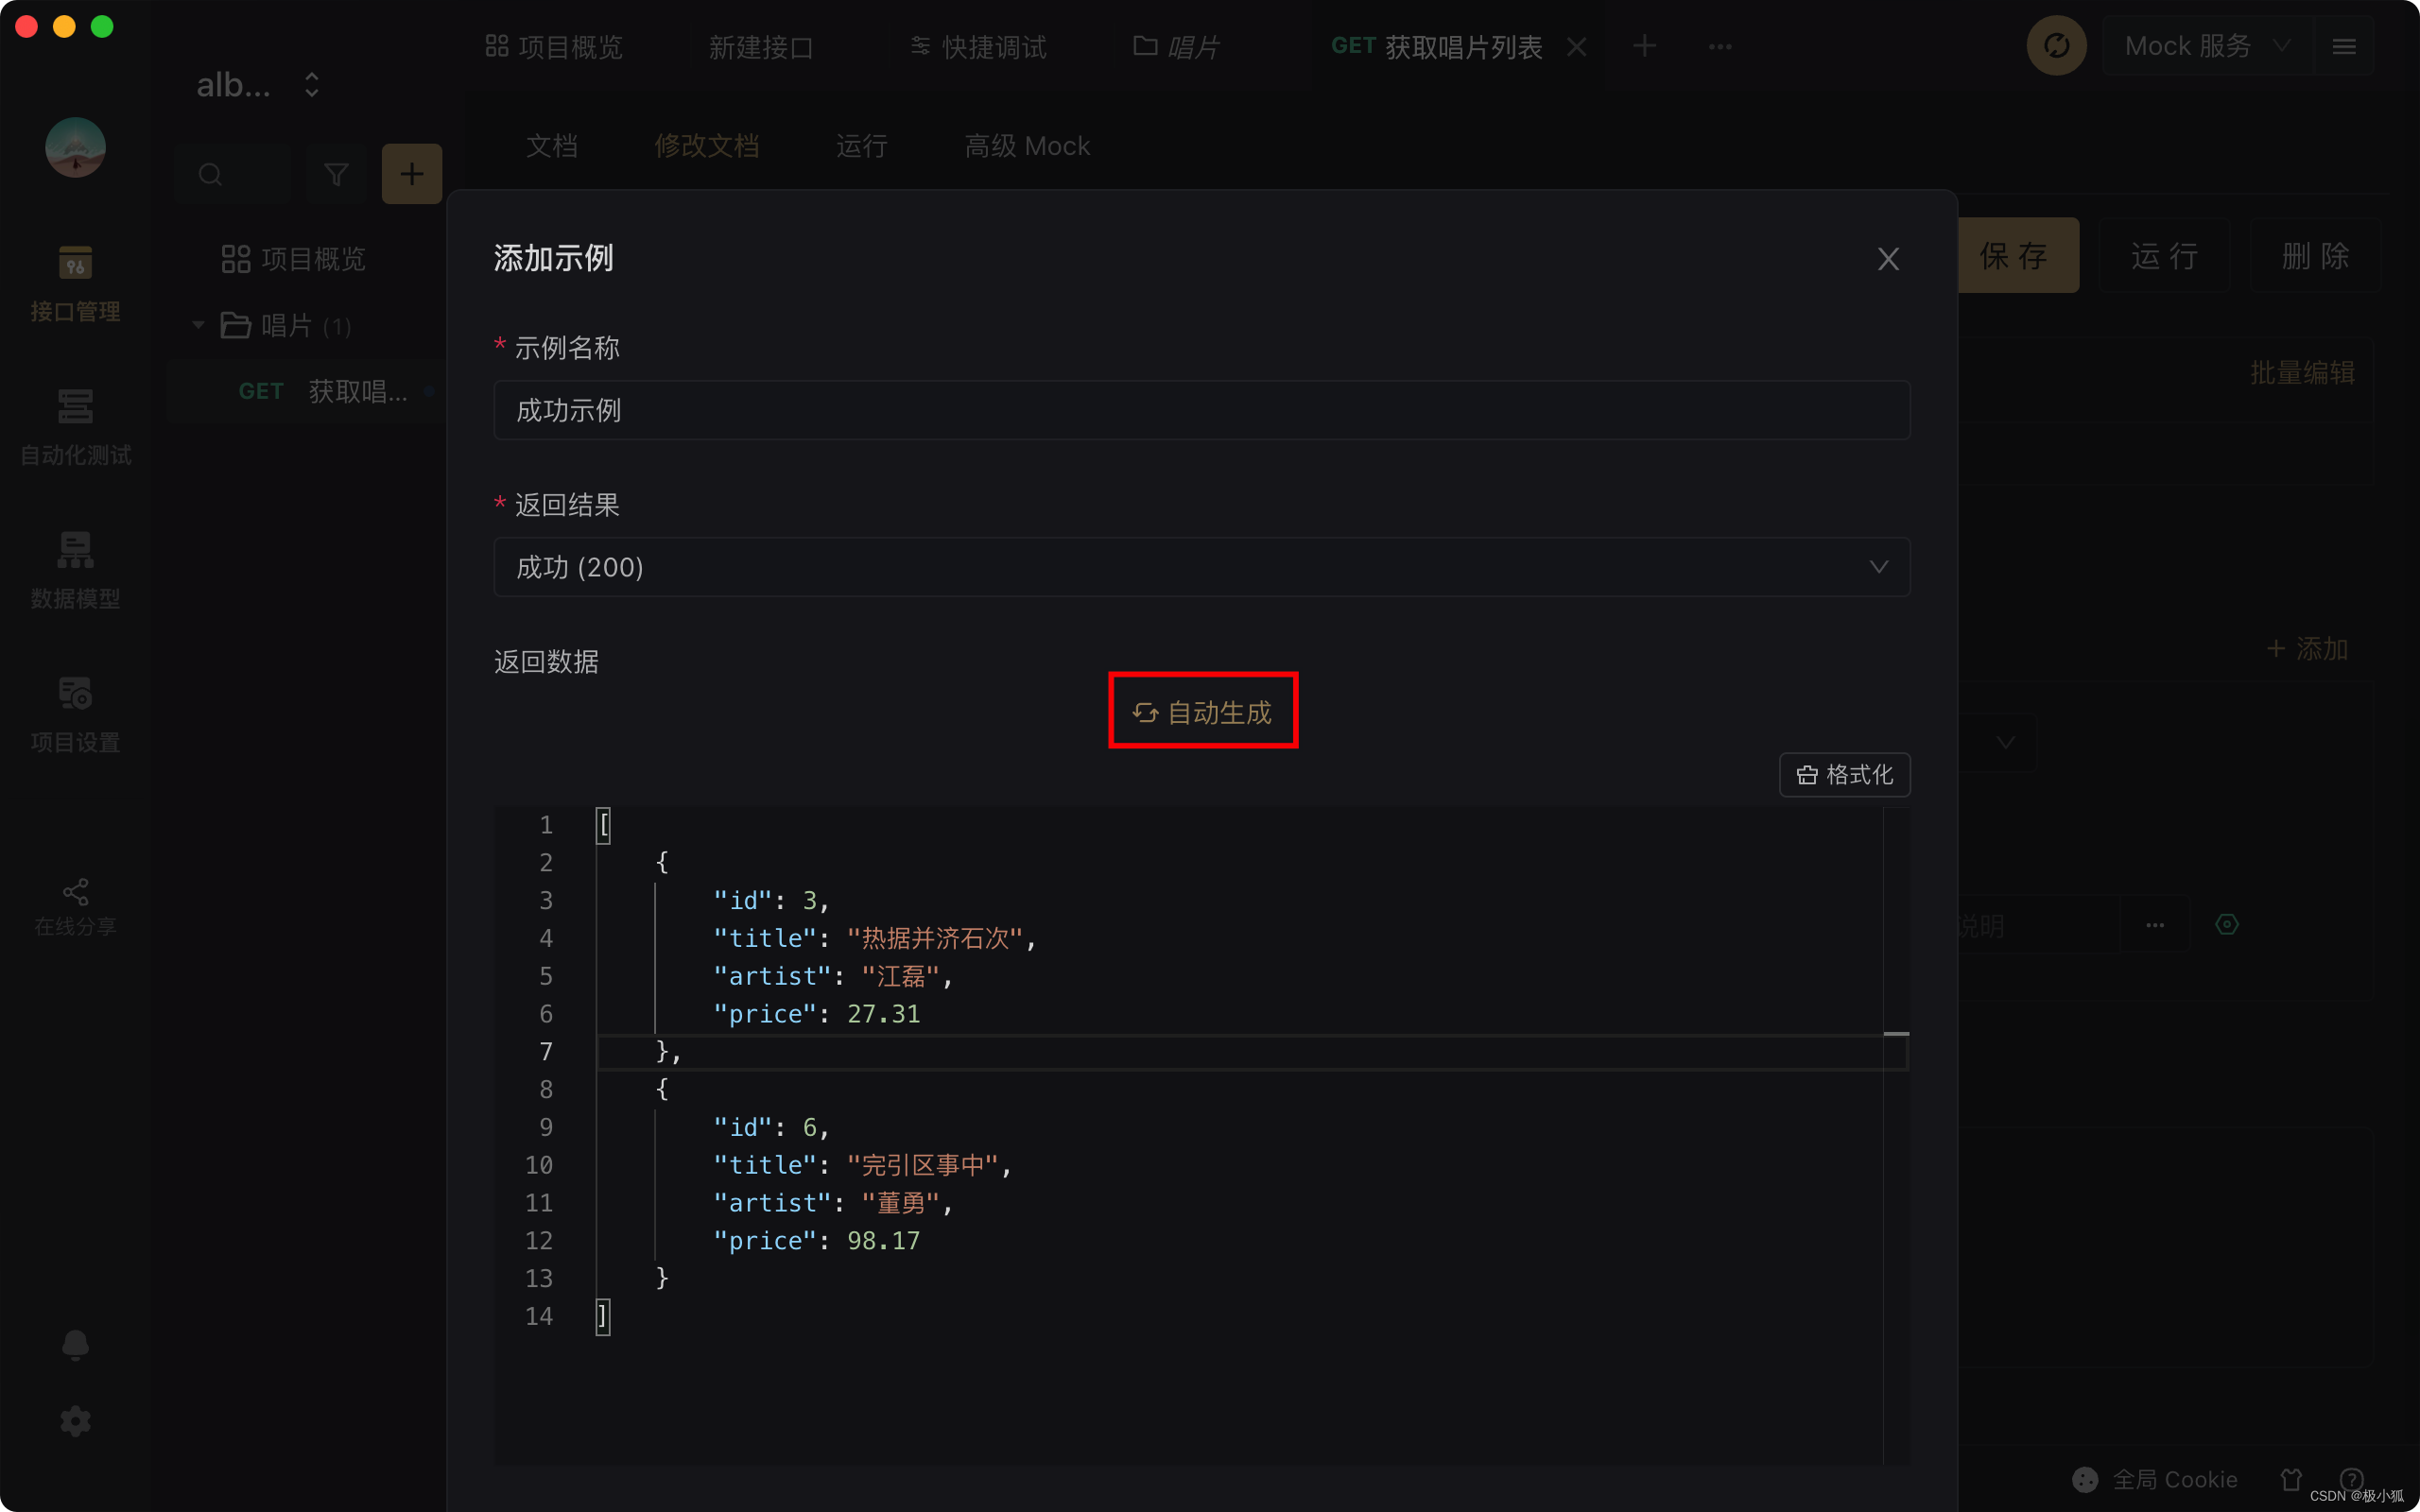
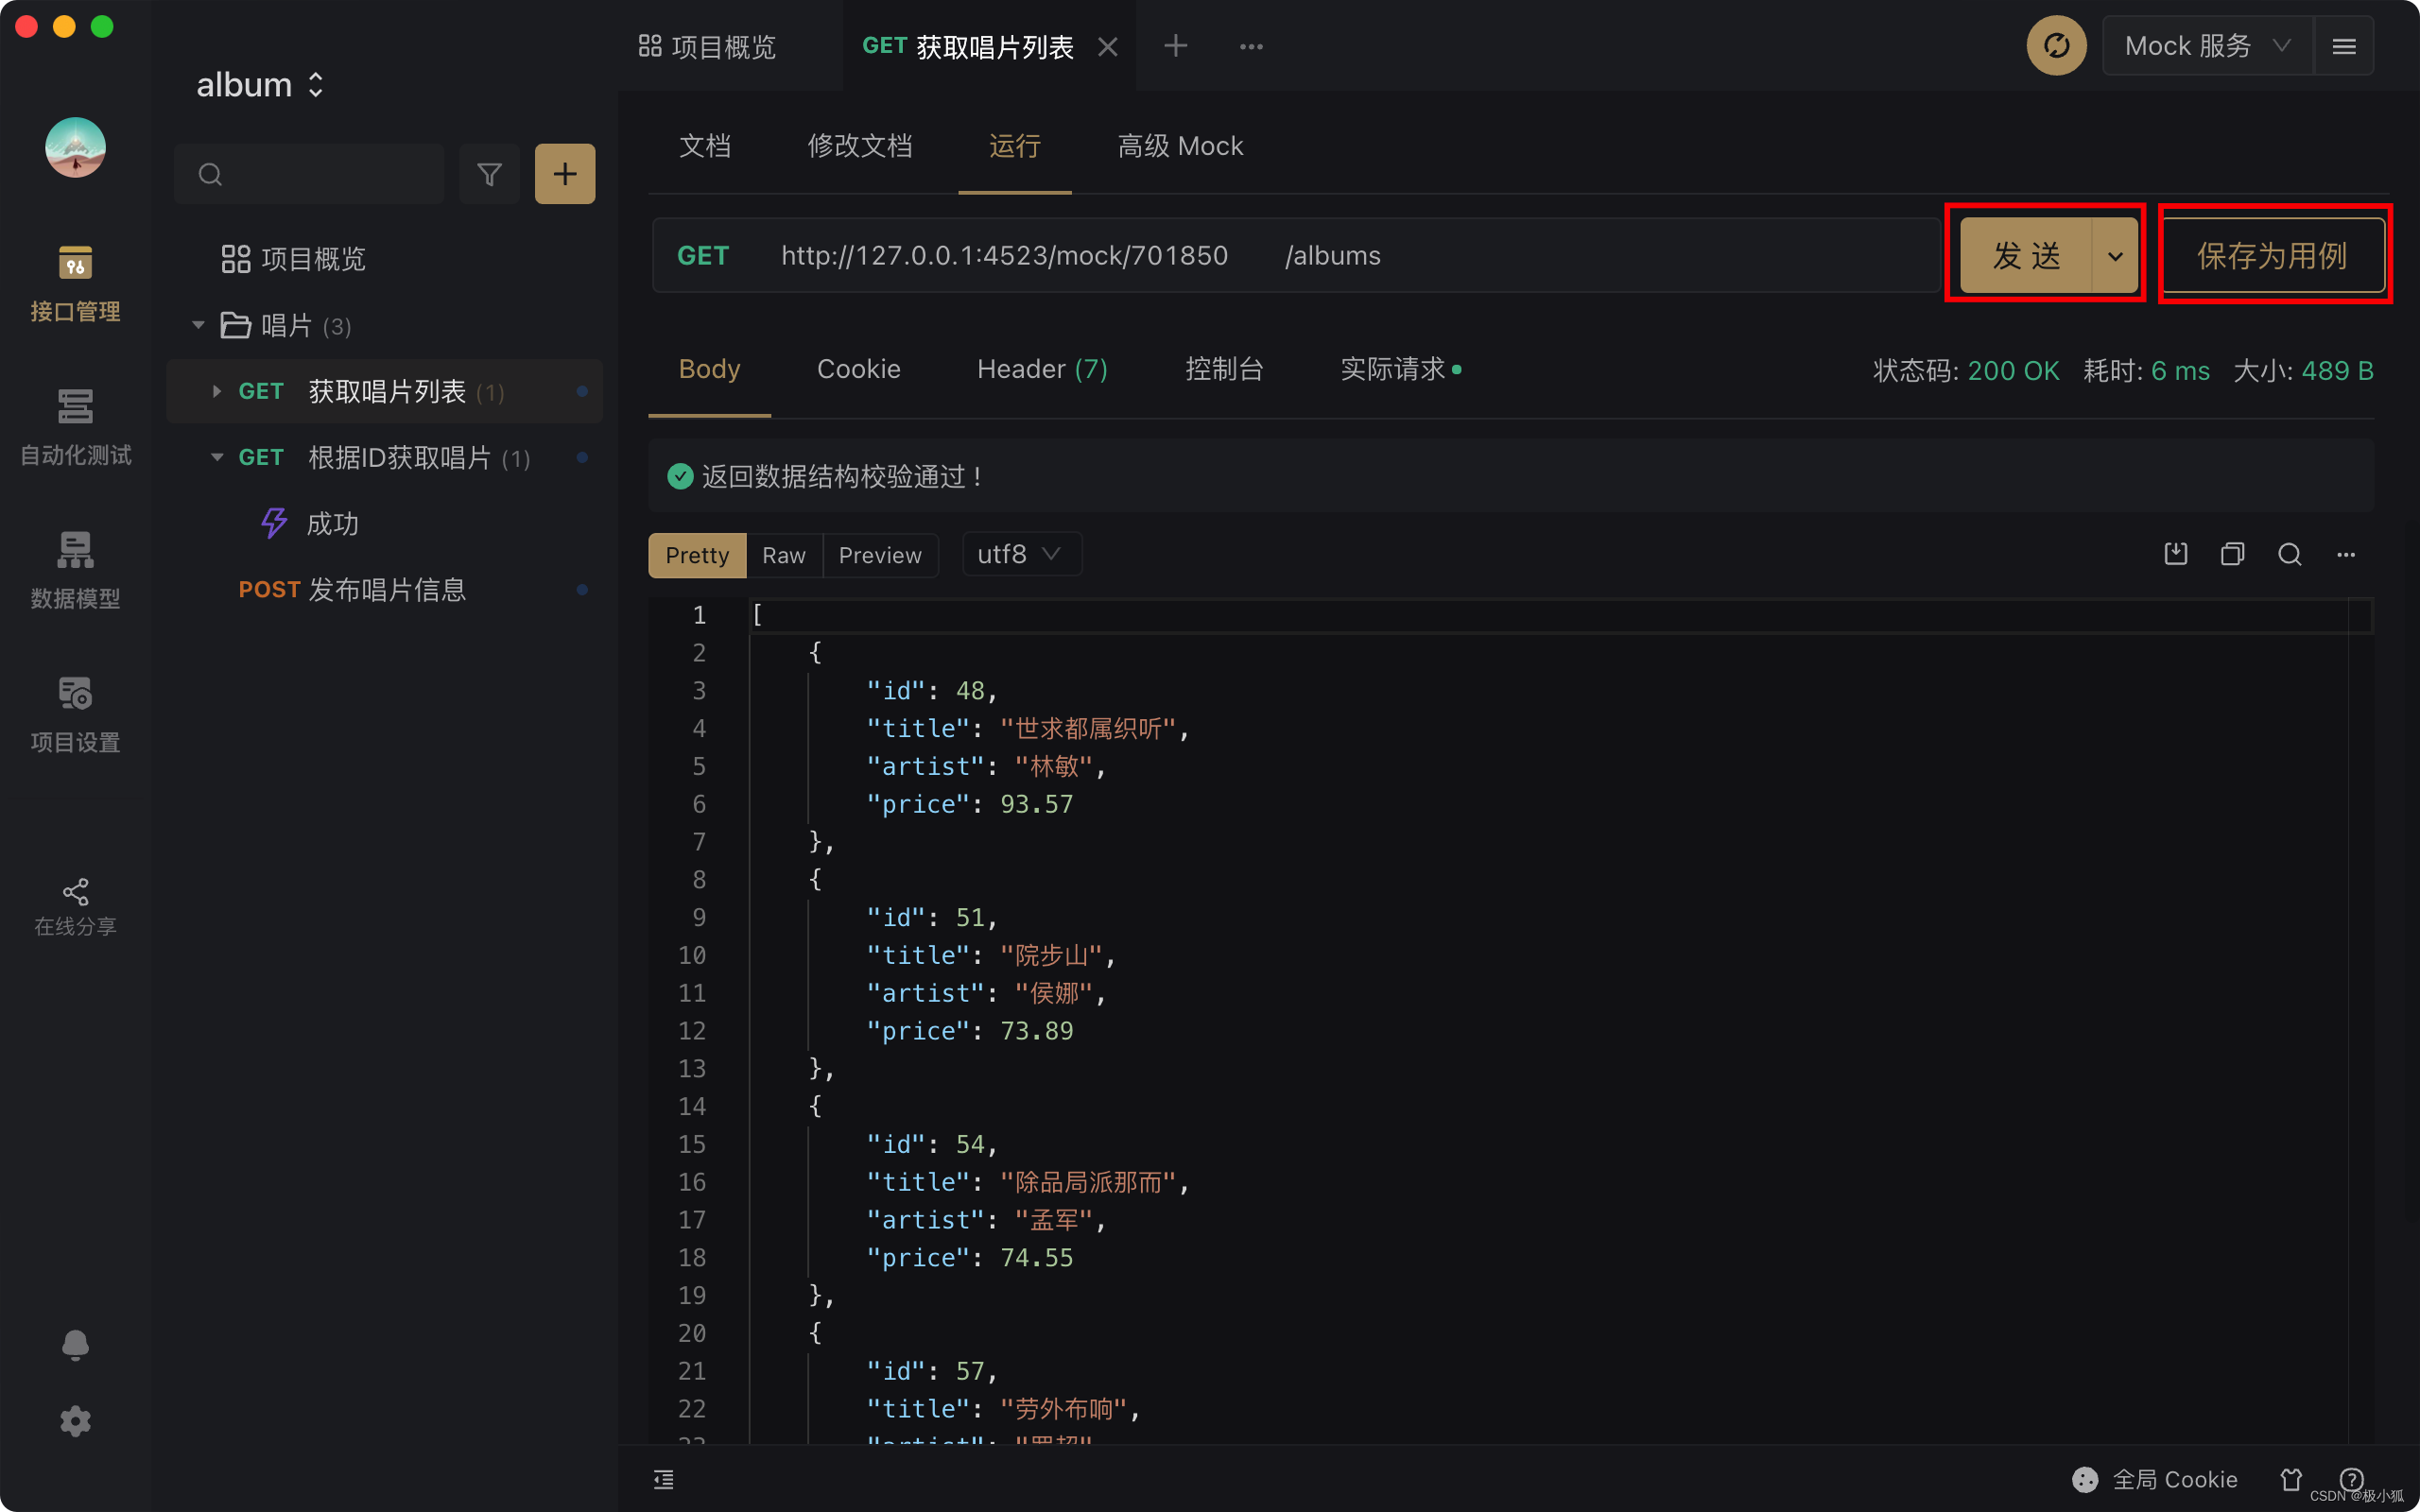
 3. 创建接口文档。如下图,引用上一步创建的数据模型,就可以快速生成返回示例,可用于运行Mock服务,运行通过后可以保存为接口用例。详见:
4. 创建好接口文档后,开发人员就可以根据文档中的示例数据或者Mock数据进行开发。而测试人员可以进一步完善接口用例,比如设置一些测试数据以及设置断言,并基于接口用例编写测试用例。其中接口用例指的主要是对接口的功能和边界进行测试,而测试用例主要是对一组接口实现的业务功能进行测试。详见:
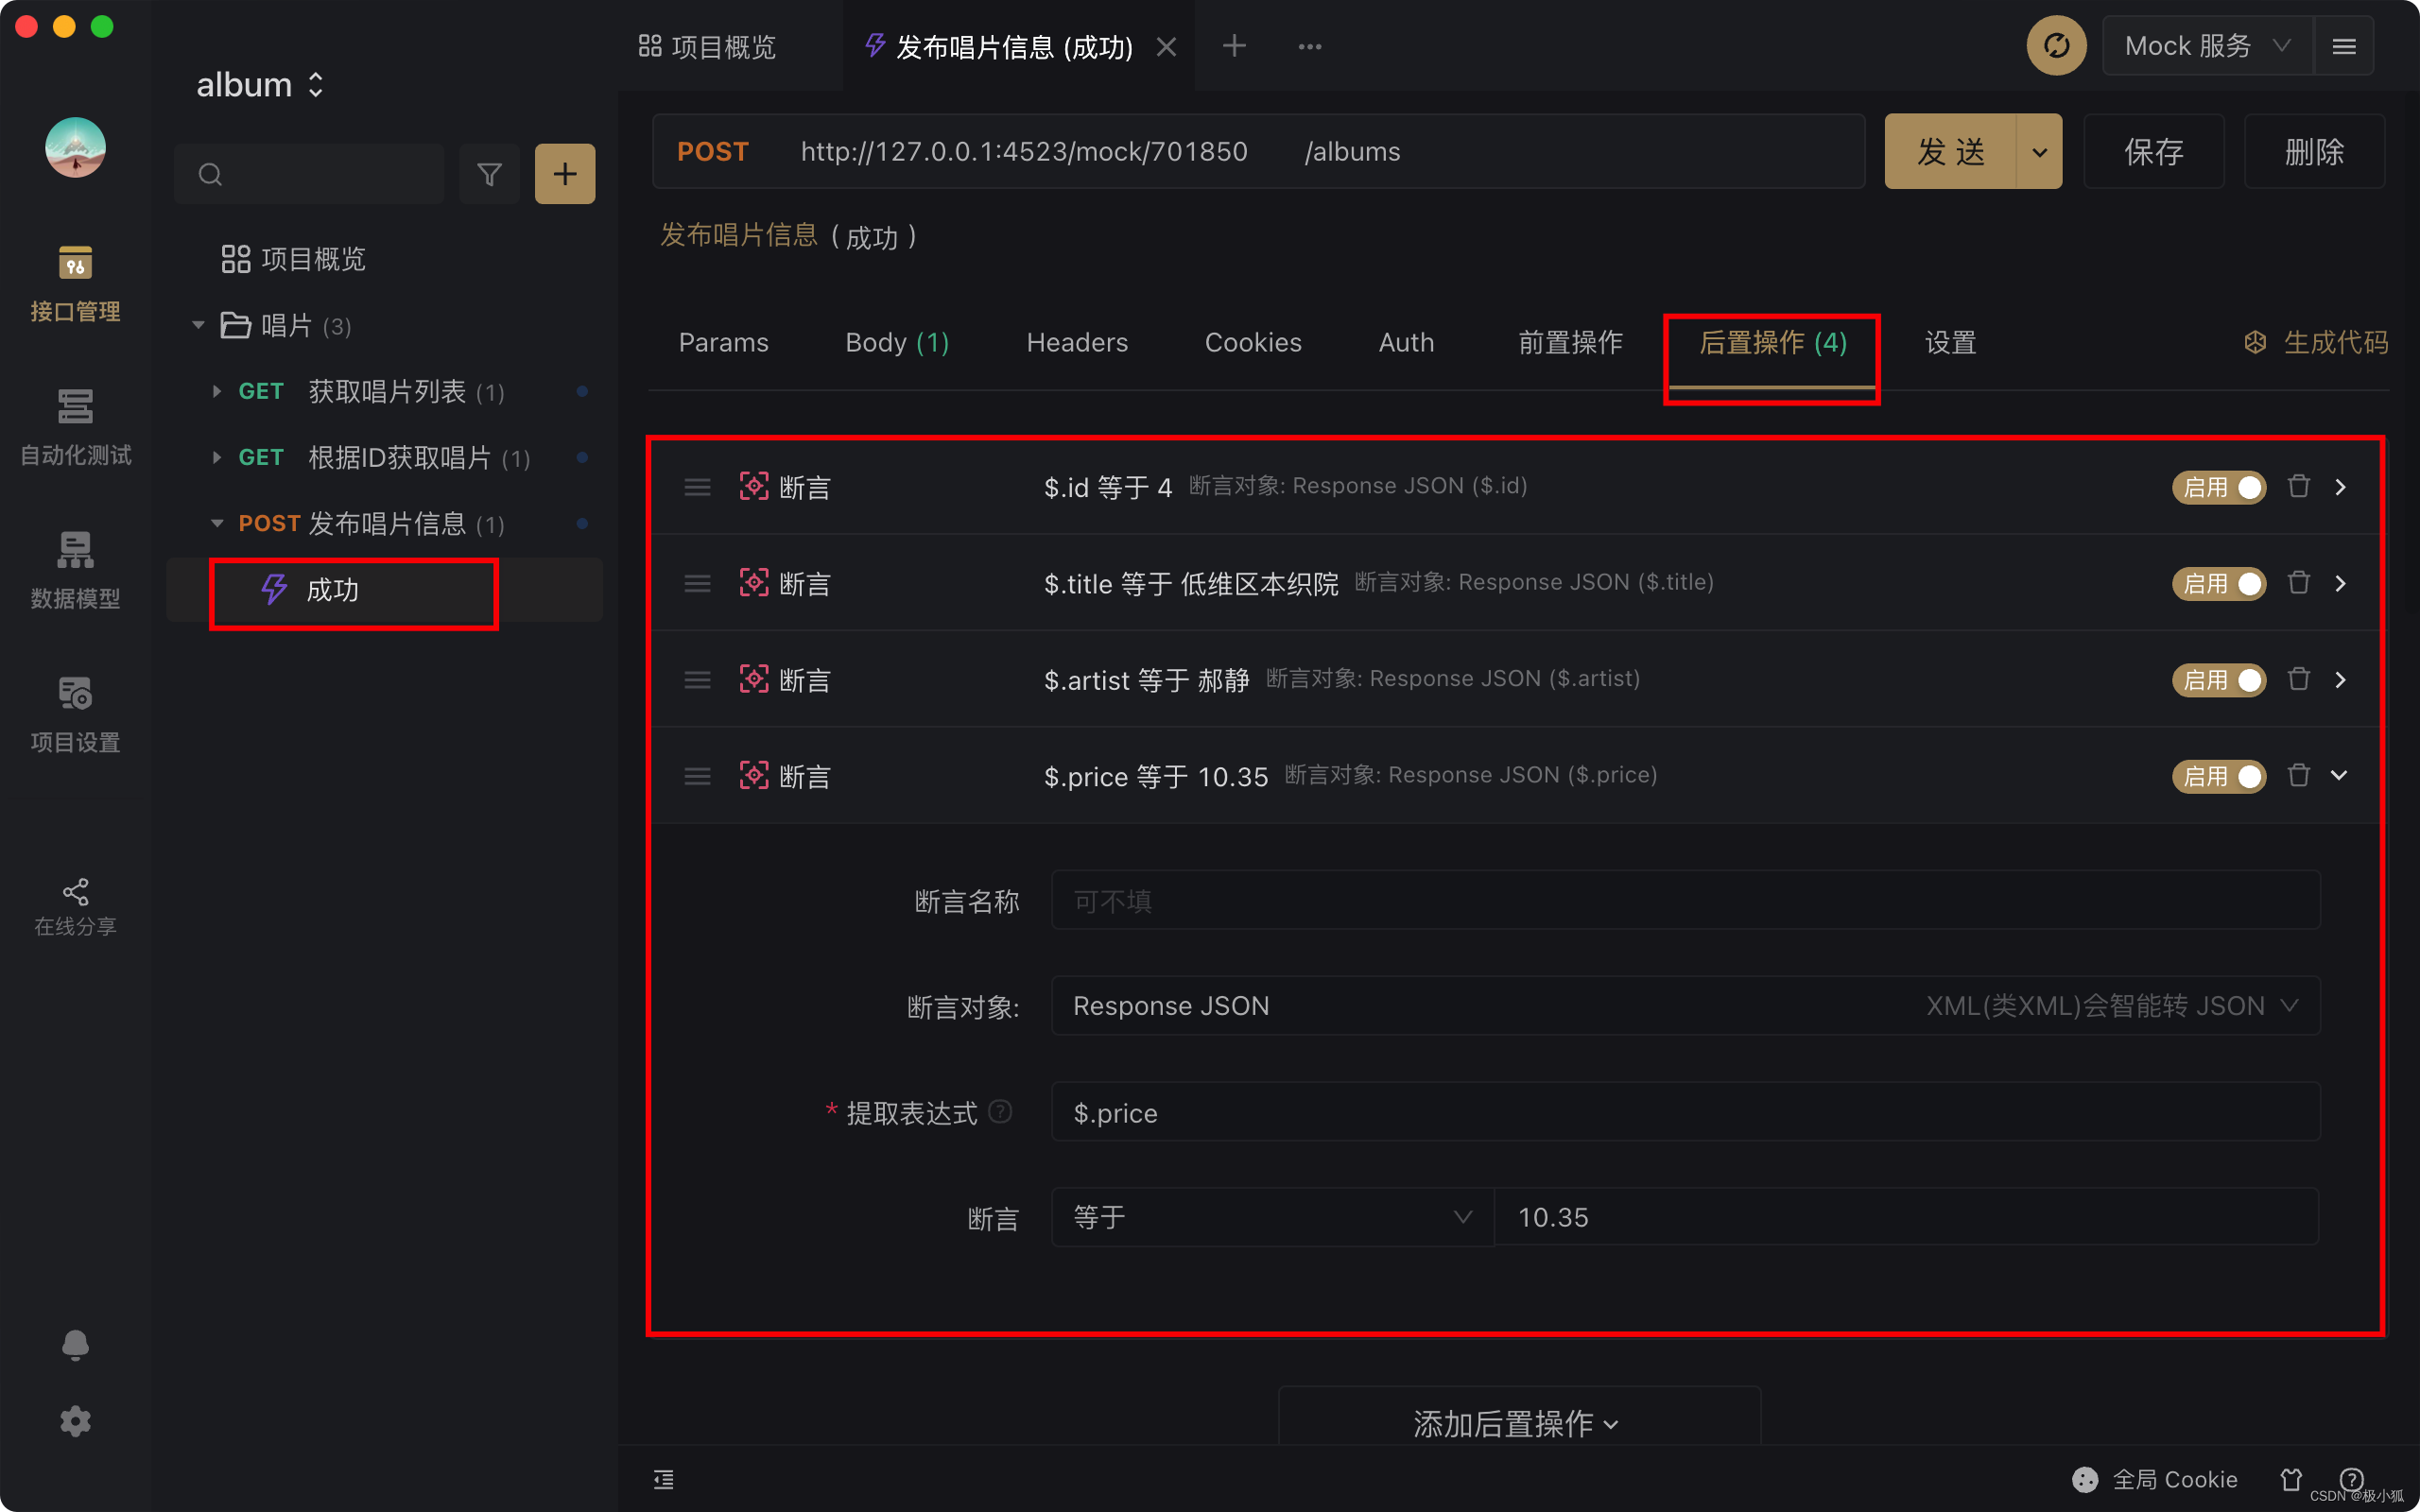
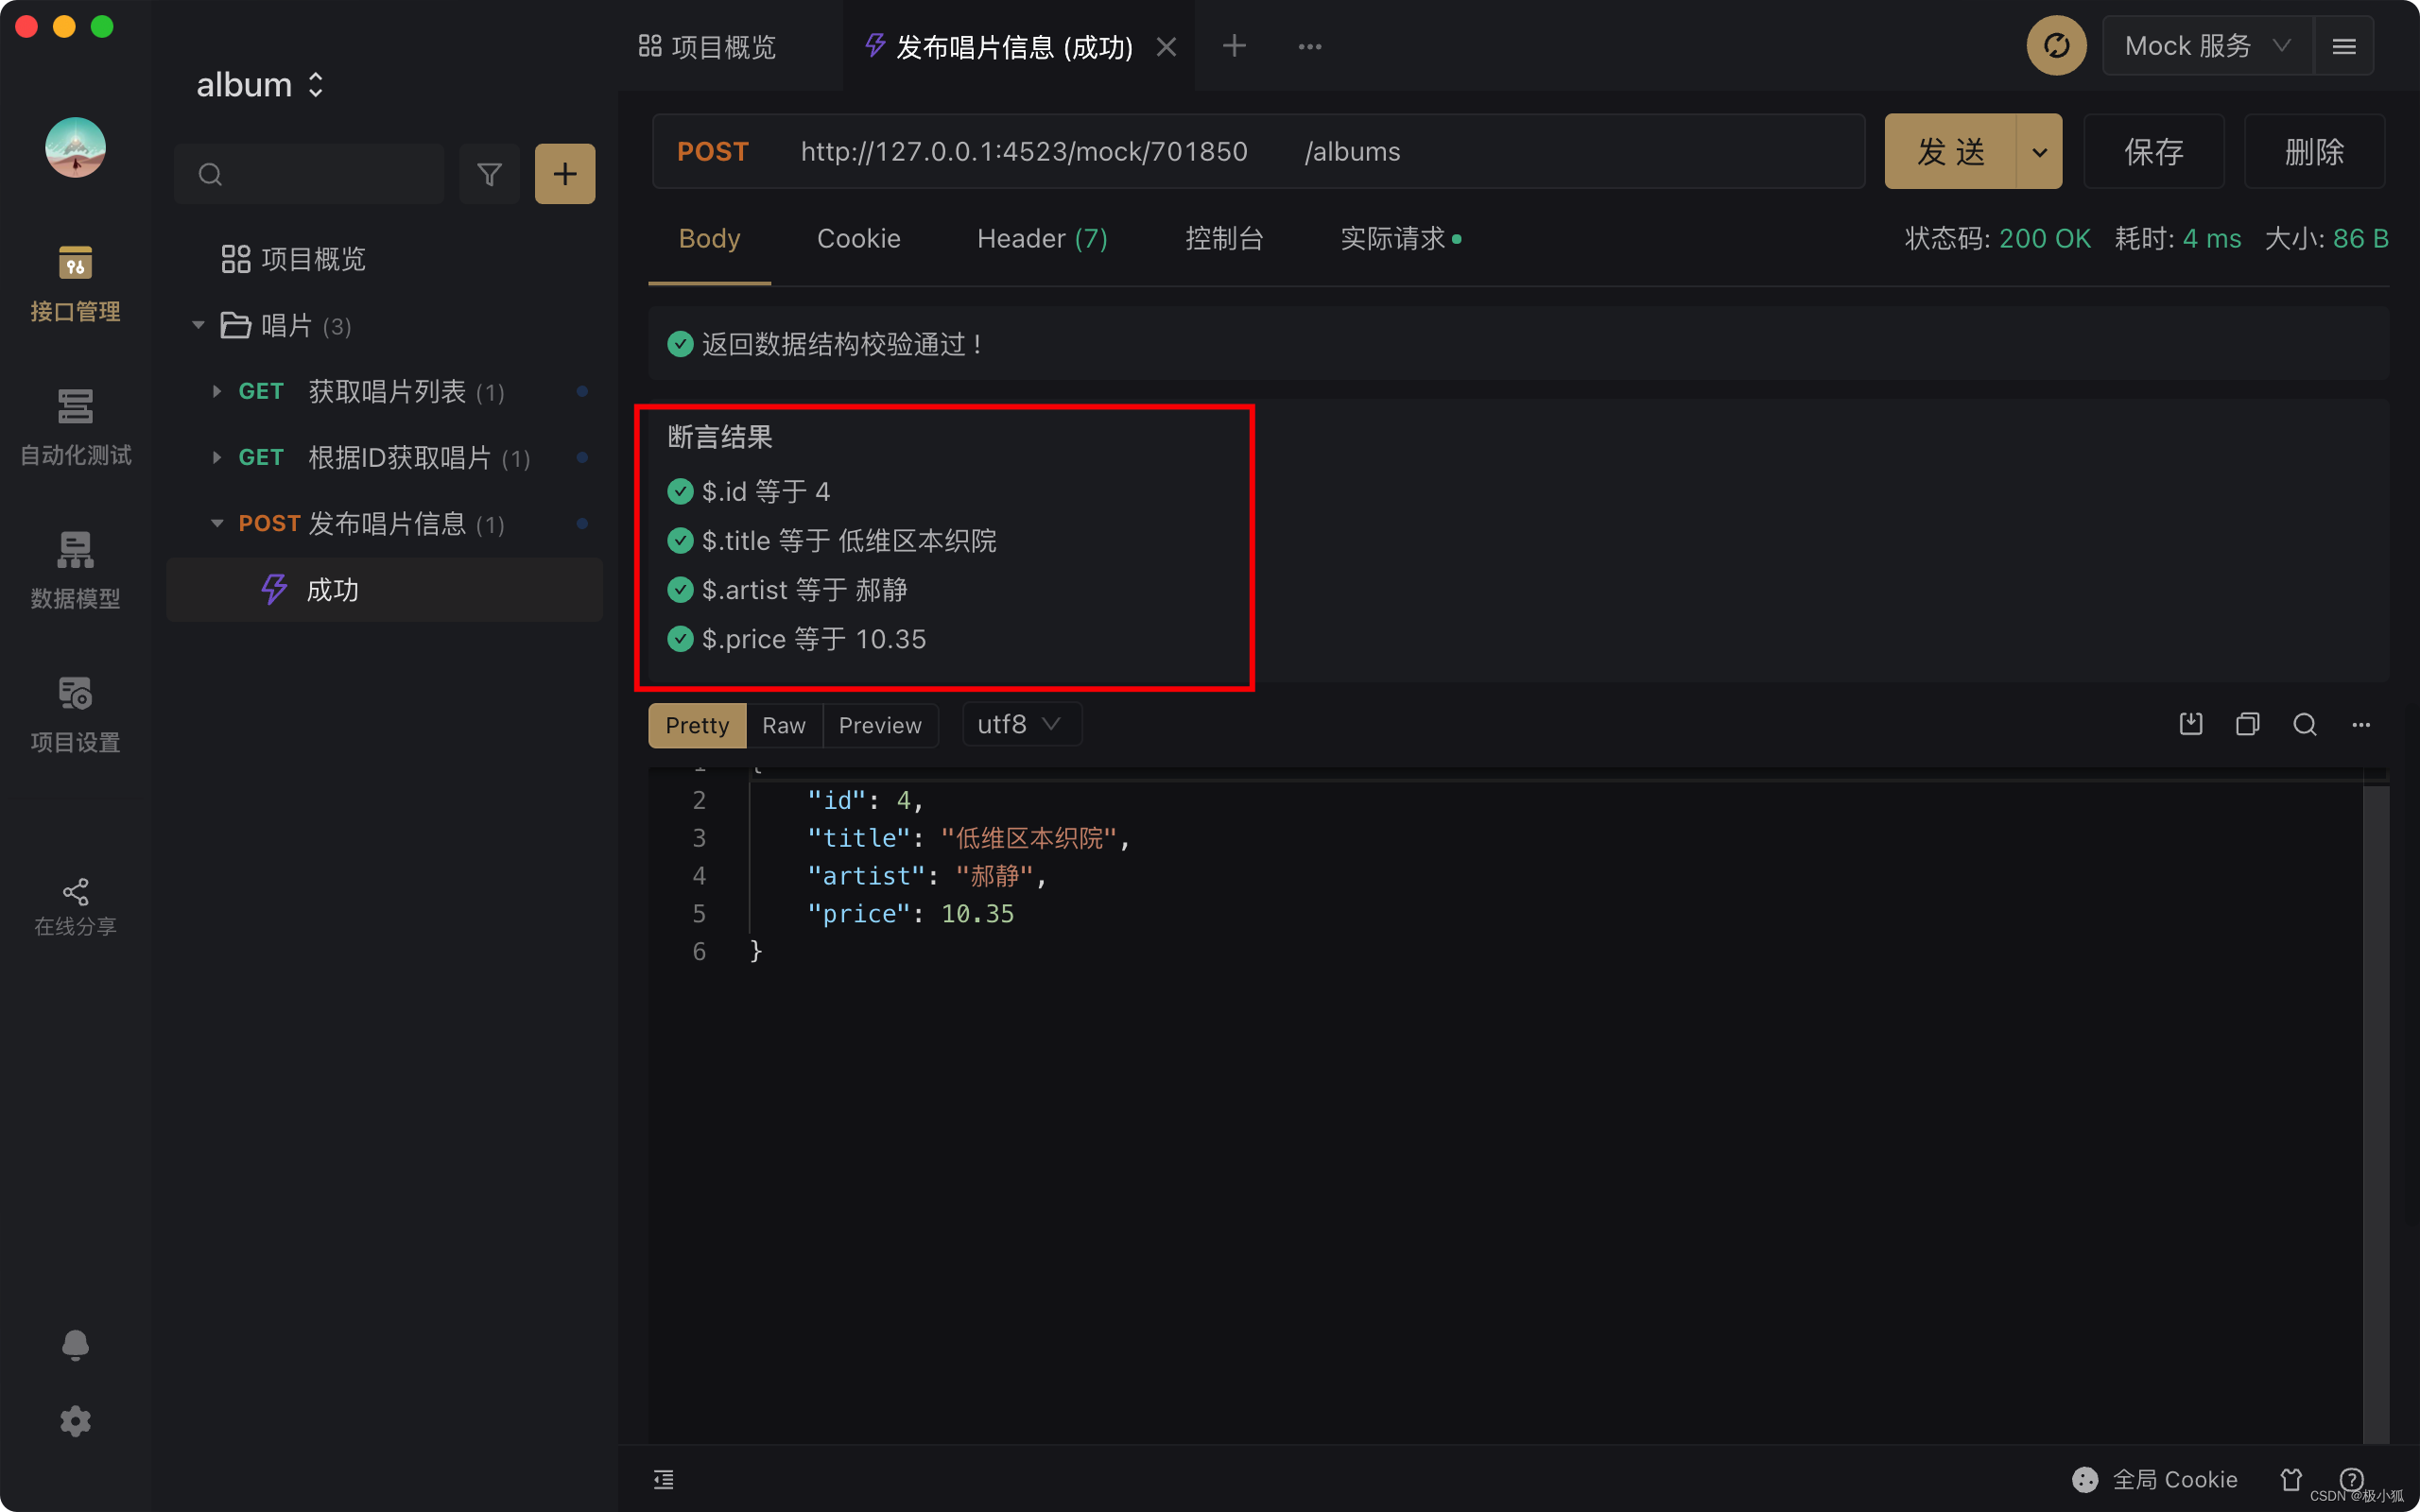
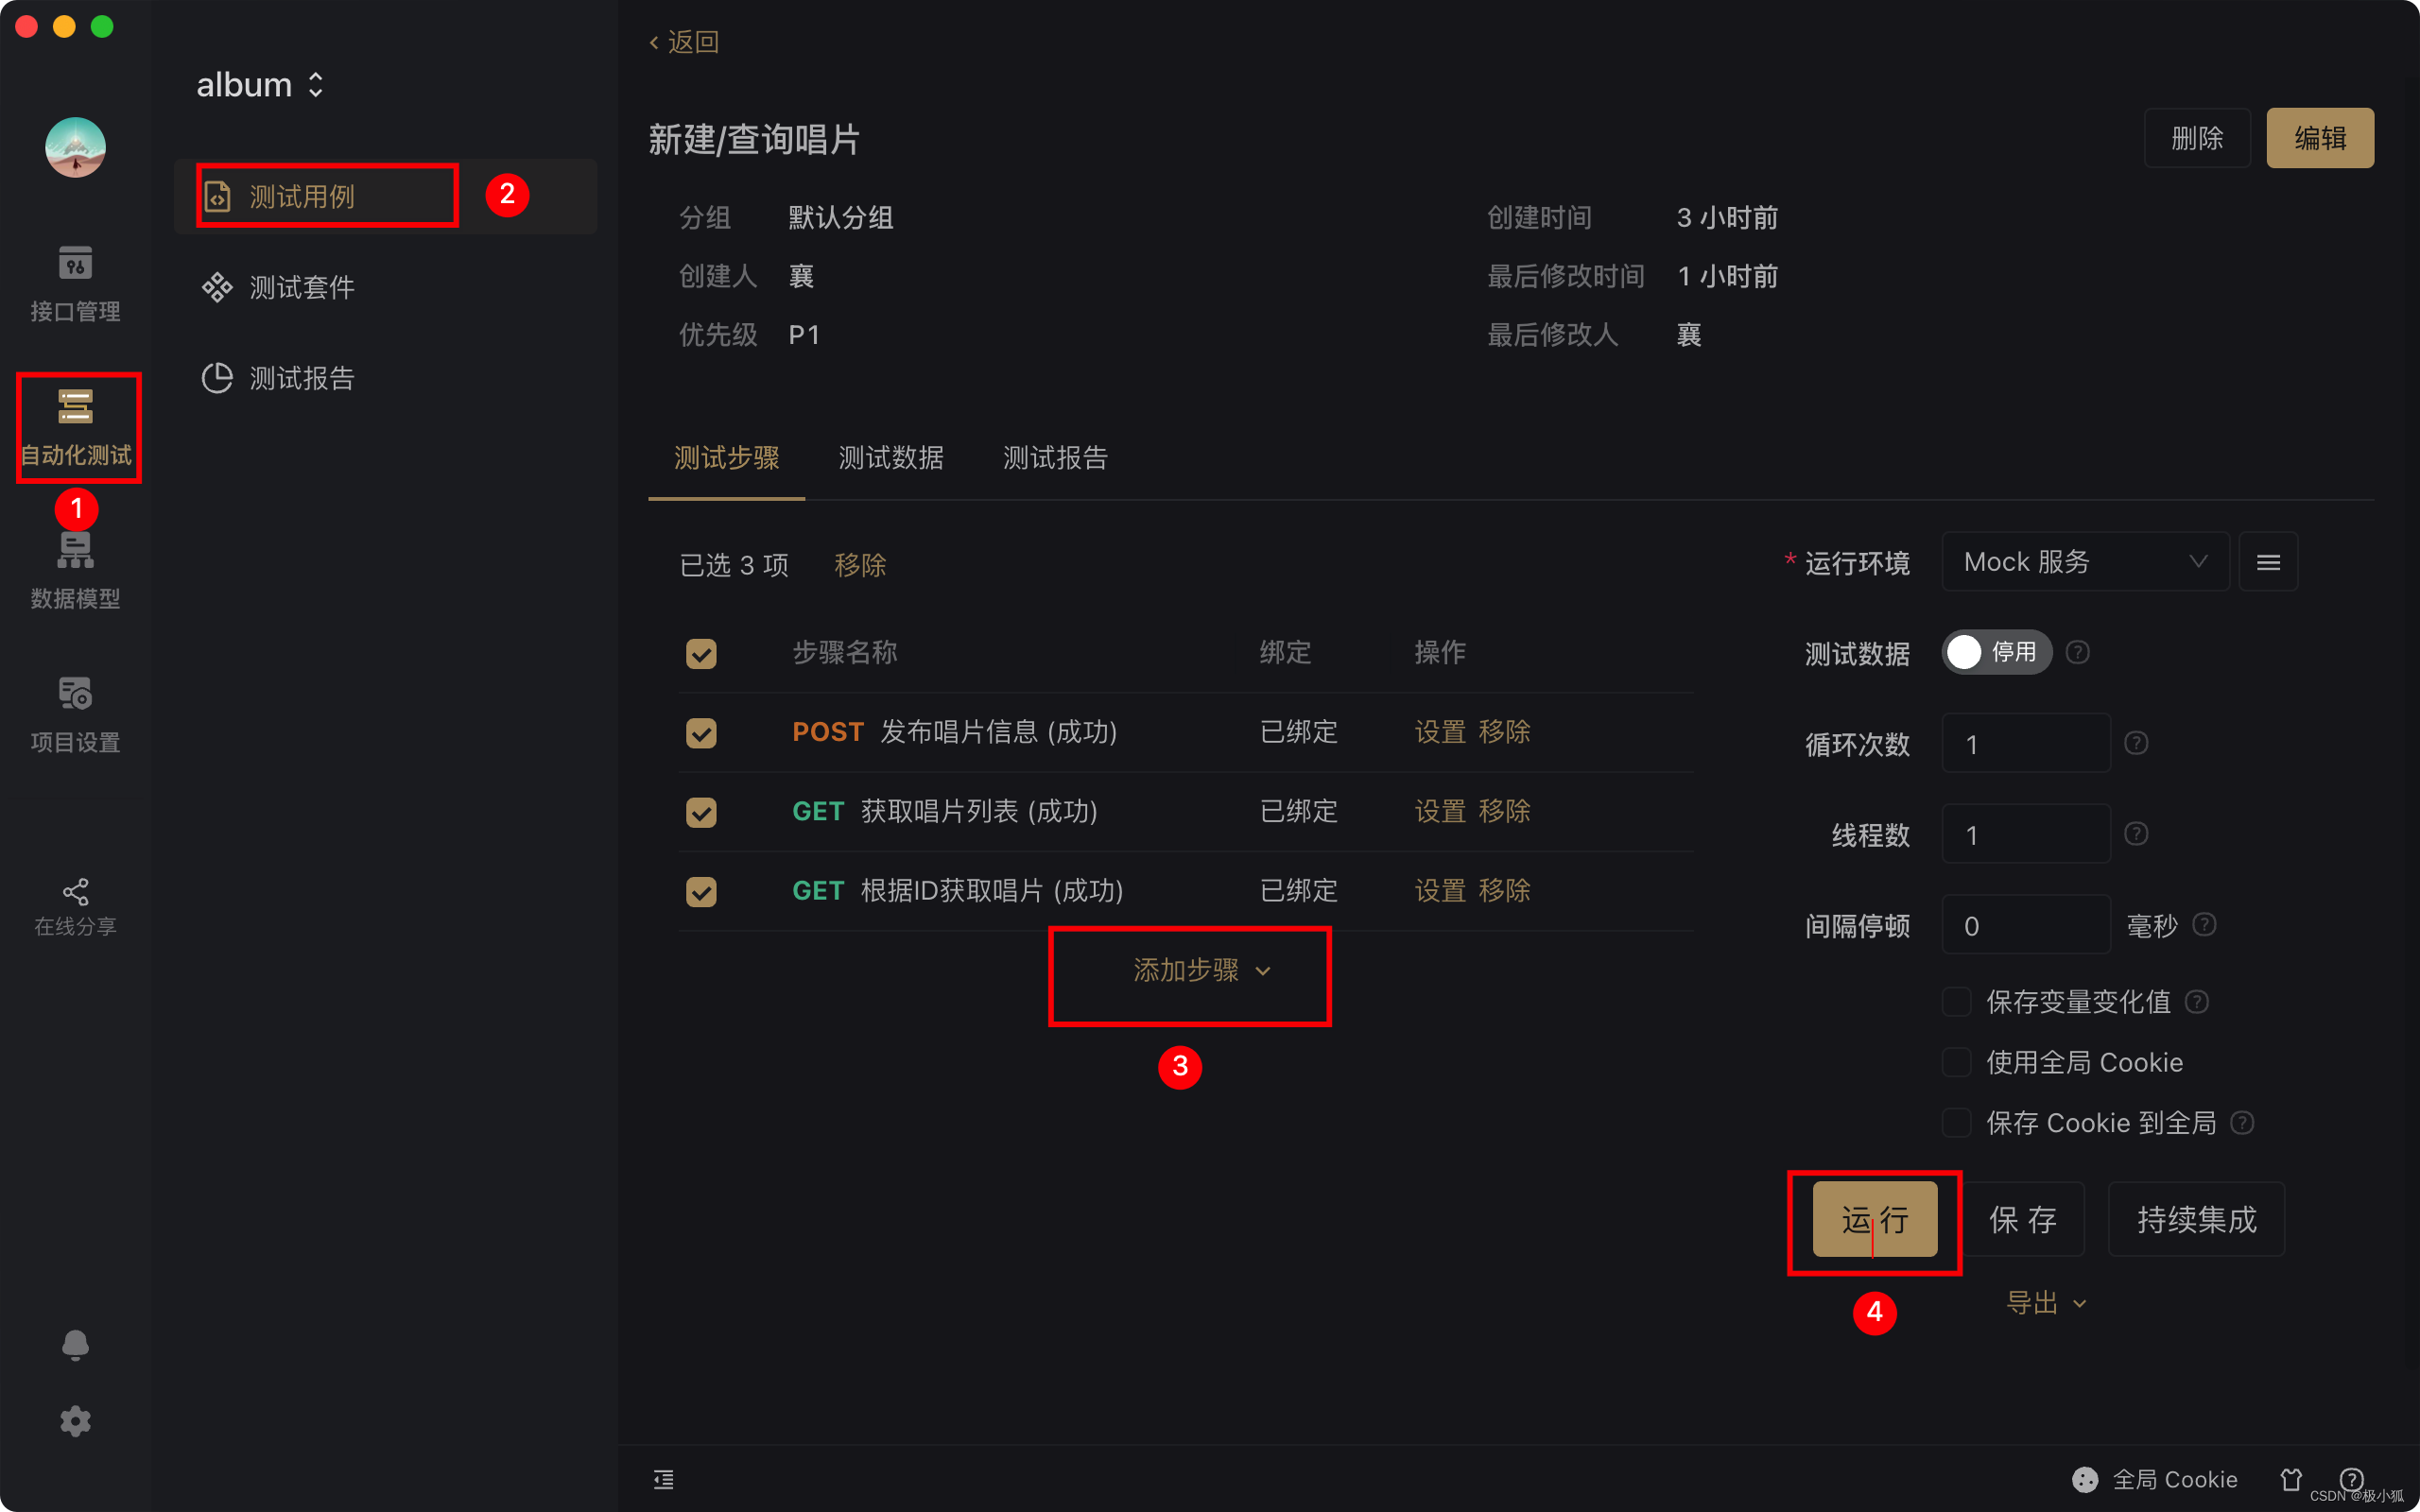
2.1.2 开发服务端程序
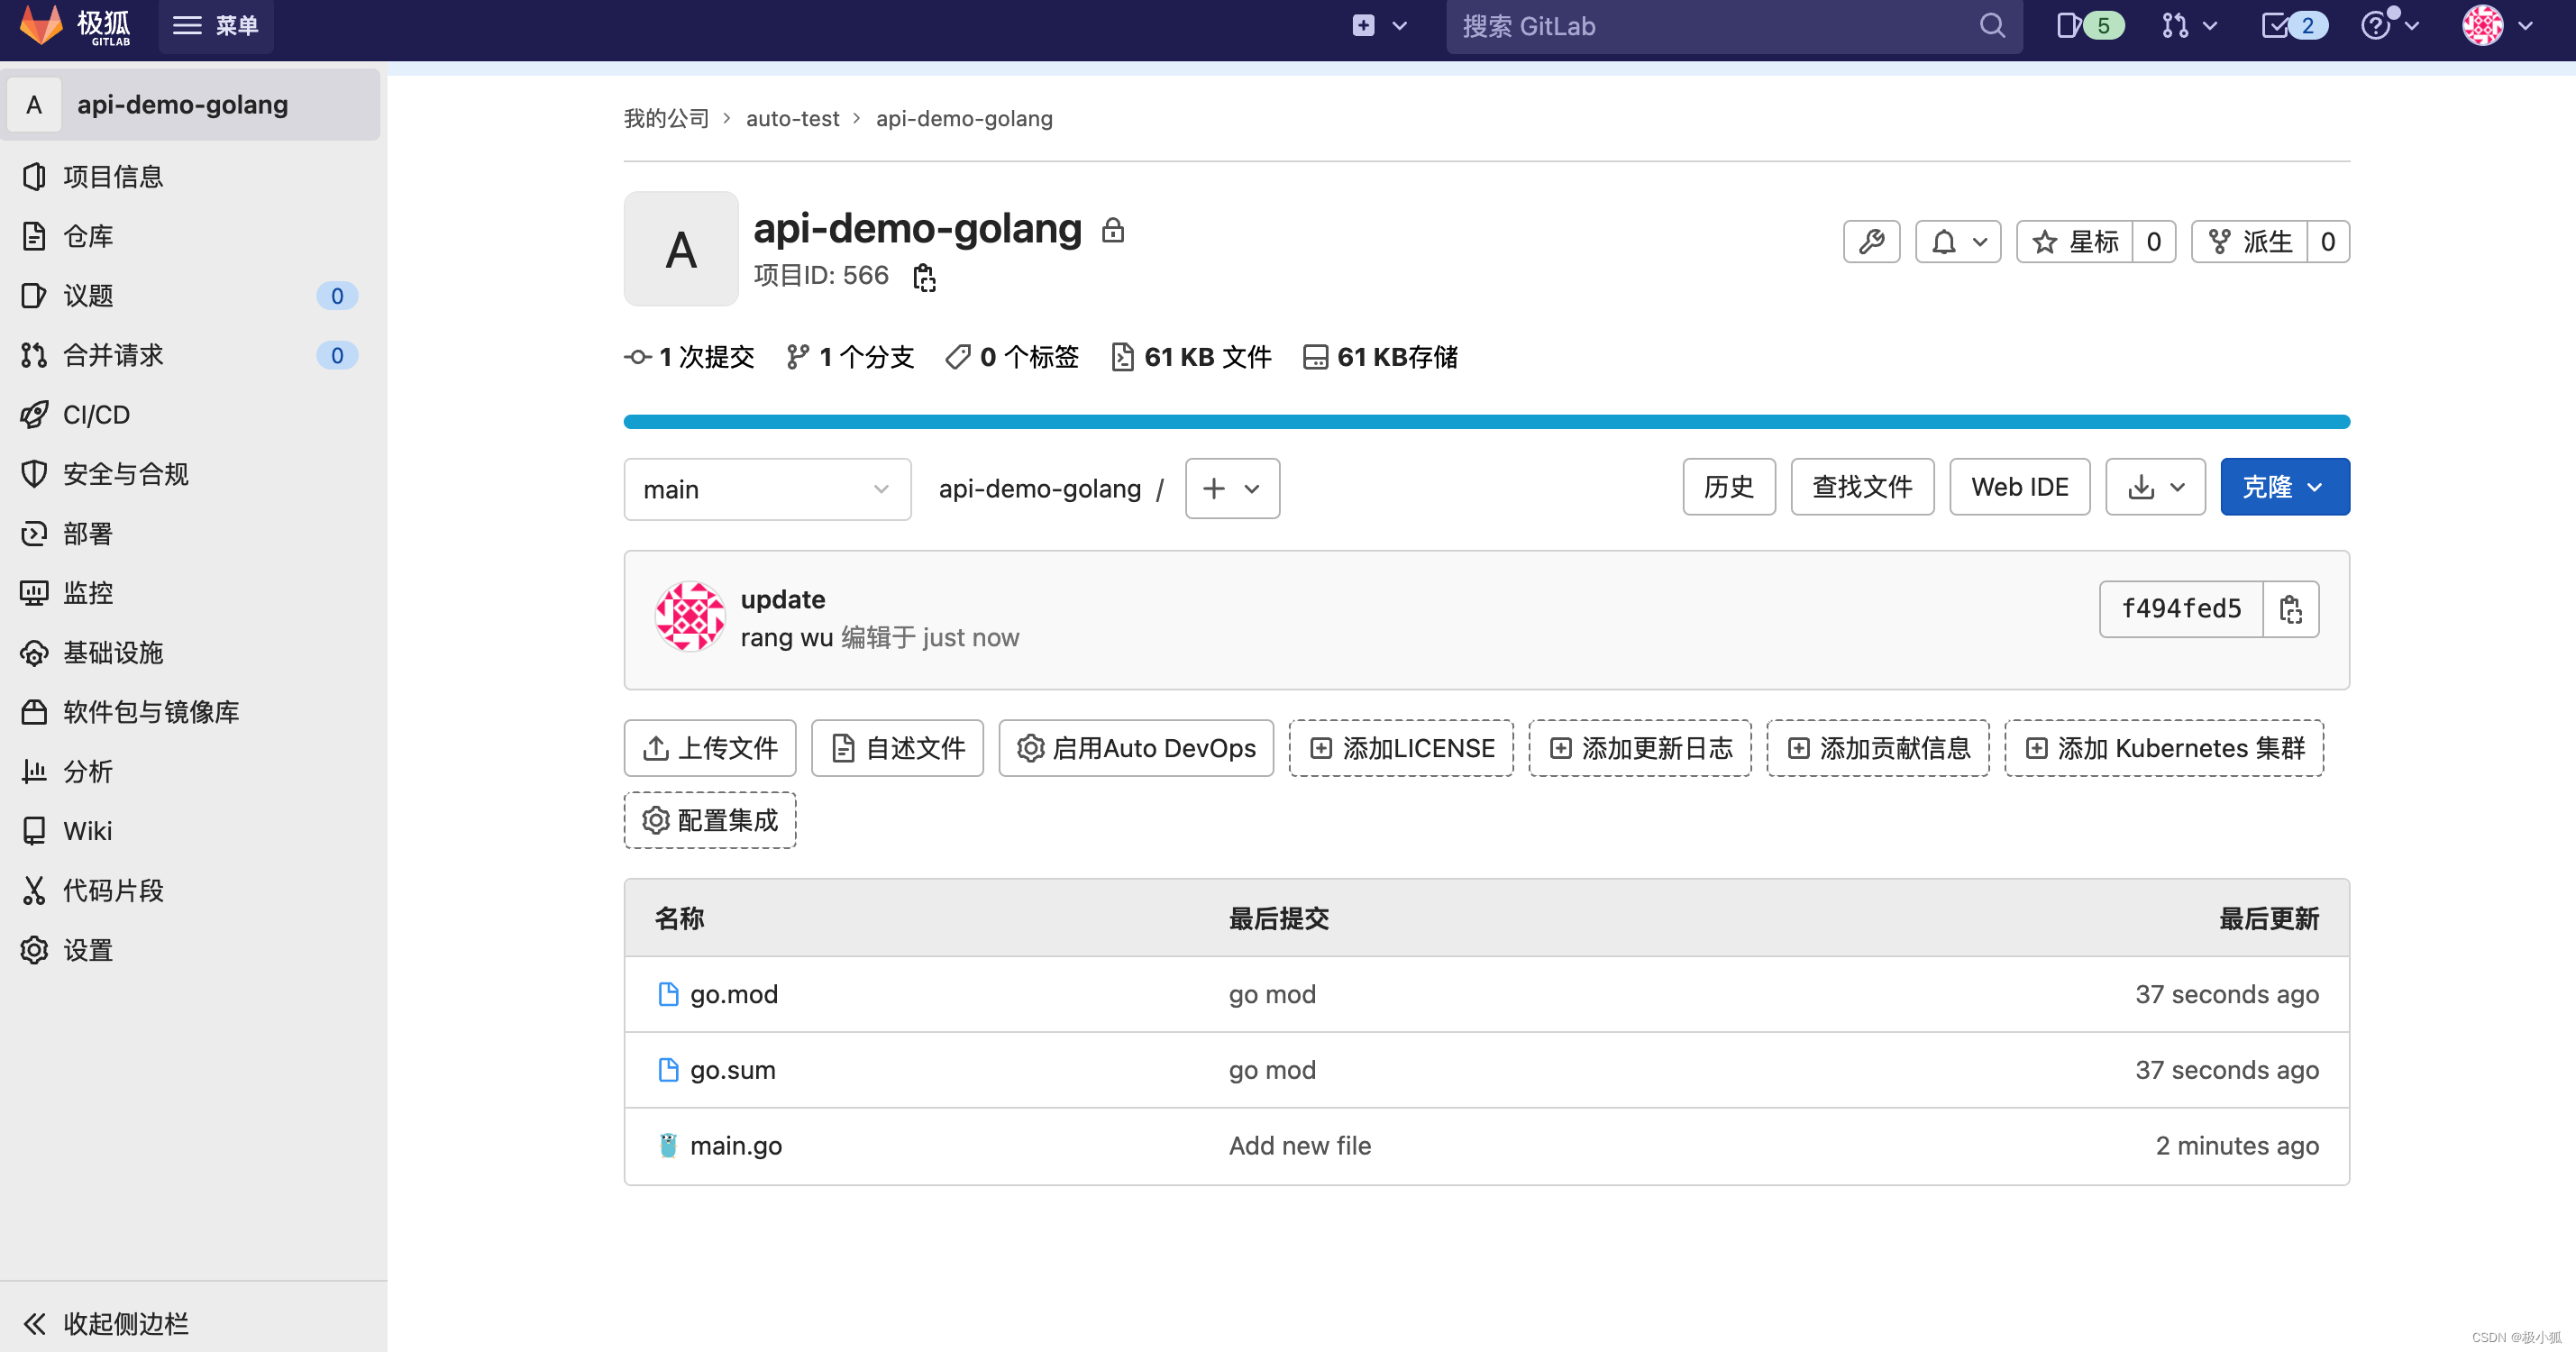
以Golang为例,开发一个服务端程序api-demo-golang,实现接口文档的相关功能:
- 使用极狐GitLab托管源代码,服务默认端口9080,参考示例main.go如下:
package main

import (
	"net/http"
	"strconv"

	"github.com/gin-gonic/gin"
)

// album represents data about a record album.
type album struct {
	ID     int     `json:"id"`
	Title  string  `json:"title"`
	Artist string  `json:"artist"`
	Price  float64 `json:"price"`
}

// albums slice to seed record album data.
var albums = []album{
	{ID: 1, Title: "Blue Train", Artist: "John Coltrane", Price: 56.99},
	{ID: 2, Title: "Jeru", Artist: "Gerry Mulligan", Price: 17.99},
	{ID: 3, Title: "Sarah Vaughan and Clifford Brown", Artist: "Sarah Vaughan", Price: 39.99},
}

func main() {
	router := gin.Default()
	router.GET("/albums", getAlbums)
	router.GET("/albums/:id", getAlbumByID)
	router.POST("/albums", postAlbums)

	router.Run(":9080")
}

// getAlbums responds with the list of all albums as JSON.
func getAlbums(c *gin.Context) {
	c.IndentedJSON(http.StatusOK, albums)
}

// postAlbums adds an album from JSON received in the request body.
func postAlbums(c *gin.Context) {
	var newAlbum album

	// Call BindJSON to bind the received JSON to
	// newAlbum.
	if err := c.BindJSON(&newAlbum); err != nil {
		return
	}

	// Add the new album to the slice.
	albums = append(albums, newAlbum)
	c.IndentedJSON(http.StatusCreated, newAlbum)
}

// getAlbumByID locates the album whose ID value matches the id
// parameter sent by the client, then returns that album as a response.
func getAlbumByID(c *gin.Context) {
	id, _ := strconv.Atoi(c.Param("id"))

	// Loop through the list of albums, looking for
	// an album whose ID value matches the parameter.
	for _, a := range albums {
		if a.ID == id {
			c.IndentedJSON(http.StatusOK, a)
			return
		}
	}
	c.IndentedJSON(http.StatusNotFound, gin.H{"message": "album not found"})
}
- 创建该项目的流水线,实现自动构建,并发布到测试环境。需Docker/K8S类型的GitLab Runner,详见:极狐GitLab Runner Executors | 极狐GitLab。参考示例.gitlab-ci.yaml如下:
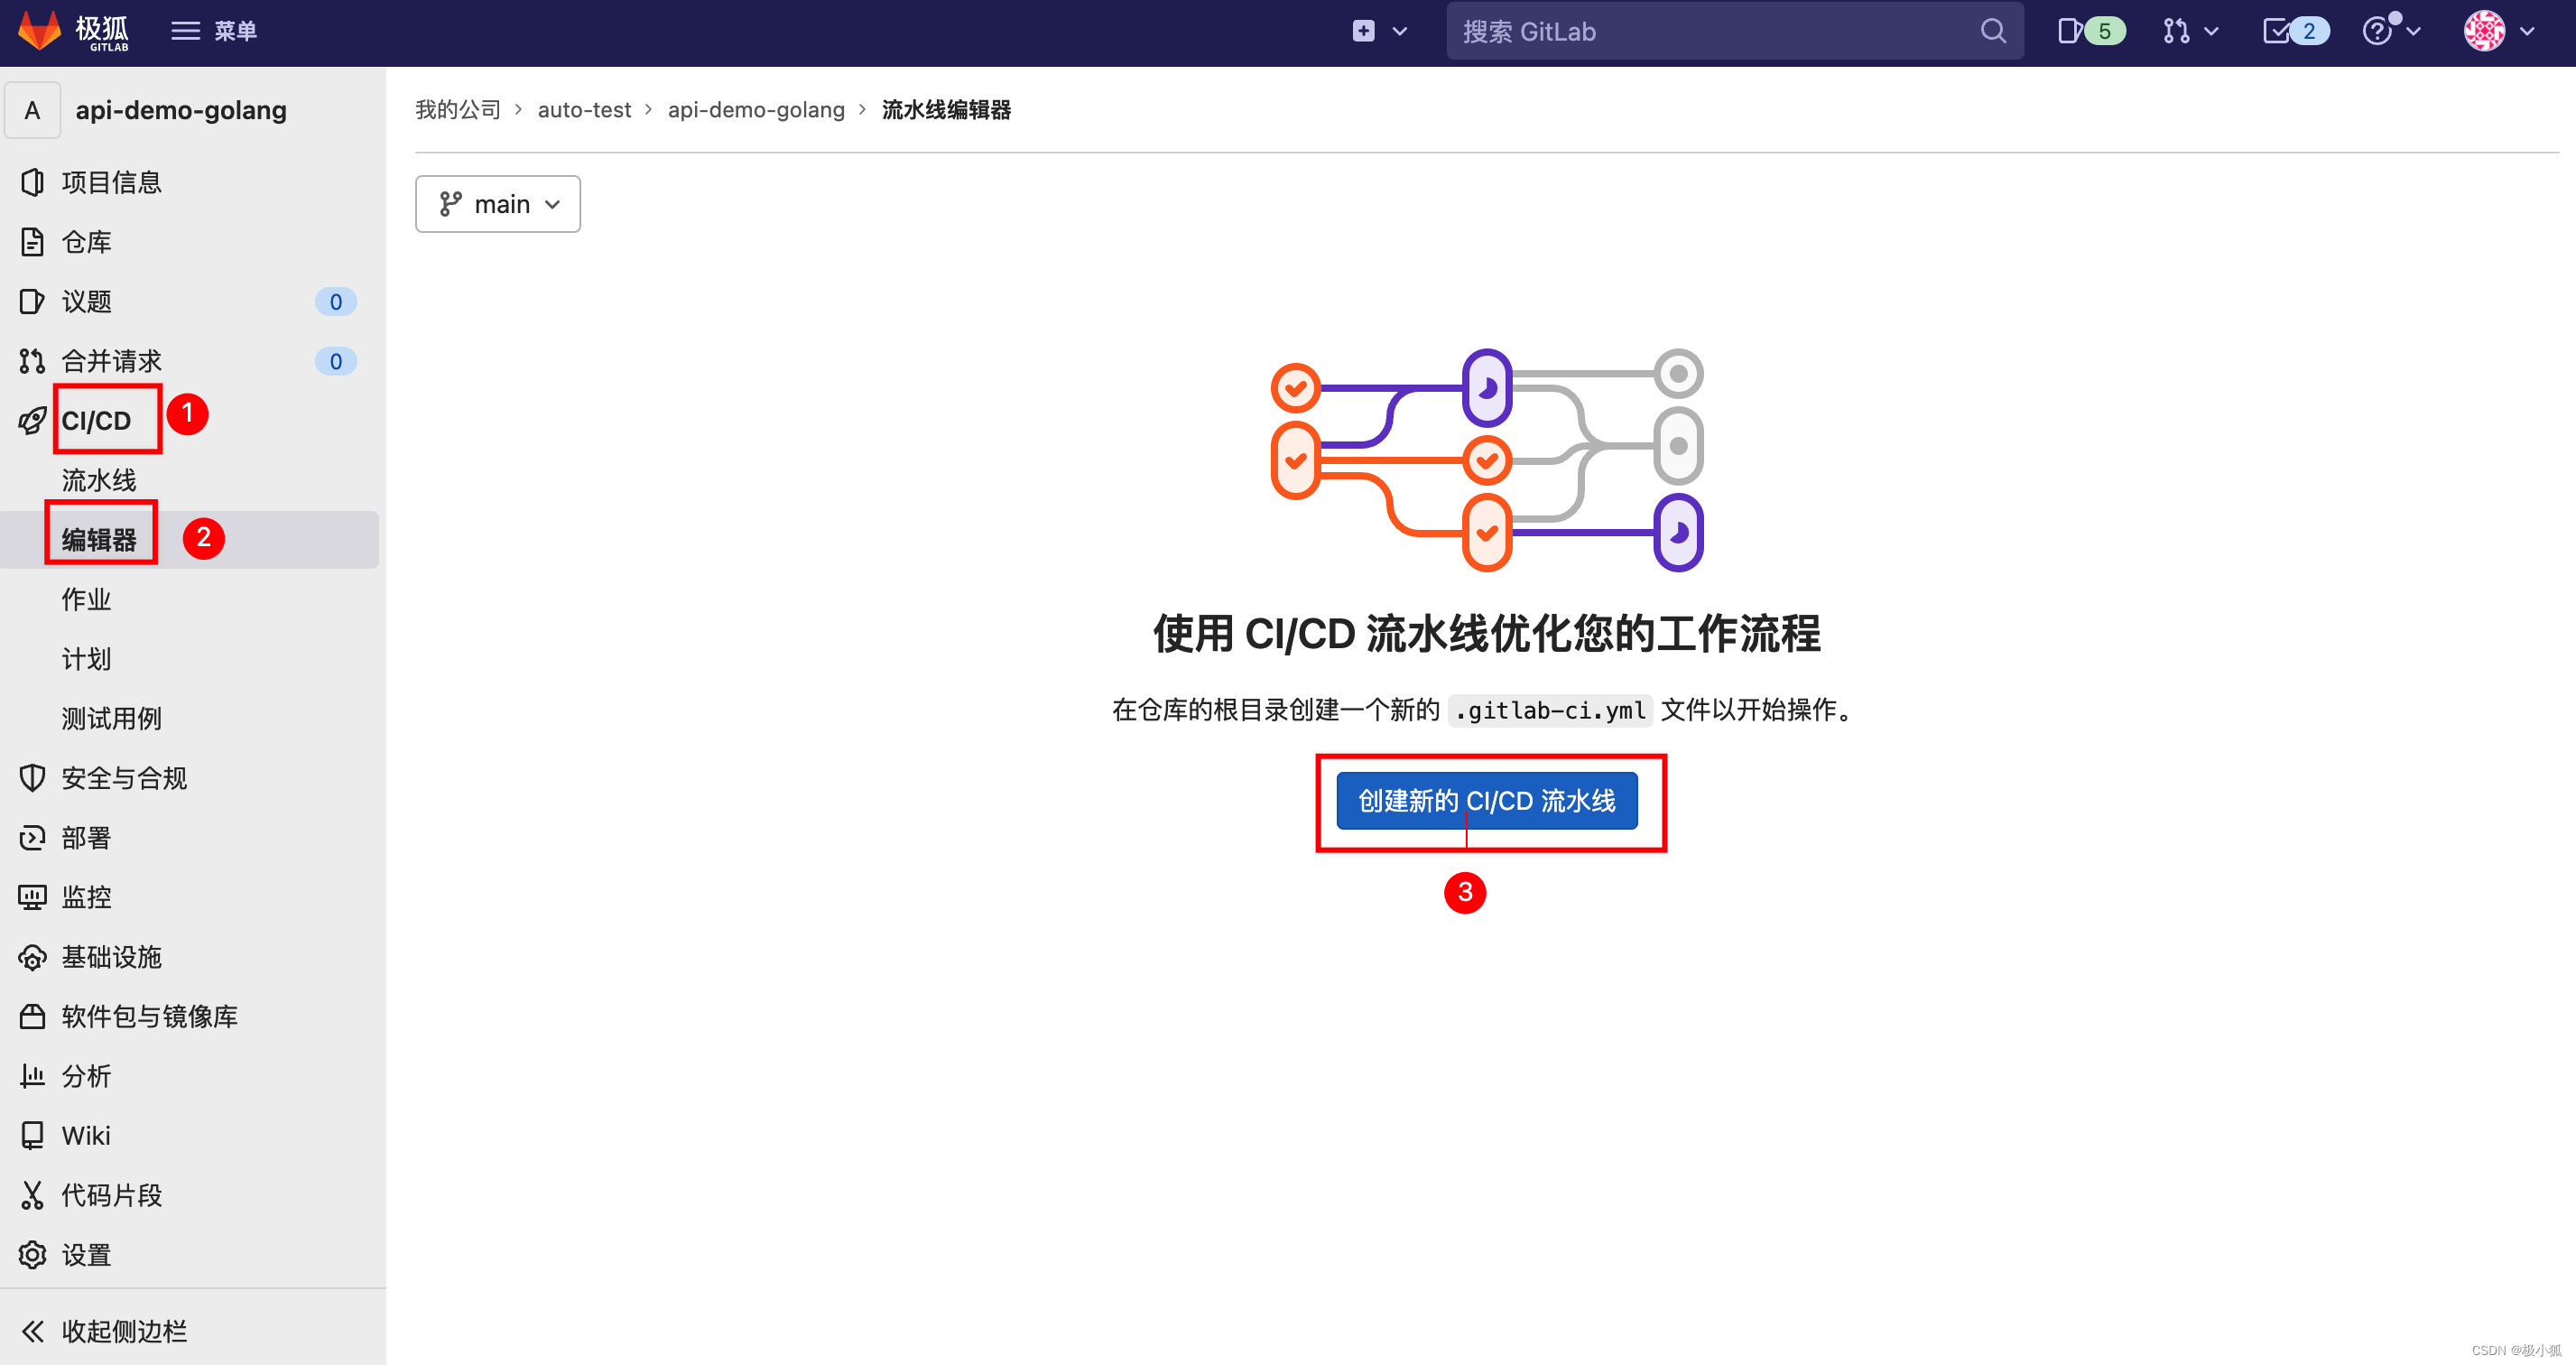
stages:
  - build
  - deploy

# 编译构建打包
build-job:
  stage: build
  image: golang:1.17
  script:
    - go mod tidy
    - go build -o api-demo .
  artifacts:
    paths:
      - api-demo

# 发布到测试环境并运行,可参考 https://docs.gitlab.com/ee/ci/ssh_keys/index.html#ssh-keys-when-using-the-docker-executor
deploy-job:
  stage: deploy
  image: debian:latest
  before_script:
  - 'command -v ssh-agent >/dev/null || ( apt-get update -y && apt-get install openssh-client -y )'
  - eval $(ssh-agent -s)
  - echo "$SSH_PRIVATE_KEY" | tr -d '\r' | ssh-add -
  - mkdir -p ~/.ssh
  - chmod 700 ~/.ssh
  - echo "$SSH_KNOWN_HOSTS" >> ~/.ssh/known_hosts
  - chmod 644 ~/.ssh/known_hosts
  script:
    - scp -P $DEPLOY_PORT ./api-demo $DEPLOY_USER@$DEPLOY_HOST:/home/ubuntu/
    - ssh -p $DEPLOY_PORT $DEPLOY_USER@$DEPLOY_HOST "./api-demo >/dev/null 2>&1 &"
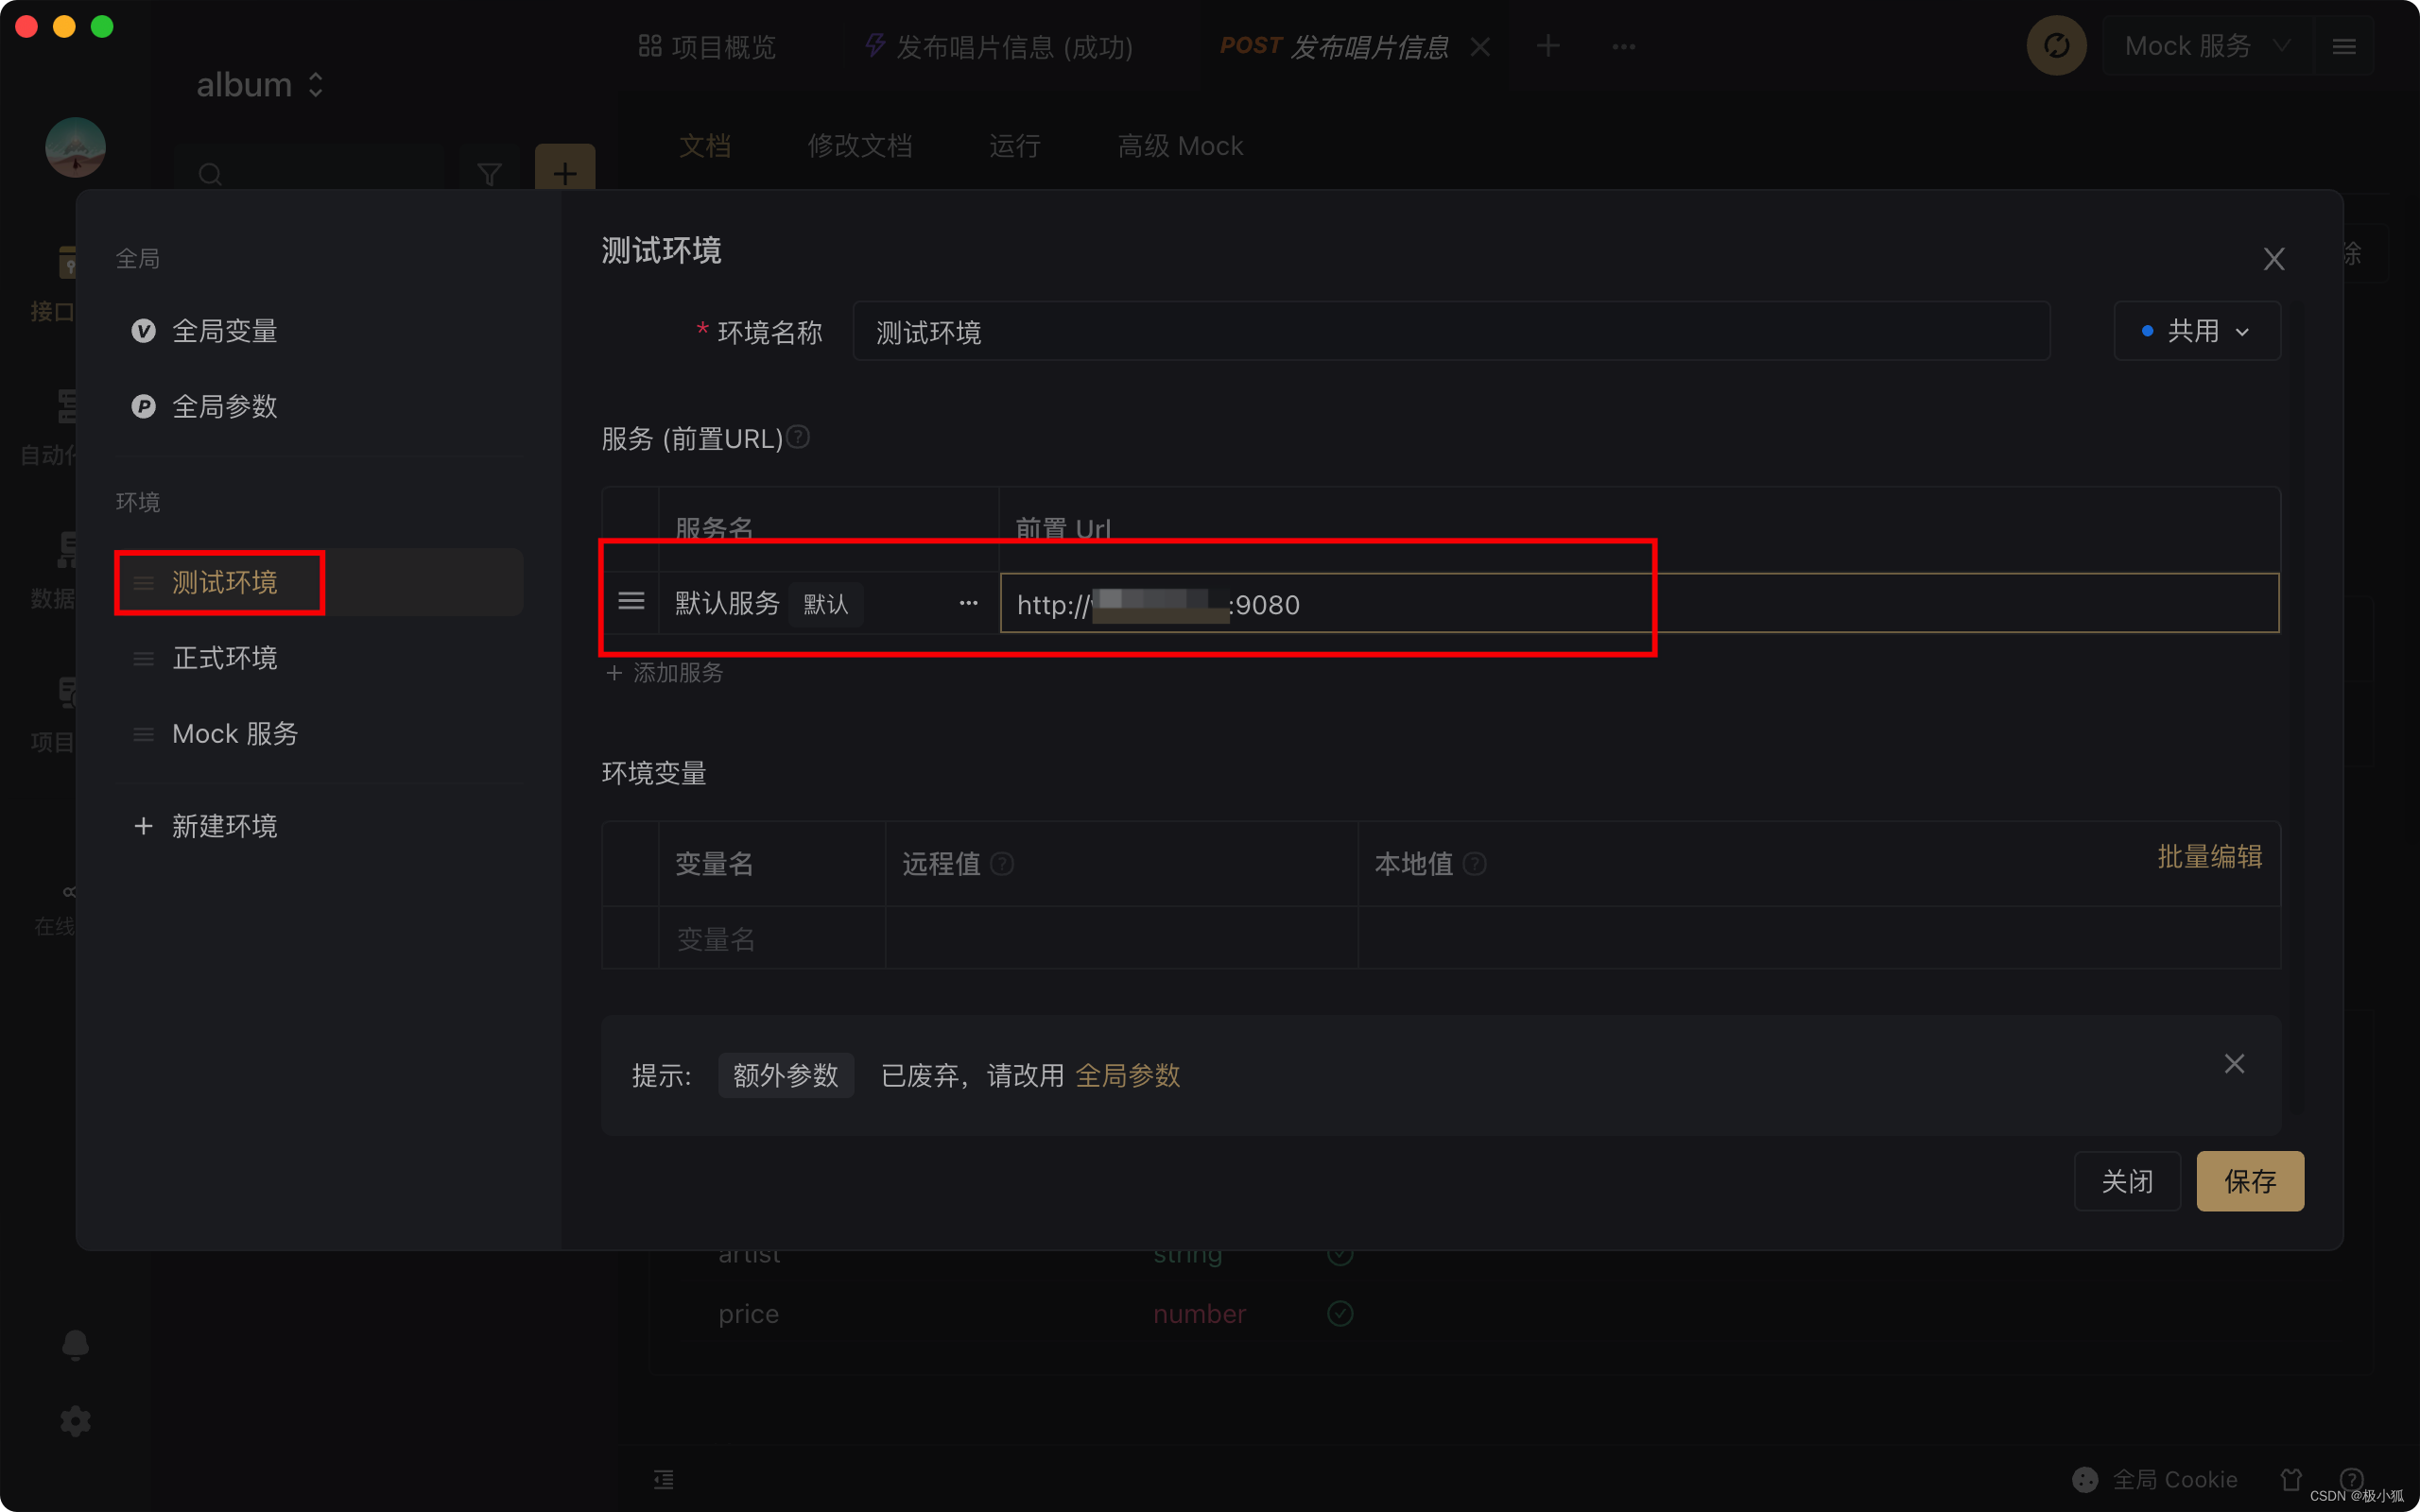
待流水线成功运行后,确定测试环境IP:9080可访问后就可以进行后续的测试。
2.1.3 手动执行测试
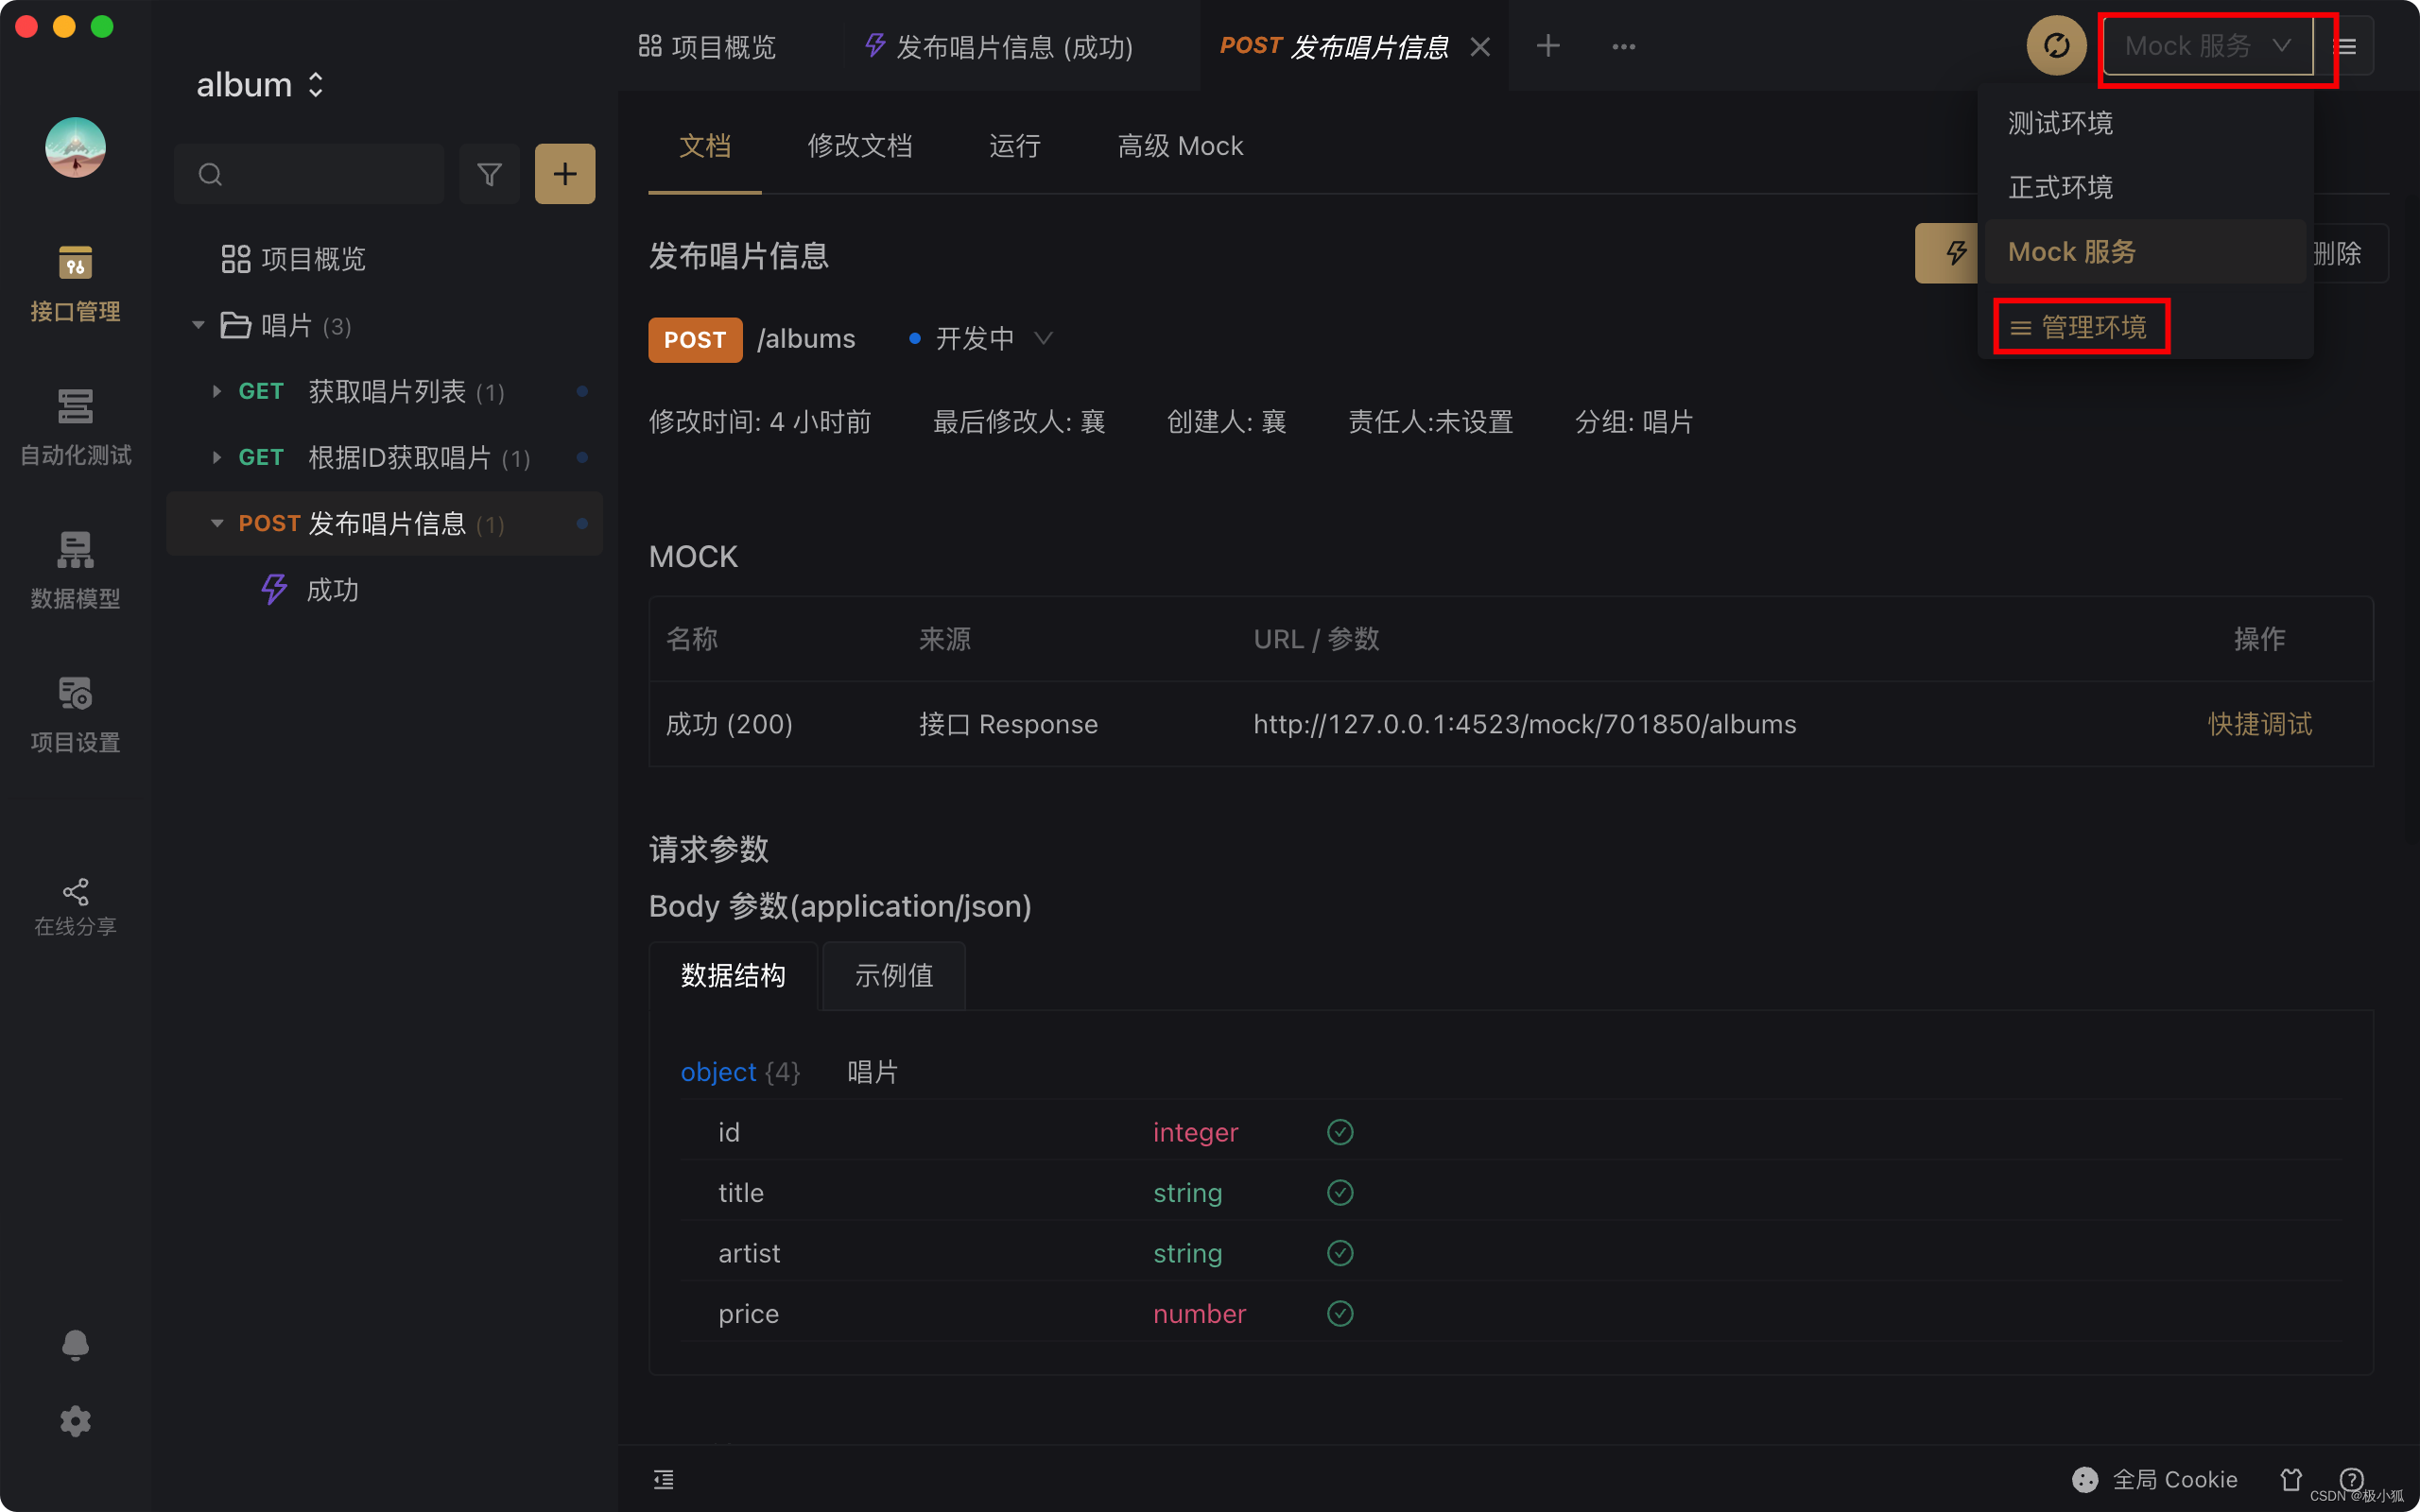
- 当后台开发人员将接口服务发布到测试环境后,测试人员就要基于测试环境进行接口测试,而不是继续做Mock。可在Apifox中配置管理不同的环境,并切换不同的环境进行测试。
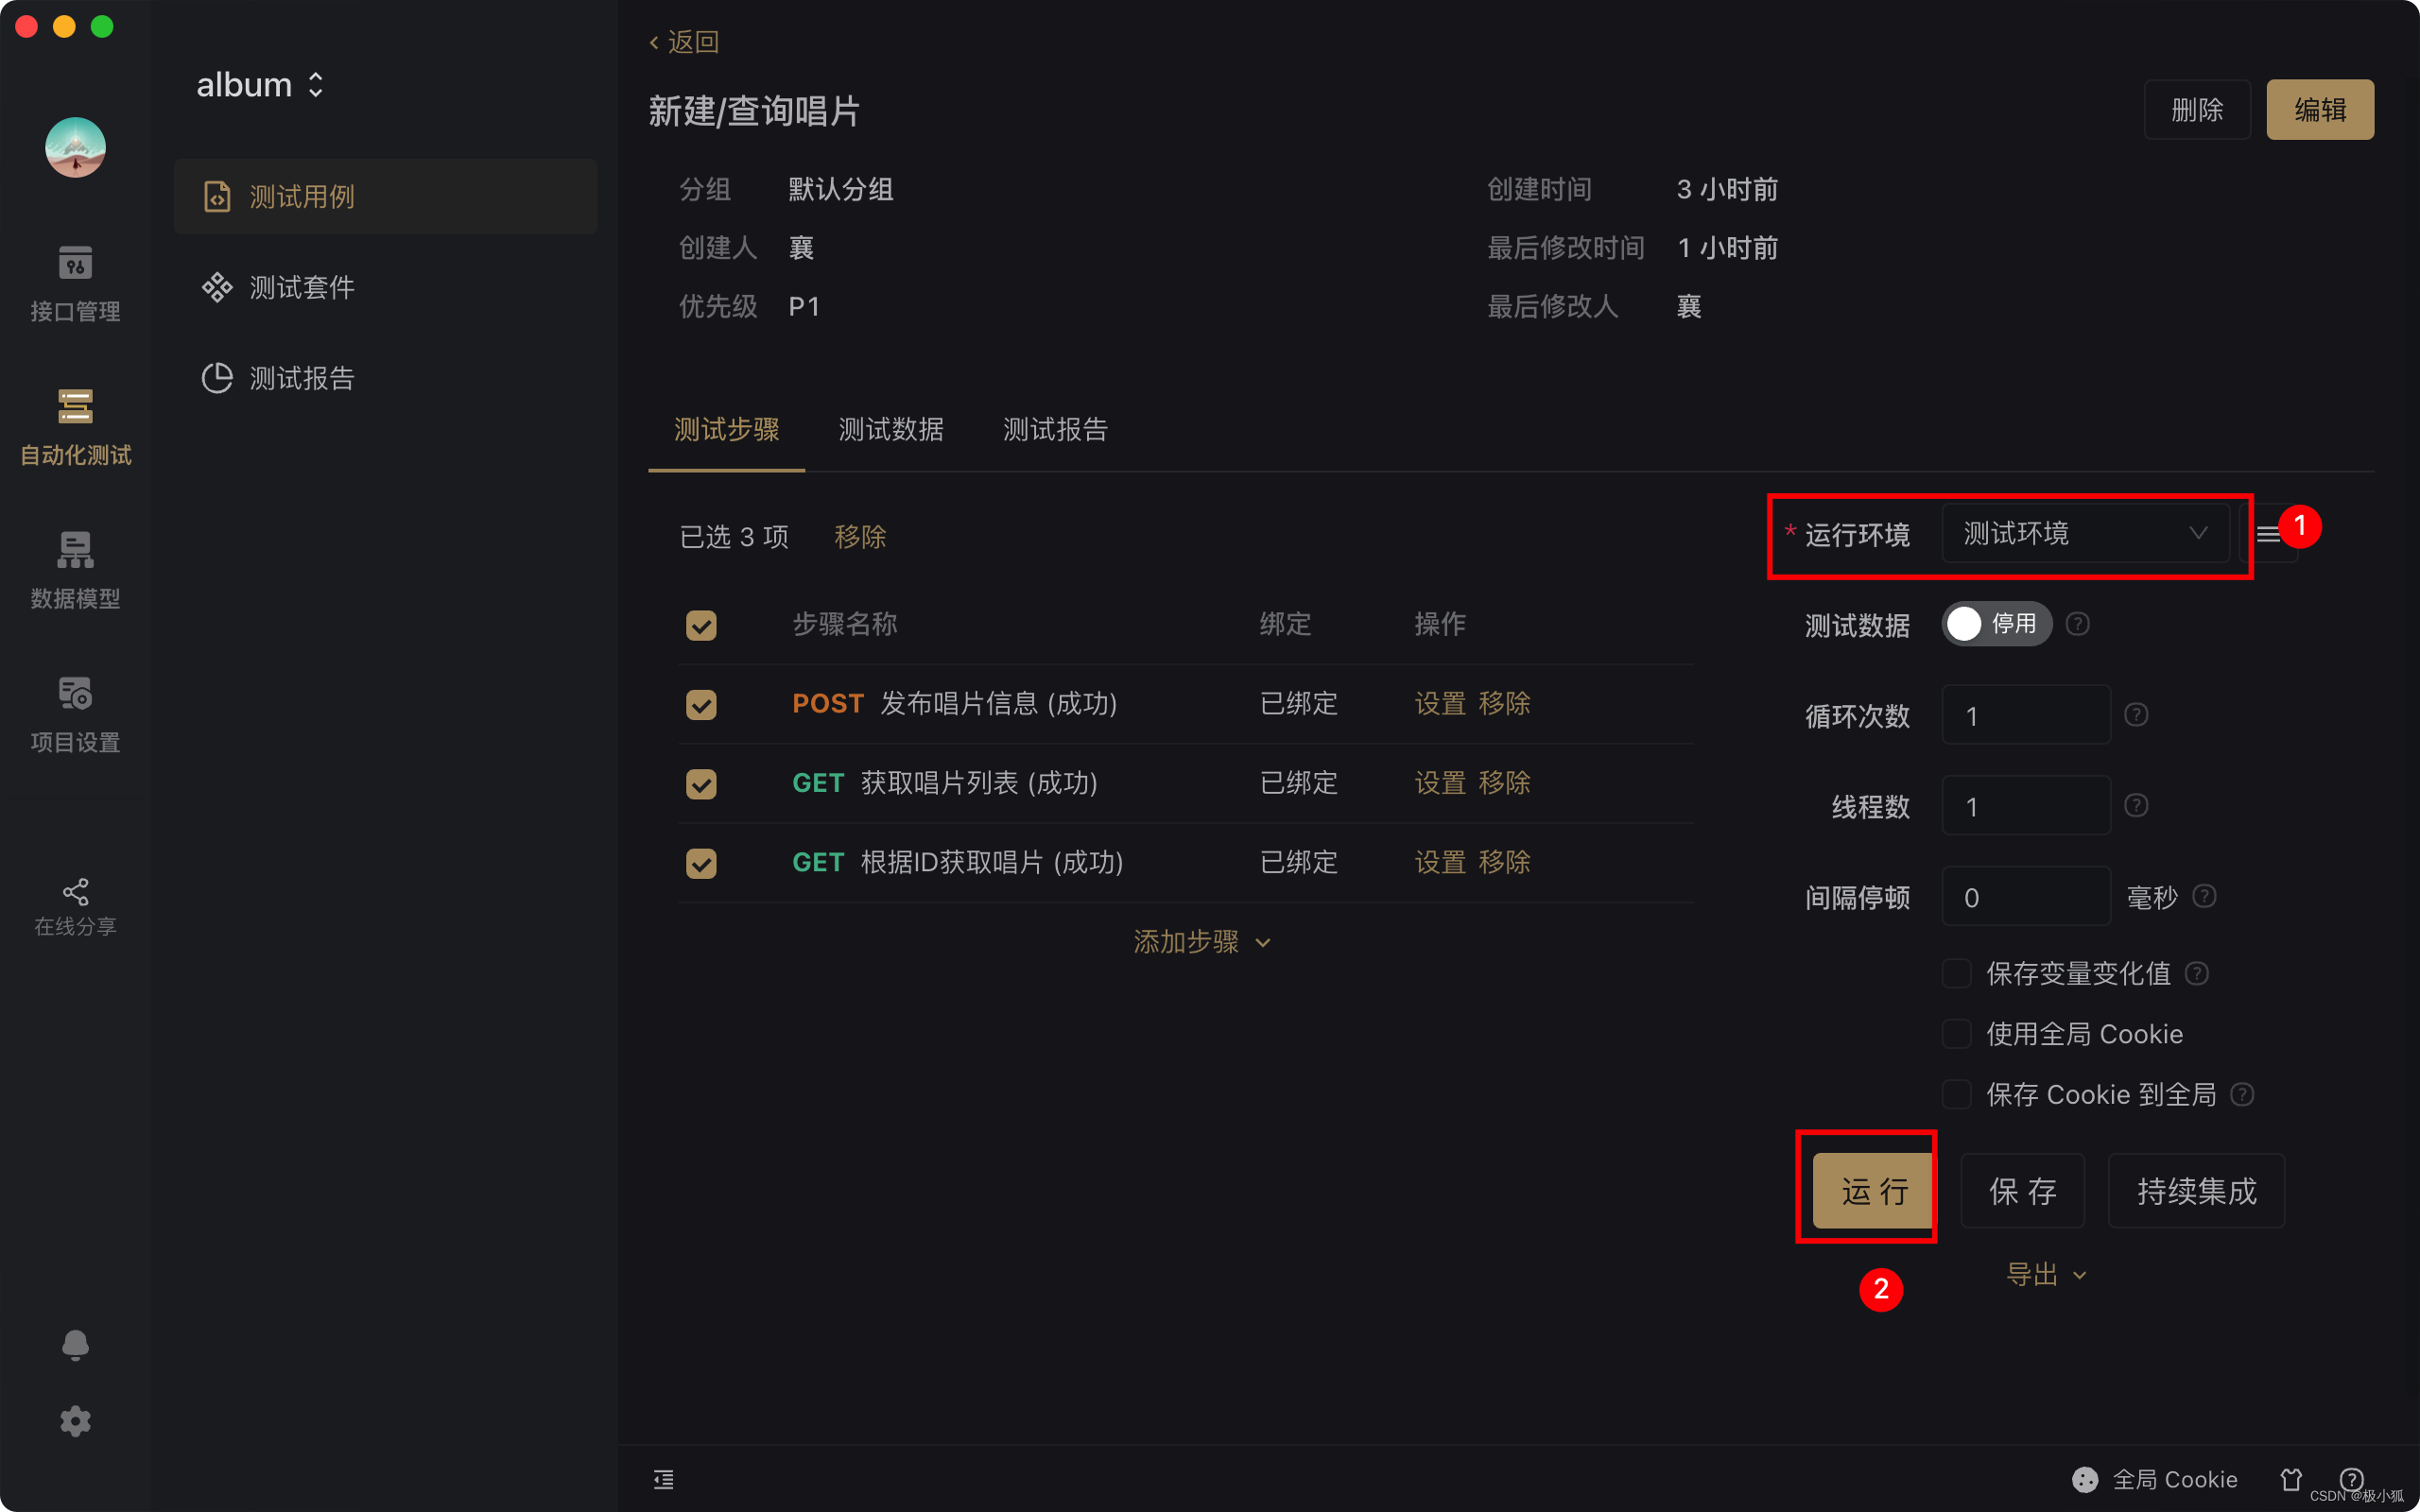
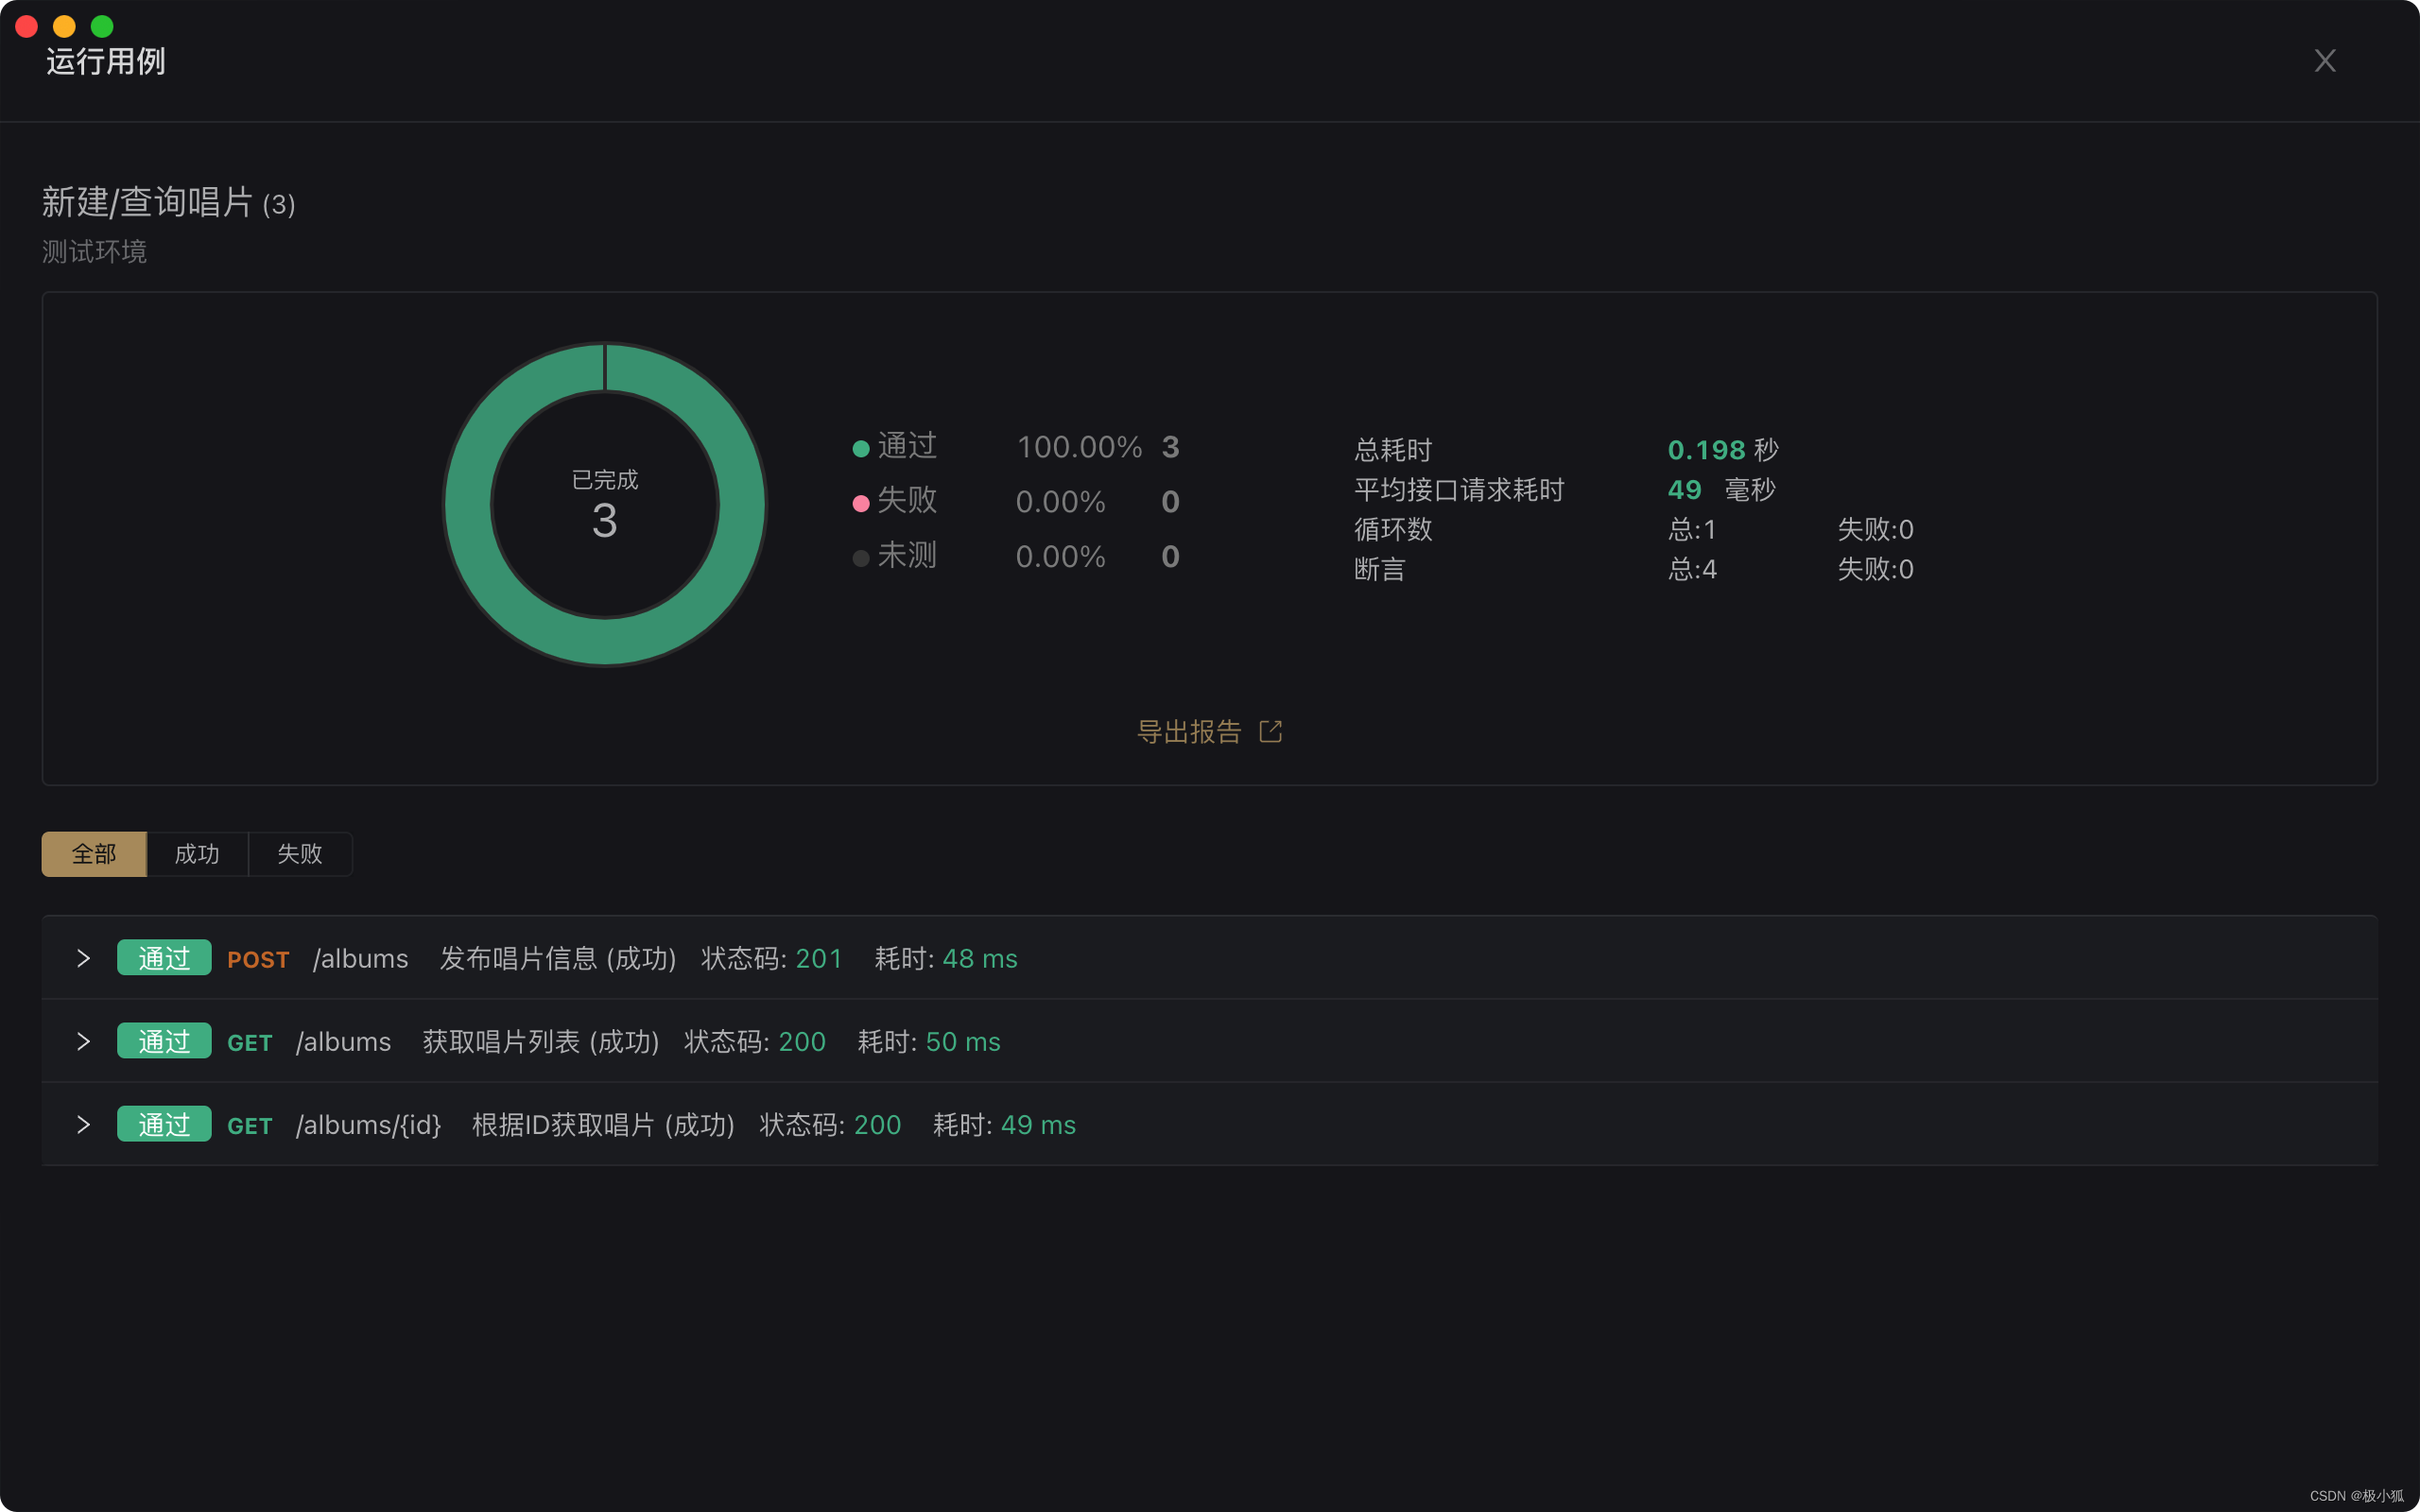
2. 在测试用例中,选择测试环境然后运行,查看测试报告。若有未通过的用例,则走Bug提报流程或调试调整测试用例;若用例全部通过,则可进行下一步,将这些测试用例通过极狐GitLab CI/CD 进行集成,实现自动化测试。
2.1.4 自动化测试
- 在极狐GitLab中创建名为api-test-golang的项目,用来管理接口的自动化测试用例。
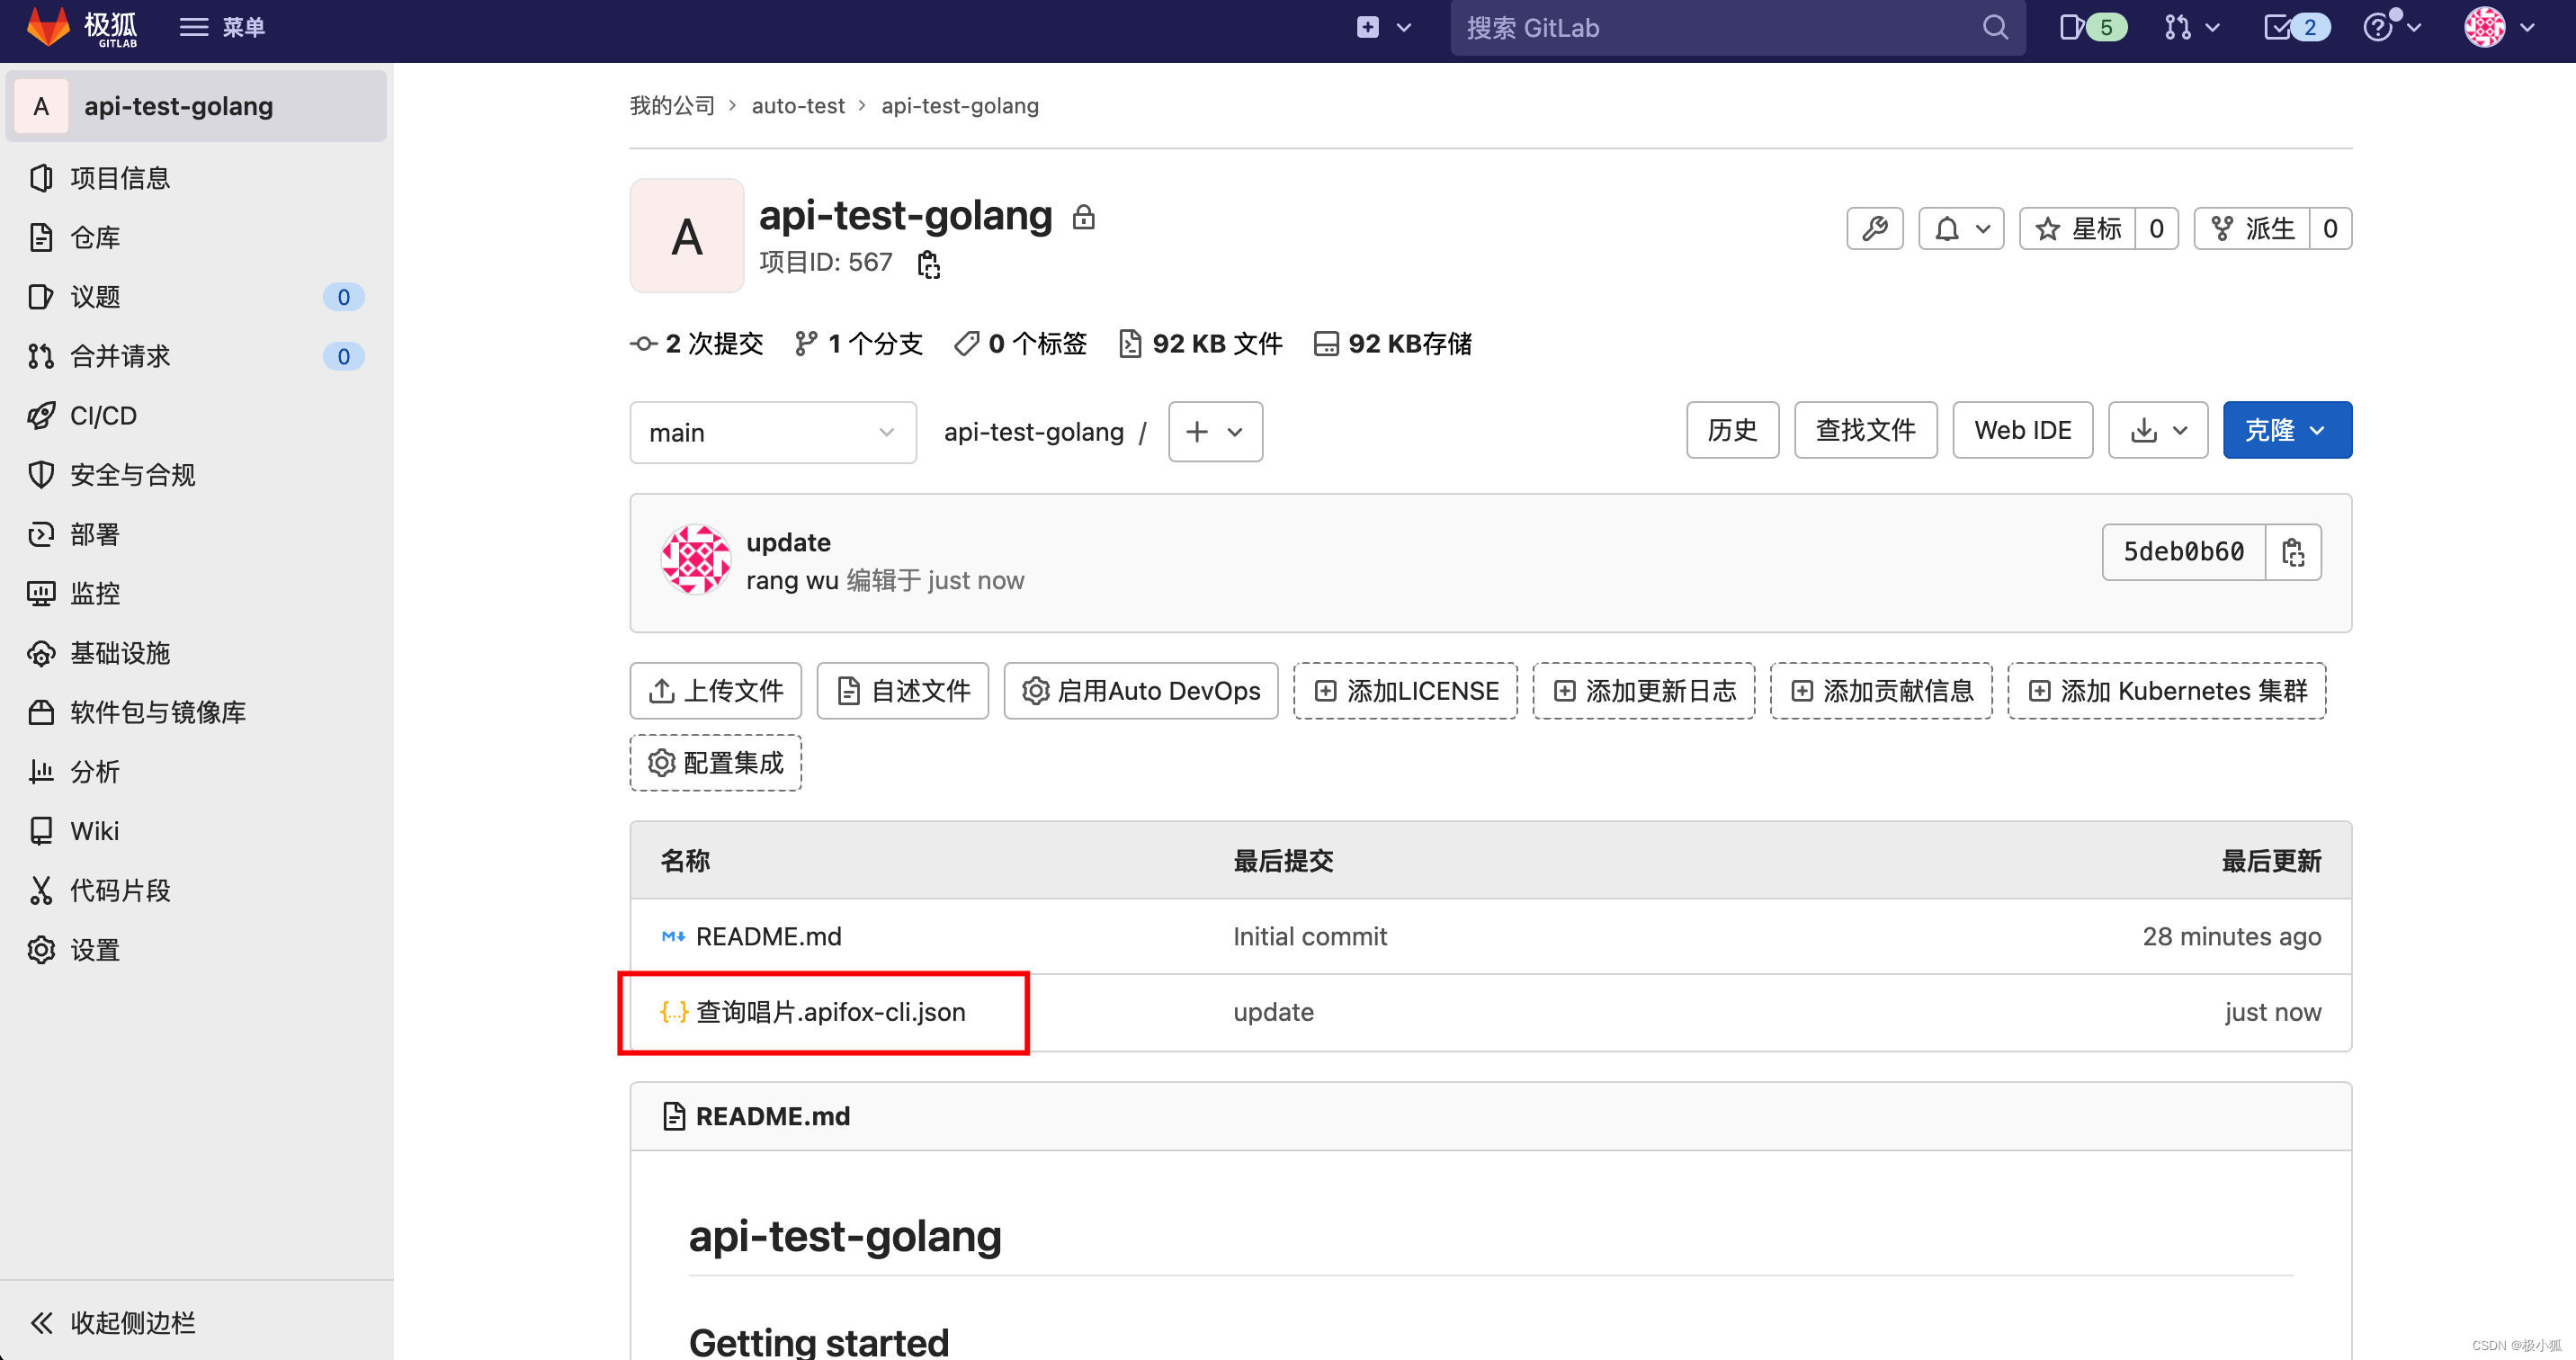
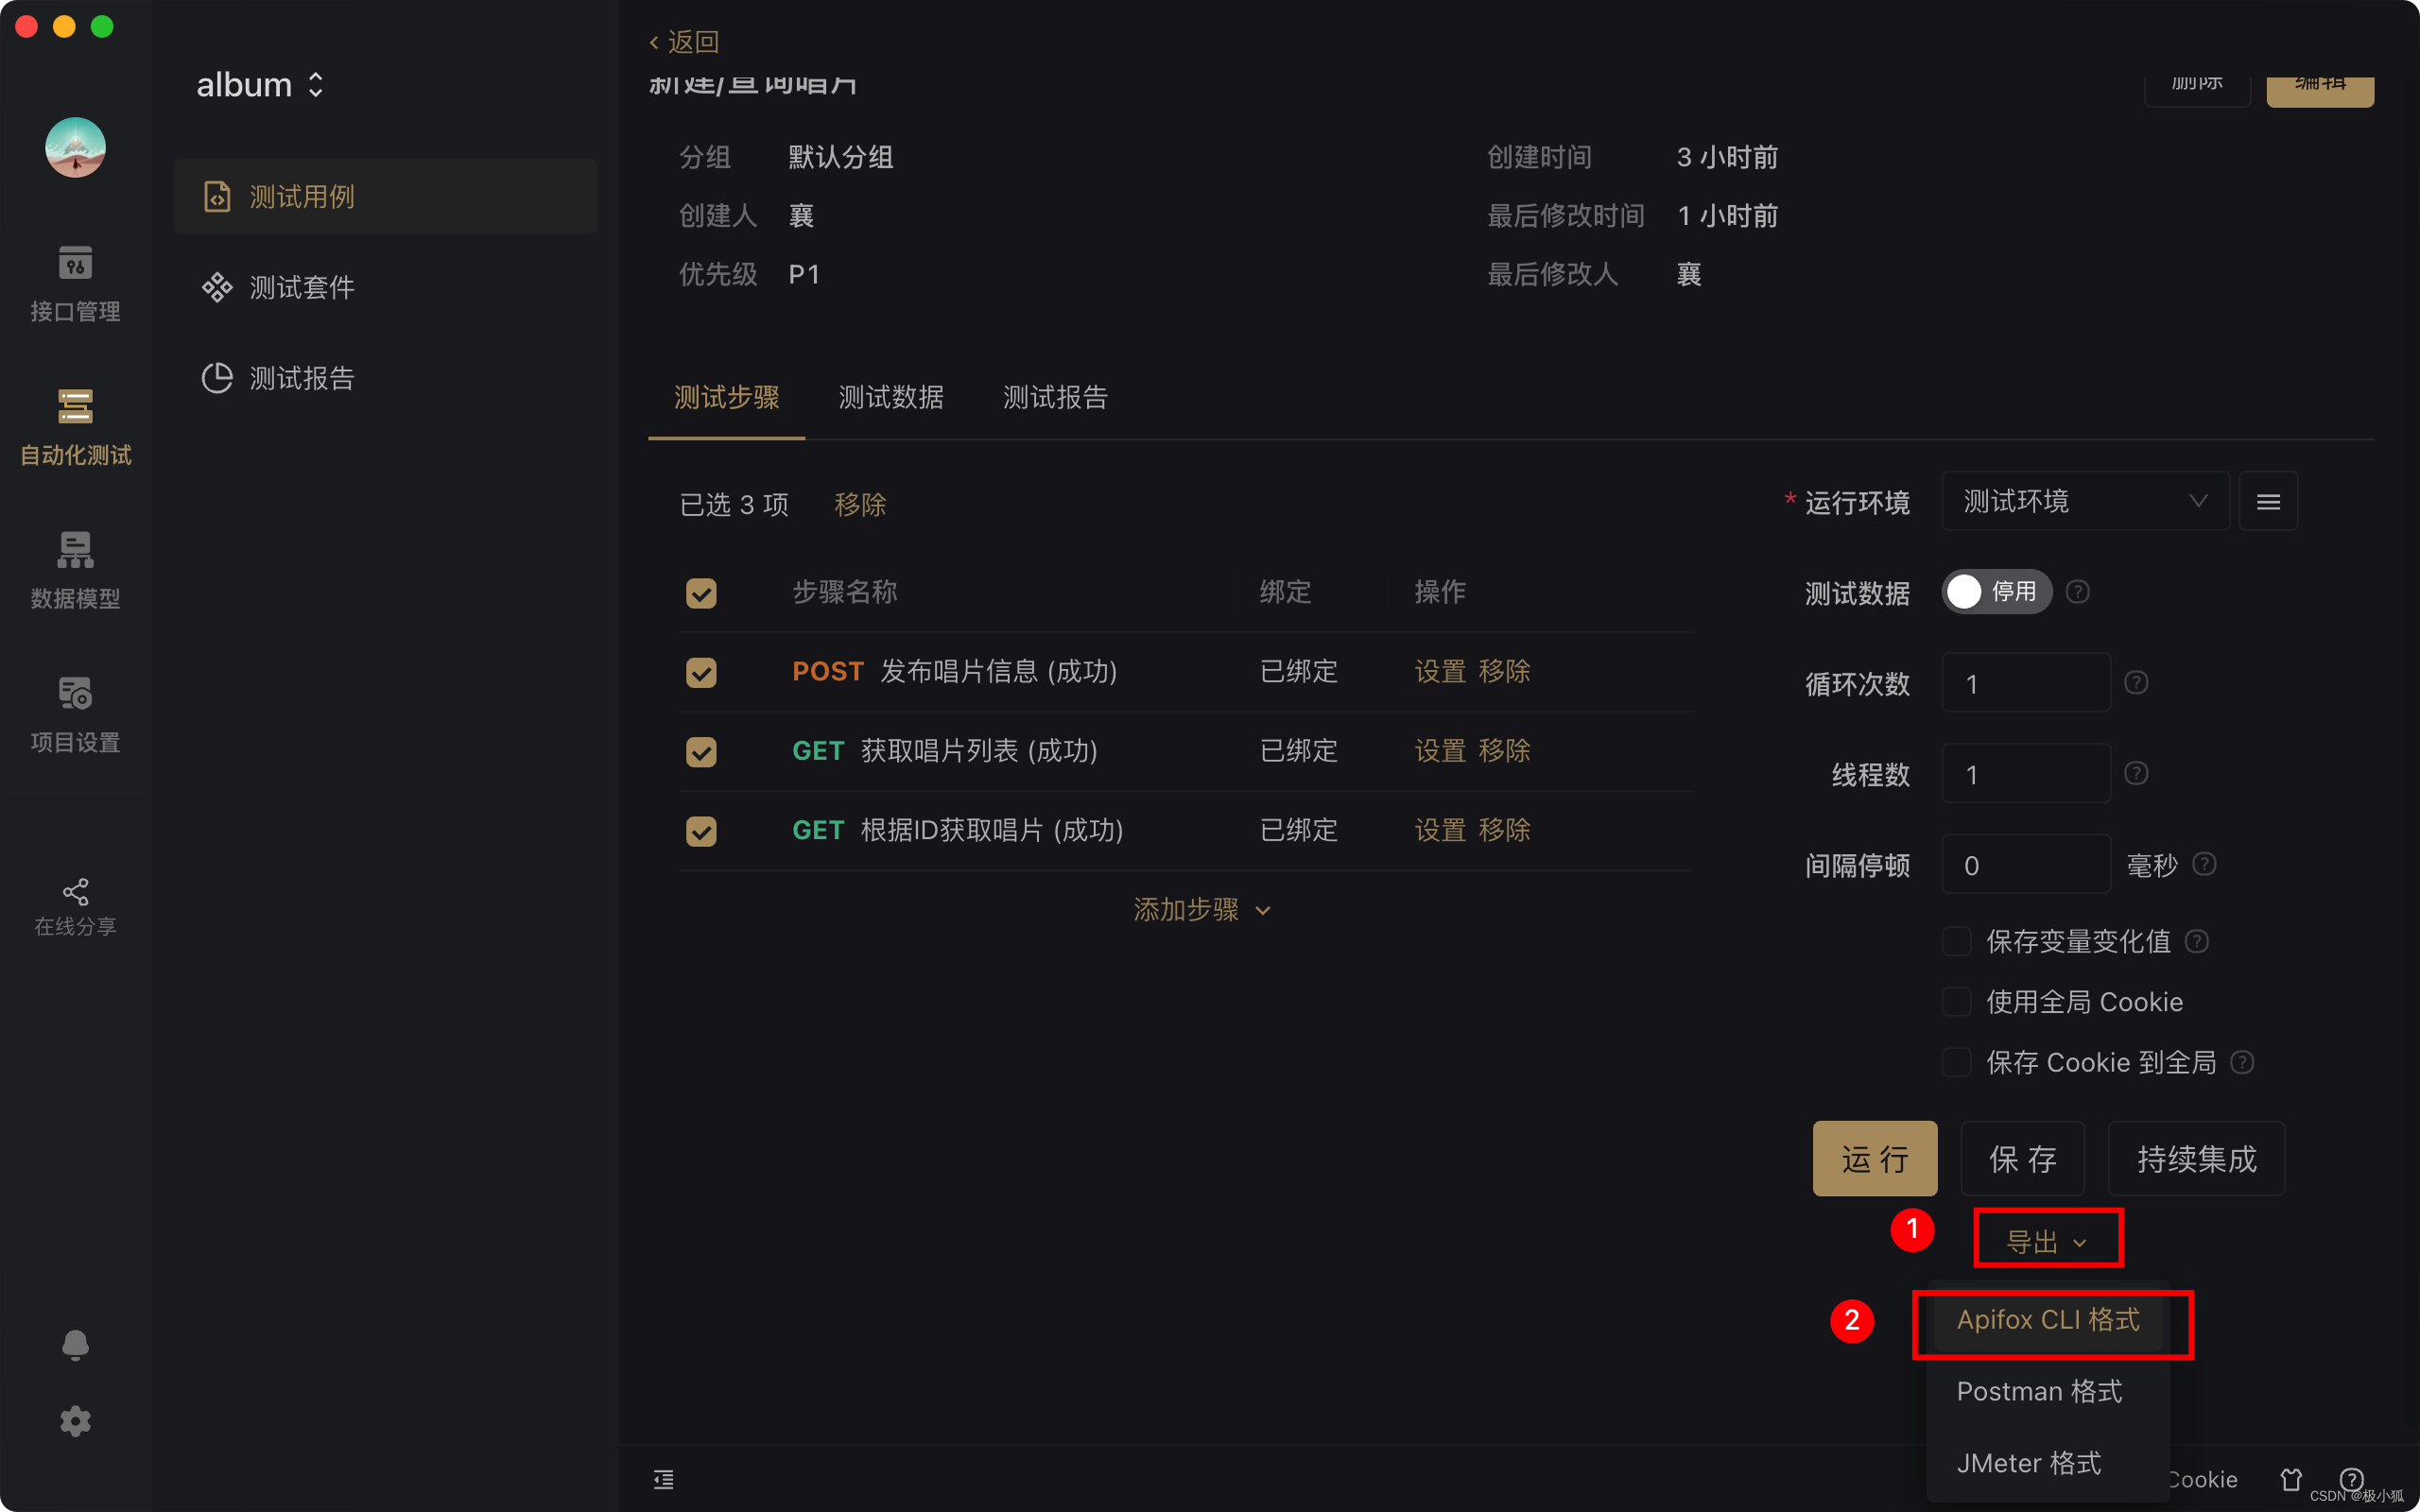
2. 将手动测试通过的测试用例导出为Apifox CLI格式文件,并上传到极狐GitLab的api-test-golang项目中,如果有多个测试用例就有多个文件。
3. 创建api-test-golang项目的CI/CD流水线,详见:Apifox CLI 命令行运行 | Apifox 使用文档。参考示例.gitlab-ci.yaml如下:
stages:
  - test
api-test-job:
  stage: test
  # 执行apifox自动化测试需nodejs环境
  image: node:12
  # 安装apifox-cli,执行测试用例,输出cli和html格式报告
  script:
    - npm install -g apifox-cli
    - apifox run *.json -r cli,html
    # 可自行实现邮件或IM工具发送通知
  # 上传报告
  artifacts:
    paths:
      - apifox-reports/*
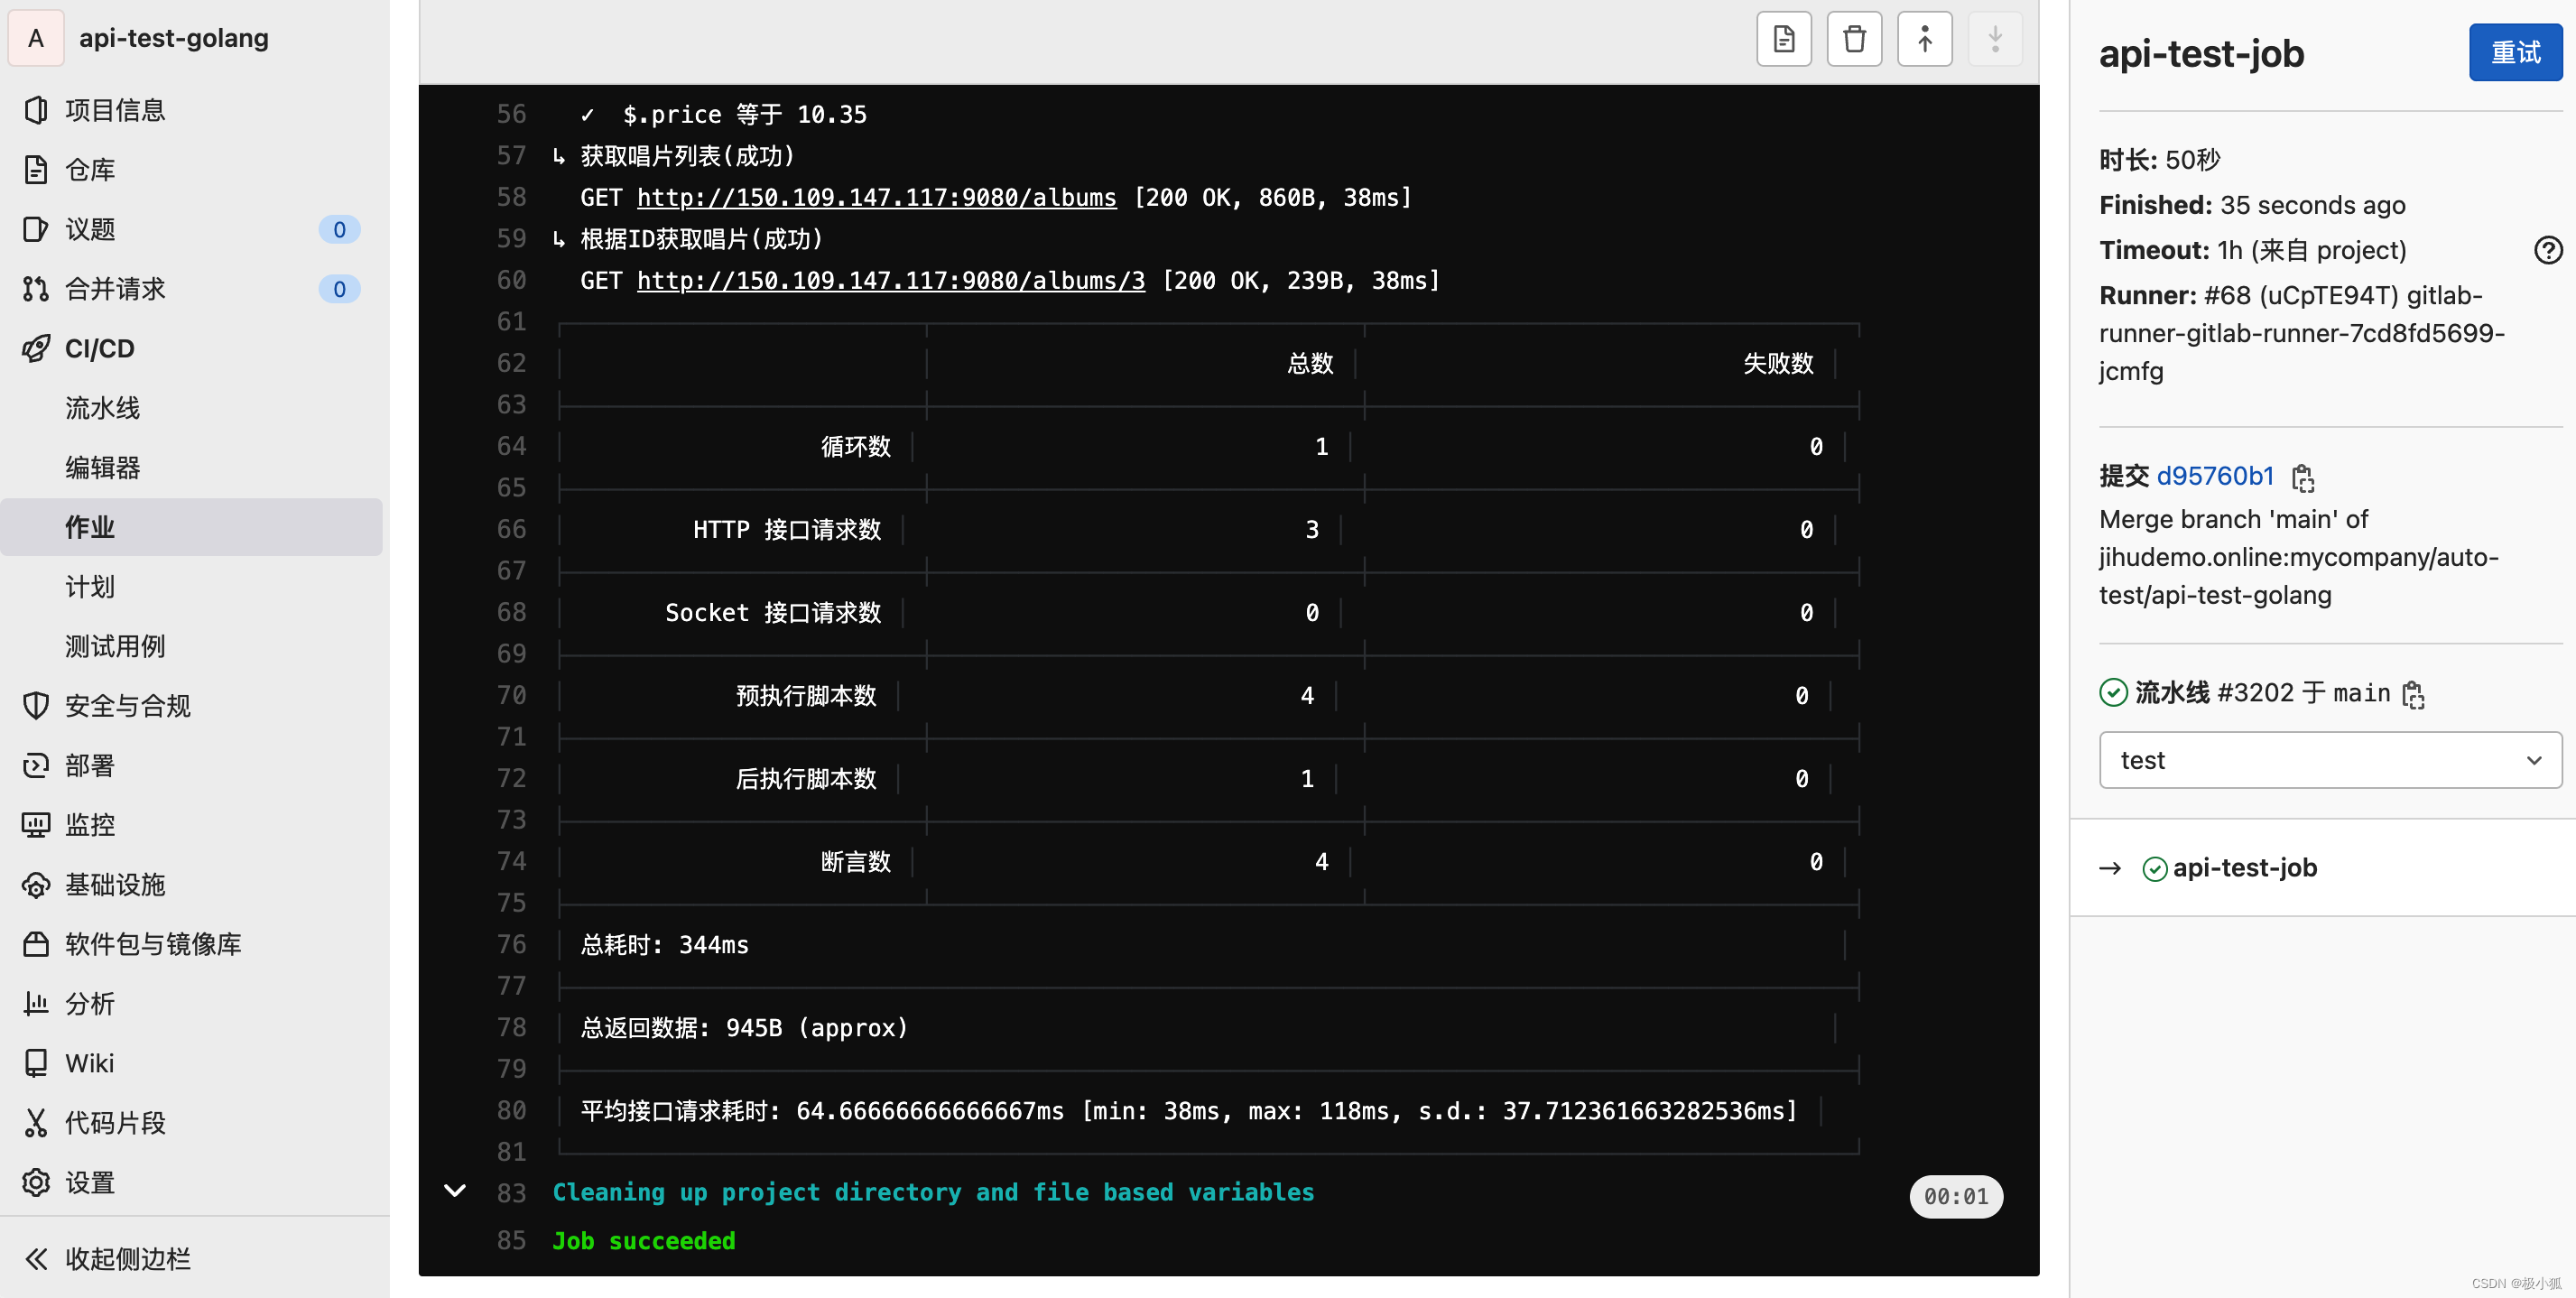
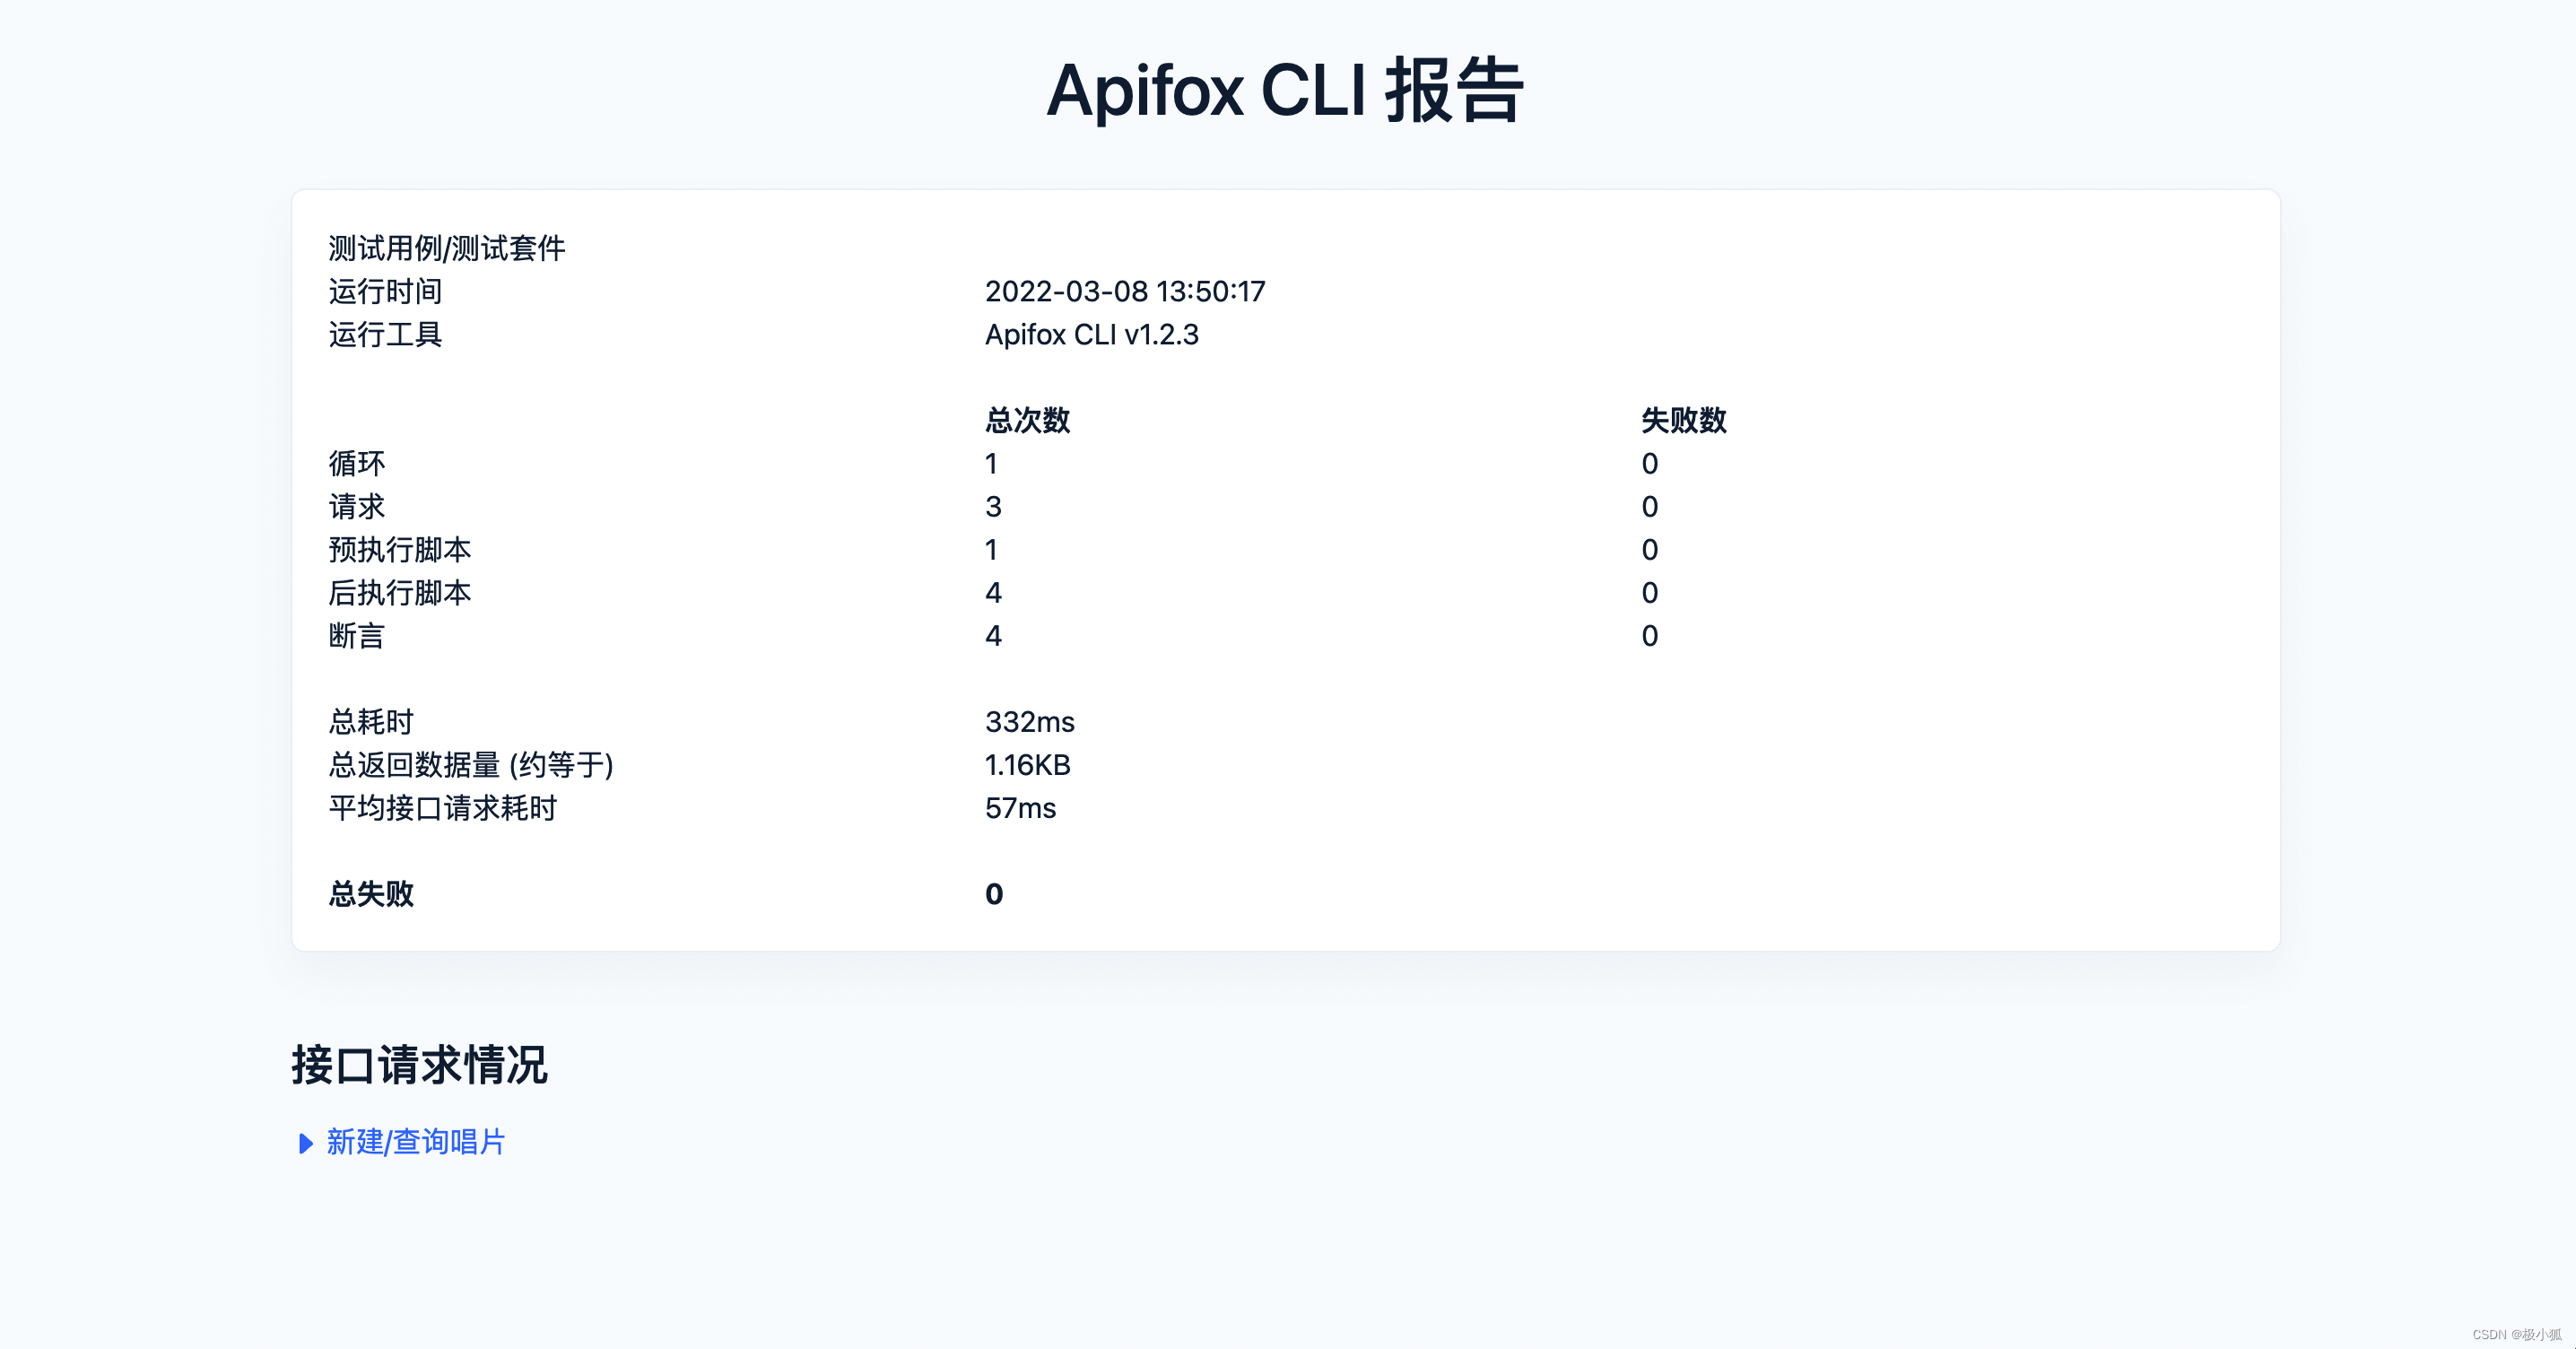
成功运行流水线后,可进入CI/CD作业(Job),通过日志查看测试报告:
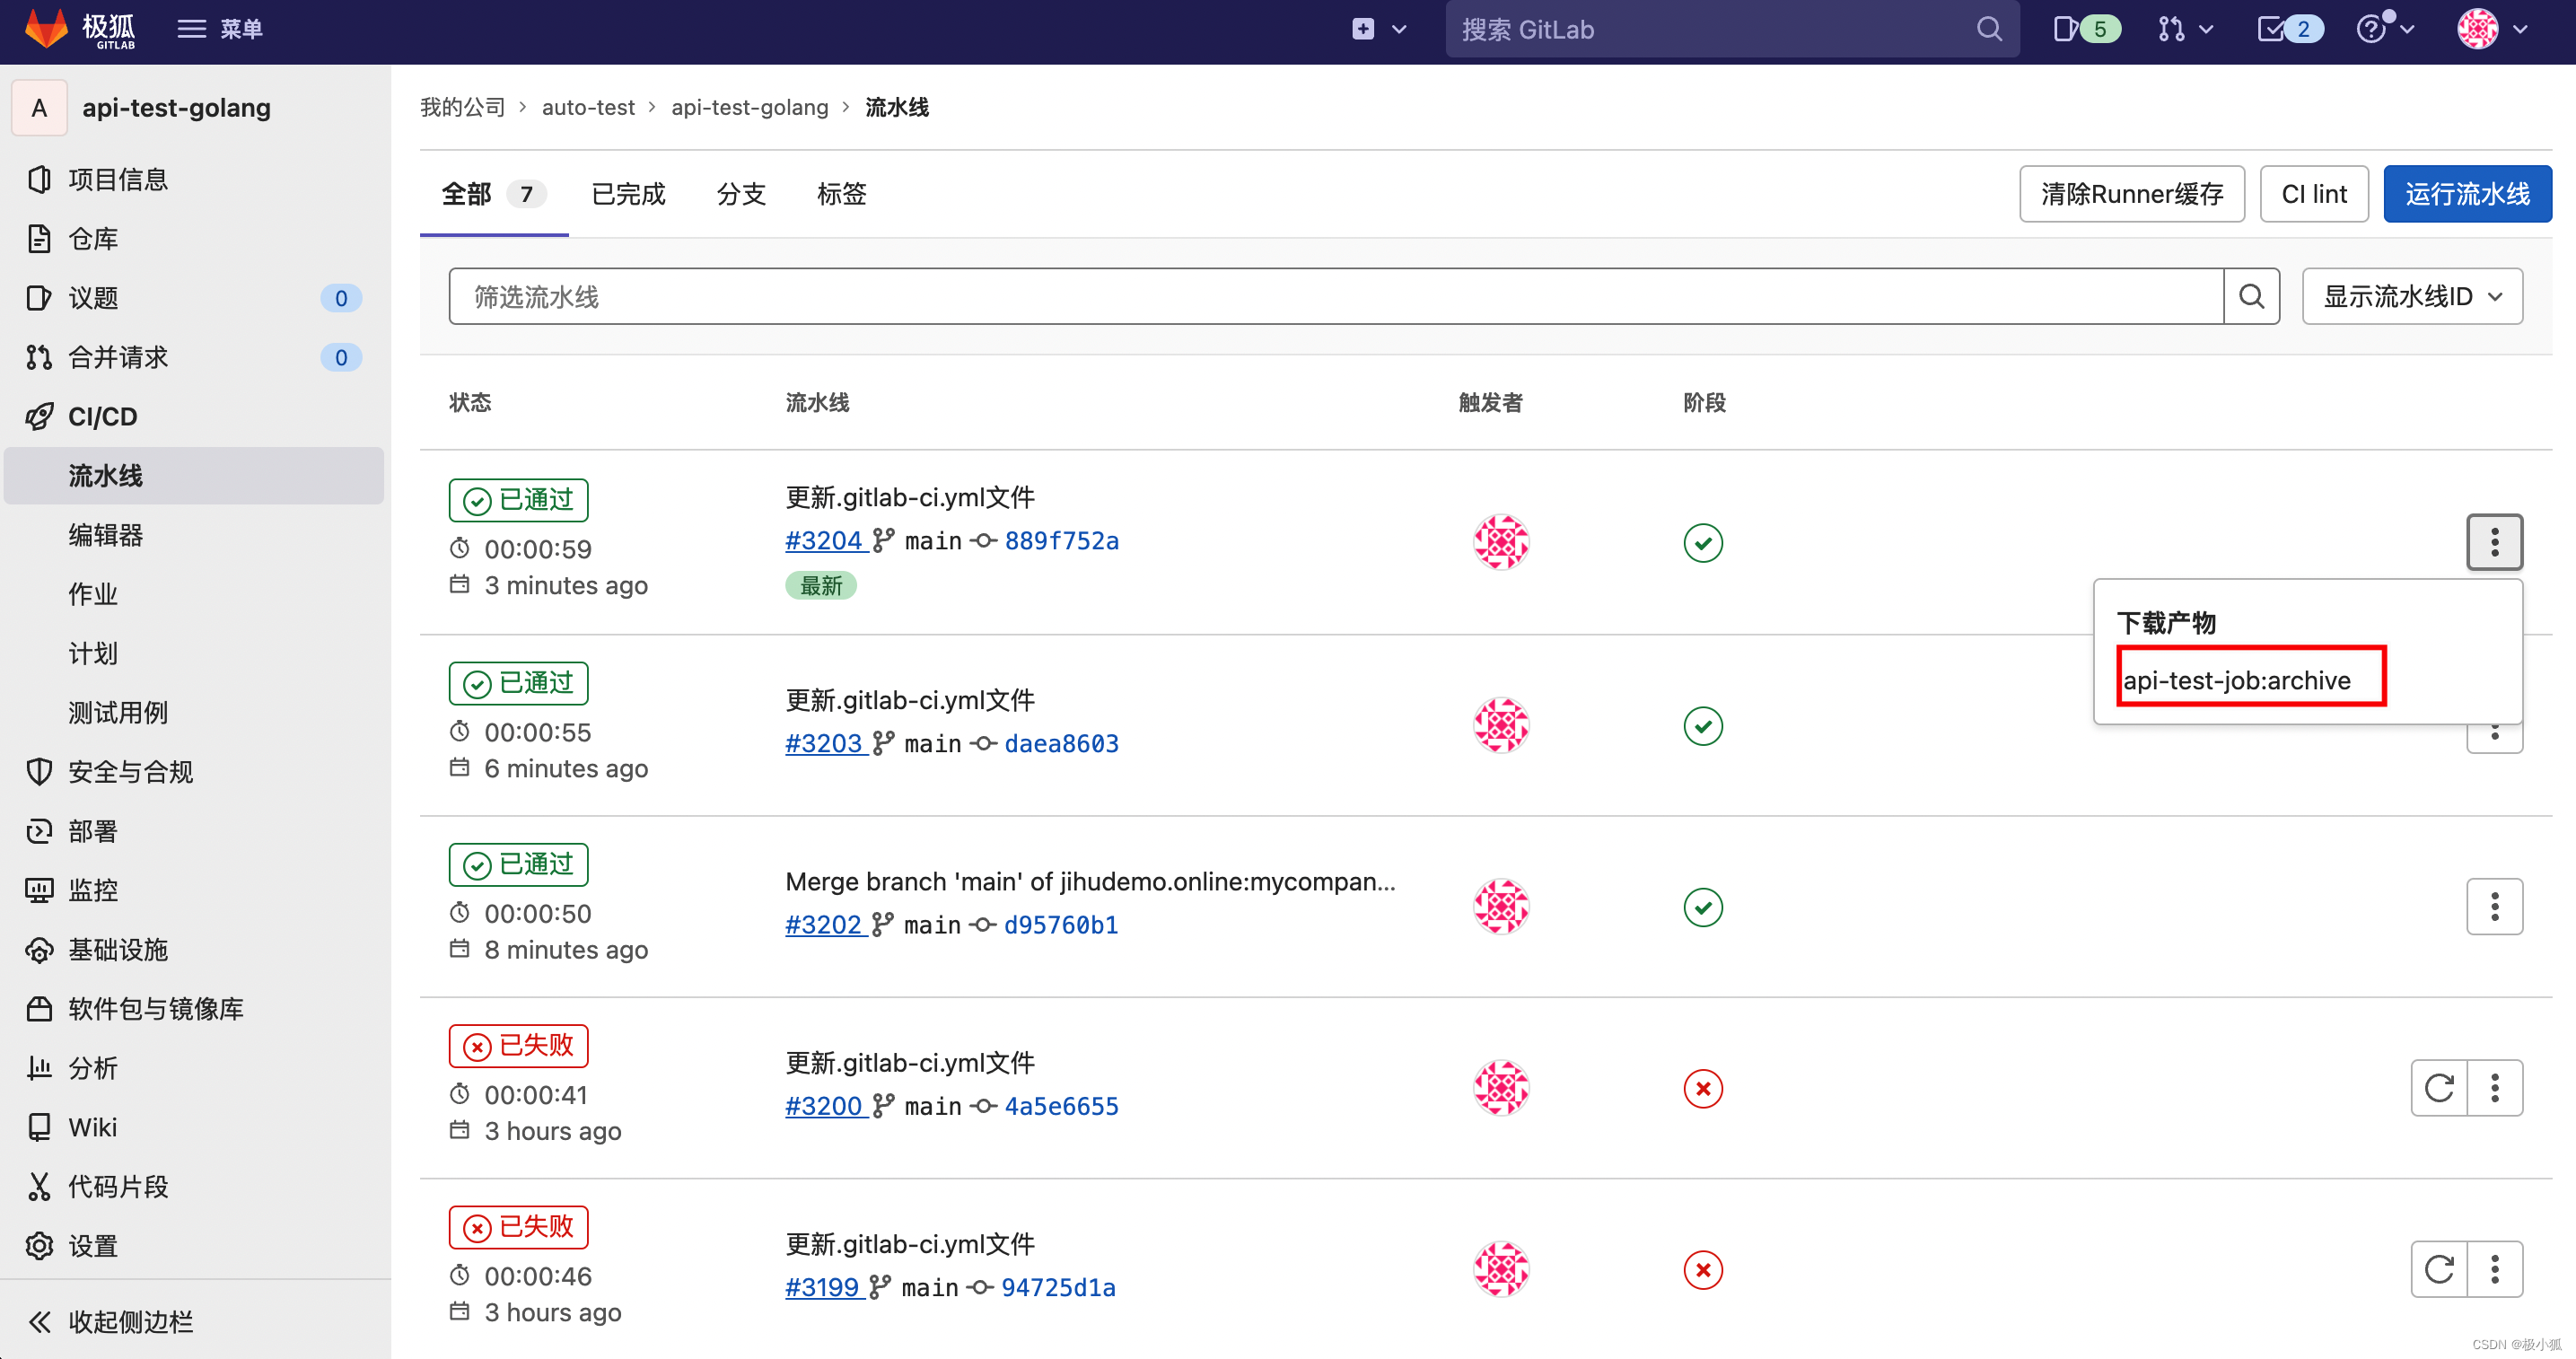
也可下载作业(Job)的制品(Artifacts),或配合极狐GitLab Pages功能,以HTML格式查看测试报告:
4. 利用极狐GitLab跨项目流水线功能,实现api-demo-golang部署到测试环境后自动触发api-test-golang的接口自动化测试。修改api-demo-golang的.gitlab-ci.yaml:
stages:
  - build
  - deploy
  - test  # 增加test阶段

# 编译构建打包
build-job:
  stage: build
  image: golang:1.17
  script:
    - go mod tidy
    - go build -o api-demo .
  artifacts:
    paths:
      - api-demo

# 发布到测试环境并运行,可参考 https://docs.gitlab.com/ee/ci/ssh_keys/index.html#ssh-keys-when-using-the-docker-executor
deploy-job:
  stage: deploy
  image: debian:latest
  before_script:
  - 'command -v ssh-agent >/dev/null || ( apt-get update -y && apt-get install openssh-client -y )'
  - eval $(ssh-agent -s)
  - echo "$SSH_PRIVATE_KEY" | tr -d '\r' | ssh-add -
  - mkdir -p ~/.ssh
  - chmod 700 ~/.ssh
  - echo "$SSH_KNOWN_HOSTS" >> ~/.ssh/known_hosts
  - chmod 644 ~/.ssh/known_hosts
  script:
    - scp -P $DEPLOY_PORT ./api-demo $DEPLOY_USER@$DEPLOY_HOST:/home/ubuntu/
    - ssh -p $DEPLOY_PORT $DEPLOY_USER@$DEPLOY_HOST "./api-demo >/dev/null 2>&1 &"

# 增加跨项目流水线,自动触发api-test-golang项目的流水线
api-test-job:
  stage: test
  trigger:
    project: <群组>/<子群组>/api-test-golang
    strategy: depend
运行api-demo-golang的流水线,可以看到下游流水线api-test-golang被成功触发。如果使用极狐GitLab专业版,还可以在上游流水线中直接查看下游流水线的构建状态和日志,如下图所示:
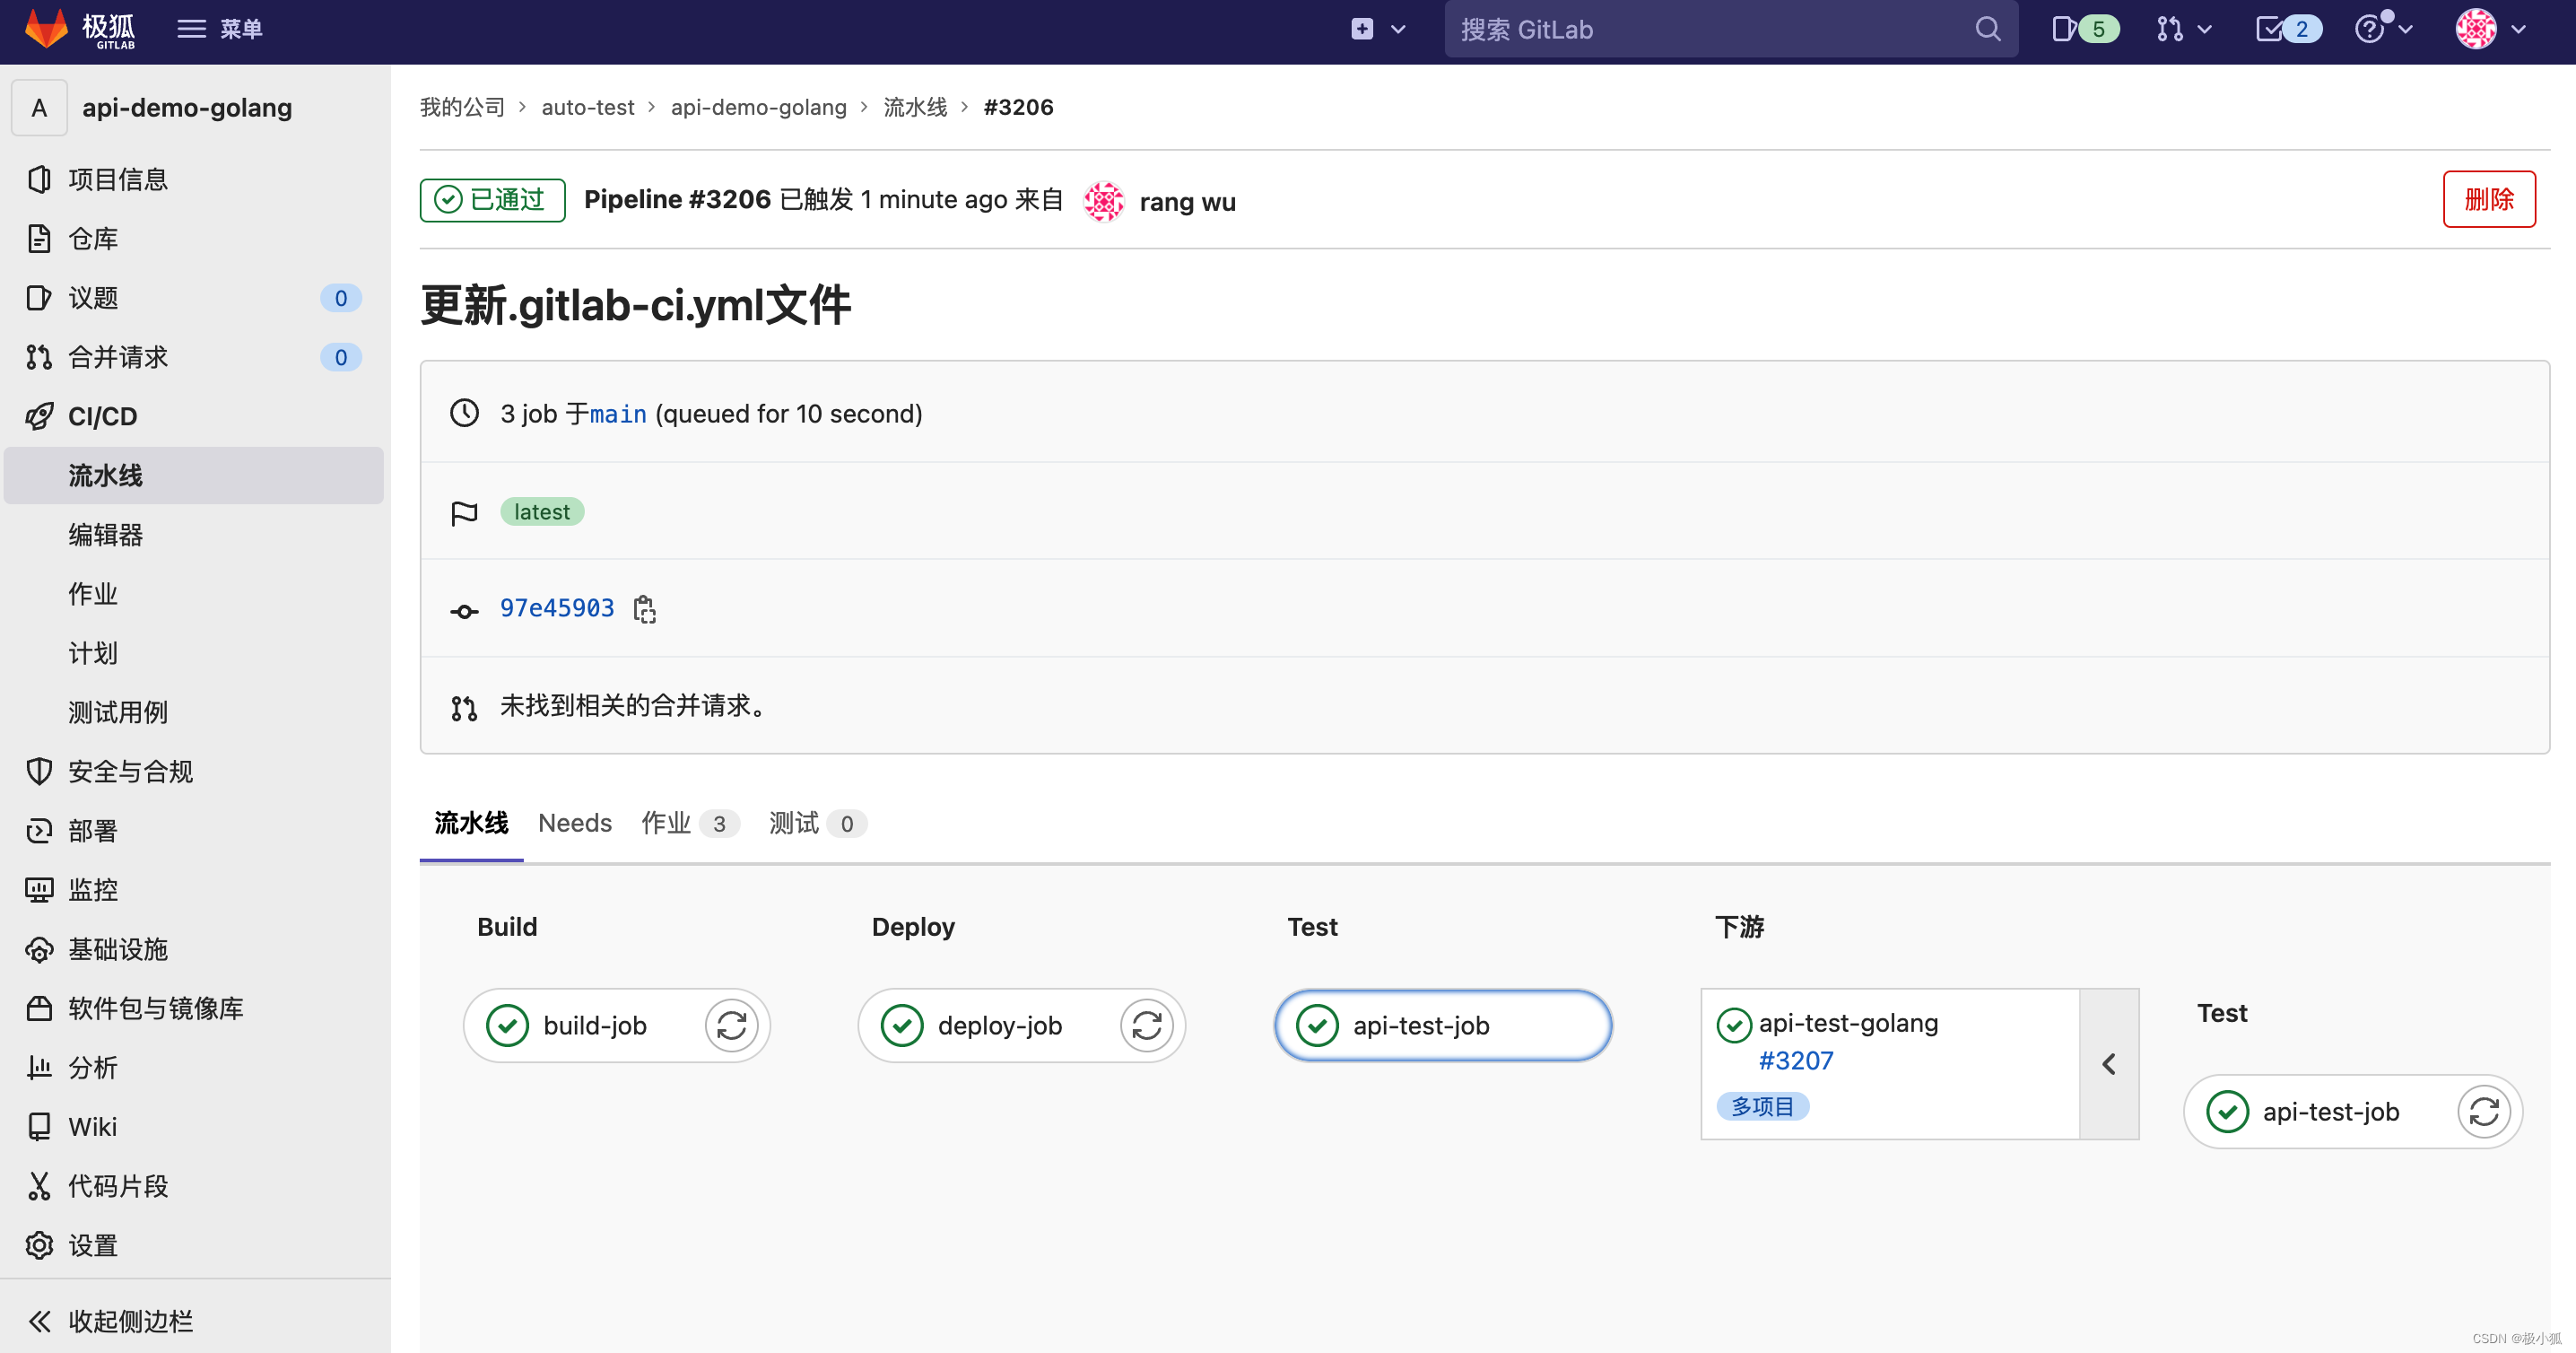
至此,就可以实现基于极狐GitLab和Apifox的自动化接口测试。持续维护api-test-golang项目,每次服务端程序发布后,就可以自动的进行接口全量回归测试。
2.2 极狐GitLab集成Postman
网络上有关Postman做接口测试的教程实在太多了,作为老牌工具功能也很强大,也支持团队协作、文档管理。但在实际工作中很多企业的测试人员只是拿Postman来做接口测试,不做接口文档的管理和协作。所以这里也仅介绍如何将Postman集成到极狐GitLab CI/CD做自动化接口测试,整体的工作流程可以参考上文。
-
在极狐GitLab中创建一个项目,用来管理Postman的接口自动化测试用例。
-
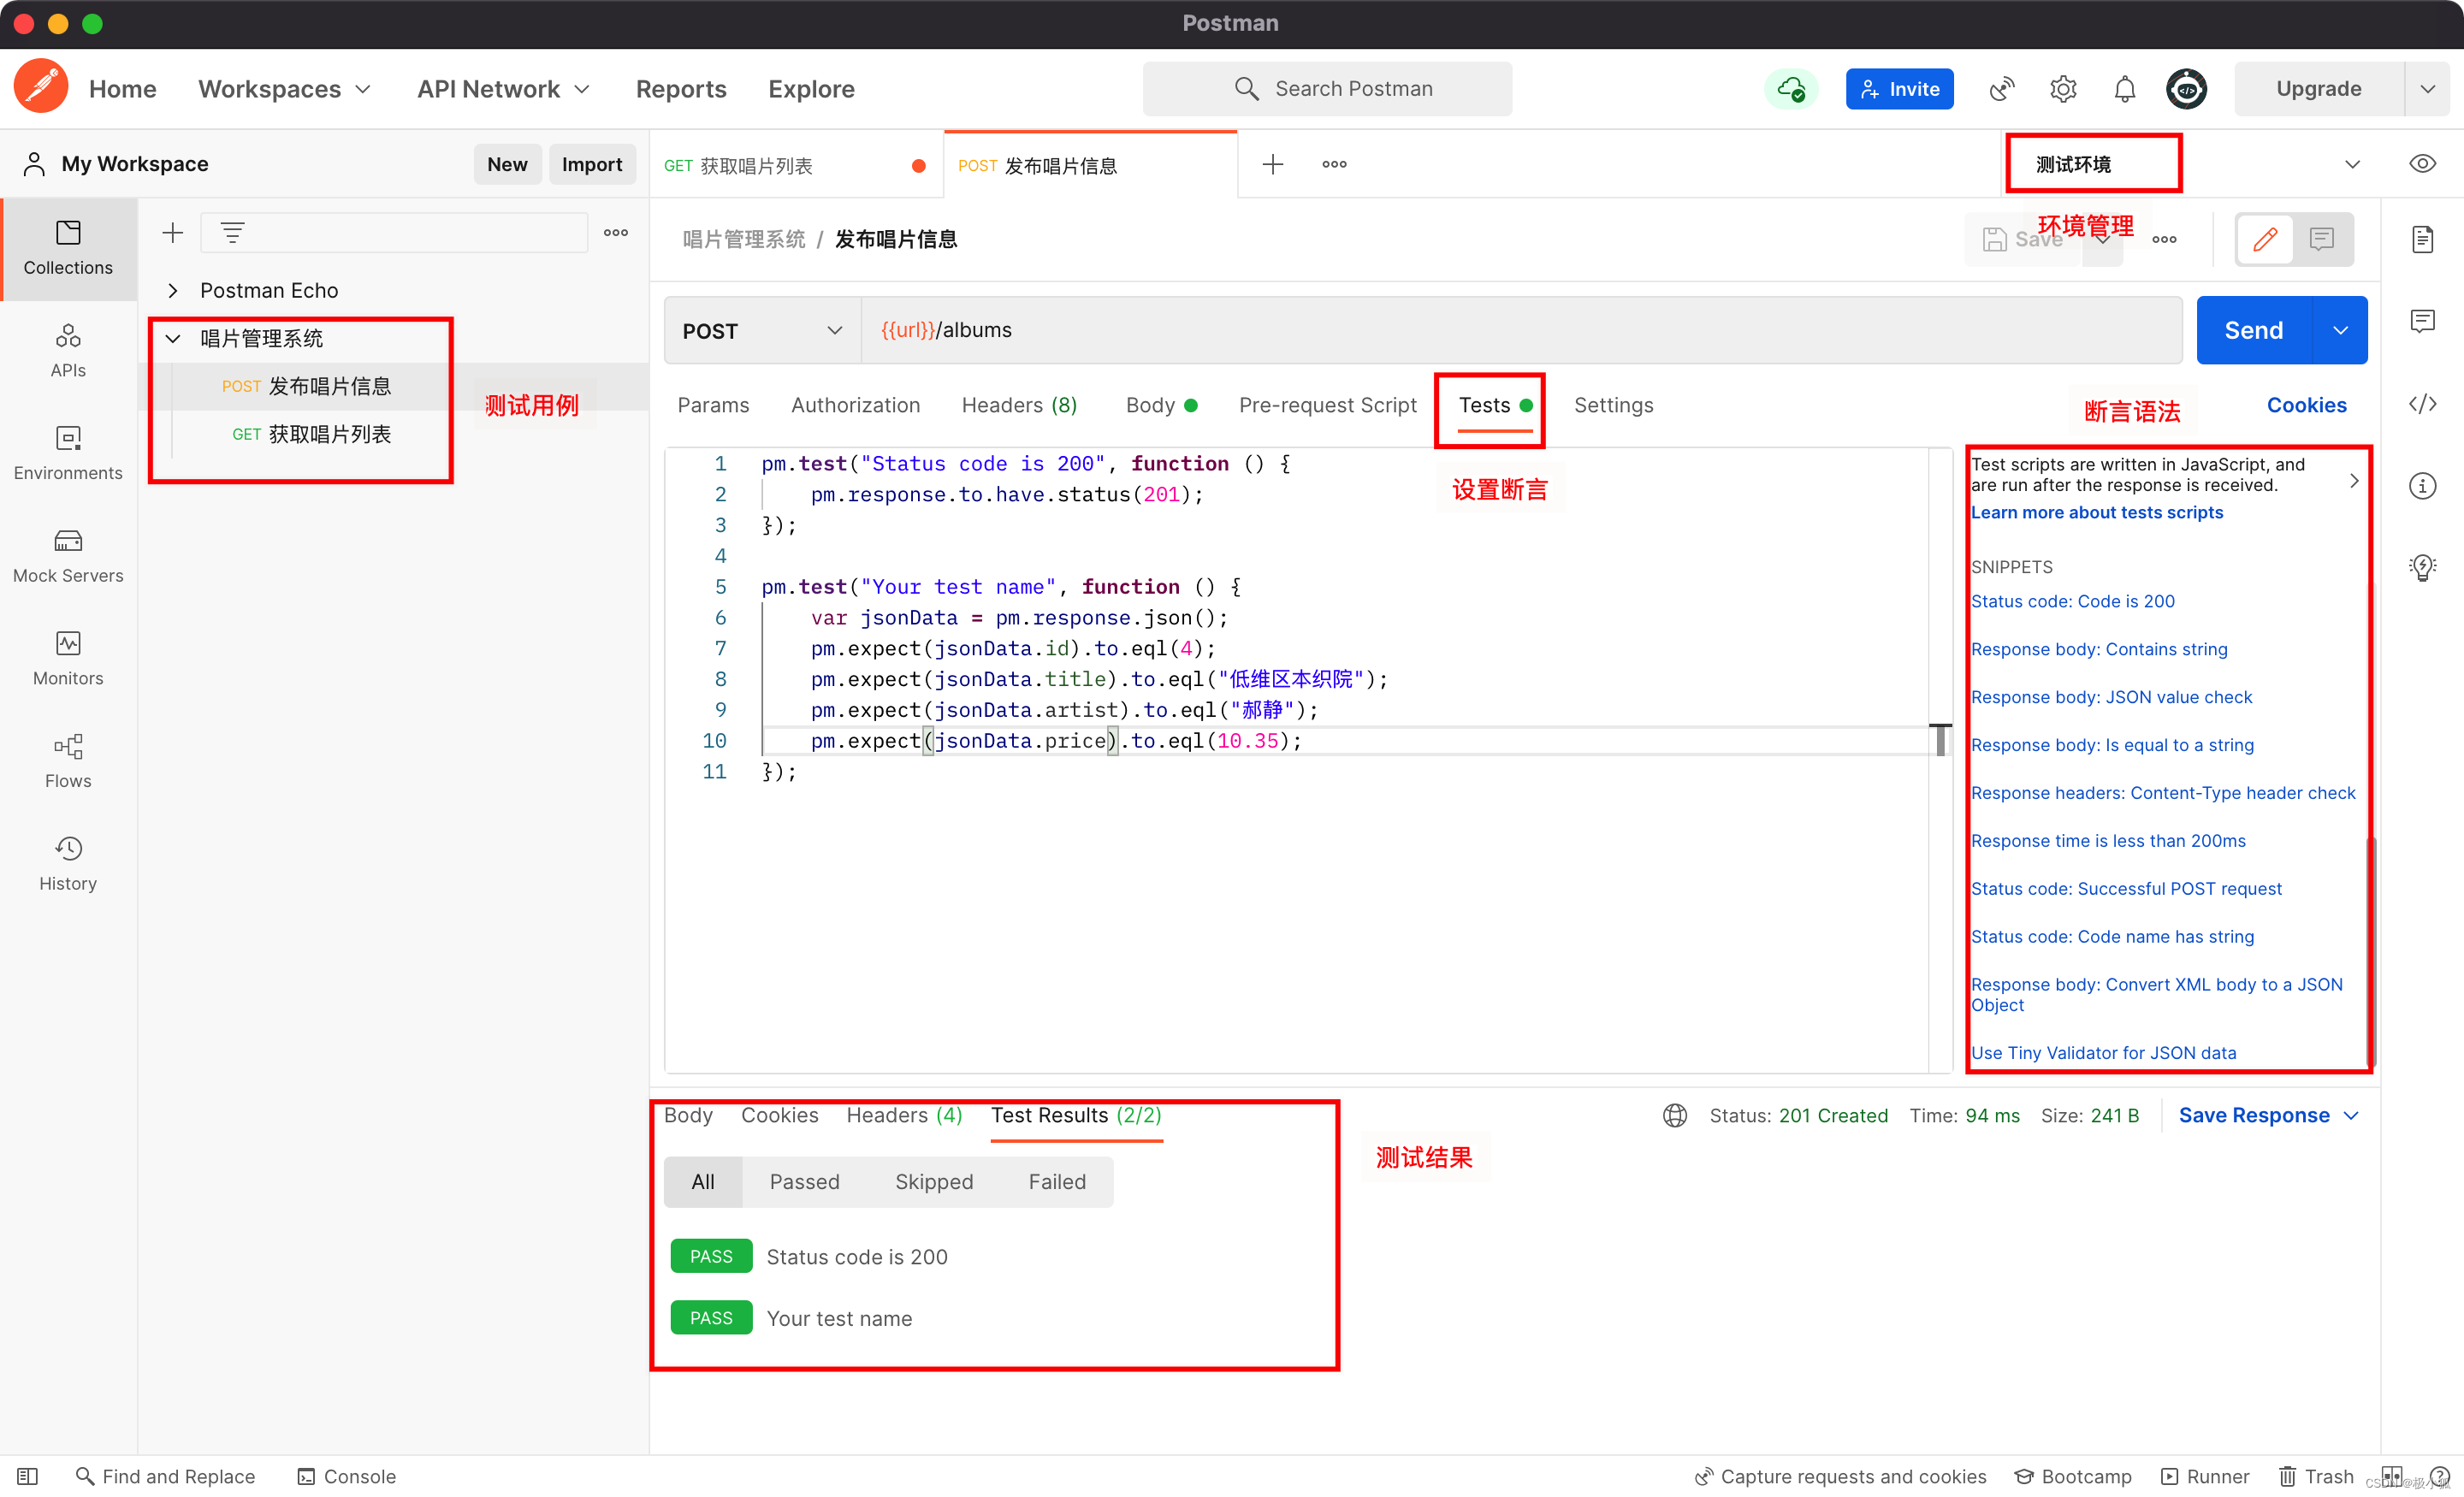
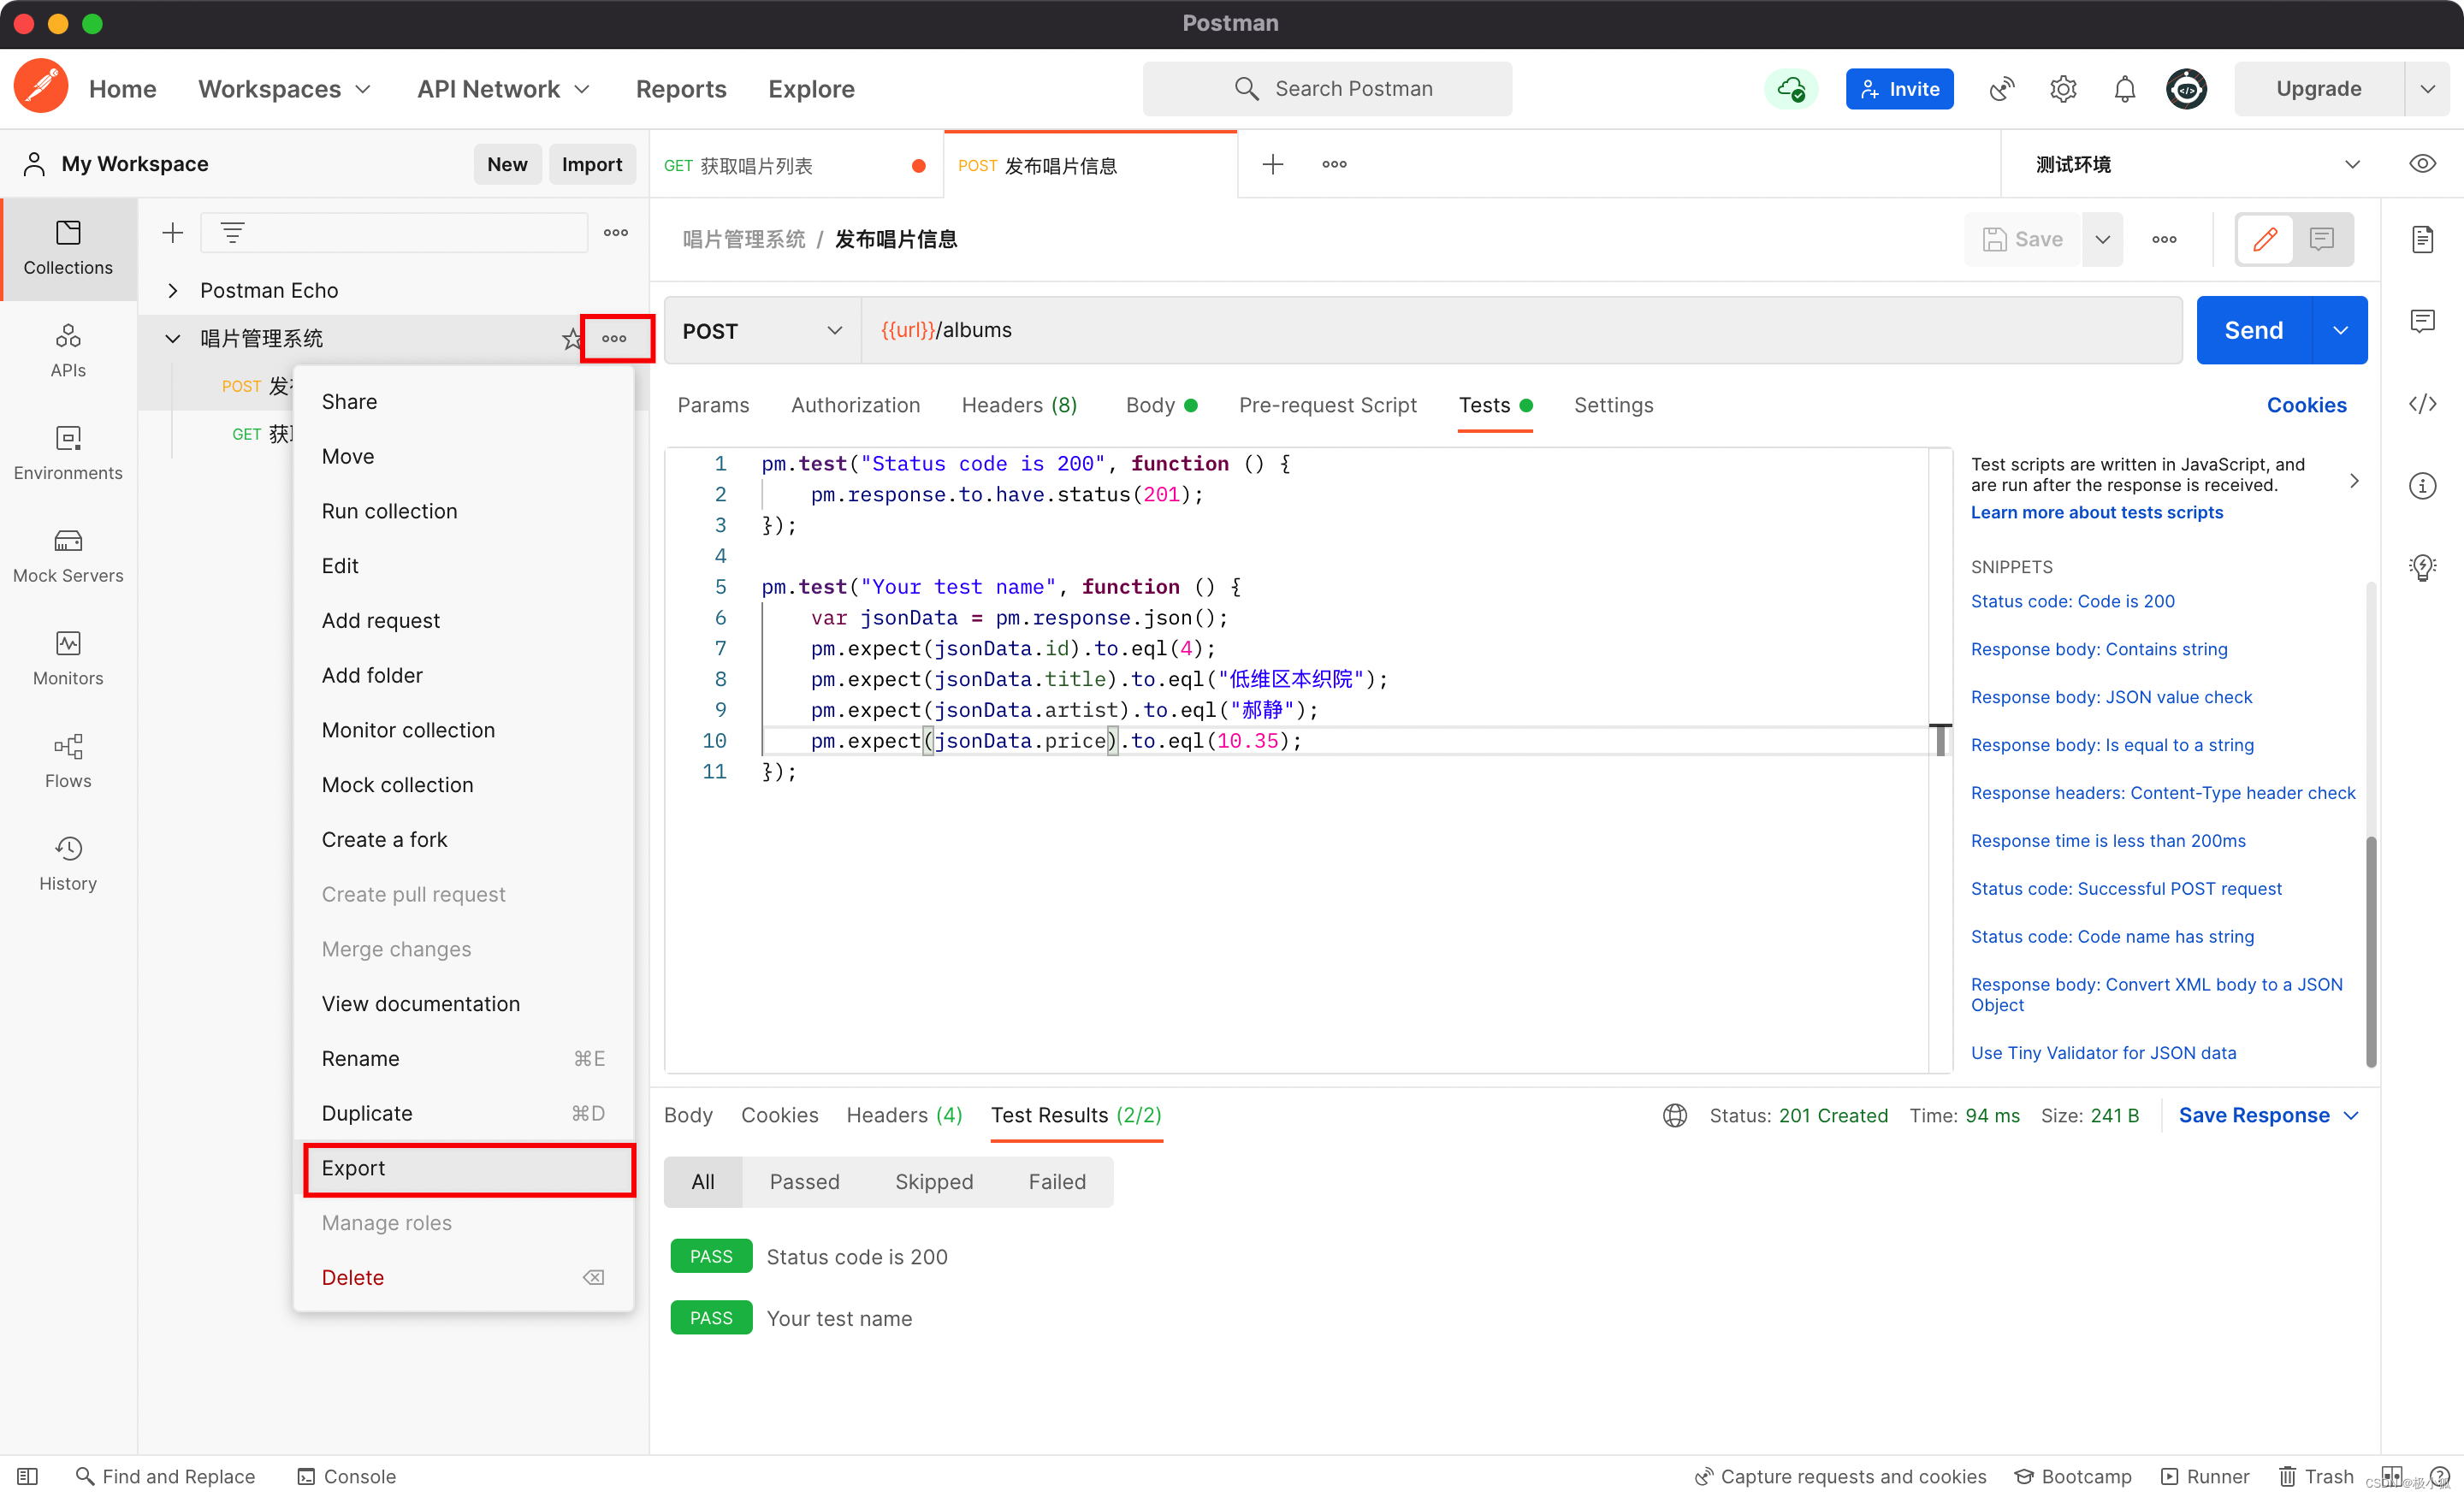
将Postman的测试用例导出为json格式文件,并上传到上一步创建的极狐GitLab项目中,如果有多个测试用例就有多个文件。
- 创建该项目的CI/CD流水线,参考示例.gitlab-ci.yaml如下:
stages:
  - test
api-test-job:
  stage: test
  # 执行postman自动化测试需newman工具
  image: postman/newman:latest
  # 安装html报告插件,执行测试用例,输出cli和html格式报告
  script:
    - npm install -g newman-reporter-html
    - newman run *.json --reporters cli,html --reporter-html-export report.html
    # 可自行实现邮件或IM工具发送通知
  # 上传报告
  artifacts:
    paths:
      - report.html
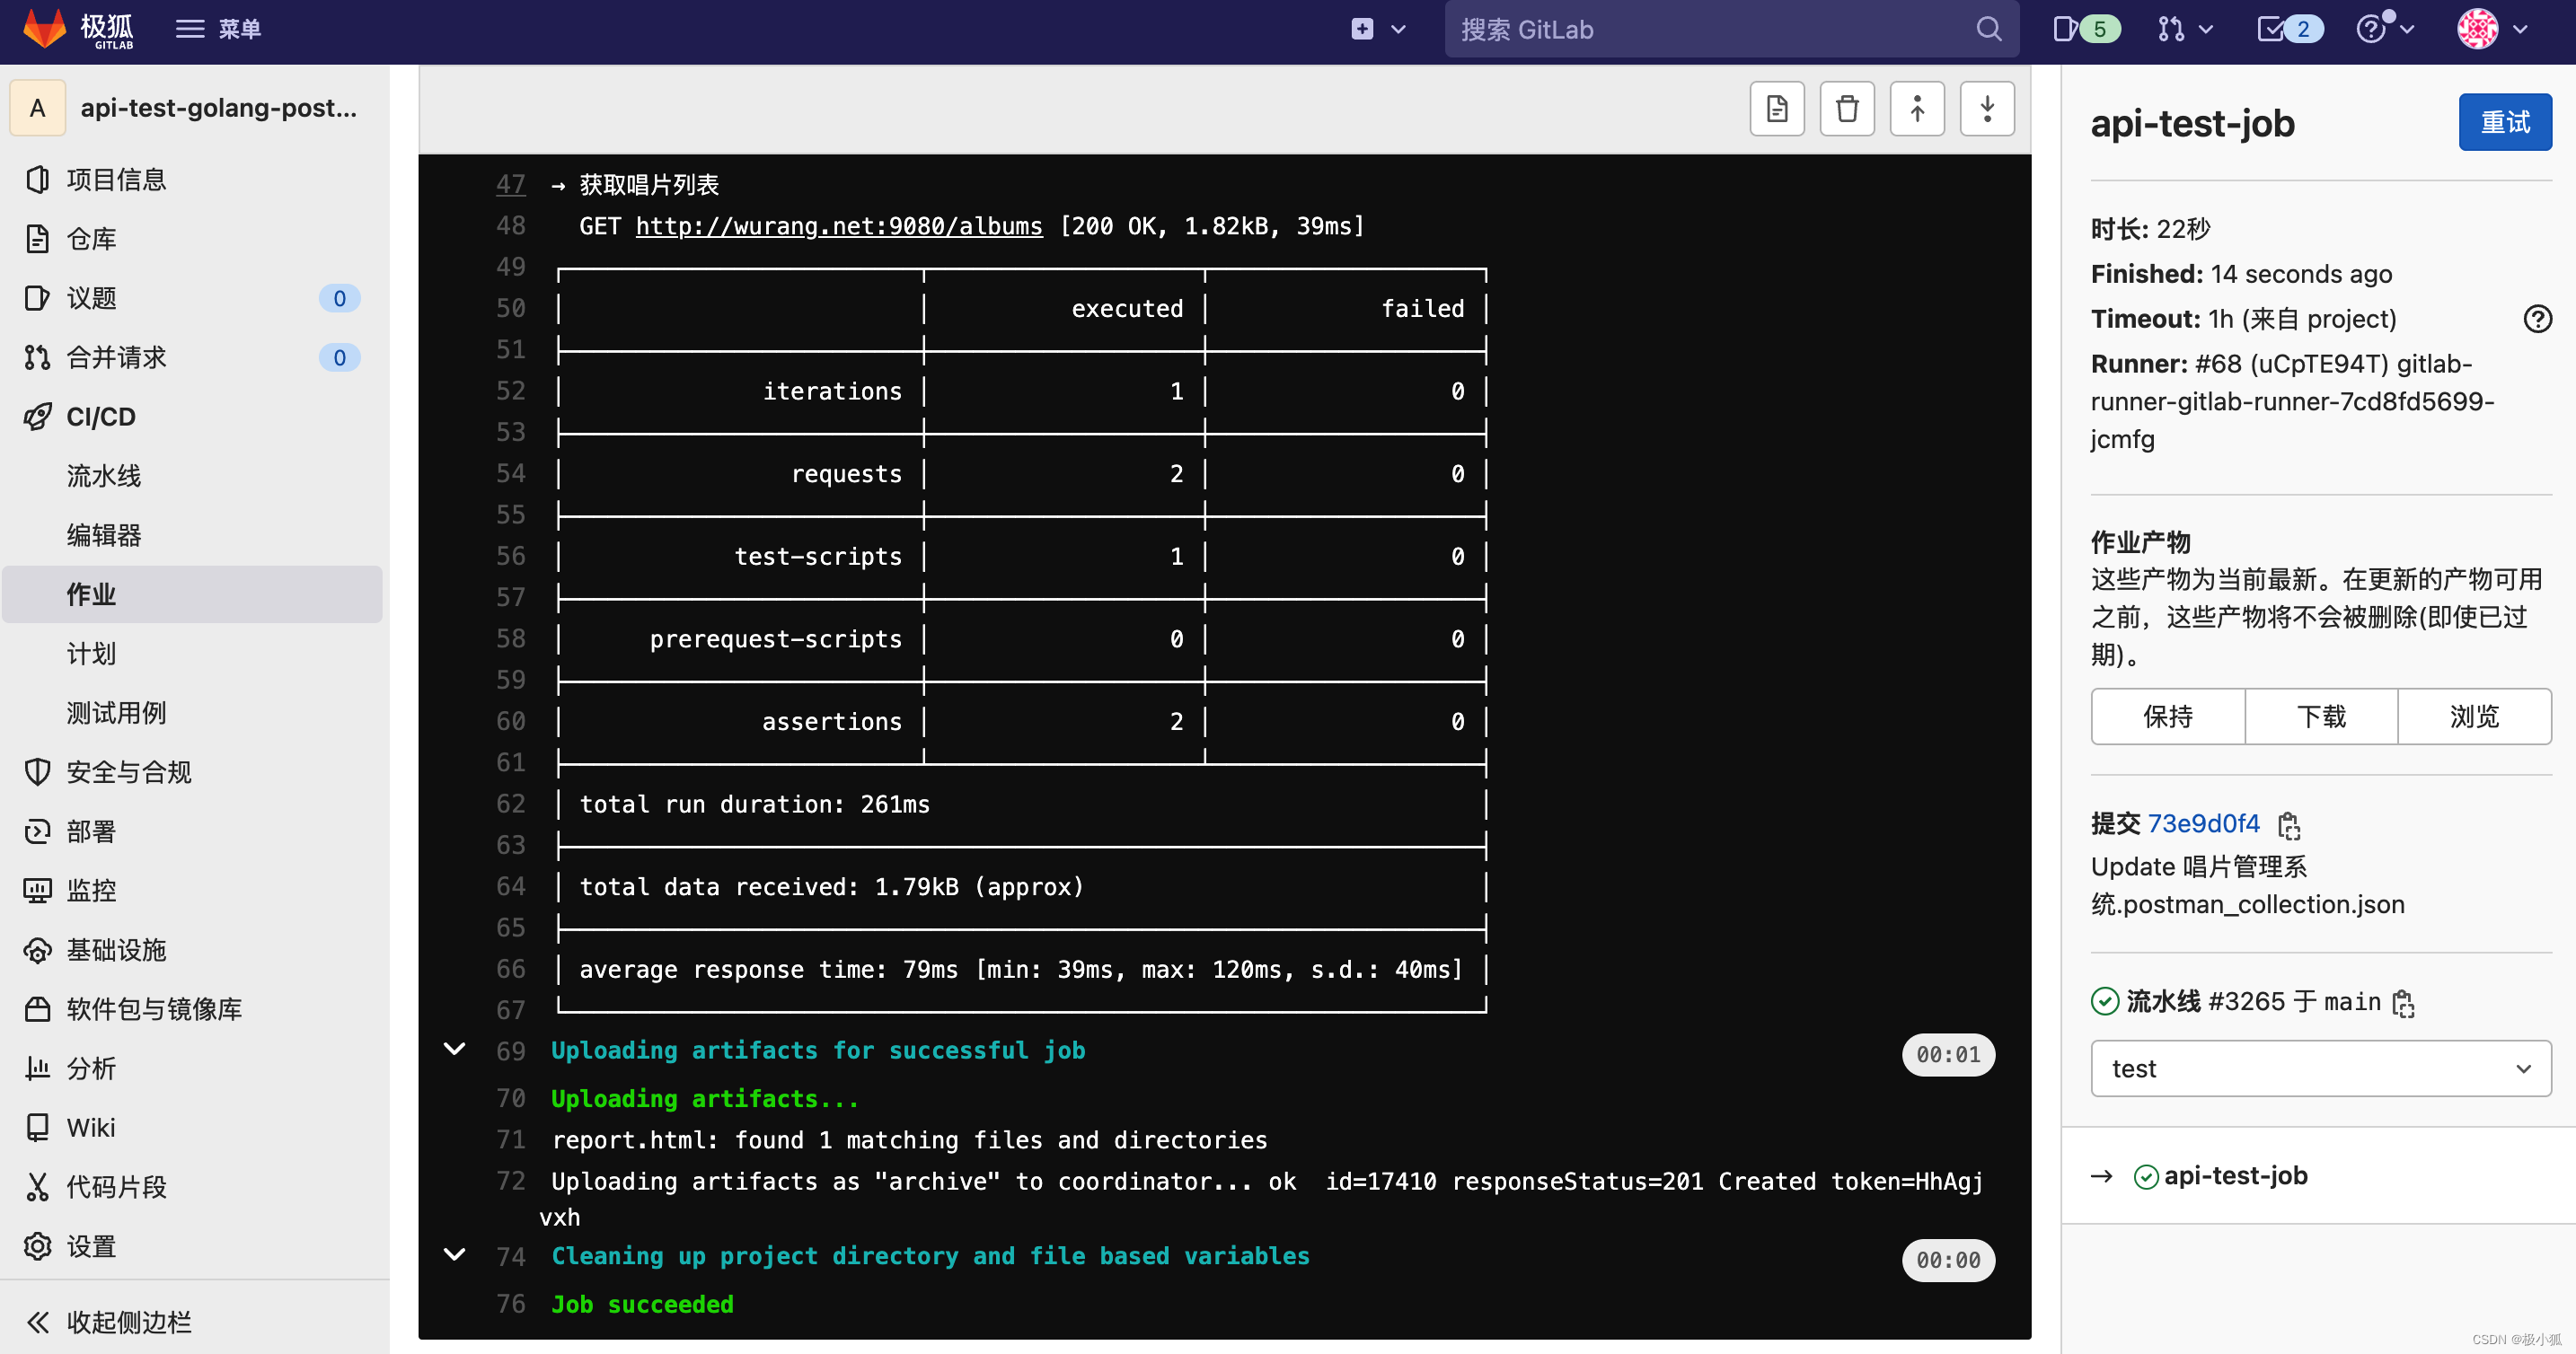
同样可以在流水线任务的日志中查看报告,也可以查看HTML格式的报告。依然可以参考前文,设置跨项目流水线,实现接口服务发布后自动进行接口测试。

北京人形旗下天工造物具身智能开源社区,聚焦具身天工与慧思开物两大平台
更多推荐
 20
20 0
0- 0


 已为社区贡献8条内容

所有评论(0)