Vue使用three.js的GLTFLoader导入外部模型绘制边界
·
一、效果展示
threeJs渲染外部模型视频
二、项目引用
将OrbitControls和GLTFLoader引入到项目中
import * as THREE from 'three' //引入three
import { OrbitControls } from 'three/examples/jsm/controls/OrbitControls' //引入鼠标控件
import { GLTFLoader } from 'three/examples/jsm/loaders/GLTFLoader' //引入渲染模型的loader
三、加载three.js的方法
这里我大概分为了三个步骤
第一步:创建场景、相机、渲染器
第二步:创建要显示的东西,设置他的材质并放到场景里
第三步:渲染场景
// 渲染外部模型并画线
loadGLTF() {
            var loader = new GLTFLoader()
            console.log(loader) //这里是为了测试是否引用成功

            loader.load(
                '/static/model.glb', //这里一定要注意引用的路径
                (gltf) => {
                    var model = gltf.scene
                    // 递归遍历设置每个模型的材质,同时设置每个模型的边线
                    gltf.scene.traverse((obj) => {
                        if (obj.isMesh) {
                            // 模型材质重新设置
                            obj.material = new THREE.MeshLambertMaterial({
                                color: 0x004444,
                                transparent: true,
                                opacity: 0.5,
                            })
                            // 模型边线设置
                            const edges = new THREE.EdgesGeometry(obj.geometry)
                            const edgesMaterial = new THREE.LineBasicMaterial({
                                color: 0x00ffff,
                            })
                            const line = new THREE.LineSegments(
                                edges,
                                edgesMaterial
                            )
                            obj.add(line)
                        }
                    })
                    this.scene.add(model)
                },
                undefined,
                function (error) {
                    console.error(error)
                }
            )
        },
四、模型出不来解决办法
自己按照three.js官网上的步骤,可能模型渲染不出来,可能会出现以下的错误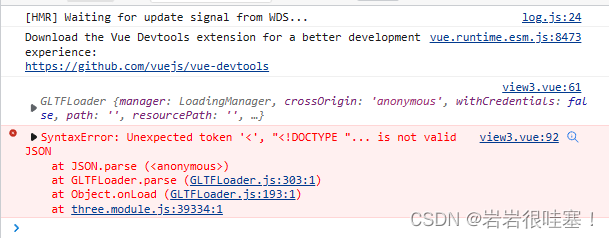
如果出现以上的错误,可能是你引用的模型路径不对
loader.load(
                '/static/model.glb', //**这里的模型路径,一定要放在public/static里面,否则下面的代码执行不了**
                (gltf) => {
                    var model = gltf.scene
                    // 递归遍历设置每个模型的材质,同时设置每个模型的边线
                    gltf.scene.traverse((obj) => {
                        if (obj.isMesh) {
                            // 模型材质重新设置
                            obj.material = new THREE.MeshLambertMaterial({
                                color: 0x004444,
                                transparent: true,
                                opacity: 0.5,
                            })
                            // 模型边线设置
                            const edges = new THREE.EdgesGeometry(obj.geometry)
                            const edgesMaterial = new THREE.LineBasicMaterial({
                                color: 0x00ffff,
                            })
                            const line = new THREE.LineSegments(
                                edges,
                                edgesMaterial
                            )
                            obj.add(line)
                        }
                    })
                    this.scene.add(model)
                },
                undefined,
                function (error) {
                    console.error(error)
                }
            )
五、整体代码
// vue文件
<template>
    <div class="three-container">
        <div id="webgl"></div>
    </div>
</template>
<script>
import * as THREE from 'three'
import { OrbitControls } from 'three/examples/jsm/controls/OrbitControls'
import { GLTFLoader } from 'three/examples/jsm/loaders/GLTFLoader'
export default {
    // 借助EdgesGeometry可以给模型设置一个模型边界线
    data() {
        return {
            scene: null,
            camera: null,
            renderer: null,
            mesh: null,
            geometry: null,
            material: null,
        }
    },
    mounted() {
        this.$nextTick(() => {
            this.init()
        })
        window.onresize = () => {
            // 重置渲染器输出画布canvas尺寸
            this.renderer.setSize(window.innerWidth, window.innerHeight)
            // 全屏情况下:设置观察范围长宽比aspect为窗口宽高比
            this.camera.aspect = window.innerWidth / window.innerHeight
            // 渲染器执行render方法的时候会读取相机对象的投影矩阵属性projectionMatrix
            // 但是不会每渲染一帧,就通过相机的属性计算投影矩阵(节约计算资源)
            // 如果相机的一些属性发生了变化,需要执行updateProjectionMatrix ()方法更新相机的投影矩阵
            this.camera.updateProjectionMatrix()
        }
    },
    methods: {
        init() {
            //第一步:创建场景、相机、渲染器
            this.scene = new THREE.Scene()
            this.loadGLTF() //渲染模型
            this.initCamera() //渲染相机
            this.initRender() //渲染器
            //第二步:创建要显示的立方体,设置它的属性材质,并把它放入场景里
            // this.initMesh()
            //创建光源
            this.initLight() //加载灯光
            //第三步:渲染场景

            this.animate() //加载渲染场景

            //鼠标操作三维场景
            var controls = new OrbitControls(
                this.camera,
                this.renderer.domElement
            ) //创建控件对象
        },
        loadGLTF() {
            var loader = new GLTFLoader()
            console.log(loader)

            loader.load(
                '/static/model.glb',
                (gltf) => {
                    var model = gltf.scene
                    // 递归遍历设置每个模型的材质,同时设置每个模型的边线
                    gltf.scene.traverse((obj) => {
                        if (obj.isMesh) {
                            // 模型材质重新设置
                            obj.material = new THREE.MeshLambertMaterial({
                                color: 0x004444,
                                transparent: true,
                                opacity: 0.5,
                            })
                            // 模型边线设置
                            const edges = new THREE.EdgesGeometry(obj.geometry)
                            const edgesMaterial = new THREE.LineBasicMaterial({
                                color: 0x00ffff,
                            })
                            const line = new THREE.LineSegments(
                                edges,
                                edgesMaterial
                            )
                            obj.add(line)
                        }
                    })
                    this.scene.add(model)
                },
                undefined,
                function (error) {
                    console.error(error)
                }
            )
        },
        animate() {
            // this.mesh.rotateY(0.01)
            // this.mesh.rotation.x += 0.005
            // this.mesh.rotation.y += 0.01
            this.renderer.render(this.scene, this.camera)
            requestAnimationFrame(this.animate)
        },
        initCamera() {
            this.camera = new THREE.PerspectiveCamera(
                75,
                window.innerWidth / window.innerHeight,
                1,
                1000
            )
            this.camera.position.set(-500, 350, 500)
            this.camera.lookAt(0, 0, 0) //指向this.mesh对应的位置
        },
        initMesh() {
            this.geometry = new THREE.BoxGeometry(150, 150, 150) //立方体

            this.material = new THREE.MeshBasicMaterial()
            this.mesh = new THREE.Mesh(this.geometry, this.material)

            //设置网格模型在三维空间中的位置坐标,默认是坐标原点
            this.mesh.position.set(100, 0, 0)

            this.scene.add(this.mesh)
        },
        initLight() {
            //点光源:两个参数分别表示光源颜色和光照强度
            // 参数1:0xffffff是纯白光,表示光源颜色
            // 参数2:1.0,表示光照强度,可以根据需要调整
            const pointLight = new THREE.DirectionalLight(0xffffff, 1.0)
            pointLight.position.set(100, 100, 100)
            this.scene.add(pointLight)
        },
        initRender() {
            this.renderer = new THREE.WebGLRenderer()

            //设置渲染器背景颜色
            //设置渲染器像素分辨值
            this.renderer.setPixelRatio(window.devicePixelRatio)
            this.renderer.setSize(window.innerWidth, window.innerHeight)
            document
                .getElementById('webgl')
                .appendChild(this.renderer.domElement)
        },
    },
}
</script>
<style scoped>
.three-container {
    position: absolute;
    top: 0;
    right: 0;
    left: 0;
    bottom: 0;
}
</style>
这里是所有的代码,其中方法都已提炼出来了,也有大量的注释

北京人形旗下天工造物具身智能开源社区,聚焦具身天工与慧思开物两大平台
更多推荐
 6
6 0
0- 0


 已为社区贡献4条内容

所有评论(0)