【数据结构】栈与队列全解析(一篇文章让你从入门到进阶)
☀️ HELLO,大家好,我是白晨❤️呀!💘今天又到了我们一起来学习的时间啦💘,苦心人、天不负,卧薪尝胆,三千越甲可吞吴,一起加油吧💪💪。
以下是成为大佬的路
前言
在顺序表和链表中我们讲述了数据结构最基本的两种结构,今天我们就要在这两种数据结构的基础上来继续认识另外两种数据结构——栈和队列。
为了内容的完整性以及可读性(主要是有进阶内容),我将前一篇文章栈结构全解析也搬到了这里。
废话不多说,正文见下
1.栈
1.1 栈的定义及结构
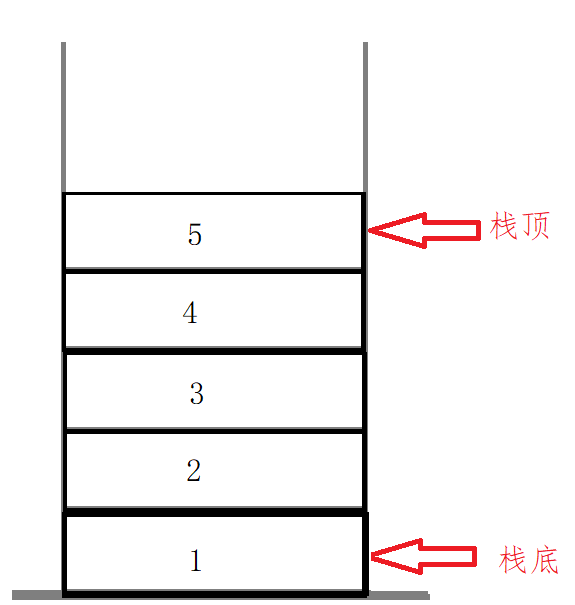
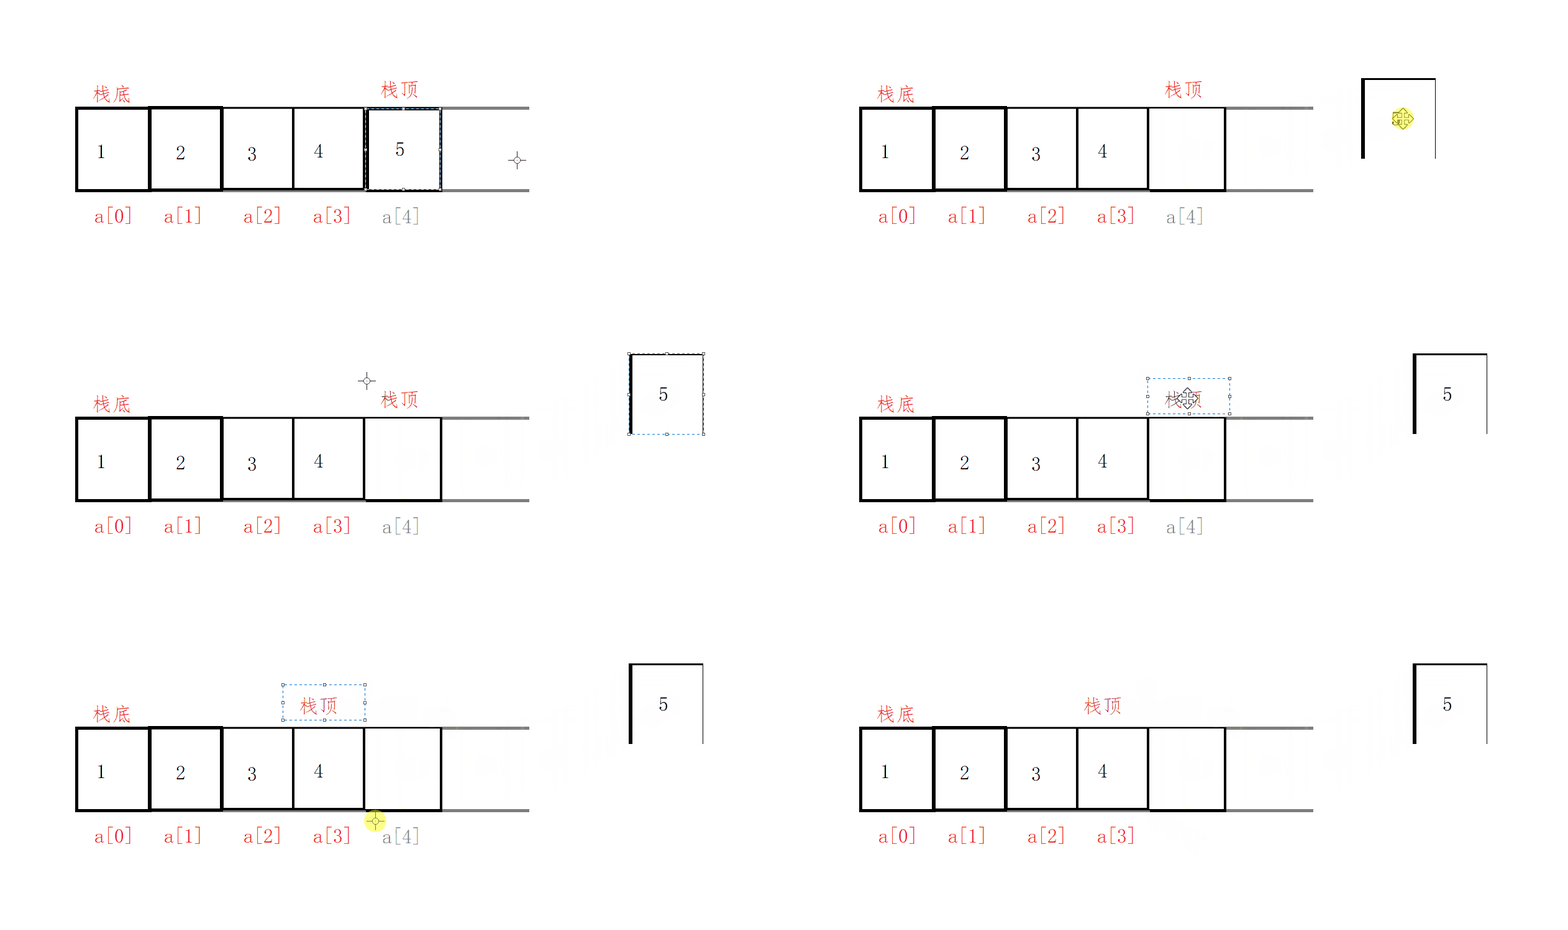
栈:一种特殊的线性表,其只允许在固定的一端进行插入和删除元素操作。进行数据插入和删除操作的一端称为栈顶,另一端称为栈底。栈中的数据元素遵守后进先出LIFO(Last In First Out)的原则。
简单来说,栈是一种只能从一端进行插入和删除的遵循后进先出的线性表。
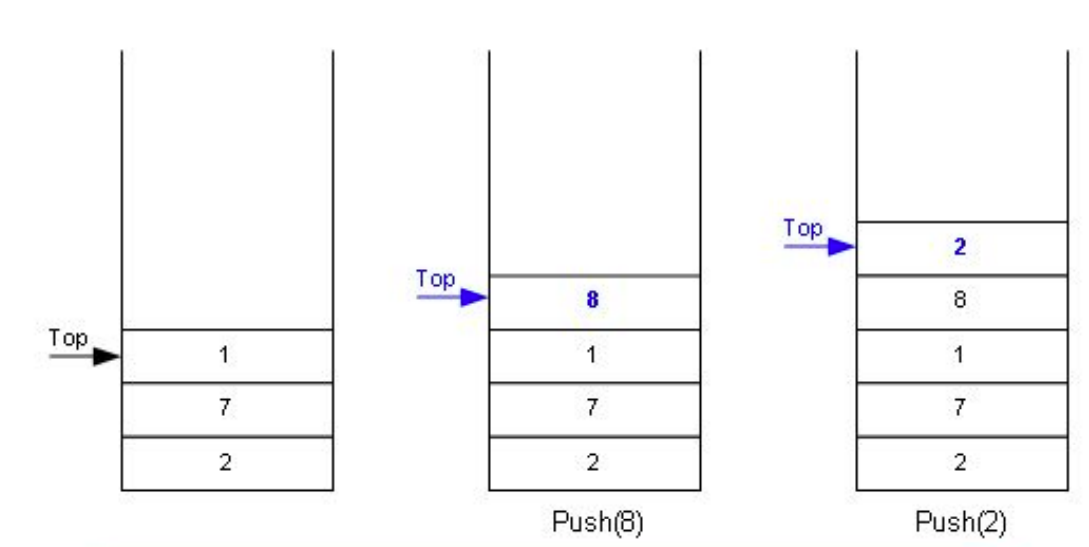
压栈:栈的插入操作叫做进栈/压栈/入栈,入数据在栈顶。
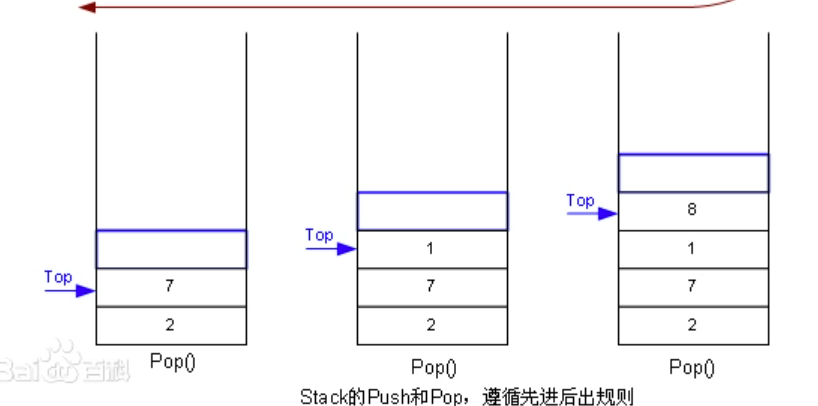
出栈:栈的删除操作叫做出栈。出数据也在栈顶。
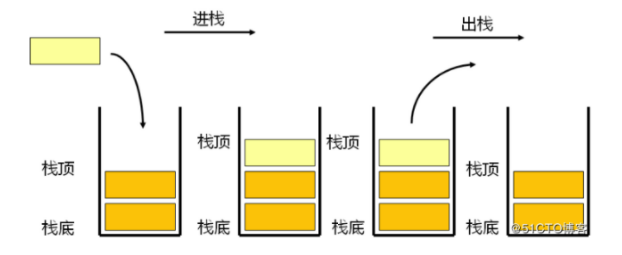
如果你曾经了解过函数栈帧,那么你应该对这种结构不陌生。但是还是要提醒一下,函数栈帧中的栈是一种存储空间,而本篇文章中的栈是一种数据结构,两者在结构上有相似之处。
我们现在已经了解了栈的结构了,那么栈到底怎么实现呢?
前文说到,栈是一种线性表,所以我们可以在顺序表和链表的基础上实现链表。
我们来对比一下,顺序表和链表实现栈的优劣情况
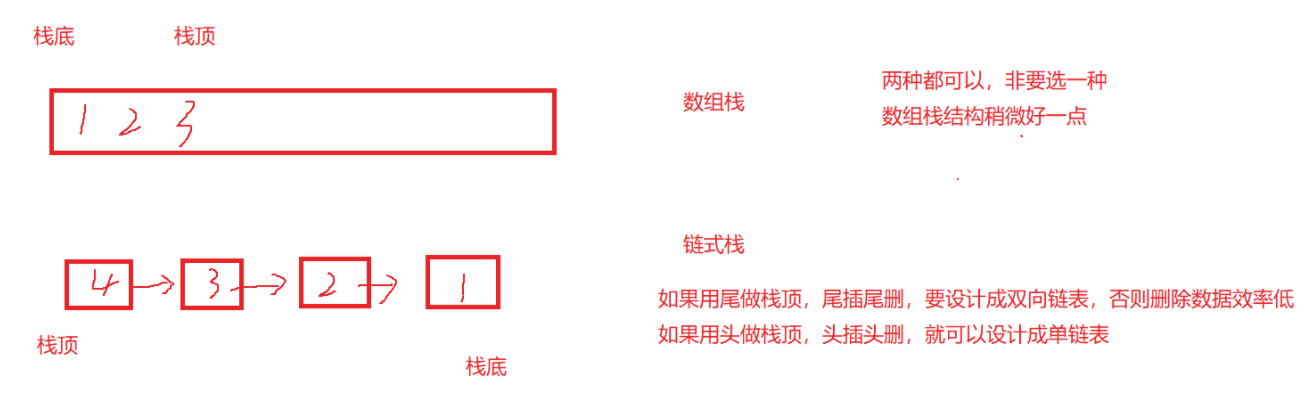
我们先来实现顺序栈
1.2 顺序栈
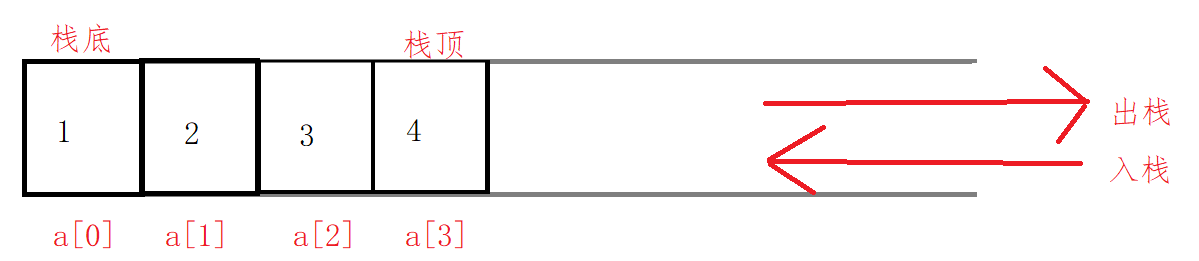
顺序栈结构
首先,我们先来写出顺序栈的结构
typedef int STDataType; typedef struct Stack { STDataType* a; int top;//栈中数据个数 int capacity;//栈总容量 }ST;首先,我们为了方便储存各种不同类型的数据,我们定义一个SLDataType,如果以后想改变储存数据的类型,直接修改 SLDataType 的定义即可。
接着,我们发现 Stack 中有一个指针,这个指针是用来指向动态内存开辟的空间的,也就是指向数据的。
最后,top 指的是顺序表中元素的个数,capacity 是指顺序表中最多能容纳元素的个数。
接下来,我们完成栈中非常重要的一步——实现接口函数
所有接口函数如下:
// 栈初始化
void StackInit(ST* ps);
// 栈销毁
void StackDestroy(ST* ps);
// 插入数据(入栈)
void StackPush(ST* ps, STDataType x);
// 删除数据 (出栈)
void StackPop(ST* ps);
// 取栈顶数据
STDataType StackTop(ST* ps);
// 栈中数据个数
int StackSize(ST* ps);
// 判断栈是否为空
bool StackEmpty(ST* ps);
初始化和销毁
-
初始化其实非常好理解,就传一个顺序表的指针,我们将其中的数据先置空。
-
销毁就是,先将size和capacity置为0,再释放掉储存数据的空间。
void StackInit(ST* ps)
{
	  assert(ps);
	  ps->a = NULL;
	  ps->capacity = 0;
	  ps->top = 0;
}
void StackDestroy(ST* ps)
{
	  assert(ps);
	  free(ps->a);
	  ps->a = NULL;
	  ps->capacity = 0;
	  ps->top = 0;
}
入栈、出栈
由于栈只能从尾部(栈顶)插入/删除元素,所以只用实现尾插/尾删功能(尾插与尾删详细见顺序表)。
入栈:
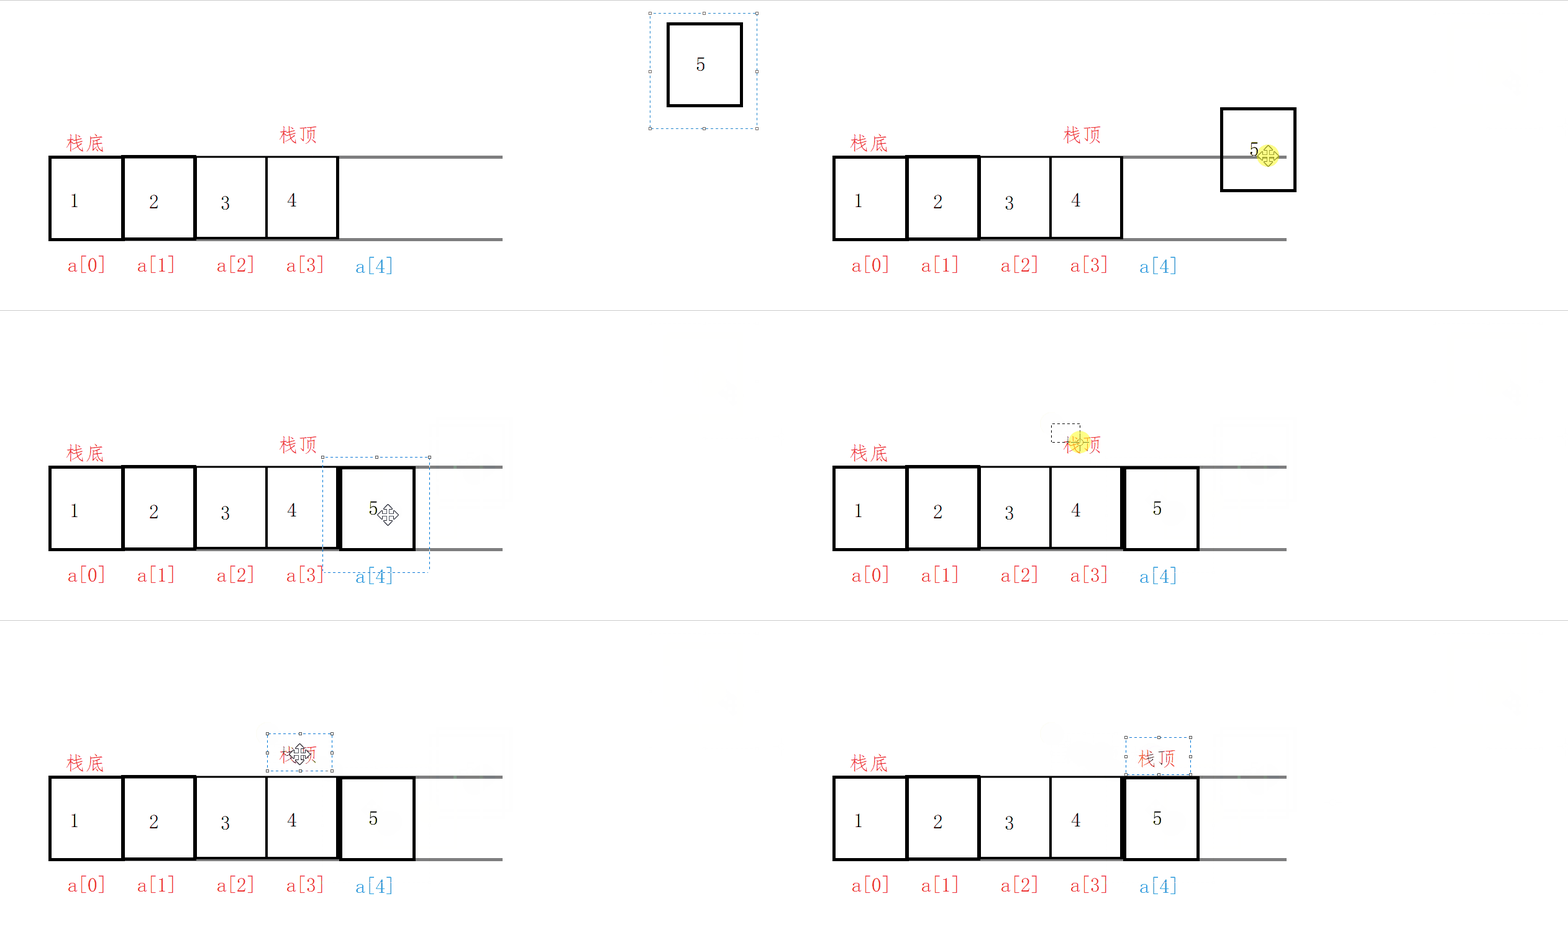
出栈:
void StackPush(ST* ps, STDataType x)
{
	assert(ps);

	if (ps->top == ps->capacity)
	{
		int newCapacity = ps->capacity == 0 ? 4 : 2 * ps->capacity;
		STDataType* tmp = (STDataType*)realloc(ps->a, newCapacity * sizeof(STDataType));
		if (tmp == NULL)
		{
			printf("realloc fail");
			exit(-1);
		}
		ps->a = tmp;
		ps->capacity = newCapacity;
	}

	ps->a[ps->top] = x;
	ps->top++;
}
void StackPop(ST* ps)
{
	assert(ps);
	assert(!StackEmpty(ps));

	ps->top--;
}
判断栈是否为空、获取栈中数据个数 及 获取栈顶元素
- 由于经常需要判断栈中是否为空以及获取栈的大小,所以我们单独将其功能封装成一个函数
- 实现相对简单,判断为空只需要判断top是否为0,如果为0,返回真,非0,返回假
- 获取栈的大小只需要将top值传出
- 要获取栈顶元素就先得判断栈是否为空,然后将栈顶元素传出
bool StackEmpty(ST* ps)
{
assert(ps);
return ps->top == 0;
}
int StackSize(ST* ps)
{
 assert(ps);
 return ps->top;
}
STDataType StackTop(ST* ps)
{
 assert(ps);
 assert(!StackEmpty(ps));
	return ps->a[ps->top - 1];
}
顺序栈全局代码
typedef int STDataType;
typedef struct Stack
{
	STDataType* a;
	int top;
	int capacity;
}ST;

void StackInit(ST* ps)
{
	assert(ps);
	ps->a = NULL;
	ps->capacity = 0;
	ps->top = 0;
}

void StackDestroy(ST* ps)
{
	assert(ps);
	free(ps->a);
	ps->a = NULL;
	ps->capacity = 0;
	ps->top = 0;
}

void StackPush(ST* ps, STDataType x)
{
	assert(ps);

	if (ps->top == ps->capacity)
	{
		int newCapacity = ps->capacity == 0 ? 4 : 2 * ps->capacity;
		STDataType* tmp = (STDataType*)realloc(ps->a, newCapacity * sizeof(STDataType));
		if (tmp == NULL)
		{
			printf("realloc fail");
			exit(-1);
		}
		ps->a = tmp;
		ps->capacity = newCapacity;
	}

	ps->a[ps->top] = x;
	ps->top++;
}

void StackPop(ST* ps)
{
	assert(ps);
	assert(!StackEmpty(ps));

	ps->top--;
}

STDataType StackTop(ST* ps)
{
	assert(ps);
	assert(!StackEmpty(ps));

	return ps->a[ps->top - 1];
}

int StackSize(ST* ps)
{
	assert(ps);

	return ps->top;
}

bool StackEmpty(ST* ps)
{
	assert(ps);
	return ps->top == 0;
}
1.3 链栈
上文提到,链栈结构选择头作为栈顶实现入栈(头插)、出栈(头删)比较简单,所以这个结构大家可以动手写一写,与链表实现极为相似,这里不过多赘述。

这次,我们要实现用链尾当栈顶的非双向链表写法。由于这种写法实际用途不大,所以我们只讲解基本实现思路。
链栈结构
- 创建栈结构
typedef int STDataType;

typedef struct StackNode
{
   struct StackNode* next;
   STDataType data;
}STNode;

typedef struct Stack
{
   STNode* top;
   STNode* bottom;
}Stack;
这里由于单向链表的节点只能指向下一个节点,所以我们只能在栈结构中记录一下栈顶和栈底的位置。

链栈入栈
- 再来说下一个难题——如何入栈?
- 先创建一个新节点,将所给数据存入
- 判断bottom是否为NULL
- 如果是,说明栈中没有数据,则让top与bottom都指向新节点
- 如果不是,则实施尾插,尾插结束后,使top指向尾节点
void StackPush(Stack* ps, STDataType data)
{
	assert(ps);

	STNode* newnode = (STNode*)malloc(sizeof(STNode));
	if (newnode == NULL)
	{
		printf("malloc fail\n");
		exit(-1);
	}
	newnode->data = data;
	newnode->next = NULL;

	if (ps->bottom == NULL)
	{
		ps->bottom = ps->top = newnode;
	}
	else
	{
		ps->top->next = newnode;
		ps->top = newnode;
	}

}
链栈出栈
- 如何出栈?
- 首先,判断是否栈中为空
- 其次,遍历找到尾节点的前一个节点,删除数据,top指向原尾节点前一个元素
- 这里有个特殊情况,如果栈中只有一个元素,那么删除完后,还得把bottom还原为NULL
void StackPop(Stack* ps)
{
	assert(ps);
	assert(!StackEmpty(ps));

	STNode* Del = ps->bottom;

	if (ps->bottom == ps->top)
	{
		free(ps->bottom);
		ps->bottom = ps->top = NULL;
		return;
	}

	while (Del->next != ps->top)
	{
		Del = Del->next;
	}

	free(ps->top);
	Del->next = NULL;
	ps->top = Del;
}
剩下的函数都不难实现,大家可以参考下文代码实现。
链栈全局代码
typedef int STDataType;

typedef struct StackNode
{
	struct StackNode* next;
	STDataType data;
}STNode;

typedef struct Stack
{
	STNode* top;
	STNode* bottom;
}Stack;

// 初始化栈
void StackInit(Stack* ps);
// 入栈
void StackPush(Stack* ps, STDataType data);
// 出栈
void StackPop(Stack* ps);
// 获取栈顶元素
STDataType StackTop(Stack* ps);
// 获取栈底元素
STDataType StackBottom(Stack* ps);
// 获取栈中有效元素个数
int StackSize(Stack* ps);
// 检测栈是否为空,如果为空返回非零结果,如果不为空返回0
bool StackEmpty(Stack* ps);
// 销毁栈
void StackDestroy(Stack* ps);

void StackInit(Stack* ps)
{
	assert(ps);
	ps->top = NULL;
	ps->bottom = NULL;
}

void StackDestroy(Stack* ps)
{
	assert(ps);

	STNode* cur = ps->bottom;

	while (cur)
	{
		STNode* next = cur->next;
		free(cur);
		cur = next;
	}

	ps->bottom = ps->top = NULL;
}

bool StackEmpty(Stack* ps)
{
	assert(ps);

	return ps->bottom == NULL;
}

void StackPush(Stack* ps, STDataType data)
{
	assert(ps);

	STNode* newnode = (STNode*)malloc(sizeof(STNode));
	if (newnode == NULL)
	{
		printf("malloc fail\n");
		exit(-1);
	}
	newnode->data = data;
	newnode->next = NULL;

	if (ps->bottom == NULL)
	{
		ps->bottom = ps->top = newnode;
	}
	else
	{
		ps->top->next = newnode;
		ps->top = newnode;
	}

}

void StackPop(Stack* ps)
{
	assert(ps);
	assert(!StackEmpty(ps));

	STNode* Del = ps->bottom;

	if (ps->bottom == ps->top)
	{
		free(ps->bottom);
		ps->bottom = ps->top = NULL;
		return;
	}

	while (Del->next != ps->top)
	{
		Del = Del->next;
	}

	free(ps->top);
	Del->next = NULL;
	ps->top = Del;
}

STDataType StackTop(Stack* ps)
{
	assert(ps);
	assert(!StackEmpty(ps));

	return ps->top->data;
}

STDataType StackBottom(Stack* ps)
{
	assert(ps);
	assert(!StackEmpty(ps));

	return ps->bottom->data;
}

int StackSize(Stack* ps)
{
	assert(ps);

	int sz = 0;
	STNode* cur = ps->bottom;

	while (cur)
	{
		sz++;
		cur = cur->next;
	}

	return sz;
}
2.队列
2.1 队列的定义和结构
队列:只允许在一端进行插入数据操作,在另一端进行删除数据操作的特殊线性表,队列具有先进先出 FIFO(First In First Out) 的性质。
入队列:进行插入操作的一端称为队尾
出队列:进行删除操作的一端称为队头

这个结构,我们可以想到什么呢?
没错,就像是一列火车。我们可以做个假设,把每个节点视为一个火车车厢,那么一个队列结构就好像是一列直行的火车。那么入队就可以视为火车进站时,车厢依次入站,前面的车厢先进,后面的车厢后进;出队就可以理解为,火车出站时,前面的车厢先离开,后面的车厢后离开。
我们以上面的队列为例,先来感受一下先进先出的特点:
入队(进站):
从数据在队列中的存储状态可以分析出,元素 1 最先进队,其次是元素 2,以此类推,最后是元素 5。
出队 (出队):
根据队列 “先进先出” 的特点,元素 1 要先出队列,元素 2 再出队列,以此类推,最后才轮到元素 5 出队列。


现在我们来对比一下栈和队列:
栈是先进后出 ,为一端封闭,另一端完成插入和删除;而队列是先进先出,一段插入,另一端删除。 这个不同一定要记住,不要混淆了。(入栈与出栈的演示)
在了解了队列的基本结构以后,我们现在就可以尝试实现队列结构了。
1️⃣那么,第一个问题是,选择顺序表还是链表来实现队列呢?
要完成一个结构,很关键的步骤就是,插入和删除数据。
假设我们选择顺序表:
- 当我们选择顺序表头为队头时:
入队过程:

入队过程可以看到过程十分的繁琐,时间复杂度为O(n),出队也相同,这样的代价我们是不能接受的。
- 当我们选择顺序表尾为队头时:
入队操作就基本无法实现,因为我们不知道要存多少个数据,所以队头的下标就不能确定。但是这也给我们提了一个醒,队列的元素个数确定,我们就可以使用顺序表来实现队列(此处是一个伏笔)。
所以,我们要选择在物理结构上不联系,并且方便插入和删除的链表来实现。
具体结构如下图:

2.2 链队列
链队列结构
链队列节点的结构与链表节点相同,这里我们不再赘述。 (链表全解析)
但是考虑到队列有队头和队尾,我们要在队列的结构中存储队头和队尾的指针(这一点与链栈很相似)。
- 具体代码实现如下:
typedef int QDataType;

// 链式结构:表示队列
typedef struct QListNode
{
	struct QListNode* next;
	QDataType data;
}QNode;

// 队列的结构
typedef struct Queue
{
	QNode* front;//队头
	QNode* rear;//队尾
}Queue;
实现完结构后,我们现在就要来实现接口函数。
// 初始化队列
void QueueInit(Queue* q);
// 队尾入队列
void QueuePush(Queue* q, QDataType data);
// 队头出队列
void QueuePop(Queue* q);
// 获取队列头部元素
QDataType QueueFront(Queue* q);
// 获取队列队尾元素
QDataType QueueBack(Queue* q);
// 获取队列中有效元素个数
int QueueSize(Queue* q);
// 检测队列是否为空,如果为空返回非零结果,如果非空返回0
bool QueueEmpty(Queue* q);
// 销毁队列
void QueueDestroy(Queue* q);
初始化和销毁
- 初始化是老规矩了,将头和尾指针置为空;
- 销毁时,从队头开始,逐个遍历释放,最后将头尾指针置零。
void QueueInit(Queue* q)
{
	assert(q);

	q->front = NULL;
	q->rear = NULL;
}

void QueueDestroy(Queue* q)
{
	assert(q);
	QNode* cur = q->front;

	while (cur)
	{
		QNode* next = cur->next;
		free(cur);
		cur = next;
	}

	q->front = NULL;
	q->rear = NULL;
}
入队
- 由于队列先入先出的性质,所以第一个元素始终占据队头,如果要插入其他数据,就得用尾插,以保证先来的占据头,后来的在尾;
- 这里我们要分类讨论一下,如果队列为空,这时头尾指针都指向NULL,插入第一个元素时,头和尾都是这个元素;

- 如果队列不为空,此时头指针不需要移动,只需要在将原最后一个元素的next指向新节点,尾指针也指向新节点即可。
我们以入队元素 1,元素 2,元素 3,元素 4为例:


入队完成

我们再以入队元素 1,元素 2为例
可以再动态感受一下:

- 代码实现:
void QueuePush(Queue* q, QDataType data)
{
	assert(q);

	QNode* newnode = (QNode*)malloc(sizeof(QNode));
	if (newnode == NULL)
	{
		printf("malloc fail\n");
		exit(-1);
	}

	newnode->next = NULL;
	newnode->data = data;

	if (q->front == NULL)
	{
		q->front = q->rear = newnode;
	}
	else
	{
		q->rear->next = newnode;
		q->rear = newnode;
	}
}
判断队列是否为空 及 获取队列中元素个数
- 判断是否为空,其实就是判断头指针或尾指针是否指向NULL(只要队列中有元素,头尾指针都不可能为空)。如果是,则为空;如不是,则不为空。
- 获取队列中个数,说白了就是从队头开始遍历,直到队尾,统计出数据个数。
bool QueueEmpty(Queue* q)
{
	assert(q);

	return q->front == NULL;
}

int QueueSize(Queue* q)
{
	assert(q);

	int sz = 0;
	QNode* cur = q->front;

	while (cur)
	{
		sz++;
		cur = cur->next;
	}

	return sz++;
}
出队
- 出队,就是要删除队头的元素,对于结构操作来说,就是头删,注意事项也和头删相同
- 首先,要保证队里不为空,用上面判断是否为空的函数就可以实现
- 其次,当删最后一个节点时,不仅头指针要置为空,尾指针也要置空


- 代码实现:
void QueuePop(Queue* q)
{
	assert(q);
	assert(!QueueEmpty(q));

	QNode* next = q->front->next;

	free(q->front);
	q->front = next;

	if (q->front == NULL)
	{
		q->rear = NULL;
	}
}
获取队头/队尾元素
- 这个其实非常简单啦,因为存储了队头队尾的指针,所以直接就可以找到数据(还是要保证队列不为空)。
QDataType QueueFront(Queue* q)
{
	assert(q);
	assert(!QueueEmpty(q));

	return q->front->data;
}

QDataType QueueBack(Queue* q)
{
	assert(q);
	assert(!QueueEmpty(q));

	return q->rear->data;
}
链队列全局代码
typedef int QDataType;

// 链式结构:表示队列
typedef struct QListNode
{
	struct QListNode* next;
	QDataType data;
}QNode;

// 队列的结构
typedef struct Queue
{
	QNode* front;
	QNode* rear;
}Queue;

void QueueInit(Queue* q)
{
	assert(q);

	q->front = NULL;
	q->rear = NULL;
}

void QueueDestroy(Queue* q)
{
	assert(q);
	QNode* cur = q->front;

	while (cur)
	{
		QNode* next = cur->next;
		free(cur);
		cur = next;
	}

	q->front = NULL;
	q->rear = NULL;
}

bool QueueEmpty(Queue* q)
{
	assert(q);

	return q->front == NULL;
}

void QueuePush(Queue* q, QDataType data)
{
	assert(q);

	QNode* newnode = (QNode*)malloc(sizeof(QNode));
	if (newnode == NULL)
	{
		printf("malloc fail\n");
		exit(-1);
	}

	newnode->next = NULL;
	newnode->data = data;

	if (q->front == NULL)
	{
		q->front = q->rear = newnode;
	}
	else
	{
		q->rear->next = newnode;
		q->rear = newnode;
	}
}

void QueuePop(Queue* q)
{
	assert(q);
	assert(!QueueEmpty(q));

	QNode* next = q->front->next;

	free(q->front);
	q->front = next;

	if (q->front == NULL)
	{
		q->rear = NULL;
	}
}

QDataType QueueFront(Queue* q)
{
	assert(q);
	assert(!QueueEmpty(q));

	return q->front->data;
}

QDataType QueueBack(Queue* q)
{
	assert(q);
	assert(!QueueEmpty(q));

	return q->rear->data;
}

int QueueSize(Queue* q)
{
	assert(q);

	int sz = 0;
	QNode* cur = q->front;

	while (cur)
	{
		sz++;
		cur = cur->next;
	}

	return sz++;
}
从这里开始就是进阶内容了,加油,一起变得更强!
为了避免冗余,进阶内容主要讲实现思想,对于具体代码实现操作只会简单提及,但仍会有每一个函数的代码实现。
2.3 循环队列
循环链表定义和结构
还记不记得前文我的伏笔,现在我就来回收这个伏笔。
如果有元素个数确定,那么我们是可以使用顺序表来实现的,并且为了提高空间的利用率,我们要把它设计成可以重复利用相同空间的结构,所以我们要让队列成一个循环。

从上图我们可以看出循环队列只是在逻辑上是循环的,其实它仍然是个顺序表,只不过通过调控下标来保证循环。
- 循环队列是一种线性数据结构,其操作表现基于 FIFO(先进先出)原则并且队尾被连接在队首之后以形成一个循环。
- 它也被称为“环形缓冲器”。
- 储存空间大小确定
- 循环队列的一个好处是我们可以利用这个队列之前用过的空间。
- 结构具体实现:
typedef int CQDataType;

typedef struct {
    CQDataType* arr;
    int front;//队头
    int tail;//队尾,这里的队尾就是最后一个元素的下一个位置
    int k;//最大存储元素的个数
} MyCircularQueue;
循环队列实现思路
初始化这一步可以说是关键,因为这里我们要开辟k+1个空间,原因如下图:

如果只开辟k个空间:
-
当队列为空时:

当队列为空时,队列的头指针等于队列的尾指针; -
当队列满时:

当数组满员时,队列的头指针等于队列的尾指针;
所以要开辟k+1个空间用来判断。
当用顺序表实现时:

也即

当用链表实现时:

这个核心思路有了,剩下的函数就依照上文的思路,控制好下标实现即可。
顺序表循环链表全局实现
typedef int CQDataType;

typedef struct {
    CQDataType* arr;
    int front;
    int tail;
    int k;
} MyCircularQueue;

//初始化循环队列
MyCircularQueue* myCircularQueueCreate(int k);
//入队(尾插)
bool myCircularQueueEnQueue(MyCircularQueue* obj, CQDataType value);
//出队(头删)
bool myCircularQueueDeQueue(MyCircularQueue* obj);
//取队头数据
CQDataType myCircularQueueFront(MyCircularQueue* obj);
//取队尾数据
CQDataType myCircularQueueRear(MyCircularQueue* obj);
//判断队列是否为空
bool myCircularQueueIsEmpty(MyCircularQueue* obj);
//判断队列是否已满
bool myCircularQueueIsFull(MyCircularQueue* obj);
//销毁队列
void myCircularQueueFree(MyCircularQueue* obj);


MyCircularQueue* myCircularQueueCreate(int k)
{
    MyCircularQueue* pq = (MyCircularQueue*)malloc(sizeof(MyCircularQueue));
    if (pq == NULL)
    {
        printf("malloc fail");
        exit(-1);
    }
    pq->arr = (CQDataType*)malloc(sizeof(CQDataType) * (k + 1));//多开一个空间,以便于判空和判满
    pq->front = 0;
    pq->tail = 0;
    pq->k = k;

    return pq;
}


bool myCircularQueueEnQueue(MyCircularQueue* obj, CQDataType value)
{
    assert(obj);

    if (myCircularQueueIsFull(obj))
    {
        return false;
    }

    obj->arr[obj->tail] = value;
    obj->tail++;
    obj->tail %= (obj->k + 1);//可使tail始终在0~k内
    return true;
}

bool myCircularQueueDeQueue(MyCircularQueue* obj)
{
    assert(obj);


    if (myCircularQueueIsEmpty(obj))
    {
        return false;
    }

    obj->front++;
    obj->front %= (obj->k + 1);
    return true;
}

CQDataType myCircularQueueFront(MyCircularQueue* obj)
{
    assert(obj);
    assert(!myCircularQueueIsEmpty(obj));

    return obj->arr[obj->front];
}

CQDataType myCircularQueueRear(MyCircularQueue* obj)
{
    assert(obj);
    assert(!myCircularQueueIsEmpty(obj));

    return obj->arr[(obj->tail + obj->k) % (obj->k + 1)];
}

bool myCircularQueueIsEmpty(MyCircularQueue* obj)
{
    assert(obj);

    return obj->front == obj->tail;
}

bool myCircularQueueIsFull(MyCircularQueue* obj)
{
    return (obj->tail + 1) % (obj->k + 1) == (obj->front);
}

void myCircularQueueFree(MyCircularQueue* obj)
{
    assert(obj);

    free(obj->arr);
    free(obj);
}
链表循环链表全局实现
typedef int CQDataType;

typedef struct CQNode
{
    CQDataType data;
    struct CQNode* next;
}CQNode;

typedef struct {
    CQNode* front;
    CQNode* tail;
    CQNode* end;
    CQNode* start;
    int k;
} MyCircularQueue;

// 判空
bool myCircularQueueIsEmpty(MyCircularQueue* obj);
// 判满
bool myCircularQueueIsFull(MyCircularQueue* obj);
// 创建循环链表
MyCircularQueue* myCircularQueueCreate(int k);
// 入队
bool myCircularQueueEnQueue(MyCircularQueue* obj, CQDataType value);
// 出队
bool myCircularQueueDeQueue(MyCircularQueue* obj);
// 获取队头元素
CQDataType myCircularQueueFront(MyCircularQueue* obj);
// 获取队尾元素
CQDataType myCircularQueueRear(MyCircularQueue* obj);
// 销毁
void myCircularQueueFree(MyCircularQueue* obj);

MyCircularQueue* myCircularQueueCreate(int k) {
    MyCircularQueue* cq = (MyCircularQueue*)malloc(sizeof(MyCircularQueue));
    if (cq == NULL)
    {
        printf("malloc fail\n");
        exit(-1);
    }

    cq->k = k;
    cq->front = NULL;
    cq->tail = NULL;

    for (int i = 0; i < k + 1; i++)
    {
        CQNode* newnode = (CQNode*)malloc(sizeof(CQNode));
        if (newnode == NULL)
        {
            printf("malloc fail\n");
            exit(-1);
        }
        newnode->next = NULL;
        if (cq->front == NULL)
        {
            cq->front = cq->tail = newnode;
            cq->start = newnode;
        }
        else
        {
            cq->tail->next = newnode;
            cq->tail = newnode;
        }
    }
    cq->end = cq->tail;

    cq->tail->next = cq->front;
    cq->tail = cq->front;

    return cq;
}

bool myCircularQueueEnQueue(MyCircularQueue* obj, CQDataType value) {
    assert(obj);

    if (myCircularQueueIsFull(obj))
    {
        return false;
    }


    if (myCircularQueueIsEmpty(obj))
    {
        obj->front->data = obj->tail->data = value;
        obj->tail = obj->tail->next;
    }
    else
    {
        obj->tail->data = value;
        obj->tail = obj->tail->next;
    }

    return true;
}

bool myCircularQueueDeQueue(MyCircularQueue* obj) {
    assert(obj);

    if (myCircularQueueIsEmpty(obj))
    {
        return false;
    }

    obj->front = obj->front->next;
    return true;
}

CQDataType myCircularQueueFront(MyCircularQueue* obj) {
    assert(obj);

    if (myCircularQueueIsEmpty(obj))
    {
        return -1;
    }

    return obj->front->data;
}

CQDataType myCircularQueueRear(MyCircularQueue* obj) {
    assert(obj);

    if (myCircularQueueIsEmpty(obj))
    {
        return -1;
    }

    CQNode* cur = obj->front;
    while (cur->next != obj->tail)
    {
        cur = cur->next;
    }

    return cur->data;
}

bool myCircularQueueIsEmpty(MyCircularQueue* obj) {
    assert(obj);

    return obj->tail == obj->front;
}

bool myCircularQueueIsFull(MyCircularQueue* obj) {
    assert(obj);

    return obj->tail->next == obj->front;
}

void myCircularQueueFree(MyCircularQueue* obj) {
    assert(obj);

    CQNode* cur = obj->start;

    while (cur != obj->end)
    {
        CQNode* next = cur->next;
        free(cur);
        cur = next;
    }

    free(obj->end);
    free(obj);
}
3.用栈实现队列

核心思路
核心思路:
-
两个队列,入数据往不为空的队列里入;

-
出数据或者取栈顶元素,先将不为空的那个队列最后一个数据元素前的元素全移到另一个队列中,再出那个队列最后一个元素(栈顶元素)。

-
如此往复,就能实现先入后出。

全局实现
typedef int QDataType;

// 链式结构:表示队列
typedef struct QListNode
{
	struct QListNode* next;
	QDataType data;
}QNode;

// 队列的结构
typedef struct Queue
{
	QNode* front;
	QNode* rear;
}Queue;

typedef struct {
	Queue q1;
	Queue q2;
} MyStack;


// 初始化队列
void QueueInit(Queue* q);
// 队尾入队列
void QueuePush(Queue* q, QDataType data);
// 队头出队列
void QueuePop(Queue* q);
// 获取队列头部元素
QDataType QueueFront(Queue* q);
// 获取队列队尾元素
QDataType QueueBack(Queue* q);
// 获取队列中有效元素个数
int QueueSize(Queue* q);
// 检测队列是否为空,如果为空返回非零结果,如果非空返回0
bool QueueEmpty(Queue* q);
// 销毁队列
void QueueDestroy(Queue* q);

MyStack* myStackCreate();
void myStackPush(MyStack* obj, QDataType x);
QDataType myStackPop(MyStack* obj);
QDataType myStackTop(MyStack* obj);
bool myStackEmpty(MyStack* obj);
void myStackFree(MyStack* obj);

// 以下为原队列函数
void QueueInit(Queue* q)
{
	assert(q);

	q->front = NULL;
	q->rear = NULL;
}

void QueueDestroy(Queue* q)
{
	assert(q);
	QNode* cur = q->front;

	while (cur)
	{
		QNode* next = cur->next;
		free(cur);
		cur = next;
	}

	q->front = NULL;
	q->rear = NULL;
}

bool QueueEmpty(Queue* q)
{
	assert(q);

	return q->front == NULL;
}

void QueuePush(Queue* q, QDataType data)
{
	assert(q);

	QNode* newnode = (QNode*)malloc(sizeof(QNode));
	if (newnode == NULL)
	{
		printf("malloc fail\n");
		exit(-1);
	}

	newnode->next = NULL;
	newnode->data = data;

	if (q->front == NULL)
	{
		q->front = q->rear = newnode;
	}
	else
	{
		q->rear->next = newnode;
		q->rear = newnode;
	}
}

void QueuePop(Queue* q)
{
	assert(q);
	assert(!QueueEmpty(q));

	QNode* next = q->front->next;

	free(q->front);
	q->front = next;

	if (q->front == NULL)
	{
		q->rear = NULL;
	}
}

QDataType QueueFront(Queue* q)
{
	assert(q);
	assert(!QueueEmpty(q));

	return q->front->data;
}

QDataType QueueBack(Queue* q)
{
	assert(q);
	assert(!QueueEmpty(q));

	return q->rear->data;
}

int QueueSize(Queue* q)
{
	assert(q);

	int sz = 0;
	QNode* cur = q->front;

	while (cur)
	{
		sz++;
		cur = cur->next;
	}

	return sz++;
}

// 以上为原队列函数

MyStack* myStackCreate()
{
    MyStack* ps = (MyStack*)malloc(sizeof(MyStack));
    if (ps == NULL)
    {
        printf("malloc fail\n");
        exit(-1);
    }
    QueueInit(&ps->q1);
    QueueInit(&ps->q2);

    return ps;
}

void myStackPush(MyStack* obj, QDataType x)
{
    assert(obj);
// 往不为空的队列里插入数据
    if (!QueueEmpty(&obj->q1))
    {
        QueuePush(&obj->q1, x);
    }
    else
    {
        QueuePush(&obj->q2, x);
    }
}

QDataType myStackPop(MyStack* obj)
{
    assert(obj);
    assert(!QueueEmpty(&obj->q1) || !QueueEmpty(&obj->q2));//保证一个队列有元素即可


    if (!QueueEmpty(&obj->q1))
    {
    // 当p1不为空时,将p1中的元素往p2搬,直至p1只剩一个元素
        while (QueueSize(&obj->q1) != 1)
        {
            QueuePush(&obj->q2, QueueFront(&obj->q1));
            QueuePop(&obj->q1);
        }
        QDataType tmp = QueueFront(&obj->q1);
        QueuePop(&obj->q1);
        return tmp;
    }
    else
    {
    // 当p2不为空时,将p2中的元素往p1搬,直至p2只剩一个元素
        while (QueueSize(&obj->q2) != 1)
        {
            QueuePush(&obj->q1, QueueFront(&obj->q2));
            QueuePop(&obj->q2);
        }
        QDataType tmp = QueueFront(&obj->q2);
        QueuePop(&obj->q2);
        return tmp;
    }

}

QDataType myStackTop(MyStack* obj)
{
    assert(obj);
    assert(!QueueEmpty(&obj->q1) || !QueueEmpty(&obj->q2));

    if (!QueueEmpty(&obj->q1))
    {
    // 当p1不为空时,将p1中的元素往p2搬,直至p1只剩一个元素
        while (QueueSize(&obj->q1) != 1)
        {
            QueuePush(&obj->q2, QueueFront(&obj->q1));
            QueuePop(&obj->q1);
        }
        QDataType tmp = QueueFront(&obj->q1);
        QueuePush(&obj->q2, QueueFront(&obj->q1));
        QueuePop(&obj->q1);
        return tmp;
    }
    else
    {
    // 当p2不为空时,将p2中的元素往p1搬,直至p2只剩一个元素
        while (QueueSize(&obj->q2) != 1)
        {
            QueuePush(&obj->q1, QueueFront(&obj->q2));
            QueuePop(&obj->q2);
        }
        QDataType tmp = QueueFront(&obj->q2);
        QueuePush(&obj->q1, QueueFront(&obj->q2));
        QueuePop(&obj->q2);
        return tmp;
    }
}

bool myStackEmpty(MyStack* obj)
{
    assert(obj);

    return QueueEmpty(&obj->q1) && QueueEmpty(&obj->q2);//两队列都为空时,才为空
}

void myStackFree(MyStack* obj)
{
    QueueDestroy(&obj->q1);
    QueueDestroy(&obj->q2);

    free(obj);
}
4.用栈实现队列
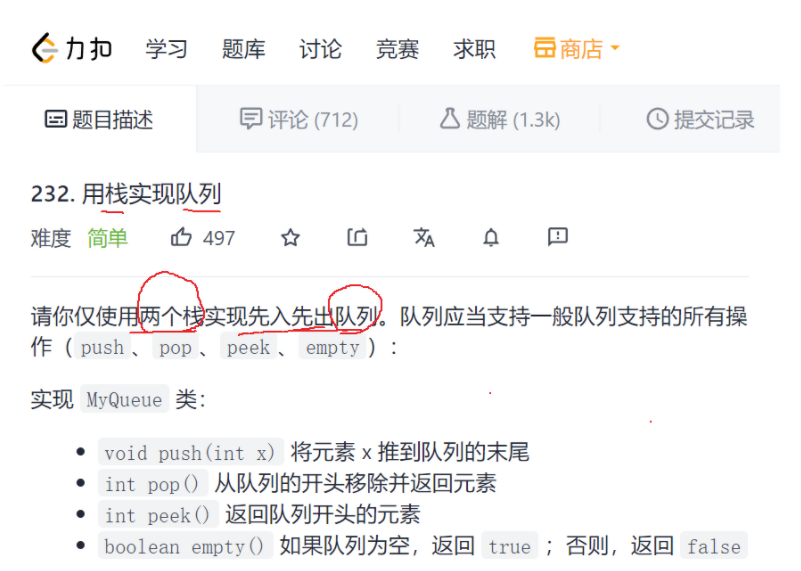
核心思路
-
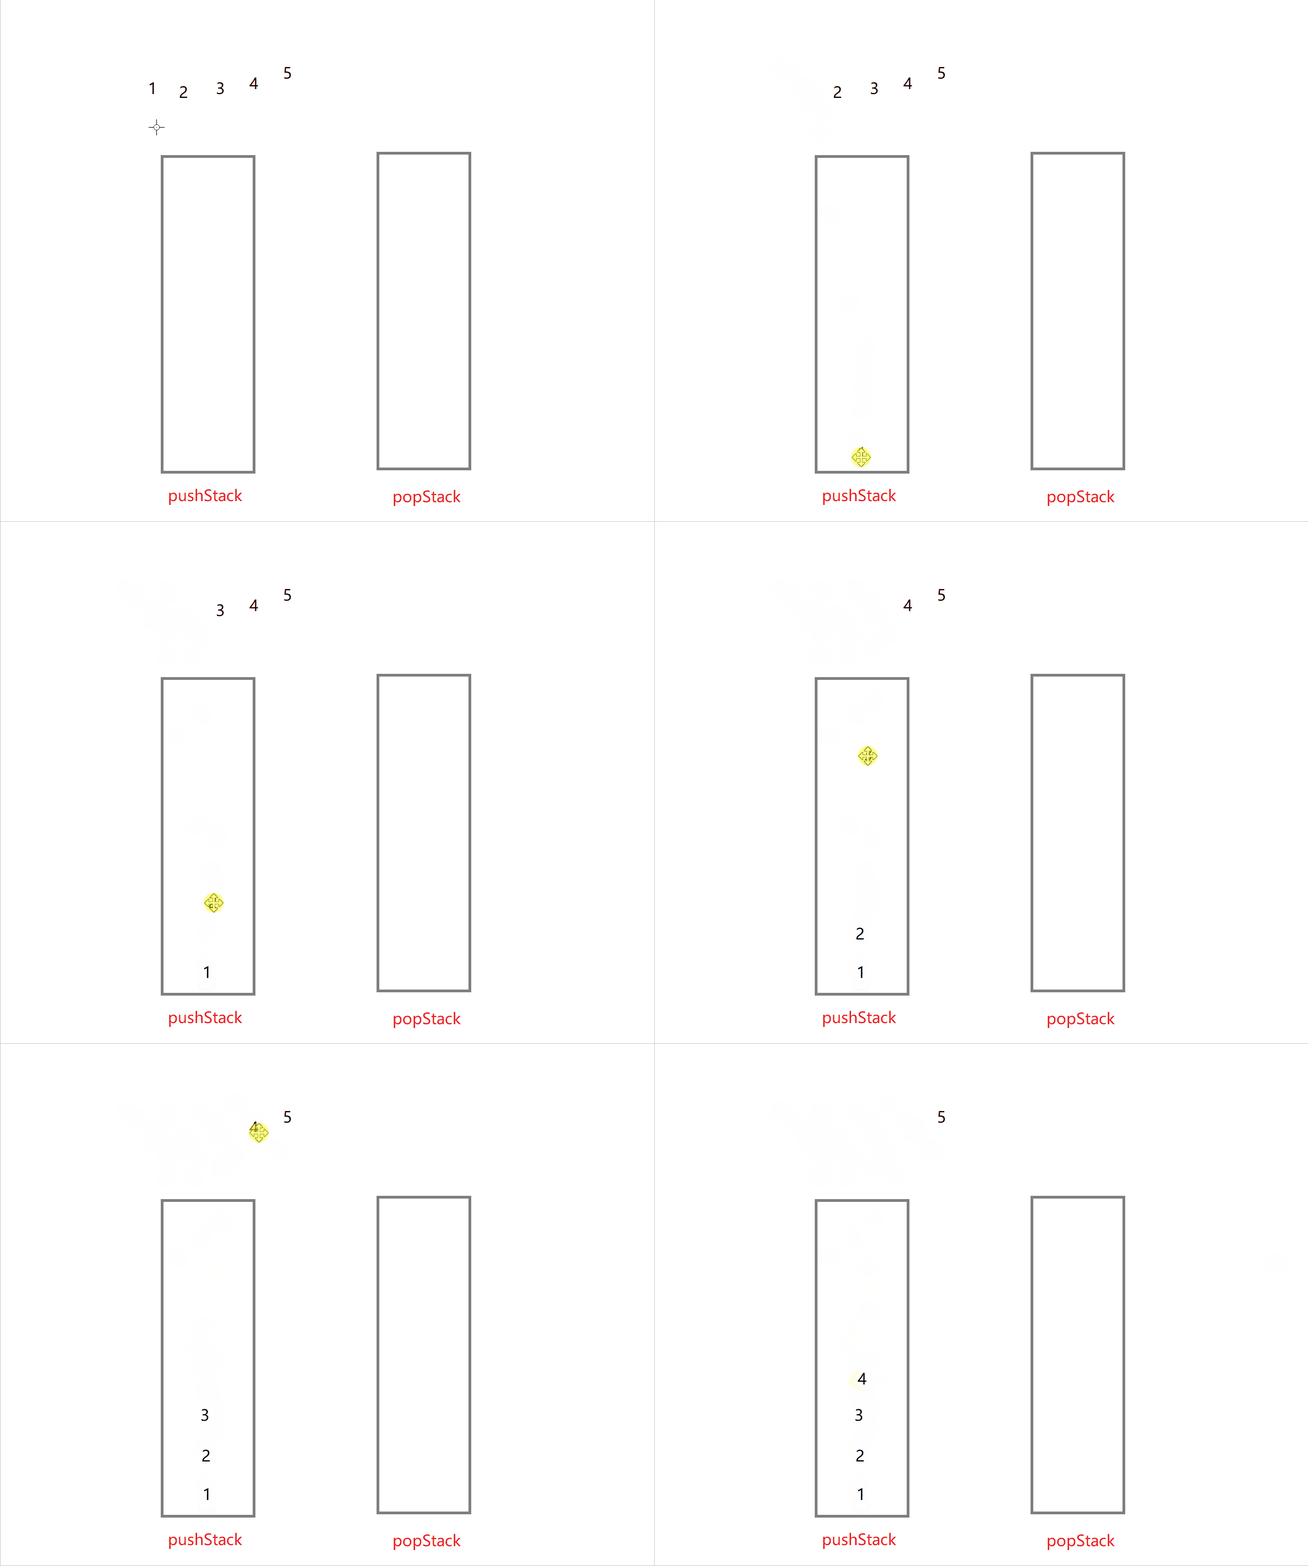
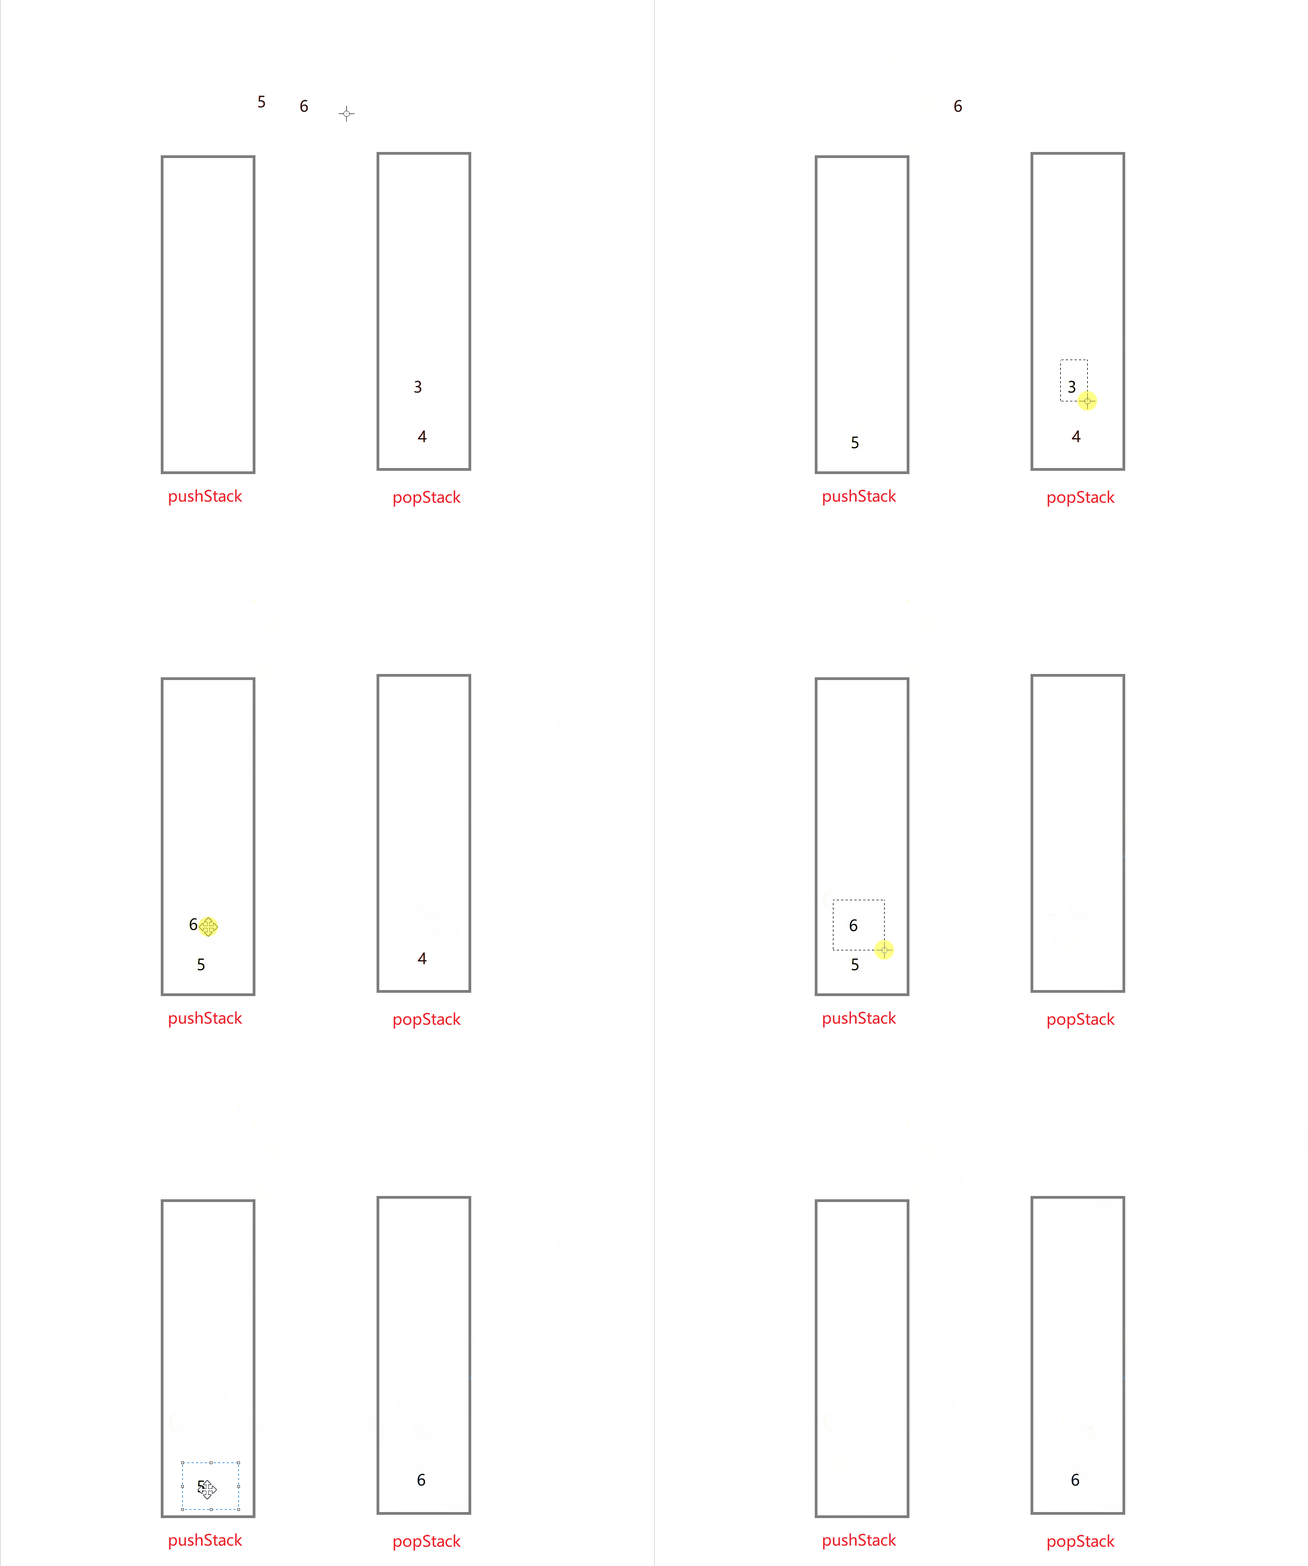
两个栈,一个用于插入数据,称为push栈;一个用于删除数据,称为pop栈。
-
push栈始终接收元素
-
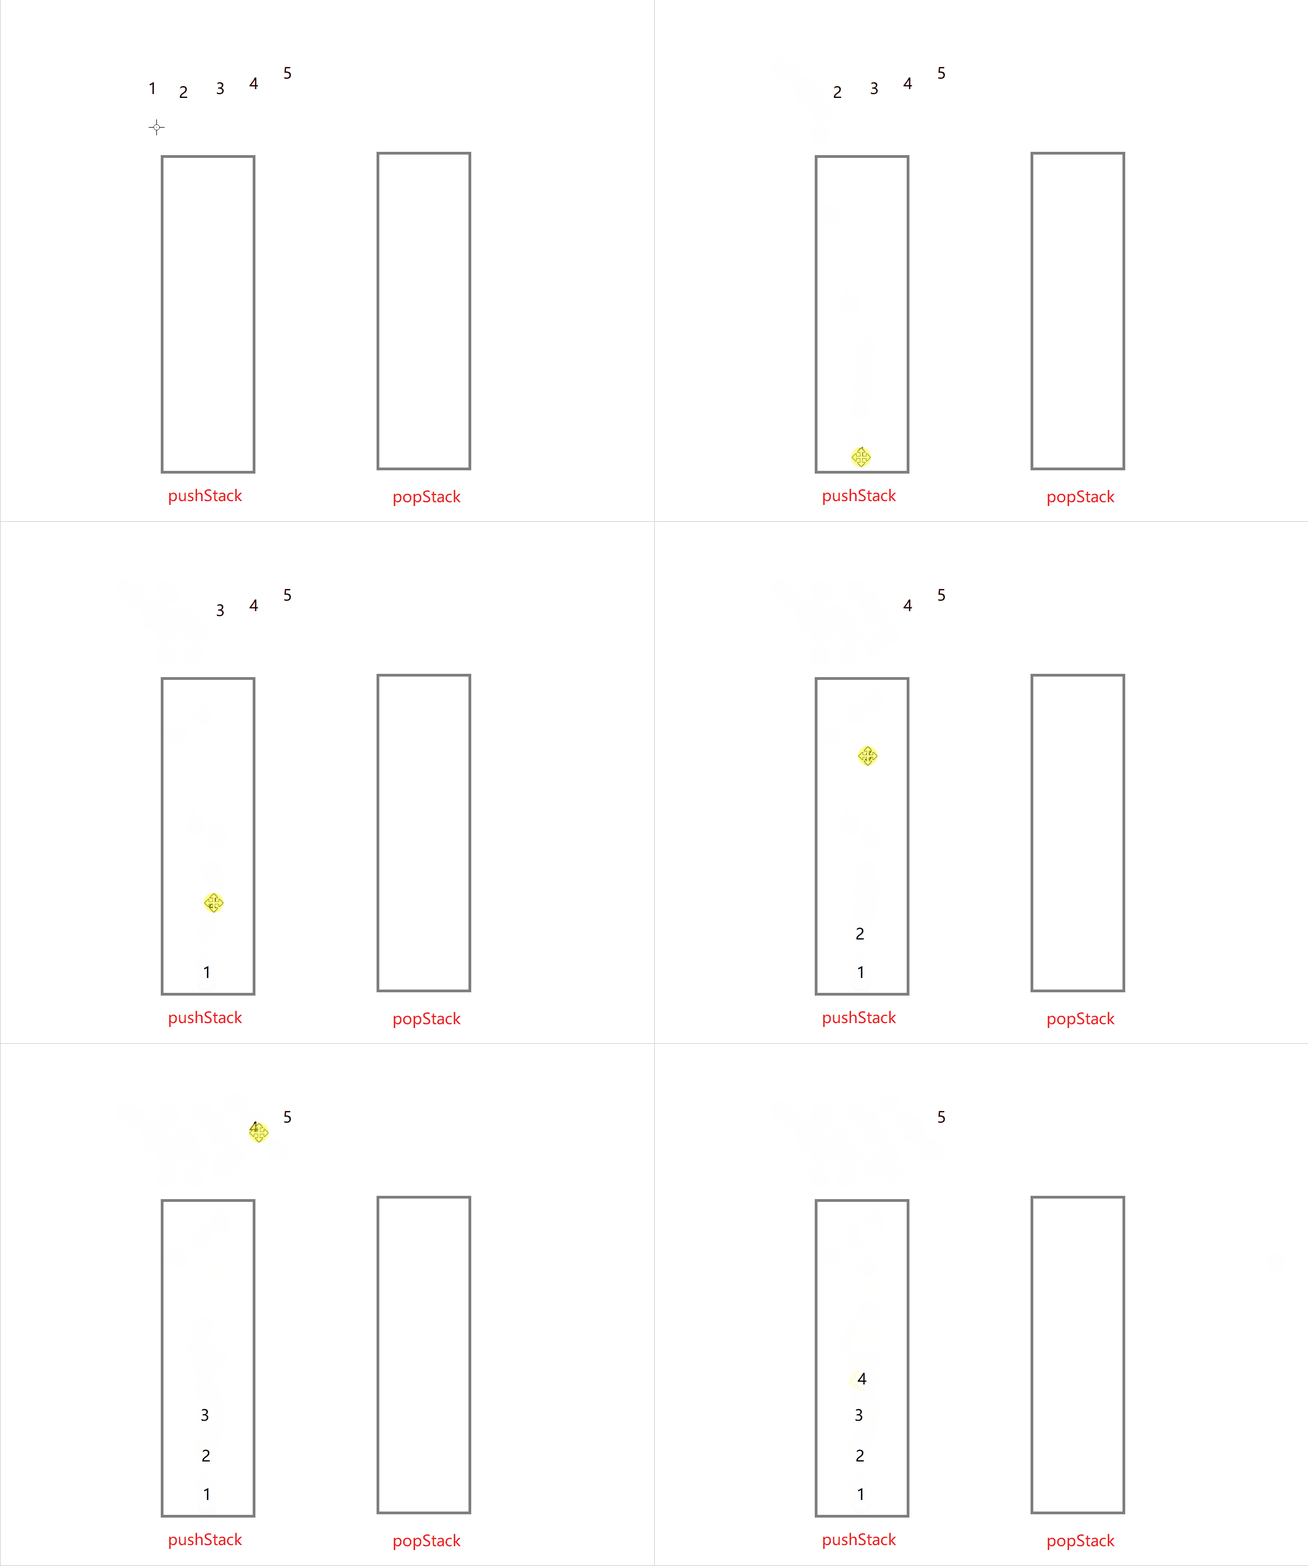
要实现出栈或者取队头元素的操作,要先把push栈的所有元素转移到pop栈,再出栈,直到pop栈出栈出到没元素了,再让push栈转移元素到pop栈。
-
重复以上两步,就可以实现先入先出。
全局实现
typedef int STDataType;
typedef struct Stack
{
	STDataType* a;
	int top;
	int capacity;
}ST;

typedef struct {
	ST pushStack;
	ST popStack;
} MyQueue;

void StackInit(ST* ps);
void StackDestroy(ST* ps);
void StackPush(ST* ps, STDataType x);
void StackPop(ST* ps);
STDataType StackTop(ST* ps);
int StackSize(ST* ps);
bool StackEmpty(ST* ps);

MyQueue* myQueueCreate();
void myQueuePush(MyQueue* obj, STDataType x);
STDataType myQueuePop(MyQueue* obj);
STDataType myQueuePeek(MyQueue* obj);
bool myQueueEmpty(MyQueue* obj);
void myQueueFree(MyQueue* obj);

// 以下是原栈函数
void StackInit(ST* ps)
{
	assert(ps);
	ps->a = NULL;
	ps->capacity = 0;
	ps->top = 0;
}

void StackDestroy(ST* ps)
{
	assert(ps);
	free(ps->a);
	ps->a = NULL;
	ps->capacity = 0;
	ps->top = 0;
}

void StackPush(ST* ps, STDataType x)
{
	assert(ps);

	if (ps->top == ps->capacity)
	{
		int newCapacity = ps->capacity == 0 ? 4 : 2 * ps->capacity;
		STDataType* tmp = (STDataType*)realloc(ps->a, newCapacity * sizeof(STDataType));
		if (tmp == NULL)
		{
			printf("realloc fail");
			exit(-1);
		}
		ps->a = tmp;
		ps->capacity = newCapacity;
	}

	ps->a[ps->top] = x;
	ps->top++;
}

void StackPop(ST* ps)
{
	assert(ps);
	assert(!StackEmpty(ps));

	ps->top--;
}

STDataType StackTop(ST* ps)
{
	assert(ps);
	assert(!StackEmpty(ps));

	return ps->a[ps->top - 1];
}

int StackSize(ST* ps)
{
	assert(ps);

	return ps->top;
}

bool StackEmpty(ST* ps)
{
	assert(ps);
	return ps->top == 0;
}
// 以上是原栈函数

MyQueue* myQueueCreate()
{
	MyQueue* pq = (MyQueue*)malloc(sizeof(MyQueue));
	if (pq == NULL)
	{
		printf("malloc fail");
		exit(-1);
	}
	StackInit(&pq->pushStack);
	StackInit(&pq->popStack);

	return pq;
}

void myQueuePush(MyQueue* obj, STDataType x)
{
	assert(obj);

	StackPush(&obj->pushStack, x);
}

STDataType myQueuePop(MyQueue* obj)
{
	assert(obj);
// 判断pop栈是否为空,如果为空,则将push栈的元素转移到pop栈
	if (StackEmpty(&obj->popStack))
	{
		while (!StackEmpty(&obj->pushStack))
		{
			StackPush(&obj->popStack, StackTop(&obj->pushStack));
			StackPop(&obj->pushStack);
		}
	}
	STDataType tmp = StackTop(&obj->popStack);
	StackPop(&obj->popStack);
	return tmp;
}

STDataType myQueuePeek(MyQueue* obj)
{
	assert(obj);
	// 判断pop栈是否为空,如果为空,则将push栈的元素转移到pop栈
	if (StackEmpty(&obj->popStack))
	{
		while (!StackEmpty(&obj->pushStack))
		{
			StackPush(&obj->popStack, StackTop(&obj->pushStack));
			StackPop(&obj->pushStack);
		}
	}

	return StackTop(&obj->popStack);
}

bool myQueueEmpty(MyQueue* obj)
{
	assert(obj);

// 当两个栈都为空时,才为空
	return StackEmpty(&obj->popStack) && StackEmpty(&obj->pushStack);
}

void myQueueFree(MyQueue* obj)
{
	StackDestroy(&obj->popStack);
	StackDestroy(&obj->pushStack);
	free(obj);
}
真棒,你已经从栈和队列的小白变成大佬了!为自己点个赞吧
后记
通过本次的学习,相信你已经掌握了栈和队列的全部内容,对于整个数据结构来说也是入门了。再接再厉,不断学习哟!👍👍
下一次数据结构,我们就要一起走进数据结构中非常重要的一部分——二叉树,一起加油!!!😆😆😆
以下是白晨的独白:
写这篇文章感觉还是挺有成就感的,从排版到找素材,从遣词造句到画图说明、动图演示,最终写成了这篇近 3w 字的文章。
对了,如果喜欢我的文章的话,不如用发财的小手给我点一个大大的赞👍,我会努力为大家带来更好的作品的😜。
如果还能加一个关注,那真是对白晨莫大的鼓励,让我们一起变强吧!!!💪💪💪

北京人形旗下天工造物具身智能开源社区,聚焦具身天工与慧思开物两大平台
更多推荐
 60
60 0
0- 0


 已为社区贡献2条内容

所有评论(0)