c#:ocelot限流体验
环境:
- window10 x64 企业版
- vs2019 企业版 16.7.5
- asp.net core 3.1
- ocelot 16.0.1
实验代码下载:https://download.csdn.net/download/u010476739/13034821
ocelot官方文档: https://ocelot.readthedocs.io/en/latest/
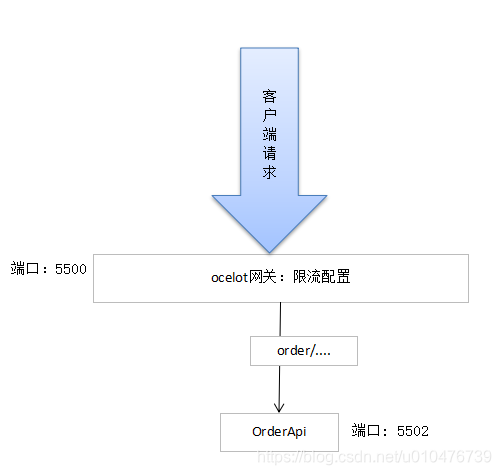
一、实验的介绍和架构图
本次实验准备两个工程即可:
ocelot-ratelimiting:
webapi工程,引入ocelot作为网关项目,本次实验的主要项目。OderApi:
正常的webapi工程
架构图如下:
二、准备OrderApi工程
新建空白解决方案ocelot-ratelimiting,然后再新建OrderApi工程。
修改OrderApi工程的appsettings.json文件,手动指定启动端口:
{
  "Logging": {
    "LogLevel": {
      "Default": "Information",
      "Microsoft": "Warning",
      "Microsoft.Hosting.Lifetime": "Information"
    }
  },
  "AllowedHosts": "*",
  "urls": "http://localhost:5501/"
}
给OrderApi工程添加DemoController控制器,如下:
using Microsoft.AspNetCore.Mvc;
using System;
using System.Collections.Generic;
using System.Linq;
using System.Threading.Tasks;

namespace OderApi.Controllers
{
    [ApiController]
    [Route("api/[controller]/[action]")]
    public class DemoController : ControllerBase
    {
        [HttpGet]
        public string Get() => "Hi I'm OrderApi!";
    }
}
现在可以将OrderApi项目运行了。
三、准备ocelot-ratelimiting工程
在ocelot-ratelimiting解决方案上添加ocelot-ratelimiting的wabapi工程。
引入ocelot的nuget包:
<ItemGroup>
  <PackageReference Include="Ocelot" Version="16.0.1" />
</ItemGroup>
修改appsettins.json文件,手动指定端口:
{
  "Logging": {
    "LogLevel": {
      "Default": "Information",
      "Microsoft": "Warning",
      "Microsoft.Hosting.Lifetime": "Information"
    }
  },
  "AllowedHosts": "*",
  "urls": "https://localhost:5500/"
}
修改Startup.cs的ConfigureServices和Configure方法,引入ocelot功能:
using Microsoft.AspNetCore.Builder;
using Microsoft.AspNetCore.Hosting;
using Microsoft.Extensions.Configuration;
using Microsoft.Extensions.DependencyInjection;
using Ocelot.DependencyInjection;
using Ocelot.Middleware;

namespace ocelot_ratelimiting
{
    public class Startup
    {
        public void ConfigureServices(IServiceCollection services)
        {
            services.AddOcelot();
        }

        public void Configure(IApplicationBuilder app, IWebHostEnvironment env)
        {
            app.UseHttpsRedirection();
            app.UseOcelot().Wait();
        }
    }
}
添加ocelot.json配置文件(注意设置文件属性为复制到输出目录):
{
  "Routes": [
    {
      "DownstreamPathTemplate": "/{url}",
      "DownstreamScheme": "http",
      "UpstreamPathTemplate": "/order/{url}",
      "UpstreamHttpMethod": [ "Get", "Post" ],
      "DownstreamHostAndPorts": [
        {
          "Host": "localhost",
          "Port": 5501
        }
      ],
      "LoadBalancerOptions": {
        "Type": "RoundRobin"
      },
      "RateLimitOptions": {
        "ClientWhitelist": [],
        "EnableRateLimiting": true,
        "Period": "1s", //用于限流计算: 在Period时间内最多允许Limit次请求(支持的格式有秒:s,分钟:m,小时:h,天:d 等)
        "Limit": 1, //用于限流计算: 在Period时间内最多允许Limit次请求
        "PeriodTimespan": 5 //限流触发后,多少秒后再开启访问
      }
    }
  ],
  "GlobalConfiguration": {}
}
修改Program.cs文件,将ocelot.json加入到容器配置中:
using Microsoft.AspNetCore.Hosting;
using Microsoft.Extensions.Configuration;
using Microsoft.Extensions.Hosting;

namespace ocelot_ratelimiting
{
    public class Program
    {
        public static void Main(string[] args)
        {
            CreateHostBuilder(args).Build().Run();
        }

        public static IHostBuilder CreateHostBuilder(string[] args) =>
            Host.CreateDefaultBuilder(args)
            .ConfigureAppConfiguration(conf =>
                {
                    conf.AddJsonFile("ocelot.json");
                })
                .ConfigureWebHostDefaults(webBuilder =>
                {
                    webBuilder.UseStartup<Startup>();
                });
    }
}
四、测试限流效果
现在启动ocelot-ratelimiting项目。
浏览器输入: https://localhost:5500/order/api/demo/get,显示如下:

这是没有被限流的,我们快速刷新几次,就会看到限流信息:
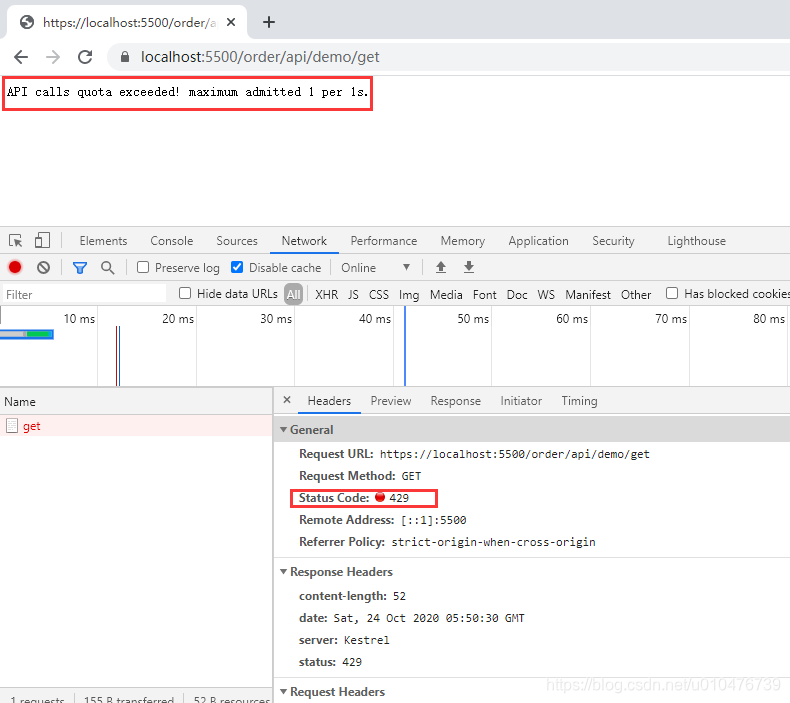
当看到这条信息后,我们还需要等5s才能重新正常访问。
上面限流后的提示API calls quota exceeded! maximum admitted 1 per 1s.和状态码429都是可以修改的,如下:
{
  "Routes": [
    {
      "DownstreamPathTemplate": "/{url}",
      "DownstreamScheme": "http",
      "UpstreamPathTemplate": "/order/{url}",
      "UpstreamHttpMethod": [ "Get", "Post" ],
      "DownstreamHostAndPorts": [
        {
          "Host": "localhost",
          "Port": 5501
        }
      ],
      "LoadBalancerOptions": {
        "Type": "RoundRobin"
      },
      "RateLimitOptions": {
        "ClientWhitelist": [],
        "EnableRateLimiting": true,
        "Period": "1s", //用于限流计算: 在Period时间内最多允许Limit次请求
        "Limit": 1, //用于限流计算: 在Period时间内最多允许Limit次请求
        "PeriodTimespan": 5 //限流触发后,多少秒后再开启访问
      }
    }
  ],
  "GlobalConfiguration": {
    "RateLimitOptions": {
      "QuotaExceededMessage": "Customize Tips!", //自定义限流的文字提示,默认: API calls quota exceeded! maximum admitted {Limit} per {Period}.
      "HttpStatusCode": 999 //自定义限流的http状态码,默认: 429
    }
  }
}
编译后重启网关项目,然后触发限流,观察返回:
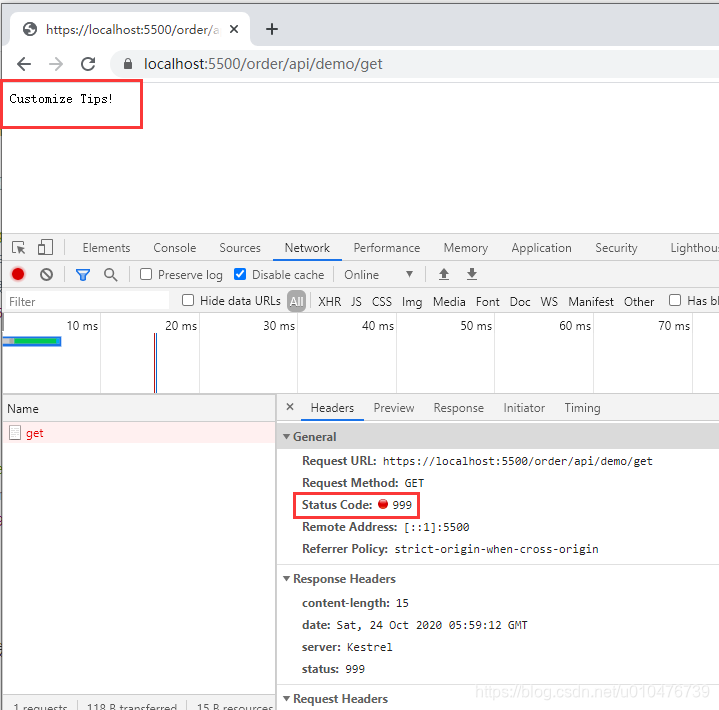
现在我们看到了自定义的限流返回了。
五、限流的白名单
顾名思义,限流的白名单就是用来让我们绕过限流的,客户端可以在请求头中标识自己的身份,如:
ClientId: jack-client这样,网关接受http请求后,一旦发现
jack-client在白名单中,就不会再对请求做限流控制。
在上面实验的基础上,修改ocelot配置如下:
{
  "Routes": [
    {
      "DownstreamPathTemplate": "/{url}",
      "DownstreamScheme": "http",
      "UpstreamPathTemplate": "/order/{url}",
      "UpstreamHttpMethod": [ "Get", "Post" ],
      "DownstreamHostAndPorts": [
        {
          "Host": "localhost",
          "Port": 5501
        }
      ],
      "LoadBalancerOptions": {
        "Type": "RoundRobin"
      },
      "RateLimitOptions": {
        "ClientWhitelist": [ "jack-client", "tom-client" ],
        "EnableRateLimiting": true,
        "Period": "1s", //用于限流计算: 在Period时间内最多允许Limit次请求
        "Limit": 1, //用于限流计算: 在Period时间内最多允许Limit次请求
        "PeriodTimespan": 5 //限流触发后,多少秒后再开启访问
      }
    }
  ],
  "GlobalConfiguration": {
    "RateLimitOptions": {
      "QuotaExceededMessage": "Customize Tips!", //自定义限流的文字提示,默认: API calls quota exceeded! maximum admitted {Limit} per {Period}.
      "HttpStatusCode": 999, //自定义限流的http状态码,默认: 429
      "ClientIdHeader": "TestHeader" //自定义用来标识客户端的请求头名称,默认: ClientId
    }
  }
}
上面的配置中,我把标识客户端的请求头名称改成TestHeader了,默认的是:ClientId。
编译后重新启动网关项目。
这次我们使用postman进行测试:
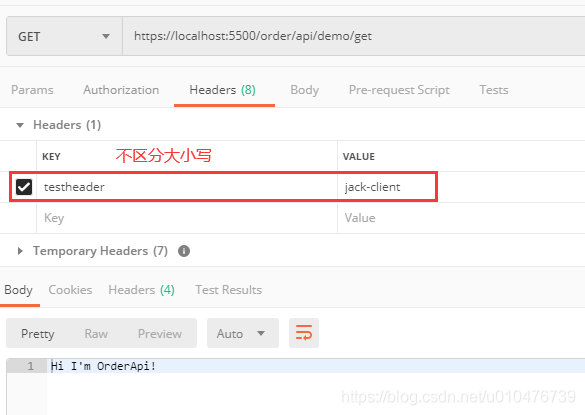
这里,当我们不断的去刷新的时候,也不会观察到被限流。
六、限流后响应头中显示限流详情
根据官方文档描述,限流后的响应头里面会有如下几个:
X-Rate-Limit-Limit:
X-Rate-Limit-Remaining:
X-Rate-Limit-Reset:
但是我在实验的时候,发现配置并不起效,后来在github上看到了上报的bug:https://github.com/ThreeMammals/Ocelot/issues/1305
所以这里就不试验了。
不过,我们知道这里的配置是:
{
    "Routes": [/*...*/]
	"GlobalConfiguration": {
   		"RateLimitOptions": {
	      	//实验的效果不理想,没有看到响应头里的东西:
	      	//bug:  https://github.com/ThreeMammals/Ocelot/issues/1305
	       "DisableRateLimitHeaders": false
	    }
	}
}

北京人形旗下天工造物具身智能开源社区,聚焦具身天工与慧思开物两大平台
更多推荐
 1
1 0
0- 0


 已为社区贡献15条内容

所有评论(0)