使用swaager(xiaoymin版本)生成在线文档并进行单元测试
·
swagger是什么
- 支持 API 自动生成同步的在线文档:使用 Swagger 后可以直接通过代码生成文档,不再需要自己手动编写接口文档了,对程序员来说非常方便,可以节约写文档的时间去学习新技术。
- 提供 Web 页面在线测试 API:光有文档还不够,Swagger 生成的文档还支持在线测试。参数和格式都定好了,直接在界面上输入参数对应的值即可在线测试接口。
1、引入依赖
<dependency>
    <groupId>io.springfox</groupId>
    <artifactId>springfox-swagger2</artifactId>
    <version>2.9.2</version>
</dependency>
<dependency>
   <groupId>com.github.>swagger是什么
>
>* 支持 API 自动生成同步的在线文档:使用 Swagger 后可以直接通过代码生成文档,不再需要自己手动编写接口文档了,对程序员来说非常方便,可以节约写文档的时间去学习新技术。
>* 提供 Web 页面在线测试 API:光有文档还不够,Swagger 生成的文档还支持在线测试。参数和格式都定好了,直接在界面上输入参数对应的值即可在线测试接口。

### 1、引入依赖
```xml
<dependency>
    <groupId>io.springfox</groupId>
    <artifactId>springfox-swagger2</artifactId>
    <version>2.9.2</version>
</dependency>
<dependency>
   <groupId>com.github.xiaoymin</groupId>
   <artifactId>swagger-bootstrap-ui</artifactId>
   <version>1.9.6</version>
</dependency>
2、加入配置类
@Configuration
@EnableSwagger2
@ConditionalOnProperty(value = {"swagger.enable"}, matchIfMissing = true)
public class SwaggerConfiguration {

    @Bean(value = "defaultApi2")
    public Docket defaultApi2() {
        Docket docket=new Docket(DocumentationType.SWAGGER_2)
                .apiInfo(apiInfo())
                .groupName("低版本")
                .select()
                .apis(RequestHandlerSelectors.basePackage("com.xiaominfo.knife4j.demo.web"))
                //.apis(RequestHandlerSelectors.withMethodAnnotation(ApiOperation.class))
                .paths(PathSelectors.any())
                .build();
        return docket;
    }
    private ApiInfo apiInfo() {
        return new ApiInfoBuilder()
                .title("swagger-bootstrap-ui-demo RESTful APIs")
                .description("# swagger-bootstrap-ui-demo RESTful APIs")
                .termsOfServiceUrl("http://www.xx.com/")
                .contact("xx@qq.com")
                .version("1.0")
                .build();
    }
}
3、给controller加入注解
@Api(tags = "测试")
@RestController
@RequestMapping("/api")
public class HelloController {


    @ApiOperation(value = "sayHelo")
    @GetMapping("/hello")
    public ResponseEntity<String> hello(String name){
        return ResponseEntity.ok("Hello"+name);
    }


    @PostMapping("save")
    @ApiOperation(value = "保存",  notes="新增结果保存", produces = "application/json")
    @ApiResponses({
            @ApiResponse(code=0,message="success"),
            @ApiResponse(code=-1,message="系统异常"),
            @ApiResponse(code=-10000,message="系统繁忙,请稍后再次操作"),
            @ApiResponse(code=3005,message="新增商户失败"),
            @ApiResponse(code=3009,message="该联系人邮箱已绑定商户:xxxxxx")
    })
    public BaseResponse batchSave(@RequestBody String req){
        return null;
    }
}
4、给响应类加入注解
@Data
public class BaseResponse<T> {

    @ApiModelProperty(value = "代码")
    private int code;

    @ApiModelProperty(value = "信息")
    private String message;
    private T data;
}
5、关闭swagger
默认是打开的,也可以关闭swagger
swagger.enable=false
6、查看api问题、单元测试
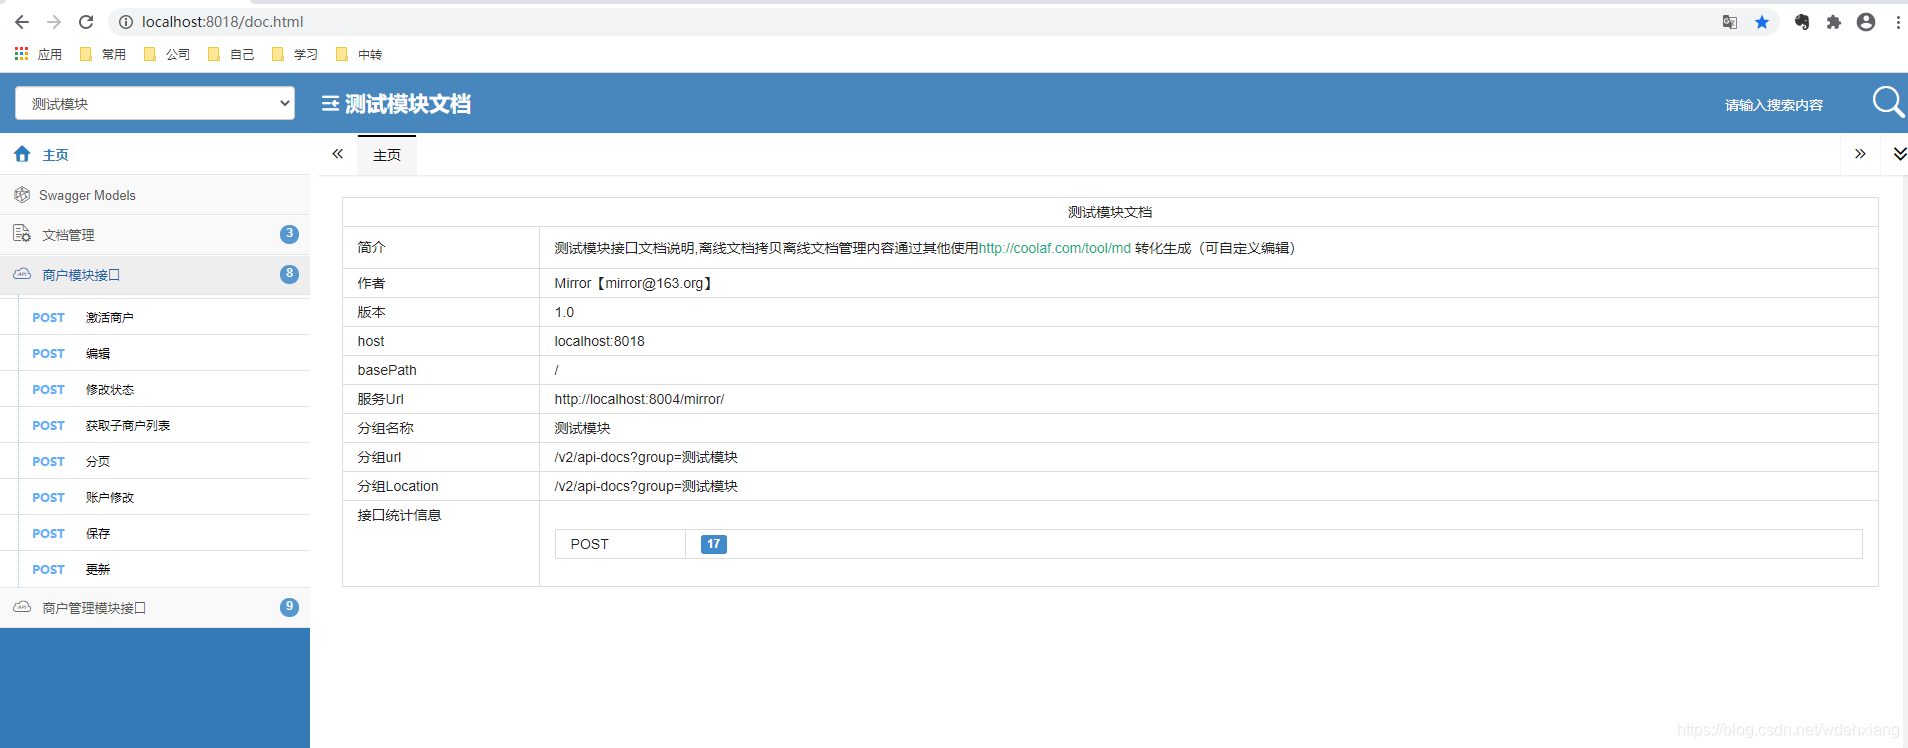
使用 http://ip:端口号/doc.html。这个版本是是用了xiaoymin的swagger,它的页面是这样的,很友好
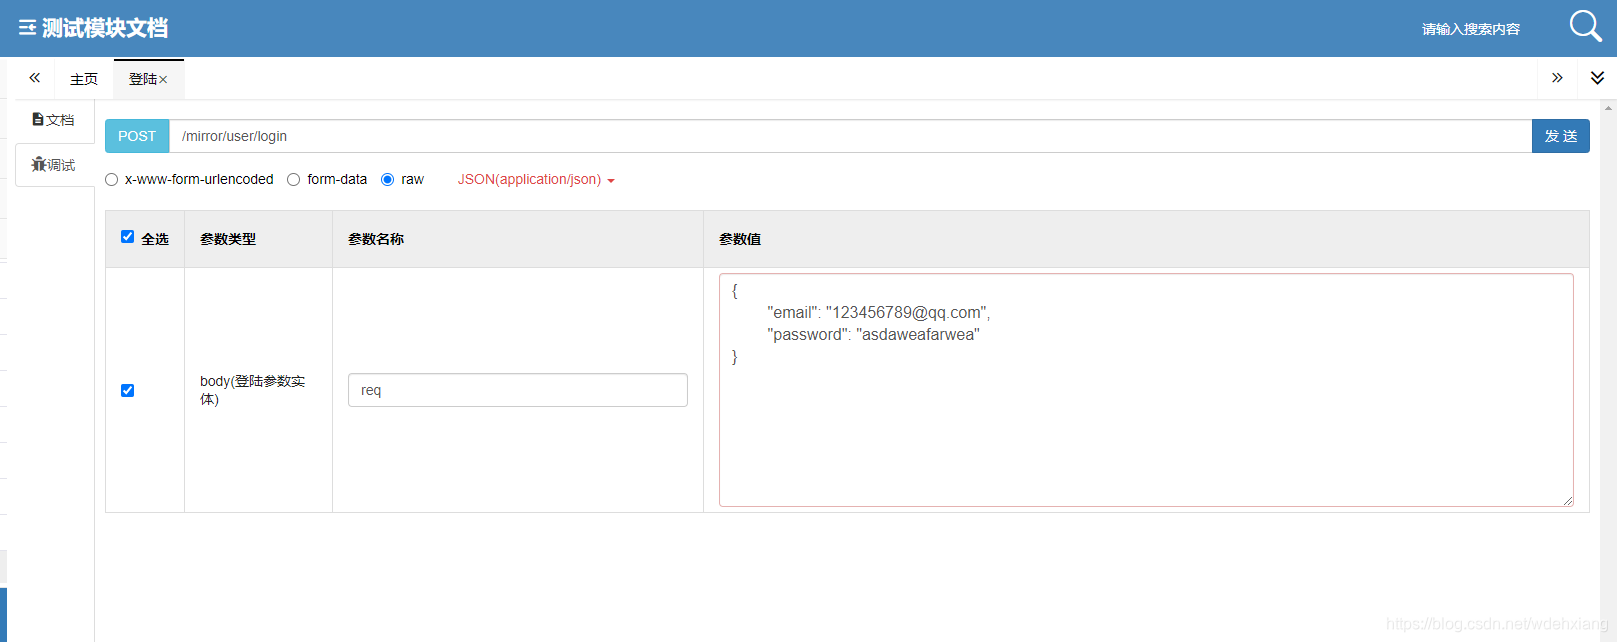
单元测试页面
hi~我是Mirror,一个为了自由安逸的未来而不断前进的的程序员。
如果你觉得文章对你有一点点帮助,一个小小赞,便是对我的认可,如果有不足之处,也欢迎各位指正。
swagger-bootstrap-ui
1.9.6
<br/>

### 2、加入配置类
```java
@Configuration
@EnableSwagger2
@ConditionalOnProperty(value = {"swagger.enable"}, matchIfMissing = true)
public class SwaggerConfiguration {

    @Bean(value = "defaultApi2")
    public Docket defaultApi2() {
        Docket docket=new Docket(DocumentationType.SWAGGER_2)
                .apiInfo(apiInfo())
                .groupName("低版本")
                .select()
                .apis(RequestHandlerSelectors.basePackage("com.xiaominfo.knife4j.demo.web"))
                //.apis(RequestHandlerSelectors.withMethodAnnotation(ApiOperation.class))
                .paths(PathSelectors.any())
                .build();
        return docket;
    }
    private ApiInfo apiInfo() {
        return new ApiInfoBuilder()
                .title("swagger-bootstrap-ui-demo RESTful APIs")
                .description("# swagger-bootstrap-ui-demo RESTful APIs")
                .termsOfServiceUrl("http://www.xx.com/")
                .contact("xx@qq.com")
                .version("1.0")
                .build();
    }
}
3、给controller加入注解
@Api(tags = "测试")
@RestController
@RequestMapping("/api")
public class HelloController {


    @ApiOperation(value = "sayHelo")
    @GetMapping("/hello")
    public ResponseEntity<String> hello(String name){
        return ResponseEntity.ok("Hello"+name);
    }


    @PostMapping("save")
    @ApiOperation(value = "保存",  notes="新增结果保存", produces = "application/json")
    @ApiResponses({
            @ApiResponse(code=0,message="success"),
            @ApiResponse(code=-1,message="系统异常"),
            @ApiResponse(code=-10000,message="系统繁忙,请稍后再次操作"),
            @ApiResponse(code=3005,message="新增商户失败"),
            @ApiResponse(code=3009,message="该联系人邮箱已绑定商户:xxxxxx")
    })
    public BaseResponse batchSave(@RequestBody String req){
        return null;
    }
}
4、给响应类加入注解
@Data
public class BaseResponse<T> {

    @ApiModelProperty(value = "代码")
    private int code;

    @ApiModelProperty(value = "信息")
    private String message;
    private T data;
}
5、关闭swagger
默认是打开的,也可以关闭swagger
swagger.enable=false
6、查看api问题、单元测试
使用 http://ip:端口号/doc.html。这个版本是是用了xiaoymin的swagger,它的页面是这样的,很友好
单元测试页面
hi~我是Mirror,一个为了自由安逸的未来而不断前进的的程序员。
如果你觉得文章对你有一点点帮助,一个小小赞,便是对我的认可,如果有不足之处,也欢迎各位指正。

北京人形旗下天工造物具身智能开源社区,聚焦具身天工与慧思开物两大平台
更多推荐
 3
3 0
0- 0


 已为社区贡献3条内容

所有评论(0)