

ios swiftui
Toolbars are amongst the interesting additions to SwiftUI’s second iteration during WWDC 2020.
工具栏是WWDC 2020期间SwiftUI的第二次迭代中有趣的新增功能之一。
Essentially, toolbar is a modifier that lets you place a wrap around a bunch of view controls and set them at desired locations.
本质上, toolbar是一个修饰符,使您可以在许多视图控件周围放置环绕并将它们设置在所需的位置。
By default, SwiftUI can smartly determine and set views at desired locations with the toolbar modifier, but you can also explicitly set it using ToolbarItem.
默认情况下,SwiftUI可以使用toolbar修饰符智能地确定并设置所需位置的视图,但是您也可以使用ToolbarItem对其进行显式设置。
In the next few sections, we’ll look at:
在接下来的几节中,我们将研究:
The need for the
toolbarmodifier需要
toolbar修改器- Using Toolbar API to automatically set items in the bottom bar and navigation bar 使用工具栏API自动设置底部和导航栏中的项目
Using
ToolbarItemfor manual placements使用
ToolbarItem进行手动放置
需要SwiftUI工具栏 (Need for SwiftUI Toolbar)
Previously, setting a bottom bar in SwiftUI was a headache. You’d probably have used UIViewRepresentable to display a UIToolbar.
以前,在SwiftUI中设置一个底线是一件令人头疼的事情。 您可能已经使用UIViewRepresentable来显示UIToolbar 。
Similarly, to customize the navigation bar at the top, earlier, you’d have to fall back on the underlying UINavigationBar. Yeah, yeah, doing stuff in init functions makes it look like a UIKit app and not pure SwiftUI.
同样,要更早地自定义顶部的导航栏,您必须依靠基础UINavigationBar 。 是的,在init函数中执行操作会使它看起来像UIKit应用程序,而不是纯SwiftUI。
Gladly, the new toolbar modifier lets us wrap views and set placement positions of our choice. So it’s fairly easy to add a view control at the bottom or top of your screen as well as set items as primary actions or confirmations in case of watchOS.
令人高兴的是,新的toolbar修改器使我们可以包装视图并设置选择的放置位置。 因此,在watchOS的屏幕底部或顶部添加视图控件以及将项目设置为主要操作或确认非常容易。
使用SwiftUI工具栏自动放置 (Automatic Placements With SwiftUI Toolbar)
Let’s see how to set up a few views with the SwiftUI toolbar modifier.
让我们看看如何使用SwiftUI toolbar修改器设置一些视图。
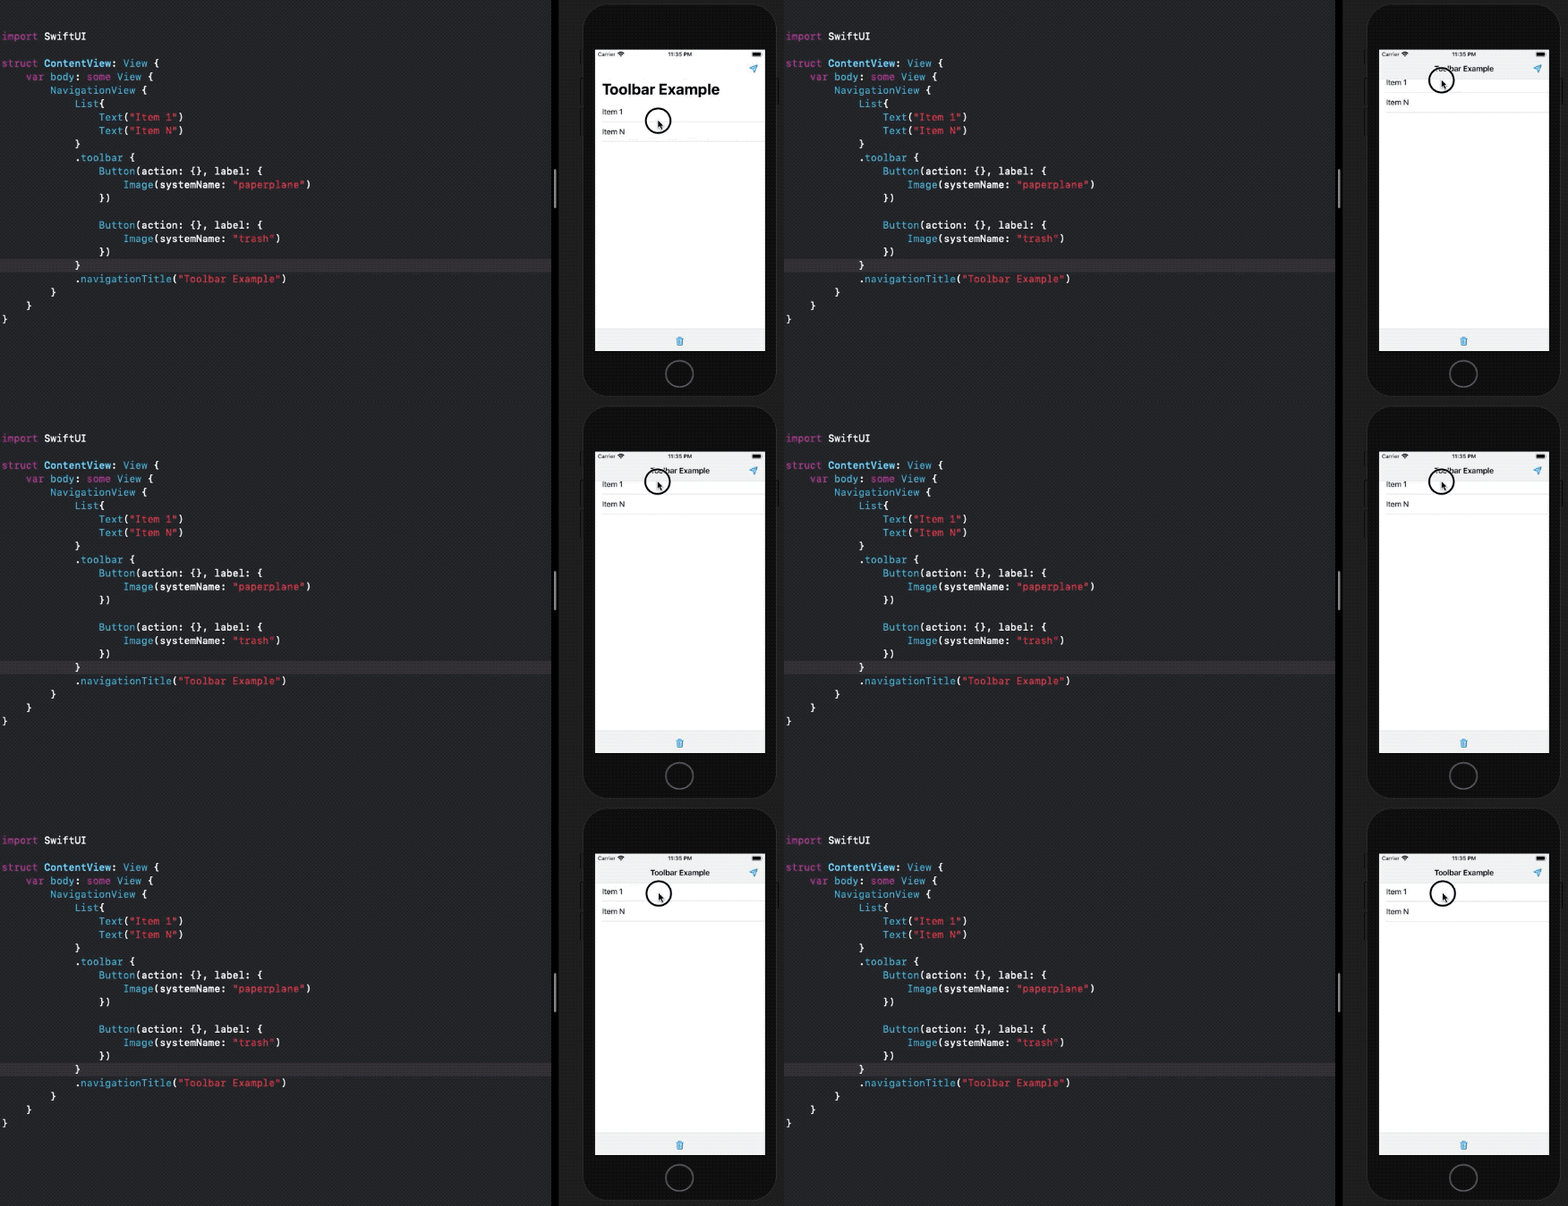
It’s important to take note of a few things:
请注意以下几点很重要:
- For the toolbar to work, your view needs to be wrapped in NavigationView. 为了使工具栏起作用,您的视图需要包装在NavigationView中。
- By default, the first item in a toolbar is placed as a right bar button of the navigation bar in iOS and macOS. 默认情况下,工具栏的第一项在iOS和macOS中作为导航栏的右栏按钮放置。
- The second item is idiomatically placed at the center of the bottom bar. 第二项习惯用法位于底部栏的中央。
If you specify a
Labelinside the toolbar, it may only display the image, due to space constraints. TheTextwill be used for accessibility purposes in such cases.如果在工具栏内指定
Label,则由于空间限制,它可能仅显示图像。 在这种情况下,Text将用于可访问性。
While the above way of specifying toolbar layouts is fine, sometimes you wish to have more control.
尽管上述指定工具栏布局的方法很好,但有时您希望获得更多控制权。
Fortunately, we have ToolbarItem just for that.
幸运的是,我们ToolbarItem提供了ToolbarItem 。
使用ToolbarItem手动定位项目 (Use ToolbarItem for Manually Positioning Items)
According to the Apple docs, ToolbarItem is “a model that represents an item that can be placed in the toolbar or navigation bar.”
根据Apple的文档 , ToolbarItem是“表示可以放置在工具栏或导航栏中的项目的模型。”
ToolBarItem lets us wrap views and define the position in the following way:
ToolBarItem使我们可以通过以下方式包装视图并定义位置:

So, we have a few modes of placements:
因此,我们有几种放置方式:
principal— This puts the view in the most prominent part of the screen. In iOS and macOS, it’s the title view.principal—将视图置于屏幕的最突出部分。 在iOS和macOS中,它是标题视图。navigationBarLeadingandnavigationBarTrailingare used to put items at the left and right ends of the navigation bar.navigationBarLeading和navigationBarTrailing用于将项目放在导航栏的左右两端。bottomBarsets the item in the toolbar at the bottom of the screen.bottomBar在屏幕底部的工具栏中设置项目。automaticis what we saw in the previous section. It finds the most apt position based on the platform and on spaces available.automatic是我们在上一节中看到的。 它根据平台和可用空间找到最合适的位置。
It’s important to note that if the navigationBar display mode is set as automatic, the principal placement will be ignored. Hence we’ve specified inline mode above.
重要的是要注意,如果将navigationBar显示模式设置为automatic ,则将忽略principal位置。 因此,我们在上面指定了inline模式。
ToolBarItem makes it easy to create a custom navigation bar if need be.
如果需要,可以使用ToolBarItem轻松创建自定义导航栏。
To style the bottom bar with multiple items, we need to ensure that the order is preserved. This means the leftmost item is placed first as shown below:
要为底部栏添加多个样式,我们需要确保保留订单。 这意味着最左边的项目位于第一位,如下所示:

结论 (Conclusion)
We explored the new toolbar modifier and saw how using ToolbarItem helps set the position of view controls.
我们探索了新的工具栏修改器,并了解了如何使用ToolbarItem帮助设置视图控件的位置。
This new API will help build platform-independent toolbars.
这个新的API将帮助构建独立于平台的工具栏。
That’s a wrap-up. Thanks for reading.
那是总结。 谢谢阅读。
翻译自: https://medium.com/better-programming/the-swiftui-toolbar-in-ios-14-b4a0fe6a3034
ios swiftui


 已为社区贡献7条内容

所有评论(0)