app压力测试入门
一、app压力测试背景
1、为什么要开展压力测试
(1)提高产品的稳定性
(2)提高产品的留存率
2、什么时候开展压力测试
(1)首轮功能测试之后(开发后存在bug)
(2)下班后夜间进行(出于效率、收益考虑)
二、7个基础知识
1、手工测试场景
2、自动化测试场景
3、monkey测试工具
Monkey是Android中的一个命令行工具,可以运行在模拟器里或实际设备中。它向系统发送伪随机的用户事件流(如按键输入、触摸屏输入、手势输入等),实现对正在开发的应用程序进行压力测试。Monkey测试是一种为了测试软件的稳定性、健壮性的快速有效的方法。(其实可以想象成一只猴子啥都不知道,疯狂乱敲…
4、ADB
adb工具即Android Debug Bridge(安卓调试桥) tools
5、monkeyscript
monkeyscript一组可以被monkey识别的命令组合,
monkeyscript可以完成重复固定的工作
6、monkeyrunner
monkeyrunner提供了一系列api
monkeyrunner通过api可以完成一系列模拟事件及截图操作
(1)、monkeyrunner api包括:
MonekeyRunner:用来连接设备或模拟器
MonkeyDevices:提供安装、卸载应用,发送模拟事件
MonkeyImage:完成图像保存及对比操作
(2)、monkeyrunner测试类型
多设备控制
功能测试
回归测试
monkey与monkeyrunner的区别:
monkey:在adb shell中,生成用户或系统的伪随机事件
monkeyrunner:通过api定义特定命令和事件来控制设备
7、压力测试结果
1、crash:即崩溃,应用程序在使用过程中,非正常退出
2、anr:Application Not Responding,即应用程序在一段时间响应不灵敏,会弹出对话框,用户可以选择“等待”而让程序继续运行,也可以选择“强制关闭”
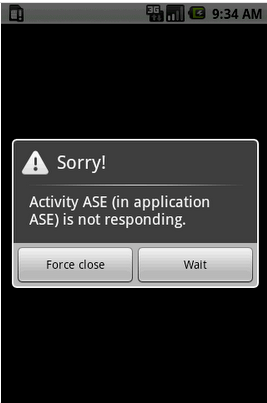
三、6个实践小案例
准备测试环境:
Android SDK的环境
python的环境
1、一个app的压测实践:
1、在手机开发者选项中,将USB调试打开
2、确认手机和电脑已经连接(adb devices)
3、安装测试app(adb install package.apk)
4、发送压测指令(adb shell monkey 1000(1000个随机指令))
5、获取包名:
(1)Linux:adb logcat | grep START:表示打印包含有START标签的日志信息,首先在cmd里面执行该命令adb logcat | grep START,然后运行需要测试的app,就能获取测试app包名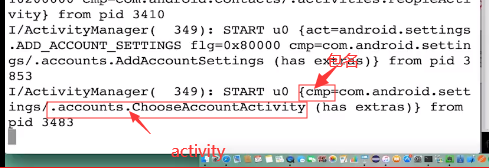
cmp等于后面的是包名,“/”后面的是activity
(2)Windows:
清除logcat内容,使用命令adb logcat -c
启动logcat,使用命令adb logcat ActivityManager:I *: s
打开被测试的app
6、给指定包打压力:adb shell monkey -p package 1000
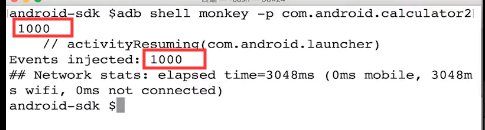
当(Event injected)的值等于运行次数时,表明没有异常出现
monkey具备同时对多设备进行调试的能力,只需要增加多个 -p 包名字段就可以实现。
adb shell monkey -p com.miui.calculator -p com.android.thememanager 1000
该命令行可以实现对多个应用进行开启的功能
2、monkey高级参数的应用
1、thorttle参数:指定事件之间的间隔(因为1000个指令几秒就结束了)
adb shell monkey -p package --thorttle < milliseconds >100(延时时间ms)
看如下效果: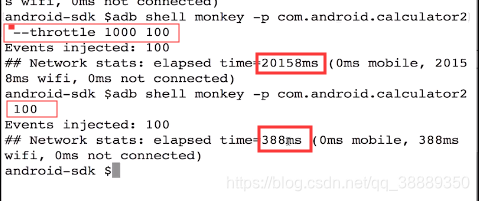
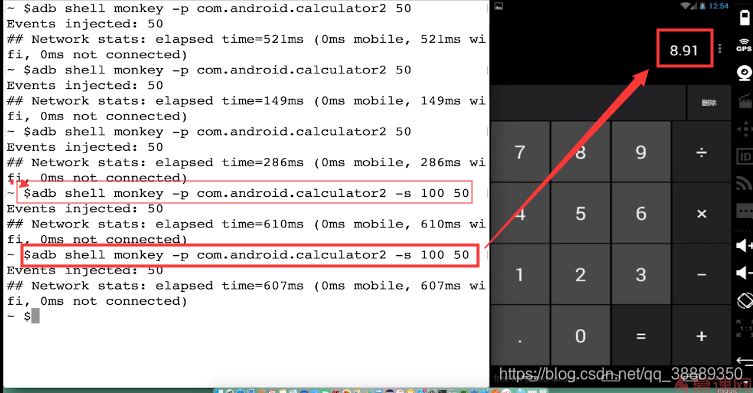
2、seed参数:指定随机生成数的seed值(获得指定的随机序列),即seed值相等,随机序列就相同
测试为了人员能够重现测试到的bug问题,需要能够对Monkey的随机生成事件有重现能力,monkey允许对随机事件的seed值做设置,当两次seed值一样,整个测试效果将会产生相同的事件序列。
adb shell monkey -p package -s[seed] < event-count >100(执行命令个数)
看如下效果:
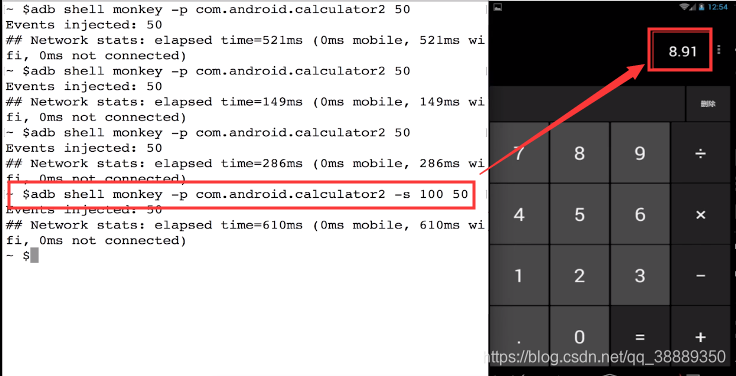
两次执行结果完全一致
3、触摸事件
设定触摸事件百分比
adb shell monkey -p package --pct-touch < percent >(百分数)
adb shell monkey -v -p package --pct-touch < percent >(-v的目的是列出点击事件的详情,即操作日志记录)
查看效果: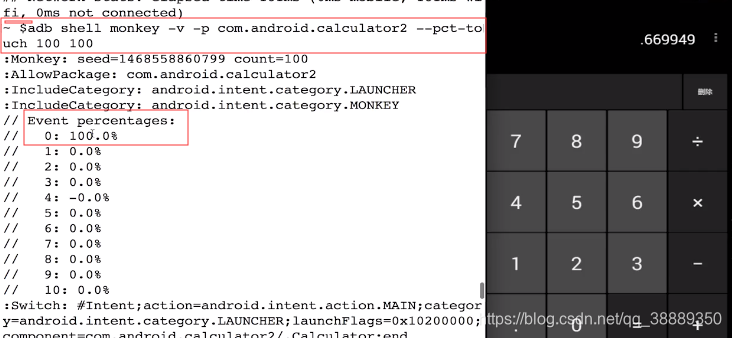
4、动作事件
设定动作事件百分比
adb shell monkey -p package --pct-motion < percent >
5、 轨迹球事件
指定滑动事件的百分比
adb shell monkey -p package --pct-trackball < percent >
6、导航事件
指定导航事件中,up、down、left、right等事件的百分比。
adb shell monkey -p package --pct-nav < percent >
7、指定导航事件
指定导航事件中,back、menu等事件的百分比。
adb shell monkey -p package --pct-majornav < percent >
8、系统按键事件
指定系统按键的百分比,包括HOME、Back、音量等。
adb shell monkey -p package --pct-syskeys < percent >
9、Activity之间切换事件
指定Activity之间切换的比例
adb shell monkey -p package --pct-appswitch < percent >
10、任意事件
指定任意事件的百分比
adb shell monkey -p package --pct-anyevent < percent >
其中,当不作任何配置的时候,默认为–pct-anyevent < percent >,此时所有事件的触发均为随机的。当所有事件的百分比加起重来小于100%的时候,多余的随机事件也将被转化为–pct-anyevent < percent >事件。超过时,系统会重新运算相应的比例。
11、崩溃事件
忽略崩溃和异常
adb shell monkey -p package --ignore-crashes < event-count >
12、超时事件
忽略超时事件
adb shell monkey -p package --ignore-timeouts < event-count >
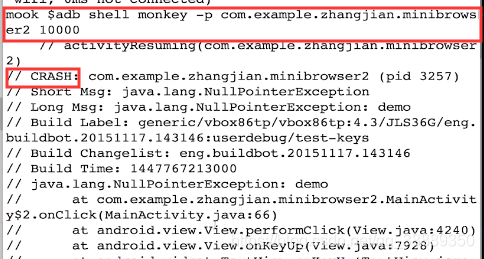
3、CRASH结果析取
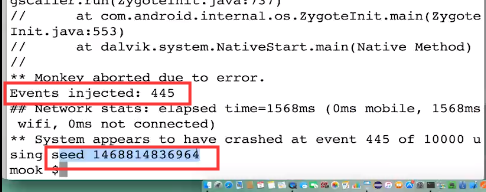
当app出现crash时,log截图如下,该命令未加–ignore-crashes,所以app crash了,程序就会停止,通过seed值可以复现词crash
4、ANR结果析取
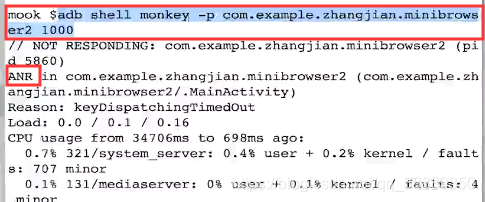
当app anr时,log截图如下:
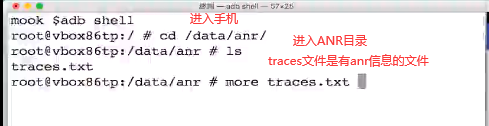
如果我们用手机测试时,没有抓取log,通过如下方法获取ANR信息:
5、monkeyscript
执行monkey脚本的命令
monkeyscript可以完成重复固定的操作
adb shell monkey -f < scriptfile > < event-count >
一、monkeyscript命令
1、DispatchTrackball —— 轨迹球事件
【注意:按一个键需要两个轨迹球事件】
DispatchTrackball(long downtime,long eventtide,int action,float x,float y,float pressure,float size,int metastate,float xprecision,float yprecision,int device,int edgeflags)
long downtime指键最初被按下的时间
long eventtide指事件发生的时间
int action指具体操作的动作,如按下
float x,float y指x和y的坐标
float pressure压力事件的大小(0~1)
float size指触摸的记事值(0~1)
int metastate指当前按下mate键的标识
float xprecision,float yprecision指x和y坐标的精确值
int device事件的来源(0~x)
int edgeflags指超出屏幕了范围
action:0代表按下,1代表弹起
2、DispatchPointer ——点击事件
【注意:按一个键需要两个点击事件】
DispatchPointer(long downtime,long eventtide,int action,float x,float y,float pressure,float size,int metastate,float xprecision,float yprecision,int device,int edgeflags)
3、DispatchString——输入字符串命令
DispatchString(String text)
4、LaunchActivity —— 启动应用
LaunchActivity(package,Activity)
5、UserWait—— 等待事件
UserWait(1000)
6、DispatchPress——按下键值
DispatchPress(int keycode) ——keycode 66 回车键
二、monkeyscript实践
在搜索框中输入查询词 —— 思考? 完成这个操作需要哪几步操作?
需要11个步骤:
1、启动App
2、点击地址栏
3、删除原有地址
4、输入www.baidu.com
5、点击回车键,让新地址到地址栏中
6、点击回车
7、点击搜索框
8、等待结果
新建test.script文件:脚本如下显示:
typ=user
count=10
speed=1.0
start data >>
#启动app,参数1:包名,参数2:包名+主activity名)
LaunchActivity(com.android.browser,com.android.browser.BrowserActivity)
UserWait(5000)

#按下坐标200,100(搜索框位置)
DispatchPointer(10,10,0,200,100,1,1,-1,1,1,0,0)
#抬起坐标200,100(搜索框位置)
DispatchPointer(10,10,1,200,100,1,1,-1,1,1,0,0)

#在搜索框输入www.baidu.com
DispatchString(www.baidu.com)
#点击回车键
DispatchPress(66)
UserWait(10000)
#按下搜索按钮
DispatchPointer(10,10,0,300,400,1,1,-1,1,1,0,0)
#抬起搜索按钮
DispatchPointer(10,10,1,300,400,1,1,-1,1,1,0,0)
UserWait(1000)
三、注意事项
脚本需要push到手机中才可以——push monkey.script /data/local/tmp
没有调试的功能,需要自己仔细去找问题
执行脚本:
(1)在脚本目录下,执行脚本——monkey -f test.script 2(次数)
(2)不在脚本目录下,执行脚本——adb shell monkey -f /data/local/tmp/test.script 2
如果启动时并不是自己要测试的App,需要开发在Android的配置文件中加入相关配置 ——android:exported=”true”
6、monkeyrunner
monkeyrunner可以进行截屏操作
一、MonkeyRunner类
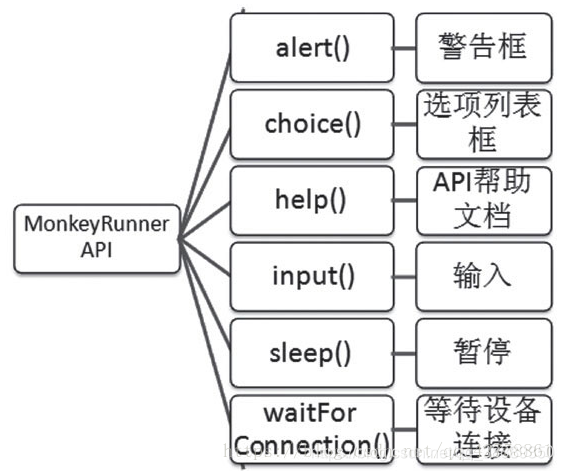
MonkeyRunner提供连接真机和模拟器、输入、暂停、警告框等方法
waitForConnection()等待设备连接,有多个device id,需要指明具体那个设备
waitForConnection(float timeout,string deviceid)
timeout:超时时间(s)
deviceid:设备id
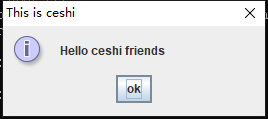
例:alert() 方法
#!user/bin/python
# -*- coding: UTF-8 -*-

from com.android.monkeyrunner import MonkeyRunner
MonkeyRunner.alert("Hello ceshi friends","This is ceshi","ok")
运行结果如下:
二、MonkeyDevice类
MonkeyDevice类提供了安装和卸载程序包、开启Activity、发送按键和点击事件、运行测试包等方法。
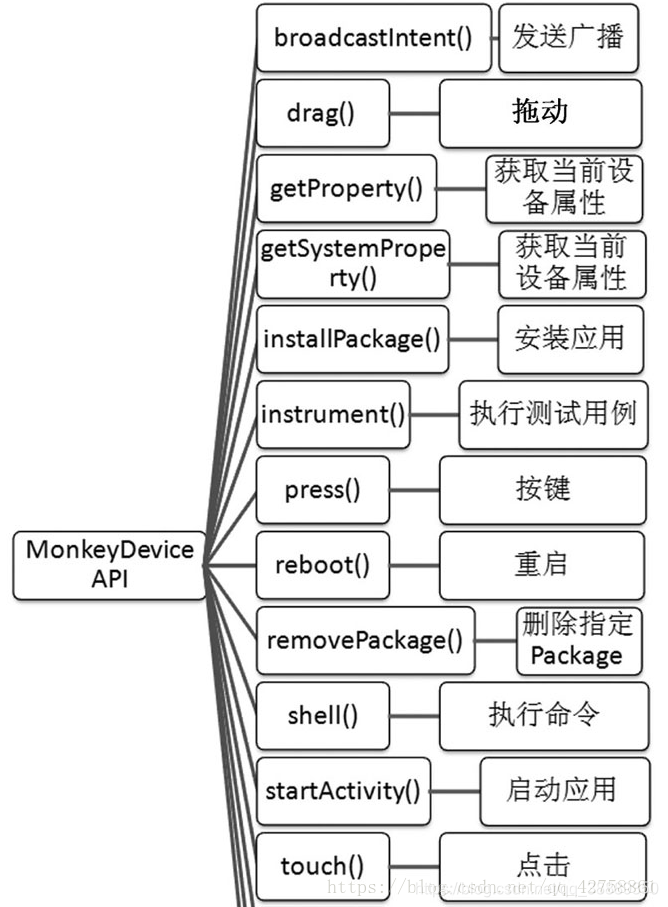
1、MonkeyDevice API——drag(拖动)
drag (tuple start, tuple end, float duration, integer steps)
tuple start:拖拽起始位置,为tuple类型的(x,y)坐标点。
tuple end:拖拽终点位置,为tuple类型的(x,y)坐标点。
float duration:拖拽手势持续时间,默认为1.0s。
integer steps:插值点的步数,默认值为10。
2、MonkeyDevice API——touch(点击)
touch (integer x, integer y, integer type)
integer x:x坐标值。
integer y:y坐标值。
integer type:key event类型(如DOWN、UP、DOWN_AND_UP)。
DOWN为按下事件 UP为弹起事件 DOWN_AND_UP为按下弹起事件。
3、MonkeyDevice API——press(按键)
press(string keycode,dictionary type)
dictionary type:key event类型(如DOWN、UP、DOWN_AND_UP)。
DOWN为按下事件 UP为弹起事件 DOWN_AND_UP为按下弹起事件。
4、MonkeyDevice API——startActivity(启动应用)
startActivity(package+"/"+activity)
device.startActivity(“com.sina.weibo/com.sina.weibo.VisitorMainTabActivity”)
5、MonkeyDevice API——takeSnapshot(截屏)
三、MonkeyImage类
MonkeyImage类在测试过程中用来保存各种格式的测试截图,并可以进行图像对比。
1、MonkeyImage API——sameAs(图像对比)
boolean sameAs(MonkeyImage other,float percent)
2、MonkeyImage API——writeToFile()(保存图像到指定路径)
writeToFile(string path,string format)
path:指定图片保存路径
format:指定图形类型(jpg\png)
实践案例
打开微博,点击搜索按钮,进入搜索页面
文件名为:test.py
#!user/bin/python
# -*- coding: UTF-8 -*-

from com.android.monkeyrunner import MonkeyRunner,MonkeyDevice,MonkeyImage
#连接设备
device = MonkeyRunner.waitForConnection(3,"127.0.0.1:62001")
#启动微博app
device.startActivity("com.sina.weibo/com.sina.weibo.VisitorMainTabActivity")
MonkeyRunner.sleep(10)
#点击随便看看
device.touch(700,50,'DOWN_AND_UP')
MonkeyRunner.sleep(3)
#截图
image = device.takeSnapshot()
image.writeToFile('./jietu/test1.png','png')
#点击搜索按钮
device.touch(300,1250,'DOWN_AND_UP')
MonkeyRunner.sleep(2)
#截图
image = device.takeSnapshot()
image.writeToFile('./jietu/test2.png','png')
执行代码方式:
monkeyrunner D:\sdk\tools\test\py
注意事项
1、当出现此错误时

解决方法:在脚本的第一行添加中文的注释语句代码:# -- coding: UTF-8 --
2、当出现此错误时

解决方法:将运行的 test.py脚本放到sdk的 tools下面。

北京人形旗下天工造物具身智能开源社区,聚焦具身天工与慧思开物两大平台
更多推荐
 5
5 0
0- 0


 已为社区贡献9条内容

所有评论(0)