ffmpeg在visual studio2019上配置及验证
1.下载ffmpeg编译好的Windows版本
下载地址:Releases · BtbN/FFmpeg-Builds · GitHub
下载、解压后,文件目录结构如下:
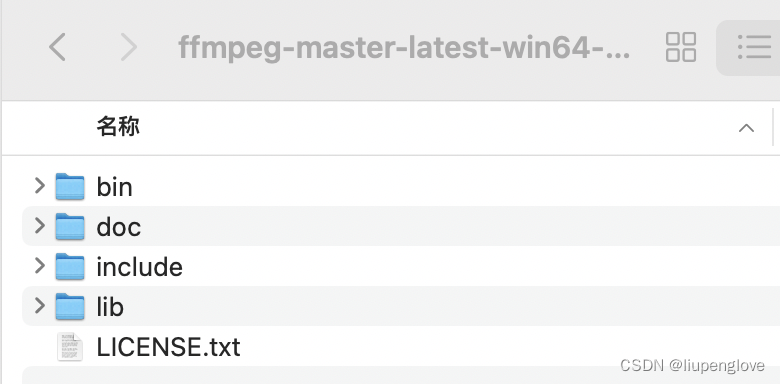
2.配置visual studio
2.1 创建控制台应用程序,c++的。
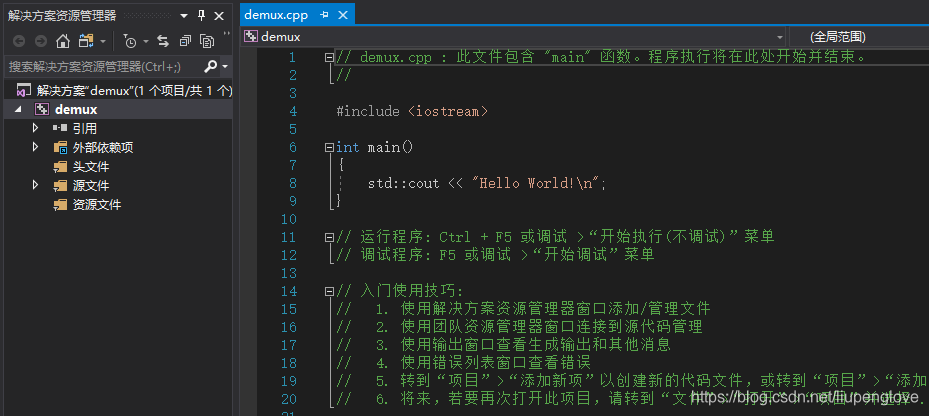
2.2 配置visual studio
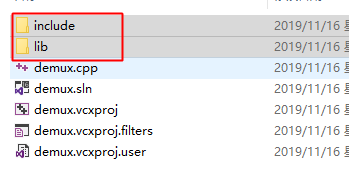
将第一步下载的dev目录下的lib、include复制到项目目录
将第一步下载的share目录下的dll复制到项目目录
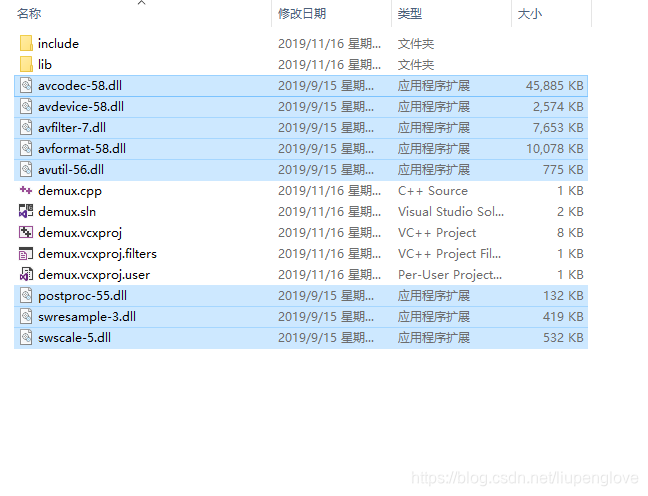
配置visual studio
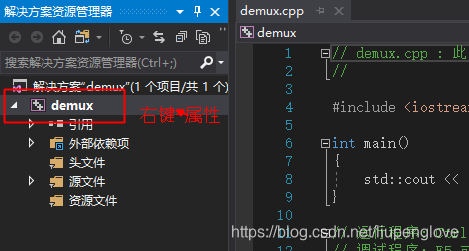
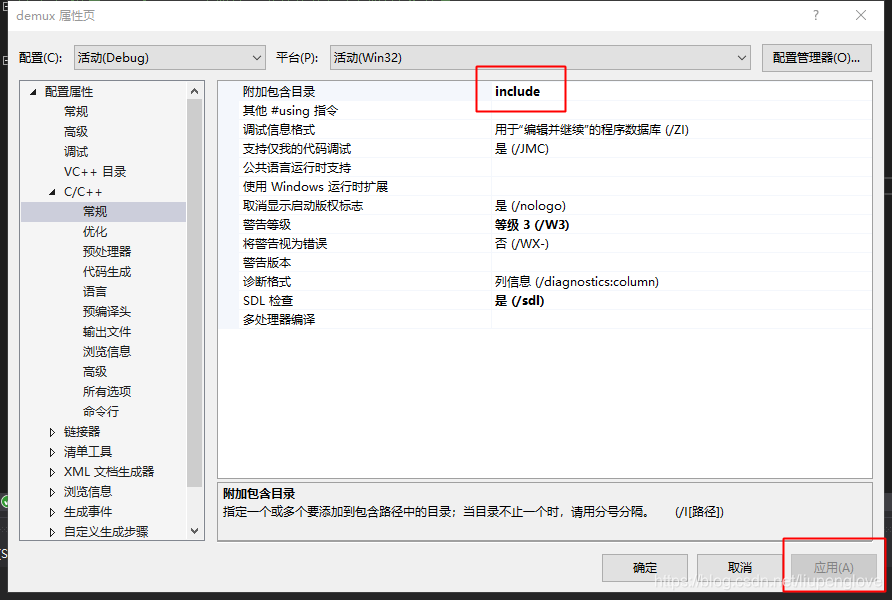
设置头文件包含路径:
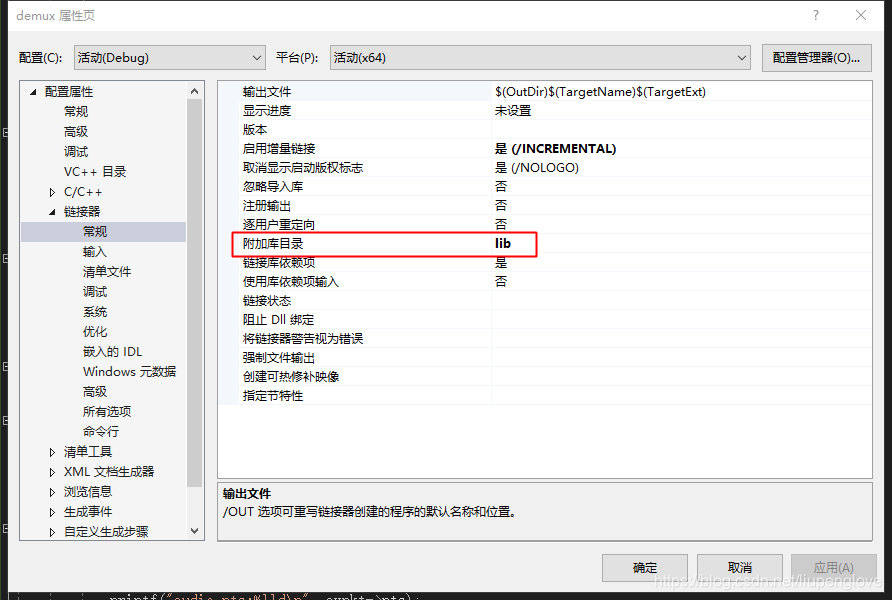
设置lib库目录:
设置附加依赖项
avcodec.lib
avdevice.lib
avfilter.lib
avformat.lib
avutil.lib
postproc.lib
swresample.lib
swscale.lib
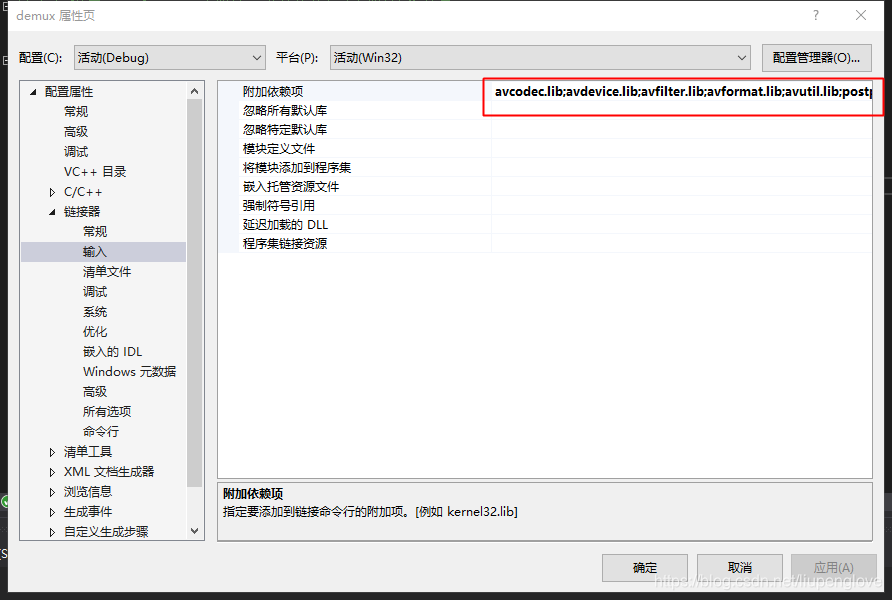
确定,配置完成。
3. 环境验证
如果debug这里是x86的话,改成x64,否则会调试不过。
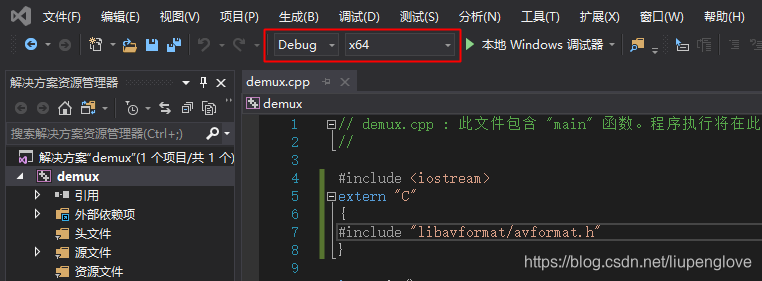
ffmpeg是使用c开发的,在c++环境调用ffmpeg库,需要使用extern “C”进行声明。
测试代码:
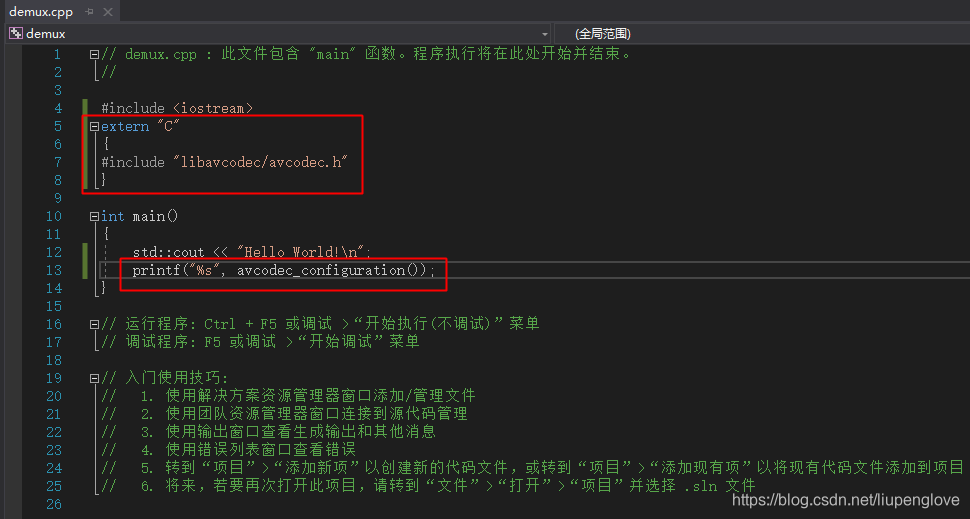
执行结果:
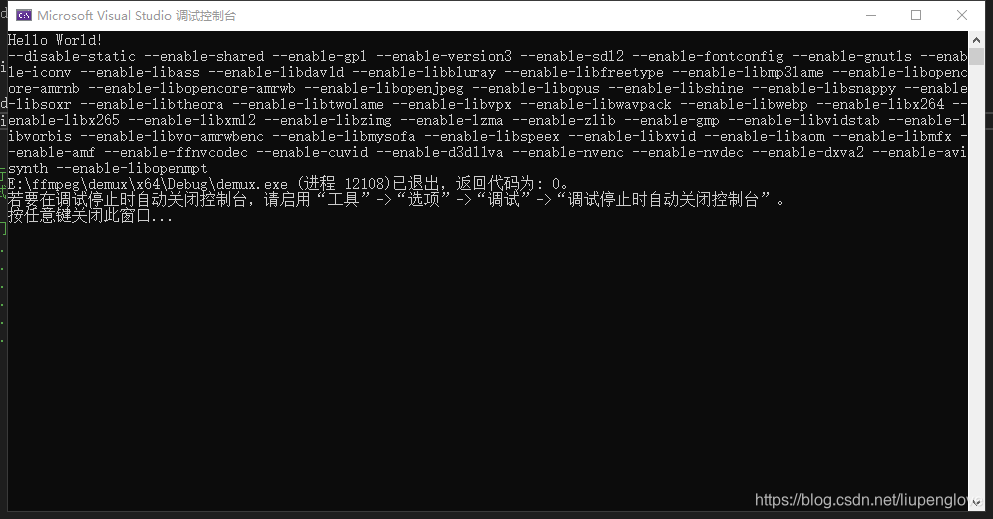
4. 练兵
将mp4文件解封装,解封装为两个文件,图像(h264)+音频(aac)文件.
下面的代码既是从visual studio中拷贝出来的,创建好控制台程序后,可以直接拷贝代码到vs中运行,测试的mp4文件名称为:test.mp4,输出文件为output.h264、output.aac,代码写死了,当然你也可以修改代码为任意名字。
// demux.cpp : 此文件包含 "main" 函数。程序执行将在此处开始并结束。
//

#include <iostream>
extern "C"
{
#include "libavformat/avformat.h"
}

int main()
{
	int ret = -1;
	int video_index = 0, audio_index = 0;
	unsigned int iloop = 0;

	const char* video_file = "output.h264";
	const char* audio_file = "output.aac";
	const char* output = "test.mp4";

	AVFormatContext* ifmt = NULL;
	AVFormatContext* ofmt_video = NULL;
	AVFormatContext* ofmt_audio = NULL;
	AVFormatContext* fmt;

	AVStream* in_stream = NULL;
	AVStream* out_stream = NULL;
	AVPacket* avpkt = av_packet_alloc();

	// 打开输入的文件
	ret = avformat_open_input(&ifmt, output, NULL, NULL);
	if (ret < 0)
	{
		printf("avformat_open_input fail,err=%d\n", ret);
		return -1;
	}

	ret = avformat_find_stream_info(ifmt, NULL);
	if (ret < 0)
	{
		printf("avformat_find_stream_info fail,err=%d\n", ret);
		return -2;
	}

	// 打开视频输出文件
	ret = avformat_alloc_output_context2(&ofmt_video, NULL, NULL, video_file);
	if (ret < 0)
	{
		printf("avformat_alloc_output_context2 video fail,err=%d\n", ret);
		return -3;
	}

	if (!(ofmt_video->flags & AVFMT_NOFILE))
	{
		ret = avio_open(&ofmt_video->pb, video_file, AVIO_FLAG_WRITE);
		if (ret < 0)
		{
			printf("avio_open video fail,err=%d\n", ret);
			return -4;
		}

	}
	// 打开音频输出文件
	ret = avformat_alloc_output_context2(&ofmt_audio, NULL, NULL, audio_file);
	if (ret < 0)
	{
		printf("avformat_alloc_output_context2 audio fail,err=%d\n", ret);
		return -5;
	}
	if (!(ofmt_audio->flags & AVFMT_NOFILE))
	{
		ret = avio_open(&ofmt_audio->pb, audio_file, AVIO_FLAG_WRITE);
		if (ret < 0)
		{
			printf("avio_open audio fail,err=%d\n", ret);
			return -6;
		}
	}

	// 对输出的音视频文件添加流
	for (iloop = 0; iloop < ifmt->nb_streams; iloop++)
	{
		in_stream = ifmt->streams[iloop];
		if (in_stream->codecpar->codec_type == AVMEDIA_TYPE_VIDEO)
		{
			video_index = iloop;
			out_stream = avformat_new_stream(ofmt_video, NULL);
			avcodec_parameters_copy(out_stream->codecpar, in_stream->codecpar);
			out_stream->codecpar->codec_tag = 0;
		}
		else if (ifmt->streams[iloop]->codecpar->codec_type == AVMEDIA_TYPE_AUDIO)
		{
			audio_index = iloop;
			out_stream = avformat_new_stream(ofmt_audio, NULL);
			avcodec_parameters_copy(out_stream->codecpar, in_stream->codecpar);
			out_stream->codecpar->codec_tag = 0;
		}
		else
		{
			continue;
		}
	}

	// 写header
	ret = avformat_write_header(ofmt_video, NULL);
	if (ret < 0)
	{
		printf("avformat_write_header video fail,err=%d\n", ret);
		return -7;
	}

	ret = avformat_write_header(ofmt_audio, NULL);
	if (ret < 0)
	{
		printf("avformat_write_header audio fail,err=%d\n", ret);
		return -8;
	}

	while (av_read_frame(ifmt, avpkt) >= 0)
	{
		in_stream = ifmt->streams[avpkt->stream_index];
		if (avpkt->stream_index == video_index)
		{
			out_stream = ofmt_video->streams[0];
			fmt = ofmt_video;
			//printf("video pts:%ld\n", avpkt->pts);
		}
		else if (avpkt->stream_index == audio_index)
		{
			out_stream = ofmt_audio->streams[0];
			fmt = ofmt_audio;
			printf("audio pts:%lld\n", avpkt->pts);
		}
		else
		{
			continue;
		}
		// 转换pts
		avpkt->pts = av_rescale_q_rnd(avpkt->pts, in_stream->time_base, out_stream->time_base, (AVRounding)(AV_ROUND_NEAR_INF | AV_ROUND_PASS_MINMAX));
		avpkt->stream_index = 0;

		// 写数据
		av_interleaved_write_frame(fmt, avpkt);
		av_packet_unref(avpkt);

	}
	av_write_trailer(ofmt_audio);
	av_write_trailer(ofmt_video);

	// 释放资源
	avformat_close_input(&ifmt);
	avformat_free_context(ofmt_video);
	avformat_free_context(ofmt_audio);
	av_packet_free(&avpkt);
}
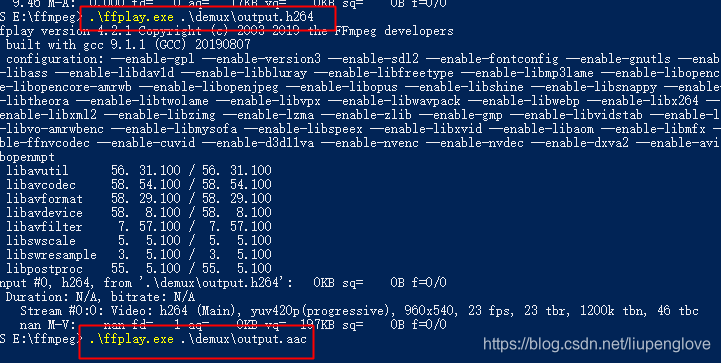
执行代码后,会生成两个文件,output.h264、output.aac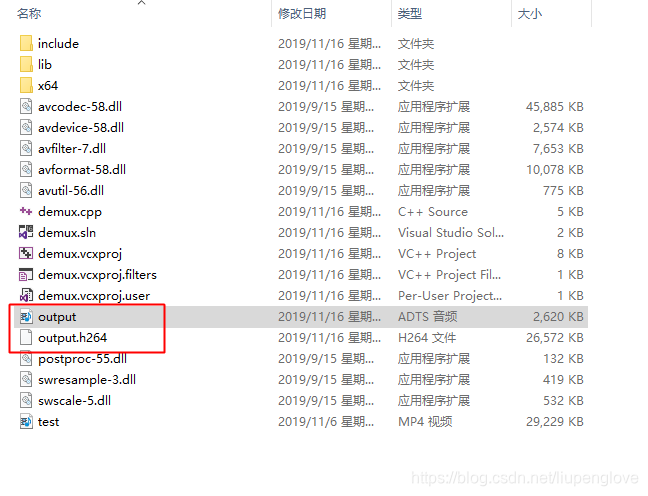
如何验证生成的两个文件是否正确呢,可以使用ffplay进行播放
5.说明
对于ffmpeg的初学者,强烈建议在Windows下使用visual studio学习,代码执行过程中加上断点各个变量的值一目了然,最开始我是在linux下编程学习,非常不直观,事倍功半,效率低下,浪费了大量时间,后来才转战到Windows下,学习效率大大提升。
觉着这篇文章对自己有益的土豪朋友可以扫描屏幕下方二维码金额随意,感谢大家支持,增加写作动力。


北京人形旗下天工造物具身智能开源社区,聚焦具身天工与慧思开物两大平台
更多推荐
 9
9 0
0- 0


 已为社区贡献6条内容

所有评论(0)