linux主机搭建gitlab以及使用教程
准备工作:
首先在部署gitlab之前,我们先提前安装好所需要的依赖以及辅助程序
[root@repo ~]# yum install -y curl policycoreutils-python openssh-server postfix
[root@repo ~]# systemctl enable postfix
[root@repo ~]# systemctl status postfix
[root@repo ~]# systemctl start postfix
尽量保证主机80,8080端口没被占用,因为gitlab运行起来unicorn maste 会占用8080端口,nginx会占用80端口
开始部署gitlab-ce:
采用清华大学的镜像仓库资源:https://mirrors.tuna.tsinghua.edu.cn/ ,
找到 gitlab-ce;注意要找的是-ce版的,这个社区版免费;然后centos应该是yum目录,之后el7,找打对应版本复制下载链接即可
[root@repo ~]#  wget https://mirrors.tuna.tsinghua.edu.cn/gitlab-ce/yum/el7/gitlab-ce-10.0.0-ce.0.el7.x86_64.rpm
[root@repo ~]#  rpm -i gitlab-ce-10.0.0-ce.0.el7.x86_64.rpm
下载之后,直接用rpm命令安装
安装完毕后,修改一下gitlab的配置文件:
[root@repo ~]# vim  /etc/gitlab/gitlab.rb
##! For more details on configuring external_url see:
##! https://docs.gitlab.com/omnibus/settings/configuration.html#configuring-the-external-url-for-gitlab
external_url 'http://139.196.96.26'

## Legend
##! The following notations at the beginning of each line may be used to
##! differentiate between components of this file and to easily select them using
配置文件正常的跑起来基本不用改太多,我们这里把
external_url 'http://139.196.96.26' # 引号里的绿色部分地址改成自己的IP,如果是阿里云等等公有云主机,那么这里就填写内网对应的公网IP地址填进去,就是我们平时能ssh连接上的那个IP,如果是虚拟机等等,直接换成eth0的那个IP即可
加载配置:
[root@repo ~]# gitlab-ctl reconfigure启动gitlab:
[root@repo ~]# gitlab-ctl restart第一次操作这两个步骤相对比较慢,耐心等待执行完毕;
看到一排都是ok: run:则表示gitlab已经正式启动起来了。
大致浏览一下运行环境,看看有没有什么异常情况
[root@repo ~]# netstat -tnlpu|grep 8080
tcp        0      0 127.0.0.1:8080          0.0.0.0:*               LISTEN      12041/unicorn maste
[root@repo ~]#
[root@repo ~]#
[root@repo ~]# ps -ef|grep 12041
git      12041     1  0 13:44 ?        00:00:13 unicorn master -D -E production -c /var/opt/gitlab/gitlab-rails/etc/unicorn.rb /opt/gitlab/embedded/service/gitlab-rails/config.ru
git      13062 12041  0 13:45 ?        00:00:06 unicorn worker[0] -D -E production -c /var/opt/gitlab/gitlab-rails/etc/unicorn.rb /opt/gitlab/embedded/service/gitlab-rails/config.ru
git      13065 12041  0 13:45 ?        00:00:06 unicorn worker[1] -D -E production -c /var/opt/gitlab/gitlab-rails/etc/unicorn.rb /opt/gitlab/embedded/service/gitlab-rails/config.ru
git      13068 12041  0 13:45 ?        00:00:06 unicorn worker[2] -D -E production -c /var/opt/gitlab/gitlab-rails/etc/unicorn.rb /opt/gitlab/embedded/service/gitlab-rails/config.ru
root     14155  8082  0 15:20 pts/0    00:00:00 grep --color=auto 12041
git      20785 12041  0 14:14 ?        00:00:05 unicorn worker[3] -D -E production -c /var/opt/gitlab/gitlab-rails/etc/unicorn.rb /opt/gitlab/embedded/service/gitlab-rails/config.ru
git      30963 12041  0 14:09 ?        00:00:04 unicorn worker[4] -D -E production -c /var/opt/gitlab/gitlab-rails/etc/unicorn.rb /opt/gitlab/embedded/service/gitlab-rails/config.ru
[root@repo ~]#
[root@repo ~]#
[root@repo ~]# gitlab-ctl status
run: gitaly: (pid 11297) 5783s; run: log: (pid 1059) 336254s
run: gitlab-monitor: (pid 11346) 5783s; run: log: (pid 1050) 336254s
run: gitlab-workhorse: (pid 11385) 5782s; run: log: (pid 1060) 336254s
run: logrotate: (pid 4947) 2182s; run: log: (pid 1061) 336254s
run: nginx: (pid 11550) 5781s; run: log: (pid 1073) 336254s
run: node-exporter: (pid 11558) 5781s; run: log: (pid 1052) 336254s
run: postgres-exporter: (pid 11641) 5781s; run: log: (pid 1062) 336254s
run: postgresql: (pid 11764) 5780s; run: log: (pid 1066) 336254s
run: prometheus: (pid 11772) 5780s; run: log: (pid 1057) 336254s
run: redis: (pid 11783) 5779s; run: log: (pid 1074) 336254s
run: redis-exporter: (pid 11788) 5779s; run: log: (pid 1056) 336254s
run: sidekiq: (pid 11888) 5778s; run: log: (pid 1049) 336254s
run: unicorn: (pid 12022) 5777s; run: log: (pid 1064) 336254s
看上去都一切正常
如果没有域名可以用,那直接用刚才配置文件里修改的IP地址加端口即可打开
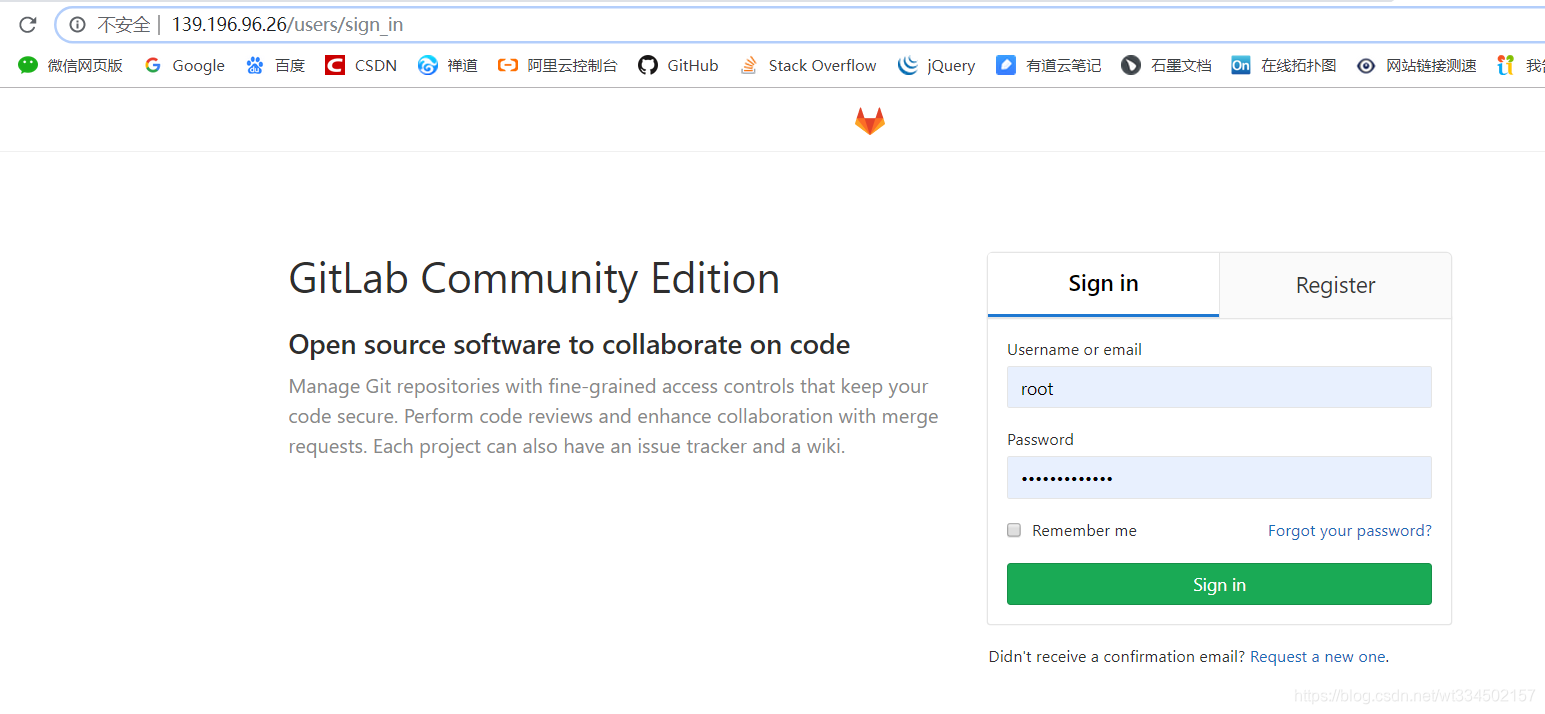
创建新用户:
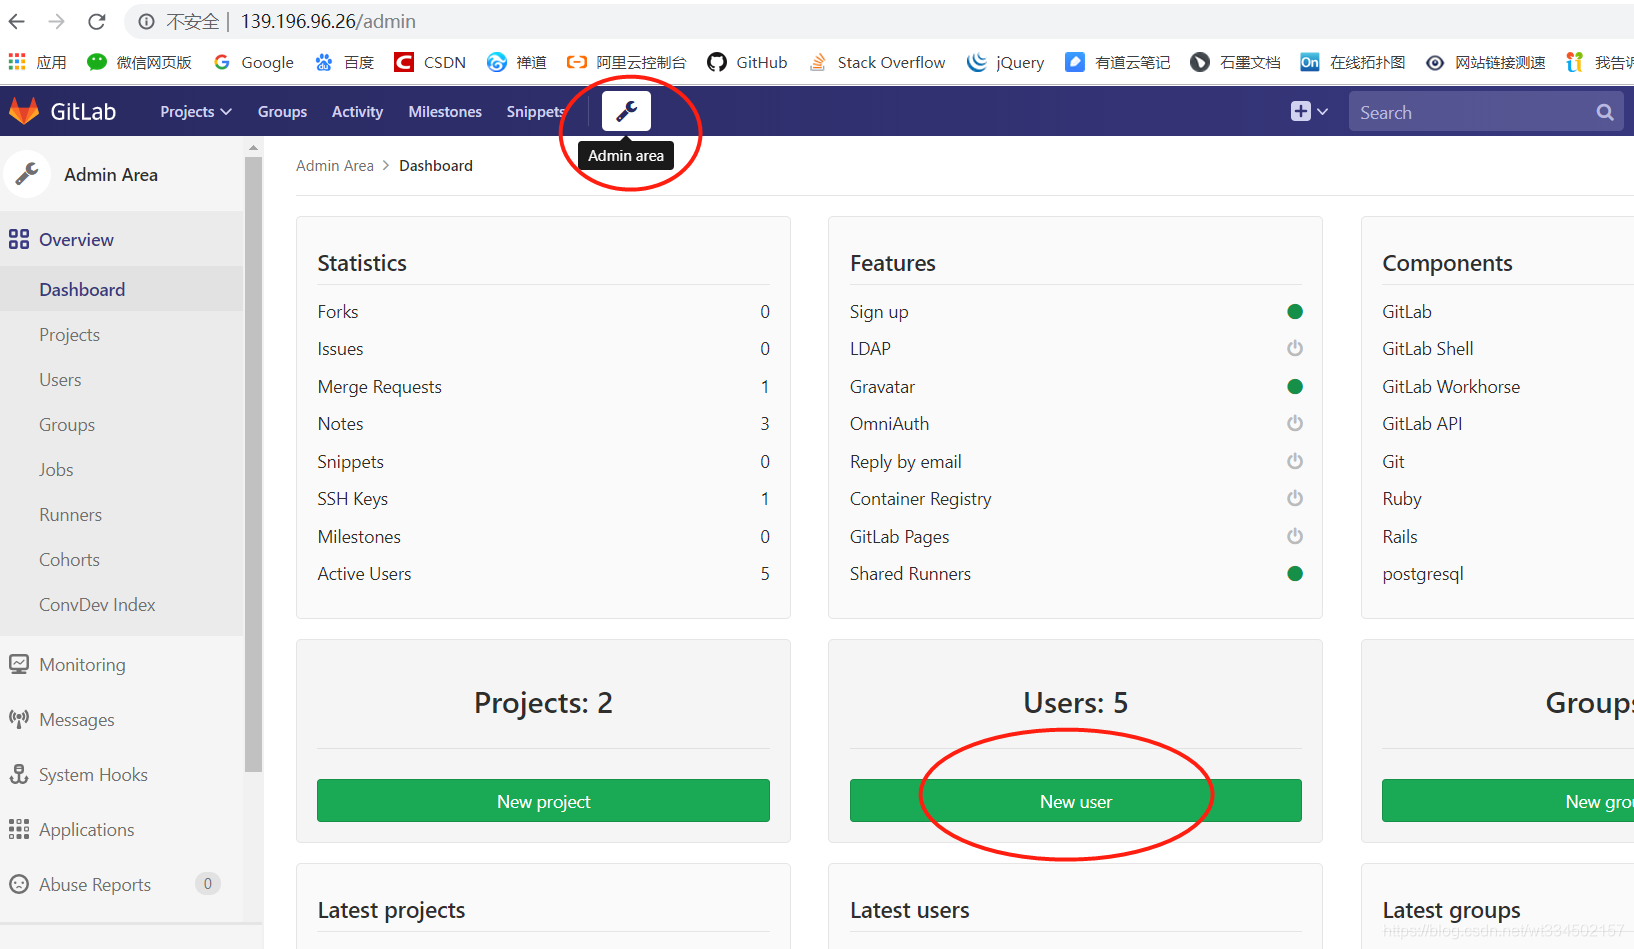
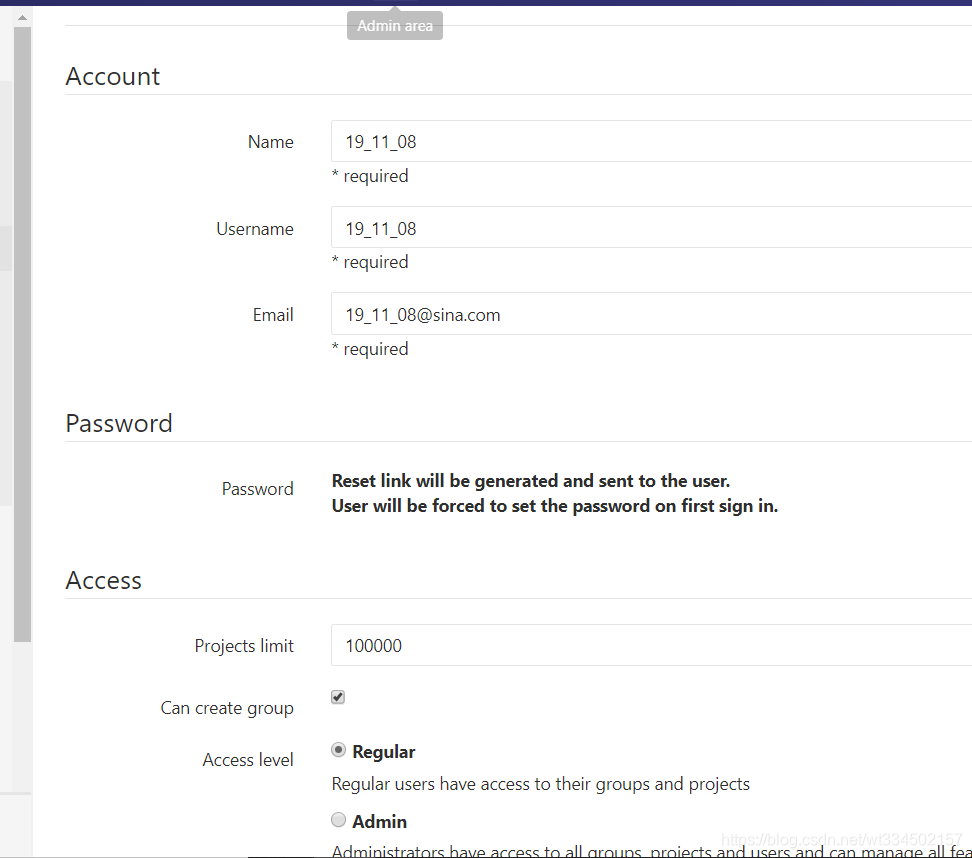
然后点击create user创建用户即可。
创建新项目:
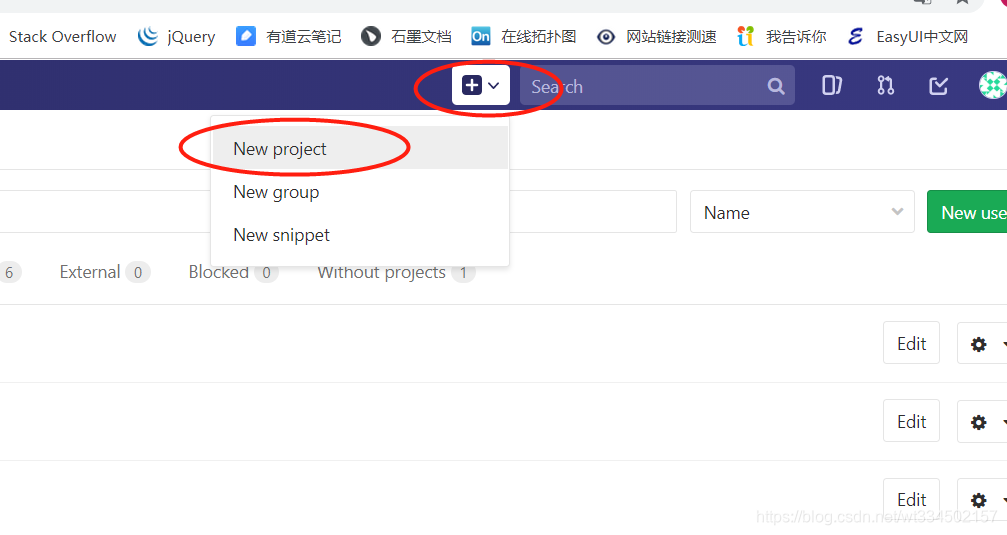
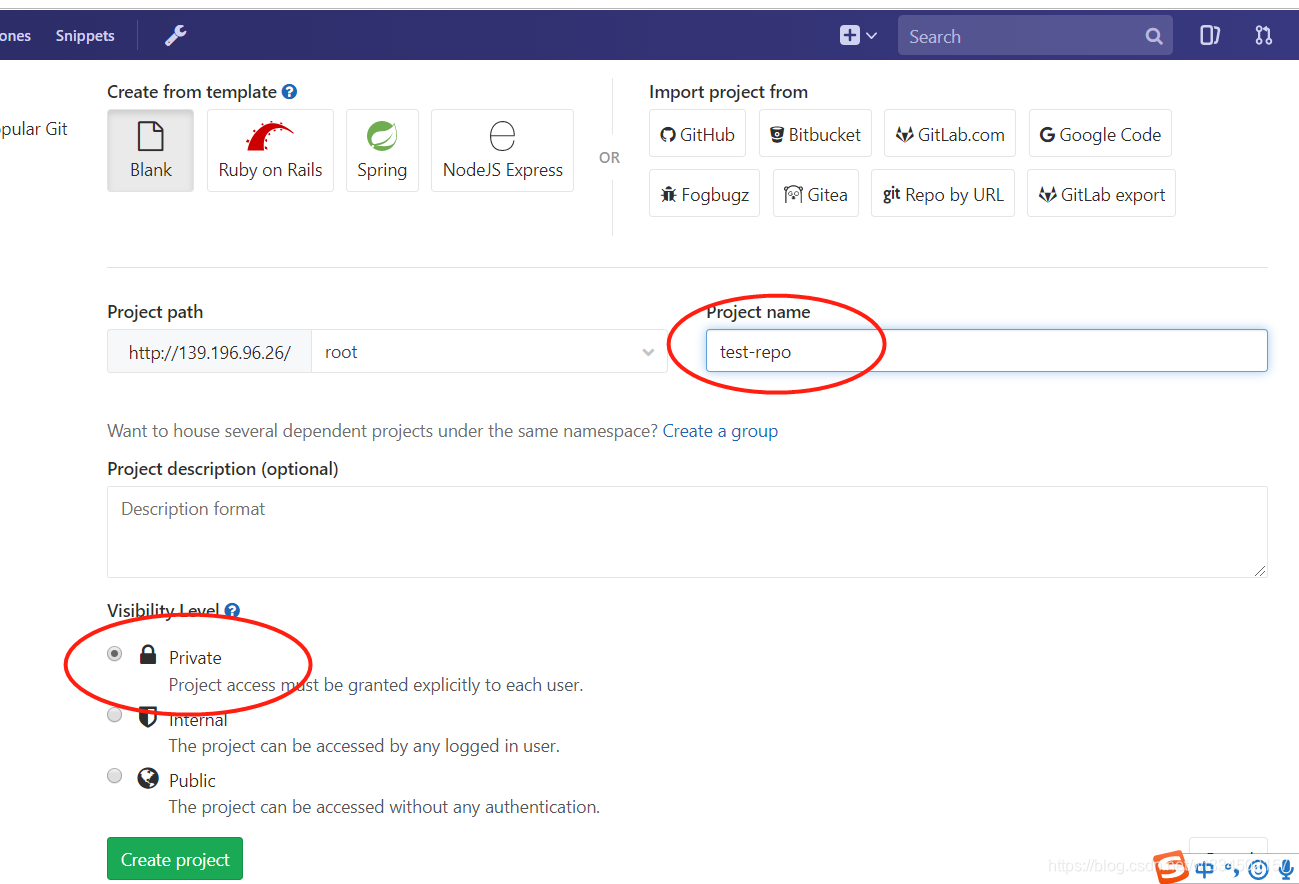
然后点击create project 创建项目即可。
给项目添加用户权限设置:
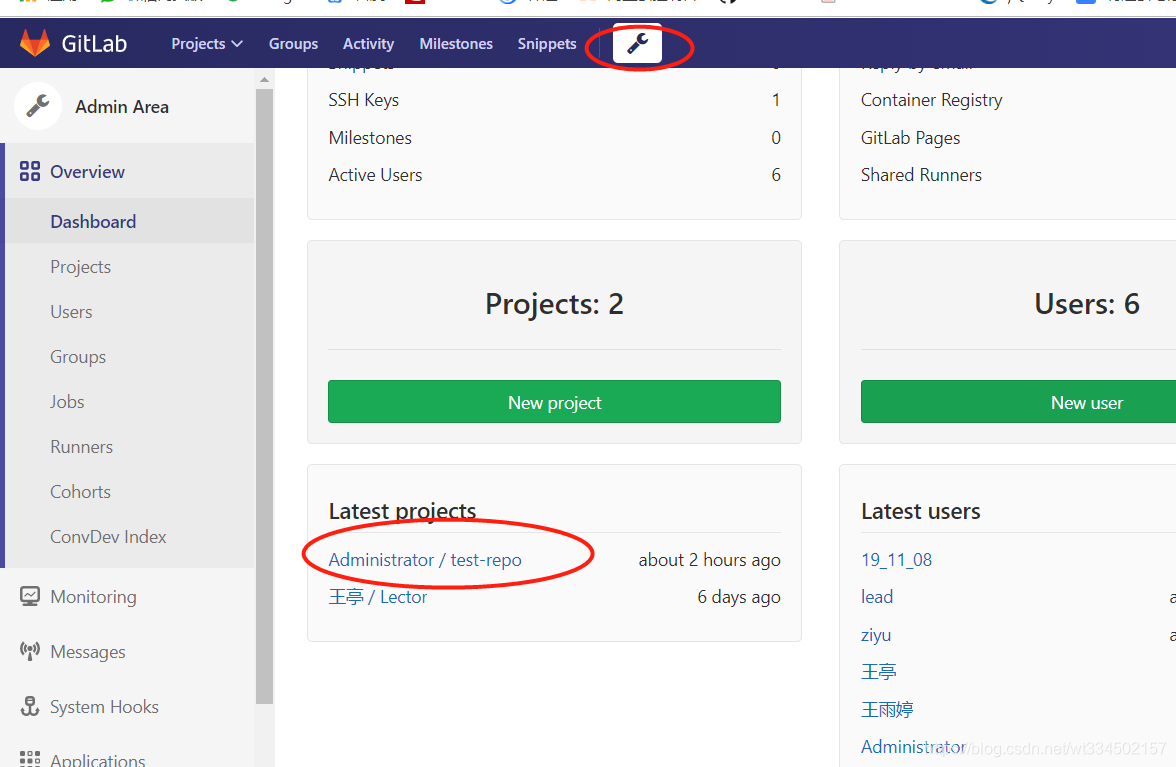
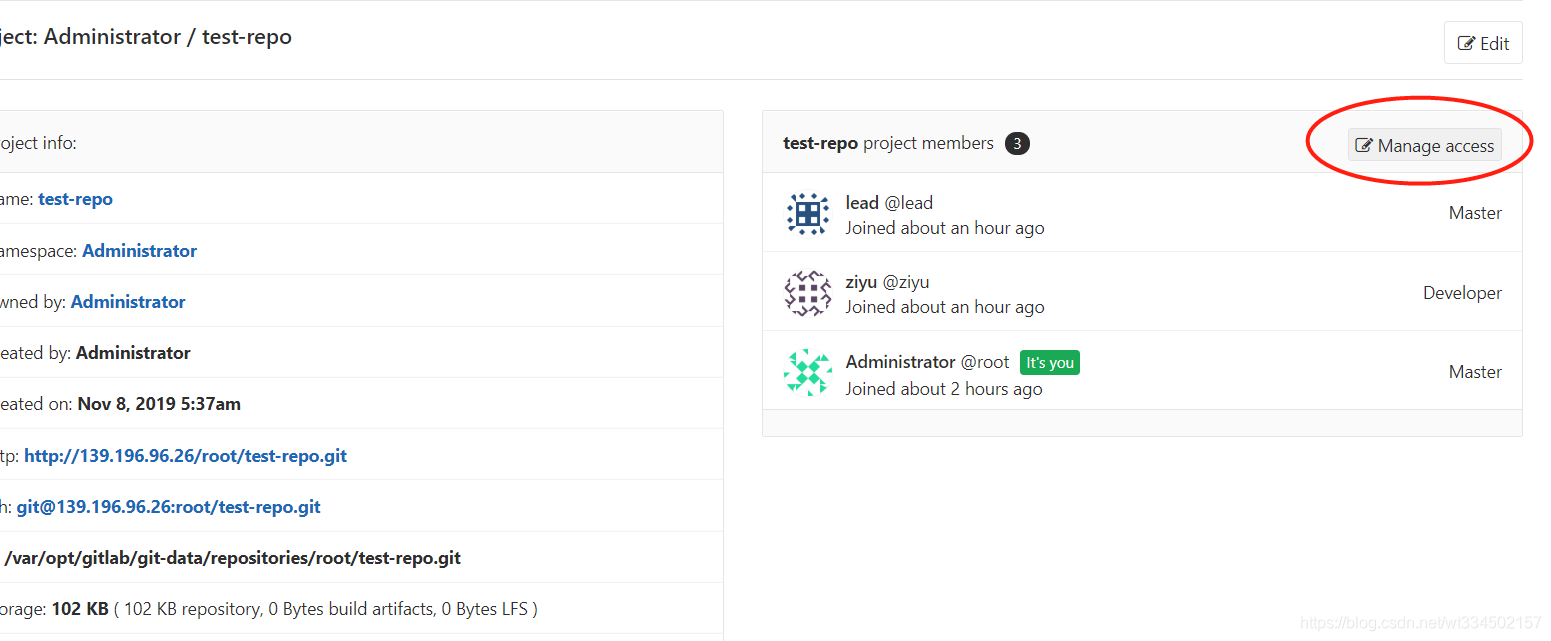
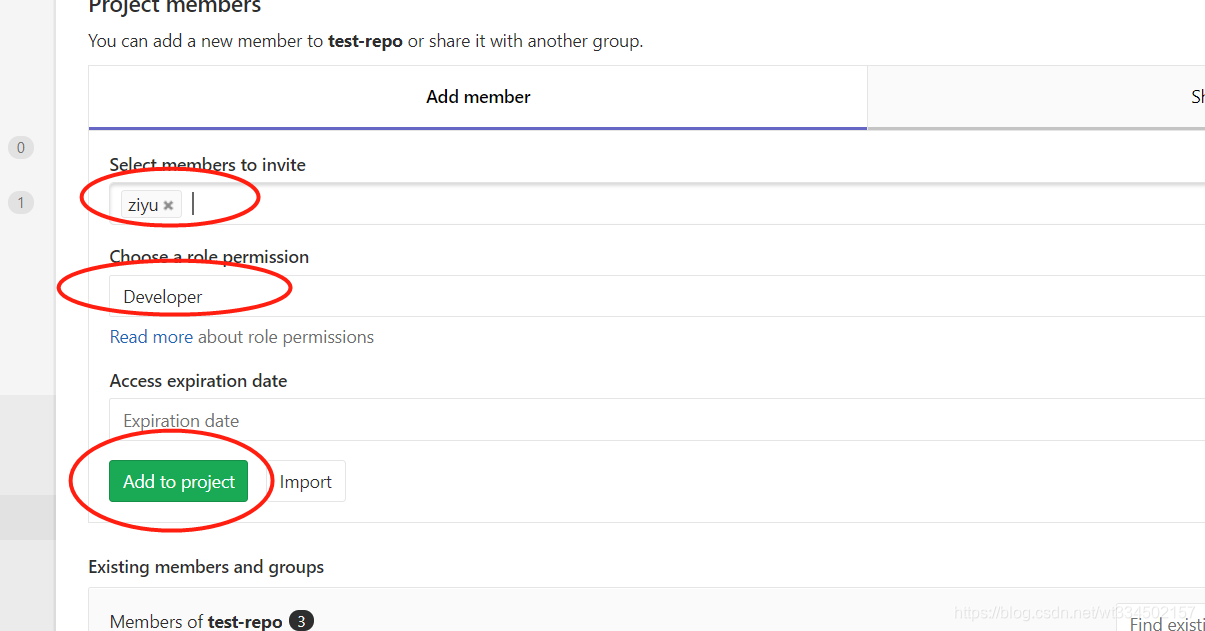
把需要添加的用户找到,然后第二个选项是赋予什么权限,一般的开发就开Developer;领导以及主要负责项目的负责人就给Master
开发人员拉取代码修改并推送:
然后我们回到Windows桌面上模拟一下开发人员开始敲代码合并代码
安装一个gitbash
桌面上创建一个repo文件夹
打开Git Bash终端
33450@DESKTOP-A9IC4BG MINGW64 ~
$ cd Desktop/

33450@DESKTOP-A9IC4BG MINGW64 ~/Desktop
$ cd repo

33450@DESKTOP-A9IC4BG MINGW64 ~/Desktop/repo
$ git -c http.sslVerify-false clone http://139.196.96.26/root/test-repo.git
Cloning into 'test-repo'...
remote: Counting objects: 3, done.
remote: Total 3 (delta 0), reused 0 (delta 0)
Unpacking objects: 100% (3/3), done.

33450@DESKTOP-A9IC4BG MINGW64 ~/Desktop/repo
$ git checkout -b release-3.0
Switched to a new branch 'release-3.0'
33450@DESKTOP-A9IC4BG MINGW64 ~/Desktop/repo
$ vim test.py

print "this is a test for wangting!and version=release-3.0"

wq

33450@DESKTOP-A9IC4BG MINGW64 ~/Desktop/repo
$ git add .

33450@DESKTOP-A9IC4BG MINGW64 ~/Desktop/repo
$ git commit -m"release-3.0"
[release-1.0 2066dc1] release-3.0
 1 file changed, 1 insertion(+), 1 deletion(-)

33450@DESKTOP-A9IC4BG MINGW64 ~/Desktop/repo(release-3.0)
$ git -c http.sslVerify=false push origin release-3.0
Enumerating objects: 5, done.
Counting objects: 100% (5/5), done.
Delta compression using up to 8 threads.
Compressing objects: 100% (2/2), done.
Writing objects: 100% (3/3), 263 bytes | 263.00 KiB/s, done.
Total 3 (delta 1), reused 0 (delta 0)
remote:
remote: To create a merge request for release-3.0, visit:
remote:   http://139.196.96.26/root/test-repo/merge_requests/new?merge_request%5Bsource_branch%5D=release-3.0
remote:
To http://139.196.96.26/root/test-repo.git
 * [new branch]      release-3.0 -> release-3.0
这里的操作相当于一个普通的开发人员去gitlab仓库上拉了一个项目到本地,改代码,然后推送到gitlab;
请求分支并入到master:
推送完之后,打开gitlab,之前推拉代码仓库改代码的用户去登录
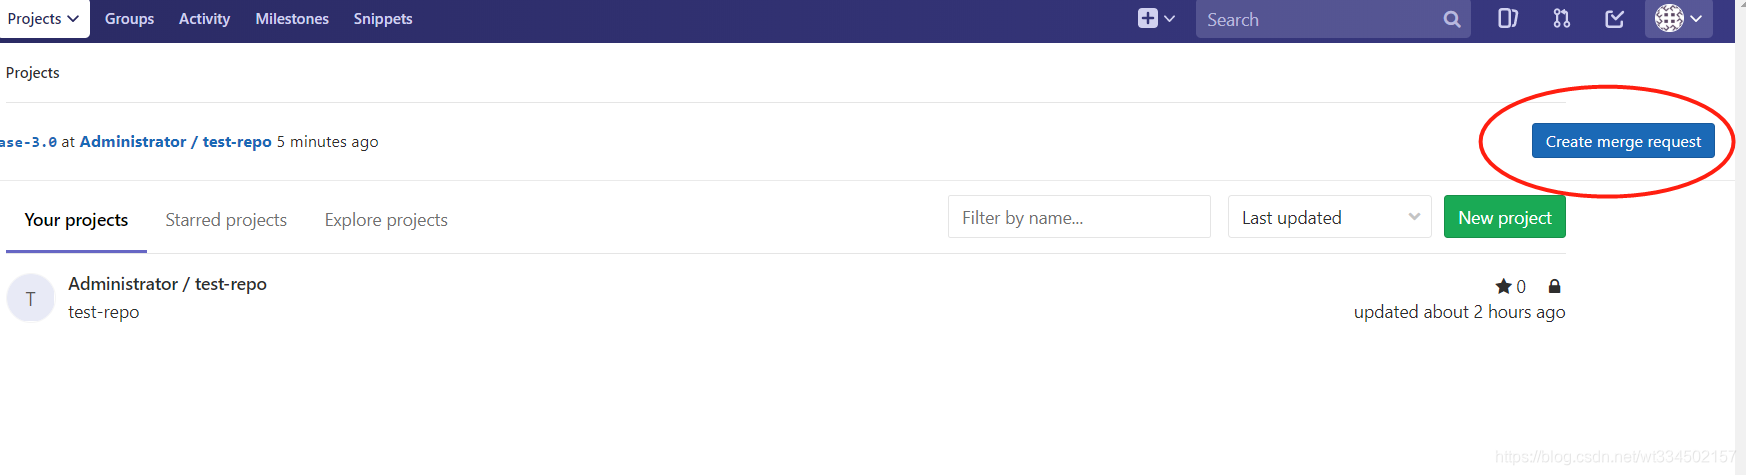
点击Create merge request,相当于创建一个合并到master的请求
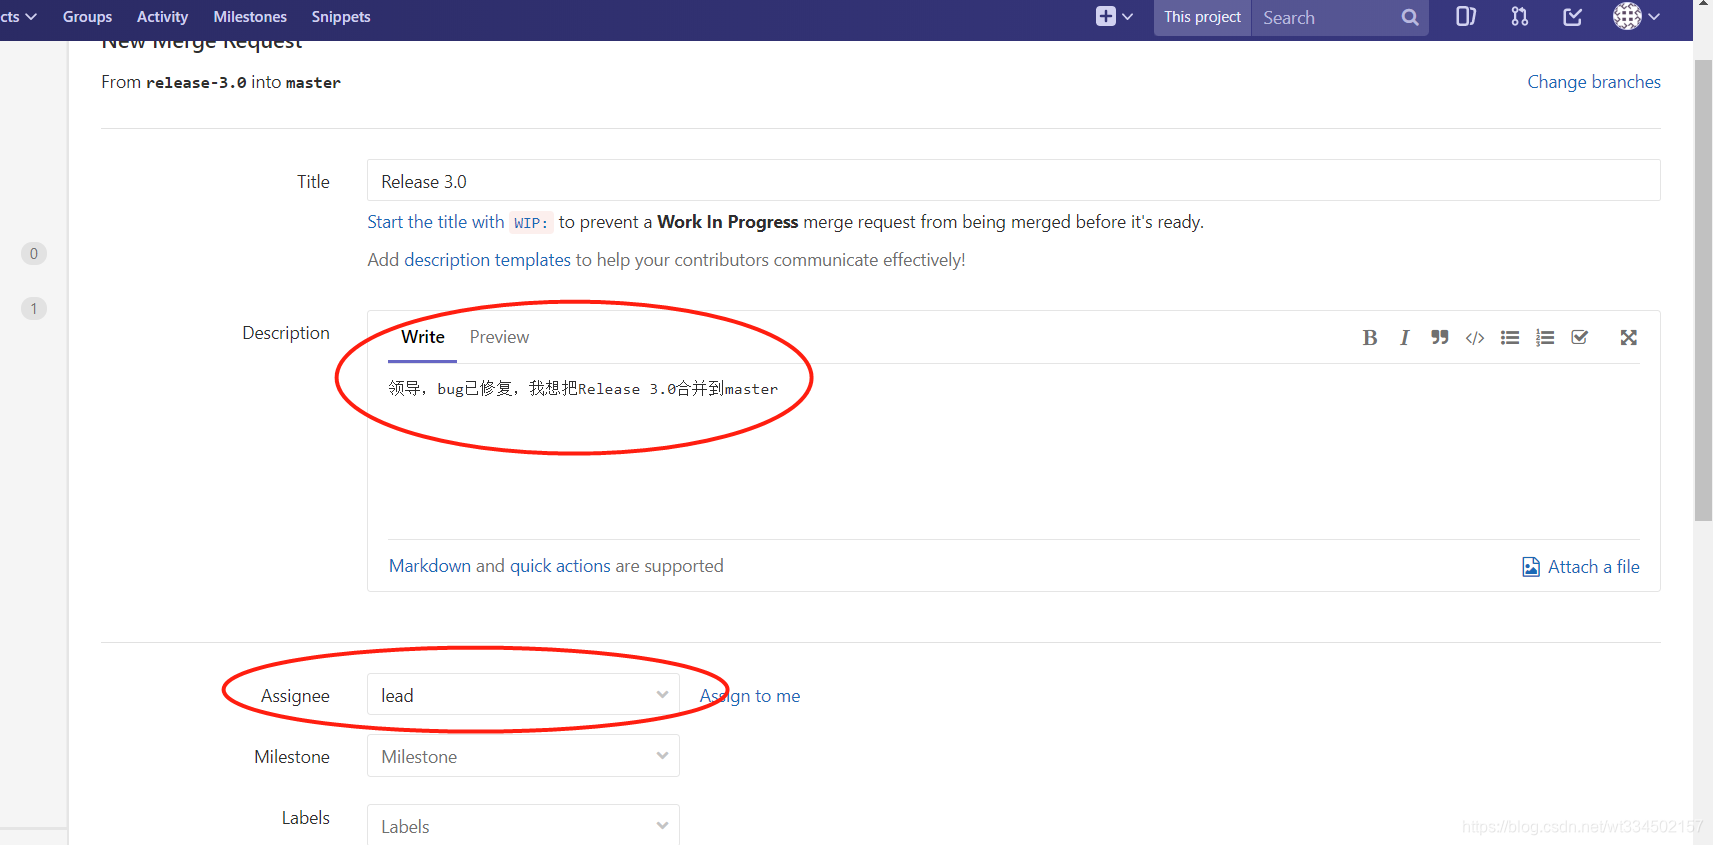
需要改的地方有3个
Title :合并的主题名称
Description: 内容描述
Assignee:审批人是谁,选出来master管理者
然后点提交,等待领导审批合并
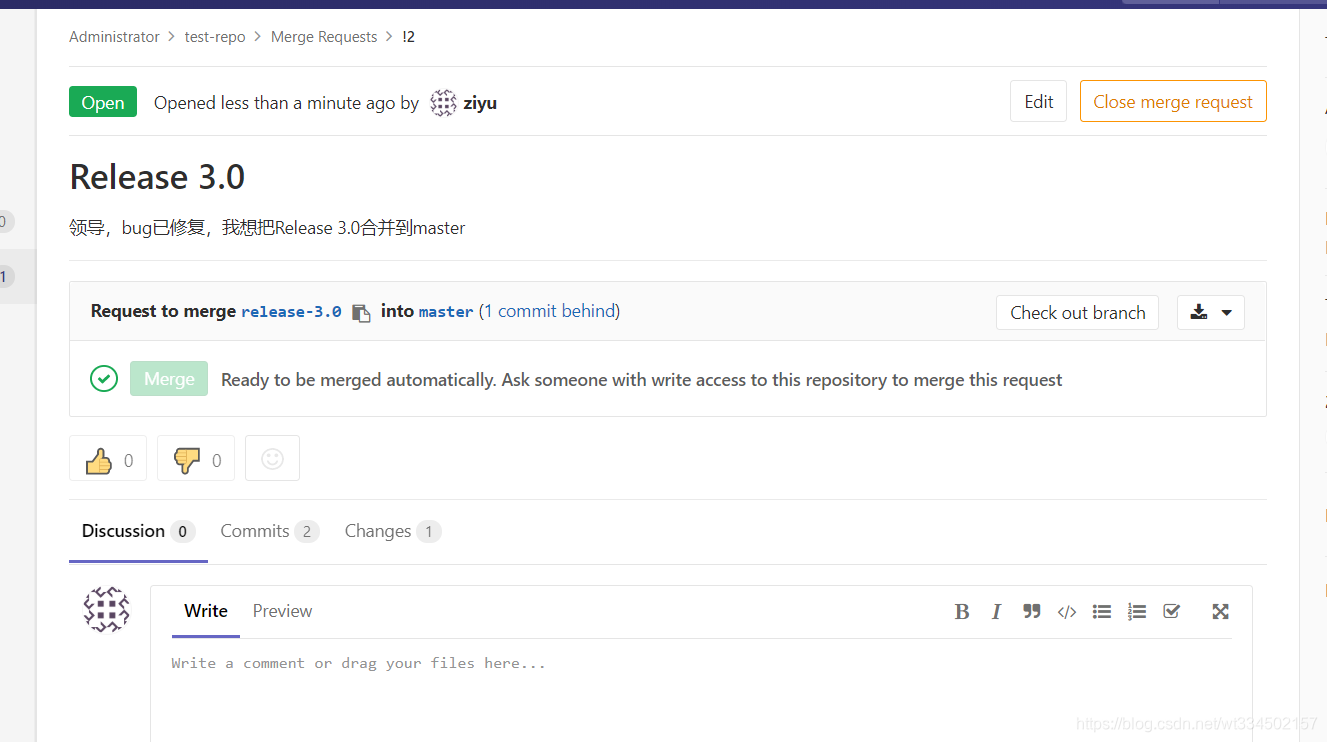
此时,lead用户就会有消息提示,如图:
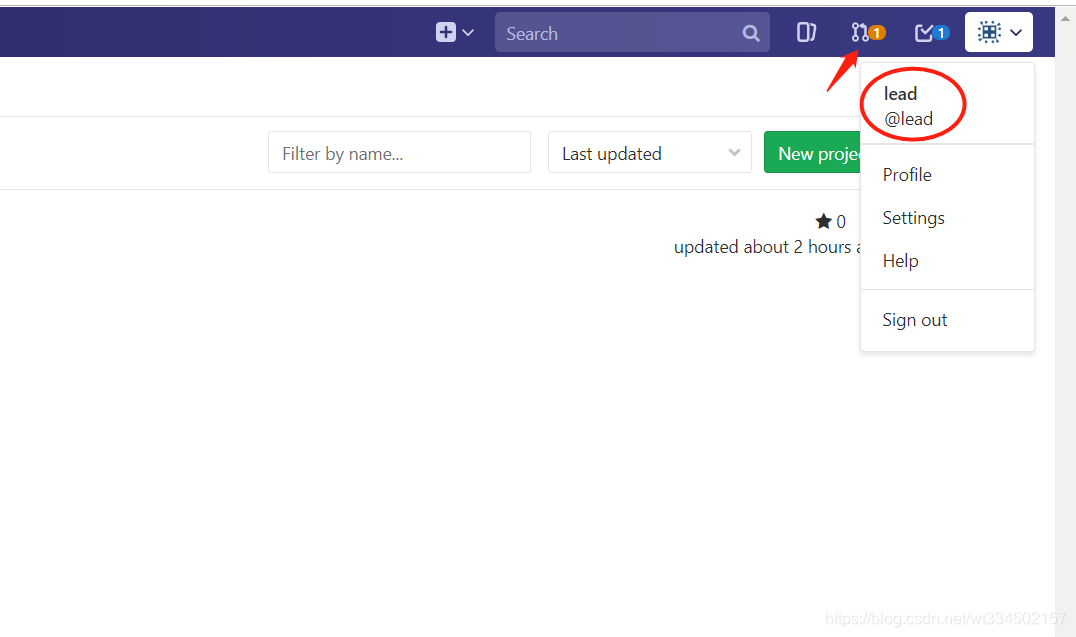
然后打开消息,就能看到release3.0请求并入master的消息了,打开
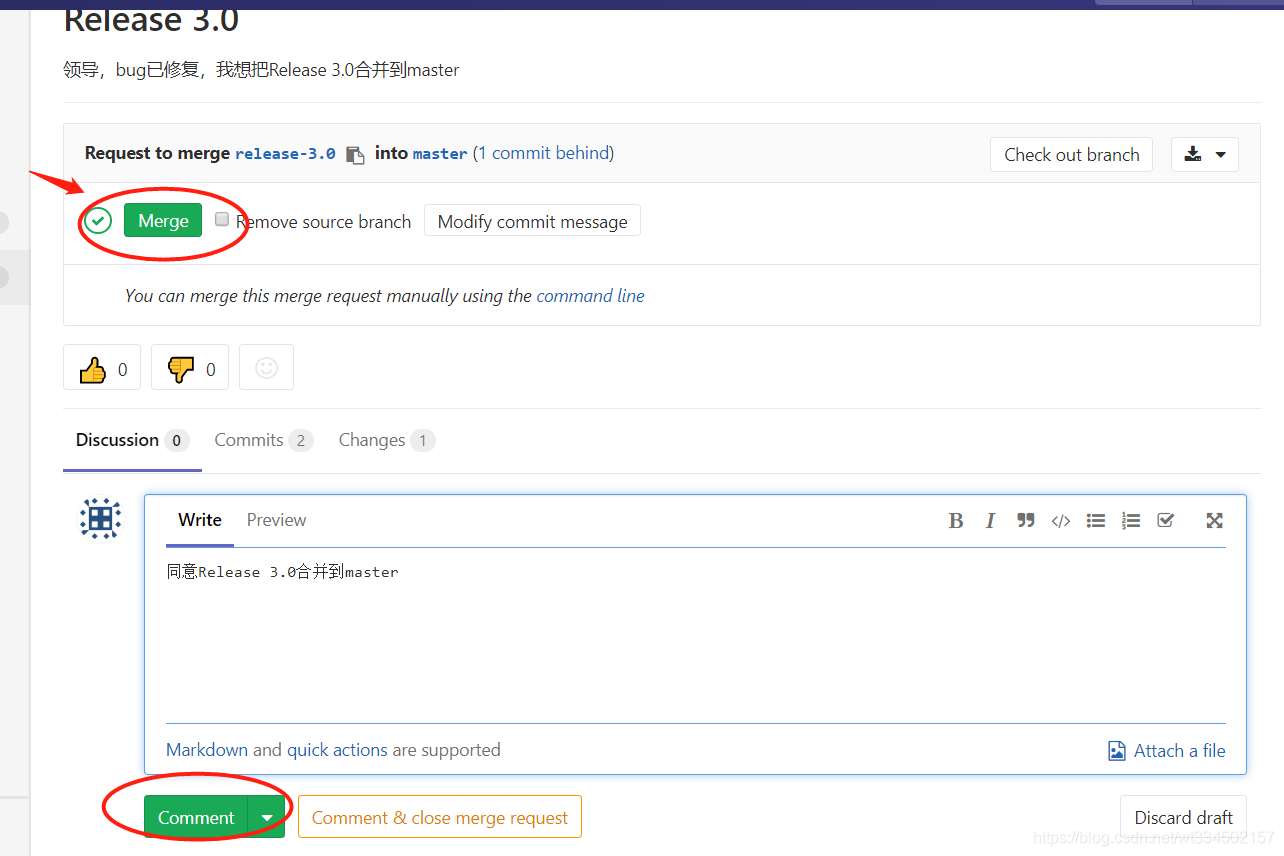
点一下Merge,然后点Comment,截止到此;我们去查看一下项目来验证一下
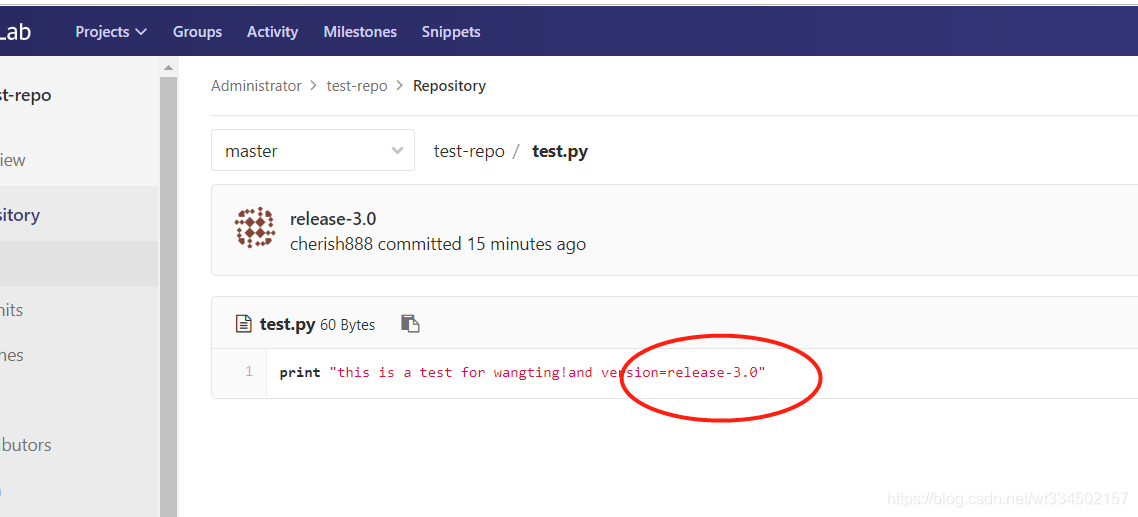
可以看到项目的master信息已经更新了内容,说明push至git,并入master成功!
配置邮件系统:
这里举例发送到QQ邮箱,考虑到大家基本人手一个QQ号,所以同步实践相对方便,先打开QQ邮箱

然后是账户选项,账户安全,开启SMTP服务
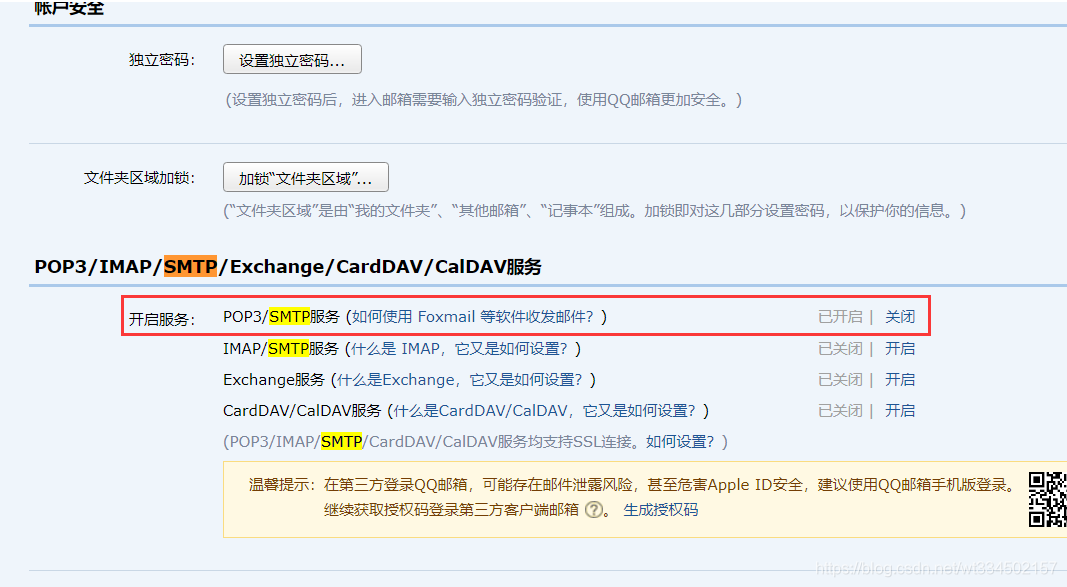
这里开启会有一个授权码(一串英文字符):类似这样的 dwnzfemnsqjcbgcc,这个配置gitlab邮件服务参数的时候需要用到,所以先到QQ邮箱上开启SMTP拿到这个授权码
第二,确认一下邮件服务已开启,本文档开头就已经开启了服务 systemctl start postfix
需要更改配置文件 /etc/gitlab/gitlab.rb, 找到如下这些参数
[root@repo ~]#
[root@repo ~]# cat /etc/gitlab/gitlab.rb |grep -vE "^#|^$|external_url"
gitlab_rails['gitlab_email_from'] = '你的QQ号@qq.com'    # <---注意换成你的QQ号
gitlab_rails['smtp_enable'] = true
gitlab_rails['smtp_address'] = "smtp.qq.com"            # smtp.qq.com
gitlab_rails['smtp_port'] = 465
gitlab_rails['smtp_user_name'] = "你的QQ号@qq.com"       # <---注意换成你的QQ号
gitlab_rails['smtp_password'] = "dwnzfemnsqjcbgcc"      # <---这里换成你的SMTP那个授权码
gitlab_rails['smtp_domain'] = "qq.com"                  # qq.com
gitlab_rails['smtp_authentication'] = "login"
gitlab_rails['smtp_enable_starttls_auto'] = true
gitlab_rails['smtp_tls'] = true                          # 改成true

user['git_user_email'] = "你的QQ号@qq.com"              # <---注意换成你的QQ号

## 注意,以上这些内容都需要打开注释

[root@repo ~]# gitlab-ctl reconfigure
[root@repo ~]#
[root@repo ~]# gitlab-rails console              # 这个执行后相当于调用邮件,需要等待一下
Loading production environment (Rails 4.2.8)
irb(main):001:0>
irb(main):047:0* Notify.test_email('你的QQ号@qq.com','标题_怀旧服开了','正文_怀旧服已经开了,哥们快来一起肝呐').deliver_now

Notify#test_email: processed outbound mail in 0.7ms

Sent mail to 399999999@qq.com (1408.9ms)
Date: Tue, 12 Nov 2019 15:39:59 +0800
邮件发送格式
Notify.test_email('收件人QQ@qq.com','标题_怀旧服开了','正文_怀旧服已经开了,哥们快来一起肝呐').deliver_now
模板 Notify.test_email('收件人QQ@qq.com','写标题','写正文').deliver_now
打开QQ邮箱验证一下:

OK,邮箱配置已经成功了!

北京人形旗下天工造物具身智能开源社区,聚焦具身天工与慧思开物两大平台
更多推荐
 1
1 0
0- 0


 已为社区贡献5条内容

所有评论(0)