mysql(6)- mysql数据库之读写分离
知识点:
- 读写分离的作用
- 实现方式:解决读写分离的方案有两种
- 应用层解决:
- 第一种方式是我们最常用的方式,就是定义2个数据库连接,一个是MasterDataSource,另一个是SlaveDataSource。更新数据时我们读取MasterDataSource,查询数据时我们读取SlaveDataSource。这种方式很简单,我就不赘述了。
- 第二种方式动态数据源切换,就是在程序运行时,把数据源动态织入到程序中,从而选择读取主库还是从库。主要使用的技术是:Annotation,Spring AOP ,反射。
例如:使用Spring AOP实现MySQL数据库读写分离
- 中间件解决
- 应用层解决:
- 使用Spring AOP实现MySQL数据库读写分离案例(如何将读写分离以一个切面的方式载入,如图所示)
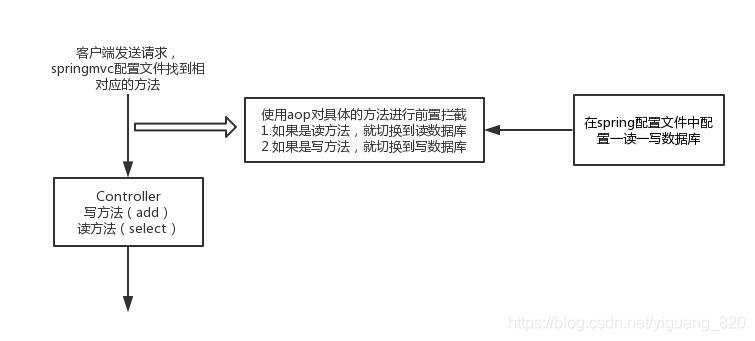
- 第一步:控制器:UserContoller模拟读写数据
- 第二步:读写数据源:spring-db.xml读写数据源配置
- 第三步:数据源选择:ChooseDataSource类
- 第四步:控制器中的具体方法进行拦截:DataSourceAspect进行具体方法的AOP拦截
- 第五步:数据源处理类:DataSourceHandler,数据源的Handler类
- 总结
一.作用
我们一般应用对数据库而言都是“读多写少”,也就说对数据库读取数据的压力比较大,有一个思路就是说采用数据库集群的方案,其中一个是主库,负责写入数据,我们称之为:写库;
其它都是从库,负责读取数据,我们称之为:读库;
那么,对我们的要求是:
- 读库和写库的数据一致;
- 写数据必须写到写库;
- 读数据必须到读库;
二.实现
2.1. 应用层解决:
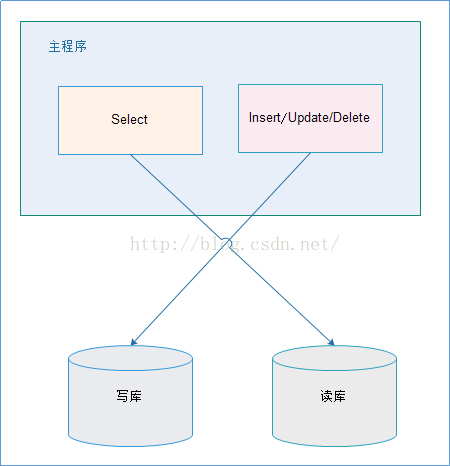
优点:
- 多数据源切换方便,由程序自动完成;
- 不需要引入中间件;
- 理论上支持任何数据库;
缺点:
- 由程序员完成,运维参与不到;
- 不能做到动态增加数据源;
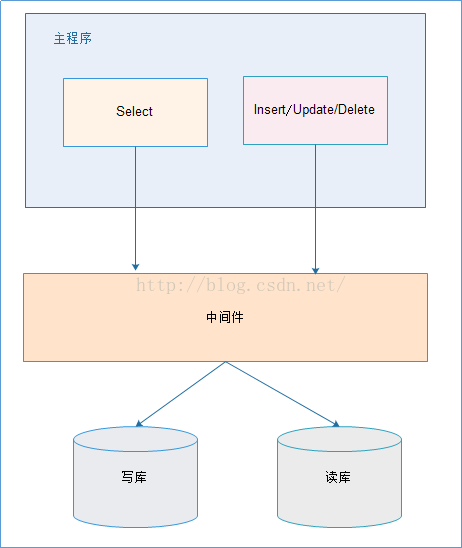
优点:
- 源程序不需要做任何改动就可以实现读写分离;
- 动态添加数据源不需要重启程序;
缺点:
- 程序依赖于中间件,会导致切换数据库变得困难;
- 2由中间件做了中转代理,性能有所下降;
相关中间件产品使用:
mysql-proxy:http://hi.baidu.com/geshuai2008/item/0ded5389c685645f850fab07
Amoeba for MySQL:http://www.iteye.com/topic/188598和http://www.iteye.com/topic/1113437
三.使用Spring AOP实现MySQL数据库读写分离案例
1、项目代码地址
目前该Demo的项目地址在开源中国 码云 上边:http://git.oschina.net/xuliugen/aop-choose-db-demo
或者CSDN免费下载:
http://download.csdn.net/detail/u010870518/9724872
2、项目结构

上图中,除了标记的代码,其他的主要是配置代码和业务代码。
3、具体分析
该项目是SSM框架的一个demo,Spring、Spring MVC和MyBatis,具体的配置文件不在过多介绍。
(1)UserContoller模拟读写数据
/**
 * Created by xuliugen on 2016/5/4.
 */
@Controller
@RequestMapping(value = "/user", produces = {"application/json;charset=UTF-8"})
public class UserController {

    @Inject
    private IUserService userService;

    //http://localhost:8080/user/select.do
    @ResponseBody
    @RequestMapping(value = "/select.do", method = RequestMethod.GET)
    public String select() {
        User user = userService.selectUserById(123);
        return user.toString();
    }

    //http://localhost:8080/user/add.do
    @ResponseBody
    @RequestMapping(value = "/add.do", method = RequestMethod.GET)
    public String add() {
        boolean isOk = userService.addUser(new User("333", "444"));
        return isOk == true ? "shibai" : "chenggong";
    }
}
模拟读写数据,调用IUserService 。
(2)spring-db.xml读写数据源配置
<?xml version="1.0" encoding="UTF-8"?>
<beans xmlns="http://www.springframework.org/schema/beans"
       xmlns:xsi="http://www.w3.org/2001/XMLSchema-instance" xmlns:aop="http://www.springframework.org/schema/aop"
       xsi:schemaLocation="http://www.springframework.org/schema/beans
                        http://www.springframework.org/schema/beans/spring-beans-4.0.xsd http://www.springframework.org/schema/aop http://www.springframework.org/schema/aop/spring-aop.xsd">

    <bean id="statFilter" class="com.alibaba.druid.filter.stat.StatFilter" lazy-init="true">
        <property name="logSlowSql" value="true"/>
        <property name="mergeSql" value="true"/>
    </bean>

    <!-- 数据库连接 -->
    <bean id="readDataSource" class="com.alibaba.druid.pool.DruidDataSource"
          destroy-method="close" init-method="init" lazy-init="true">
        <property name="driverClassName" value="${driver}"/>
        <property name="url" value="${url1}"/>
        <property name="username" value="root"/>
        <property name="password" value="${password}"/>
         <!-- 省略部分内容 -->
    </bean>

    <bean id="writeDataSource" class="com.alibaba.druid.pool.DruidDataSource"
          destroy-method="close" init-method="init" lazy-init="true">
        <property name="driverClassName" value="${driver}"/>
        <property name="url" value="${url}"/>
        <property name="username" value="root"/>
        <property name="password" value="${password}"/>
        <!-- 省略部分内容 -->
    </bean>

    <!-- 配置动态分配的读写 数据源 -->
    <bean id="dataSource" class="com.xuliugen.choosedb.demo.aspect.ChooseDataSource" lazy-init="true">
        <property name="targetDataSources">
            <map key-type="java.lang.String" value-type="javax.sql.DataSource">
                <!-- write -->
                <entry key="write" value-ref="writeDataSource"/>
                <!-- read -->
                <entry key="read" value-ref="readDataSource"/>
            </map>
        </property>
        <property name="defaultTargetDataSource" ref="writeDataSource"/>
        <property name="methodType">
            <map key-type="java.lang.String">
                <!-- read -->
                <entry key="read" value=",get,select,count,list,query"/>
                <!-- write -->
                <entry key="write" value=",add,create,update,delete,remove,"/>
            </map>
        </property>
    </bean>

</beans>
上述配置中,配置了readDataSource和writeDataSource两个数据源,但是交给SqlSessionFactoryBean进行管理的只有dataSource,其中使用到了:com.xuliugen.choosedb.demo.aspect.ChooseDataSource 这个是进行数据库选择的。
<property name="methodType">
    <map key-type="java.lang.String">
        <!-- read -->
        <entry key="read" value=",get,select,count,list,query"/>
        <!-- write -->
        <entry key="write" value=",add,create,update,delete,remove,"/>
     </map>
</property>
配置了数据库具体的那些是读哪些是写的前缀关键字。ChooseDataSource的具体代码如下:
(3)ChooseDataSource
/**
 * 获取数据源,用于动态切换数据源
 */
public class ChooseDataSource extends AbstractRoutingDataSource {

    public static Map<String, List<String>> METHOD_TYPE_MAP = new HashMap<String, List<String>>();

    /**
     * 实现父类中的抽象方法,获取数据源名称
     * @return
     */
    protected Object determineCurrentLookupKey() {
        return DataSourceHandler.getDataSource();
    }

    // 设置方法名前缀对应的数据源
    public void setMethodType(Map<String, String> map) {
        for (String key : map.keySet()) {
            List<String> v = new ArrayList<String>();
            String[] types = map.get(key).split(",");
            for (String type : types) {
                if (StringUtils.isNotBlank(type)) {
                    v.add(type);
                }
            }
            METHOD_TYPE_MAP.put(key, v);
        }
    }
}
(4)DataSourceAspect进行具体方法的AOP拦截
/**
 * 切换数据源(不同方法调用不同数据源)
 */
@Aspect
@Component
@EnableAspectJAutoProxy(proxyTargetClass = true)
public class DataSourceAspect {

    protected Logger logger = LoggerFactory.getLogger(this.getClass());

    @Pointcut("execution(* com.xuliugen.choosedb.demo.mybatis.dao.*.*(..))")
    public void aspect() {
    }

    /**
     * 配置前置通知,使用在方法aspect()上注册的切入点
     */
    @Before("aspect()")
    public void before(JoinPoint point) {
        String className = point.getTarget().getClass().getName();
        String method = point.getSignature().getName();
        logger.info(className + "." + method + "(" + StringUtils.join(point.getArgs(), ",") + ")");
        try {
            for (String key : ChooseDataSource.METHOD_TYPE_MAP.keySet()) {
                for (String type : ChooseDataSource.METHOD_TYPE_MAP.get(key)) {
                    if (method.startsWith(type)) {
                        DataSourceHandler.putDataSource(key);
                    }
                }
            }
        } catch (Exception e) {
            e.printStackTrace();
        }
    }
}
(5)DataSourceHandler,数据源的Handler类
package com.xuliugen.choosedb.demo.aspect;

/**
 * 数据源的Handler类
 */
public class DataSourceHandler {

    // 数据源名称线程池
    public static final ThreadLocal<String> holder = new ThreadLocal<String>();

    /**
     * 在项目启动的时候将配置的读、写数据源加到holder中
     */
    public static void putDataSource(String datasource) {
        holder.set(datasource);
    }

    /**
     * 从holer中获取数据源字符串
     */
    public static String getDataSource() {
        return holder.get();
    }
}

北京人形旗下天工造物具身智能开源社区,聚焦具身天工与慧思开物两大平台
更多推荐
 0
0 0
0- 0


 已为社区贡献4条内容

所有评论(0)