微信小程序入门八头像上传
·

上一章介绍了微信小程序入门七登录注册,这章谈谈头像的选择,上传,预览以及后台服务端代码的功能。本章节主要用的知识点有
1. action-sheet 底部弹出可选菜单组件
2. wx.uploadFile 将本地资源上传到服务器
3. wx.chooseImage 从本地相册选择图片或使用相机拍照。
4. wx.previewImage 预览图片
效果图:
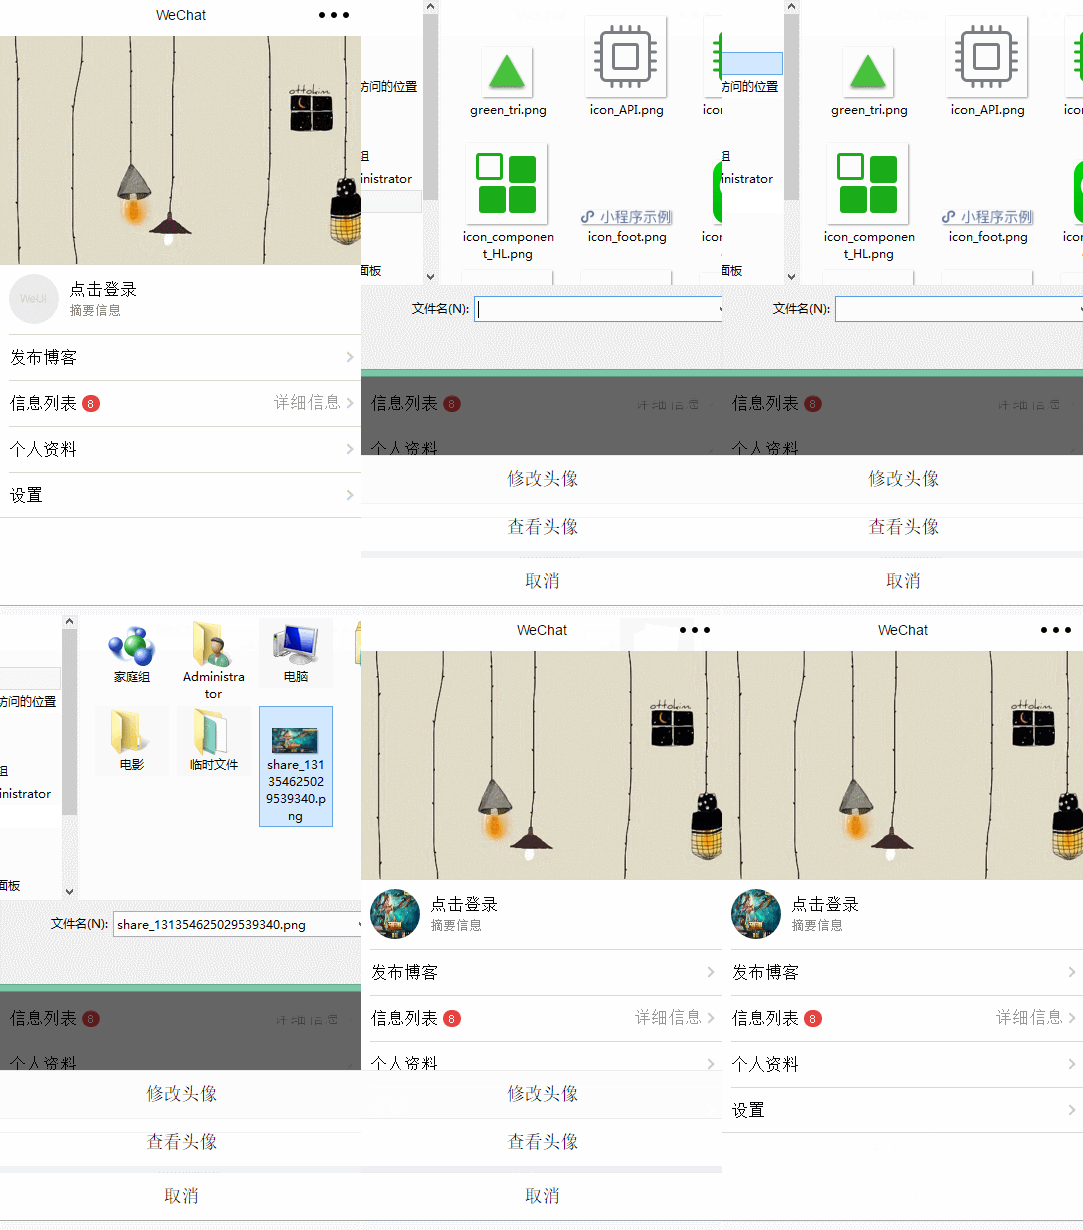
wxml代码:
<!--
变量说明:
windowHeight :设备的窗口的高度
windowWidth : 设备的窗口的宽度
actionSheetHidden : 组件是否显示
actionSheetItems :组件菜单项
-->
<view class="page__bd" style="height: {{windowHeight * 0.8}}px; width: {{windowWidth}}px;">
    <view class="weui-cells weui-cells_after-title me-info"
    style="top:{{windowHeight * 0.4}}px;">
        <view class="weui-cell">
            <view class="weui-cell__hd" style="position: relative;margin-right: 10px;">
                <image src="{{userImg}}" style="width: 50px; height: 50px; display: block;border-radius:25px;" bindtap="clickImage"/>
            </view>
            <view class="weui-cell__bd">
                <navigator url="../login/login" >
                点击登录</navigator>
                <view style="font-size: 13px;color: #888888;">摘要信息</view>
            </view>
        </view>
        <view class="weui-cell weui-cell_access">
            <view class="weui-cell__bd">
                <view style="display: inline-block; vertical-align: middle">发布博客</view>
            </view>
            <view class="weui-cell__ft weui-cell__ft_in-access"></view>
        </view>
        <view class="weui-cell weui-cell_access">
            <view class="weui-cell__bd">
                <view style="display: inline-block; vertical-align: middle">信息列表</view>
                <view class="weui-badge" style="margin-left: 5px;">8</view>
            </view>
            <view class="weui-cell__ft weui-cell__ft_in-access">详细信息</view>
        </view>
        <view class="weui-cell weui-cell_access">
            <view class="weui-cell__bd">
                <view style="display: inline-block; vertical-align: middle">个人资料</view>
            </view>
            <view class="weui-cell__ft weui-cell__ft_in-access"></view>
        </view>
        <view class="weui-cell weui-cell_access">
            <view class="weui-cell__bd">
                <view style="display: inline-block; vertical-align: middle">设置</view>
            </view>
            <view class="weui-cell__ft weui-cell__ft_in-access"></view>
        </view>
    </view>
    <action-sheet hidden="{{actionSheetHidden}}" bindchange="actionSheetbindchange">
        <block wx:for="{{actionSheetItems}}" wx:key="unique">
            <action-sheet-item bindtap="{{item.bindtap}}">{{item.txt}}</action-sheet-item>
        </block>
        <action-sheet-cancel class="cancel">取消</action-sheet-cancel>
    </action-sheet>
</view>
wxss代码:
.page__bd{
    background: url(https://www.itit123.cn/image/meBack.jpg) no-repeat;
    background-size:cover;
}
js代码:
var util = require('../../utils/util.js');
var app = getApp();

Page({
    data: {
        userImg: "../../images/pic_160.png", // 头像图片路径
        actionSheetHidden: true, // 是否显示底部可选菜单
        actionSheetItems: [
            { bindtap: 'changeImage', txt: '修改头像' },
            { bindtap: 'viewImage', txt: '查看头像' }
        ] // 底部可选菜单
    },
    // 初始化加载获取设备长宽
    onLoad: function (options) {
        var that = this;
        wx.getSystemInfo({
            success: function (res) {
                that.setData({
                    windowHeight: res.windowHeight,
                    windowWidth: res.windowWidth
                })
            }
        });
    },
    // 点击头像 显示底部菜单
    clickImage: function () {
        var that = this;
        that.setData({
            actionSheetHidden: !that.data.actionSheetHidden
        })
    },
    // 点击其他区域 隐藏底部菜单
    actionSheetbindchange: function () {
        var that = this;
        that.setData({
            actionSheetHidden: !that.data.actionSheetHidden
        })
    },
    // 上传头像
    changeImage: function () {
        var that = this;
        wx.chooseImage({
            count: 1, // 默认9
            sizeType: ['original', 'compressed'], // 可以指定是原图还是压缩图,默认二者都有
            sourceType: ['album', 'camera'], // 可以指定来源是相册还是相机,默认二者都有
            success: function (res) {
                // 返回选定照片的本地文件路径列表,tempFilePath可以作为img标签的src属性显示图片,只有一张图片获取下标为0
                var tempFilePaths = res.tempFilePaths[0];
                that.setData({
                    userImg: tempFilePaths,
                    actionSheetHidden: !that.data.actionSheetHidden
                })
                util.uploadFile('/itdragon/uploadImage', tempFilePaths, 'imgFile' ,{}, function (res) {
                    console.log(res);
                    if (null != res) {
                        that.setData({
                            userImg: res
                        })
                    } else {
                        // 显示消息提示框
                        wx.showToast({
                            title: '上传失败',
                            icon: 'error',
                            duration: 2000
                        })
                    }
                });
            }
        })
    },
    // 查看原图
    viewImage: function () {
        var that = this;
        wx.previewImage({
            current: '', // 当前显示图片的http链接
            urls: [that.data.userImg] // 需要预览的图片http链接列表
        })
    }
});
utils.js代码:
//上传文件
function uploadFile(url, filePath, name, formData, cb) {
  console.log('a=' + filePath)
  wx.uploadFile({
    url: rootDocment + url,
    filePath: filePath,
    name: name,
    header: {
      'content-type': 'multipart/form-data'
    }, // 设置请求的 header
    formData: formData, // HTTP 请求中其他额外的 form data
    success: function (res) {
      if (res.statusCode == 200 && !res.data.result_code) {
        return typeof cb == "function" && cb(res.data)
      } else {
        return typeof cb == "function" && cb(false)
      }
    },
    fail: function () {
      return typeof cb == "function" && cb(false)
    }
  })
}
后台服务器代码:
@RequestMapping("uploadImage")
	@ResponseBody
    public String uploadHeadImage(HttpServletRequest request, @RequestParam(value = "imgFile" , required=false) MultipartFile imageFile) {
		try {
			System.out.println("imageFile :::: " + imageFile);
			String realPath = request.getSession().getServletContext().getRealPath("/");
			if(imageFile!=null){
				if(GenerateUtils.allowUpload(imageFile.getContentType())){
					String fileName = GenerateUtils.rename(imageFile.getOriginalFilename());
					String saveName = fileName.substring(0,fileName.lastIndexOf("."));
					File dir = new File(realPath + "image");
					if(!dir.exists()){
						dir.mkdirs();
					}
					File file = new File(dir,saveName+".jpg");
					imageFile.transferTo(file);
					return "https://www.itit123.cn/sierew/image/"+file.getName();
				}
			}
		} catch (Exception e) {
			e.printStackTrace();
		}
        return "null";
    }
最后是有关头像裁剪的问题,没有找到合适的解决方法。不能在选择图片的时候进行裁剪,如果有知道的朋友请赐教。还有一种是图片选择后裁剪。可以参考 weCropper.js 地址:https://github.com/dlhandsome/we-cropper
微信小程序系统学习地址:微信小程序入门教程

北京人形旗下天工造物具身智能开源社区,聚焦具身天工与慧思开物两大平台
更多推荐
 6
6 0
0- 0


 已为社区贡献3条内容

所有评论(0)