centos7安装docker,nginx,docker部署jenkins java项目
·
1:前置准备centos更改配置。
原因:出现这个错误是因为使用的 CentOS 7 仓库已经被归档,当前的镜像地址无法找到所需的文件。CentOS 7 的官方支持已经结束,部分仓库已被移至归档库。这导致了你的 yum 命令无法找到所需的元数据文件。CentOS 7 的官方仓库在 2024 年 6 月 30 日之后已经停止维护。因此,使用最新的 CentOS 7 官方仓库可能会遇到问题。
0.1:进入/etc/yum.repos.d目录下找到 CentOS-Base.repo
cd /etc/yum.repos.d
0.2:执行
cp  CentOS-Base.repo   CentOS-Base.repo.backup
vi CentOS-Base.repo
0.3:改为
# CentOS-Base.repo

#

# The mirror system uses the connecting IP address of the client and the

# update status of each mirror to pick mirrors that are updated to and

# geographically close to the client.  You should use this for CentOS updates

# unless you are manually picking other mirrors.

#

# If the mirrorlist= does not work for you, as a fall back you can try the

# remarked out baseurl= line instead.

#
#

[base]
name=CentOS-$releasever - Base
#mirrorlist=http://mirrorlist.centos.org/?release=$releasever&arch=$basearch&repo=os&infra=$infra
#baseurl=http://mirror.centos.org/centos/$releasever/os/$basearch/
#baseurl=http://vault.centos.org/7.9.2009/x86_64/os/
baseurl=http://vault.centos.org/7.9.2009/os/$basearch/
gpgcheck=1
gpgkey=file:///etc/pki/rpm-gpg/RPM-GPG-KEY-CentOS-7

#released updates
[updates]
name=CentOS-$releasever - Updates
#mirrorlist=http://mirrorlist.centos.org/?release=$releasever&arch=$basearch&repo=updates&infra=$infra
#baseurl=http://mirror.centos.org/centos/$releasever/updates/$basearch/
#baseurl=http://vault.centos.org/7.9.2009/x86_64/os/
baseurl=http://vault.centos.org/7.9.2009/updates/$basearch/
gpgcheck=1
gpgkey=file:///etc/pki/rpm-gpg/RPM-GPG-KEY-CentOS-7

#additional packages that may be useful
[extras]
name=CentOS-$releasever - Extras
#mirrorlist=http://mirrorlist.centos.org/?release=$releasever&arch=$basearch&repo=extras&infra=$infra
#$baseurl=http://mirror.centos.org/centos/$releasever/extras/$basearch/
#baseurl=http://vault.centos.org/7.9.2009/x86_64/os/
baseurl=http://vault.centos.org/7.9.2009/extras/$basearch/
gpgcheck=1
gpgkey=file:///etc/pki/rpm-gpg/RPM-GPG-KEY-CentOS-7

#additional packages that extend functionality of existing packages
[centosplus]
name=CentOS-$releasever - Plus
#mirrorlist=http://mirrorlist.centos.org/?release=$releasever&arch=$basearch&repo=centosplus&infra=$infra
#baseurl=http://mirror.centos.org/centos/$releasever/centosplus/$basearch/
#baseurl=http://vault.centos.org/7.9.2009/x86_64/os/
baseurl=http://vault.centos.org/7.9.2009/centosplus/$basearch/
gpgcheck=1
enabled=0
gpgkey=file:///etc/pki/rpm-gpg/RPM-GPG-KEY-CentOS-7
0.4:执行
sudo yum clean all
sudo yum makecache
0.5:执行
curl -o /etc/yum.repos.d/CentOS-Base.repo https://mirrors.aliyun.com/repo/Centos-7.repo
2,安装docker
1:安装依赖包
yum install -y yum-utils device-mapper-persistent-data lvm2
2:设置阿里云docker-ce镜像源
yum-config-manager --add-repo https://mirrors.aliyun.com/docker-ce/linux/centos/docker-ce.repo
3:安装docker
sudo yum install -y docker-ce docker-ce-cli containerd.io
4:开启docker
#启动docker命令
systemctl start docker
#设置开机自启命令
systemctl enable docker
#查看docker版本命令
docker version
5:设置阿里云镜像
#创建docker配置文件目录
mkdir -p /etc/docker
#添加配置内容
tee /etc/docker/daemon.json <<-'EOF'
{
  "registry-mirrors": [
    "https://registry.docker-cn.com",
    "http://hub-mirror.c.163.com",
    "https://dockerhub.azk8s.cn",
    "https://mirror.ccs.tencentyun.com",
    "https://registry.cn-hangzhou.aliyuncs.com",
    "https://docker.mirrors.ustc.edu.cn",
    "https://docker.m.daocloud.io",
    "https://noohub.ru",
    "https://huecker.io",
    "https://dockerhub.timeweb.cloud"
  ]
}
EOF
6:重启docker
systemctl restart docker
3:安装nginx,并启动
1:拉取镜像
docker pull nginx
2:新建卷
docker volume create ngconfig
3:绑定域名
docker network create mynet
4:运行
docker run -d -p 88:80 --name cjnginx02 -v ngconfig:/usr/share/nginx --network mynet nginx
4:使用Dockerfile打造镜像
1:Spring boot项目使用maven打包项目
    <build>
        <plugins>
            <plugin>
                <groupId>org.springframework.boot</groupId>
                <artifactId>spring-boot-maven-plugin</artifactId>
                <version>${spring-boot.version}</version>
                <configuration>
                    <mainClass>${main-class}</mainClass>
                    <layout>JAR</layout>
                </configuration>
                <executions>
                    <execution>
                        <goals>
                            <goal>repackage</goal>
                        </goals>
                    </execution>
                </executions>
            </plugin>
        </plugins>
    </build>
2,将jar包传入到linux中,在同级目录下创建Dockerfile

3.Dockerfile文件编写:
FROM openjdk:8
WORKDIR /app/ocr/api
COPY ocr-api-0.0.1-SNAPSHOT.jar ocr-api-0.0.1-SNAPSHOT.jar
ENTRYPOINT ["java","-jar","app.jar"]
EXPOSE 8900
4.build项目
docker build -t ocr:V1.0 .
5.运行项目
docker run -p 8900:8900 -d --name ocr ocr:V1.0
5:Jenkins+docker+git自动化部署
1:docker pull Jenkins镜像
docker pull jenkins:lts-alpine-jdk17
2:运行Jenkins镜像
docker run -d -p 8080:8080 --name jenkins jenkins:lts-alpine-jdk17
3:安装好推荐的插件,下载ssh插件
4:构建一个自动化任务,需要准备 启动的.sh脚本,Dockerfile文件
start.sh脚本:
#!/bin/bash
OCR_CONTAINERS=$(docker ps -a | grep ocr)
OCR_IMAGES=$(docker images | grep ocr)
echo $(OCR_CONTAINERS)
if [ -n "$OCR_CONTAINERS" ]; then
         echo "删除容器..."
         docker rm -f ocr
fi
echo $(OCR_IMAGES)
if [ -n "$OCR_IMAGES" ]; then
        echo "删除镜像..."
        docker rmi -f ocr:V1.0
fi

docker build -t ocr:V1.0 /var/lib/docker/volumes/for_jenkins/_data/workspace/ocr_test

docker run -p 8900:8900 -d --name ocr ocr:V1.0
DockerFile文件
FROM openjdk:8
WORKDIR /app/ocr/api
COPY ./target/ocr-api-0.0.1-SNAPSHOT.jar ocr-api-0.0.1-SNAPSHOT.jar
ENTRYPOINT ["java","-jar","ocr-api-0.0.1-SNAPSHOT.jar"]
EXPOSE 8900
下面是jenkins的配置:
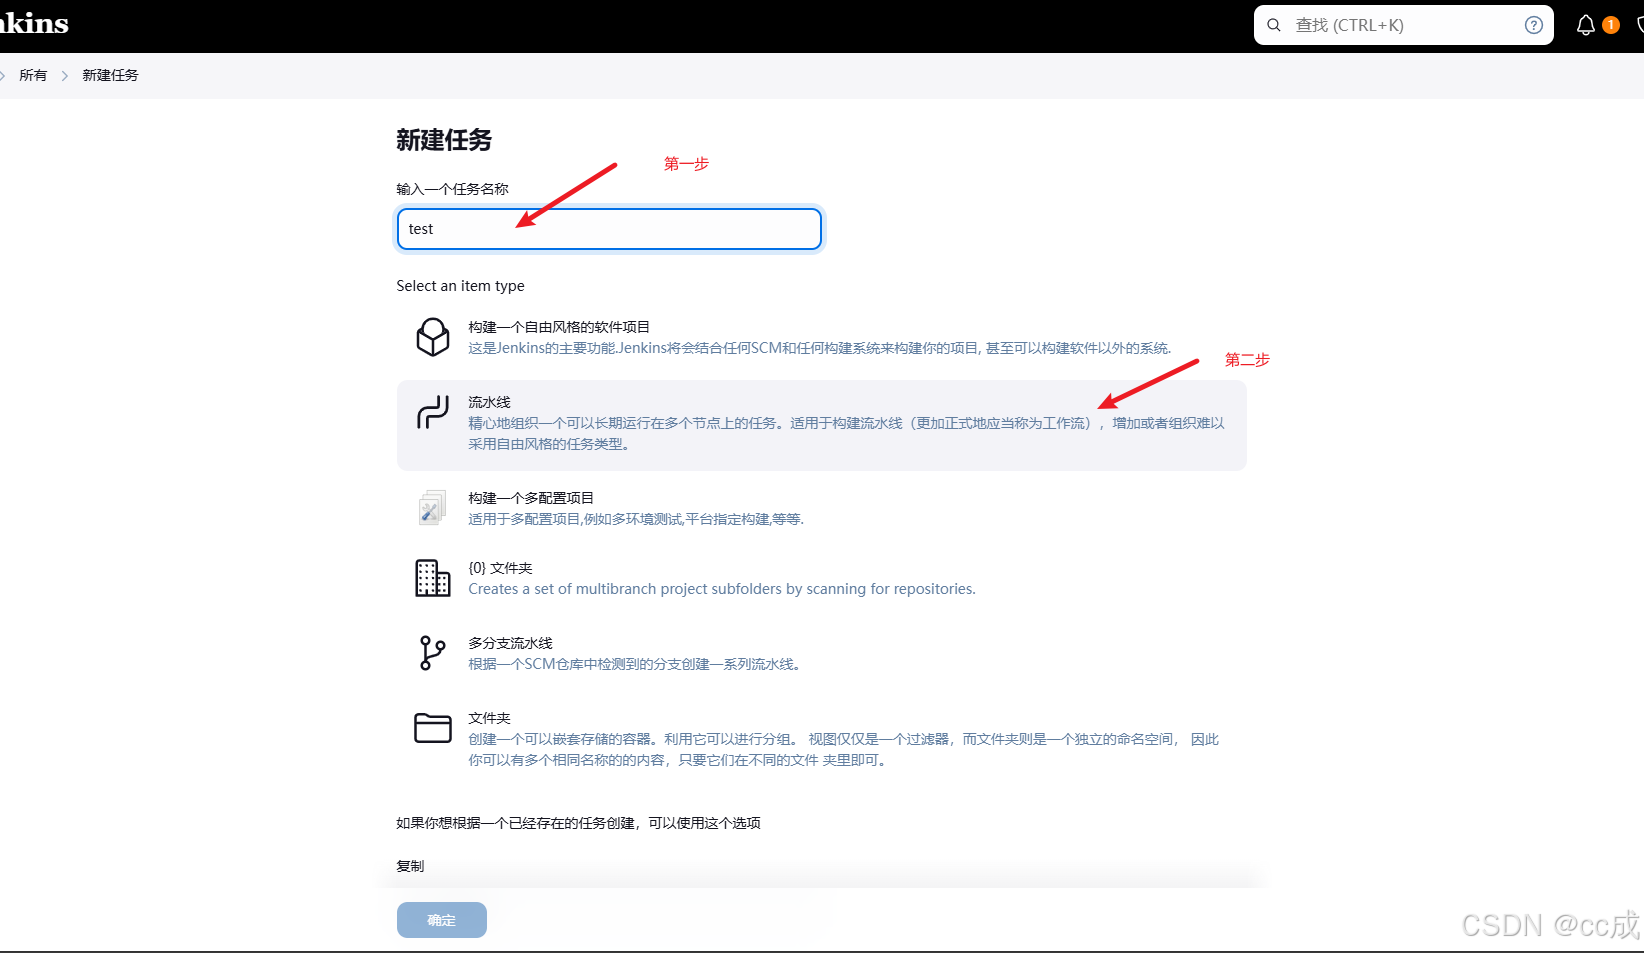
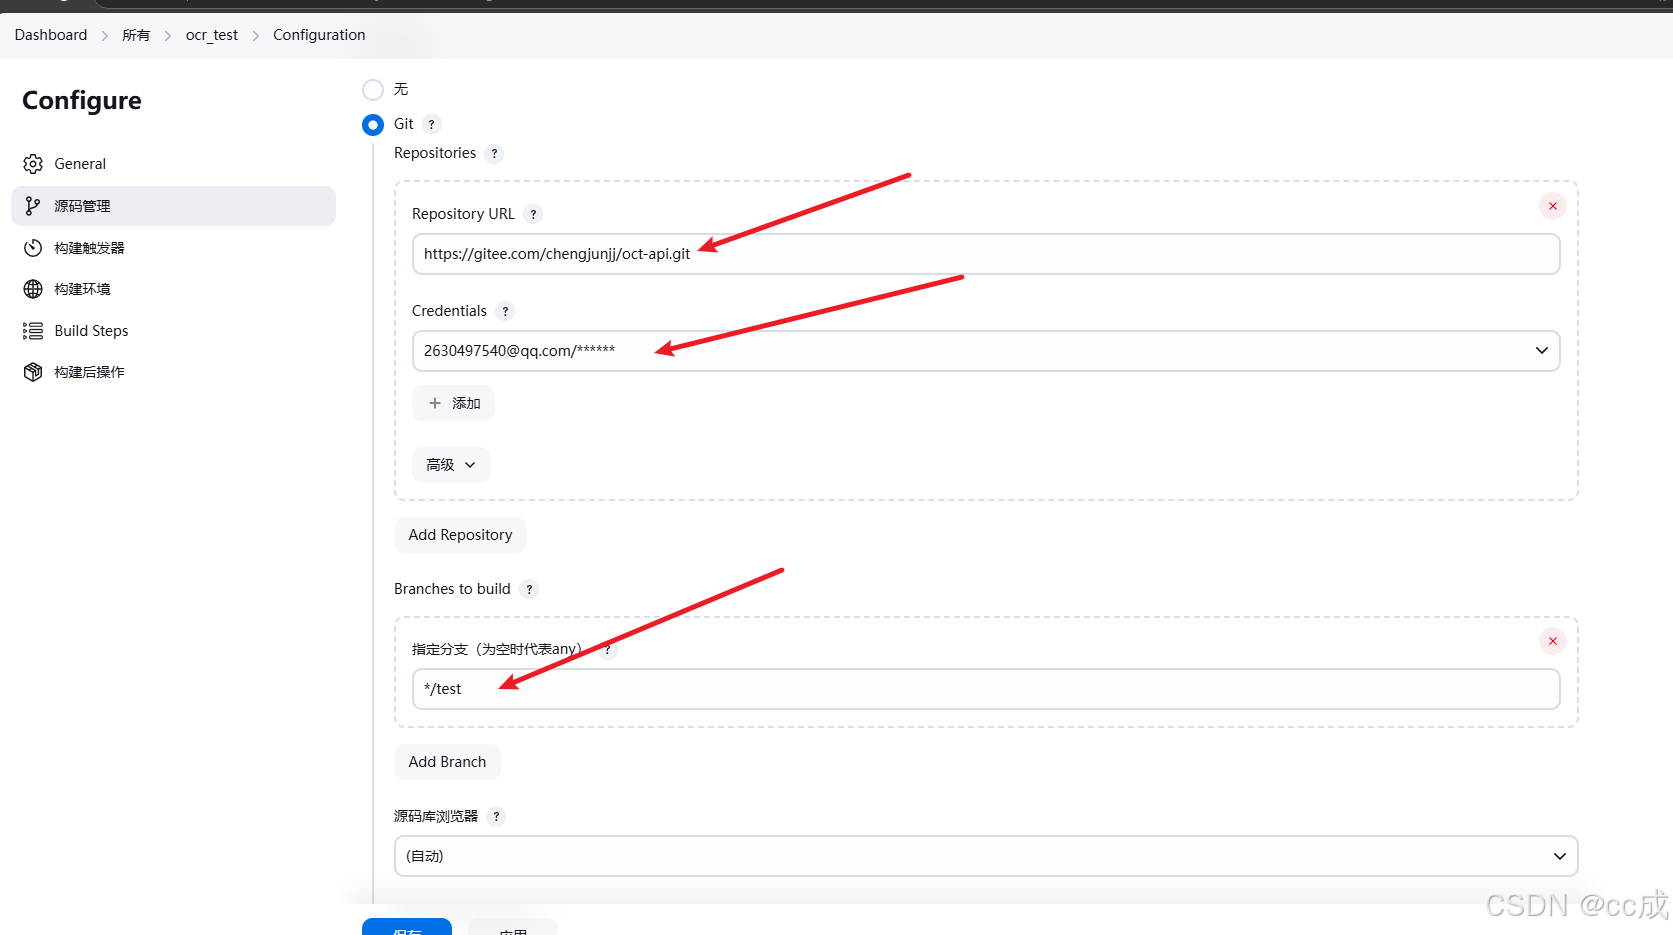
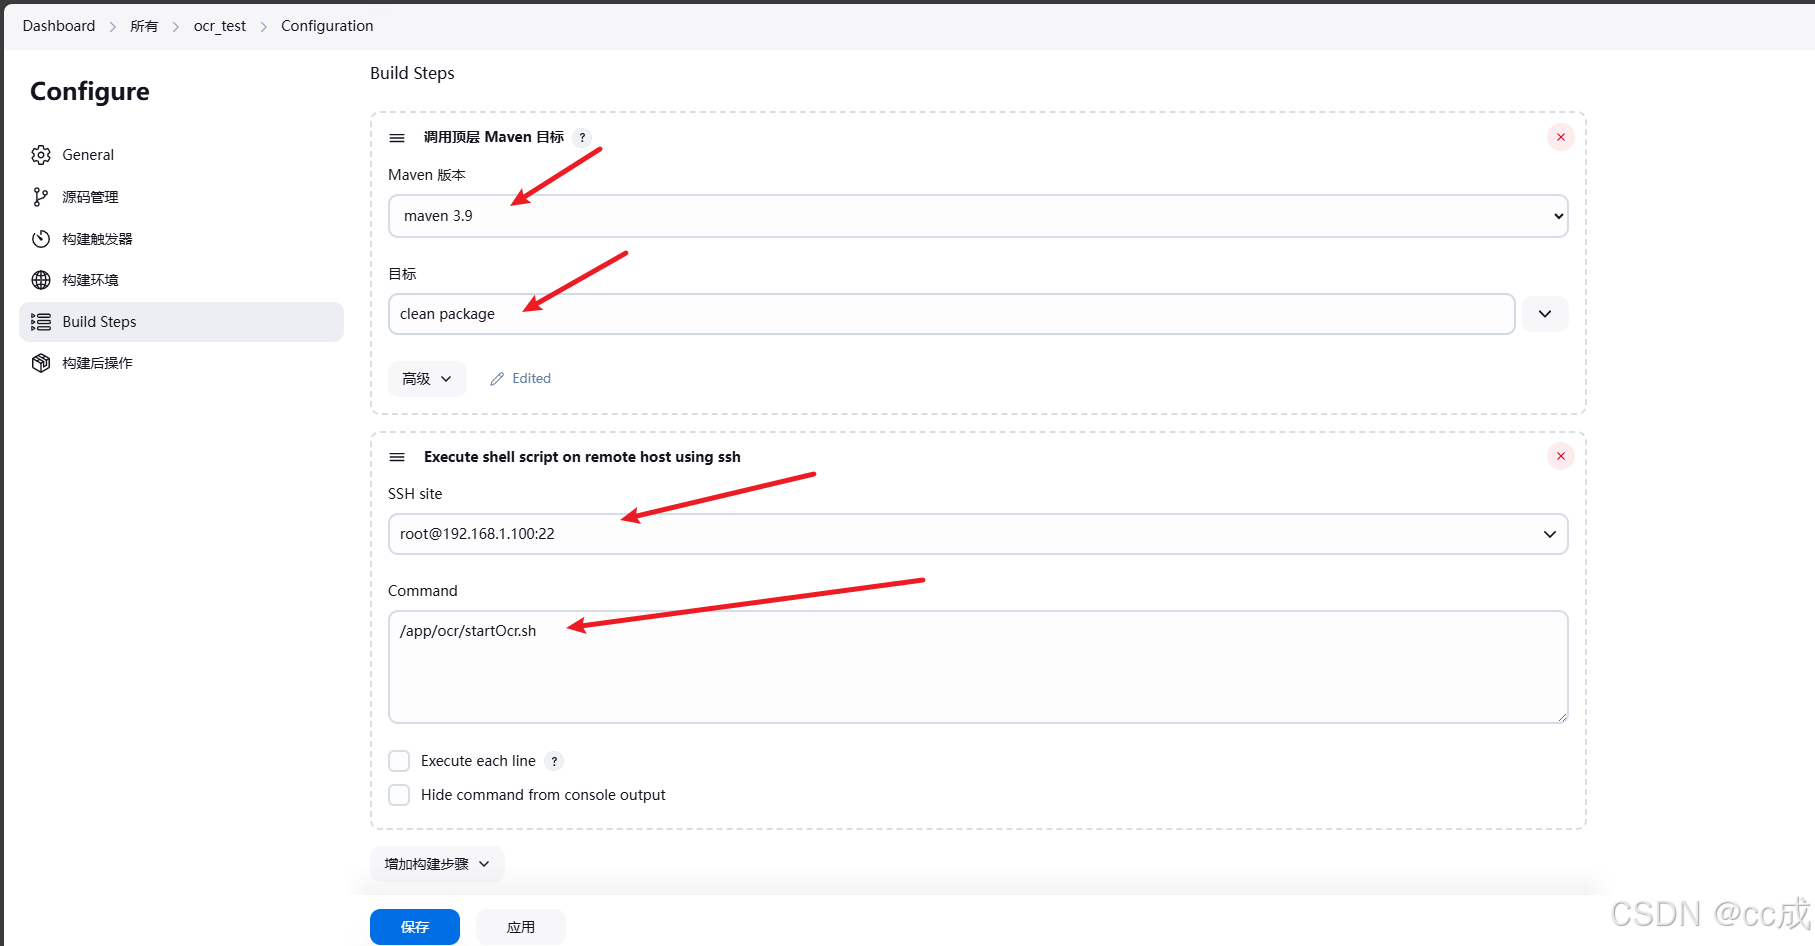
就ok了

北京人形旗下天工造物具身智能开源社区,聚焦具身天工与慧思开物两大平台
更多推荐
 51
51 0
0- 0


 已为社区贡献1条内容

所有评论(0)