hadoop安装教程
第3章 Hadoop运行环境搭建(开发重点)
完整hadoop课程:
https://item.taobao.com/item.htm?ft=t&id=623286114101
3.1 虚拟机环境准备
-
克隆虚拟机
-
修改克隆虚拟机的静态IP
-
修改主机名
-
关闭防火墙
-
创建atguigu用户
-
配置atguigu用户具有root权限(详见《尚硅谷大数据技术之Linux》)
7.在/opt目录下创建文件夹
(1)在/opt目录下创建module、software文件夹
[atguigu@hadoop101 opt]$ sudo mkdir module
[atguigu@hadoop101 opt]$ sudo mkdir software
(2)修改module、software文件夹的所有者cd
[atguigu@hadoop101 opt]$ sudo chown atguigu:atguigu module/ software/
[atguigu@hadoop101 opt]$ ll
总用量 8
drwxr-xr-x. 2 atguigu atguigu 4096 1月 17 14:37 module
drwxr-xr-x. 2 atguigu atguigu 4096 1月 17 14:38 software
3.2 安装JDK
- 卸载现有JDK
(1)查询是否安装Java软件:
[atguigu@hadoop101 opt]$ rpm -qa | grep java
(2)如果安装的版本低于1.7,卸载该JDK:
[atguigu@hadoop101 opt]$ sudo rpm -e 软件包
(3)查看JDK安装路径:
[atguigu@hadoop101 ~]$ which java
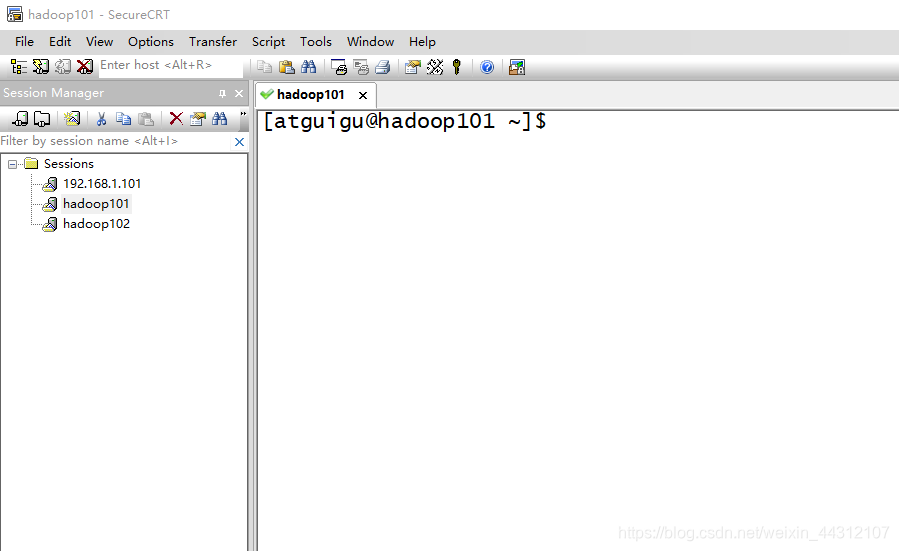
- 用SecureCRT工具将JDK导入到opt目录下面的software文件夹下面,如图2-28所示
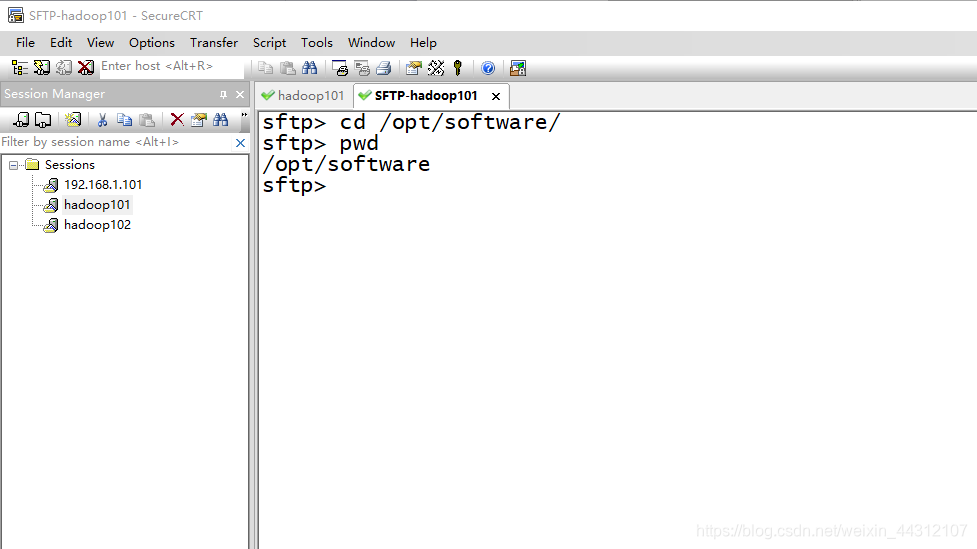
“alt+p”进入sftp模式,如图2-29所示
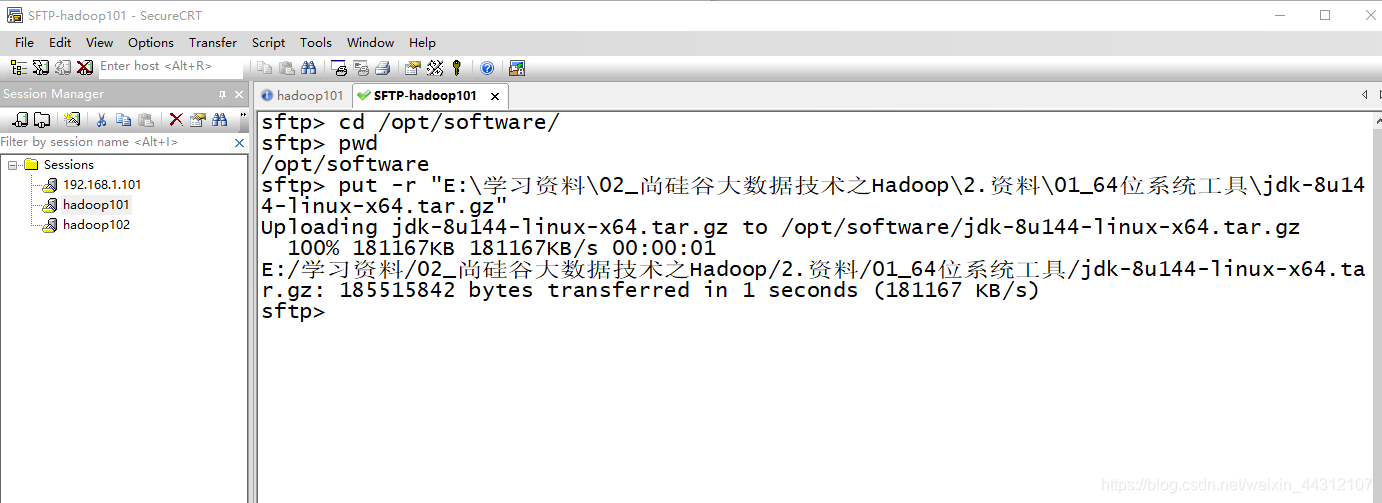
选择jdk1.8拖入,如图2-30,2-31所示

- 在Linux系统下的opt目录中查看软件包是否导入成功
[atguigu@hadoop101 opt]$ cd software/
[atguigu@hadoop101 software]$ ls
hadoop-2.7.2.tar.gz jdk-8u144-linux-x64.tar.gz
- 解压JDK到/opt/module目录下
[atguigu@hadoop101 software]$ tar -zxvf jdk-8u144-linux-x64.tar.gz -C
/opt/module/
- 配置JDK环境变量
(1)先获取JDK路径
[atguigu@hadoop101 jdk1.8.0_144]$ pwd
/opt/module/jdk1.8.0_144
(2)打开/etc/profile文件
[atguigu@hadoop101 software]$ sudo vi /etc/profile
在profile文件末尾添加JDK路径
#JAVA_HOME
export JAVA_HOME=/opt/module/jdk1.8.0_144
export PATH=$PATH:$JAVA_HOME/bin
(3)保存后退出
:wq
(4)让修改后的文件生效
[atguigu@hadoop101 jdk1.8.0_144]$ source /etc/profile
- 测试JDK是否安装成功
[atguigu@hadoop101 jdk1.8.0_144]# java -version
java version “1.8.0_144”
注意:重启(如果java -version可以用就不用重启)
[atguigu@hadoop101 jdk1.8.0_144]$ sync
[atguigu@hadoop101 jdk1.8.0_144]$ sudo reboot
3.3 安装Hadoop
- Hadoop下载地址:
https://archive.apache.org/dist/hadoop/common/hadoop-2.7.2/
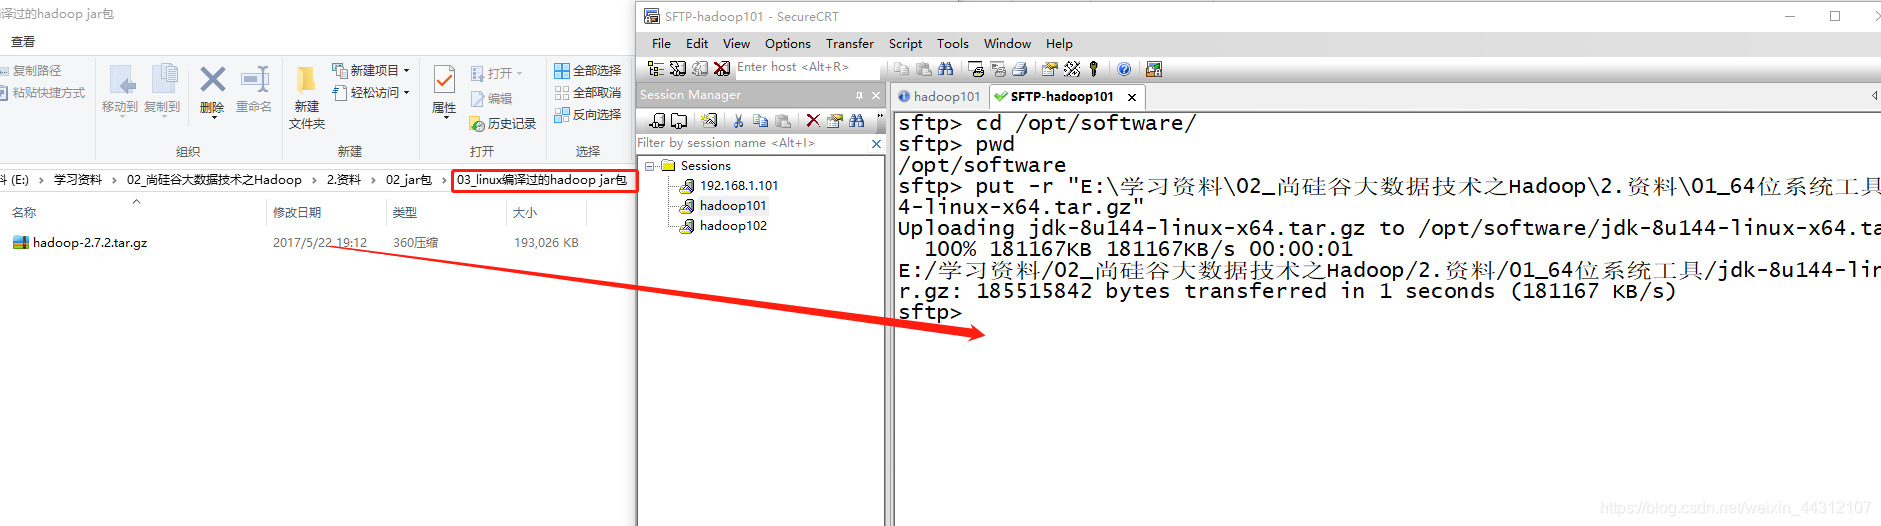
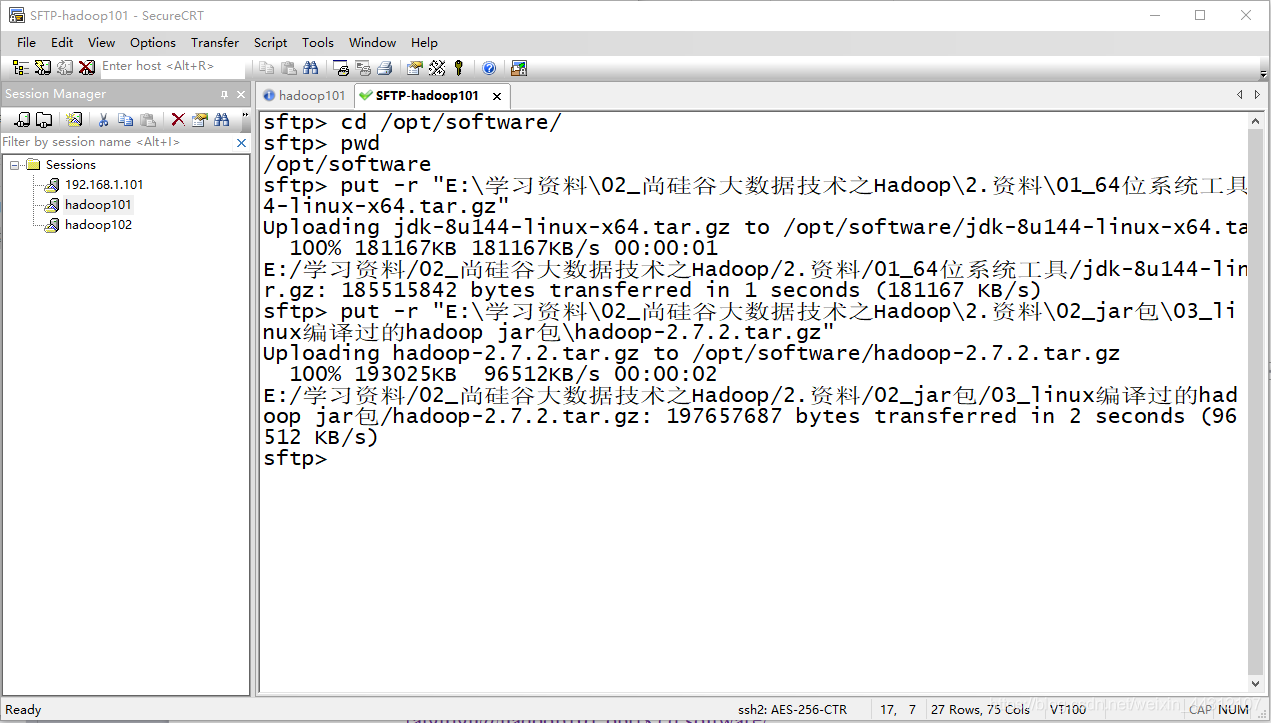
- 用SecureCRT工具将hadoop-2.7.2.tar.gz导入到opt目录下面的software文件夹下面
切换到sftp连接页面,选择Linux下编译的hadoop jar包拖入,如图2-32所示
- 进入到Hadoop安装包路径下
[atguigu@hadoop101 ~]$ cd /opt/software/
- 解压安装文件到/opt/module下面
[atguigu@hadoop101 software]$ tar -zxvf hadoop-2.7.2.tar.gz -C
/opt/module/
- 查看是否解压成功
[atguigu@hadoop101 software]$ ls /opt/module/
hadoop-2.7.2
- 将Hadoop添加到环境变量
(1)获取Hadoop安装路径
[atguigu@hadoop101 hadoop-2.7.2]$ pwd
/opt/module/hadoop-2.7.2
(2)打开/etc/profile文件
[atguigu@hadoop101 hadoop-2.7.2]$ sudo vi /etc/profile
在profile文件末尾添加JDK路径:(shitf+g)
##HADOOP_HOME
export HADOOP_HOME=/opt/module/hadoop-2.7.2
export PATH=$PATH:$HADOOP_HOME/bin
export PATH=$PATH:$HADOOP_HOME/sbin
(3)保存后退出
:wq
(4)让修改后的文件生效
[atguigu@ hadoop101 hadoop-2.7.2]$ source /etc/profile
- 测试是否安装成功
[atguigu@hadoop101 hadoop-2.7.2]$ hadoop version
Hadoop 2.7.2
- 重启(如果Hadoop命令不能用再重启)
[atguigu@ hadoop101 hadoop-2.7.2]$ sync
[atguigu@ hadoop101 hadoop-2.7.2]$ sudo reboot
3.4 Hadoop目录结构
1、查看Hadoop目录结构
[atguigu@hadoop101 hadoop-2.7.2]$ ll
总用量 52
drwxr-xr-x. 2 atguigu atguigu 4096 5月 22 2017 bin
drwxr-xr-x. 3 atguigu atguigu 4096 5月 22 2017 etc
drwxr-xr-x. 2 atguigu atguigu 4096 5月 22 2017 include
drwxr-xr-x. 3 atguigu atguigu 4096 5月 22 2017 lib
drwxr-xr-x. 2 atguigu atguigu 4096 5月 22 2017 libexec
-rw-r–r--. 1 atguigu atguigu 15429 5月 22 2017 LICENSE.txt
-rw-r–r--. 1 atguigu atguigu 101 5月 22 2017 NOTICE.txt
-rw-r–r--. 1 atguigu atguigu 1366 5月 22 2017 README.txt
drwxr-xr-x. 2 atguigu atguigu 4096 5月 22 2017 sbin
drwxr-xr-x. 4 atguigu atguigu 4096 5月 22 2017 share
2、重要目录
(1)bin目录:存放对Hadoop相关服务(HDFS,YARN)进行操作的脚本
(2)etc目录:Hadoop的配置文件目录,存放Hadoop的配置文件
(3)lib目录:存放Hadoop的本地库(对数据进行压缩解压缩功能)
(4)sbin目录:存放启动或停止Hadoop相关服务的脚本
(5)share目录:存放Hadoop的依赖jar包、文档、和官方案例
第4章 Hadoop运行模式
Hadoop运行模式包括:本地模式、伪分布式模式以及完全分布式模式。
Hadoop官方网站:http://hadoop.apache.org/
4.2 伪分布式运行模式
4.2.1 启动HDFS并运行MapReduce程序
- 分析
(1)配置集群
(2)启动、测试集群增、删、查
(3)执行WordCount案例
- 执行步骤
(1)配置集群
(a)配置:hadoop-env.sh
Linux系统中获取JDK的安装路径:
[atguigu@ hadoop101 ~]# echo $JAVA_HOME
/opt/module/jdk1.8.0_144
修改JAVA_HOME 路径:
export JAVA_HOME=/opt/module/jdk1.8.0_144
(b)配置:core-site.xml
| <!-- 指定HDFS中NameNode的地址 --> <property> <name>fs.defaultFS</name> <value>hdfs://hadoop101:9000</value> </property> <!-- 指定Hadoop运行时产生文件的存储目录 --> <property> <name>hadoop.tmp.dir</name> <value>/opt/module/hadoop-2.7.2/data/tmp</value> </property> |
|---|
(c)配置:hdfs-site.xml
| <!-- 指定HDFS副本的数量 --> <property> <name>dfs.replication</name> <value>1</value> </property> |
|---|
(2)启动集群
(a)格式化NameNode(第一次启动时格式化,以后就不要总格式化)
[atguigu@hadoop101 hadoop-2.7.2]$ bin/hdfs namenode -format
(b)启动NameNode
[atguigu@hadoop101 hadoop-2.7.2]$ sbin/hadoop-daemon.sh start namenode
(c)启动DataNode
[atguigu@hadoop101 hadoop-2.7.2]$ sbin/hadoop-daemon.sh start datanode
(3)查看集群
(a)查看是否启动成功
[atguigu@hadoop101 hadoop-2.7.2]$ jps
13586 NameNode
13668 DataNode
13786 Jps
注意:jps是JDK中的命令,不是Linux命令。不安装JDK不能使用jps
(b)web端查看HDFS文件系统
http://hadoop101:50070/dfshealth.html#tab-overview
注意:如果不能查看,看如下帖子处理
(c)查看产生的Log日志
说明:在企业中遇到Bug时,经常根据日志提示信息去分析问题、解决Bug。
当前目录:/opt/module/hadoop-2.7.2/logs
[atguigu@hadoop101 logs]$ ls
hadoop-atguigu-datanode-hadoop.atguigu.com.log
hadoop-atguigu-datanode-hadoop.atguigu.com.out
hadoop-atguigu-namenode-hadoop.atguigu.com.log
hadoop-atguigu-namenode-hadoop.atguigu.com.out
SecurityAuth-root.audit
[atguigu@hadoop101 logs]# cat hadoop-atguigu-datanode-hadoop101.log
(d)思考:为什么不能一直格式化NameNode,格式化NameNode,要注意什么?
[atguigu@hadoop101 hadoop-2.7.2]$ cd data/tmp/dfs/name/current/
[atguigu@hadoop101 current]$ cat VERSION
clusterID=CID-f0330a58-36fa-4a2a-a65f-2688269b5837
[atguigu@hadoop101 hadoop-2.7.2]$ cd data/tmp/dfs/data/current/
clusterID=CID-f0330a58-36fa-4a2a-a65f-2688269b5837
注意:格式化NameNode,会产生新的集群id,导致NameNode和DataNode的集群id不一致,集群找不到已往数据。所以,格式NameNode时,一定要先删除data数据和log日志,然后再格式化NameNode。
(4)操作集群
(a)在HDFS文件系统上创建一个input文件夹
[atguigu@hadoop101 hadoop-2.7.2]$ bin/hdfs dfs -mkdir -p
/user/atguigu/input
(b)将测试文件内容上传到文件系统上
[atguigu@hadoop101 hadoop-2.7.2]$bin/hdfs dfs -put wcinput/wc.input
/user/atguigu/input/
(c)查看上传的文件是否正确
[atguigu@hadoop101 hadoop-2.7.2]$ bin/hdfs dfs -ls /user/atguigu/input/
[atguigu@hadoop101 hadoop-2.7.2]$ bin/hdfs dfs -cat /user/atguigu/
input/wc.input
(d)运行MapReduce程序
[atguigu@hadoop101 hadoop-2.7.2]$ bin/hadoop jar
share/hadoop/mapreduce/hadoop-mapreduce-examples-2.7.2.jar wordcount
/user/atguigu/input/ /user/atguigu/output
(e)查看输出结果
命令行查看:
[atguigu@hadoop101 hadoop-2.7.2]$ bin/hdfs dfs -cat
/user/atguigu/output/*
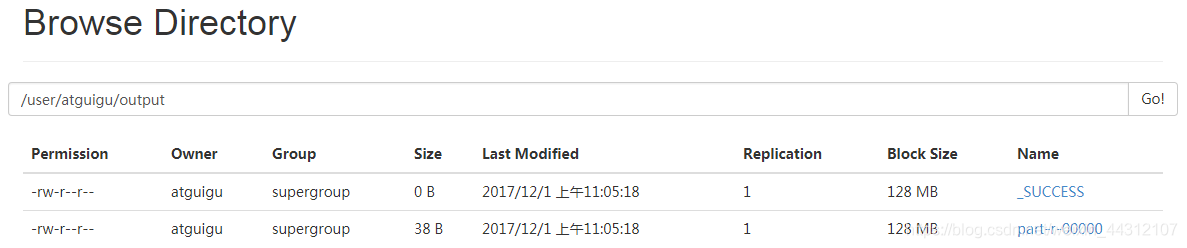
浏览器查看,如图2-34所示
(f)将测试文件内容下载到本地
[atguigu@hadoop101 hadoop-2.7.2]$ hdfs dfs -get
/user/atguigu/output/part-r-00000 ./wcoutput/
(g)删除输出结果
[atguigu@hadoop101 hadoop-2.7.2]$ hdfs dfs -rm -r /user/atguigu/output
4.2.2 启动YARN并运行MapReduce程序
- 分析
(1)配置集群在YARN上运行MR
(2)启动、测试集群增、删、查
(3)在YARN上执行WordCount案例
- 执行步骤
(1)配置集群
(a)配置yarn-env.sh
配置一下JAVA_HOME
export JAVA_HOME=/opt/module/jdk1.8.0_144
(b)配置yarn-site.xml
<!-- Reducer获取数据的方式 -->
<property>
<name>yarn.nodemanager.aux-services</name>
<value>mapreduce_shuffle</value>
</property>
<!-- 指定YARN的ResourceManager的地址 -->
<property>
<name>yarn.resourcemanager.hostname</name>
<value>hadoop101</value>
</property>
(c)配置:mapred-env.sh
配置一下JAVA_HOME
export JAVA_HOME=/opt/module/jdk1.8.0_144
(d)配置: (对mapred-site.xml.template重新命名为) mapred-site.xml
[atguigu@hadoop101 hadoop]$ mv mapred-site.xml.template mapred-site.xml
[atguigu@hadoop101 hadoop]$ vi mapred-site.xml
<!-- 指定MR运行在YARN上 -->
<property>
<name>mapreduce.framework.name</name>
<value>yarn</value>
</property>
(2)启动集群
(a)启动前必须保证NameNode和DataNode已经启动
(b)启动ResourceManager
[atguigu@hadoop101 hadoop-2.7.2]$ sbin/yarn-daemon.sh start
resourcemanager
(c)启动NodeManager
[atguigu@hadoop101 hadoop-2.7.2]$ sbin/yarn-daemon.sh start nodemanager
(3)集群操作
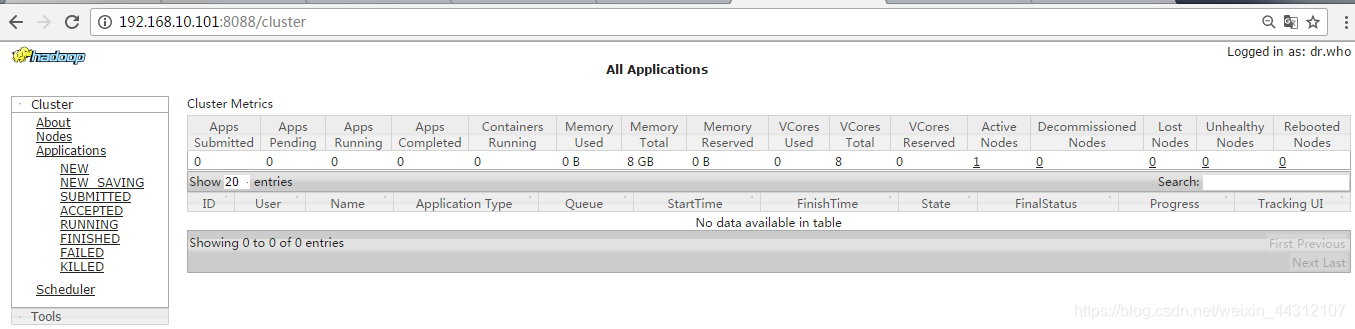
(a)YARN的浏览器页面查看,如图2-35所示
http://hadoop101:8088/cluster
(b)删除文件系统上的output文件
[atguigu@hadoop101 hadoop-2.7.2]$ bin/hdfs dfs -rm -R /user/atguigu/output
(c)执行MapReduce程序
[atguigu@hadoop101 hadoop-2.7.2]$ bin/hadoop jar
share/hadoop/mapreduce/hadoop-mapreduce-examples-2.7.2.jar wordcount
/user/atguigu/input /user/atguigu/output
(d)查看运行结果,如图2-36所示
[atguigu@hadoop101 hadoop-2.7.2]$ bin/hdfs dfs -cat
/user/atguigu/output/*

4.2.3 配置历史服务器
为了查看程序的历史运行情况,需要配置一下历史服务器。具体配置步骤如下:
- 配置mapred-site.xml
[atguigu@hadoop101 hadoop]$ vi mapred-site.xml
在该文件里面增加如下配置。
<!-- 历史服务器端地址 -->
<property>
<name>mapreduce.jobhistory.address</name>
<value>hadoop101:10020</value>
</property>
<!-- 历史服务器web端地址 -->
<property>
<name>mapreduce.jobhistory.webapp.address</name>
<value>hadoop101:19888</value>
</property>
- 启动历史服务器
[atguigu@hadoop101 hadoop-2.7.2]$ sbin/mr-jobhistory-daemon.sh start
historyserver
- 查看历史服务器是否启动
[atguigu@hadoop101 hadoop-2.7.2]$ jps
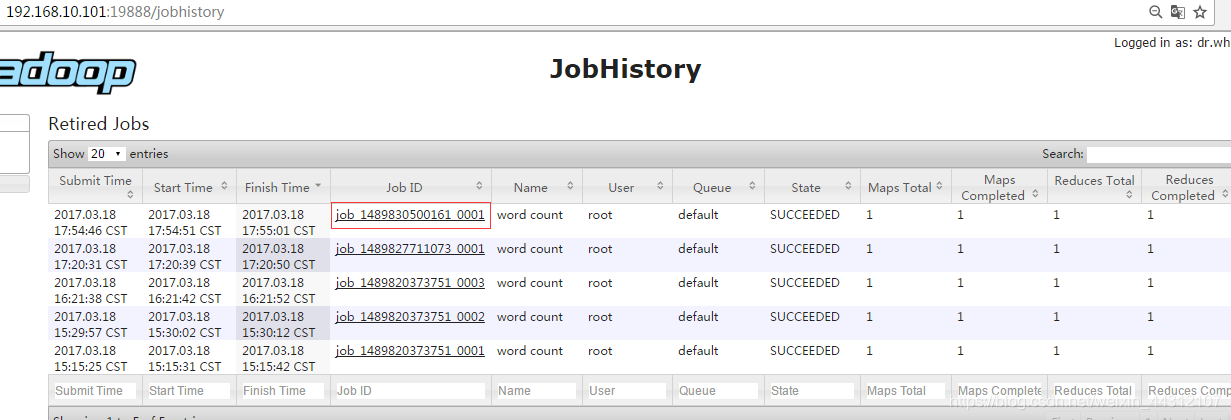
- 查看JobHistory
http://hadoop101:19888/jobhistory
4.2.4 配置日志的聚集
日志聚集概念:应用运行完成以后,将程序运行日志信息上传到HDFS系统上。
日志聚集功能好处:可以方便的查看到程序运行详情,方便开发调试。
注意:开启日志聚集功能,需要重新启动NodeManager
、ResourceManager和HistoryManager。
开启日志聚集功能具体步骤如下:
- 配置yarn-site.xml
[atguigu@hadoop101 hadoop]$ vi yarn-site.xml
在该文件里面增加如下配置。
<!-- 日志聚集功能使能 -->
<property>
<name>yarn.log-aggregation-enable</name>
<value>true</value>
</property>
<!-- 日志保留时间设置7天 -->
<property>
<name>yarn.log-aggregation.retain-seconds</name>
<value>604800</value>
</property>
- 关闭NodeManager 、ResourceManager和HistoryManager
[atguigu@hadoop101 hadoop-2.7.2]$ sbin/yarn-daemon.sh stop resourcemanager
[atguigu@hadoop101 hadoop-2.7.2]$ sbin/yarn-daemon.sh stop nodemanager
[atguigu@hadoop101 hadoop-2.7.2]$ sbin/mr-jobhistory-daemon.sh stop
historyserver
- 启动NodeManager 、ResourceManager和HistoryManager
[atguigu@hadoop101 hadoop-2.7.2]$ sbin/yarn-daemon.sh start
resourcemanager
[atguigu@hadoop101 hadoop-2.7.2]$ sbin/yarn-daemon.sh start nodemanager
[atguigu@hadoop101 hadoop-2.7.2]$ sbin/mr-jobhistory-daemon.sh start
historyserver
- 删除HDFS上已经存在的输出文件
[atguigu@hadoop101 hadoop-2.7.2]$ bin/hdfs dfs -rm -R /user/atguigu/output
- 执行WordCount程序
[atguigu@hadoop101 hadoop-2.7.2]$ hadoop jar
share/hadoop/mapreduce/hadoop-mapreduce-examples-2.7.2.jar wordcount
/user/atguigu/input /user/atguigu/output
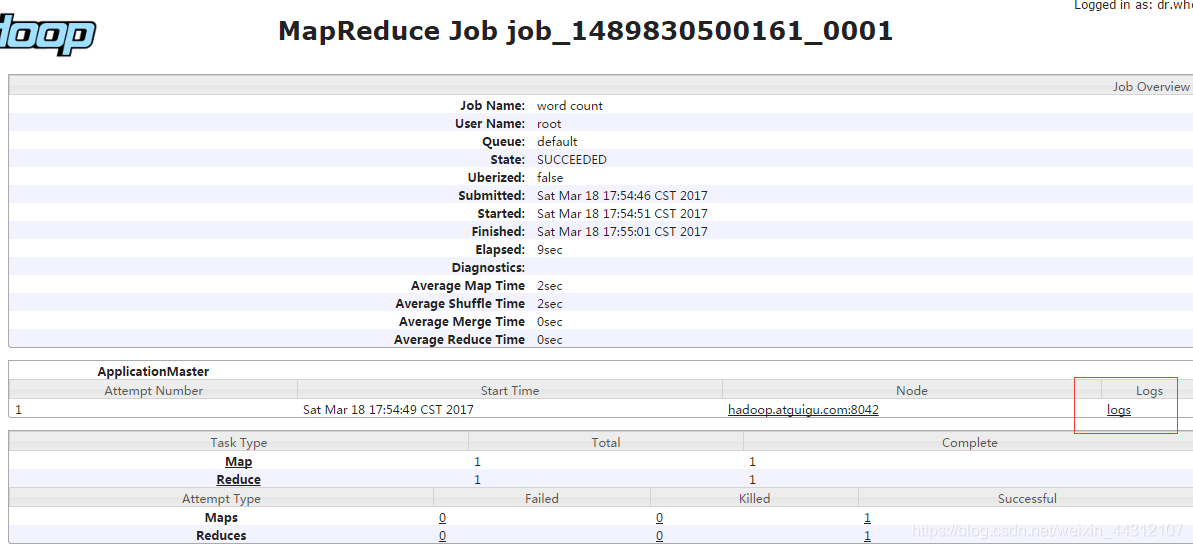
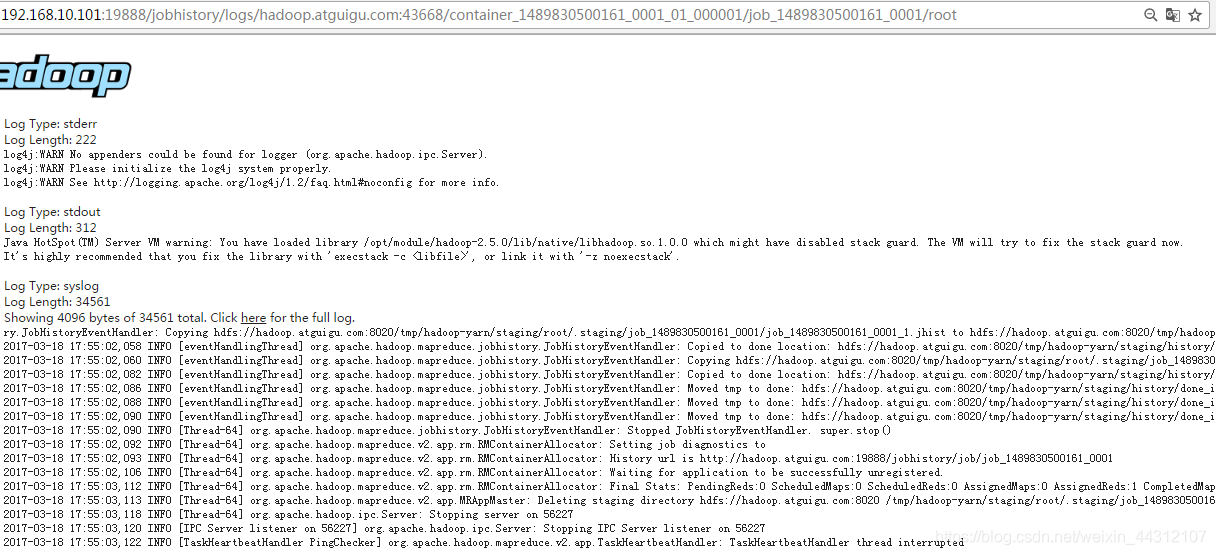
- 查看日志,如图2-37,2-38,2-39所示
4.2.5 配置文件说明
Hadoop配置文件分两类:默认配置文件和自定义配置文件,只有用户想修改某一默认配置值时,才需要修改自定义配置文件,更改相应属性值。
(1)默认配置文件:
表2-1
| 要获取的默认文件 | 文件存放在Hadoop的jar包中的位置 |
|---|---|
| [core-default.xml] | hadoop-common-2.7.2.jar/ core-default.xml |
| [hdfs-default.xml] | hadoop-hdfs-2.7.2.jar/ hdfs-default.xml |
| [yarn-default.xml] | hadoop-yarn-common-2.7.2.jar/ yarn-default.xml |
| [mapred-default.xml] | hadoop-mapreduce-client-core-2.7.2.jar/ mapred-default.xml |
(2)自定义配置文件:
core-site.xml、hdfs-site.xml、yarn-site.xml、mapred-site.xml四个配置文件存放在$HADOOP_HOME/etc/hadoop这个路径上,用户可以根据项目需求重新进行修改配置。
4.3 完全分布式运行模式(开发重点)
分析:
1)准备3台客户机(关闭防火墙、静态ip、主机名称)
2)安装JDK
3)配置环境变量
4)安装Hadoop
5)配置环境变量
6)配置集群
7)单点启动
8)配置ssh
9)群起并测试集群
4.3.1 虚拟机准备
详见3.1章。
4.3.2 编写集群分发脚本xsync
- scp(secure copy)安全拷贝
(1)scp定义:
scp可以实现服务器与服务器之间的数据拷贝。(from server1 to server2)
(2)基本语法
scp -r $pdir/$fname $user@hadoop$host:$pdir/$fname
命令 递归 要拷贝的文件路径/名称 目的用户@主机:目的路径/名称
(3)案例实操
(a)在hadoop101上,将hadoop101中/opt/module目录下的软件拷贝到hadoop102上。
[atguigu@hadoop101 /]$ scp -r /opt/module root@hadoop102:/opt/module
(b)在hadoop103上,将hadoop101服务器上的/opt/module目录下的软件拷贝到hadoop103上。
[atguigu@hadoop103 opt]$sudo scp -r atguigu@hadoop101:/opt/module
root@hadoop103:/opt/module
(c)在hadoop103上操作将hadoop101中/opt/module目录下的软件拷贝到hadoop104上。
[atguigu@hadoop103 opt]$ scp -r atguigu@hadoop101:/opt/module
root@hadoop104:/opt/module
注意:拷贝过来的/opt/module目录,别忘了在hadoop102、hadoop103、hadoop104上修改所有文件的,所有者和所有者组。sudo
chown atguigu:atguigu -R /opt/module
(d)将hadoop101中/etc/profile文件拷贝到hadoop102的/etc/profile上。
[atguigu@hadoop101 ~]$ sudo scp /etc/profile root@hadoop102:/etc/profile
(e)将hadoop101中/etc/profile文件拷贝到hadoop103的/etc/profile上。
[atguigu@hadoop101 ~]$ sudo scp /etc/profile root@hadoop103:/etc/profile
(f)将hadoop101中/etc/profile文件拷贝到hadoop104的/etc/profile上。
[atguigu@hadoop101 ~]$ sudo scp /etc/profile root@hadoop104:/etc/profile
注意:拷贝过来的配置文件别忘了source一下/etc/profile,。
- rsync 远程同步工具
rsync主要用于备份和镜像。具有速度快、避免复制相同内容和支持符号链接的优点。
rsync和scp区别:用rsync做文件的复制要比scp的速度快,rsync只对差异文件做更新。scp是把所有文件都复制过去。
(1)基本语法
rsync -rvl $pdir/$fname $user@hadoop$host:$pdir/$fname
命令 选项参数 要拷贝的文件路径/名称 目的用户@主机:目的路径/名称
选项参数说明
表2-2
| 选项 | 功能 |
|---|---|
| -r | 递归 |
| -v | 显示复制过程 |
| -l | 拷贝符号连接 |
(2)案例实操
(a)把hadoop101机器上的/opt/software目录同步到hadoop102服务器的root用户下的/opt/目录
[atguigu@hadoop101 opt]$ rsync -rvl /opt/software/
root@hadoop102:/opt/software
- xsync集群分发脚本
(1)需求:循环复制文件到所有节点的相同目录下
(2)需求分析:
(a)rsync命令原始拷贝:
rsync -rvl /opt/module root@hadoop103:/opt/
(b)期望脚本:
xsync要同步的文件名称
(c)说明:在/home/atguigu/bin这个目录下存放的脚本,atguigu用户可以在系统任何地方直接执行。
(3)脚本实现
(a)在/home/atguigu目录下创建bin目录,并在bin目录下xsync创建文件,文件内容如下:
[atguigu@hadoop102 ~]$ mkdir bin
[atguigu@hadoop102 ~]$ cd bin/
[atguigu@hadoop102 bin]$ touch xsync
[atguigu@hadoop102 bin]$ vi xsync
在该文件中编写如下代码
#!/bin/bash
#1 获取输入参数个数,如果没有参数,直接退出
pcount=$#
if((pcount==0)); then
echo no args;
exit;
fi
#2 获取文件名称
p1=$1
fname=`basename $p1`
echo fname=$fname
#3 获取上级目录到绝对路径
pdir=`cd -P $(dirname $p1); pwd`
echo pdir=$pdir
#4 获取当前用户名称
user=`whoami`
#5 循环
for((host=103; host<105; host++)); do
echo ------------------- hadoop$host --------------
rsync -rvl $pdir/$fname $user@hadoop$host:$pdir
done
(b)修改脚本 xsync 具有执行权限
[atguigu@hadoop102 bin]$ chmod 777 xsync
(c)调用脚本形式:xsync 文件名称
[atguigu@hadoop102 bin]$ xsync /home/atguigu/bin
注意:如果将xsync放到/home/atguigu/bin目录下仍然不能实现全局使用,可以将xsync移动到/usr/local/bin目录下。
4.3.3 集群配置
- 集群部署规划
表2-3
| hadoop102 | hadoop103 | hadoop104 | |
|---|---|---|---|
| HDFS | NameNode DataNode | DataNode | SecondaryNameNode DataNode |
| YARN | NodeManager | ResourceManager NodeManager | NodeManager |
- 配置集群
(1)核心配置文件
配置core-site.xml
[atguigu@hadoop102 hadoop]$ vi core-site.xml
在该文件中编写如下配置
<!-- 指定HDFS中NameNode的地址 -->
<property>
<name>fs.defaultFS</name>
<value>hdfs://hadoop102:9000</value>
</property>
<!-- 指定Hadoop运行时产生文件的存储目录 -->
<property>
<name>hadoop.tmp.dir</name>
<value>/opt/module/hadoop-2.7.2/data/tmp</value>
</property>
(2)HDFS配置文件
配置hadoop-env.sh
[atguigu@hadoop102 hadoop]$ vi hadoop-env.sh
export JAVA_HOME=/opt/module/jdk1.8.0_144
配置hdfs-site.xml
[atguigu@hadoop102 hadoop]$ vi hdfs-site.xml
在该文件中编写如下配置
<property>
<name>dfs.replication</name>
<value>1</value>
</property>
<!-- 指定Hadoop辅助名称节点主机配置 -->
<property>
<name>dfs.namenode.secondary.http-address</name>
<value>hadoop104:50090</value>
</property>
(3)YARN配置文件
配置yarn-env.sh
[atguigu@hadoop102 hadoop]$ vi yarn-env.sh
export JAVA_HOME=/opt/module/jdk1.8.0_144
配置yarn-site.xml
[atguigu@hadoop102 hadoop]$ vi yarn-site.xml
在该文件中增加如下配置
<!-- Reducer获取数据的方式 -->
<property>
<name>yarn.nodemanager.aux-services</name>
<value>mapreduce_shuffle</value>
</property>
<!-- 指定YARN的ResourceManager的地址 -->
<property>
<name>yarn.resourcemanager.hostname</name>
<value>hadoop103</value>
</property>
(4)MapReduce配置文件
配置mapred-env.sh
[atguigu@hadoop102 hadoop]$ vi mapred-env.sh
export JAVA_HOME=/opt/module/jdk1.8.0_144
配置mapred-site.xml
[atguigu@hadoop102 hadoop]$ cp mapred-site.xml.template mapred-site.xml
[atguigu@hadoop102 hadoop]$ vi mapred-site.xml
在该文件中增加如下配置
<!-- 指定MR运行在Yarn上 -->
<property>
<name>mapreduce.framework.name</name>
<value>yarn</value>
</property>
3.在集群上分发配置好的Hadoop配置文件
[atguigu@hadoop102 hadoop]$ xsync /opt/module/hadoop-2.7.2/
4.查看文件分发情况
[atguigu@hadoop103 hadoop]$ cat
/opt/module/hadoop-2.7.2/etc/hadoop/core-site.xml
4.3.4 集群单点启动
(1)如果集群是第一次启动,需要格式化NameNode
[atguigu@hadoop102 hadoop-2.7.2]$ hadoop namenode -format
(2)在hadoop102上启动NameNode
[atguigu@hadoop102 hadoop-2.7.2]$ hadoop-daemon.sh start namenode
[atguigu@hadoop102 hadoop-2.7.2]$ jps
3461 NameNode
(3)在hadoop102、hadoop103以及hadoop104上分别启动DataNode
[atguigu@hadoop102 hadoop-2.7.2]$ hadoop-daemon.sh start datanode
[atguigu@hadoop102 hadoop-2.7.2]$ jps
3461 NameNode
3608 Jps
3561 DataNode
[atguigu@hadoop103 hadoop-2.7.2]$ hadoop-daemon.sh start datanode
[atguigu@hadoop103 hadoop-2.7.2]$ jps
3190 DataNode
3279 Jps
[atguigu@hadoop104 hadoop-2.7.2]$ hadoop-daemon.sh start datanode
[atguigu@hadoop104 hadoop-2.7.2]$ jps
3237 Jps
3163 DataNode
(4)思考:每次都一个一个节点启动,如果节点数增加到1000个怎么办?
早上来了开始一个一个节点启动,到晚上下班刚好完成,下班?
4.3.5 SSH无密登录配置
- 配置ssh
(1)基本语法
ssh另一台电脑的ip地址
(2)ssh连接时出现Host key verification failed的解决方法
[atguigu@hadoop102 opt] $ ssh 192.168.1.103
The authenticity of host ‘192.168.1.103 (192.168.1.103)’ can’t be
established.
RSA key fingerprint is cf:1e🇩🇪d7:d0:4c:2d:98:60:b4:fd:ae:b1:2d:ad:06.
Are you sure you want to continue connecting (yes/no)?
Host key verification failed.
(3)解决方案如下:直接输入yes
- 无密钥配置
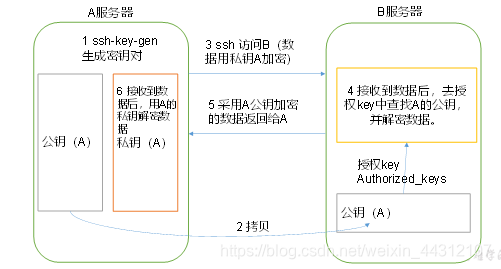
(1)免密登录原理,如图2-40所示
(2)生成公钥和私钥:
[atguigu@hadoop102 .ssh]$ ssh-keygen -t rsa
然后敲(三个回车),就会生成两个文件id_rsa(私钥)、id_rsa.pub(公钥)
(3)将公钥拷贝到要免密登录的目标机器上
[atguigu@hadoop102 .ssh]$ ssh-copy-id hadoop102
[atguigu@hadoop102 .ssh]$ ssh-copy-id hadoop103
[atguigu@hadoop102 .ssh]$ ssh-copy-id hadoop104
注意:
还需要在hadoop102上采用root账号,配置一下无密登录到hadoop102、hadoop103、hadoop104;
还需要在hadoop103上采用atguigu账号配置一下无密登录到hadoop102、hadoop103、hadoop104服务器上。
- .ssh文件夹下(~/.ssh)的文件功能解释
表2-4
| known_hosts | 记录ssh访问过计算机的公钥(public key) |
|---|---|
| id_rsa | 生成的私钥 |
| id_rsa.pub | 生成的公钥 |
| authorized_keys | 存放授权过得无密登录服务器公钥 |
4.3.6 群起集群
- 配置slaves
/opt/module/hadoop-2.7.2/etc/hadoop/slaves
[atguigu@hadoop102 hadoop]$ vi slaves
在该文件中增加如下内容:
hadoop102
hadoop103
hadoop104
注意:该文件中添加的内容结尾不允许有空格,文件中不允许有空行。
同步所有节点配置文件
[atguigu@hadoop102 hadoop]$ xsync slaves
- 启动集群
(1)如果集群是第一次启动,需要格式化NameNode(注意格式化之前,一定要先停止上次启动的所有namenode和datanode进程,然后再删除data和log数据)
[atguigu@hadoop102 hadoop-2.7.2]$ bin/hdfs namenode -format
(2)启动HDFS
[atguigu@hadoop102 hadoop-2.7.2]$ sbin/start-dfs.sh
[atguigu@hadoop102 hadoop-2.7.2]$ jps
4166 NameNode
4482 Jps
4263 DataNode
[atguigu@hadoop103 hadoop-2.7.2]$ jps
3218 DataNode
3288 Jps
[atguigu@hadoop104 hadoop-2.7.2]$ jps
3221 DataNode
3283 SecondaryNameNode
3364 Jps
(3)启动YARN
[atguigu@hadoop103 hadoop-2.7.2]$ sbin/start-yarn.sh
注意:NameNode和ResourceManger如果不是同一台机器,不能在NameNode上启动
YARN,应该在ResouceManager所在的机器上启动YARN。
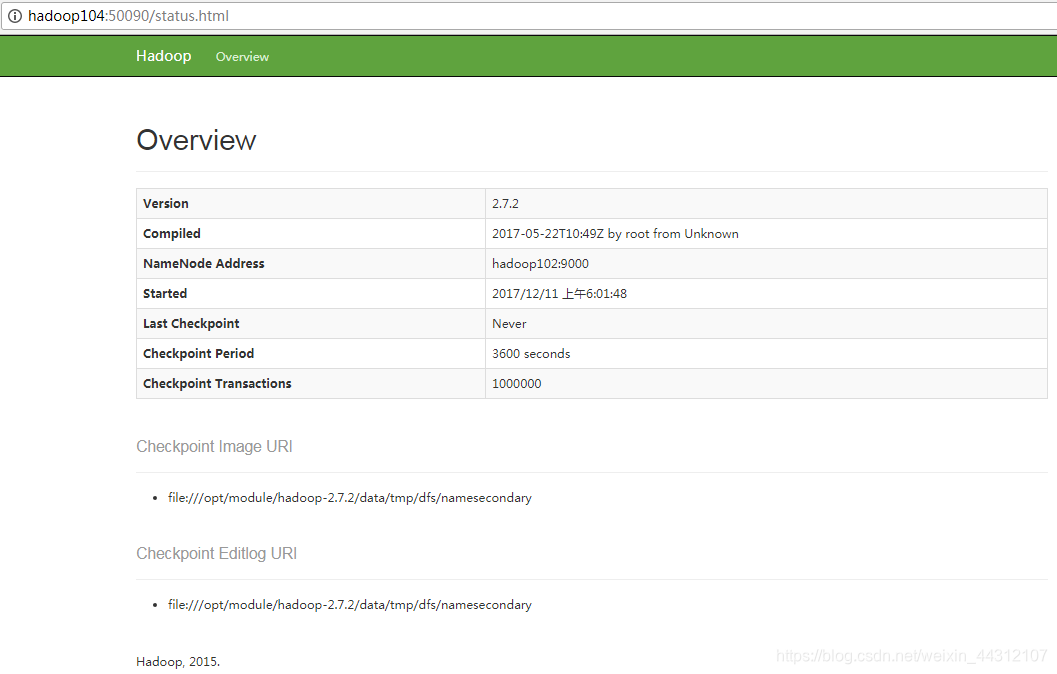
(4)Web端查看SecondaryNameNode
(a)浏览器中输入:http://hadoop104:50090/status.html
(b)查看SecondaryNameNode信息,如图2-41所示。
- 集群基本测试
(1)上传文件到集群
上传小文件
[atguigu@hadoop102 hadoop-2.7.2]$ hdfs dfs -mkdir -p /user/atguigu/input
[atguigu@hadoop102 hadoop-2.7.2]$ hdfs dfs -put wcinput/wc.input
/user/atguigu/input
上传大文件
[atguigu@hadoop102 hadoop-2.7.2]$ bin/hadoop fs -put
/opt/software/hadoop-2.7.2.tar.gz /user/atguigu/input
(2)上传文件后查看文件存放在什么位置
(a)查看HDFS文件存储路径
[atguigu@hadoop102 subdir0]$ pwd
/opt/module/hadoop-2.7.2/data/tmp/dfs/data/current/BP-938951106-192.168.10.107-1495462844069/current/finalized/subdir0/subdir0
(b)查看HDFS在磁盘存储文件内容
[atguigu@hadoop102 subdir0]$ cat blk_1073741825
hadoop yarn
hadoop mapreduce
atguigu
atguigu
(3)拼接
-rw-rw-r–. 1 atguigu atguigu 134217728 5月 23 16:01 blk_1073741836
-rw-rw-r–. 1 atguigu atguigu 1048583 5月 23 16:01 blk_1073741836_1012.meta
-rw-rw-r–. 1 atguigu atguigu 63439959 5月 23 16:01 blk_1073741837
-rw-rw-r–. 1 atguigu atguigu 495635 5月 23 16:01 blk_1073741837_1013.meta
[atguigu@hadoop102 subdir0]$ cat blk_1073741836>>tmp.file
[atguigu@hadoop102 subdir0]$ cat blk_1073741837>>tmp.file
[atguigu@hadoop102 subdir0]$ tar -zxvf tmp.file
(4)下载
[atguigu@hadoop102 hadoop-2.7.2]$ bin/hadoop fs -get
/user/atguigu/input/hadoop-2.7.2.tar.gz ./
4.3.7 集群启动/停止方式总结
- 各个服务组件逐一启动/停止
(1)分别启动/停止HDFS组件
hadoop-daemon.sh start / stop namenode / datanode / secondarynamenode
(2)启动/停止YARN
yarn-daemon.sh start / stop resourcemanager / nodemanager
- 各个模块分开启动/停止(配置ssh是前提)常用
(1)整体启动/停止HDFS
start-dfs.sh / stop-dfs.sh
(2)整体启动/停止YARN
start-yarn.sh / stop-yarn.sh
4.3.8 集群时间同步
时间同步的方式:找一个机器,作为时间服务器,所有的机器与这台集群时间进行定时的同步,比如,每隔十分钟,同步一次时间。
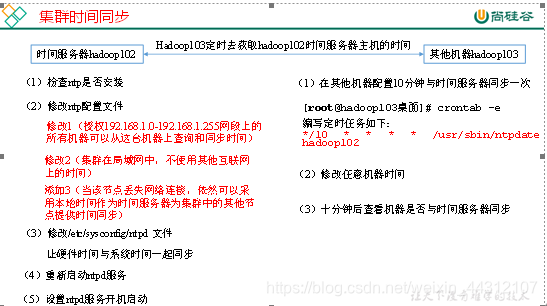
配置时间同步具体实操:
- 时间服务器配置(必须root用户)
(1)检查ntp是否安装
[root@hadoop102 桌面]# rpm -qa|grep ntp
ntp-4.2.6p5-10.el6.centos.x86_64
fontpackages-filesystem-1.41-1.1.el6.noarch
ntpdate-4.2.6p5-10.el6.centos.x86_64
(2)修改ntp配置文件
[root@hadoop102 桌面]# vi /etc/ntp.conf
修改内容如下
a)修改1(授权192.168.1.0-192.168.1.255网段上的所有机器可以从这台机器上查询和同步时间)
**#**restrict 192.168.1.0 mask 255.255.255.0 nomodify notrap为
restrict 192.168.1.0 mask 255.255.255.0 nomodify notrap
b)修改2(集群在局域网中,不使用其他互联网上的时间)
server 0.centos.pool.ntp.org iburst
server 1.centos.pool.ntp.org iburst
server 2.centos.pool.ntp.org iburst
server 3.centos.pool.ntp.org iburst为
**#**server 0.centos.pool.ntp.org iburst
**#**server 1.centos.pool.ntp.org iburst
**#**server 2.centos.pool.ntp.org iburst
**#**server 3.centos.pool.ntp.org iburst
c)添加3(当该节点丢失网络连接,依然可以采用本地时间作为时间服务器为集群中的其他节点提供时间同步)
server 127.127.1.0
fudge 127.127.1.0 stratum 10
(3)修改/etc/sysconfig/ntpd 文件
[root@hadoop102 桌面]# vim /etc/sysconfig/ntpd
增加内容如下(让硬件时间与系统时间一起同步)
SYNC_HWCLOCK=yes
(4)重新启动ntpd服务
[root@hadoop102 桌面]# service ntpd status
ntpd 已停
[root@hadoop102 桌面]# service ntpd start
正在启动 ntpd: [确定]
(5)设置ntpd服务开机启动
[root@hadoop102 桌面]# chkconfig ntpd on
- 其他机器配置(必须root用户)
(1)在其他机器配置10分钟与时间服务器同步一次
[root@hadoop103桌面]# crontab -e
编写定时任务如下:
*/10 * * * * /usr/sbin/ntpdate hadoop102
(2)修改任意机器时间
[root@hadoop103桌面]# date -s “2017-9-11 11:11:11”
(3)十分钟后查看机器是否与时间服务器同步
[root@hadoop103桌面]# date
255.0 nomodify notrap
b)修改2(集群在局域网中,不使用其他互联网上的时间)
server 0.centos.pool.ntp.org iburst
server 1.centos.pool.ntp.org iburst
server 2.centos.pool.ntp.org iburst
server 3.centos.pool.ntp.org iburst为
**#**server 0.centos.pool.ntp.org iburst
**#**server 1.centos.pool.ntp.org iburst
**#**server 2.centos.pool.ntp.org iburst
**#**server 3.centos.pool.ntp.org iburst
c)添加3(当该节点丢失网络连接,依然可以采用本地时间作为时间服务器为集群中的其他节点提供时间同步)
server 127.127.1.0
fudge 127.127.1.0 stratum 10
(3)修改/etc/sysconfig/ntpd 文件
[root@hadoop102 桌面]# vim /etc/sysconfig/ntpd
增加内容如下(让硬件时间与系统时间一起同步)
SYNC_HWCLOCK=yes
(4)重新启动ntpd服务
[root@hadoop102 桌面]# service ntpd status
ntpd 已停
[root@hadoop102 桌面]# service ntpd start
正在启动 ntpd: [确定]
(5)设置ntpd服务开机启动
[root@hadoop102 桌面]# chkconfig ntpd on
- 其他机器配置(必须root用户)
(1)在其他机器配置10分钟与时间服务器同步一次
[root@hadoop103桌面]# crontab -e
编写定时任务如下:
*/10 * * * * /usr/sbin/ntpdate hadoop102
(2)修改任意机器时间
[root@hadoop103桌面]# date -s “2017-9-11 11:11:11”
(3)十分钟后查看机器是否与时间服务器同步
[root@hadoop103桌面]# date
说明:测试的时候可以将10分钟调整为1分钟,节省时间。

北京人形旗下天工造物具身智能开源社区,聚焦具身天工与慧思开物两大平台
更多推荐
 0
0 0
0- 0


 已为社区贡献1条内容

所有评论(0)