【Linux】Linux/ubuntu上部署ftp服务进行上传下载文件
Linux/ubuntu上部署ftp服务进行上传下载文件
目录
一.安装并启动 FTP 服务
1.安装 VSFTPD
sudo apt-get install vsftpd -y
2.启动 VSFTPD
安装完成后 VSFTPD 会自动启动,通过 netstat 命令可以看到系统已经[监听了21号端口]:
$ sudo netstat -nltp | grep 21
(Not all processes could be identified, non-owned process info
 will not be shown, you would have to be root to see it all.)
tcp6       0      0 :::21                   :::*                    LISTEN
如果没有启动,可以手动开启 VSFTPD 服务:
sudo systemctl start vsftpdFTP 协议默认使用 21 端口作为服务端口
3.配置用户访问目录
1)新建用户主目录
sudo mkdir /home/uftp
执行完后,在这里 /home/uftp [?] 就能看到新建的文件夹 uftp 了。
创建登录欢迎文件 [?]:
sudo touch /home/uftp/welcome.txt
方便用户登录后可以看到欢迎信息,并且确定用户确实登录到了主目录上。
用户的主目录是用户通过 FTP 登录后看到的根目录
2)新建用户 uftp 并设置密码
创建一个用户 uftp :
sudo useradd -d /home/uftp -s /bin/bash uftp
为用户 uftp 设置密码 :
sudo passwd uftp
删除掉 pam.d 中 vsftpd,因为该配置文件会导致使用用户名登录 ftp 失败:
sudo rm /etc/pam.d/vsftpd
3)限制该用户仅能通过 FTP 访问
限制用户 uftp 只能通过 FTP 访问服务器,而不能直接登录服务器:
sudo usermod -s /sbin/nologin uftp
4)修改 vsftpd 配置
sudo chmod a+w /etc/vsftpd.conf
修改 /etc/vsftpd.conf 文件中的配置(直接将如下配置添加到配置文件最下方):
# 限制用户对主目录以外目录访问
chroot_local_user=YES

# 指定一个 userlist 存放允许访问 ftp 的用户列表
userlist_deny=NO
userlist_enable=YES

# 记录允许访问 ftp 用户列表
userlist_file=/etc/vsftpd.user_list

# 不配置可能导致莫名的530问题
seccomp_sandbox=NO

# 允许文件上传
write_enable=YES

# 使用utf8编码
utf8_filesystem=YES
新建文件 /etc/vsftpd.user_list,用于存放允许访问 ftp 的用户:
sudo touch /etc/vsftpd.user_list
sudo chmod a+w /etc/vsftpd.user_list
修改 /etc/vsftpd.user_list ,加入刚刚创建的用户:
示例代码:/etc/vsftpd.user_list
uftp
5)设置访问权限
设置主目录访问权限(只读):
sudo chmod a-w /home/uftp
新建公共目录,并设置权限(读写):
sudo mkdir /home/uftp/public && sudo chmod 777 -R /home/uftp/public
重启vsftpd 服务:
sudo systemctl restart vsftpd二.访问uftp目录
1.ftp客户端(ubuntu)
下载好ftp
sudo apt-get install ftp -y登录本地的uftp
ftp 127.0.0.1trust100@ubuntu:/home$ ftp 127.0.0.1
Connected to 127.0.0.1.
220 (vsFTPd 3.0.3)
Name (127.0.0.1:trust100): uftp
331 Please specify the password.
Password:
230 Login successful.
Remote system type is UNIX.
Using binary mode to transfer files.
ftp> ls
200 PORT command successful. Consider using PASV.
150 Here comes the directory listing.
drwxrwxrwx 2 0 0 4096 Mar 28 01:30 public
-rw-r--r-- 1 0 0 0 Mar 28 01:24 welcome.txt
226 Directory send OK.
ftp> pwd
257 "/" is the current directory
ftp> open 127.0.0.1
Already connected to 127.0.0.1, use close first.
ftp> h
?Ambiguous command
ftp> -h
?Invalid command
ftp> help
Commands may be abbreviated. Commands are:
! dir mdelete qc site
$ disconnect mdir sendport size
account exit mget put status
append form mkdir pwd struct
ascii get mls quit system
bell glob mode quote sunique
binary hash modtime recv tenex
bye help mput reget tick
case idle newer rstatus trace
cd image nmap rhelp type
cdup ipany nlist rename user
chmod ipv4 ntrans reset umask
close ipv6 open restart verbose
cr lcd prompt rmdir ?
delete ls passive runique
debug macdef proxy send
ftp> pwd
257 "/" is the current directory
ftp> ls
200 PORT command successful. Consider using PASV.
150 Here comes the directory listing.
drwxrwxrwx 2 0 0 4096 Mar 28 01:30 public
-rw-r--r-- 1 0 0 0 Mar 28 01:24 welcome.txt
226 Directory send OK.
ftp> exit
221 Goodbye.
2.通过FileZilla(Windows)
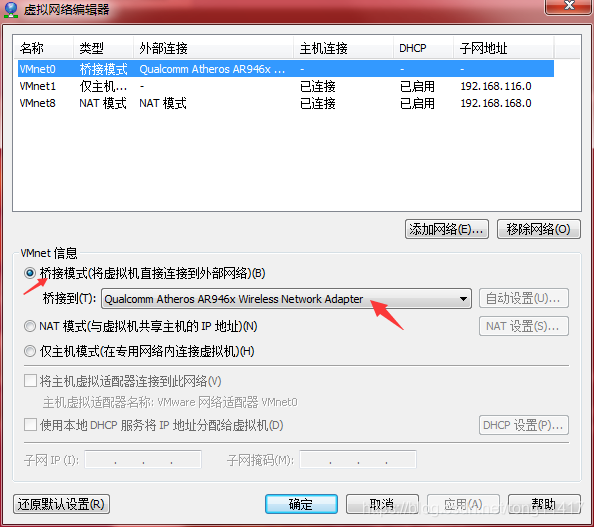
首先先让虚拟机中的ubuntu与宿主机Windows的IP地址在同一网段,这个可以通过设置虚拟机vmvare虚拟网络编辑器
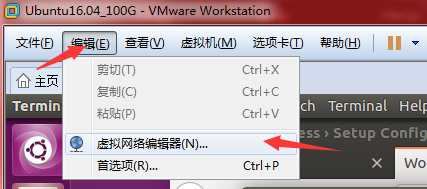
如果你想让你的网段在你家的wifi中的网段,需要设置桥接模式的无线网络适配器
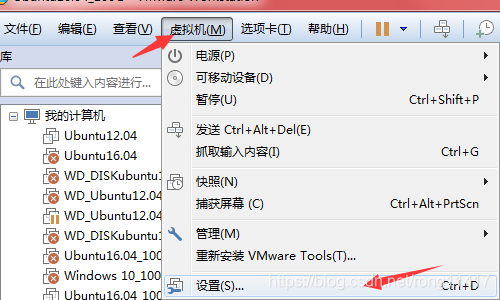
然后进入设置中配置 -》硬件-》网络适配器-》桥接模式
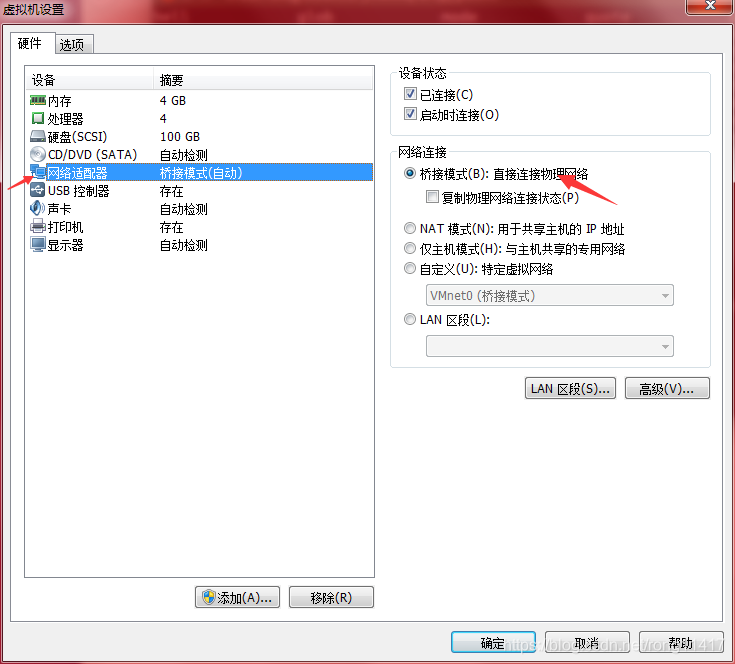
点击确定即可
重启ubuntu
进入系统后,使用ifconfig查看当前的ip地址
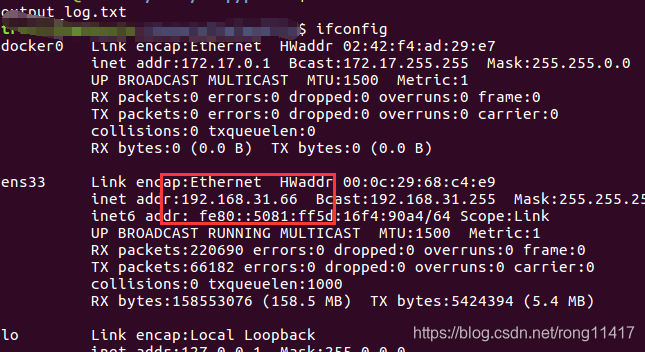
然后在windows上的FileZilla中,
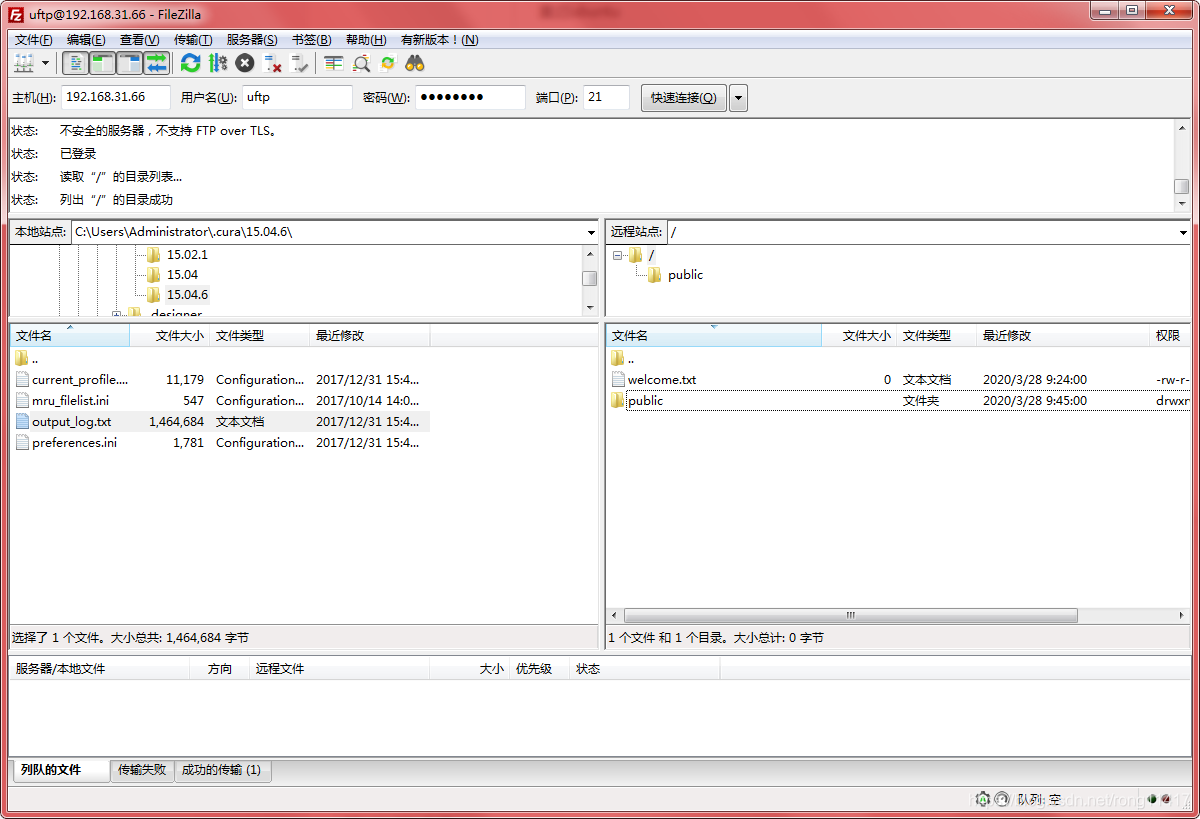
就连接上了,可以进行文件的上传和下载

北京人形旗下天工造物具身智能开源社区,聚焦具身天工与慧思开物两大平台
更多推荐
 0
0 0
0- 0


 已为社区贡献2条内容

所有评论(0)