python 3.9 解决“ImportError: cannot import name ‘Image‘ from ‘PIL‘ (unknown location)”问题
·
踩雷记录,仅供参考。
一、问题
import torch
import torch.nn as nn
import torch.optim as optim
from torch.utils.data import DataLoader
import torchvision
from torchvision import transforms
import matplotlib.pyplot as plt

class AlexNet(nn.Module):
    """
        AlexNet 架构 (2012年由Alex Krizhevsky提出)
        原始输入尺寸: 3x227x227 (ImageNet)
        关键创新:
            - 使用ReLU激活函数加速收敛
            - 多GPU并行训练(原论文实现)
            - Local Response Normalization (LRN)
            - Dropout减少过拟合
    """
    def __init__(self,num_classes=1000):
        super(AlexNet,self).__init__()
        self.features=nn.Sequential(
            # 第1层卷积: 输入3通道,输出96通道,11x11卷积核,步长4
            # 计算: (227 - 11)/4 + 1 = 55 → 输出96x55x55
            # 步骤 卷积+激活函数+LRN+池化
            nn.Conv2d(3,96,kernel_size=11,stride=4,padding=2),
            nn.ReLU(inplace=True),
            nn.LocalResponseNorm(size=5,alpha=0.0001,beta=0.75,k=2), # LRN层对ReLU激活后的输出进行局部响应归一化
            nn.MaxPool2d(kernel_size=3,stride=2),# 输出96x27x27
            # 第2层卷积: 96通道 -> 256通道,5x5卷积核,padding=2
            nn.Conv2d(96,256,kernel_size=5,padding=2),
            nn.ReLU(inplace=True),
            nn.LocalResponseNorm(size=5,alpha=0.0001,beta=0.75,k=2),
            nn.MaxPool2d(kernel_size=3,stride=2),# 输出256x13x13
            # 连续3层卷积(无池化)
            nn.Conv2d(256,384,kernel_size=3,padding=1), # 384x13x13
            nn.ReLU(inplace=True),
            nn.Conv2d(384,384,kernel_size=3,padding=1), # 384x13x13
            nn.ReLU(inplace=True),
            nn.Conv2d(384,256,kernel_size=3,padding=1), # 256x13x13
            nn.ReLU(inplace=True),
            nn.MaxPool2d(kernel_size=3,stride=2), # 输出256x6x6
        )
        self.classifier=nn.Sequential(
            nn.Dropout(p=0.5),
            nn.Linear(256*6*6,4096), # 原论文第一全连接层dropout
            nn.ReLU(inplace=True),
            nn.Dropout(p=0.5), # 第二全连接层dropout
            nn.Linear(4096,4096),
            nn.ReLU(inplace=True),
            nn.Linear(4096,num_classes),
        )
    def forward(self,x):
        x=self.features(x)
        x=torch.flatten(x,start_dim=1)
        x=self.classifier(x)
        return x

    # 测试网络结构

if __name__ == '__main__':
    # 1、实例化模型
    model=AlexNet(num_classes=1000)
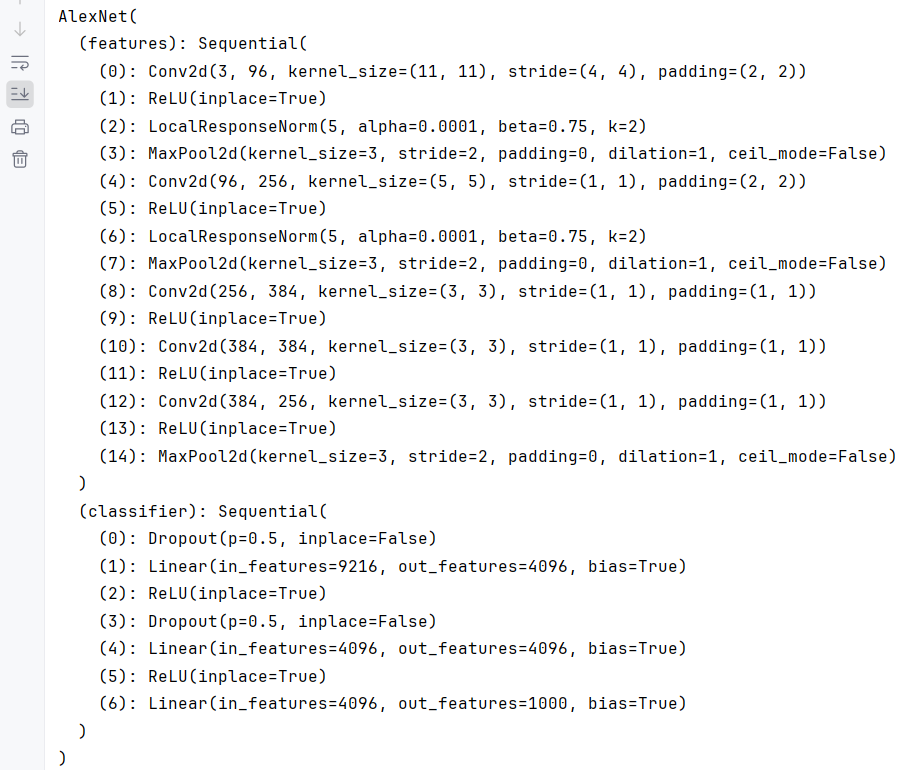
    print(model)
    # 2、验证输入输出尺寸
    dummy_input=torch.randn(1,3,227,227) # 模拟ImageNet输入
    output=model(dummy_input)
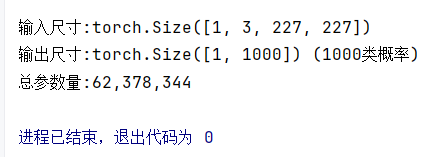
    print(f"\n输入尺寸:{dummy_input.shape}")
    print(f"输出尺寸:{output.shape} (1000类概率)")
    # 3、计算参数量
    total_params=sum(p.numel() for p in model.parameters())
    print(f"总参数量:{total_params:,}")# 约60M参数
运行上面的AlexNet代码时出现报错:
ImportError: cannot import name ‘Image’ from ‘PIL’ (unknown location)
二、可能的原因
- PIL库未正确安装,可能被弃用的Pillow-fork替代;
- 环境配置问题,如多个Python版本或虚拟环境导致依赖冲突;
- 导入语句书写错误,正确的是
from PIL import Image而非直接import Image。
三、解决
①使用快捷键win+R,输入cmd后,我重新安装了一遍PIL库,(在cmd里PIL的全称是pillow),输入pip install pillow,无效。
②根据提示,我认为出现cannot import name ‘Image’ from 'PIL’的小插曲的原因是pip和PIL库的版本号不匹配,要升级pip,以便成功匹配。
按提示,输入python -m pip install --upgrade pip升级,依然无效。
③我检查了我的代码文件名也没有以模块名命名的文件PIL.py,应该不是因为命名冲突。
④最后发现是pillow的版本不对,以下是版本对应关系:
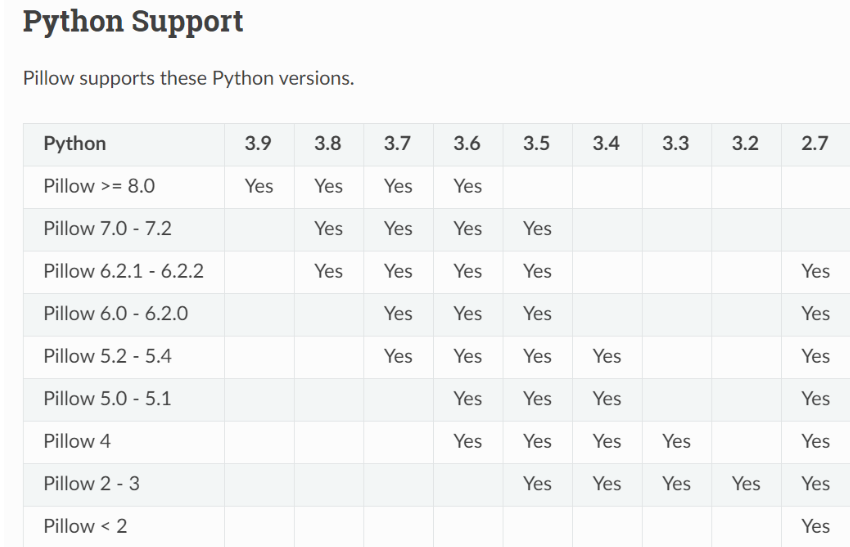
我的python版本是3.9,需要pillow版本大于等于8.0,于是修改安装命令,成功安装。
pip install pillow==8.0 -i https://pypi.tuna.tsinghua.edu.cn/simple
最终代码成功运行√

北京人形旗下天工造物具身智能开源社区,聚焦具身天工与慧思开物两大平台
更多推荐
 4
4 0
0- 0


 已为社区贡献1条内容

所有评论(0)