自然语言处理入门级项目——文本分类(训练篇)
前言
本篇博客主要承接上一篇博客的介绍,实现基于pytorch搭建单层感知机模型,并训练模型的过程
1.训练前期准备
虽然这是一个简单基于单层感知机的二分类问题,模型非常简单,但为了规范化训练过程,作者还是使用比较规范代码逻辑供我们学习。
1.1辅助函数
- 模型状态函数
def make_train_state(args):
    return {'stop_early': False,
            'early_stopping_step': 0,
            'early_stopping_best_val': 1e8,
            'learning_rate': args.learning_rate,
            'epoch_index': 0,
            'train_loss': [],
            'train_acc': [],
            'val_loss': [],
            'val_acc': [],
            'test_loss': -1,
            'test_acc': -1,
            'model_filename': args.model_state_file}
- 模型状态更新函数
def update_train_state(args, model, train_state):
    """Handle the training state updates.

    Components:
     - Early Stopping: Prevent overfitting.
     - Model Checkpoint: Model is saved if the model is better

    :param args: main arguments
    :param model: model to train
    :param train_state: a dictionary representing the training state values
    :returns:
        a new train_state
    """

    # Save one model at least
    if train_state['epoch_index'] == 0:
        torch.save(model.state_dict(), train_state['model_filename'])
        train_state['stop_early'] = False

    # Save model if performance improved
    elif train_state['epoch_index'] >= 1:
        loss_tm1, loss_t = train_state['val_loss'][-2:]

        # If loss worsened
        if loss_t >= train_state['early_stopping_best_val']:
            # Update step
            train_state['early_stopping_step'] += 1
        # Loss decreased
        else:
            # Save the best model
            if loss_t < train_state['early_stopping_best_val']:
                torch.save(model.state_dict(), train_state['model_filename'])

            # Reset early stopping step
            train_state['early_stopping_step'] = 0

        # Stop early ?
        train_state['stop_early'] = \
            train_state['early_stopping_step'] >= args.early_stopping_criteria

    return train_state
该函数主要实现模型参数的保存,以及早停策略。模型参数的保存相对于之前模型的验证集损失是否下降,如果下降,则保存模型并重置模型变差的步数;如果未下降则更新模型变差的步数,该步数达到设置的步数时,即判断该模型训练完毕,即早停。
- 准确率计算函数
def compute_accuracy(y_pred, y_target):
    y_target = y_target.cpu()
    y_pred_indices = (torch.sigmoid(y_pred)>0.5).cpu().long()#.max(dim=1)[1]
    n_correct = torch.eq(y_pred_indices, y_target).sum().item()
    return n_correct / len(y_pred_indices) * 100
- 随机种子设定
def set_seed_everywhere(seed, cuda):
    np.random.seed(seed)
    torch.manual_seed(seed)
    if cuda:
        torch.cuda.manual_seed_all(seed)
- 路径信息相关文件夹的创建
def handle_dirs(dirpath):
    if not os.path.exists(dirpath):
        os.makedirs(dirpath)
1.2准备工作
这里将所有可调节参数进行了封装,具体代码如下:
args = Namespace(
    # Data and Path information
    frequency_cutoff=25,
    model_state_file='model.pth',
    review_csv='data/yelp/reviews_with_splits_lite_new.csv',
    # review_csv='data/yelp/reviews_with_splits_full.csv',
    save_dir='model_storage/ch3/yelp/',
    vectorizer_file='vectorizer.json',
    # No Model hyper parameters
    # Training hyper parameters
    batch_size=128,
    early_stopping_criteria=5,
    learning_rate=0.001,
    num_epochs=100,
    seed=1337,
    # Runtime options
    catch_keyboard_interrupt=True,
    cuda=True,
    expand_filepaths_to_save_dir=True,
    reload_from_files=False,
)
这里对部分参数进行解释:
frequency_cutoff:用来确定生成词汇表基础频次要求。如果将其设置过小,会导致词汇表过大,相反过小。应当设置一个合适的数值,才能更好的表征评论。model_state_file:用来存储模型的文件名。review_csv:数据集的路径信息。save_dir:保存文件的路径信息,后续会和一些文件名进行结合,将相关文件保存到指定文件夹中。vectorizer_file:用来存储词汇表的文件名。batch_size:批次大小,用来表示小批量梯度下降使用的样本数。early_stopping_criteria:最大容纳模型性能连续升高的轮数,早停策略的超参数。learning_rate:初始学习率。num_epochs:最大迭代轮数。seed:随机种子。
剩余的超参数暂时不做解释,后续需要在进行解释。接着解释准备工作。
if args.expand_filepaths_to_save_dir:
    args.vectorizer_file = os.path.join(args.save_dir,
                                        args.vectorizer_file)

    args.model_state_file = os.path.join(args.save_dir,
                                         args.model_state_file)

    print("Expanded filepaths: ")
    print("\t{}".format(args.vectorizer_file))
    print("\t{}".format(args.model_state_file))
该部分运用了参数expand_filepaths_to_save_dir,此处说明该参数用来指定是否使用参数save_dir将模型参数保存路径以及词汇表保存路径信息进行调整。
# Check CUDA
if not torch.cuda.is_available():
    args.cuda = False

print("Using CUDA: {}".format(args.cuda))

args.device = torch.device("cuda" if args.cuda else "cpu")

# Set seed for reproducibility
set_seed_everywhere(args.seed, args.cuda)

# handle dirs
handle_dirs(args.save_dir)
接着,查看是否具备cuda环境,否则使用cpu运行。同时设置了随机化种子,使得结果能够重复实现。对于未存在的路径进行创建。
运行结果:
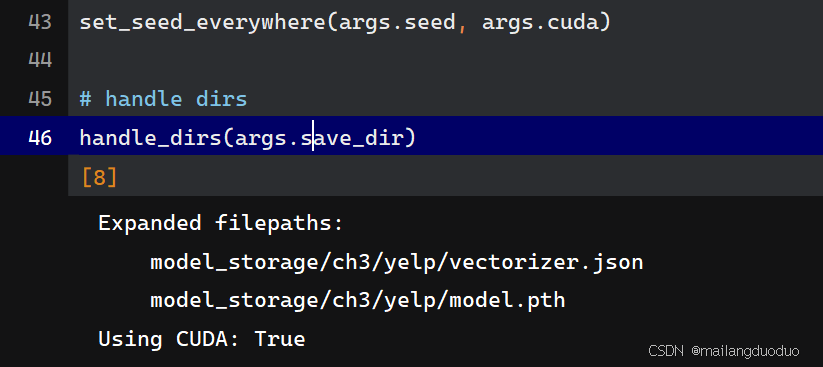
同时你也可以看到,在当前文件所在位置下,出现了save_dir所示的文件夹。
1.3数据集加载
在进行训练前,需要将数据集加载进来,即以向量化方式加载进来
if args.reload_from_files:
    # training from a checkpoint
    print("Loading dataset and vectorizer")
    dataset = ReviewDataset.load_dataset_and_load_vectorizer(args.review_csv,
                                                            args.vectorizer_file)
else:
    print("Loading dataset and creating vectorizer")
    # create dataset and vectorizer
    dataset = ReviewDataset.load_dataset_and_make_vectorizer(args.review_csv)
    dataset.save_vectorizer(args.vectorizer_file)
vectorizer = dataset.get_vectorizer()
这里涉及了一个自定义参数reload_from_files该参数的功能是利用数据集生成词汇表还是使用已有的词汇表。
词汇表结果如下所示:
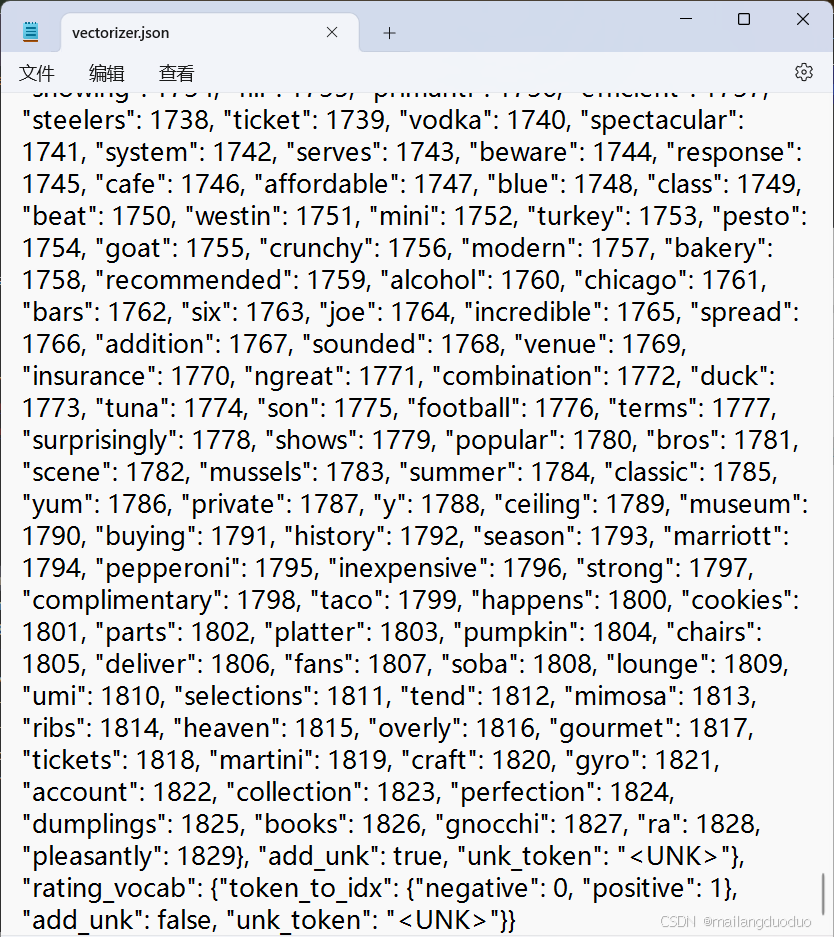
经过该部分处理,数据已经处理为向量化表示,这里随机查看一条数据:

该数据确实和之前所说,已经表示为基于词汇表的独热编码形式。
1.4模型搭建
因为该问题和之前博客介绍相似——单层感知机的二分类模型,属于简单的二分类问题,因此这里仍采用单层感知机模型。
class ReviewClassifier(nn.Module):
    """ a simple perceptron based classifier """
    def __init__(self, num_features):
        """
        Args:
            num_features (int): the size of the input feature vector
        """
        super(ReviewClassifier, self).__init__()
        self.fc1 = nn.Linear(in_features=num_features,
                             out_features=1)

    def forward(self, x_in, apply_sigmoid=False):
        """The forward pass of the classifier

        Args:
            x_in (torch.Tensor): an input data tensor.
                x_in.shape should be (batch, num_features)
            apply_sigmoid (bool): a flag for the sigmoid activation
                should be false if used with the Cross Entropy losses
        Returns:
            the resulting tensor. tensor.shape should be (batch,)
        """
        y_out = self.fc1(x_in).squeeze()
        if apply_sigmoid:
            y_out = torch.sigmoid(y_out)
        return y_out
至此模型搭建完毕,后续需选择合适的设备(cpu or gpu)、损失函数、优化器等。
2.训练阶段
此处使用的是GPU,损失函数为二元交叉熵损失,优化器使用。同时为了使训练过程可视化,使用了tqdm模块。下面是对该模块的介绍。
2.1训练可视化
tqdm是一个 Python 库,用于在循环中显示进度条,帮助你直观地了解长时间运行任务的完成情况。它支持多种环境(命令行、Jupyter Notebook 等),可以与各种迭代器(如列表、生成器)集成,并且提供了丰富的自定义选项。
这里使用的是tqdm_notebook,显示为 HTML 进度条。
epoch_bar = tqdm(desc='training routine',
                          total=args.num_epochs,
                          position=0)

dataset.set_split('train')
train_bar = tqdm(desc='split=train',
                          total=dataset.get_num_batches(args.batch_size),
                          position=1,
                          leave=True)
dataset.set_split('val')
val_bar = tqdm(desc='split=val',
                        total=dataset.get_num_batches(args.batch_size),
                        position=1,
                        leave=True)
这里创建了三个进度条,分别记录总的epoch处理进度、训练集上的处理进度以及验证集上的处理进度
2.2训练过程
整体的训练过程总共就是五个步骤:
- 梯度清零
- 计算模型输出
- 计算损失
- 方向传播
- 参数更新
try:
    for epoch_index in range(args.num_epochs):
        train_state['epoch_index'] = epoch_index

        # Iterate over training dataset

        # setup: batch generator, set loss and acc to 0, set train mode on
        dataset.set_split('train')
        batch_generator = generate_batches(dataset,
                                           batch_size=args.batch_size,
                                           device=args.device)
        running_loss = 0.0
        running_acc = 0.0
        classifier.train()

        for batch_index, batch_dict in enumerate(batch_generator):
            # the training routine is these 5 steps:

            # --------------------------------------
            # step 1. zero the gradients
            optimizer.zero_grad()

            # step 2. compute the output
            y_pred = classifier(x_in=batch_dict['x_data'].float())

            # step 3. compute the loss
            loss = loss_func(y_pred, batch_dict['y_target'].float())
            loss_t = loss.item()
            running_loss += (loss_t - running_loss) / (batch_index + 1)

            # step 4. use loss to produce gradients
            loss.backward()

            # step 5. use optimizer to take gradient step
            optimizer.step()
            # -----------------------------------------
            # compute the accuracy
            acc_t = compute_accuracy(y_pred, batch_dict['y_target'])
            running_acc += (acc_t - running_acc) / (batch_index + 1)

            # update bar
            train_bar.set_postfix(loss=running_loss,
                                  acc=running_acc,
                                  epoch=epoch_index)
            train_bar.update()

        train_state['train_loss'].append(running_loss)
        train_state['train_acc'].append(running_acc)

        # Iterate over val dataset

        # setup: batch generator, set loss and acc to 0; set eval mode on
        dataset.set_split('val')
        batch_generator = generate_batches(dataset,
                                           batch_size=args.batch_size,
                                           device=args.device)
        running_loss = 0.
        running_acc = 0.
        classifier.eval()

        for batch_index, batch_dict in enumerate(batch_generator):

            # compute the output
            y_pred = classifier(x_in=batch_dict['x_data'].float())

            # step 3. compute the loss
            loss = loss_func(y_pred, batch_dict['y_target'].float())
            loss_t = loss.item()
            running_loss += (loss_t - running_loss) / (batch_index + 1)

            # compute the accuracy
            acc_t = compute_accuracy(y_pred, batch_dict['y_target'])
            running_acc += (acc_t - running_acc) / (batch_index + 1)

            val_bar.set_postfix(loss=running_loss,
                                acc=running_acc,
                                epoch=epoch_index)
            val_bar.update()

        train_state['val_loss'].append(running_loss)
        train_state['val_acc'].append(running_acc)

        train_state = update_train_state(args=args, model=classifier,
                                         train_state=train_state)

        scheduler.step(train_state['val_loss'][-1])

        train_bar.n = 1
        val_bar.n = 1
        epoch_bar.update()

        if train_state['stop_early']:
            break

except KeyboardInterrupt:

    print("Exiting loop")
运行结果:
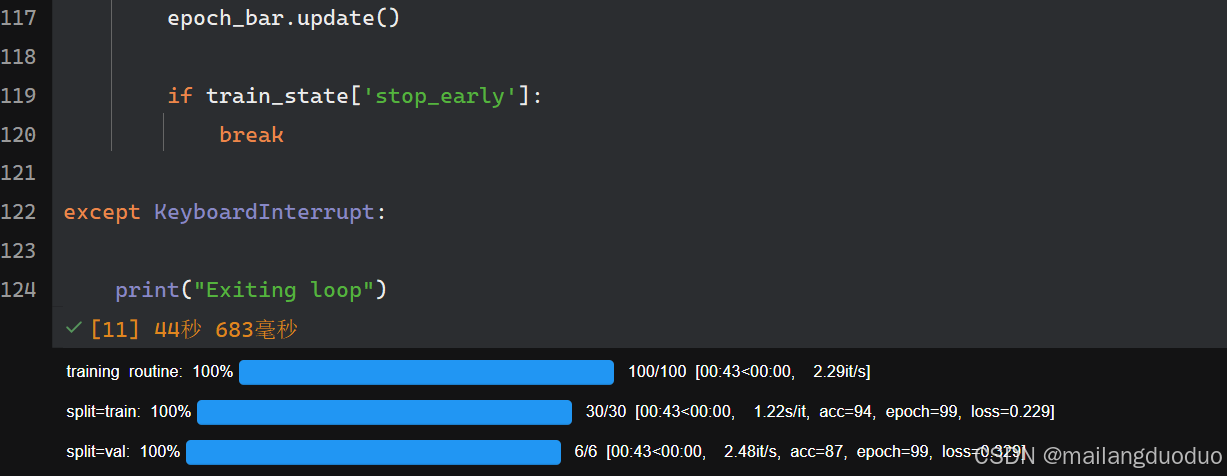
这里统计的损失并不是每个批次的损失(该损失会出现较为剧烈的抖动),也不是每个epoch内所有损失的平均值(该损失会在一定程度上缓解抖动),而是当前训练批次的损失值的加权移动平均值(也称为指数移动平均),该损失相对于简单的平均损失而言,更能反映最近的训练状态,同时结果也能平滑。这里将训练过程的结果进行可视化输出,代码如下:
from matplotlib import pyplot as plt

# 绘制训练过程中的损失变化曲线以及正确率变化曲线
plt.figure(figsize=(10, 5))
plt.subplot(1, 2, 1)
plt.plot(train_state['train_loss'], label='Train Loss')
plt.plot(train_state['val_loss'], label='Val Loss')
plt.xlabel('Epoch')
plt.ylabel('Loss')
plt.legend()
plt.subplot(1, 2, 2)
plt.plot(train_state['train_acc'], label='Train Acc')
plt.plot(train_state['val_acc'], label='Val Acc')
plt.xlabel('Epoch')
plt.ylabel('Accuracy')
plt.legend()
plt.show()
运行结果:
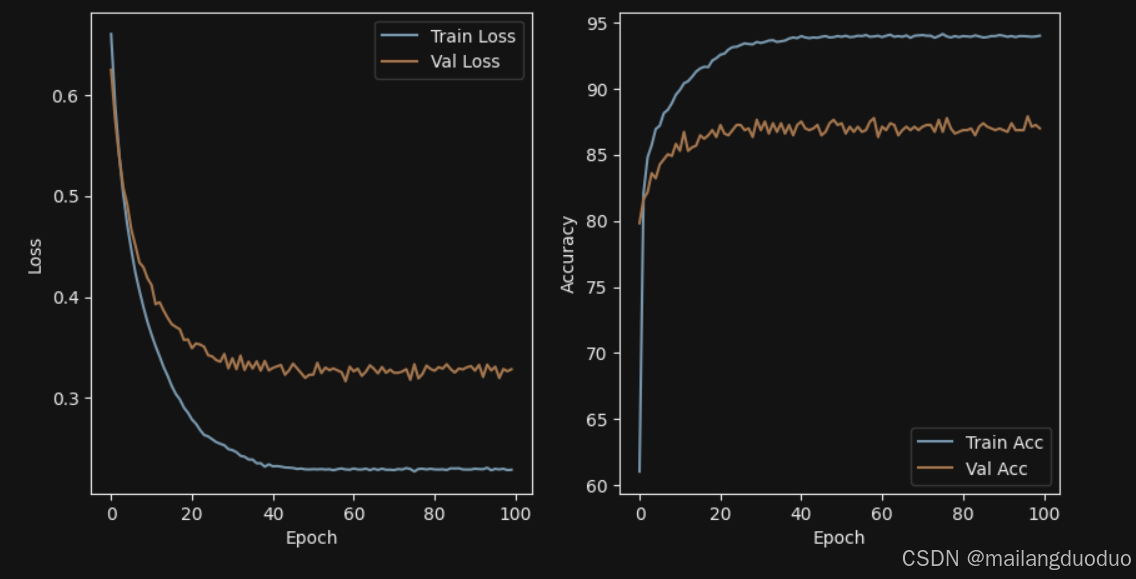
该方式明显更适合解决之前博客中出现的问题——训练过程损失波动剧烈UNRET语义分割
从结果来看,训练集和验证集损失基本趋于收敛,因此判断模型已收敛。接着将对已经训练好的模型进行评估,使用未见过的评论数据,观察模型的预测结果,考虑模型的泛化性能。
3.模型预测
经过上述过程,模型已经训练完毕,接着通过观察测试集上的预测性能和输入一条自制文本来观察模型的泛化性能。
3.1测试集
测试集的代码逻辑和之前验证集基本保持一致。
# compute the loss & accuracy on the test set using the best available model

classifier.load_state_dict(torch.load(train_state['model_filename']))
classifier = classifier.to(args.device)

dataset.set_split('test')
batch_generator = generate_batches(dataset,
                                   batch_size=args.batch_size,
                                   device=args.device)
running_loss = 0.
running_acc = 0.
classifier.eval()

for batch_index, batch_dict in enumerate(batch_generator):
    # compute the output
    y_pred = classifier(x_in=batch_dict['x_data'].float())

    # compute the loss
    loss = loss_func(y_pred, batch_dict['y_target'].float())
    loss_t = loss.item()
    running_loss += (loss_t - running_loss) / (batch_index + 1)

    # compute the accuracy
    acc_t = compute_accuracy(y_pred, batch_dict['y_target'])
    running_acc += (acc_t - running_acc) / (batch_index + 1)

train_state['test_loss'] = running_loss
train_state['test_acc'] = running_acc
print("Test loss: {:.3f}".format(train_state['test_loss']))
print("Test Accuracy: {:.2f}".format(train_state['test_acc']))
运行结果:
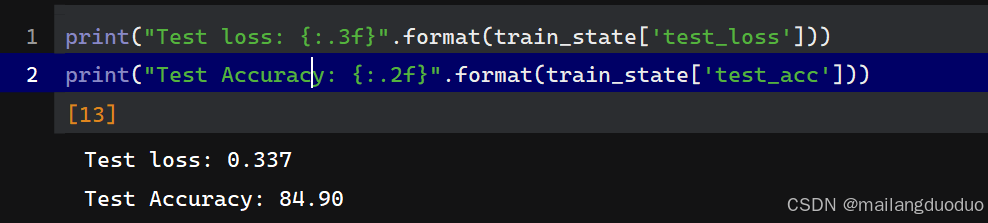
通过结果可以看出,准确率达到了84.9%,如果想要进一步提升模型性能,可以从向量化表示,以及模型结构入手。
3.2自制评论
该评论在作为模型输入前,需要经过相同的预处理操作,即数据清洗,该部分使用之前定义的函数,代码如下:
def preprocess_text(text):
    text = text.lower()
    text = re.sub(r"([.,!?])", r" \1 ", text)
    text = re.sub(r"[^a-zA-Z.,!?]+", r" ", text)
    return text
预测逻辑为,模型输出的结果使用sigmoid归一化,以某阈值作为分割线(这里以0.5为例),输出相应的两个类别。
def predict_rating(review, classifier, vectorizer, decision_threshold=0.5):
    """Predict the rating of a review

    Args:
        review (str): the text of the review
        classifier (ReviewClassifier): the trained model
        vectorizer (ReviewVectorizer): the corresponding vectorizer
        decision_threshold (float): The numerical boundary which separates the rating classes
    """
    review = preprocess_text(review)

    vectorized_review = torch.tensor(vectorizer.vectorize(review))
    result = classifier(vectorized_review.view(1, -1))

    probability_value = F.sigmoid(result).item()
    index = 1
    if probability_value < decision_threshold:
        index = 0

    return vectorizer.rating_vocab.lookup_index(index)
test_review = "this is a pretty awesome book"

classifier = classifier.cpu()
prediction = predict_rating(test_review, classifier, vectorizer, decision_threshold=0.5)
print("{} -> {}".format(test_review, prediction))
预测结果:
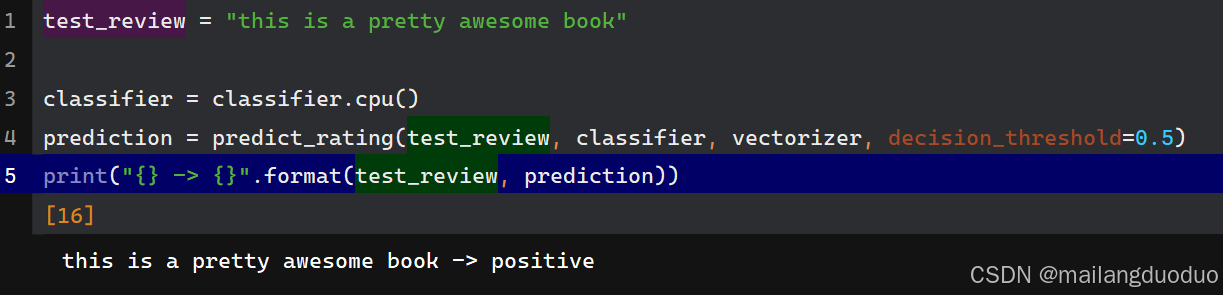
通过个人主观判断,该类别预测正确。
结语
至此,基于单层感知机模型的文本分类(二分类)已经介绍完毕,希望能够对你有所帮助。
备注:本案例代码参考本校《自然语言处理》课程实验中老师提供的参考代码

北京人形旗下天工造物具身智能开源社区,聚焦具身天工与慧思开物两大平台
更多推荐
 22
22 0
0- 0


 已为社区贡献2条内容

所有评论(0)