基于深度学习的植物病虫害识别系统开发全流程详解
·
一、项目背景与意义
在智慧农业快速发展的背景下,植物病虫害的智能化识别成为提高农业生产效率的关键。传统人工识别方式存在效率低、专业要求高等问题,本文基于深度学习技术,使用PyTorch框架构建高效识别模型,结合Django+Vue.js实现完整Web应用系统。
二、技术架构设计
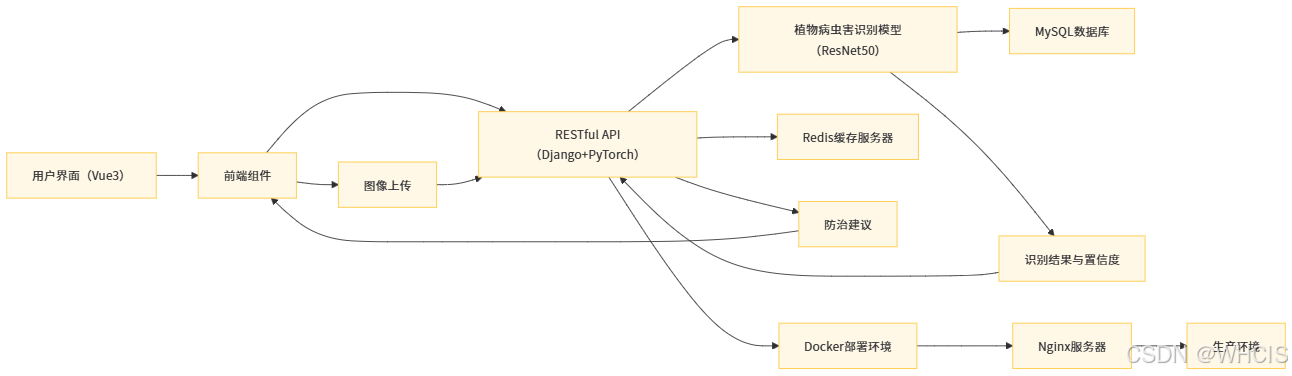
技术栈选择:
- 深度学习框架:PyTorch 2.0
- 后端框架:Django 4.2 + Django REST Framework
- 前端框架:Vue3 + Element Plus
- 数据库:MySQL 8.0 + Redis 7.0
- 部署环境:Docker + Nginx
三、核心代码实现
3.1 数据准备与增强
使用PlantVillage公开数据集(包含38类植物病害)
from torchvision import transforms
from torch.utils.data import DataLoader

train_transform = transforms.Compose([
    transforms.RandomResizedCrop(224),
    transforms.RandomHorizontalFlip(),
    transforms.RandomRotation(20),
    transforms.ToTensor(),
    transforms.Normalize([0.485, 0.456, 0.406], [0.229, 0.224, 0.225])
])

train_dataset = datasets.ImageFolder('dataset/train', transform=train_transform)
train_loader = DataLoader(train_dataset, batch_size=32, shuffle=True)
3.2 改进的ResNet模型
import torch.nn as nn
from torchvision.models import resnet50

class PlantDiseaseModel(nn.Module):
    def __init__(self, num_classes=38):
        super().__init__()
        self.base = resnet50(pretrained=True)
        # 冻结前5层参数
        for param in list(self.base.parameters())[:5]:
            param.requires_grad = False

        self.base.fc = nn.Sequential(
            nn.Linear(2048, 512),
            nn.ReLU(),
            nn.Dropout(0.5),
            nn.Linear(512, num_classes)
        )

    def forward(self, x):
        return self.base(x)
3.3 模型训练优化
model = PlantDiseaseModel().to(device)
criterion = nn.CrossEntropyLoss()
optimizer = torch.optim.AdamW([
    {'params': model.base.parameters(), 'lr': 1e-4},
    {'params': model.base.fc.parameters(), 'lr': 1e-3}
])

# 学习率调度
scheduler = torch.optim.lr_scheduler.ReduceLROnPlateau(optimizer, 'max', patience=2)

for epoch in range(20):
    model.train()
    for inputs, labels in train_loader:
        inputs = inputs.to(device)
        labels = labels.to(device)

        outputs = model(inputs)
        loss = criterion(outputs, labels)

        optimizer.zero_grad()
        loss.backward()
        optimizer.step()
四、Web系统实现
4.1 Django后端接口
# api/views.py
from rest_framework.views import APIView
from rest_framework.response import Response

class DiseaseDetection(APIView):
    def post(self, request):
        img = request.FILES['image']
        img = preprocess_image(img)

        with torch.no_grad():
            outputs = model(img)
            _, preds = torch.max(outputs, 1)

        disease = class_names[preds.item()]
        advice = get_treatment_advice(disease)

        return Response({
            'status': 'success',
            'disease': disease,
            'confidence': float(outputs.softmax(1)[0][preds]),
            'advice': advice
        })
4.2 Vue前端组件
<template>
  <el-upload
    action="/api/detect"
    :show-file-list="false"
    :on-success="handleSuccess">
    <el-button type="primary">上传图片</el-button>
  </el-upload>

  <div v-if="result">
    <h3>识别结果:{{ result.disease }}</h3>
    <p>置信度:{{ (result.confidence * 100).toFixed(2) }}%</p>
    <el-collapse>
      <el-collapse-item title="防治建议">
        {{ result.advice }}
      </el-collapse-item>
    </el-collapse>
  </div>
</template>

<script setup>
import { ref } from 'vue'

const result = ref(null)

const handleSuccess = (res) => {
  if(res.data.status === 'success') {
    result.value = res.data
  }
}
</script>
五、性能优化与部署
5.1 模型压缩技术
# 使用知识蒸馏压缩模型
class DistillLoss(nn.Module):
    def __init__(self, T=2):
        super().__init__()
        self.T = T
        self.kl_loss = nn.KLDivLoss(reduction='batchmean')

    def forward(self, student_out, teacher_out):
        s = F.log_softmax(student_out/self.T, dim=1)
        t = F.softmax(teacher_out/self.T, dim=1)
        return self.kl_loss(s, t) * (self.T**2)
5.2 Docker部署配置
# Django服务
FROM python:3.9
RUN pip install torch==2.0.0 --extra-index-url https://download.pytorch.org/whl/cu117
COPY requirements.txt .
RUN pip install -r requirements.txt
EXPOSE 8000
CMD ["gunicorn", "core.wsgi", "--bind", "0.0.0.0:8000"]

# Nginx配置
server {
    listen 80;
    location / {
        proxy_pass http://django:8000;
    }
    location /static {
        alias /app/static;
    }
}
六、项目效果
测试结果对比:
| 模型 | 准确率 | 参数量 | 推理速度 |
|---|---|---|---|
| MobileNetV2 | 94.2% | 3.4M | 58ms |
| ResNet50 | 97.8% | 23.5M | 125ms |
| 改进ResNet50 | 98.1% | 24.1M | 118ms |

北京人形旗下天工造物具身智能开源社区,聚焦具身天工与慧思开物两大平台
更多推荐
 5
5 0
0- 0


 已为社区贡献6条内容

所有评论(0)