CV - 语义分割和数据集
语义分割
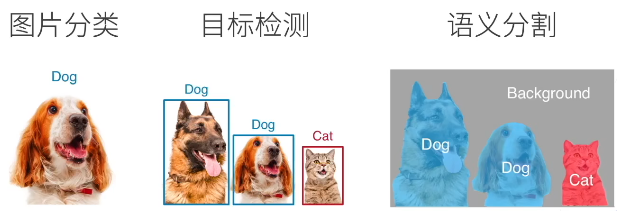
如上图所示:在图片分类里面,主要的任务是给定一张图片,将图中主体部分的物体给我识别出来。
在目标检测里面,有多个感兴趣的物体,把每个物体给我找出来,并告知我该物体具体在图片中的位置。但是这个框(bound-box)比较的粗糙,例如只能大致告知 Dog 所在的位置,但是不能精确地告知狗耳朵,狗眼睛的位置。
要想解决这个问题,需要了解语义分割(semantic-segmentation)的相关概念。语义分割将图片中的每个像素分类到对应的类别。
语义分割的应用:
- 背景虚化(例如腾讯会议开会的时候,背景虚化)
- 路面分割
语义分割 VS 实例分割
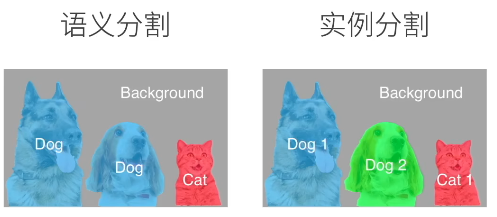
语义分割关心的是这个像素属于哪个类,在实例分割里面,可以识别对每个具体类的实例,比如,图片中有两只狗,第一只狗的像素可以告诉我说这个像素是属于第一只狗的,第二只狗的像素可以告诉我说这个像素是属于第二只狗的。实例分割更加精细,但是实际上和语义分割的区别就是多几个标号,比如将狗换成 狗1 狗2 标签即可。
语义分割数据集
最重要的语义分割数据集之一是 Pascal VOC2012。
Pascal 是一个组织,VOC是一个竞赛,2012表示竞赛时间
数据集的tar文件大约为2GB,所以下载可能需要一段时间。
下面了解一下这个数据集:
%matplotlib inline
import os
import torch
import torchvision
from d2l import torch as d2l

#@save
d2l.DATA_HUB['voc2012'] = (d2l.DATA_URL + 'VOCtrainval_11-May-2012.tar',
                           '4e443f8a2eca6b1dac8a6c57641b67dd40621a49')

voc_dir = d2l.download_extract('voc2012', 'VOCdevkit/VOC2012')
将所有输入的图像和标签读入内存
这是比较暴力的做法,但是由于这里只有几千张图片,因此一次性读进来问题不大
VOC 是用的比较广泛的格式
#@save
def read_voc_images(voc_dir, is_train=True):
    """读取所有VOC图像并标注"""
    txt_fname = os.path.join(voc_dir, 'ImageSets', 'Segmentation',
                             'train.txt' if is_train else 'val.txt') # val.txt 验证数据集
    mode = torchvision.io.image.ImageReadMode.RGB
    with open(txt_fname, 'r') as f:
        images = f.read().split()
    features, labels = [], []
    # 语义分割的训练数据是一个图片,其标号是和它一样大小的图片
    for i, fname in enumerate(images):
        features.append(torchvision.io.read_image(
            os.path.join(voc_dir, 'JPEGImages', f'{fname}.jpg')))
        labels.append(
            torchvision.io.read_image(
                os.path.join(voc_dir, 'SegmentationClass' ,f'{fname}.png'),
                mode))
    return features, labels

train_features, train_labels = read_voc_images(voc_dir, True)
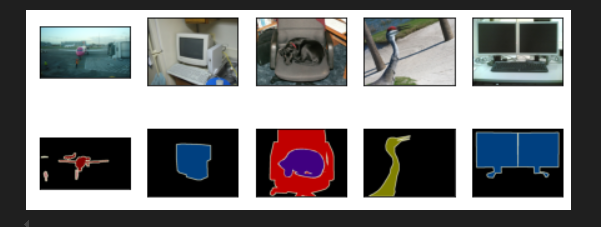
绘制前5个输入图像及其标签
n = 5
imgs = train_features[0:n] + train_labels[0:n]
imgs = [img.permute(1,2,0) for img in imgs]
d2l.show_images(imgs, 2, n);
列举RGB颜色值和类名(数据已经标注好了)
#@save
VOC_COLORMAP = [[0, 0, 0], [128, 0, 0], [0, 128, 0], [128, 128, 0],
                [0, 0, 128], [128, 0, 128], [0, 128, 128], [128, 128, 128],
                [64, 0, 0], [192, 0, 0], [64, 128, 0], [192, 128, 0],
                [64, 0, 128], [192, 0, 128], [64, 128, 128], [192, 128, 128],
                [0, 64, 0], [128, 64, 0], [0, 192, 0], [128, 192, 0],
                [0, 64, 128]]

#@save
VOC_CLASSES = ['background', 'aeroplane', 'bicycle', 'bird', 'boat',
               'bottle', 'bus', 'car', 'cat', 'chair', 'cow',
               'diningtable', 'dog', 'horse', 'motorbike', 'person',
               'potted plant', 'sheep', 'sofa', 'train', 'tv/monitor']
查找标签中每个像素的类索引
# @save
def voc_colormap2label():
    """构建从RGB到VOC类别索引的映射"""
    colormap2label = torch.zeros(256 ** 3, dtype=torch.long)  # 开一个大的数组,但是大部分都是无效映射
    for i, colormap in enumerate(VOC_COLORMAP):
        colormap2label[
            (colormap[0] * 256 + colormap[1]) * 256 + colormap[2]] = i # 将RGB值映射到索引
    return colormap2label # 尽量不用forloop进行查找,直接返回字典,查找即可

# @save
def voc_label_indices(colormap, colormap2label):
    """将VOC标签中的RGB值映射到它们的类别索引"""
    colormap = colormap.permute(1, 2, 0).numpy().astype('int32')
    idx = ((colormap[:, :, 0] * 256 + colormap[:, :, 1]) * 256
           + colormap[:, :, 2])
    return colormap2label[idx]
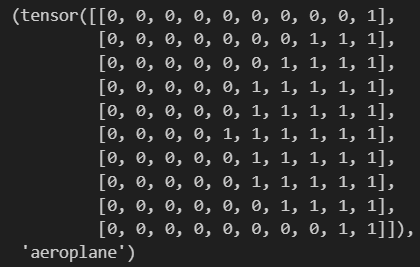
下面看一个例子(看飞机的那张图片)
y = voc_label_indices(train_labels[0], voc_colormap2label())
y[105:115, 130:140], VOC_CLASSES[1]
使用图像增广中的随机裁剪,裁剪输入图像和标签的相同区域
图像裁剪后,标号也需要做相应的裁剪,不然对应不起来。
# 裁剪图片后,对应的标号也是需要相应的裁剪的
# @save
def voc_rand_crop(feature, label, height, width):
    """随机裁剪特征和标签图像"""
    rect = torchvision.transforms.RandomCrop.get_params(
        feature, (height, width))
    feature = torchvision.transforms.functional.crop(feature, *rect)
    label = torchvision.transforms.functional.crop(label, *rect)
    return feature, label

imgs = []
for _ in range(n):
    imgs += voc_rand_crop(train_features[0], train_labels[0], 200, 300)

imgs = [img.permute(1, 2, 0) for img in imgs]
d2l.show_images(imgs[::2] + imgs[1::2], 2, n);
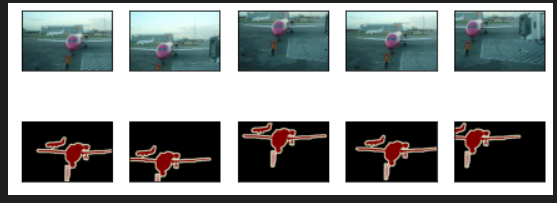
下面就自定义语义分割数据集类
#@save
class VOCSegDataset(torch.utils.data.Dataset):
    """一个用于加载VOC数据集的自定义数据集"""
    # 图片分割不太适合使用 Resize 操作
    def __init__(self, is_train, crop_size, voc_dir):
        self.transform = torchvision.transforms.Normalize(
            mean=[0.485, 0.456, 0.406], std=[0.229, 0.224, 0.225]) # 直接从 ImageNet 上面拿过来的
        self.crop_size = crop_size
        features, labels = read_voc_images(voc_dir, is_train=is_train)
        self.features = [
            self.normalize_image(feature)
            for feature in self.filter(features)]
        self.labels = self.filter(labels) # 图片没了,对应的标号也没有了
        self.colormap2label = voc_colormap2label()
        print('read ' + str(len(self.features)) + ' examples')

    def normalize_image(self, img):
        return self.transform(img.float() / 255)
    # 假设图片特别小,比crop_size高宽还要小的话,就丢弃
    def filter(self, imgs):
        return [
            img for img in imgs if (
                img.shape[1] >= self.crop_size[0] and
                img.shape[2] >= self.crop_size[1])]

    def __getitem__(self, idx):
        feature, label = voc_rand_crop(self.features[idx], self.labels[idx],
                                       *self.crop_size)
        return (feature, voc_label_indices(label, self.colormap2label))

    def __len__(self):
        return len(self.features)
读取数据集
crop_size = (320, 480)
voc_train = VOCSegDataset(True, crop_size, voc_dir)
voc_test = VOCSegDataset(False, crop_size, voc_dir)
# 图片不是很多,因为人工标注很贵啊

# read 1114 examples
# read 1078 examples
batch_size = 64
train_iter = torch.utils.data.DataLoader(
    voc_train, batch_size, shuffle=True, drop_last=True,
    num_workers=d2l.get_dataloader_workers())
for X, Y in train_iter:
    print(X.shape)
    print(Y.shape)
    break

# torch.Size([64, 3, 320, 480])
# torch.Size([64, 320, 480])
整合所有组件
#@save
def load_data_voc(batch_size, crop_size):
    """加载VOC语义分割数据集"""
    voc_dir = d2l.download_extract('voc2012', os.path.join(
        'VOCdevkit', 'VOC2012'))
    num_workers = d2l.get_dataloader_workers()
    train_iter = torch.utils.data.DataLoader(
        VOCSegDataset(True, crop_size, voc_dir), batch_size,
        shuffle=True, drop_last=True, num_workers=num_workers)
    test_iter = torch.utils.data.DataLoader(
        VOCSegDataset(False, crop_size, voc_dir), batch_size,
        drop_last=True, num_workers=num_workers)
    return train_iter, test_iter
QA 思考
Q1:目标检测里面如果也做图像增广,目标框也会做同样的变换。如果是做图像的倾斜、旋转这样的操作,目标框的形状可能就不是矩形了,这种情况怎么解决?
A1:要是做旋转的话,可以加一个额外的 feature,表示框旋转的角度。或者旋转之后,画一个大框将其包起来也是可以的。
后记
完整代码如下:
import hashlib
import os
import tarfile
import zipfile
import requests
import torch
import torchvision
from matplotlib import pyplot as plt

# 定义数据下载源
DATA_HUB = dict()
DATA_URL = 'http://d2l-data.s3-accelerate.amazonaws.com/'
DATA_HUB['voc2012'] = (DATA_URL + 'VOCtrainval_11-May-2012.tar',
                       '4e443f8a2eca6b1dac8a6c57641b67dd40621a49')


def download(name, cache_dir=os.path.join('..', 'data')):
    """
    下载DATA_HUB中的文件,返回本地文件名。

    :param name: 要下载的文件名称
    :param cache_dir: 缓存目录
    :return: 本地文件名
    """
    assert name in DATA_HUB, f"{name} 不存在于 {DATA_HUB}"
    url, sha1_hash = DATA_HUB[name]
    os.makedirs(cache_dir, exist_ok=True)
    fname = os.path.join(cache_dir, url.split('/')[-1])
    if os.path.exists(fname):
        sha1 = hashlib.sha1()
        with open(fname, 'rb') as f:
            while True:
                data = f.read(1048576)
                if not data:
                    break
                sha1.update(data)
        if sha1.hexdigest() == sha1_hash:
            return fname  # 命中缓存
    print(f'正在从{url}下载{fname}...')
    r = requests.get(url, stream=True, verify=True)
    with open(fname, 'wb') as f:
        f.write(r.content)
    return fname


def download_extract(name, folder=None):
    """
    下载并解压zip/tar文件。

    :param name: 要下载的文件名称
    :param folder: 解压后的文件夹
    :return: 解压后的目录
    """
    fname = download(name)
    base_dir = os.path.dirname(fname)
    data_dir, ext = os.path.splitext(fname)
    if ext == '.zip':
        fp = zipfile.ZipFile(fname, 'r')
    elif ext in ('.tar', '.gz'):
        fp = tarfile.open(fname, 'r')
    else:
        assert False, '只有zip/tar文件可以被解压缩'
    fp.extractall(base_dir)
    return os.path.join(base_dir, folder) if folder else data_dir


def show_images(imgs, num_rows, num_cols, titles=None, scale=1.5):
    """
    绘制图像列表。

    :param imgs: 图像列表
    :param num_rows: 行数
    :param num_cols: 列数
    :param titles: 标题列表
    :param scale: 图像缩放比例
    :return: 图像坐标轴
    """
    figsize = (num_cols * scale, num_rows * scale)
    _, axes = plt.subplots(num_rows, num_cols, figsize=figsize)
    axes = axes.flatten()
    for i, (ax, img) in enumerate(zip(axes, imgs)):
        if torch.is_tensor(img):
            # 图片张量
            ax.imshow(img.numpy())
        else:
            # PIL图片
            ax.imshow(img)
        ax.axes.get_xaxis().set_visible(False)
        ax.axes.get_yaxis().set_visible(False)
        if titles:
            ax.set_title(titles[i])
    return axes


def read_voc_images(voc_dir, is_train=True):
    """
    读取VOC图像和标签。

    :param voc_dir: VOC数据集目录
    :param is_train: 是否为训练集
    :return: 特征和标签列表
    """
    txt_fname = os.path.join(voc_dir, 'ImageSets', 'Segmentation',
                             'train.txt' if is_train else 'val.txt')
    mode = torchvision.io.image.ImageReadMode.RGB
    with open(txt_fname, 'r') as f:
        images = f.read().split()
    features, labels = [], []
    for i, fname in enumerate(images):
        features.append(torchvision.io.read_image(
            os.path.join(voc_dir, 'JPEGImages', f'{fname}.jpg')
        ))
        # 存储成 .png 文件是为了防止压缩
        labels.append(torchvision.io.read_image(
            os.path.join(voc_dir, 'SegmentationClass', f'{fname}.png'), mode
        ))
    return features, labels


VOC_COLORMAP = [[0, 0, 0], [128, 0, 0], [0, 128, 0], [128, 128, 0],
                [0, 0, 128], [128, 0, 128], [0, 128, 128], [128, 128, 128],
                [64, 0, 0], [192, 0, 0], [64, 128, 0], [192, 128, 0],
                [64, 0, 128], [192, 0, 128], [64, 128, 128], [192, 128, 128],
                [0, 64, 0], [128, 64, 0], [0, 192, 0], [128, 192, 0],
                [0, 64, 128]]

VOC_CLASSES = ['background', 'aeroplane', 'bicycle', 'bird', 'boat',
               'bottle', 'bus', 'car', 'cat', 'chair', 'cow',
               'diningtable', 'dog', 'horse', 'motorbike', 'person',
               'potted plant', 'sheep', 'sofa', 'train', 'tv/monitor']


def voc_colormap2label():
    """
    生成颜色映射到标签的映射表。

    :return: 颜色映射到标签的张量
    """
    colormap2label = torch.zeros(256 ** 3, dtype=torch.long)
    for i, colormap in enumerate(VOC_COLORMAP):
        colormap2label[
            (colormap[0] * 256 + colormap[1]) * 256 + colormap[2]
            ] = i
    return colormap2label


def voc_label_indices(colormap, colormap2label):
    """
    根据颜色映射表将颜色图转换为标签索引。

    :param colormap: 颜色图
    :param colormap2label: 颜色映射到标签的映射表
    :return: 标签索引
    """
    colormap = colormap.permute(1, 2, 0).numpy().astype('int32')
    idx = ((colormap[:, :, 0] * 256 + colormap[:, :, 1]) * 256
           + colormap[:, :, 2])
    return colormap2label[idx]


def voc_rand_crop(feature, label, height, width):
    """
    随机裁剪特征和标签图像。

    :param feature: 特征图像
    :param label: 标签图像
    :param height: 裁剪高度
    :param width: 裁剪宽度
    :return: 裁剪后的特征和标签图像
    """
    # rect 是一个包含四个元素的元组,
    # 分别代表裁剪区域的左上角坐标 (top, left) 以及裁剪区域的高度和宽度 (height, width)。
    rect = torchvision.transforms.RandomCrop.get_params(
        feature, (height, width))
    feature = torchvision.transforms.functional.crop(feature, *rect)
    label = torchvision.transforms.functional.crop(label, *rect)
    return feature, label


class VOCSegDataset(torch.utils.data.Dataset):
    """
    一个用于加载VOC数据集的自定义数据集。
    """

    def __init__(self, is_train, crop_size, voc_dir):
        """
        初始化数据集。

        :param is_train: 是否为训练集
        :param crop_size: 裁剪尺寸
        :param voc_dir: VOC数据集目录
        """
        self.transform = torchvision.transforms.Normalize(
            mean=[0.485, 0.456, 0.406], std=[0.229, 0.224, 0.225])  # 直接从 ImageNet 上面拿过来的
        self.crop_size = crop_size
        features, labels = read_voc_images(voc_dir, is_train=is_train)  # 图片全部读进来
        self.features = [
            self.normalize_image(feature)
            for feature in self.filter(features)]
        self.labels = self.filter(labels)  # 图片没了,对应的标号也没有了
        self.colormap2label = voc_colormap2label()
        print('read ' + str(len(self.features)) + ' examples')

    def normalize_image(self, img):
        """
        对图像进行归一化处理。

        :param img: 输入图像
        :return: 归一化后的图像
        """
        return self.transform(img.float() / 255)

    def filter(self, imgs):
        """
        过滤掉尺寸小于裁剪尺寸的图像。

        :param imgs: 图像列表
        :return: 过滤后的图像列表
        """
        return [
            img for img in imgs if (
                    img.shape[1] >= self.crop_size[0] and
                    img.shape[2] >= self.crop_size[1])]

    def __getitem__(self, idx):
        """
        获取指定索引的样本。

        :param idx: 索引
        :return: 特征和标签
        """
        feature, label = voc_rand_crop(self.features[idx], self.labels[idx],
                                       *self.crop_size)
        return feature, voc_label_indices(label, self.colormap2label)

    def __len__(self):
        """
        获取数据集长度。

        :return: 数据集长度
        """
        return len(self.features)


def load_data_voc(batch_size, crop_size):
    """
    加载VOC语义分割数据集。

    :param batch_size: 批量大小
    :param crop_size: 裁剪尺寸
    :return: 训练集和测试集数据加载器
    """
    voc_dir = download_extract('voc2012', os.path.join(
        'VOCdevkit', 'VOC2012'))
    num_workers = 4
    train_iter = torch.utils.data.DataLoader(
        VOCSegDataset(True, crop_size, voc_dir), batch_size,
        shuffle=True, drop_last=True, num_workers=num_workers)
    test_iter = torch.utils.data.DataLoader(
        VOCSegDataset(False, crop_size, voc_dir), batch_size,
        drop_last=True, num_workers=num_workers)
    return train_iter, test_iter


if __name__ == "__main__":
    # 下载并解压数据集
    voc_dir = download_extract('voc2012', 'VOCdevkit/VOC2012')

    # 读取训练集图像和标签
    train_features, train_labels = read_voc_images(voc_dir, True)

    # 显示部分图像
    n = 5
    imgs = train_features[0:n] + train_labels[0:n]
    imgs = [img.permute(1, 2, 0) for img in imgs]
    show_images(imgs, 2, n)

    # 测试标签索引转换
    y = voc_label_indices(train_labels[0], voc_colormap2label())
    print(y[105:115, 130:140], VOC_CLASSES[1])

    # 随机裁剪并显示图像
    imgs = []
    for _ in range(n):
        imgs += voc_rand_crop(train_features[0], train_labels[0], 200, 300)
    imgs = [img.permute(1, 2, 0) for img in imgs]
    show_images(imgs[::2] + imgs[1::2], 2, n)

    # 加载数据集
    crop_size = (320, 480)
    voc_train = VOCSegDataset(True, crop_size, voc_dir)
    voc_test = VOCSegDataset(False, crop_size, voc_dir)

    # 创建数据加载器
    batch_size = 64
    train_iter = torch.utils.data.DataLoader(
        voc_train, batch_size, shuffle=True, drop_last=True,
        num_workers=4)
    for X, Y in train_iter:
        print(X.shape)
        print(Y.shape)
        break

    # 测试数据加载函数
    train_iter, test_iter = load_data_voc(batch_size, crop_size)

北京人形旗下天工造物具身智能开源社区,聚焦具身天工与慧思开物两大平台
更多推荐
 5
5 0
0- 0


 已为社区贡献2条内容

所有评论(0)