基于卷积神经网络的车牌识别系统设计实践
基于卷积神经网络的车牌识别系统设计。 本设计用的Python语 言,PyCharm编程平台,PyTorch编程环境。 搭建了U-net网络进行车牌的定位,搭建了LPRnet来进行车牌识别。 最终可实现对图片的识别和对视频的识别。 效果还不错。 包含程序和完成本项目所需要的基础知识以及环境配置等电子资料。
最近搞了个基于卷积神经网络的车牌识别系统,感觉还挺有意思,来和大家分享分享。
一、开发工具与环境
这次项目我选用了Python语言,在PyCharm这个超好用的编程平台上,搭配PyTorch的编程环境。Python就不用多说了,在深度学习这块简直是如鱼得水,各种丰富的库能帮我们省不少事儿。PyCharm提供了非常便捷的代码编辑、调试功能,而PyTorch,动态计算图的特性让模型搭建和训练变得更加直观。
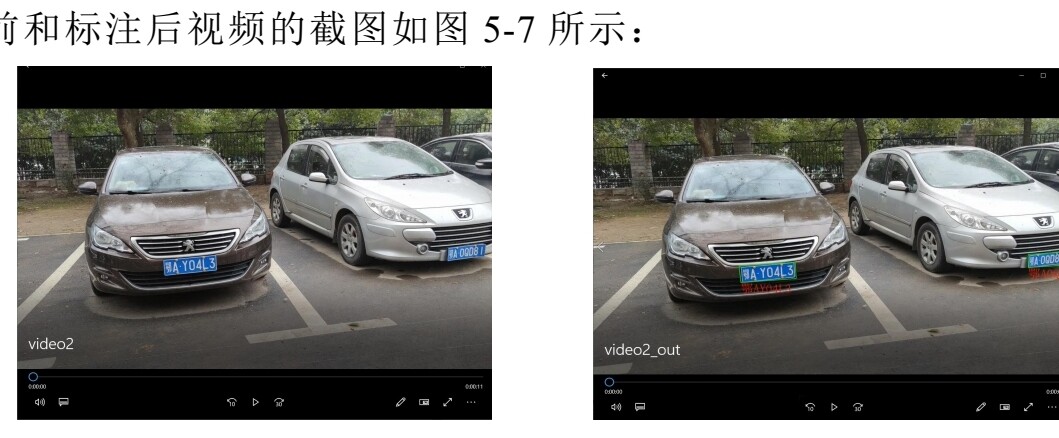
环境配置这块,首先确保你安装了Python,我用的是Python 3.8。然后通过pip安装PyTorch,不同的CUDA版本对应不同的PyTorch安装命令,像我的CUDA是11.1版本,就用下面这个命令:
pip install torch==1.9.0+cu111 torchvision==0.10.0+cu111 torchaudio==0.9.0 -f https://download.pytorch.org/whl/torch_stable.html还得安装一些其他常用库,比如opencv-python用于图像处理,numpy用于数值计算等等:
pip install opencv-python numpy二、网络搭建
(一)车牌定位 - U - net网络
U - net网络在图像分割领域很经典,用来做车牌定位再合适不过。它的结构很有特点,像个U字形,由收缩路径和扩张路径组成。收缩路径用来提取特征,扩张路径则负责恢复图像分辨率,最终得到车牌位置的分割结果。
下面是一个简化的U - net网络搭建代码示例(用PyTorch):
import torch
import torch.nn as nn


class DoubleConv(nn.Module):
    def __init__(self, in_channels, out_channels):
        super(DoubleConv, self).__init__()
        self.conv = nn.Sequential(
            nn.Conv2d(in_channels, out_channels, kernel_size=3, padding=1),
            nn.BatchNorm2d(out_channels),
            nn.ReLU(inplace=True),
            nn.Conv2d(out_channels, out_channels, kernel_size=3, padding=1),
            nn.BatchNorm2d(out_channels),
            nn.ReLU(inplace=True)
        )

    def forward(self, x):
        return self.conv(x)


class Down(nn.Module):
    def __init__(self, in_channels, out_channels):
        super(Down, self).__init__()
        self.maxpool_conv = nn.Sequential(
            nn.MaxPool2d(2),
            DoubleConv(in_channels, out_channels)
        )

    def forward(self, x):
        return self.maxpool_conv(x)


class Up(nn.Module):
    def __init__(self, in_channels, out_channels, bilinear=True):
        super(Up, self).__init__()
        if bilinear:
            self.up = nn.Upsample(scale_factor=2, mode='bilinear', align_corners=True)
        else:
            self.up = nn.ConvTranspose2d(in_channels // 2, in_channels // 2, kernel_size=2, stride=2)
        self.conv = DoubleConv(in_channels, out_channels)

    def forward(self, x1, x2):
        x1 = self.up(x1)
        diffY = x2.size()[2] - x1.size()[2]
        diffX = x2.size()[3] - x1.size()[3]
        x1 = nn.functional.pad(x1, [diffX // 2, diffX - diffX // 2,
                                    diffY // 2, diffY - diffY // 2])
        x = torch.cat([x2, x1], dim=1)
        return self.conv(x)


class OutConv(nn.Module):
    def __init__(self, in_channels, out_channels):
        super(OutConv, self).__init__()
        self.conv = nn.Conv2d(in_channels, out_channels, kernel_size=1)

    def forward(self, x):
        return self.conv(x)


class UNet(nn.Module):
    def __init__(self, n_channels, n_classes, bilinear=True):
        super(UNet, self).__init__()
        self.n_channels = n_channels
        self.n_classes = n_classes
        self.bilinear = bilinear

        self.inc = DoubleConv(n_channels, 64)
        self.down1 = Down(64, 128)
        self.down2 = Down(128, 256)
        self.down3 = Down(256, 512)
        factor = 2 if bilinear else 1
        self.down4 = Down(512, 1024 // factor)
        self.up1 = Up(1024, 512 // factor, bilinear)
        self.up2 = Up(512, 256 // factor, bilinear)
        self.up3 = Up(256, 128 // factor, bilinear)
        self.up4 = Up(128, 64, bilinear)
        self.outc = OutConv(64, n_classes)

    def forward(self, x):
        x1 = self.inc(x)
        x2 = self.down1(x1)
        x3 = self.down2(x2)
        x4 = self.down3(x3)
        x5 = self.down4(x4)
        x = self.up1(x5, x4)
        x = self.up2(x, x3)
        x = self.up3(x, x2)
        x = self.up4(x, x1)
        logits = self.outc(x)
return logits在这段代码里,DoubleConv模块是U - net网络的基本组成单元,连续两个卷积层加BN和ReLU激活函数。Down模块是下采样部分,先进行最大池化再做两次卷积。Up模块负责上采样,要么用反卷积,要么用双线性插值,然后和下采样路径对应的特征图拼接再卷积。OutConv则输出最终的分割结果。
(二)车牌识别 - LPRnet
LPRnet是专门针对车牌识别设计的轻量级网络。它的设计理念就是在保证识别准确率的同时,尽可能减少计算量和模型大小,这样在实际应用中能快速响应。
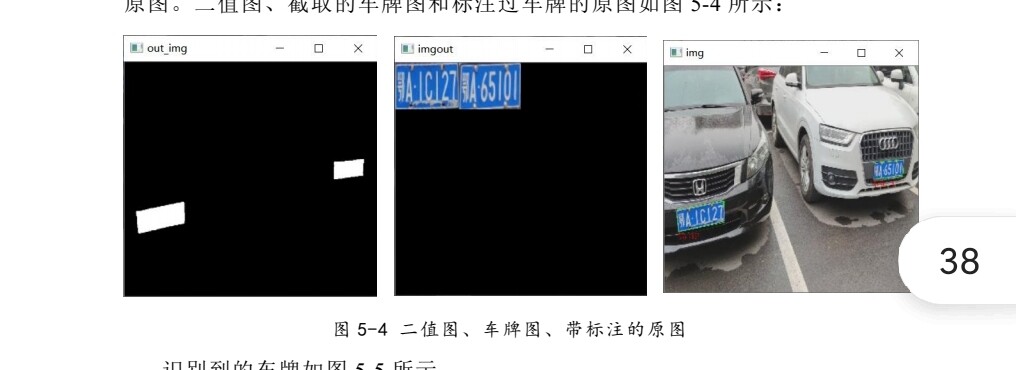
以下是简单的LPRnet网络结构代码:
import torch
import torch.nn as nn


class LPRNet(nn.Module):
    def __init__(self, dropout_rate=0.5, class_num=66):
        super(LPRNet, self).__init__()
        self.feature = nn.Sequential(
            nn.Conv2d(3, 64, kernel_size=3, padding=1),
            nn.BatchNorm2d(64),
            nn.ReLU(True),
            nn.MaxPool2d(2, 2),
            nn.Conv2d(64, 128, kernel_size=3, padding=1),
            nn.BatchNorm2d(128),
            nn.ReLU(True),
            nn.MaxPool2d(2, 2),
            nn.Conv2d(128, 256, kernel_size=3, padding=1),
            nn.BatchNorm2d(256),
            nn.ReLU(True),
            nn.Conv2d(256, 256, kernel_size=3, padding=1),
            nn.BatchNorm2d(256),
            nn.ReLU(True),
            nn.MaxPool2d((2, 1), (2, 1)),
            nn.Conv2d(256, 512, kernel_size=3, padding=1),
            nn.BatchNorm2d(512),
            nn.ReLU(True),
            nn.Dropout(dropout_rate),
            nn.Conv2d(512, 512, kernel_size=3, padding=1),
            nn.BatchNorm2d(512),
            nn.ReLU(True),
            nn.MaxPool2d((2, 1), (2, 1))
        )
        self.classifier = nn.Sequential(
            nn.Linear(512 * 4 * 1, 256),
            nn.ReLU(True),
            nn.Dropout(dropout_rate),
            nn.Linear(256, class_num)
        )

    def forward(self, x):
        x = self.feature(x)
        x = x.view(x.size(0), -1)
        x = self.classifier(x)
return x这里feature部分是特征提取,通过一系列卷积、池化操作提取车牌图像的特征。classifier则是将提取的特征进行线性变换,最终输出车牌字符的分类结果。
三、系统功能实现
(一)图片识别
通过U - net定位出车牌位置后,把车牌区域裁剪出来,送入LPRnet进行识别。代码如下:
import cv2
import torch
from unet import UNet
from lprnet import LPRNet


# 加载U - net模型
unet_model = UNet(n_channels=3, n_classes=1)
unet_model.load_state_dict(torch.load('unet_model.pth'))
unet_model.eval()

# 加载LPRnet模型
lprnet_model = LPRNet(class_num=66)
lprnet_model.load_state_dict(torch.load('lprnet_model.pth'))
lprnet_model.eval()


def recognize_image(image_path):
    image = cv2.imread(image_path)
    image = cv2.cvtColor(image, cv2.COLOR_BGR2RGB)
    image = torch.from_numpy(image).permute(2, 0, 1).unsqueeze(0).float() / 255.0
    with torch.no_grad():
        # U - net定位车牌
        unet_output = unet_model(image)
        _, unet_pred = torch.max(unet_output, 1)
        unet_pred = unet_pred.squeeze(0).cpu().numpy().astype('uint8')
        contours, _ = cv2.findContours(unet_pred, cv2.RETR_EXTERNAL, cv2.CHAIN_APPROX_SIMPLE)
        for contour in contours:
            x, y, w, h = cv2.boundingRect(contour)
            plate_image = image[:, :, y:y + h, x:x + w]
            plate_image = cv2.resize(plate_image.squeeze(0).permute(1, 2, 0).numpy(), (94, 24))
            plate_image = torch.from_numpy(plate_image).permute(2, 0, 1).unsqueeze(0).float() / 255.0
            # LPRnet识别车牌
            lprnet_output = lprnet_model(plate_image)
            _, lprnet_pred = torch.max(lprnet_output, 1)
            print('识别结果:', lprnet_pred.item())


recognize_image('test.jpg')
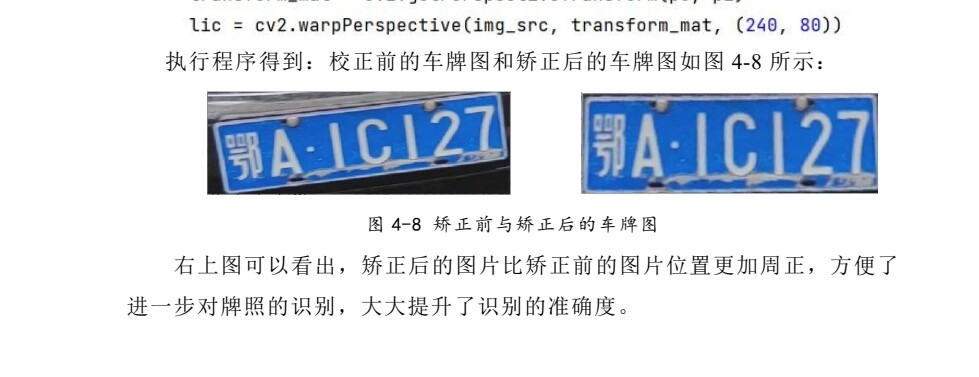
这段代码首先加载训练好的U - net和LPRnet模型,然后读取图片,经过U - net定位出车牌位置,裁剪车牌区域并调整大小后送入LPRnet进行识别。
(二)视频识别
视频识别其实就是对视频的每一帧图像进行上述的图片识别操作。代码如下:
import cv2
import torch
from unet import UNet
from lprnet import LPRNet


# 加载U - net模型
unet_model = UNet(n_channels=3, n_classes=1)
unet_model.load_state_dict(torch.load('unet_model.pth'))
unet_model.eval()

# 加载LPRnet模型
lprnet_model = LPRNet(class_num=66)
lprnet_model.load_state_dict(torch.load('lprnet_model.pth'))
lprnet_model.eval()


cap = cv2.VideoCapture('test_video.mp4')
while cap.isOpened():
    ret, frame = cap.read()
    if not ret:
        break
    image = cv2.cvtColor(frame, cv2.COLOR_BGR2RGB)
    image = torch.from_numpy(image).permute(2, 0, 1).unsqueeze(0).float() / 255.0
    with torch.no_grad():
        # U - net定位车牌
        unet_output = unet_model(image)
        _, unet_pred = torch.max(unet_output, 1)
        unet_pred = unet_pred.squeeze(0).cpu().numpy().astype('uint8')
        contours, _ = cv2.findContours(unet_pred, cv2.RETR_EXTERNAL, cv2.CHAIN_APPROX_SIMPLE)
        for contour in contours:
            x, y, w, h = cv2.boundingRect(contour)
            plate_image = image[:, :, y:y + h, x:x + w]
            plate_image = cv2.resize(plate_image.squeeze(0).permute(1, 2, 0).numpy(), (94, 24))
            plate_image = torch.from_numpy(plate_image).permute(2, 0, 1).unsqueeze(0).float() / 255.0
            # LPRnet识别车牌
            lprnet_output = lprnet_model(plate_image)
            _, lprnet_pred = torch.max(lprnet_output, 1)
            print('识别结果:', lprnet_pred.item())
    cv2.imshow('Video', frame)
    if cv2.waitKey(1) & 0xFF == ord('q'):
        break
cap.release()
cv2.destroyAllWindows()
这段代码从视频中逐帧读取图像,同样经过U - net定位和LPRnet识别,最后展示视频画面。
四、效果与总结
最终实现的系统,无论是图片识别还是视频识别,效果都还不错。当然,实际应用中可能还得考虑更多的因素,比如不同光照条件、车牌的变形等。
整个项目过程中,对卷积神经网络在图像定位和识别方面的应用有了更深入的理解。而且通过自己搭建网络、训练模型,收获满满。我这里还包含程序和完成本项目所需要的基础知识等电子资料,感兴趣的小伙伴可以一起交流探讨。希望这篇博文能给大家在车牌识别或者深度学习项目上带来一些启发。

北京人形旗下天工造物具身智能开源社区,聚焦具身天工与慧思开物两大平台
更多推荐
 23
23 0
0- 0


 已为社区贡献4条内容

所有评论(0)