16、window11+visual studio 2022+cuda+ffmpeg进行拉流和解码(RTX3050)
基本思想:需要一个window11 下的gpu的编码和解码代码,逐开发使用,先上个图
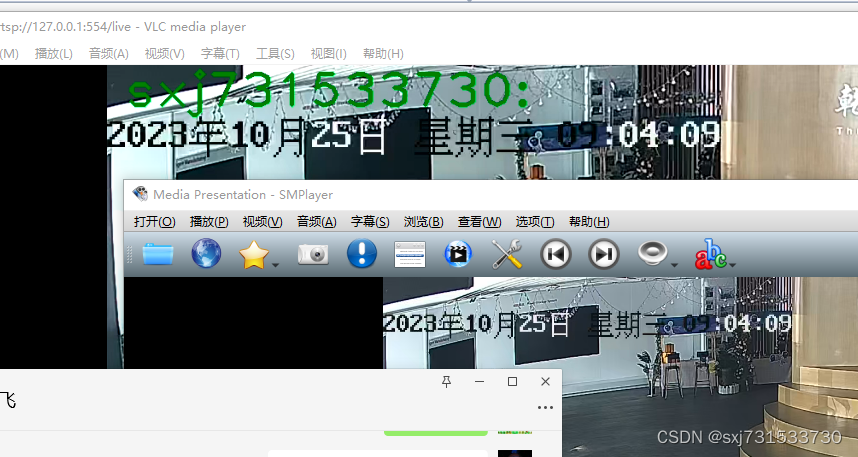 几乎0延迟的,使用笔记本的显卡
C:\Program Files\NVIDIA GPU Computing Toolkit\CUDA\v12.0\extras\demo_suite>deviceQuery.exe
deviceQuery.exe Starting...

 CUDA Device Query (Runtime API) version (CUDART static linking)

Detected 1 CUDA Capable device(s)

Device 0: "NVIDIA GeForce RTX 3050 Laptop GPU"
  CUDA Driver Version / Runtime Version          12.0 / 12.0
  CUDA Capability Major/Minor version number:    8.6
  Total amount of global memory:                 4096 MBytes (4294443008 bytes)
  (16) Multiprocessors, (128) CUDA Cores/MP:     2048 CUDA Cores
  GPU Max Clock rate:                            1500 MHz (1.50 GHz)
  Memory Clock rate:                             6001 Mhz
  Memory Bus Width:                              128-bit
  L2 Cache Size:                                 1572864 bytes
  Maximum Texture Dimension Size (x,y,z)         1D=(131072), 2D=(131072, 65536), 3D=(16384, 16384, 16384)
  Maximum Layered 1D Texture Size, (num) layers  1D=(32768), 2048 layers
  Maximum Layered 2D Texture Size, (num) layers  2D=(32768, 32768), 2048 layers
  Total amount of constant memory:               zu bytes
  Total amount of shared memory per block:       zu bytes
  Total number of registers available per block: 65536
  Warp size:                                     32
  Maximum number of threads per multiprocessor:  1536
  Maximum number of threads per block:           1024
  Max dimension size of a thread block (x,y,z): (1024, 1024, 64)
  Max dimension size of a grid size    (x,y,z): (2147483647, 65535, 65535)
  Maximum memory pitch:                          zu bytes
  Texture alignment:                             zu bytes
  Concurrent copy and kernel execution:          Yes with 5 copy engine(s)
  Run time limit on kernels:                     Yes
  Integrated GPU sharing Host Memory:            No
  Support host page-locked memory mapping:       Yes
  Alignment requirement for Surfaces:            Yes
  Device has ECC support:                        Disabled
  CUDA Device Driver Mode (TCC or WDDM):         WDDM (Windows Display Driver Model)
  Device supports Unified Addressing (UVA):      Yes
  Device supports Compute Preemption:            Yes
  Supports Cooperative Kernel Launch:            Yes
  Supports MultiDevice Co-op Kernel Launch:      No
  Device PCI Domain ID / Bus ID / location ID:   0 / 1 / 0
  Compute Mode:
     < Default (multiple host threads can use ::cudaSetDevice() with device simultaneously) >

deviceQuery, CUDA Driver = CUDART, CUDA Driver Version = 12.0, CUDA Runtime Version = 12.0, NumDevs = 1, Device0 = NVIDIA GeForce RTX 3050 Laptop GPU
Result = PASS一:首先安装驱动,参考【精选】41、window10 +visual Studio 2019+CUDA11.1+cudnn11.1+TensorRT7.2.3.4+YOLO5(含安装vulkan)_cuda11.1 tensorrt-CSDN博客 这里只执行第三步,需要安装cuda12.0 驱动下载:
链接:https://pan.baidu.com/s/1zSrhdpyRULlR3YXorZ6pyA?pwd=eor7
提取码:eor7
然后进行代码开发,这里并没有将opencv+cuda进行二次编译,当然也可以编译,但是本菜鸡没用cv::cuda::Mat的形式开发,还是依赖ffmpeg的方式进行开发,同时使用cuda进行了某些格式的转换
二:下载官方支持的ffmpeg+cuda编译好的包:Releases · BtbN/FFmpeg-Builds · GitHub 这里使用的是ffmpeg-master-latest-win64-gpl-shared 然后开始开发,其ffmpeg信息
C:\Program Files\NVIDIA GPU Computing Toolkit\CUDA\v12.0\extras\demo_suite>ffplay
ffplay version N-112442-g6028728bb8-20231011 Copyright (c) 2003-2023 the FFmpeg developers
  built with gcc 13.2.0 (crosstool-NG 1.25.0.232_c175b21)
  configuration: --prefix=/ffbuild/prefix --pkg-config-flags=--static --pkg-config=pkg-config --cross-prefix=x86_64-w64-mingw32- --arch=x86_64 --target-os=mingw32 --enable-gpl --enable-version3 --disable-debug --enable-shared --disable-static --disable-w32threads --enable-pthreads --enable-iconv --enable-libxml2 --enable-zlib --enable-libfreetype --enable-libfribidi --enable-gmp --enable-lzma --enable-fontconfig --enable-libharfbuzz --enable-libvorbis --enable-opencl --disable-libpulse --enable-libvmaf --disable-libxcb --disable-xlib --enable-amf --enable-libaom --enable-libaribb24 --enable-avisynth --enable-chromaprint --enable-libdav1d --enable-libdavs2 --disable-libfdk-aac --enable-ffnvcodec --enable-cuda-llvm --enable-frei0r --enable-libgme --enable-libkvazaar --enable-libass --enable-libbluray --enable-libjxl --enable-libmp3lame --enable-libopus --enable-librist --enable-libssh --enable-libtheora --enable-libvpx --enable-libwebp --enable-lv2 --enable-libvpl --enable-openal --enable-libopencore-amrnb --enable-libopencore-amrwb --enable-libopenh264 --enable-libopenjpeg --enable-libopenmpt --enable-librav1e --enable-librubberband --enable-schannel --enable-sdl2 --enable-libsoxr --enable-libsrt --enable-libsvtav1 --enable-libtwolame --enable-libuavs3d --disable-libdrm --enable-vaapi --enable-libvidstab --enable-vulkan --enable-libshaderc --enable-libplacebo --enable-libx264 --enable-libx265 --enable-libxavs2 --enable-libxvid --enable-libzimg --enable-libzvbi --extra-cflags=-DLIBTWOLAME_STATIC --extra-cxxflags= --extra-ldflags=-pthread --extra-ldexeflags= --extra-libs=-lgomp --extra-version=20231011
  libavutil      58. 27.100 / 58. 27.100
  libavcodec     60. 30.102 / 60. 30.102
  libavformat    60. 15.100 / 60. 15.100
  libavdevice    60.  2.101 / 60.  2.101
  libavfilter     9. 11.100 /  9. 11.100
  libswscale      7.  4.100 /  7.  4.100
  libswresample   4. 11.100 /  4. 11.100
  libpostproc    57.  2.100 / 57.  2.100
Simple media player
usage: ffplay [options] input_file

An input file must be specified
Use -h to get full help or, even better, run 'man ffplay'
三:代码目录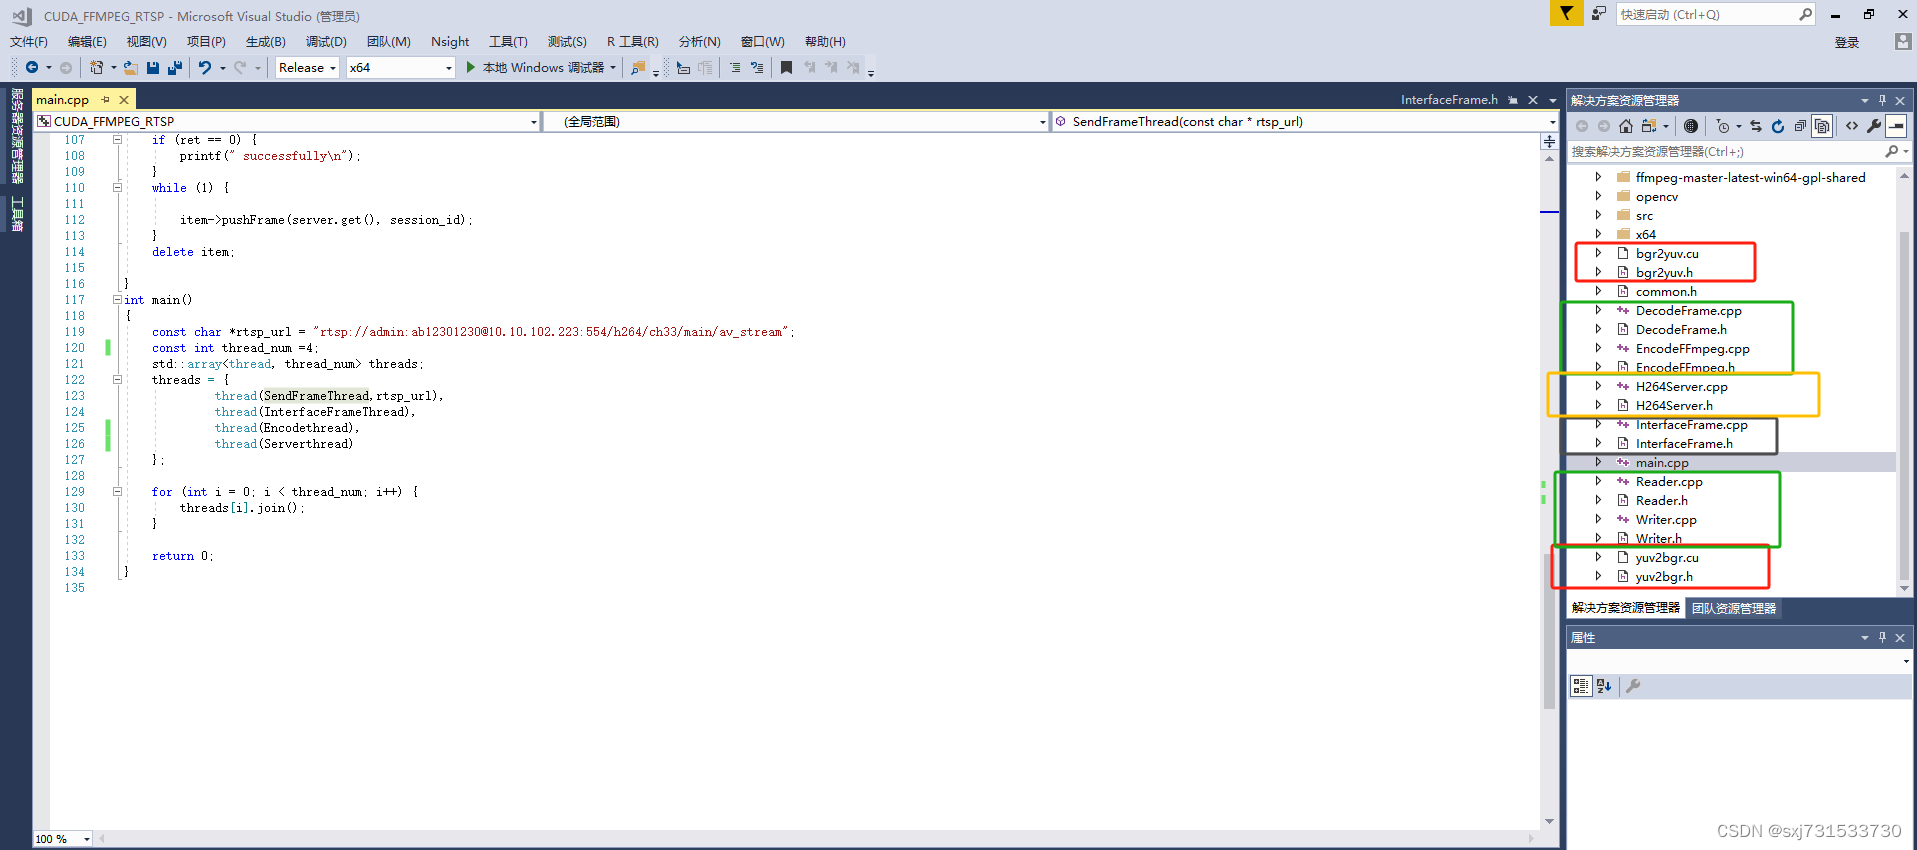
上述框颜色 红色是两个框 一个是基于解码的gpu进行yuv转rgb 然后送给黑色框进行算法推理,然后经过解码进行另一个红色框进行rgb转yuv,然后给橙色框进行编码h264进行推流,整个数据传输使用共享内存进行数据交互,整个解码器和编码器使用
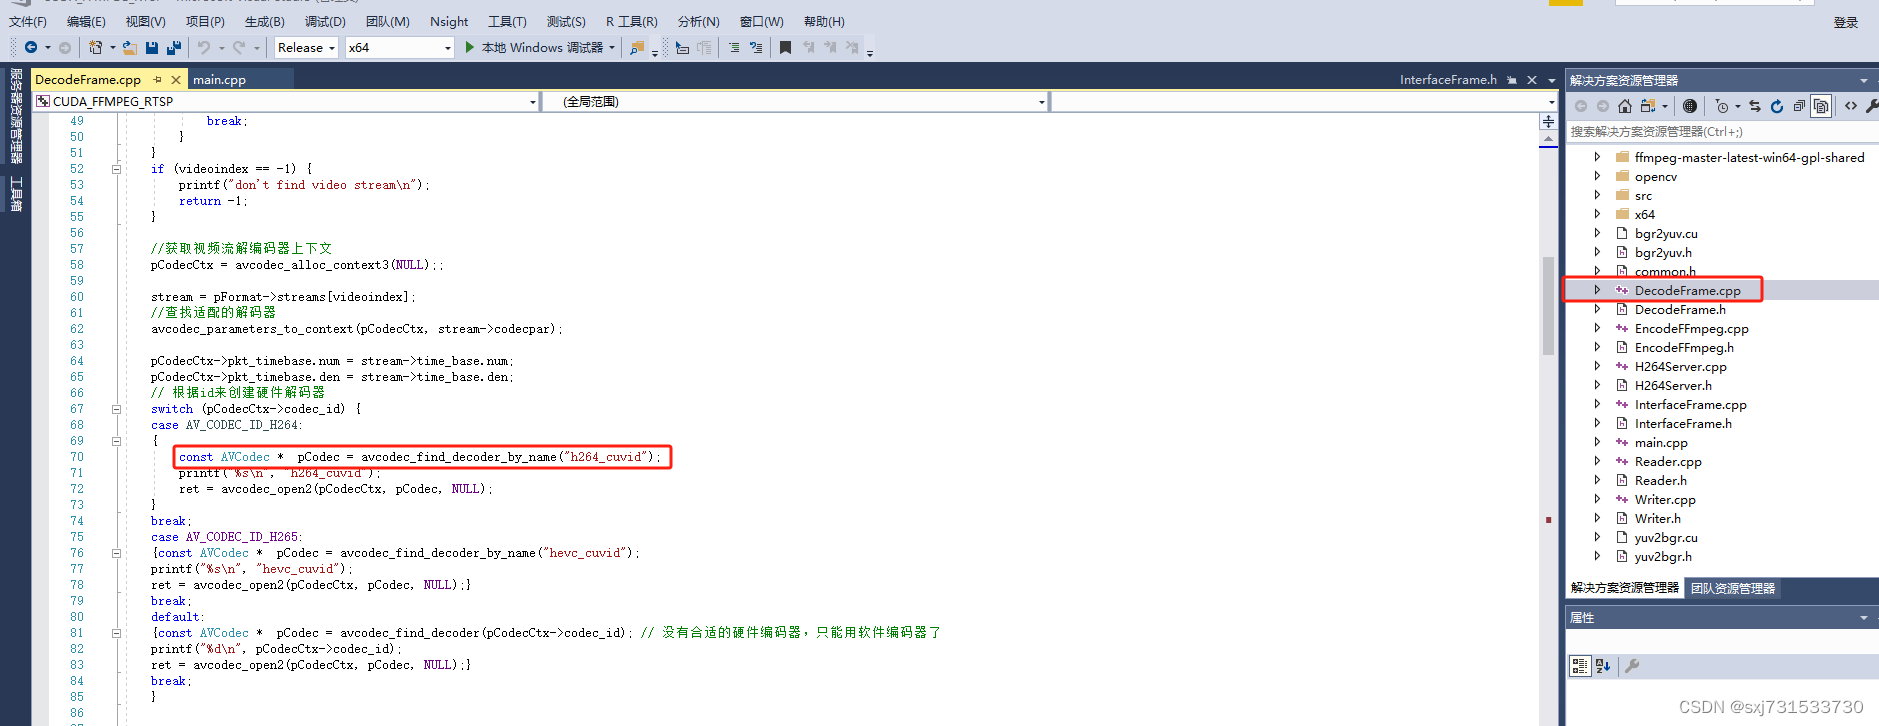
编码器
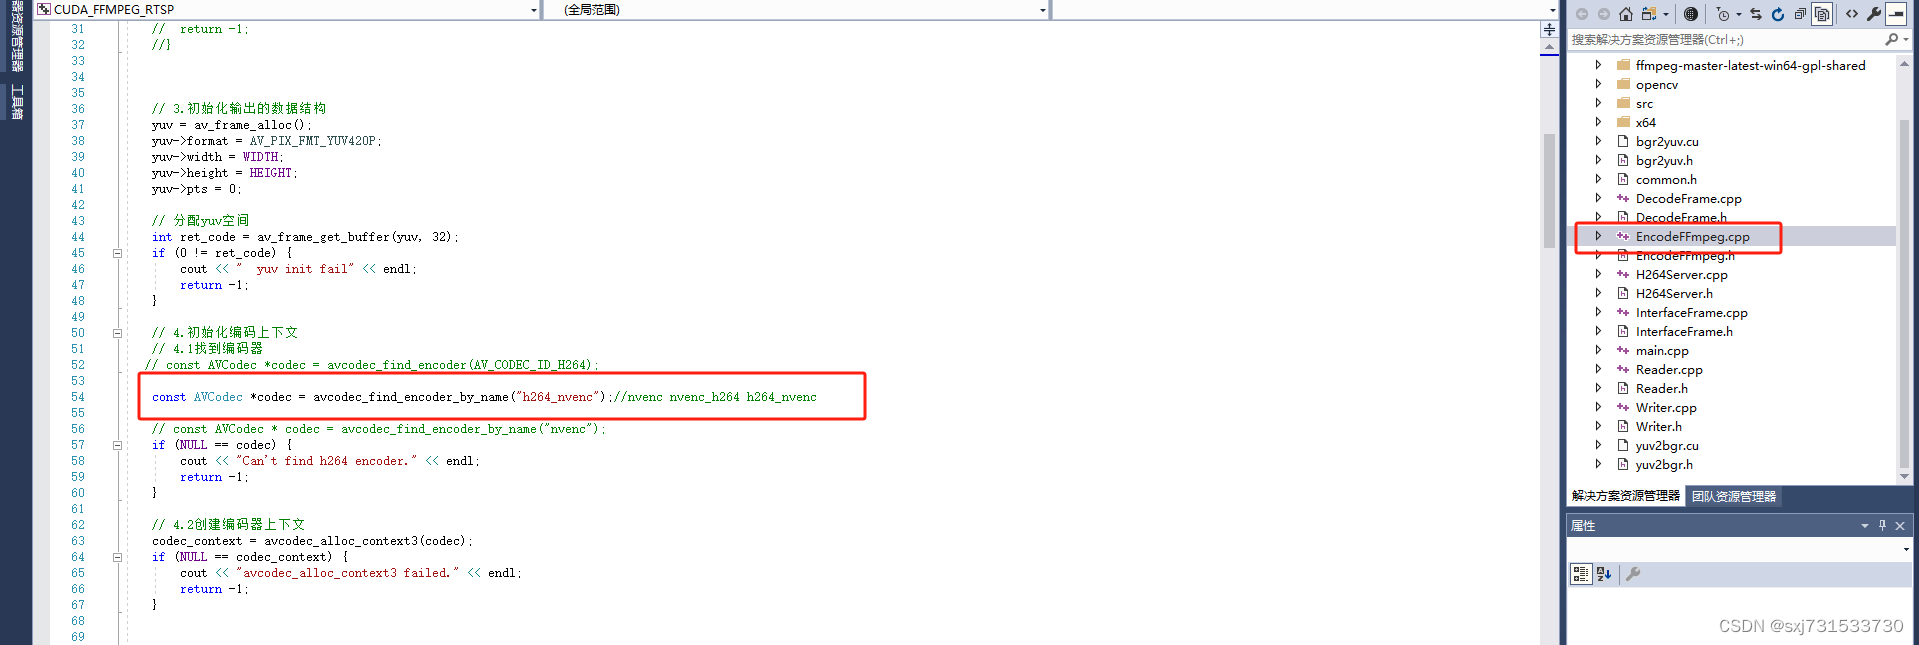
同时使用tcp这种可靠的数据传递方式进行投递,具体代码参考github:https://github.com/sxj731533730/CUDA_FFMPEG_RTSP.git

北京人形旗下天工造物具身智能开源社区,聚焦具身天工与慧思开物两大平台
更多推荐
 0
0 0
0- 0


 已为社区贡献2条内容

所有评论(0)