一步步将DeepSeek R1微调成一个DeepDoctor(资深医生)
DeepSeek 颠覆了 AI 领域,挑战 OpenAI 的主导地位,推出了一系列先进的推理模型。最令人兴奋的是?这些模型完全免费,且没有任何使用限制,人人都可以访问。
在本教程中,我们将对 DeepSeek-R1-Distill-Llama-8B 模型进行微调,使用来自 Hugging Face 的医学思维链数据集进行训练。该精简版 DeepSeek-R1 模型是通过在 DeepSeek-R1 生成的数据上微调 Llama 3.1 8B 模型而创建的。它展示了与原始模型相似的推理能力。
什么是 DeepSeek R1?
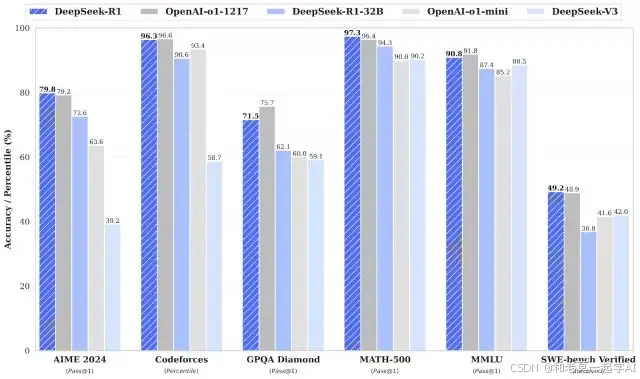
DeepSeek-R1 和 DeepSeek-R1-Zero 在数学、编程和逻辑推理任务上与 OpenAI 的 o1 性能相当。但是 R1 和 R1-Zero 都是开源的。
DeepSeek-R1-Zero
DeepSeek-R1-Zero 是首个完全通过大规模强化学习(RL,Reinforcement Learning)训练的开源模型,而不是通过监督微调(SFT,Supervised Fine-Tuning)作为初始步骤。这种方法使得模型能够独立探索思维链(CoT,Chain-of-Thought)推理,解决复杂问题,并迭代优化其输出。然而,这种方式也带来了一些挑战,如推理步骤重复、可读性差以及语言混杂,可能影响其清晰度和可用性。
DeepSeek-R1
DeepSeek-R1 的推出旨在克服 DeepSeek-R1-Zero 的局限性,通过在 RL 之前引入冷启动数据,为推理和非推理任务提供了更为坚实的基础。
这种多阶段训练使得该模型在数学、编程和推理基准测试中,能够达到与 OpenAI-o1 相媲美的领先水平,同时提升了输出的可读性和连贯性。
DeepSeek 蒸馏(Distillation)
DeepSeek 还推出了蒸馏模型。这些更小、更高效的模型同样展示了卓越的推理性能。
这些模型的参数范围从 1.5B 到 70B 不等,但保留了强大的推理能力,其中 DeepSeek-R1-Distill-Qwen-32B 在多个基准测试中超越了 OpenAI-o1-mini。
更小的模型继承了大模型的推理模式,展示了蒸馏过程的有效性。
逐步微调 DeepSeek R1
1. 环境设置
在本项目中,我们使用 Kaggle 作为云 IDE,因为它提供免费的 GPU 资源。我选择了两块 T4 GPU,但是看起来最终我只用了一块。如果你想用自己的电脑微调的话,那估计至少是要一块 16GB 显存的 RTX 3090 才行。
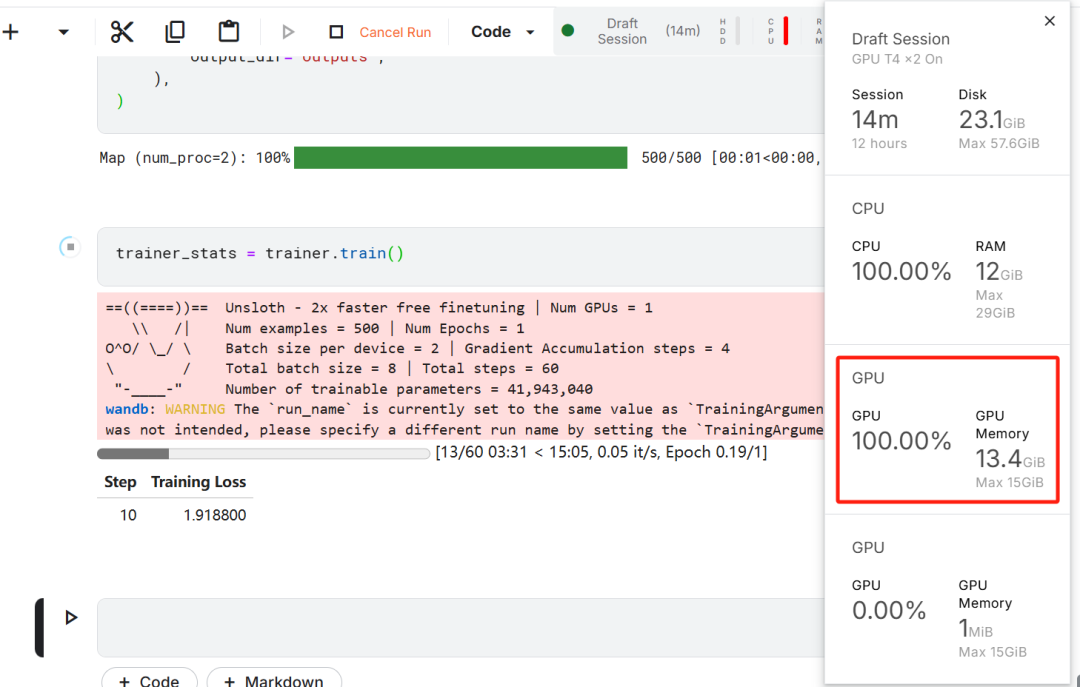
首先,启动一个新的 Kaggle notebook,并将你的 Hugging Face token 和 Weights & Biases token 添加为密钥。
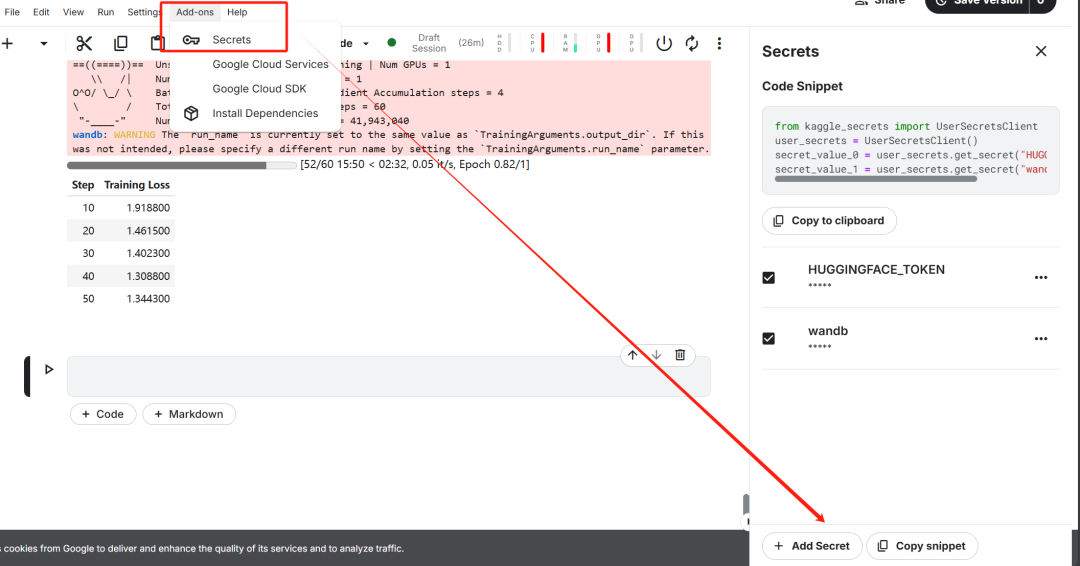
设置好密钥之后,安装 unsloth Python 包。Unsloth 是一个开源框架,旨在使大型语言模型(LLM)的微调速度提高一倍,并且更具内存效率。
%%capture``!pip install unsloth``!pip install --force-reinstall --no-cache-dir --no-deps git+https://github.com/unslothai/unsloth.git
登录 Hugging Face CLI,我们后续下载数据集和上传微调后的模型用得到。
from huggingface_hub import login``from kaggle_secrets import UserSecretsClient``user_secrets = UserSecretsClient()`` ``hf_token = user_secrets.get_secret("HUGGINGFACE_TOKEN")``login(hf_token)
登录Weights & Biases (wandb),并创建一个新项目,以跟踪实验和微调进展。
import wandb`` ``wb_token = user_secrets.get_secret("wandb")`` ``wandb.login(key=wb_token)``run = wandb.init(` `project='Fine-tune-DeepSeek-R1-Distill-Llama-8B on Medical COT Dataset',`` job_type="training", `` anonymous="allow"``)
2. 加载模型和 tokenizer
在本项目中,我们将加载 Unsloth 版本的 DeepSeek-R1-Distill-Llama-8B。
https://huggingface.co/unsloth/DeepSeek-R1-Distill-Llama-8B
此外,为了优化内存使用和性能,我们将以 4-bit 量化的方式加载该模型。
from unsloth import FastLanguageModel`` ``max_seq_length = 2048` `dtype = None` `load_in_4bit = True`` `` ``model, tokenizer = FastLanguageModel.from_pretrained(` `model_name = "unsloth/DeepSeek-R1-Distill-Llama-8B",` `max_seq_length = max_seq_length,` `dtype = dtype,` `load_in_4bit = load_in_4bit,` `token = hf_token,` `)
3. 微调前的模型推理
为了为模型创建提示模板,我们将定义一个系统提示,并在其中包含问题和回答生成的占位符。该提示将引导模型逐步思考,并提供一个逻辑严谨、准确的回答。
prompt_style = """Below is an instruction that describes a task, paired with an input that provides further context.` `Write a response that appropriately completes the request.` `Before answering, think carefully about the question and create a step-by-step chain of thoughts to ensure a logical and accurate response.`` ``### Instruction:``You are a medical expert with advanced knowledge in clinical reasoning, diagnostics, and treatment planning.` `Please answer the following medical question.` ` ``### Question:``{}`` ``### Response:``<think>{}"""
在这个示例中,我们将向 prompt_style 提供一个医学问题,将其转换为 token,然后将这些 token 传递给模型以生成回答。
question = "A 61-year-old woman with a long history of involuntary urine loss during activities like coughing or sneezing but no leakage at night undergoes a gynecological exam and Q-tip test. Based on these findings, what would cystometry most likely reveal about her residual volume and detrusor contractions?"`` `` ``FastLanguageModel.for_inference(model)` `inputs = tokenizer([prompt_style.format(question, "")], return_tensors="pt").to("cuda")`` ``outputs = model.generate(` `input_ids=inputs.input_ids,` `attention_mask=inputs.attention_mask,` `max_new_tokens=1200,` `use_cache=True,``)``response = tokenizer.batch_decode(outputs)``print(response[0].split("### Response:")[1])
这个医学问题的大致含义是:
一名 61 岁的女性长期在咳嗽或打喷嚏等活动中不自觉地漏尿,但夜间没有漏尿,她接受了妇科检查和 Q-tip 测试。根据这些发现,膀胱测压最有可能揭示她的残余量和逼尿肌收缩情况?
即使在没有微调的情况下,我们的模型也成功地生成了思维链,并在给出最终答案之前进行了推理。推理过程被封装在 标签内。
那么,为什么我们仍然需要微调呢?尽管推理过程详细,但它显得冗长且不简洁。此外,最终答案以项目符号格式呈现,这与我们希望微调的数据集的结构和风格有所偏离。
4. 加载和处理数据集
我们将稍微调整提示模板,以处理数据集,方法是为复杂的思维链列添加第三个占位符。
train_prompt_style = """Below is an instruction that describes a task, paired with an input that provides further context.` `Write a response that appropriately completes the request.` `Before answering, think carefully about the question and create a step-by-step chain of thoughts to ensure a logical and accurate response.`` ``### Instruction:``You are a medical expert with advanced knowledge in clinical reasoning, diagnostics, and treatment planning.` `Please answer the following medical question.` ` ``### Question:``{}`` ``### Response:``<think>``{}``</think>``{}"""
编写一个 Python 函数,在数据集中创建一个 “text” 列,该列由训练提示模板组成。将占位符填充为问题、思维链和答案。
EOS_TOKEN = tokenizer.eos_token # Must add EOS_TOKEN`` `` ``def formatting_prompts_func(examples):` `inputs = examples["Question"]` `cots = examples["Complex_CoT"]` `outputs = examples["Response"]` `texts = []` `for input, cot, output in zip(inputs, cots, outputs):` `text = train_prompt_style.format(input, cot, output) + EOS_TOKEN` `texts.append(text)` `return {` `"text": texts,` `}
我们将从 Hugging Face Hub 加载 FreedomIntelligence/medical-o1-reasoning-SFT 数据集的前 500个 样本。
https://huggingface.co/datasets/FreedomIntelligence/medical-o1-reasoning-SFT?row=46
之后,我们将使用 formatting_prompts_func 函数对 “text” 列进行映射。
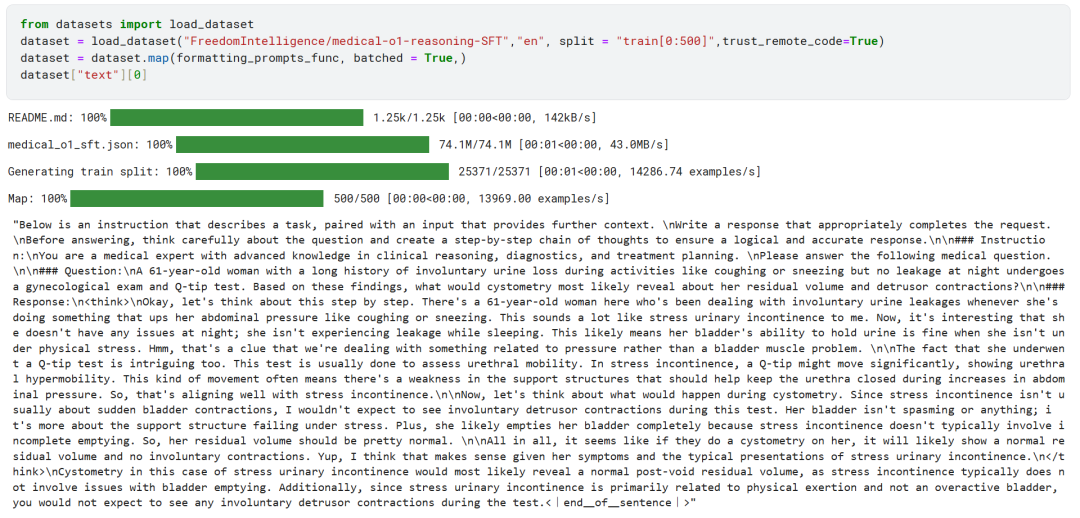
如我们所见,“text” 列包含了系统提示、指令、思维链和答案。
5. 设置模型
通过使用目标模块,我们将通过向模型中添加低秩适配器(low-rank adopter)来设置模型。
model = FastLanguageModel.get_peft_model(` `model,` `r=16,`` target_modules=[` `"q_proj",` `"k_proj",` `"v_proj",` `"o_proj",` `"gate_proj",` `"up_proj",` `"down_proj",` `],` `lora_alpha=16,` `lora_dropout=0,`` bias="none", `` use_gradient_checkpointing="unsloth", # True or "unsloth" for very long context` `random_state=3407,` `use_rslora=False,`` loftq_config=None,``)
接下来,我们将设置训练参数和训练器,通过提供模型、tokenizer、数据集以及其他重要的训练参数,来优化我们的微调过程。
from trl import SFTTrainer``from transformers import TrainingArguments``from unsloth import is_bfloat16_supported`` ``trainer = SFTTrainer(` `model=model,` `tokenizer=tokenizer,` `train_dataset=dataset,` `dataset_text_field="text",` `max_seq_length=max_seq_length,` `dataset_num_proc=2,` `args=TrainingArguments(` `per_device_train_batch_size=2,` `gradient_accumulation_steps=4,` `# Use num_train_epochs = 1, warmup_ratio for full training runs!` `warmup_steps=5,` `max_steps=60,` `learning_rate=2e-4,` `fp16=not is_bfloat16_supported(),` `bf16=is_bfloat16_supported(),` `logging_steps=10,` `optim="adamw_8bit",` `weight_decay=0.01,` `lr_scheduler_type="linear",` `seed=3407,` `output_dir="outputs",` `),``)
**6. 训练模型
**
trainer_stats = trainer.train()
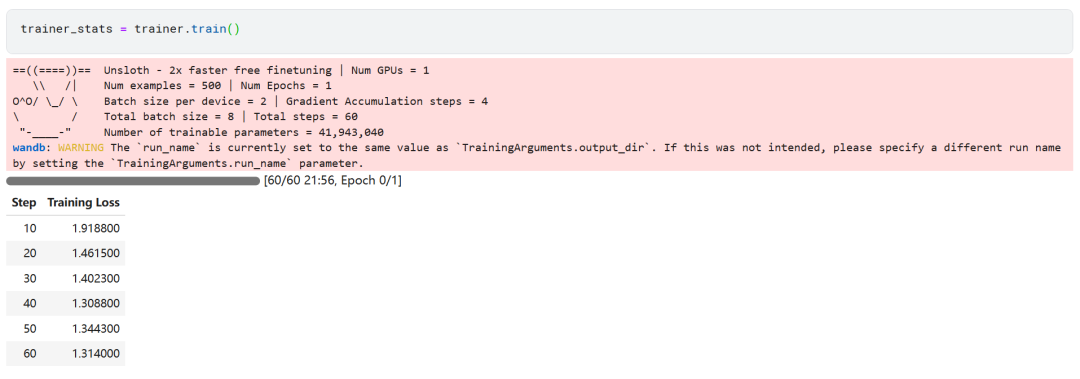
训练过程花费了 22 分钟完成。训练损失逐渐降低,这表明模型性能有所提升,这是一个积极的信号。
通过登录 Weights & Biases 网站并查看完整的模型评估报告。
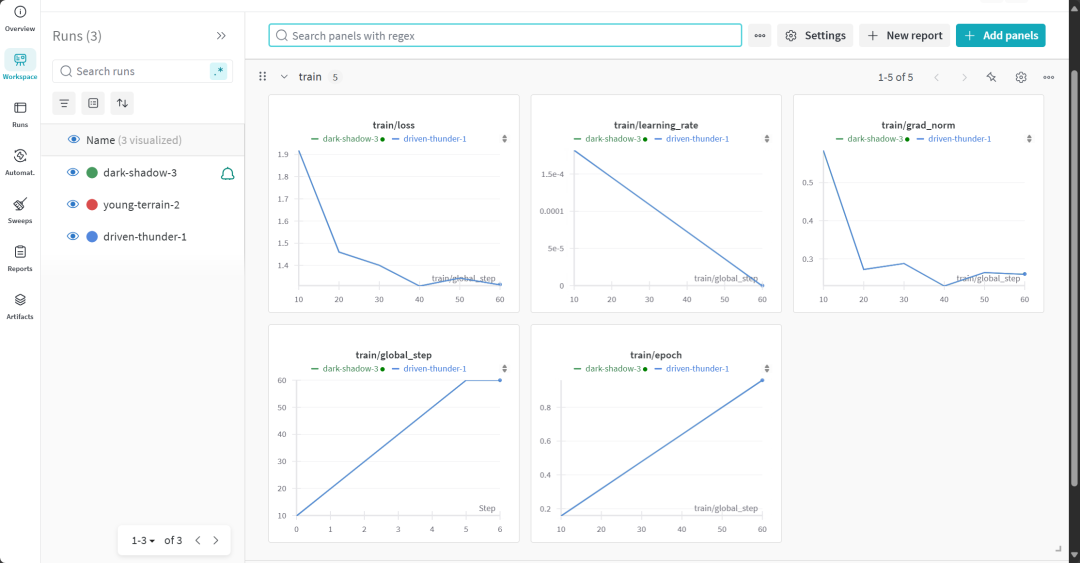
7. 微调后的模型推理
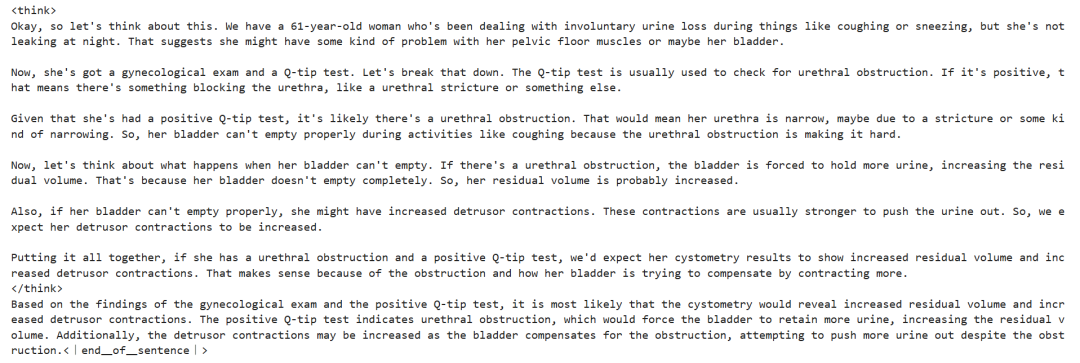
为了对比结果,我们将向微调后的模型提出与之前相同的问题,看看有什么变化。
question = "A 61-year-old woman with a long history of involuntary urine loss during activities like coughing or sneezing but no leakage at night undergoes a gynecological exam and Q-tip test. Based on these findings, what would cystometry most likely reveal about her residual volume and detrusor contractions?"`` `` ``FastLanguageModel.for_inference(model) # Unsloth has 2x faster inference!``inputs = tokenizer([prompt_style.format(question, "")], return_tensors="pt").to("cuda")`` ``outputs = model.generate(` `input_ids=inputs.input_ids,` `attention_mask=inputs.attention_mask,` `max_new_tokens=1200,` `use_cache=True,``)``response = tokenizer.batch_decode(outputs)``print(response[0].split("### Response:")[1])``
结果明显更好且更准确。思维链条简洁明了,答案直接且只用了一段话。微调成功。
8. 本地保存模型
现在,让我们将适配器、完整模型和 tokenizer 保存在本地,以便在其他项目中使用。
new_model_local = "DeepSeek-R1-Medical-COT"``model.save_pretrained(new_model_local)` `tokenizer.save_pretrained(new_model_local)`` ``model.save_pretrained_merged(new_model_local, tokenizer, save_method = "merged_16bit",)
9. 将模型推送到 Hugging Face Hub
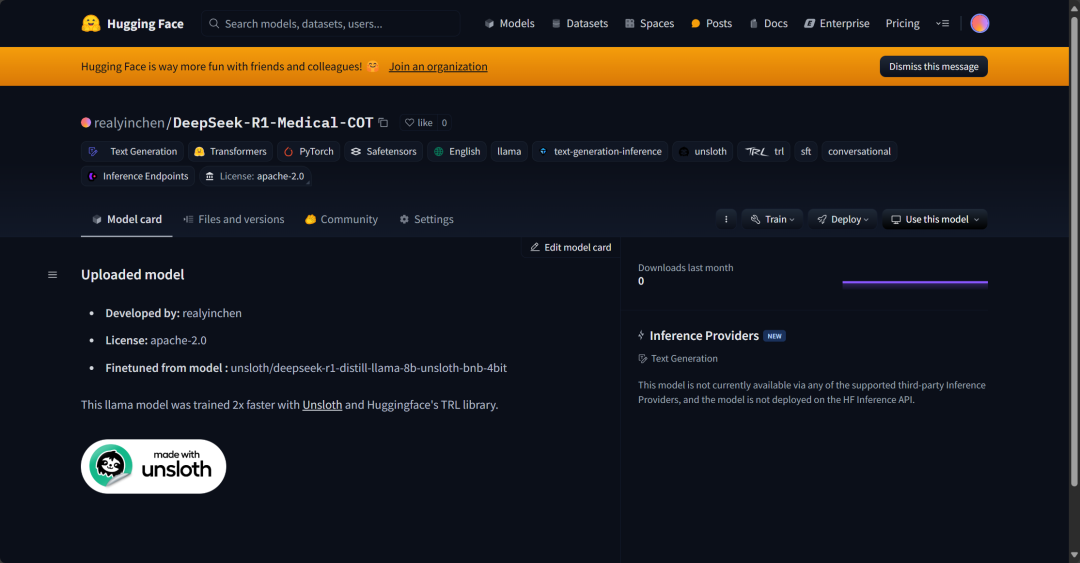
我们还将把适配器、tokenizer 和模型推送到 Hugging Face Hub,以便 AI 社区能够通过将其集成到他们的系统中,充分利用这个模型。
new_model_online = "realyinchen/DeepSeek-R1-Medical-COT"``model.push_to_hub(new_model_online)``tokenizer.push_to_hub(new_model_online)`` ``model.push_to_hub_merged(new_model_online, tokenizer, save_method = "merged_16bit")
总结
AI 领域正在快速变化。开源社区正在崛起,挑战过去三年主导 AI 领域的专有模型。
开源的 LLM 正在变得更加优秀、更快速、更高效,使得在较低的计算和内存资源下微调它们变得比以往更加容易。
在本教程中,我们探讨了 DeepSeek R1 推理模型,并学习了如何对其精简版进行微调,以应用于医学问答任务。微调后的推理模型不仅提升了性能,还使其能够应用于医学、急救服务和医疗等关键领域。
为了应对 DeepSeek R1 的发布,OpenAI 推出了两个强大的工具:一个更先进的推理模型:o3,以及 Operator AI Agent,依托全新的计算机使用 Agent(CUA,Computer Use Agent)模型,能够自主浏览网站并执行任务。
零基础如何学习AI大模型
领取方式在文末
为什么要学习大模型?
学习大模型课程的重要性在于它能够极大地促进个人在人工智能领域的专业发展。大模型技术,如自然语言处理和图像识别,正在推动着人工智能的新发展阶段。通过学习大模型课程,可以掌握设计和实现基于大模型的应用系统所需的基本原理和技术,从而提升自己在数据处理、分析和决策制定方面的能力。此外,大模型技术在多个行业中的应用日益增加,掌握这一技术将有助于提高就业竞争力,并为未来的创新创业提供坚实的基础。
大模型典型应用场景
①AI+教育:智能教学助手和自动评分系统使个性化教育成为可能。通过AI分析学生的学习数据,提供量身定制的学习方案,提高学习效果。
②AI+医疗:智能诊断系统和个性化医疗方案让医疗服务更加精准高效。AI可以分析医学影像,辅助医生进行早期诊断,同时根据患者数据制定个性化治疗方案。
③AI+金融:智能投顾和风险管理系统帮助投资者做出更明智的决策,并实时监控金融市场,识别潜在风险。
④AI+制造:智能制造和自动化工厂提高了生产效率和质量。通过AI技术,工厂可以实现设备预测性维护,减少停机时间。
…
这些案例表明,学习大模型课程不仅能够提升个人技能,还能为企业带来实际效益,推动行业创新发展。
学习资料领取
如果你对大模型感兴趣,可以看看我整合并且整理成了一份AI大模型资料包,需要的小伙伴文末免费领取哦,无偿分享!!!
vx扫描下方二维码即可
加上后会一个个给大家发

部分资料展示
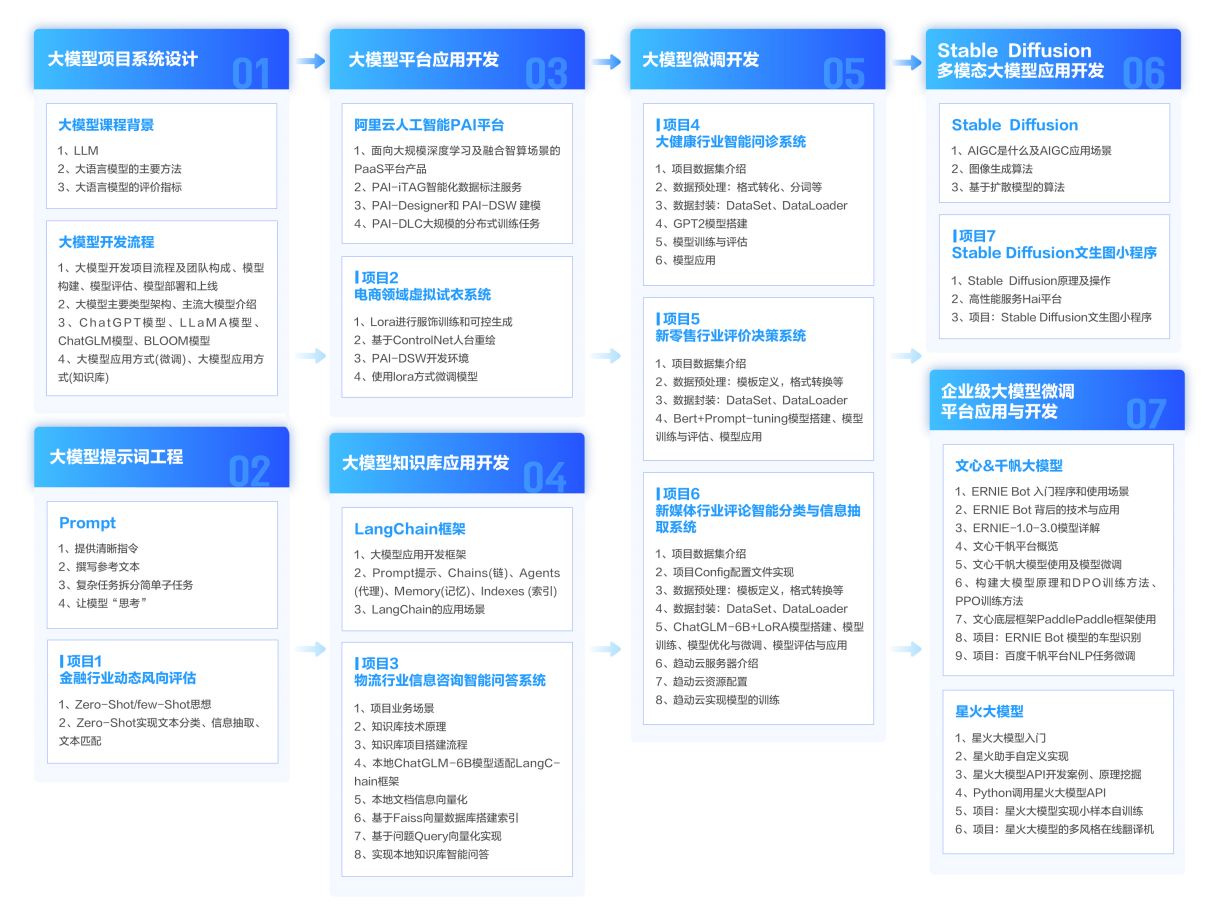
一、 AI大模型学习路线图
整个学习分为7个阶段

二、AI大模型实战案例
涵盖AI大模型的理论研究、技术实现、行业应用等多个方面。无论您是科研人员、工程师,还是对AI大模型感兴趣的爱好者,皆可用。


三、视频和书籍PDF合集
从入门到进阶这里都有,跟着老师学习事半功倍。


四、LLM面试题


五、AI产品经理面试题

六、deepseek部署包+技巧大全

😝朋友们如果有需要的话,可以V扫描下方二维码联系领取~


北京人形旗下天工造物具身智能开源社区,聚焦具身天工与慧思开物两大平台
更多推荐
 30
30 0
0- 0


 已为社区贡献7条内容

所有评论(0)