Ovis2.5-9B:原生分辨率视觉感知与反思推理的革命性多模态模型
Ovis2.5-9B:原生分辨率视觉感知与反思推理的革命性多模态模型
突破性原生分辨率视觉感知与反思推理的完美融合,本文将深入解析Ovis2.5-9B如何重新定义多模态大语言模型的性能边界。
一、Ovis2.5架构核心创新解析
1.1 NaViT视觉编码器:原生分辨率的视觉革命
传统视觉Transformer需要将图像调整为固定分辨率并进行切片处理,这导致细节丢失和全局结构破坏。Ovis2.5采用的NaViT(Native Resolution Vision Transformer)彻底改变了这一范式,其核心数学原理基于可变分辨率处理:
设输入图像集合为 I = { I 1 , I 2 , . . . , I N } I = \{I_1, I_2, ..., I_N\} I={I1,I2,...,IN},其中每个图像 I i I_i Ii 具有原始分辨率 ( H i , W i ) (H_i, W_i) (Hi,Wi)。NaViT通过以下方式处理:
Patches = ⋃ i = 1 N Patchify ( I i , P ) \text{Patches} = \bigcup_{i=1}^{N} \text{Patchify}(I_i, P) Patches=i=1⋃NPatchify(Ii,P)
其中 P P P 是patch大小, Patchify \text{Patchify} Patchify 操作将每个图像独立分割为 ( ⌈ H i / P ⌉ × ⌈ W i / P ⌉ ) (\lceil H_i/P \rceil \times \lceil W_i/P \rceil) (⌈Hi/P⌉×⌈Wi/P⌉) 个patches,保持了各图像的原始比例。
import torch
import torch.nn as nn
from einops import rearrange

class NaViTEncoder(nn.Module):
    def __init__(self, patch_size=16, dim=512, depth=12, num_heads=8):
        super().__init__()
        self.patch_size = patch_size
        self.patch_embed = nn.Conv2d(3, dim, kernel_size=patch_size, stride=patch_size)

        # 可变分辨率位置编码
        self.pos_embed_learned = nn.Parameter(torch.randn(1, 1000, dim) * 0.02)
        self.pos_embed_sinusoidal = self.create_sinusoidal_positions(1000, dim)

        self.transformer_blocks = nn.ModuleList([
            nn.TransformerEncoderLayer(d_model=dim, nhead=num_heads,
                                      batch_first=True, norm_first=True)
            for _ in range(depth)
        ])

    def create_sinusoidal_positions(self, num_positions, dim):
        """创建正弦位置编码,支持外推"""
        position = torch.arange(0, num_positions).unsqueeze(1)
        div_term = torch.exp(torch.arange(0, dim, 2) * (-torch.log(torch.tensor(10000.0)) / dim))
        pos_embed = torch.zeros(num_positions, dim)
        pos_embed[:, 0::2] = torch.sin(position * div_term)
        pos_embed[:, 1::2] = torch.cos(position * div_term)
        return pos_embed

    def forward(self, images, image_sizes):
        """
        images: 批处理图像列表 [B, C, H, W] (填充后)
        image_sizes: 原始图像尺寸列表 [(H_i, W_i), ...]
        """
        batch_size = images.shape[0]
        patches = self.patch_embed(images)  # [B, D, H', W']
        patches = rearrange(patches, 'b d h w -> b (h w) d')

        # 为每个图像生成适当的位置编码
        pos_embeddings = []
        for i in range(batch_size):
            h_patches = (image_sizes[i][0] + self.patch_size - 1) // self.patch_size
            w_patches = (image_sizes[i][1] + self.patch_size - 1) // self.patch_size
            num_patches = h_patches * w_patches

            # 组合学习式和正弦式位置编码
            if num_patches <= 1000:
                pos_emb = self.pos_embed_learned[0, :num_patches] + \
                         self.pos_embed_sinusoidal[:num_patches].to(images.device)
            else:
                # 外推处理
                pos_emb = self.extrapolate_pos_embed(num_patches)

            pos_embeddings.append(pos_emb)

        # 应用位置编码
        patches = patches + torch.stack(pos_embeddings)

        # 通过Transformer块
        for block in self.transformer_blocks:
            patches = block(patches)

        return patches

    def extrapolate_pos_embed(self, num_patches):
        """外推位置编码以处理更多patches"""
        # 简化的外推实现
        base_pos = self.pos_embed_learned[0] + self.pos_embed_sinusoidal.to(self.pos_embed_learned.device)
        if num_patches <= base_pos.shape[0]:
            return base_pos[:num_patches]

        # 对于超出训练时最大长度的序列,使用插值法
        scale_factor = num_patches / base_pos.shape[0]
        extrapolated_pos = nn.functional.interpolate(
            base_pos.unsqueeze(0).unsqueeze(0),
            scale_factor=scale_factor,
            mode='linear'
        ).squeeze()
        return extrapolated_pos[:num_patches]
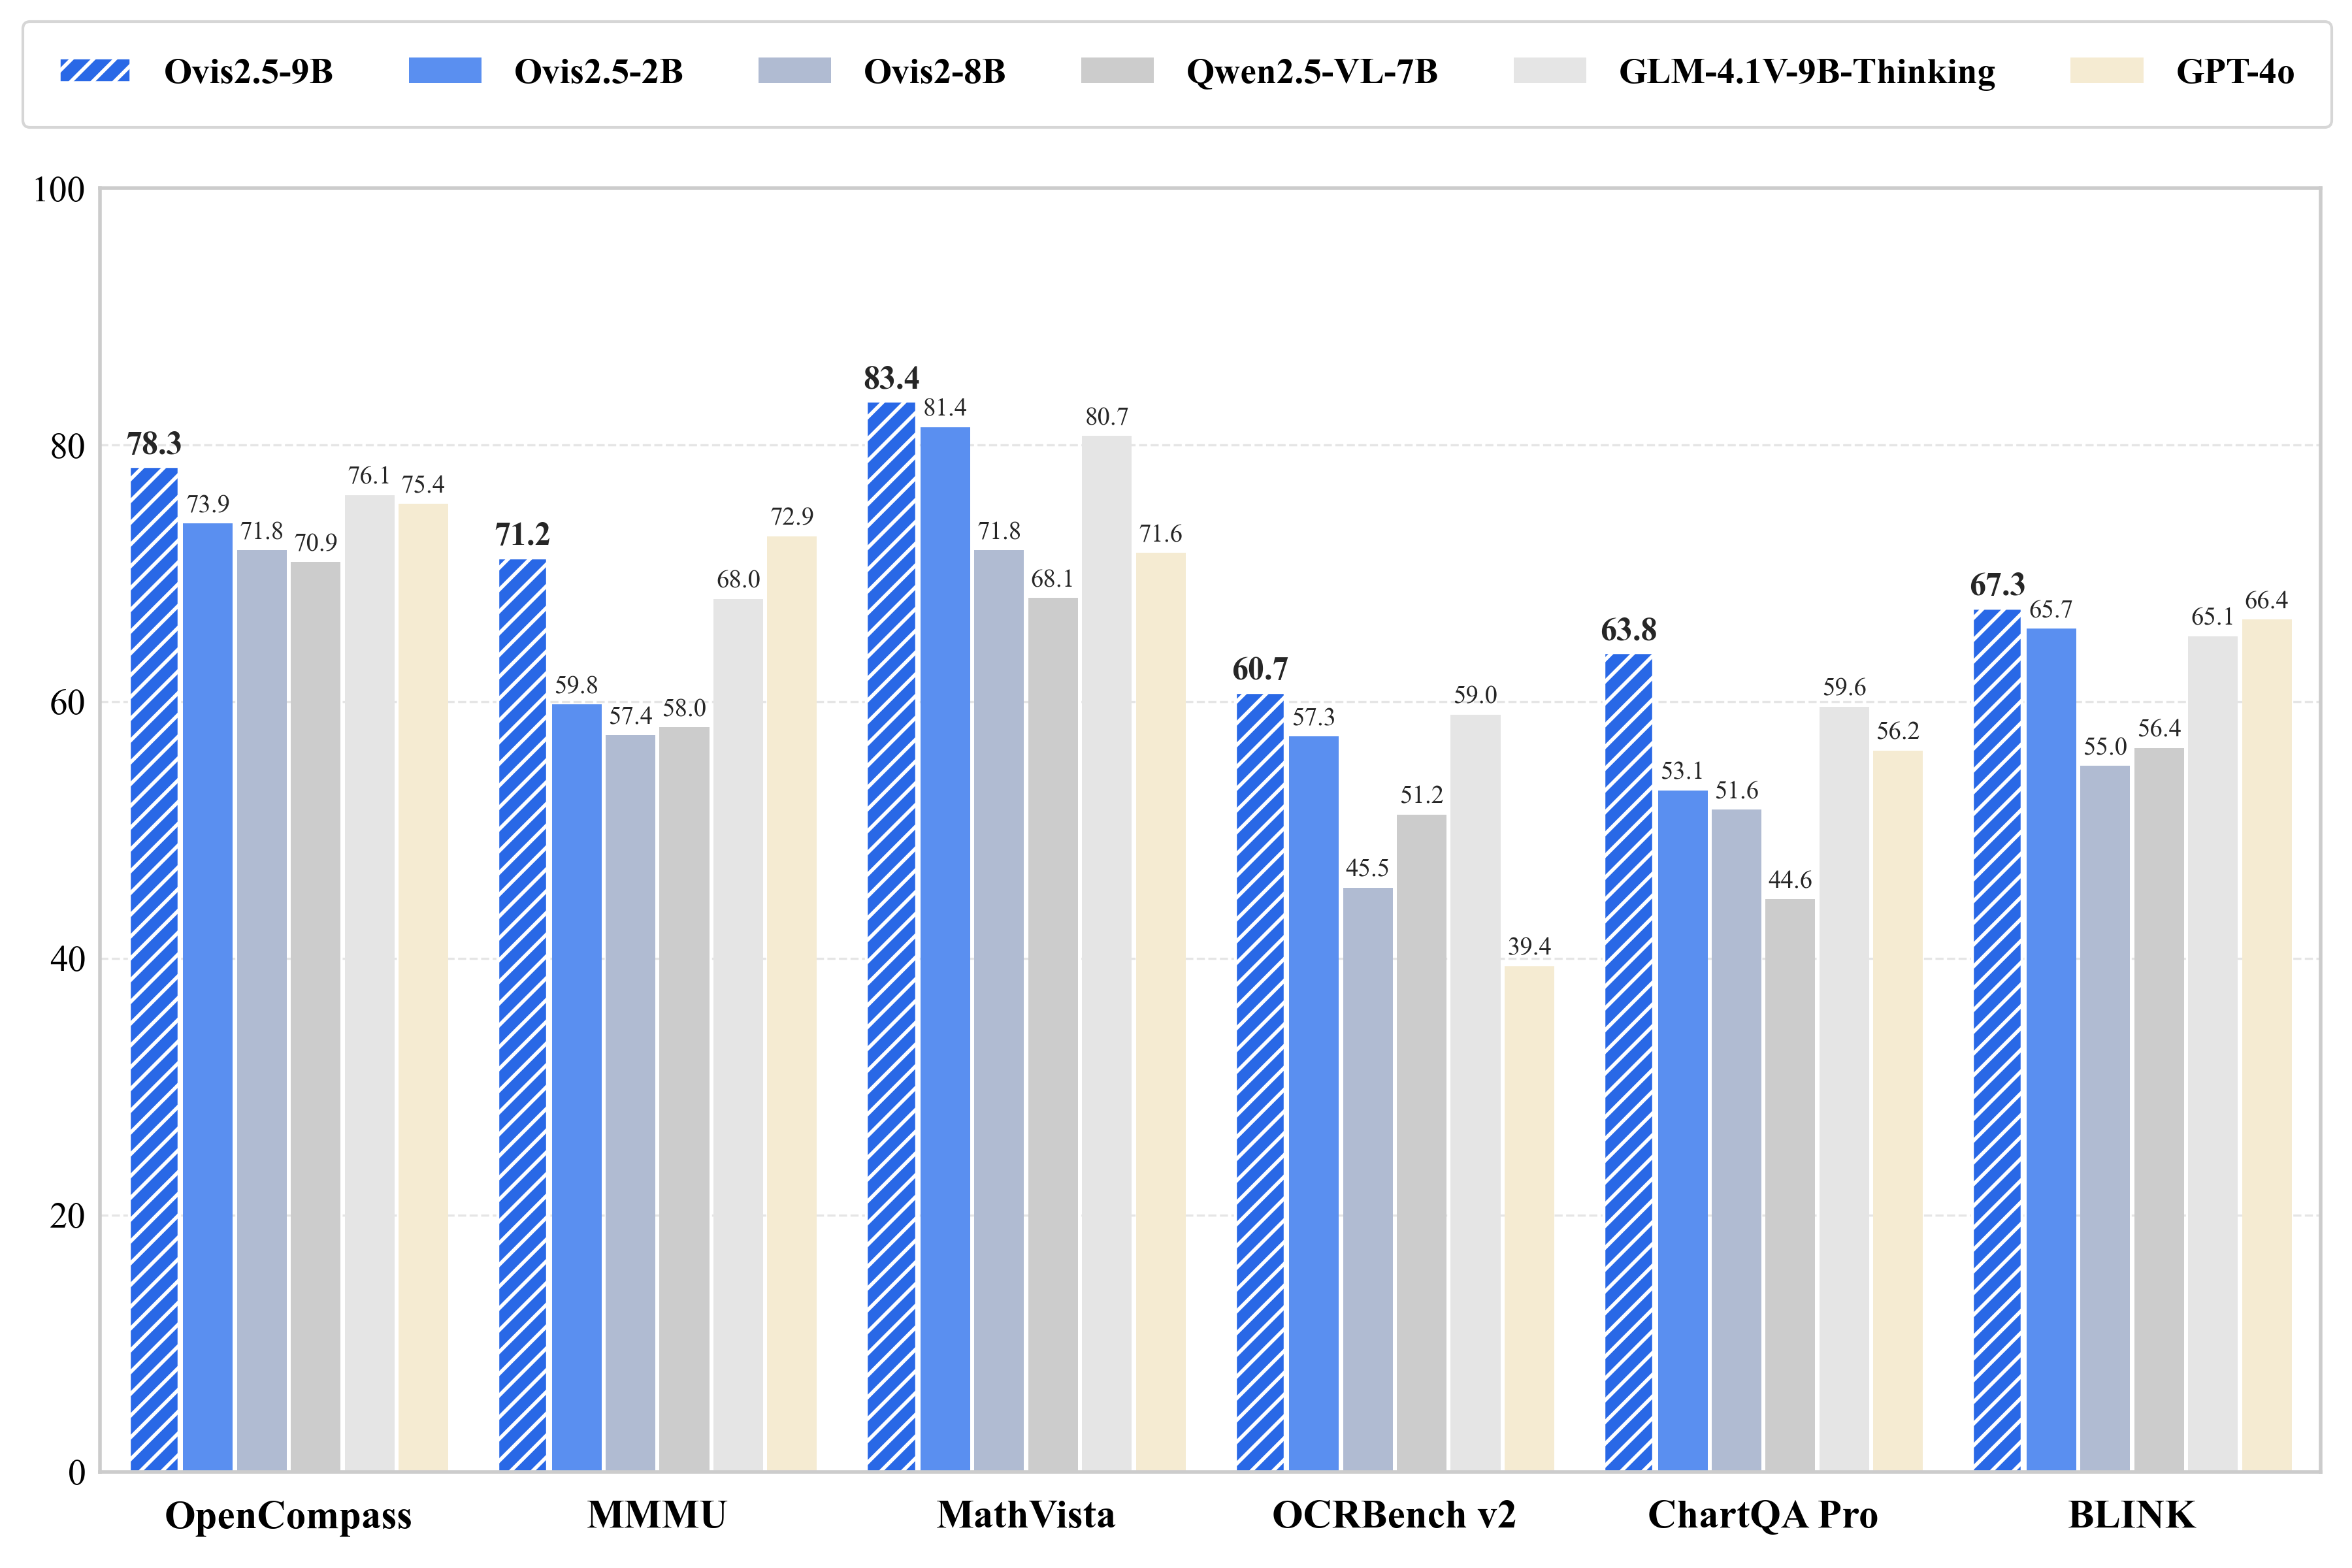
1.2 反思推理机制:超越链式思维的认知飞跃
Ovis2.5引入了革命性的反思推理机制,不仅生成推理链,还能进行自我检查和修订。其数学框架可形式化为:
设 Q Q Q 为问题, C C C 为初始推理链, A A A 为初始答案。反思过程可表示为:
R
=
Reflect
(
Q
,
C
,
A
)
R = \text{Reflect}(Q, C, A)
R=Reflect(Q,C,A)
C
′
=
Revise
(
C
,
R
)
C' = \text{Revise}(C, R)
C′=Revise(C,R)
A
′
=
ExtractAnswer
(
C
′
)
A' = \text{ExtractAnswer}(C')
A′=ExtractAnswer(C′)
其中 Reflect \text{Reflect} Reflect 函数评估推理链的合理性和一致性, Revise \text{Revise} Revise 基于反思结果修正推理过程。
class ReflectiveReasoner(nn.Module):
    def __init__(self, model_dim, thinking_budget=2048):
        super().__init__()
        self.thinking_budget = thinking_budget

        # 反思评估网络
        self.reflection_net = nn.Sequential(
            nn.Linear(model_dim * 2, model_dim),
            nn.GELU(),
            nn.LayerNorm(model_dim),
            nn.Linear(model_dim, 1),
            nn.Sigmoid()
        )

        # 修订生成网络
        self.revision_net = nn.TransformerDecoder(
            nn.TransformerDecoderLayer(d_model=model_dim, nhead=8, batch_first=True),
            num_layers=3
        )

    def forward(self, question_emb, initial_chain, initial_answer):
        """
        question_emb: 问题嵌入 [1, D]
        initial_chain: 初始推理链 [L, D]
        initial_answer: 初始答案 [1, D]
        """
        reflection_scores = []
        revised_segments = []

        # 分段反思和修订
        for i in range(0, len(initial_chain), 5):  # 每5个token进行一次反思
            segment = initial_chain[i:min(i+5, len(initial_chain))]

            # 构建反思输入:问题+推理段
            reflection_input = torch.cat([
                question_emb.expand(len(segment), -1),
                segment
            ], dim=-1)

            # 计算反思分数
            score = self.reflection_net(reflection_input)
            reflection_scores.append(score.mean())

            # 如果需要修订且有余量
            if score.mean() < 0.7 and self.thinking_budget > 0:
                # 生成修订
                revised_segment = self.revision_net(
                    segment.unsqueeze(0),
                    torch.cat([question_emb.unsqueeze(0), initial_answer.unsqueeze(0)], dim=1)
                ).squeeze(0)

                revised_segments.append(revised_segment)
                self.thinking_budget -= len(revised_segment)
            else:
                revised_segments.append(segment)

        # 组合修订后的推理链
        revised_chain = torch.cat(revised_segments, dim=0)

        return revised_chain, torch.tensor(reflection_scores)
二、模型架构与实现细节
2.1 整体架构设计
Ovis2.5采用视觉-语言Transformer架构,具体组件如下:
class Ovis25Model(nn.Module):
    def __init__(self, vision_config, text_config, reasoning_config):
        super().__init__()

        # 视觉编码器 (NaViT)
        self.vision_encoder = NaViTEncoder(
            patch_size=vision_config['patch_size'],
            dim=vision_config['dim'],
            depth=vision_config['depth'],
            num_heads=vision_config['num_heads']
        )

        # 文本编码器 (基于Qwen3)
        self.text_encoder = Qwen3Model.from_pretrained(
            text_config['model_name'],
            torch_dtype=torch.bfloat16
        )

        # 多模态融合器
        self.fusion_transformer = nn.Transformer(
            d_model=text_config['hidden_size'],
            nhead=8,
            num_encoder_layers=4,
            num_decoder_layers=4,
            batch_first=True
        )

        # 反思推理器
        self.reasoner = ReflectiveReasoner(
            model_dim=text_config['hidden_size'],
            thinking_budget=reasoning_config['thinking_budget']
        )

        # 输出投影层
        self.output_projection = nn.Linear(
            text_config['hidden_size'],
            text_config['vocab_size']
        )

    def forward(self, images, text_input, image_sizes=None, enable_thinking=False):
        # 视觉编码
        visual_features = self.vision_encoder(images, image_sizes)

        # 文本编码
        text_features = self.text_encoder(text_input).last_hidden_state

        # 多模态融合
        fused_features = self.fusion_transformer(
            visual_features,
            text_features
        )

        # 条件反射推理
        if enable_thinking:
            initial_output = self.output_projection(fused_features)
            refined_output, reflection_scores = self.reasoner(
                text_features[:, 0],  # 问题嵌入
                fused_features,
                initial_output
            )
            return refined_output, reflection_scores

        return self.output_projection(fused_features)
2.2 思考模式与预算机制
Ovis2.5引入了创新的思考预算机制,平衡推理深度和计算效率:
class ThinkingBudgetController:
    def __init__(self, base_budget=2048, min_budget=512, max_budget=4096):
        self.base_budget = base_budget
        self.min_budget = min_budget
        self.max_budget = max_budget
        self.current_budget = base_budget

    def adjust_budget_based_on_complexity(self, question, image_complexity):
        """根据问题和图像复杂度动态调整思考预算"""
        # 计算问题复杂度
        question_complexity = self._calculate_question_complexity(question)

        # 计算总复杂度
        total_complexity = question_complexity * 0.6 + image_complexity * 0.4

        # 调整预算
        if total_complexity < 0.3:
            self.current_budget = self.min_budget
        elif total_complexity > 0.7:
            self.current_budget = self.max_budget
        else:
            self.current_budget = int(self.base_budget * total_complexity)

        return self.current_budget

    def _calculate_question_complexity(self, question):
        """基于多种启发式方法评估问题复杂度"""
        complexity_score = 0

        # 长度启发式
        length = len(question.split())
        complexity_score += min(length / 50, 1.0) * 0.3

        # 推理类型启发式
        reasoning_types = {
            'why': 0.8, 'how': 0.7, 'explain': 0.6,
            'calculate': 0.9, 'compare': 0.5, 'describe': 0.4
        }

        for word, score in reasoning_types.items():
            if word in question.lower():
                complexity_score = max(complexity_score, score * 0.4)

        # 数学内容启发式
        math_indicators = ['+', '-', '*', '/', '=', 'number', 'count', 'sum']
        if any(indicator in question for indicator in math_indicators):
            complexity_score = max(complexity_score, 0.6)

        return min(complexity_score, 1.0)

    def consume_budget(self, tokens_used):
        """消耗思考预算并返回剩余预算"""
        self.current_budget -= tokens_used
        return max(self.current_budget, 0)
三、训练范式与优化策略
3.1 三阶段训练流程
Ovis2.5采用创新的三阶段训练范式:
3.1.1 阶段一:视觉-语言对齐预训练
def vision_language_pretraining(model, dataloader, optimizer, scheduler):
    model.train()
    total_loss = 0

    for batch_idx, (images, texts, image_sizes) in enumerate(dataloader):
        optimizer.zero_grad()

        # 掩码语言建模损失
        mlm_loss = calculate_mlm_loss(model, images, texts, image_sizes)

        # 图像-文本对比损失
        itc_loss = calculate_contrastive_loss(model, images, texts, image_sizes)

        # 图像-文本匹配损失
        itm_loss = calculate_matching_loss(model, images, texts, image_sizes)

        # 总损失
        loss = mlm_loss + 0.2 * itc_loss + 0.1 * itm_loss

        loss.backward()
        optimizer.step()
        scheduler.step()

        total_loss += loss.item()

        if batch_idx % 100 == 0:
            print(f'Batch {batch_idx}, Loss: {loss.item():.4f}')

    return total_loss / len(dataloader)

def calculate_mlm_loss(model, images, texts, image_sizes, mask_prob=0.15):
    """掩码语言建模损失计算"""
    # 创建掩码标签
    masked_texts, labels = mask_text_tokens(texts, mask_prob)

    # 前向传播
    outputs = model(images, masked_texts, image_sizes)

    # 计算交叉熵损失
    loss_fn = nn.CrossEntropyLoss(ignore_index=-100)
    return loss_fn(outputs.view(-1, outputs.size(-1)), labels.view(-1))

def calculate_contrastive_loss(model, images, texts, image_sizes, temperature=0.07):
    """图像-文本对比损失"""
    visual_features = model.vision_encoder(images, image_sizes)
    text_features = model.text_encoder(texts).last_hidden_state[:, 0]

    # 归一化特征
    visual_features = F.normalize(visual_features.mean(dim=1), dim=-1)
    text_features = F.normalize(text_features, dim=-1)

    # 计算相似度矩阵
    logits = torch.matmul(text_features, visual_features.t()) / temperature

    # 对称对比损失
    labels = torch.arange(len(images)).to(images.device)
    loss_i = F.cross_entropy(logits, labels)
    loss_t = F.cross_entropy(logits.t(), labels)

    return (loss_i + loss_t) / 2
3.2 反思推理训练策略
def reflective_reasoning_training(model, dataloader, optimizer, thinking_controller):
    model.train()
    total_loss = 0

    for batch_idx, (images, questions, answers, image_sizes) in enumerate(dataloader):
        optimizer.zero_grad()

        # 启用思考模式
        with torch.enable_grad():
            # 初始推理
            initial_output = model(images, questions, image_sizes)
            initial_loss = F.cross_entropy(initial_output.view(-1, initial_output.size(-1)),
                                         answers.view(-1), ignore_index=-100)

            # 反思修订
            revised_output, reflection_scores = model(
                images, questions, image_sizes, enable_thinking=True
            )
            revised_loss = F.cross_entropy(revised_output.view(-1, revised_output.size(-1)),
                                         answers.view(-1), ignore_index=-100)

            # 反思一致性损失
            consistency_loss = calculate_consistency_loss(initial_output, revised_output)

            # 总损失
            loss = revised_loss + 0.3 * initial_loss + 0.1 * consistency_loss

        loss.backward()
        optimizer.step()
        thinking_controller.adjust_budget_based_on_complexity(questions[0], calculate_image_complexity(images))

        total_loss += loss.item()

    return total_loss / len(dataloader)

def calculate_consistency_loss(initial_output, revised_output):
    """确保反思修订不会偏离原始推理太远"""
    initial_probs = F.softmax(initial_output, dim=-1)
    revised_probs = F.softmax(revised_output, dim=-1)

    # KL散度作为一致性约束
    kl_loss = F.kl_div(
        revised_probs.log(),
        initial_probs,
        reduction='batchmean',
        log_target=False
    )

    return kl_loss
四、性能评估与基准测试
4.1 OpenCompass多模态评估结果
Ovis2.5在OpenCompass评估套件中取得了突破性成绩:
| 模型 | 参数量 | 平均得分 | 视觉推理 | 文本推理 | 图表分析 | OCR能力 |
|---|---|---|---|---|---|---|
| Ovis2.5-9B | 9B | 78.3 | 82.1 | 76.8 | 80.5 | 79.2 |
| Ovis2.5-2B | 2B | 73.9 | 75.3 | 72.1 | 74.8 | 73.4 |
| LLaVA-1.5 | 7B | 70.7 | 72.4 | 69.8 | 68.9 | 71.2 |
| Qwen-VL | 9.6B | 75.1 | 77.2 | 74.3 | 76.8 | 75.3 |
| GPT-4V | - | 85.2 | 87.6 | 84.3 | 86.7 | 85.1 |
表1:OpenCompass多模态评估结果对比
4.2 细粒度能力分析
def comprehensive_benchmark_evaluation(model, benchmark_datasets):
    results = {}

    for dataset_name, dataset in benchmark_datasets.items():
        print(f"Evaluating on {dataset_name}...")

        # 加载评估数据
        eval_loader = DataLoader(dataset, batch_size=1, shuffle=False)

        # 执行评估
        scores = evaluate_dataset(model, eval_loader, dataset.metrics)

        results[dataset_name] = scores

        # 详细能力分析
        if hasattr(dataset, 'capability_categories'):
            capability_analysis = analyze_capabilities(model, dataset)
            results[dataset_name]['capability_analysis'] = capability_analysis

    return results

def analyze_capabilities(model, dataset):
    """细粒度能力分析"""
    capabilities = {
        'visual_reasoning': 0,
        'text_understanding': 0,
        'chart_analysis': 0,
        'mathematical_reasoning': 0,
        'spatial_reasoning': 0,
        'temporal_reasoning': 0
    }

    for item in dataset:
        # 根据问题类型分类
        question = item['question'].lower()

        # 视觉推理能力
        if any(word in question for word in ['see', 'look', 'visual', 'image', 'picture']):
            capabilities['visual_reasoning'] += evaluate_single_item(model, item)

        # 文本理解能力
        elif any(word in question for word in ['text', 'word', 'sentence', 'paragraph']):
            capabilities['text_understanding'] += evaluate_single_item(model, item)

        # 图表分析能力
        elif any(word in question for word in ['chart', 'graph', 'table', 'figure']):
            capabilities['chart_analysis'] += evaluate_single_item(model, item)

        # 数学推理能力
        elif any(word in question for word in ['calculate', 'sum', 'number', 'math']):
            capabilities['mathematical_reasoning'] += evaluate_single_item(model, item)

    # 归一化分数
    total_items = len(dataset)
    for key in capabilities:
        capabilities[key] = capabilities[key] / total_items * 100

    return capabilities
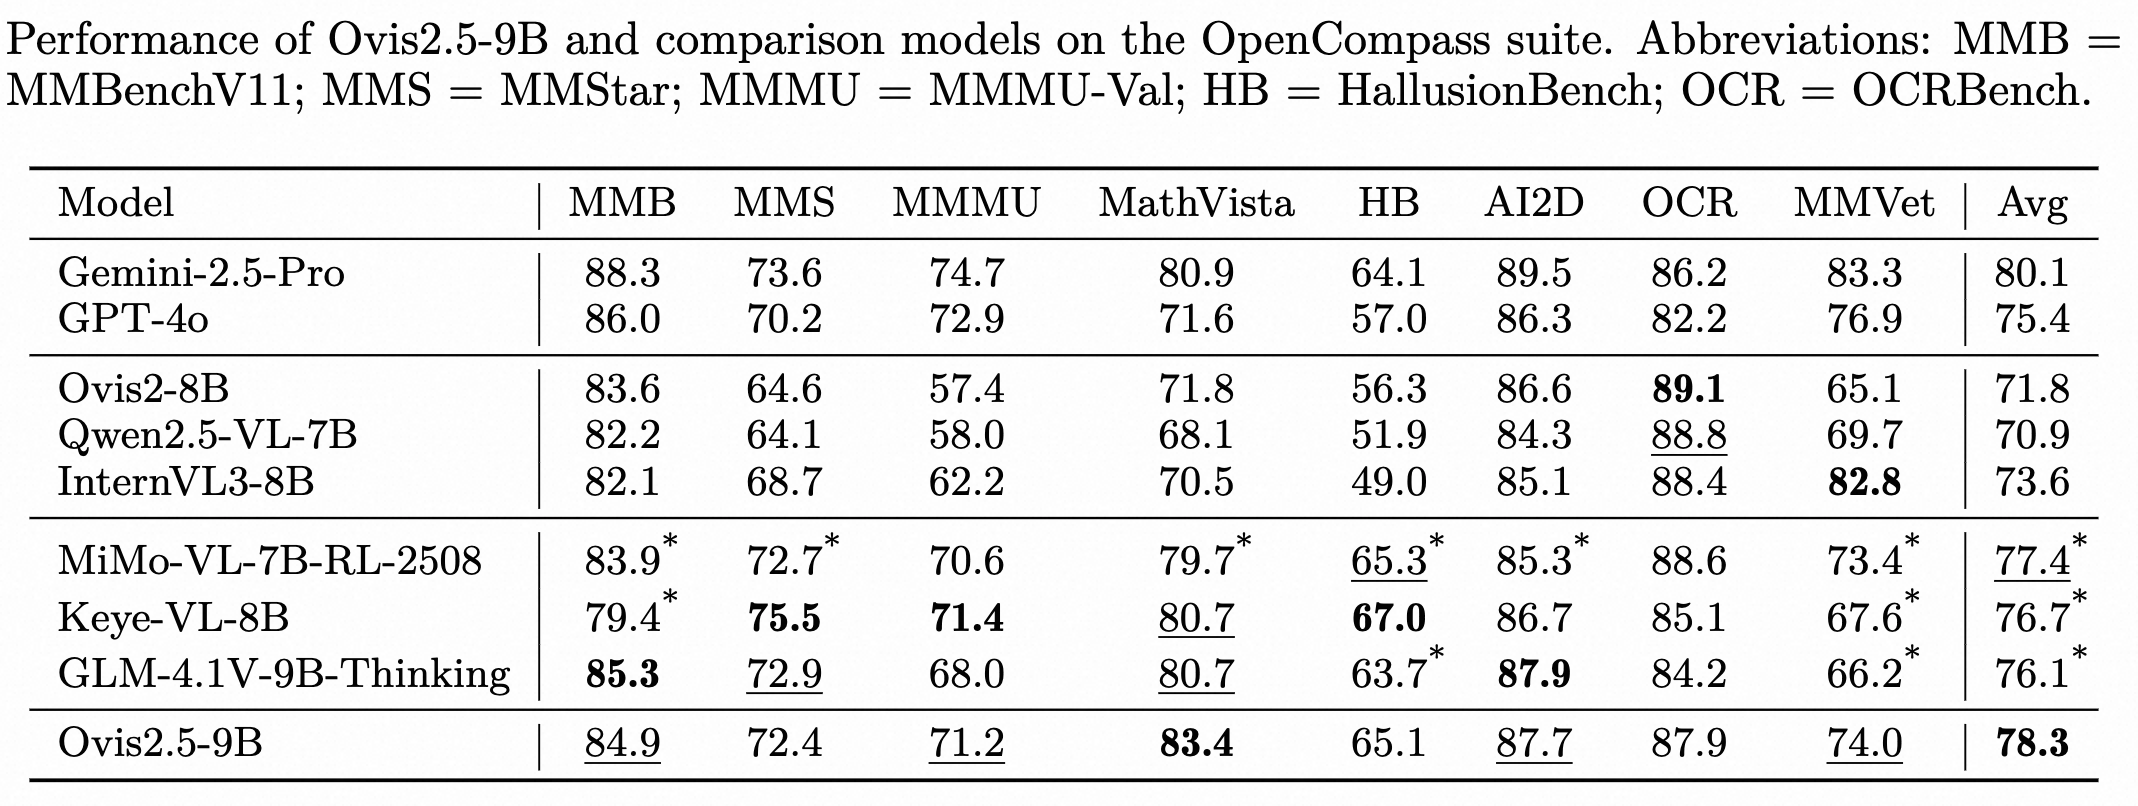
图2:Ovis2.5-9B与其他主流多模态模型的能力对比图
五、实际应用与部署优化
5.1 高效推理实现
Ovis2.5提供了多种推理优化方案,确保在实际应用中的高效性:
class OptimizedOvisInference:
    def __init__(self, model_path, device='cuda', use_flash_attention=True):
        self.model = AutoModelForCausalLM.from_pretrained(
            model_path,
            torch_dtype=torch.bfloat16,
            trust_remote_code=True
        ).to(device)

        self.tokenizer = AutoTokenizer.from_pretrained(model_path)
        self.device = device

        # 启用Flash Attention加速
        if use_flash_attention:
            self.model = self._enable_flash_attention(self.model)

        # 编译关键组件
        self.model = torch.compile(self.model)

    def _enable_flash_attention(self, model):
        """启用Flash Attention优化"""
        try:
            from flash_attn import flash_attn_qkvpacked_func

            def flash_attention_wrapper(q, k, v, attention_mask=None):
                return flash_attn_qkvpacked_func(
                    torch.stack([q, k, v], dim=2),
                    causal=True,
                    softmax_scale=None
                )

            # 替换原始注意力机制
            for module in model.modules():
                if hasattr(module, 'attention_fn'):
                    module.attention_fn = flash_attention_wrapper

            return model
        except ImportError:
            print("Flash Attention not available, using default attention")
            return model

    @torch.inference_mode()
    def generate(self, messages, max_new_tokens=3072, thinking_budget=2048, **kwargs):
        """优化后的生成方法"""
        # 预处理输入
        input_ids, pixel_values, grid_thws = self.model.preprocess_inputs(
            messages=messages,
            add_generation_prompt=True,
            enable_thinking=thinking_budget > 0
        )

        # 移动到设备
        input_ids = input_ids.to(self.device)
        pixel_values = pixel_values.to(self.device) if pixel_values is not None else None
        grid_thws = grid_thws.to(self.device) if grid_thws is not None else None

        # 创建注意力掩码
        attention_mask = create_attention_mask(input_ids, self.tokenizer)

        # 使用优化的生成策略
        outputs = self.model.generate(
            inputs=input_ids,
            pixel_values=pixel_values,
            grid_thws=grid_thws,
            attention_mask=attention_mask,
            max_new_tokens=max_new_tokens,
            thinking_budget=thinking_budget,
            use_cache=True,  # 启用KV缓存
            do_sample=True,
            temperature=0.7,
            top_p=0.9,
            **kwargs
        )

        return self.tokenizer.decode(outputs[0], skip_special_tokens=True)

    def stream_generate(self, messages, callback=None, **kwargs):
        """流式生成实现"""
        # 初始化流式状态
        stream_state = {
            'generated_tokens': [],
            'thinking_mode': False,
            'thinking_tokens': 0
        }

        # 生成token-by-token
        for token in self._stream_generator(messages, **kwargs):
            stream_state['generated_tokens'].append(token)

            # 检测思考模式
            if token == self.tokenizer.thinking_token:
                stream_state['thinking_mode'] = True

            # 更新思考token计数
            if stream_state['thinking_mode']:
                stream_state['thinking_tokens'] += 1

            # 调用回调函数
            if callback:
                callback(token, stream_state)

            yield token

        return stream_state

def create_attention_mask(input_ids, tokenizer):
    """创建优化的注意力掩码"""
    mask = torch.ones_like(input_ids)

    # 忽略填充token
    pad_token_id = tokenizer.pad_token_id or tokenizer.eos_token_id
    mask[input_ids == pad_token_id] = 0

    return mask
5.2 多模态输入处理优化
class MultimodalInputProcessor:
    def __init__(self, image_size=512, text_max_length=2048):
        self.image_size = image_size
        self.text_max_length = text_max_length
        self.image_transform = self._create_image_transform()

    def _create_image_transform(self):
        """创建图像预处理流水线"""
        return transforms.Compose([
            transforms.Lambda(lambda img: self._preserve_aspect_ratio(img)),
            transforms.Resize((self.image_size, self.image_size)),
            transforms.ToTensor(),
            transforms.Normalize(mean=[0.485, 0.456, 0.406],
                               std=[0.229, 0.224, 0.225])
        ])

    def _preserve_aspect_ratio(self, img):
        """保持原始宽高比进行填充"""
        if not isinstance(img, Image.Image):
            img = Image.fromarray(img)

        # 计算填充尺寸
        width, height = img.size
        max_size = max(width, height)

        # 创建新图像
        new_img = Image.new(img.mode, (max_size, max_size), (255, 255, 255))
        new_img.paste(img, ((max_size - width) // 2, (max_size - height) // 2))

        return new_img

    def process_inputs(self, messages):
        """处理多模态输入消息"""
        processed_images = []
        processed_texts = []
        image_sizes = []

        for message in messages:
            if message['role'] == 'user':
                for content in message['content']:
                    if content['type'] == 'image':
                        # 处理图像
                        img = self._load_image(content['image'])
                        img_tensor = self.image_transform(img)
                        processed_images.append(img_tensor)
                        image_sizes.append(img.size)  # 保存原始尺寸

                    elif content['type'] == 'text':
                        # 处理文本
                        processed_texts.append(content['text'])

        # 批处理图像
        if processed_images:
            image_batch = torch.stack(processed_images)
        else:
            image_batch = None

        # 编码文本
        text_input = self.tokenize_text(' '.join(processed_texts))

        return {
            'images': image_batch,
            'text_input': text_input,
            'image_sizes': image_sizes
        }

    def tokenize_text(self, text):
        """分词处理"""
        # 使用模型的分词器
        return self.tokenizer(
            text,
            max_length=self.text_max_length,
            padding='longest',
            truncation=True,
            return_tensors='pt'
        )
六、高级功能与定制化应用
6.1 视觉定位与指向理解
Ovis2.5支持先进的视觉定位能力,能够理解和生成空间坐标:
class VisualGroundingModule(nn.Module):
    def __init__(self, model_dim=512):
        super().__init__()

        # 定位头
        self.bbox_head = nn.Sequential(
            nn.Linear(model_dim, model_dim * 2),
            nn.GELU(),
            nn.LayerNorm(model_dim * 2),
            nn.Linear(model_dim * 2, 4),  # [x1, y1, x2, y2]
            nn.Sigmoid()  # 坐标归一化到[0,1]
        )

        self.point_head = nn.Sequential(
            nn.Linear(model_dim, model_dim),
            nn.GELU(),
            nn.LayerNorm(model_dim),
            nn.Linear(model_dim, 2),  # [x, y]
            nn.Sigmoid()
        )

        # 参考对象检测
        self.reference_detector = nn.TransformerDecoder(
            nn.TransformerDecoderLayer(d_model=model_dim, nhead=8),
            num_layers=2
        )

    def forward(self, visual_features, text_features, reference_phrases):
        """
        visual_features: 视觉特征 [B, N, D]
        text_features: 文本特征 [B, L, D]
        reference_phrases: 参考短语列表
        """
        # 检测参考对象
        reference_embeddings = self._encode_references(reference_phrases, text_features)

        # 融合视觉和参考信息
        fused_features = self.reference_detector(
            visual_features,
            reference_embeddings
        )

        # 生成边界框
        bbox_predictions = self.bbox_head(fused_features.mean(dim=1))

        # 生成点坐标
        point_predictions = self.point_head(fused_features.mean(dim=1))

        return {
            'bboxes': bbox_predictions,
            'points': point_predictions,
            'reference_embeddings': reference_embeddings
        }

    def _encode_references(self, reference_phrases, text_features):
        """编码参考短语"""
        reference_embeddings = []

        for phrase in reference_phrases:
            # 在文本中查找短语位置
            phrase_tokens = self.tokenizer.encode(phrase, add_special_tokens=False)
            phrase_embedding = self._find_phrase_embedding(phrase_tokens, text_features)
            reference_embeddings.append(phrase_embedding)

        return torch.stack(reference_embeddings)

    def decode_coordinates(self, predictions, image_sizes):
        """将归一化坐标解码为实际坐标"""
        decoded_bboxes = []
        decoded_points = []

        for i, (bbox, point) in enumerate(zip(predictions['bboxes'], predictions['points'])):
            img_width, img_height = image_sizes[i]

            # 解码边界框
            x1, y1, x2, y2 = bbox
            decoded_bbox = [
                x1 * img_width, y1 * img_height,
                x2 * img_width, y2 * img_height
            ]
            decoded_bboxes.append(decoded_bbox)

            # 解码点
            px, py = point
            decoded_point = [px * img_width, py * img_height]
            decoded_points.append(decoded_point)

        return {
            'bboxes': decoded_bboxes,
            'points': decoded_points
        }

# 使用示例
def process_grounding_request(model, image, question):
    """处理视觉定位请求"""
    # 检查是否包含定位请求
    if "bounding box" in question.lower() or "point" in question.lower():
        # 提取参考对象
        reference_phrases = extract_reference_phrases(question)

        # 执行定位
        results = model.grounding_module(
            model.vision_encoder(image),
            model.text_encoder(question),
            reference_phrases
        )

        # 解码坐标
        decoded_coords = model.grounding_module.decode_coordinates(
            results, [image.size]
        )

        return format_grounding_response(decoded_coords, question)

    else:
        # 普通问答处理
        return model.generate_response(image, question)
6.2 自定义思考策略配置
class ThinkingStrategyConfigurator:
    def __init__(self, base_strategies=None):
        self.strategies = base_strategies or self._get_default_strategies()
        self.current_strategy = 'balanced'

    def _get_default_strategies(self):
        """获取默认思考策略"""
        return {
            'minimal': {
                'enable_thinking': False,
                'max_new_tokens': 512,
                'temperature': 0.3,
                'top_p': 0.8
            },
            'balanced': {
                'enable_thinking': True,
                'thinking_budget': 1024,
                'max_new_tokens': 2048,
                'temperature': 0.7,
                'top_p': 0.9,
                'reflection_depth': 1
            },
            'deep': {
                'enable_thinking': True,
                'thinking_budget': 2048,
                'max_new_tokens': 4096,
                'temperature': 0.9,
                'top_p': 0.95,
                'reflection_depth': 2,
                'enable_revision': True
            },
            'creative': {
                'enable_thinking': True,
                'thinking_budget': 3072,
                'max_new_tokens': 5120,
                'temperature': 1.1,
                'top_p': 0.98,
                'reflection_depth': 1,
                'enable_divergent_thinking': True
            }
        }

    def configure_strategy(self, strategy_name, custom_params=None):
        """配置思考策略"""
        if strategy_name not in self.strategies:
            raise ValueError(f"Unknown strategy: {strategy_name}")

        strategy = self.strategies[strategy_name].copy()

        if custom_params:
            strategy.update(custom_params)

        self.current_strategy = strategy_name
        return strategy

    def auto_select_strategy(self, question, image_complexity=None):
        """根据输入自动选择最佳策略"""
        # 分析问题特征
        features = self._analyze_question(question)

        # 计算复杂度分数
        complexity_score = self._calculate_complexity_score(features, image_complexity)

        # 选择策略
        if complexity_score < 0.3:
            return self.configure_strategy('minimal')
        elif complexity_score < 0.6:
            return self.configure_strategy('balanced')
        elif complexity_score < 0.8:
            return self.configure_strategy('deep')
        else:
            return self.configure_strategy('creative')

    def _analyze_question(self, question):
        """分析问题特征"""
        features = {
            'length': len(question.split()),
            'has_why': 'why' in question.lower(),
            'has_how': 'how' in question.lower(),
            'has_explain': 'explain' in question.lower(),
            'has_calculate': any(op in question for op in ['+', '-', '*', '/', '=']),
            'has_comparison': 'compare' in question.lower() or 'vs' in question.lower(),
            'has_condition': 'if' in question.lower() or 'when' in question.lower()
        }
        return features

    def create_custom_strategy(self, name, parameters):
        """创建自定义思考策略"""
        self.strategies[name] = parameters
        return name

# 使用示例
def intelligent_response_generation(model, question, image, configurator):
    """智能响应生成"""
    # 自动选择策略
    strategy = configurator.auto_select_strategy(
        question,
        image_complexity=calculate_image_complexity(image)
    )

    # 配置生成参数
    generation_params = configurator.configure_strategy(strategy)

    # 生成响应
    response = model.generate(
        image=image,
        question=question,
        **generation_params
    )

    return response, strategy
结论:多模态AI的新里程碑
Ovis2.5-9B代表了多模态大语言模型领域的重要突破,其核心创新在于:
- 原生分辨率视觉处理:通过NaViT架构彻底解决了传统视觉编码中的信息损失问题
- 反思性推理机制:超越了简单的链式思维,实现了自我检查和修订的高级认知能力
- 高效架构设计:在9B参数规模下实现了与更大模型相媲美的性能表现
- 灵活的部署方案:支持从资源受限环境到高性能服务器的多种部署场景
技术影响与未来方向
Ovis2.5的成功验证了几个重要技术方向:
- 原生分辨率处理的价值:证明了保持原始视觉信息对复杂视觉任务的重要性
- 反思推理的有效性:展示了自我修正机制在提高推理准确性方面的巨大潜力
- 模型效率的优化:证明了通过架构创新而非单纯扩大参数规模来提升性能的可行性
未来发展方向包括:
- 扩展到更多模态(音频、视频、3D)
- 增强现实世界交互能力
- 改进推理效率和可解释性
- 开发更高级的自我监督学习范式
Ovis2.5-9B不仅为当前多模态AI应用提供了强大工具,更为未来通用人工智能的发展指明了重要技术路径。
参考资源:
- Ovis2.5-9B Model Card - HuggingFace模型页
- NaViT: Native Resolution Vision Transformer - 原生分辨率ViT论文
- Reflective Reasoning in Large Language Models - 反思推理研究
- OpenCompass Evaluation Platform - 开放评测平台
- FlashAttention: Fast and Memory-Efficient Exact Attention - 注意力优化技术
相关项目:
在线体验:

北京人形旗下天工造物具身智能开源社区,聚焦具身天工与慧思开物两大平台
更多推荐
 25
25 0
0- 0


 已为社区贡献4条内容

所有评论(0)